Removing Upper Intake Manifold (UIM) w/pics
 03-10-2011, 11:52 AM
#81
Junior Member

Join Date: Mar 2011
Location: Southern Illinois
Posts: 18
Very thorough walkthrough! I am a newbie with a 187,000 mile 95 SE with leaking valve cover. Dealer wants 400 plus to fix. If I had it done what else should I have done while it is all apart to avoid going back in anytime soon. I dont think I can do this job myself due to lack of time and mechanical ability.
 03-10-2011, 12:49 PM
#83


 04-21-2011, 04:56 PM
#86

Double check all of your wiring harnesses and make sure they are all plugged back in correctly. Also make sure your brake booster hose is on. I had to clean an EGR today and mine started right up after I was done.

 04-23-2011, 12:45 PM
#89
Junior Member

Join Date: Jul 2009
Posts: 43
Great post, I was able to replace my valve cover gaskets with these instructions. This site has been a blessing! I would advise anyone attempting this to be sure you have plenty of time and patience as some steps are very difficult such as those rear hoses behind the uim. I ended up cutting and replacing them which I figured would not hurt with the age of the car.


 07-03-2011, 12:13 PM
#92
 07-03-2011, 12:39 PM
#93
The gold line that has the rubber hose. It bends right in front of it so I assume it does, just looks like it will kink if I put it on. I bought this other nissan and its all taken apart. Thanks for the fast response by the way
07-03-2011, 01:21 PM
#94
IIRC that's one of the water lines going through the UIM at the EGR guide tube.
 07-03-2011, 04:50 PM
#96
07-29-2011, 11:38 PM
#97
Member

Join Date: May 2011
Posts: 160
Part 5:
Remove the 10mm bolt holding the EGR temperature sensor bracket onto the IACV. This bolt is hard to see - you can locate it by feel. You'll need a 3" extension or a deep socket. The EGR temp sensor wire is in the way - make sure to move it aside to keep from pinching it with the socket. (No pics for this - it's too hard to see).
Remove the 10mm bolt holding the EGR temperature sensor bracket onto the IACV. This bolt is hard to see - you can locate it by feel. You'll need a 3" extension or a deep socket. The EGR temp sensor wire is in the way - make sure to move it aside to keep from pinching it with the socket. (No pics for this - it's too hard to see).
 could someone please describe where this bolt is or even show me a picture of where to look? i don't even know where i could look for it in the fsm x.x
thanks jholley
 was able to take off the uim by following this guide. there were two extra hoses near the iacv that i had to take off as well as a couple random bolts that seemed necessary to remove
Last edited by Perseus; 07-30-2011 at 11:31 PM.
07-30-2011, 06:26 AM
#98

That bolt holds the grey connector to the IACV. Due to the narrow gap between the IACV and firewall you cannot view the location of that bolt until the IACV is removed. You need to feel it's location on the far right side of the IACV. I used a 10mm socket with a 3" extension for removal.
01-07-2012, 12:55 PM
#99
Junior Member

Join Date: Dec 2011
Location: Florida.....Space Coast
Posts: 21
P1105 could indicate the MAP/BARO solenoid valve, instead of the MAP sensor. The solenoid valve has a vacuum hose that connects to the bottom of the throttle body. It's very easy to miss this and leave that hose disconnected, if you've had the throttle body/UIM off. If that hose is disconnected, it will throw a P1105.
I checked all hose(s) possibilities being disconnected. There was one that was disconnected like you mentioned above. The funny part is, I do not remember pulling or disconnecting this one. And when I look at it (without touching) it looks connected, but when I pulled it... sure enough it was not even connected. I must have pulled it during the UIM fixes.
So far the code is gone... Whew! thanks again. This forum is AWESOME!
same symptom here. Just recently had the UIM off. Now I have P1105.
Can you provide any hints to find the suspect hose?
 03-25-2012, 08:59 PM
#101
Newbie - Just Registered

Join Date: Jan 2010
Location: San Jose, CA
Posts: 2
Great thread...thanks!! just finished the front and rear valve cover gaskets.
The small rear hose wasn't as bad as I expected... if you do all steps first and leave it for last as the OP stated (and I should have read more cafefully first) you can elevate the UIM and reach under it pretty good to get to it.
Going back used a little WD40 on the hose and a screw tube clamp and it slid right in. Just had to hold it in place from the drivers side while using a 1/4" socket drove to snug it up.
Used carb cleaner to disolve the crud out of the EGR tube. I droped the gasket and was able to pick it up with a magnet on a stick since the OEM has metal in it (these magnets are great for recovery when working on a car).
Noticed a lot of varnish in the UIM so I used Sea Foam after it was all buttoned up. It seems to have more life now and alot less drips.
Spent about $50 on an Evergreen head gasket set since the price of the valve cover gaskets alone were about the same. Instead of $500 to have a shop replace the F&R valve cover gaskets, I got through it for about $80 total and have a few more tools to boot.
Thanks to the OP and to all that contributed to this thread.
03-29-2012, 02:03 PM
#102
Great Thread!! I just finished replacing my rear valve cover gasket. Took my time and was 5 hrs. Just make sure you have the gaskets and maybe some coolant hoses in case they are brittle. I just cut off the one to the intake and replaced it. Saved me a lot of time. No leaks so far!! 207k miles Thanks to everyone that posted info!!
04-02-2012, 12:57 PM
#103
Newbie - Just Registered

Join Date: Oct 2011
Posts: 3
Great info!
Another THX for posting this write up. I have a misfire on cyl 5 that comes and goes. New plugs in, did the coil swap and code comes back still on cyl 5. Next is a suspect injector and I'm still trying to decide if I will tackle it or let my mechanic take my money.
I will definitely use this post if I decide to tear into it.
Thanks again from this MAX newbie!
(no so much a newbie at tearing stuff apart
Daniel
I will definitely use this post if I decide to tear into it.
Thanks again from this MAX newbie!
(no so much a newbie at tearing stuff apart
Daniel
05-04-2012, 07:34 PM
#104
Newbie - Just Registered

Join Date: May 2012
Posts: 2
Life Saver...
or Money saver. Thanks man for writing this post, these instructions were a big help in taking my UIM off my '99 Maxima. Gotta admit reading this gave me the courage to dig this far into my engine. I am usually only a brakes and oil kinda guy. Few alternators back in the day but not much else till this endeavor.
Thanks Mods for giving this the sticky, made it much easier to find.
Might be stupid question but is there a way to clean up the UIM inside before I put it back on, is that something you do? Any other suggestions as I am just about to put it all back together.
Thanks again all you have posted as there was valuable information through out the post.
Edit: ARghh...did all this and found out that the fuel injector I was after is fine. All 6 gave me back the same resistance reading on my muti-meter. This is what I get for not trying to change out a coil first....
Last edited by greenin3; 05-04-2012 at 08:16 PM.
09-09-2012, 04:02 PM
#105
Junior Member

Join Date: Apr 2009
Posts: 26
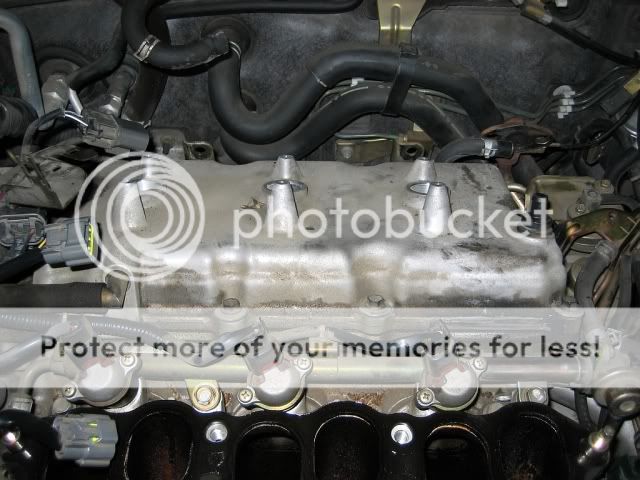
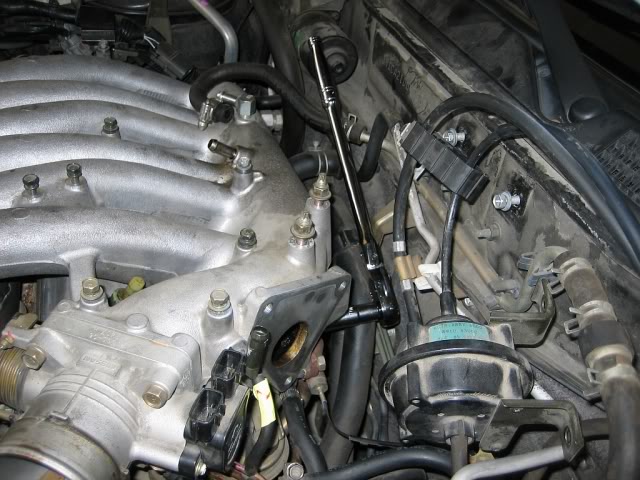
NICE POST
I AM READY TO TAKE OUT UIM TO REPLACE GASKET AS YOU SEE IN THIS PICTURES IT IS LEAKS. ALSO IN 2ND PICTURE IF YOU LOOK FROM PASSENGER SIDE I SEE A SENSOR AND I SAW ALL THE AREA IS SOAKED IS SOMETHING LEAKING LEAKING FROM HERE. IS ANYBODY HAVE IDEA HOW CAN I FIX THIS


I AM READY TO TAKE OUT UIM TO REPLACE GASKET AS YOU SEE IN THIS PICTURES IT IS LEAKS. ALSO IN 2ND PICTURE IF YOU LOOK FROM PASSENGER SIDE I SEE A SENSOR AND I SAW ALL THE AREA IS SOAKED IS SOMETHING LEAKING LEAKING FROM HERE. IS ANYBODY HAVE IDEA HOW CAN I FIX THIS
09-09-2012, 04:59 PM
#106

NICE POST
I AM READY TO TAKE OUT UIM TO REPLACE GASKET AS YOU SEE IN THIS PICTURES IT IS LEAKS. ALSO IN 2ND PICTURE IF YOU LOOK FROM PASSENGER SIDE I SEE A SENSOR AND I SAW ALL THE AREA IS SOAKED IS SOMETHING LEAKING LEAKING FROM HERE. IS ANYBODY HAVE IDEA HOW CAN I FIX THIS
I AM READY TO TAKE OUT UIM TO REPLACE GASKET AS YOU SEE IN THIS PICTURES IT IS LEAKS. ALSO IN 2ND PICTURE IF YOU LOOK FROM PASSENGER SIDE I SEE A SENSOR AND I SAW ALL THE AREA IS SOAKED IS SOMETHING LEAKING LEAKING FROM HERE. IS ANYBODY HAVE IDEA HOW CAN I FIX THIS
CAM sensor... the oring is shot....pretty common so ive seen as of recently, you can buy it from nissan OR buy a multipack at the parts store and replace the oring....ive replaced mine already and its leaking again so this time im going to call the dealer...although im replacing my sensor this week to cause mines on its way out..but its the camshaft sensor...


 04-16-2013, 07:25 AM
#109
Newbie - Just Registered

Join Date: Apr 2013
Posts: 8
EGR Guide Tube Removal without the hacksaw
Great Thread guys...
Planning to do this this weekend...
How do you remove the EGR GUIDE TUBE with using a hacksaw on the bolt to get it out...
I think I read in from mrglynis reply in this thread...
Please help... Thanks
Planning to do this this weekend...
How do you remove the EGR GUIDE TUBE with using a hacksaw on the bolt to get it out...
I think I read in from mrglynis reply in this thread...
Please help... Thanks
04-16-2013, 07:53 AM
#110

Originally Posted by toby99
Great Thread guys...
Planning to do this this weekend...
How do you remove the EGR GUIDE TUBE with using a hacksaw on the bolt to get it out...
I think I read in from mrglynis reply in this thread...
Please help... Thanks
Planning to do this this weekend...
How do you remove the EGR GUIDE TUBE with using a hacksaw on the bolt to get it out...
I think I read in from mrglynis reply in this thread...
Please help... Thanks
http://forums.maxima.org/4th-generat...g-dummies.html http://forums.maxima.org/4th-generat...g-dummies.html
This should explain it. And might as well clean your EGR while you're there. Haha.
Posted from Maxima.org App for Android
08-28-2013, 07:33 AM
#111
Junior Member

Join Date: Oct 2003
Posts: 24
When you see the EGR tube gets clogged, it is better to unclog this carbon built-up inside the tube. If not, the check engine light will be on eventually. Use a metal wire brush stick and carburetor clean spray for this job will be the best. See my post at http://forums.maxima.org/4th-generat...el-0302-a.html
08-28-2013, 08:51 AM
#112

When you see the EGR tube gets clogged, it is better to unclog this carbon built-up inside the tube. If not, the check engine light will be on eventually. Use a metal wire brush stick and carburetor clean spray for this job will be the best. See my post at http://forums.maxima.org/4th-generat...el-0302-a.html
 05-07-2014, 11:00 AM
#113
Senior Member

Join Date: Jan 2011
Location: Central AR
Posts: 3,041
Does anyone have any tricks or tips for dealing with the (read PITA) U-shaped coolant hose at the back of the UIM described on page 7 in this thread? I see the hose clamp tools listed in this thread. I aim to order the Craftsman hose clamp tool unless there is a better alternative.
On two past UIM removal/reinstallation projects, I have used a longer hose (~12 inches) than the OEM U shaped hose. If I remember correctly, I had to secure the excess hose (e.g. loop) to the back of the firewall to keep it from getting too close to the exhaust manifold. The extra hose provided extra working room for reinstalling the UIM. I'm looking for ideas before I start 4th gen UIM re-installation #3.
As a side note, I invented some new swear words during my first UIM coolant hose re-installation before I decided to use a longer hose.
On two past UIM removal/reinstallation projects, I have used a longer hose (~12 inches) than the OEM U shaped hose. If I remember correctly, I had to secure the excess hose (e.g. loop) to the back of the firewall to keep it from getting too close to the exhaust manifold. The extra hose provided extra working room for reinstalling the UIM. I'm looking for ideas before I start 4th gen UIM re-installation #3.
Part 7:
This will reveal the two coolant hoses on the back of the UIM. It's an extreme PITA to loosen the hose clamps and pull off these hoses. When you pull on them, you just pull the UIM and your assistant toward you. It took me a lot of patience and a lot of swearing to get them off. Getting them back on is no fun either. Maybe somebody can share a trick for this.
This will reveal the two coolant hoses on the back of the UIM. It's an extreme PITA to loosen the hose clamps and pull off these hoses. When you pull on them, you just pull the UIM and your assistant toward you. It took me a lot of patience and a lot of swearing to get them off. Getting them back on is no fun either. Maybe somebody can share a trick for this.
 05-07-2014, 11:47 AM
#114

Does anyone have any tricks or tips for dealing with the (read PITA) U-shaped coolant hose at the back of the UIM described on page 7 in this thread? I see the hose clamp tools listed in this thread. I aim to order the Craftsman hose clamp tool unless there is a better alternative.
On two past UIM removal/reinstallation projects, I have used a longer hose (~12 inches) than the OEM U shaped hose. If I remember correctly, I had to secure the excess hose (e.g. loop) to the back of the firewall to keep it from getting too close to the exhaust manifold. The extra hose provided extra working room for reinstalling the UIM. I'm looking for ideas before I start 4th gen UIM re-installation #3.
As a side note, I invented some new swear words during my first UIM coolant hose re-installation before I decided to use a longer hose.
On two past UIM removal/reinstallation projects, I have used a longer hose (~12 inches) than the OEM U shaped hose. If I remember correctly, I had to secure the excess hose (e.g. loop) to the back of the firewall to keep it from getting too close to the exhaust manifold. The extra hose provided extra working room for reinstalling the UIM. I'm looking for ideas before I start 4th gen UIM re-installation #3.
As a side note, I invented some new swear words during my first UIM coolant hose re-installation before I decided to use a longer hose.
cut it and bypass it because all it does is cool where the egr tube connects..
05-07-2014, 11:57 AM
#115

 Aren't those the heater core hoses? And why would an EGR need cooling?
 05-07-2014, 12:41 PM
#116
Senior Member
Join Date: Jan 2011
Location: Central AR
Posts: 3,041
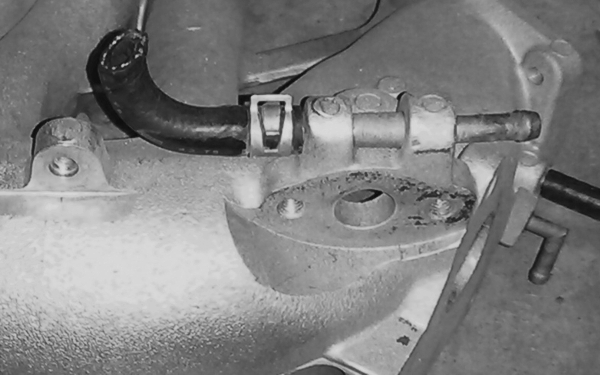
Tonight I'll post a picture of the picture of the hose connection on the UIM.
In the picture below it should be sitting behind the EGR pipe mounting for the EGR temp sensor.
[IMG]="http://i888.photobucket.com/albums/ac90/ATTappman/EGRtubebolt.jpg"][/IMG]
Last edited by CS_AR; 05-07-2014 at 12:43 PM.
05-07-2014, 03:25 PM
#117
Nope look at the connection its just a little piece of pipe right below the egr inlet connected to the egr valve if i knew how i would post pictures as i did this job over the week end
05-07-2014, 07:20 PM
#118
Senior Member
Join Date: Jan 2011
Location: Central AR
Posts: 3,041
Does running coolant through the little pipe keep the UIM from cracking under heat from the EGR?
I get the idea for cooling the EGR contact area, though I wonder about the benefit provided by the external pipe concept.
So I'm scratching my head over this one..

Last edited by CS_AR; 05-07-2014 at 07:50 PM.
05-07-2014, 10:48 PM
#119
Here's a picture of the hose (cut for plenum removal) and little pipe on the UIM body.
Does running coolant through the little pipe keep the UIM from cracking under heat from the EGR?
I get the idea for cooling the EGR contact area, though I wonder about the benefit provided by the external pipe concept.
So I'm scratching my head over this one..
....
Does running coolant through the little pipe keep the UIM from cracking under heat from the EGR?
I get the idea for cooling the EGR contact area, though I wonder about the benefit provided by the external pipe concept.
So I'm scratching my head over this one..
....
05-08-2014, 03:31 AM
#120
Senior Member
Join Date: Jan 2011
Location: Central AR
Posts: 3,041
Take a look at Steps 17, 18 and Pic 6 in the following PDF instructions on Page 2 from NWP Engineering. I like the bypass idea. Bypassing the little coolant pipe can be a game changer for UIM re-inatallation.
Note:
17) Install the brass coolant bypass fitting by connecting the two coolant hoses together. Make sure the hose clamps are securely fastened to prevent coolant leaks.
18) Use the two high temperature cable ties that are supplied in the kit and
secure the coolant bypass hoses to the heater hoses on the firewall to move
them away from the EGR tube. (Pic 6)
http://www.nwpengineering.com/VQ30DE_4th_gen.pdf
:
:
Last edited by CS_AR; 05-08-2014 at 03:36 AM.