The definitive radiator core support thread
 08-07-2012, 07:51 PM
#1

The definitive radiator core support thread
As many of you may know the radiator core support is a known "weak point" on the A32 chassis. This is an extremely common issue among A32's from "wet" states. This thread will address a number of key points with this issues
1)Signs of a bad radiator core support
2)How to replace said radiator core support
3)And why you shouldnt use a cheap radiator core support
I:
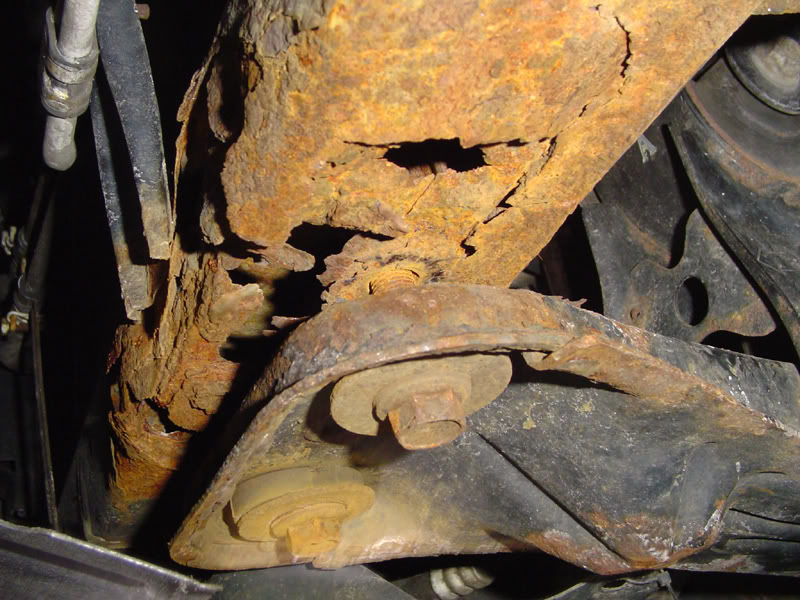
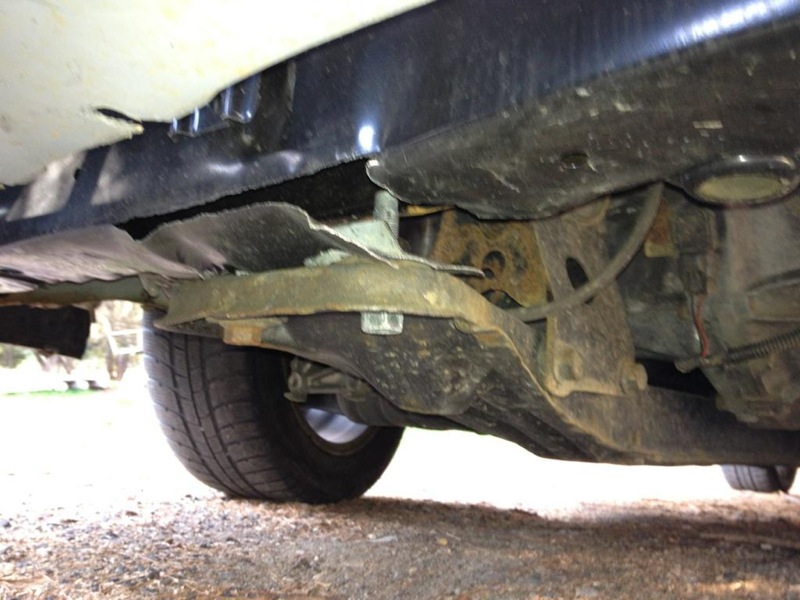
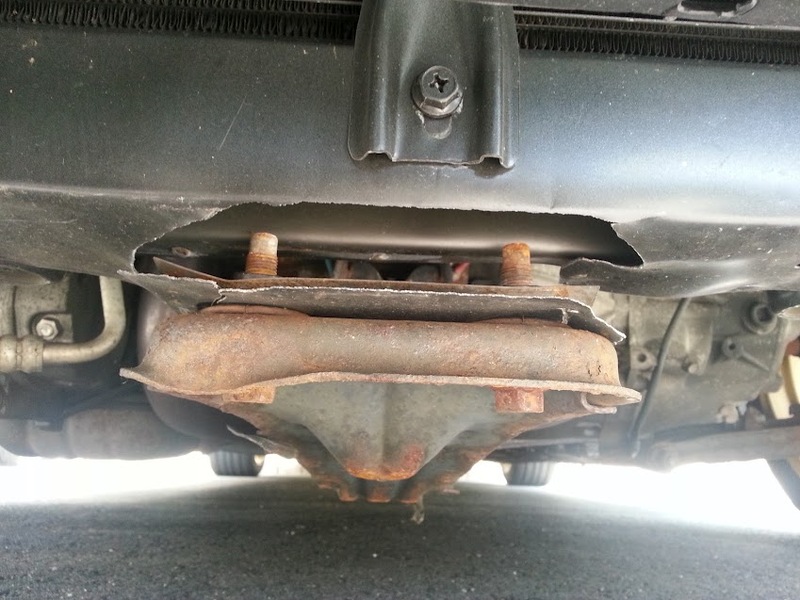
lets start off with spotting a failing core support (NOTE: The images shown are of very, very badly rusted supports) .
II:
we move on to How To replace the core support and what is the proper parts to be used and where you can purchase them.
To correctly replace the core support, the old unit will need to be cut out and the new unit will need be be bolted and welded in place..This job is definitely not one of the easier things to do an A32 and will likely need to be done by a professional or a fairly knowledgeable DIY mechanic with access to air tools and a welder.
Their are two common methods to to replacing the core support; one is replacing just the lower support (under the radiator) and the other is replacing the entire front core support. Either of these parts can be sourced at your local Nissan dealer or through a reputable online dealer such as Courtesy Nissan Parts.
PARTS
I'm not going to post all of the info in the following threads ... please follow the links for more information
JSutter - How to: Radiator support on life support.... fixed!
95naSTA - Lower Radiator Support Replacement Pics
http://forums.maxima.org/4th-generat...nt-photos.html
III:
we will move on to why you should buy an OEM core support and not a cheap piece off of ebay or rockauto. This is one of those things that "if it sounds too good to be true, it probably is"...meaning that $50 coresupport on ebay may sound like a steal of a deal right now, but 3 months down the road when you notice your engine cradle is sitting 3 inches off the ground and you have to pay to do all of this work again, you will wish that you had just spent the extra money to begin with because in the long run an OE piece is going to be the cheaper AND better investment.
I will let the images speak for themselves


If you believe anything should be added or changed please let me know.
1)Signs of a bad radiator core support
2)How to replace said radiator core support
3)And why you shouldnt use a cheap radiator core support
I:
lets start off with spotting a failing core support (NOTE: The images shown are of very, very badly rusted supports) .
II:
we move on to How To replace the core support and what is the proper parts to be used and where you can purchase them.
To correctly replace the core support, the old unit will need to be cut out and the new unit will need be be bolted and welded in place..This job is definitely not one of the easier things to do an A32 and will likely need to be done by a professional or a fairly knowledgeable DIY mechanic with access to air tools and a welder.
Their are two common methods to to replacing the core support; one is replacing just the lower support (under the radiator) and the other is replacing the entire front core support. Either of these parts can be sourced at your local Nissan dealer or through a reputable online dealer such as Courtesy Nissan Parts.
PARTS
- This link takes you the Front Apron & Radiator Core Support diagram and parts list LINK
- The part number through Courtesy for the entire support is 62500 and HERE is a link.
- The part number through Courtesy for the lower support is 62530M and HERE is a link
I'm not going to post all of the info in the following threads ... please follow the links for more information
JSutter - How to: Radiator support on life support.... fixed!
95naSTA - Lower Radiator Support Replacement Pics
http://forums.maxima.org/4th-generat...nt-photos.html
III:
we will move on to why you should buy an OEM core support and not a cheap piece off of ebay or rockauto. This is one of those things that "if it sounds too good to be true, it probably is"...meaning that $50 coresupport on ebay may sound like a steal of a deal right now, but 3 months down the road when you notice your engine cradle is sitting 3 inches off the ground and you have to pay to do all of this work again, you will wish that you had just spent the extra money to begin with because in the long run an OE piece is going to be the cheaper AND better investment.
I will let the images speak for themselves
If you believe anything should be added or changed please let me know.
Last edited by tigersharkdude; 11-05-2013 at 10:34 AM.


 08-08-2012, 09:05 PM
#8
Senior Member


Join Date: Sep 2010
Location: Jacksonville, FL
Posts: 10,349
This is a 5th gen problem as well.
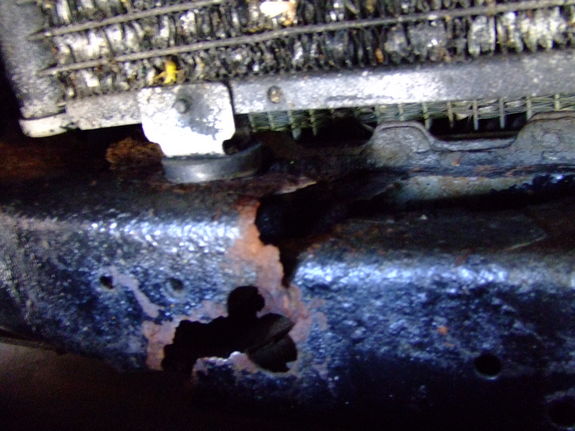
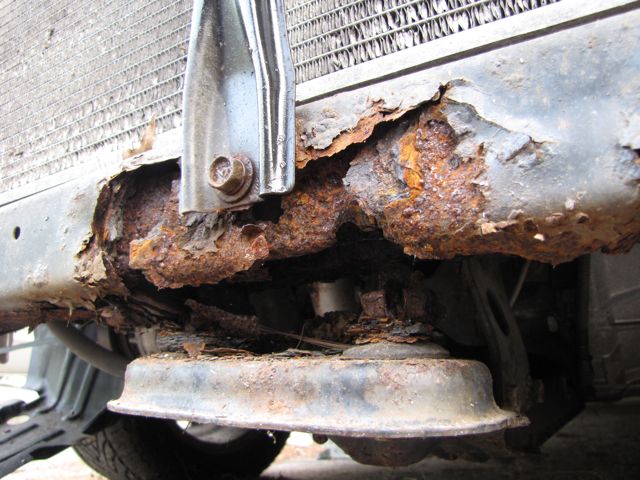
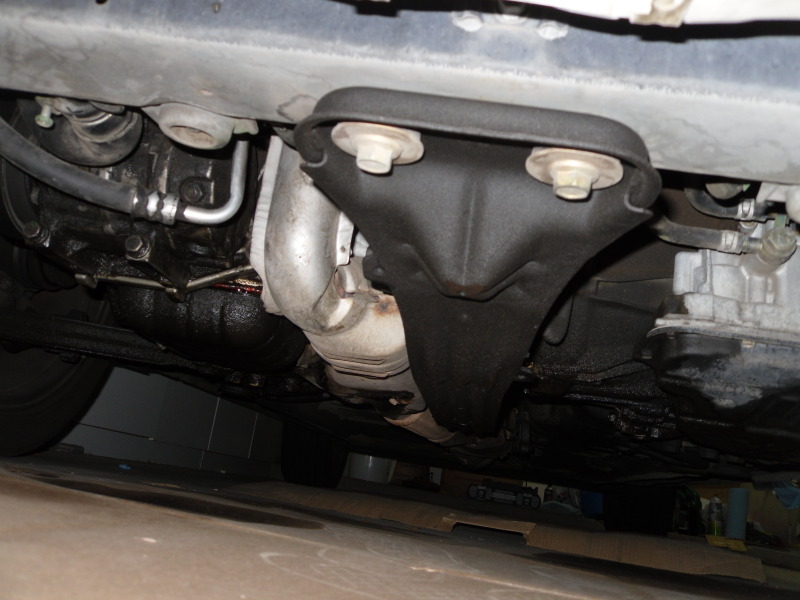
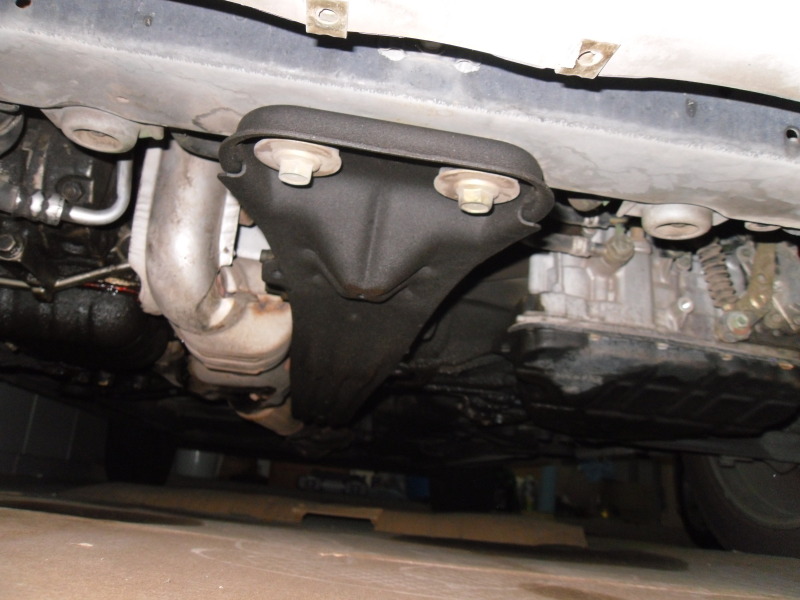
And for those who are in dry states who think they are safe, don't be quite so sure. This problem starts from the inside-out, so if you see a bubble in the paint, jab at it with a large screwdriver to check it out. Once they start rusting, the rust spreads pretty fast.
Here's a couple pics of my old support after it was cut out.
08-08-2012, 09:41 PM
#9
THE PROBLEM RELIES SOMEHWAT IN THE PREP WORK OF THE OEM SUPPORT. WHEN YOU REPLACE YOUR SUPPORT, MAKE SURE YOU USE MAD SEAM SEALER, AND UNDERCAOT THE **** OUT OF IT. AND THEN EVEN BASE COAT IT. AND BARE METAL SPOTS SHOULD BE PRIMED AND SANDED, THE WHOLE AREA SHOULD ALSO BE PRIMED AND SANDED AFTER ALL THE FOREMENTIONED THINGS ARE DONE. AND AFTER THAT, BODY FILLER SHOULD BE APPLIED ON THE GRINDED WELD ZONES TO MAKE THE MATING SURFACES LKE BRAND NEW. AND THEN YOU WANT TO SPRAY CAVETY WAX INSIDE EVERY SINGLE ACCESS WHOLE THERE IS ON THE SUPPORT. THE TYPE OF WELDING USED TO DO THIS IS SPOT WELDING. WHAT YOU WANT TO DO IS GET A HOLE PUNCH AND PUNCH A 1/4 HOLE IN THE NEW SUPPORT, IN THE SAME SPOTS THAT THE OLD SUPPORT HAD SPOTWELDS IN. YOU THEM LINE THE NEW SUPPORT UP WITH BOLTS, AND MAD CLAMPS TO ENSURE ITS LINES UP PERFECTLY BEFORE YOU MAKE ANY TACK WELDS. FIT IN PLACE ALL BOLTS IN ONLY HAND TIGHT. THEN TAK WELD INTO PLACE TO SUPPORT WHILE PLUG WELDING YOUR HOLES. IF YOU GO THE THESE EXTREMES, YOUR SUPPORT WITH NEVER RUST AGAIN.
Last edited by GGENIUS; 08-09-2012 at 09:44 AM.


 but I doubt us California folk have to worry about it, at least, not until maybe another 10-20 years.....
  08-09-2012, 09:21 AM
#16
Senior Member

Join Date: Nov 2000
Posts: 3,883
 08-09-2012, 12:28 PM
#19
THE PROBLEM RELIES SOMEHWAT IN THE PREP WORK OF THE OEM SUPPORT. WHEN YOU REPLACE YOUR SUPPORT, MAKE SURE YOU USE MAD SEAM SEALER, AND UNDERCAOT THE **** OUT OF IT. AND THEN EVEN BASE COAT IT. AND BARE METAL SPOTS SHOULD BE PRIMED AND SANDED, THE WHOLE AREA SHOULD ALSO BE PRIMED AND SANDED AFTER ALL THE FOREMENTIONED THINGS ARE DONE. AND AFTER THAT, BODY FILLER SHOULD BE APPLIED ON THE GRINDED WELD ZONES TO MAKE THE MATING SURFACES LKE BRAND NEW. AND THEN YOU WANT TO SPRAY CAVETY WAX INSIDE EVERY SINGLE ACCESS WHOLE THERE IS ON THE SUPPORT. THE TYPE OF WELDING USED TO DO THIS IS SPOT WELDING. WHAT YOU WANT TO DO IS GET A HOLE PUNCH AND PUNCH A 1/4 HOLE IN THE NEW SUPPORT, IN THE SAME SPOTS THAT THE OLD SUPPORT HAD SPOTWELDS IN. YOU THEM LINE THE NEW SUPPORT UP WITH BOLTS, AND MAD CLAMPS TO ENSURE ITS LINES UP PERFECTLY BEFORE YOU MAKE ANY TACK WELDS. FIT IN PLACE ALL BOLTS IN ONLY HAND TIGHT. THEN TAK WELD INTO PLACE TO SUPPORT WHILE PLUG WELDING YOUR HOLES. IF YOU GO THE THESE EXTREMES, YOUR SUPPORT WITH NEVER RUST AGAIN.
use a good weld through primer.
yes you want to punch holes in the new metal and plug weld it.
a quality urethane undercoating would be good on the outside surfaces.
cavity wax is a good idea for the inside areas.
you need bare metal so the weld sticks...you can't weld over paint (aside from weld through primer)
big text and all caps = super annoying.
08-09-2012, 02:05 PM
#20
smearing seam sealer is pretty much a waste of time.
use a good weld through primer.
yes you want to punch holes in the new metal and plug weld it.
a quality urethane undercoating would be good on the outside surfaces.
cavity wax is a good idea for the inside areas.
you need bare metal so the weld sticks...you can't weld over paint (aside from weld through primer)
big text and all caps = super annoying.
when i say bare metal spots, im talking about after your weld on the support, any left over bare metal should be primed.
when i did mine, i used seam sealer around the crossmember that bolts into the lower radiatior support, and around some places where rust appears most by seams.
but yes, i did forget weld through primer. definitely use that too. all of these combined will create a flawless rad support.
 08-10-2012, 07:50 AM
#25

 08-11-2012, 08:32 AM
#31
Senior Member
Join Date: Sep 2010
Location: Jacksonville, FL
Posts: 10,349
 08-11-2012, 08:36 PM
#34
09-22-2012, 03:59 PM
#36
Junior Member

Join Date: Feb 2012
Location: Delaware, OH
Posts: 26
WOW!!!
Looking at these pics I had to crawl under my "lifetime in Ohio" 2000 Maxima. I couldn't see things real well due to the plastic cover. Through the cracks, I could see that it was all rust around where the support from the hood latch was supposed to be attached!
Are there any differences between fixing this on a 4th gen and a 5th gen?
Thanks, Ron
Last edited by isrb710; 09-23-2012 at 09:49 PM.

 12-07-2016, 06:45 PM
#39
Senior Member

Join Date: Apr 2016
Location: Florida
Posts: 972

I got one rusted real bad and am lining it up to replace. These pictures are horrifying me! Which brand are these supports and did they come with a warranty? It looks like they broke from applying the lifting cup to the Nissan Jack point.
Last edited by maximatech12; 12-07-2016 at 06:57 PM.
12-11-2016, 07:54 AM
#40
Senior Member
Join Date: Apr 2016
Location: Florida
Posts: 972
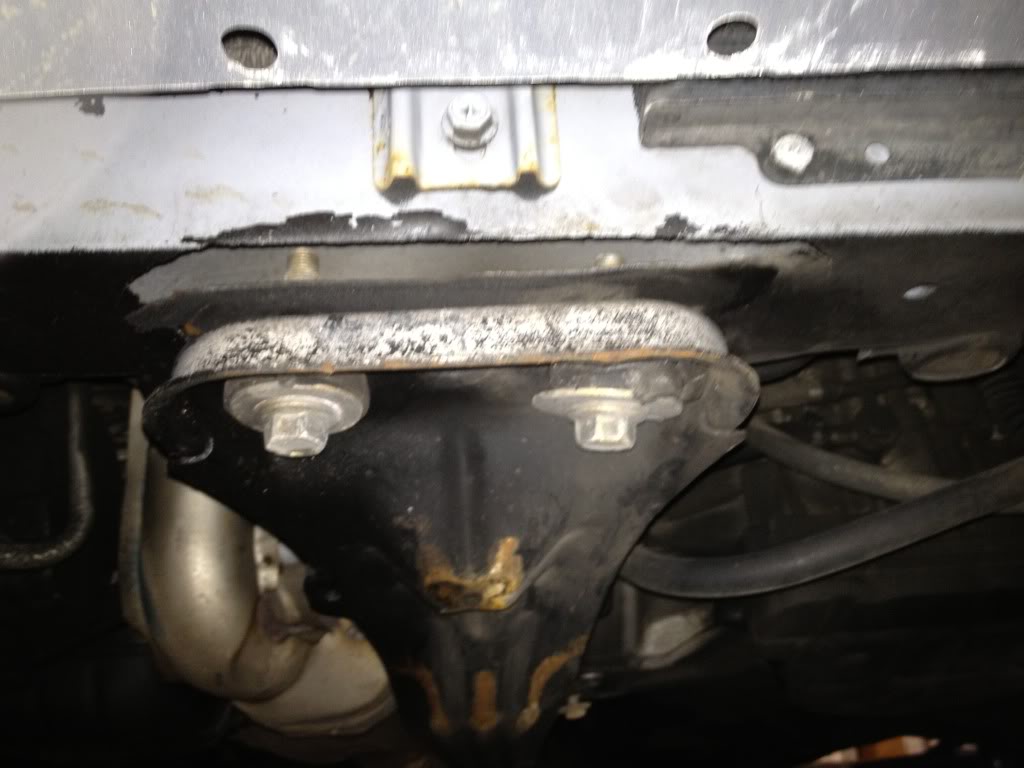
I don't think you HAVE to get a Nissan genuine support.
I think these pics above are from defective aftermarket supports.
The aftermarket supports look pretty solid!
I don't think they're too much different than what your getting from Nissan
I think these pics above are from defective aftermarket supports.
The aftermarket supports look pretty solid!
I don't think they're too much different than what your getting from Nissan

