Motor mounts without dropping cross member
 10-17-2014, 09:10 PM
#1
Senior Member
Thread Starter

Join Date: Sep 2013
Location: Oshkosh WI
Posts: 327
Motor mounts without dropping cross member
Is it possible to replace the motor mounts without dropping the cross member? I have a "custom mount" done on the back by the previous owner. Its very solid, but a PITA to get off and back on, I'm not certain it will go back on, there is some rust on the bolts. Basically he drilled out the bolt holes and somehow got bolts inside the top part of the subframe, and dropped them through the crossmember. Everything is on there rock solid, but I don't want to get it off and not be able to get it on.
Can I get the two torque motor mounts off by themselves? I want to press in ES ones. I have a manual with an e-bay y pipe if that makes a difference. Thanks in advance!
Can I get the two torque motor mounts off by themselves? I want to press in ES ones. I have a manual with an e-bay y pipe if that makes a difference. Thanks in advance!


 10-18-2014, 09:40 AM
#5

There may be another way BUT I don't know if there is enough room to do it. You would have to disconnect all 4 engine mounts and lift the engine. Unbolting the mount from the engine is the big "I don't know".
I'm sure it would be more work than taking the bolts out of the crossmember.
I'm sure it would be more work than taking the bolts out of the crossmember.
10-18-2014, 11:33 AM
#6
Senior Member
Thread Starter
Join Date: Sep 2013
Location: Oshkosh WI
Posts: 327
Do you need to drop the member to get the pressure off the mounts? I have not done mounts on this car before, It looks like there enough room to get the mounts off the car once they are unbolted. Could I jack up the engine to get the pressure off?
I think I can get the cross member off, but it might not go on so well
I think I can get the cross member off, but it might not go on so well
10-18-2014, 12:49 PM
#7

Mounts cant be removed with the member on because the member is in the way. Most people actually remove the member with the mounts still attached because its easier that way.
Im sure theoretically there is some method to get them off without touching the cross member but it would be WAY harder. The cross member is 4 bolts vs spending 10 times longer disembowling your car to do the same task.
Kinda hard to see what you mean about a custom mount though, pics would help. Just hope the previous owner didnt rig it up thinking "f it, i'm never going to have to remove it"
10-18-2014, 01:30 PM
#8
Senior Member
Thread Starter
Join Date: Sep 2013
Location: Oshkosh WI
Posts: 327
Thats exactly what he thought. He drilled the holes out in the subframe, and put two bolts hanging down from the subframe throught the cross member. I can't take pics now, or I would. It looks like it holding in there tight enough, but I don't know whats going to happen when I take them off. With the bolts hanigng down for a couple years, it caught all kinds of salt and crap that rusted them up. I was hoping I wouldn't have to mess with it, but my mounts are shot and I want ES ones in there.
Has anybody had to mount the member to the subframe without using the stock bolts? IE: rusted or snapped bolts I'm curuous how they did it. I can see myself having to but the bolts off and being left having find a want to re-attach it. I can tap the holes in the subframe, but they are pretty big, around 7/16 or 1/2.
Has anybody had to mount the member to the subframe without using the stock bolts? IE: rusted or snapped bolts I'm curuous how they did it. I can see myself having to but the bolts off and being left having find a want to re-attach it. I can tap the holes in the subframe, but they are pretty big, around 7/16 or 1/2.
10-18-2014, 04:22 PM
#10
You might end up having to buy a new mount and/or crossmember, or it might be easier that is. Again very hard to tell whats going on without pics. Get pics when you can so we can see whats happening in there and jape and sneer at your misery 
10-18-2014, 04:49 PM
#11
Senior Member
Thread Starter
Join Date: Sep 2013
Location: Oshkosh WI
Posts: 327
Its on the other side, the back side of the cross member mount. The front side by the radiator appears to be the factory bolts. Granted I have a little bit of rust, but I don't want to replace it this year if I don't have to, doing headers and power steering pump left some good marks on my garilla hands. I'll post up pics when I get a chance to crawl under there.
10-18-2014, 10:46 PM
#12
I've done the front mount on an I35 without removing anything but the radiator and fans. We had the radiator out since that was getting replaced as well so I didn't try with the rad in.
Do you need to replace the rear mount?
Do you need to replace the rear mount?
11-02-2014, 07:27 AM
#15
Senior Member
Thread Starter
Join Date: Sep 2013
Location: Oshkosh WI
Posts: 327
One other quick question while I am contemplating what to do. Its getting below freezing now at night, which is not giving me any encouragement.
Is there any difference if I go to the junkyard and pull some 5.5 gen mounts? From what I read on here it looks like they bolt up, but are they any better/stiffer than the 4th gen stock ones? My other question is would the electric mounts be any good? From looking at the wiring diagram, I could wire them into a switch to make them switch on and off when I want it stiffer/softer. Are the electric mounts in the firm setting more firm than the manual mounts? Just throwing options out there, its a lot easier/cheaper to get something from the junkyard, and there are several 5.5 gens in my local yard. I'm not against using ES, that would be ideal, but at 80 bucks, then I have to try to get the old ones out and press new ones in, I don't want this costing me $200 to get everything done.
Is there any difference if I go to the junkyard and pull some 5.5 gen mounts? From what I read on here it looks like they bolt up, but are they any better/stiffer than the 4th gen stock ones? My other question is would the electric mounts be any good? From looking at the wiring diagram, I could wire them into a switch to make them switch on and off when I want it stiffer/softer. Are the electric mounts in the firm setting more firm than the manual mounts? Just throwing options out there, its a lot easier/cheaper to get something from the junkyard, and there are several 5.5 gens in my local yard. I'm not against using ES, that would be ideal, but at 80 bucks, then I have to try to get the old ones out and press new ones in, I don't want this costing me $200 to get everything done.
11-02-2014, 11:59 AM
#16
The 5.5 mounts would physically fit, but I think there is a difference in the stiffness between the 4th and 5th gens. Nissan does have different part numbers for the 2 generations. Don't know if it you would be able to feel any differences.
I wouldn't waste my time with the electric mounts. When the electric mount is in the firm mode, it is supposed to be the same as the solid rubber mount. The soft mode is for when the engine is idling. If the engine has a rough idle, the softer mode will hide it better so you don't feel it. The ECU switches modes at 1K rpm.
I wouldn't waste my time with the electric mounts. When the electric mount is in the firm mode, it is supposed to be the same as the solid rubber mount. The soft mode is for when the engine is idling. If the engine has a rough idle, the softer mode will hide it better so you don't feel it. The ECU switches modes at 1K rpm.
11-04-2014, 12:39 PM
#18
Senior Member
Thread Starter
Join Date: Sep 2013
Location: Oshkosh WI
Posts: 327
I did an impulse buy and ordered the ES bushings today. When I start in, I will take pics of my f*ed up rear mount for the crossmember. I plan on taking the max out of commission when the first snow falls, which looks like might be as soon as later this week.
Keep you guys posted
One quick question, has anyone tried to press in the ES ones themselves? I have a ball joint press. Is it something that can be done by yourself?
Keep you guys posted
One quick question, has anyone tried to press in the ES ones themselves? I have a ball joint press. Is it something that can be done by yourself?
11-09-2014, 07:53 PM
#19
Senior Member
Thread Starter
Join Date: Sep 2013
Location: Oshkosh WI
Posts: 327
Alright here we go, after five hours, my car is sitting in the garage with two new ES poly motor mounts in and a bunch of rubber pieces out!
I took some quick pics to post up, when I did a search, it looked like everyone already put their mounts in around 2006 or so.
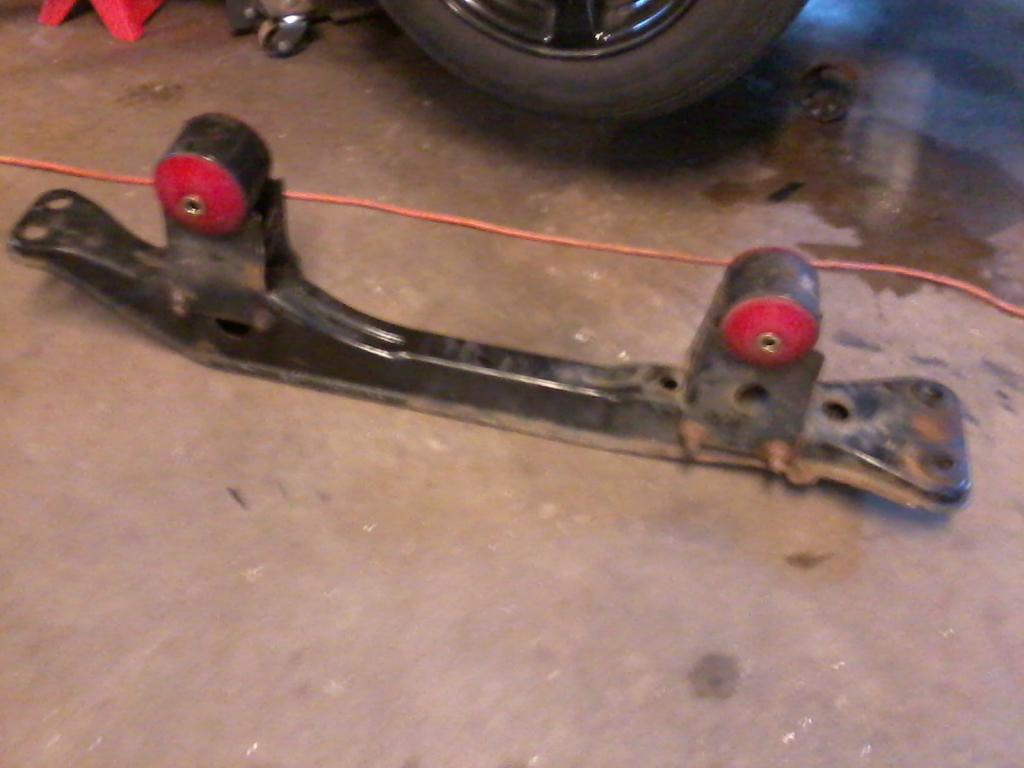
This is what I was talking about in the first post, this is the rear crossmember where it bolts on the subframe:
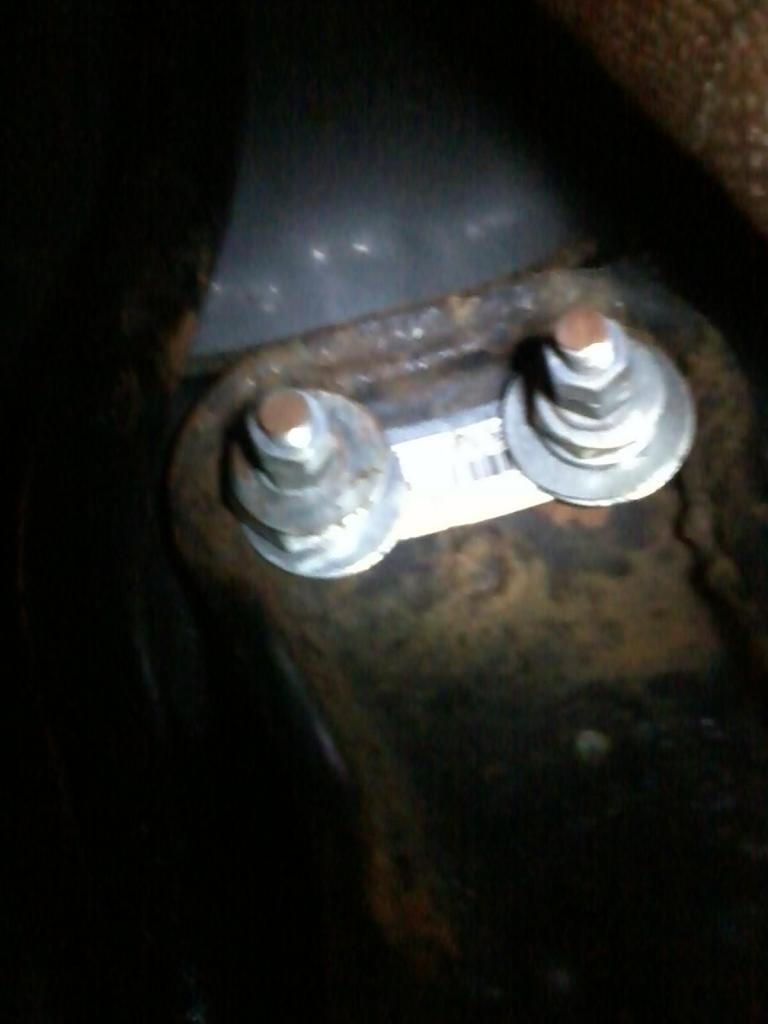

It wasn't as bad as I remember it being, I thought it was rusted, but to my surprise, it looked in too shape, whatever you want to call it. There is a u clamp that is hanging up there, the holes are drilled out. Works well actually, but I don't like it as is. I like the U bolt idea as opposed to trying to tap the subframe. Does anyone know where I can get a hardened u clamp?
Here is the rest of the fun,
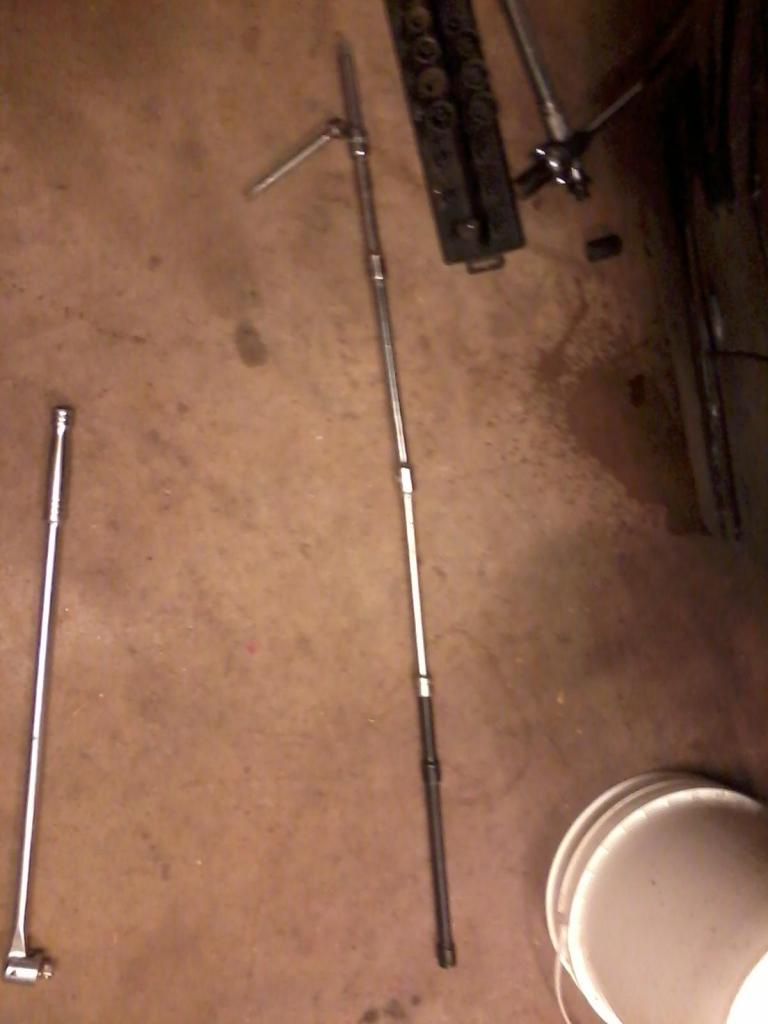
Bolts were easy to crack, use every extension you have to get to the rear mount. This is how long my 1/2 extensions were. This gets the ratchet 6" past the fender. It could be a foot or so shorter if you don't have any more extensions, but then you are trying to get 100lbs or torque inside the wheel well.
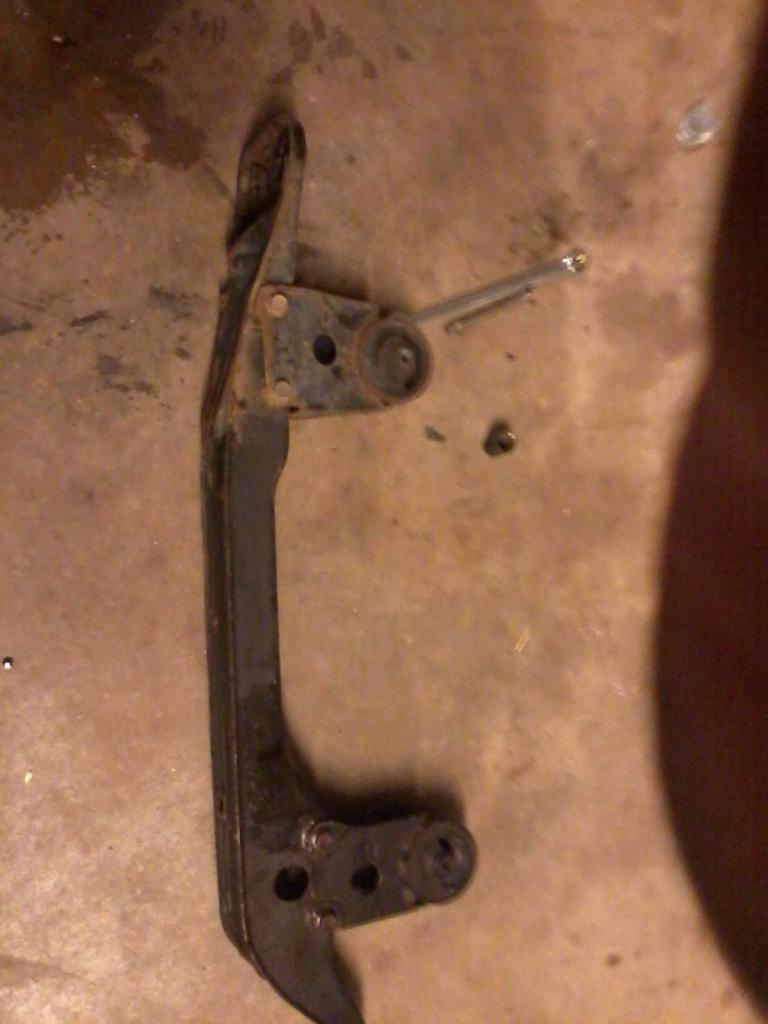
Removed crossmember:
All of the motor mount must be removed, including the metal sleeve. Two options: take it a shop and have them press the old ones out and the new ones in. Only takes an hour or so, but I was quotes $40-80 per side per press. Not going to happen.
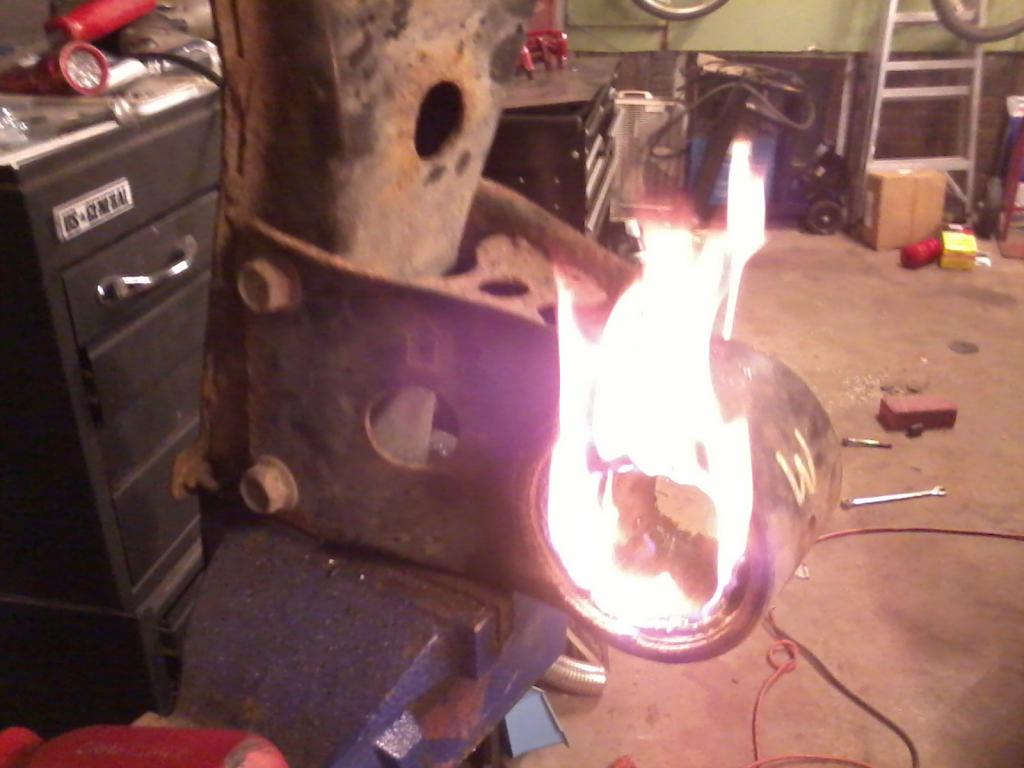
Other option is to gut them yourself, lots of cutting, and some fire.
Take a sawzall and cut out all the rubber you can. The front mount has peices of plastic around the outer edge. There are lots that go into these mounts. This is my first time gutting mounts, I can see why the OEM ones are expensive.
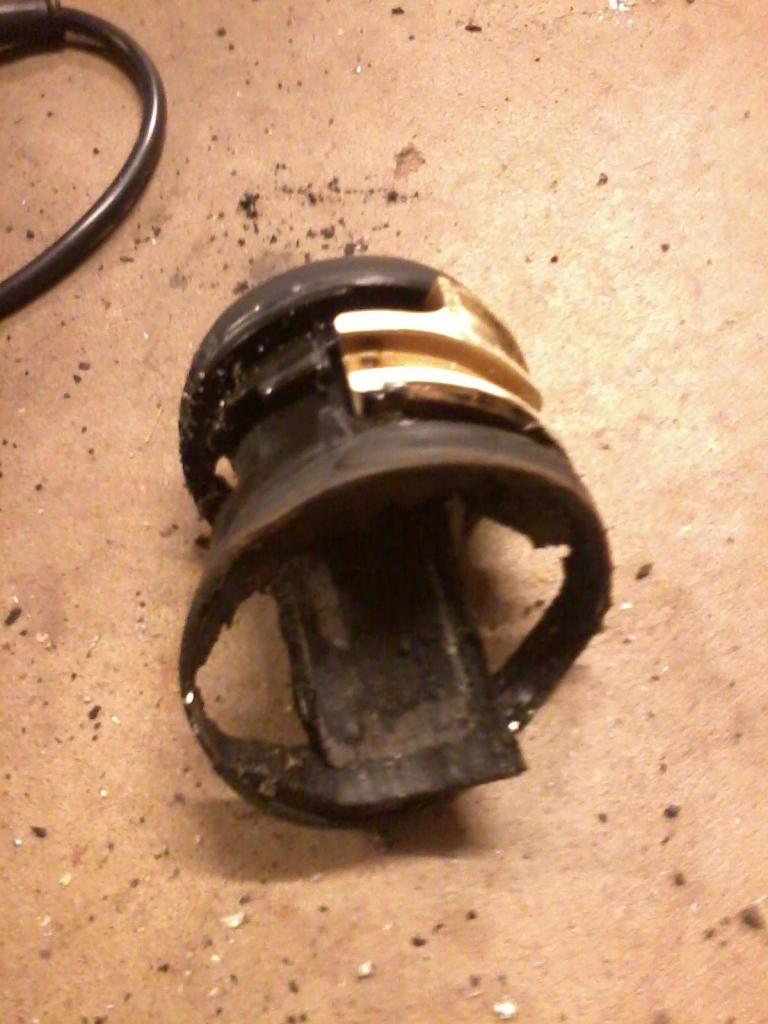
Piece of the front motor mount that came out
Both also have this nasty black liquid in them that get shot all over by the saw blade
I took some quick pics to post up, when I did a search, it looked like everyone already put their mounts in around 2006 or so.
This is what I was talking about in the first post, this is the rear crossmember where it bolts on the subframe:
It wasn't as bad as I remember it being, I thought it was rusted, but to my surprise, it looked in too shape, whatever you want to call it. There is a u clamp that is hanging up there, the holes are drilled out. Works well actually, but I don't like it as is. I like the U bolt idea as opposed to trying to tap the subframe. Does anyone know where I can get a hardened u clamp?
Here is the rest of the fun,
Bolts were easy to crack, use every extension you have to get to the rear mount. This is how long my 1/2 extensions were. This gets the ratchet 6" past the fender. It could be a foot or so shorter if you don't have any more extensions, but then you are trying to get 100lbs or torque inside the wheel well.
Removed crossmember:
All of the motor mount must be removed, including the metal sleeve. Two options: take it a shop and have them press the old ones out and the new ones in. Only takes an hour or so, but I was quotes $40-80 per side per press. Not going to happen.
Other option is to gut them yourself, lots of cutting, and some fire.
Take a sawzall and cut out all the rubber you can. The front mount has peices of plastic around the outer edge. There are lots that go into these mounts. This is my first time gutting mounts, I can see why the OEM ones are expensive.
Piece of the front motor mount that came out
Both also have this nasty black liquid in them that get shot all over by the saw blade
11-09-2014, 08:14 PM
#20
Senior Member
Thread Starter
Join Date: Sep 2013
Location: Oshkosh WI
Posts: 327
This is the ring inside the front mount, this ring has to come out too. Count the rings around the outside, don't stop until only the very outer ring of the bracket is left.
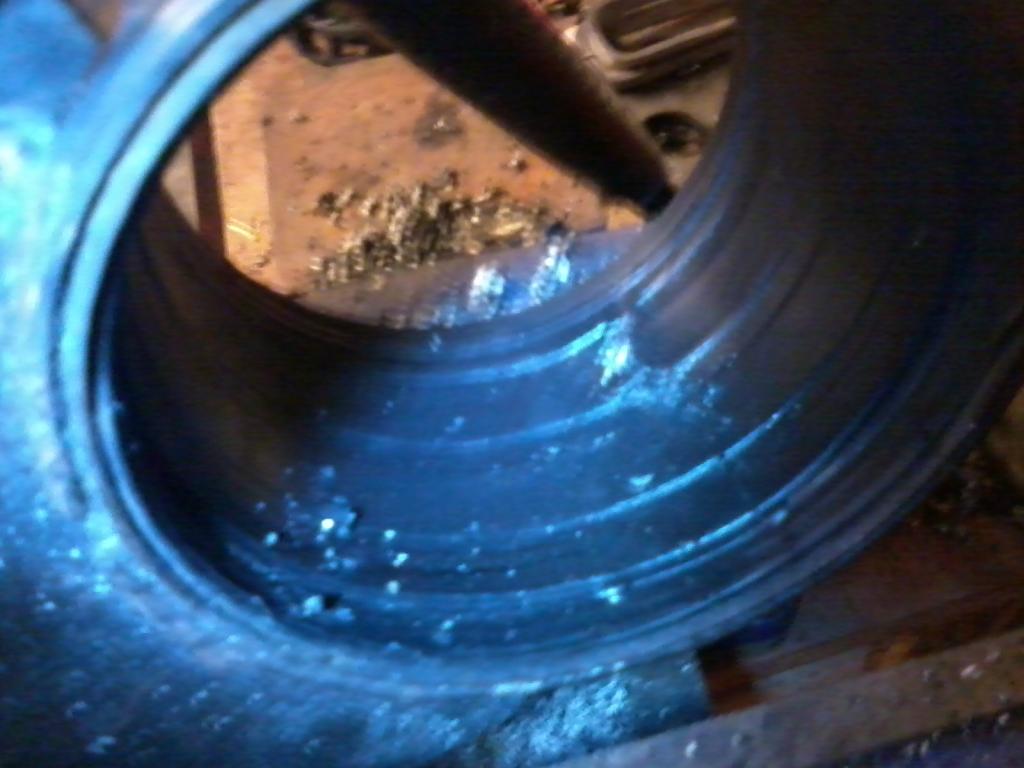
The rear mount has a metal tab inside it. I didn't get a pic of that one. To get the rubber out around it, I used the handy dandy torch.
Once all the rubber is gone, I used the sawzall to cut the metal band (dont go too far) and pry it up with a screwdriver. Once I bent them in, they popped out.
Here I got excited and stopped taking pics for a while. Once all the material from the old mounts are gone, time to press in the new ones. ES gives you a little slip in the box that shows the orientation of the mounts. One side is flat, the other is convex. Point both convex ends toward the passenger side.
The first mount I was able to force partially in by a very small press I found laying around. That broke halfway in, so a few pieces of wood and a sledge got the first one in the rest of the way. The second one I got smart about. I filed down half of the lip of the convex side to make it easier to get it. Not like they are going anywhere once installed. I greased it up, three hits with a rubbet mallet, and it was in. By all means, do not pay someone to press these in for you. I read on the .org that you can cut them in half like LCA bushings to. That was my next option if the hammer didn't work. I didn't know how to cut them without loosing material from the blade. Not sure if it matters, but I didn't have to worry about it. Once installed, pound in the metal sleeve.
This is the end result
Rest is the reverse of the removal.
I put the contraption back on to hold the rear up until I can find a more stable solution. Its been working good so far.
Opinions:
I have only taken it around the block a few times, so this might change. Overall I am please with the firmness it adds to the front end. My old mounts were shot to hell, so anything is better that what was in there. There is some idle vibration, but nothing severe, no dash or trim rattle. It goes away once you get moving. Shifting is crisper and smoother. The shifter does not vibrate as much (probably because the whole car is vibrating with it). jk, its not bad at all. Bottom line, a good upgrade for not that much money. Compared to window weld filling mounts, this seems so much easier, and with not much down time. I could have it done in a day if I didn't run out of saw blades. It takes no special tools, aside from a bunch of extensions, the rest is all typical garage type stuff.

 11-10-2014, 11:08 PM
#25

.....
Opinions:
I have only taken it around the block a few times, so this might change. Overall I am please with the firmness it adds to the front end. My old mounts were shot to hell, so anything is better that what was in there. There is some idle vibration, but nothing severe, no dash or trim rattle. It goes away once you get moving. Shifting is crisper and smoother. The shifter does not vibrate as much (probably because the whole car is vibrating with it). jk, its not bad at all. Bottom line, a good upgrade for not that much money. Compared to window weld filling mounts, this seems so much easier, and with not much down time. I could have it done in a day if I didn't run out of saw blades. It takes no special tools, aside from a bunch of extensions, the rest is all typical garage type stuff.
You should try TCW3. Your car runs a whole lot smoother once you do, and I think it's partly because the ECU is now seeing more predictable behaviour from the injectors, all the injectors are firing more uniformly....6 soldiers marching in lockstep,so to speak.
https://maxima.org/forums/fluids-lub...itive-new.html
11-11-2014, 05:14 AM
#26
Senior Member
Thread Starter
Join Date: Sep 2013
Location: Oshkosh WI
Posts: 327
Yes I do have a 5 spd. When I would engage the clutch, sometimes the shifter would shake a lot, along with the engine, when I was launching from first. It is much less noticeable now.
I'm running stock injectors for the 97, not sure if they are the 250 or 270 ones. If I change injectors, then won't I need to tune it somehow?
I'll look into the TC-W3, to my knowledge I don't have any engine problems. I picked up the max last year and have been slowly overhauling it as needed, plugs, coils, belts, ps pump, oovi, trans swap etc.
11-11-2014, 05:56 AM
#27

Thats exactly what he thought. He drilled the holes out in the subframe, and put two bolts hanging down from the subframe throught the cross member. I can't take pics now, or I would. It looks like it holding in there tight enough, but I don't know whats going to happen when I take them off. With the bolts hanigng down for a couple years, it caught all kinds of salt and crap that rusted them up. I was hoping I wouldn't have to mess with it, but my mounts are shot and I want ES ones in there.
Has anybody had to mount the member to the subframe without using the stock bolts? IE: rusted or snapped bolts I'm curuous how they did it. I can see myself having to but the bolts off and being left having find a want to re-attach it. I can tap the holes in the subframe, but they are pretty big, around 7/16 or 1/2.
Has anybody had to mount the member to the subframe without using the stock bolts? IE: rusted or snapped bolts I'm curuous how they did it. I can see myself having to but the bolts off and being left having find a want to re-attach it. I can tap the holes in the subframe, but they are pretty big, around 7/16 or 1/2.
11-11-2014, 06:20 AM
#28
Anyway, it's good to see you got your mounts installed. I am most envious of that cross memebr pic with the ES mounts installed

Last edited by dwapenyi; 11-11-2014 at 06:26 AM.
11-11-2014, 08:48 AM
#29
One thing I noticed in the photos is the the precious owner threw out the rubber bushings when he did the Mickey Mouse mod. Without the bushings, you will have more engine vibrations transmitted to the body. It probably isn't that much, and whether you could feel it is another question. But the bushings wouldn't be called for if the situation didn't exist.
11-11-2014, 10:26 AM
#30
Senior Member
Thread Starter
Join Date: Sep 2013
Location: Oshkosh WI
Posts: 327
I assumed you have stock injectors, and they have a flow rate of 260 to 270 cc IIRC. What I was getting at is, because of the quality of fuel, age etc, all 6 injectors won't be operating at the same performance levels. If one injectors is acting iffy, the ECU is going to adjust for one bad injector and slow everything down.
Anyway, it's good to see you got your mounts installed. I am most envious of that cross memebr pic with the ES mounts installed
Anyway, it's good to see you got your mounts installed. I am most envious of that cross memebr pic with the ES mounts installed
Ahhh, got it with the fuel injectors. I looked all of them when I did the 00vi swap earlier this year. All of the pintle caps were in place.
When I say it vibrates, it doesn't shake, just vibration, kind of a "hey the engine is running". Not a vibrate loose change and move papers around, shake. I will drive it some more and see what happens.
On the bushing - I noticed they were gone, but didn't have any to put in. I am going to try to get a generic size bushing to put in there. The front ones fell apart when I took it off, so I need those too.
11-11-2014, 09:34 PM
#31
FWIW I used my car to press the inserts in. I tried a sledge but gave up pretty quick. Instead I jacked the car up and suck the ES and mount under the tire and let the cars weight press it in for me.
ES makes bushings for the cross member.
ES makes bushings for the cross member.
11-11-2014, 10:40 PM
#32
Senior Member
Thread Starter
Join Date: Sep 2013
Location: Oshkosh WI
Posts: 327
I just got back from work, all I can say is AMAZING!
The difference is huge. Once the car is warmed up, there is almost no vibration at idle, and none while driving (hot or cold).
The takeoff is smoother, shifting is smoother, all around it feels like the car is more rigid and acting as one piece.
Even though I know its not any faster, the max feels faster.
Great mod, so happy I bit the bullet and took this job on. Now I just need to get some bushings for the crossmember and all will be good.
Thanks everybody for all your help.
 11-12-2014, 10:16 PM
#34
I love your creativeness for pressing in the new bushings. Excellent work.
I don't know if you can get the cross member bushings at the local autostore, but the nissan part number is 11248-40U06 if you need it.
I don't know if you can get the cross member bushings at the local autostore, but the nissan part number is 11248-40U06 if you need it.
11-14-2014, 10:35 PM
#35
Senior Member
Thread Starter
Join Date: Sep 2013
Location: Oshkosh WI
Posts: 327
Thanks Dennis,
I had to drive the car to work (wife's explorer didn't start) so I put the crossmember on without bushings. I couldn't tell a difference. I know I should get some bushings in there. I have the winter to work on it. The max will live in the garage, free of salt and snow
I had to drive the car to work (wife's explorer didn't start) so I put the crossmember on without bushings. I couldn't tell a difference. I know I should get some bushings in there. I have the winter to work on it. The max will live in the garage, free of salt and snow
07-30-2016, 07:45 PM
#36
Newbie - Just Registered

Join Date: Jul 2016
Posts: 3
Sorry to revive a dead thread...if that's a thing...I'm in a sticky situation. I'm dead broke, just bought a 96 maxima that was beat to ****. Long story, really needed to get the car. I couldn't afford to replace the lower radiator support, so I had a shop weld the cross member to the existing one, with a length of steel to bridge the rusted out part.
I really should have replaced the motor mounts first, but I wasn't really aware at the time. I thought the motor movement was a function of the cross member being separated from the lower radiator support.
The car also needs a front suspension overall from what I gather.
Totally impossible to get the mounts out with the member on, eh? Do you guys have any advice??

Thread
Thread Starter
Forum
Replies
Last Post
The Frye
7th Generation Maxima (2009-2015)
6
09-02-2021 11:03 AM
QueensMAX
5th Generation Maxima (2000-2003)
7
09-15-2015 04:14 AM