HOW TO: Testing and Eliminating P1447 EVAP Control System Purge Flow Monitoring
 07-10-2015, 08:40 PM
#1

HOW TO: Testing and Eliminating P1447 EVAP Control System Purge Flow Monitoring
Hey everyone, I haven't been active on the forums for a while but would like to share my solution to my CEL code P1447: EVAP Control System Purge Flow Monitoring code. This code is known as the jackpot code since it points to so many possible issues. I've been getting this code for a few years and never took the time to fully research and fix the problem. I kept trying to reset my ECU and fill up the gas tank, hoping the EVAP system will stay not ready and allow me to pass inspection. I would have to drive the car for about 60 miles before it gets down to 2 monitors not ready but by then I would get the EVAP code, Knock Sensor, and 02 sensor, and other various 5spd swap codes. After about 20hrs of research, multiple days of labor, and about $500+ in trial and error parts, I finally fixed everything. Keep reading, I could have fixed everything in just a few hours for about $120 !!!
First off, I would like to give credit to everyone who posted the Factory Service Manuals (FSM), Technical Service Bulletins (TSB), YouTube videos, and past experiences online. Also, my local 4th gen parts guy, maxfever1987.
Tools Required:
Air Compressor
Vacuum Pump Tester ($40 from AutoZone)
Multimeter
2 wires with alligator clips
10, 12, 14mm sockets an ratchets
Pliers
Screwdrivers
Replacement Parts where available are also linked in each section below.
To keep things from getting complicated, refer to this factory diagram below (95-98 step motor type). From here on I will be using part names as stated in this diagram. The names are very similar and I found many threads where people are referring to a part by the wrong name which gets confusing fast.
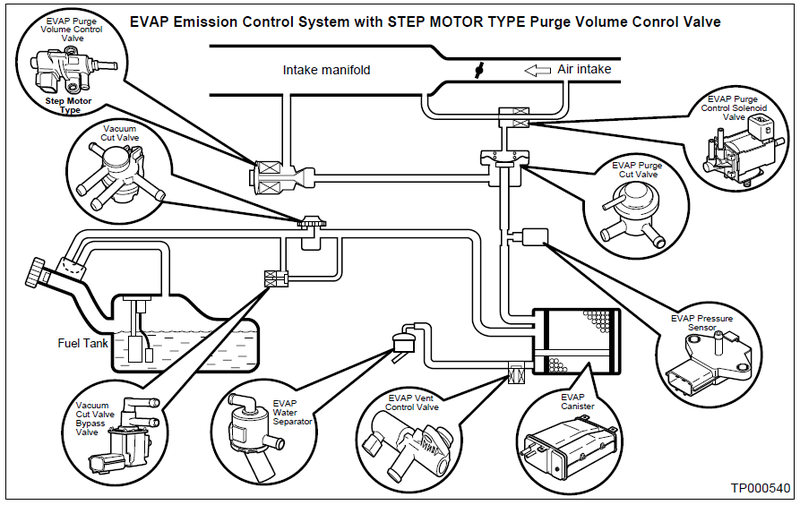
My car is a 97 SE Auto that was converted to 5spd. I am finally running the correct year ECU in this car and I also have a custom engine harness adapter for my Greddy EU and J&S Safeguard. However, cars manufactured AFTER 4/97 have a different EVAP canister and EVAP Vent Control Valve. I am not sure if that affects the ECU for 97s since it is a transition year for these parts. My car has a 4/97 production date and uses the earlier style canister/vent control valve setup. 1999 models uses a different type (duty cycle) EVAP Purge Volume Control Valve and does not have an EVAP Purge Cut Valve and EVAP Purge Control Solenoid Valve. My knowledge of this is based solely on FSM material and I will do my best to point out the differences.
I followed the factory 97 FSM, see pages EC-330 - EC-336:
http://boredmder.com/FSMs/Nissan/Maxima/1997/EC.pdf
I used a modified approach of troubleshooting and If I was to do this again, this would be my course of action. First thing to check under the hood is the EVAP Purge Cut Valve and EVAP Purge Volume Control Valve by removing two 12mm and two 10mm bolts and unplug the harness. Take off all the necessary hose clamps/hoses and remove this assembly from the car. Then separate the EVAP Purge Volume Control Valve. Leave the EVAP Purge Cut Valve connected with the small hoses and tiny hardline/bracket assembly. Shake the parts and if you find any bit of charcoal which you most likely will, you will need a new EVAP canister and MUST, MUST, MUST blow out the entire purge line.
EVAP Purge Volume Control Valve (99s should follow EVAP Purge Control Solenoid Valve test below for this component)
Follow the test on FSM EC-334 and refer to this video from 9:00 to the end: https://www.youtube.com/watch?v=QnVU...ature=youtu.be
I had all the hoses disconnected and the unit fully removed, just plug it in and have someone cycle the ignition switch and watch for the solenoid movement. It will only move about an half inch in a slow steady motion. Make sure it is not sticking. Use compress air gently to blow out all the charcoal particles in both positions, ignition switch on and ignition off. DO NOT use forceful pressure. With the valve closed, there should be very minimal airflow, it's better to use your mouth to blow on it. The compressed air can cause high volume airflow that will not be seen under normal conditions. Determine that all resistance values are within range and the solenoid operates properly. New unit: https://www.rockauto.com/catalog/mor...nid=459&jpid=2
EVAP Purge Cut Valve (Except 99s)
Follow the test on the top of FSM EC-335. Use compress air to gently blow out the charcoal particles from ports B and C. For these steps, do not use compressed air to test the air flow especially on step 2 with vacuum applied or you will hear the diagram flapping hard and may damage it. Blow into the port with your mouth and check to see that works as described in the test. If it does not stay closed or does not open, you will need to replace it. Buy used or NEW from Nissan, I could not find an aftermarket equivalent: http://www.courtesyparts.com/14931-v...-p-130349.html
EVAP Purge Control Solenoid Valve
Follow the test just under the above component on FSM EC-335. I did not disconnect any of the hoses because these nipples have a tendency to become brittle and break if you do not remove the hoses properly. All I did was use alligator clips. Unplug the harness and connect your alligator clips to the solenoid pins. Try to connect each one on the far outside so there is less chance of them making contact. A short circuit will not damage the solenoid itself but will heat up those tiny alligator clips and wires fast. Put any end of one wire on the battery ground terminal and use the remaining free wire end to tap on the battery positive terminal. You should hear the solenoid click each time you tap the battery terminal. If it clicks, you should be good. There are a total of 3 solenoids in that same area. I ended up testing them all, only 2 are EVAP related I believe. I did not test the Boost Sensor. Perform a visual inspection of all the small vacuum/hard lines and make sure there are no cracks. If your lines look brittle, you may want to replace them or test them with the vacuum pump and your finger.
EVAP Canister & EVAP Vent Control VALVE
This is located behind the driver rear wheel. I found it easy to jack up the car and remove the wheel since you will be spending a lot of time here testing and replacing parts as well. Be careful removing the plastic shield, the clips are easy to break. Remove the 3 hoses that go to the EVAP Canister and then unbolt the 2 bolts that hold it to the car carefully. If you strip the bolts, zip ties will be holding up your new canister! If you had charcoal pieces up front, then you can probably spend 15 minutes just emptying the canister. I tried to replace the canister and the EVAP Vent Control Valve only and it did nothing for me (underbody lines needed to be cleaned!!!). My EVAP Vent Control Valve plunger was stuck and would not move. I decided to replace it and didn't bother testing it. You can follow the same 12V solenoid test above to verify that it is working. This part is a common failure on these cars from what I�ve read.
As mentioned earlier, cars produced up to and including 4/97 will need the valve that has a flat face and a canister which requires an O-Ring. Cars made after 4/97 will need the other style valve which has a nipple and O-ring that pushes into the canister. I do not know if you can use the later model canister on the earlier 4th gens but the canister must use the corresponding valve. The sensors cost about the same but the canister is $28 more for the earlier version. Do not buy these parts from Autozone/Advance/Pep Boys, they are usually $50 more than what RockAuto.com sells the exact same part for.
Production dates up to and including 4/97:
Canister: https://www.rockauto.com/catalog/mor...nid=458&jpid=3
Vent: https://www.rockauto.com/catalog/mor...nid=457&jpid=1
Production dates 5/97+:
Canister: https://www.rockauto.com/catalog/mor...nid=458&jpid=1
Vent: https://www.rockauto.com/catalog/mor...nid=457&jpid=2
Try not to damage the O-ring when removing the valve, the replacement part does not come with a new one. Also, DO NOT overtighten the valve to the canister because the bolt can cause the nut on the canister to start stripping the plastic and removal without damaging the canister/valve becomes impossible. If you think the seal is not adequate on the new replacement parts, use some RTV silicone. I was able to get away without using RTV.
EVAP Water Separator
I did not clean or remove this part. It has the thick hose that connects to the EVAP Vent Control Valve. Use some compressed air inside the hose just to make sure there are no charcoal particles in there.
Vacuum Cut Valve & Vacuum Cut Bypass Valve
Remove the small hose that comes from the fuel tank to the Vacuum Cut Valve and unbolt that assembly from the car. Leave the Vacuum Cut Bypass Valves intact with the hoses. Lightly blow some air through the two open ports on the Vacuum Cut Valve. I am not sure if this is necessary but I did it anyway. Perform the same 12V solenoid test on the Vacuum Cut Bypass Valve.
Vacuum Cut Valve: https://www.rockauto.com/catalog/mor...nid=459&jpid=1
Vacuum Cut Bypass Valve: https://www.rockauto.com/catalog/mor...nid=457&jpid=0
EVAP Pressure Sensor
Unbolt the senor and remove the hose carefully. This sensor has about a 1" plastic nipple. Follow the test procedure on the bottom of FSM EC-335 and refer to this video from 4:58-8:48: https://www.youtube.com/watch?v=QnVU...ature=youtu.be
Cleaning the Purge Lines
Refer to this TSB under the Step Motor Purge Volume Control Valve for non-99s: http://www.lyberty.com/car/Maxima_A3...NTB00-085a.pdf
You should have all the lines and sensors isolated by now. My rubber hose under the hood coming off the EVAP Purge Cut Valve was completely blocked with charcoal particles. I was unable to even squeeze the hose with my fingers! Start at the front and keep working your way back and forth sending air both ways. Keep an eye on your pressure because you don't want to cause any leaks on the rubber hoses. Keep doing this until the air blows free and clean. When this is done right, you will end up with charcoal particles all over your intake manifold and under the spare tire. It�s a good idea to cover up the exposed hoses you have in the engine bay so you don�t get debris in other lines. Once that is done, plug one end of the line and perform a vacuum test to verify there are no air leaks and the rubber hoses and metal are good from throughout the underbody.
Gas Cap
I've heard that this could be causing issues with pressure in the system. For a $5 part, you may want to try this first providing that your EVAP canister is not busted and already clogged your entire system.
At this point you can re-install everything back on the car. Make sure all vacuum lines are connected properly and free of any tears/cracks especially from moving stubborn hose clamps. Reset your ECU because you may have various codes from turning the ignition on with the system/sensors disconnected (P0440, P0443, P0446, P0450, P1441, P1445, etc)
After you reset the ECU follow this TSB for the drive cycle pattern based on your year, page 24-27: http://www.lyberty.com/car/Maxima_A3...NTB98-018c.pdf
This applies to 96/97, I am not sure how different the other years are but I was never able to get an ECU ready in such a short time. We would not have access of knowing the B/F schedule but try to follow everything else. The 5spd ECU only knows if the transmission is in Neutral, Reverse or in any of the 5 gears (not the specific individual gears) but I'm sure the load the engine sees in the gears listed may give the proper B/F schedule.
After performing all these steps with ~� of gas and never filling up, I am pleased to report that I passed inspection with 2 monitors being not ready. Currently, I have 1 more showing not ready which is my 02 sensor. I installed one of those spark plug non-fouler to avoid the P0420 code I was getting possibly due to my replacement 02 sensor combined with an aftermarket y-pipe, and high flow cat.
I hope this write-up will help people get rid of the annoying P1447 code. I tried to type everything out while it�s still fresh in my head. If you have any questions or comments, don�t hesitate to ask.
Patrick*


 07-12-2015, 12:59 PM
#4
Thanks guys.
The cause was due to a failed EVAP canister. I left it that way for a few years and eventually the purge lines got all caked up and clogged with those tiny particles. All I needed to do was replace the canister and clean the lines.
The cause was due to a failed EVAP canister. I left it that way for a few years and eventually the purge lines got all caked up and clogged with those tiny particles. All I needed to do was replace the canister and clean the lines.
05-11-2020, 06:38 PM
#5
Newbie - Just Registered

Join Date: May 2020
Location: Oregon
Posts: 8
Hey everyone, I haven't been active on the forums for a while but would like to share my solution to my CEL code P1447: EVAP Control System Purge Flow Monitoring code. This code is known as the jackpot code since it points to so many possible issues. I've been getting this code for a few years and never took the time to fully research and fix the problem. I kept trying to reset my ECU and fill up the gas tank, hoping the EVAP system will stay not ready and allow me to pass inspection. I would have to drive the car for about 60 miles before it gets down to 2 monitors not ready but by then I would get the EVAP code, Knock Sensor, and 02 sensor, and other various 5spd swap codes. After about 20hrs of research, multiple days of labor, and about $500+ in trial and error parts, I finally fixed everything. Keep reading, I could have fixed everything in just a few hours for about $120 !!!
First off, I would like to give credit to everyone who posted the Factory Service Manuals (FSM), Technical Service Bulletins (TSB), YouTube videos, and past experiences online. Also, my local 4th gen parts guy, maxfever1987.
Tools Required:
Air Compressor
Vacuum Pump Tester ($40 from AutoZone)
Multimeter
2 wires with alligator clips
10, 12, 14mm sockets an ratchets
Pliers
Screwdrivers
Replacement Parts where available are also linked in each section below.
To keep things from getting complicated, refer to this factory diagram below (95-98 step motor type). From here on I will be using part names as stated in this diagram. The names are very similar and I found many threads where people are referring to a part by the wrong name which gets confusing fast.
Attachment 16574
My car is a 97 SE Auto that was converted to 5spd. I am finally running the correct year ECU in this car and I also have a custom engine harness adapter for my Greddy EU and J&S Safeguard. However, cars manufactured AFTER 4/97 have a different EVAP canister and EVAP Vent Control Valve. I am not sure if that affects the ECU for 97s since it is a transition year for these parts. My car has a 4/97 production date and uses the earlier style canister/vent control valve setup. 1999 models uses a different type (duty cycle) EVAP Purge Volume Control Valve and does not have an EVAP Purge Cut Valve and EVAP Purge Control Solenoid Valve. My knowledge of this is based solely on FSM material and I will do my best to point out the differences.
I followed the factory 97 FSM, see pages EC-330 - EC-336:
http://boredmder.com/FSMs/Nissan/Maxima/1997/EC.pdf
I used a modified approach of troubleshooting and If I was to do this again, this would be my course of action. First thing to check under the hood is the EVAP Purge Cut Valve and EVAP Purge Volume Control Valve by removing two 12mm and two 10mm bolts and unplug the harness. Take off all the necessary hose clamps/hoses and remove this assembly from the car. Then separate the EVAP Purge Volume Control Valve. Leave the EVAP Purge Cut Valve connected with the small hoses and tiny hardline/bracket assembly. Shake the parts and if you find any bit of charcoal which you most likely will, you will need a new EVAP canister and MUST, MUST, MUST blow out the entire purge line.
EVAP Purge Volume Control Valve (99s should follow EVAP Purge Control Solenoid Valve test below for this component)
Follow the test on FSM EC-334 and refer to this video from 9:00 to the end: https://www.youtube.com/watch?v=QnVU...ature=youtu.be
I had all the hoses disconnected and the unit fully removed, just plug it in and have someone cycle the ignition switch and watch for the solenoid movement. It will only move about an half inch in a slow steady motion. Make sure it is not sticking. Use compress air gently to blow out all the charcoal particles in both positions, ignition switch on and ignition off. DO NOT use forceful pressure. With the valve closed, there should be very minimal airflow, it's better to use your mouth to blow on it. The compressed air can cause high volume airflow that will not be seen under normal conditions. Determine that all resistance values are within range and the solenoid operates properly. New unit: https://www.rockauto.com/catalog/mor...nid=459&jpid=2
EVAP Purge Cut Valve (Except 99s)
Follow the test on the top of FSM EC-335. Use compress air to gently blow out the charcoal particles from ports B and C. For these steps, do not use compressed air to test the air flow especially on step 2 with vacuum applied or you will hear the diagram flapping hard and may damage it. Blow into the port with your mouth and check to see that works as described in the test. If it does not stay closed or does not open, you will need to replace it. Buy used or NEW from Nissan, I could not find an aftermarket equivalent: http://www.courtesyparts.com/14931-v...-p-130349.html
EVAP Purge Control Solenoid Valve
Follow the test just under the above component on FSM EC-335. I did not disconnect any of the hoses because these nipples have a tendency to become brittle and break if you do not remove the hoses properly. All I did was use alligator clips. Unplug the harness and connect your alligator clips to the solenoid pins. Try to connect each one on the far outside so there is less chance of them making contact. A short circuit will not damage the solenoid itself but will heat up those tiny alligator clips and wires fast. Put any end of one wire on the battery ground terminal and use the remaining free wire end to tap on the battery positive terminal. You should hear the solenoid click each time you tap the battery terminal. If it clicks, you should be good. There are a total of 3 solenoids in that same area. I ended up testing them all, only 2 are EVAP related I believe. I did not test the Boost Sensor. Perform a visual inspection of all the small vacuum/hard lines and make sure there are no cracks. If your lines look brittle, you may want to replace them or test them with the vacuum pump and your finger.
EVAP Canister & EVAP Vent Control VALVE
This is located behind the driver rear wheel. I found it easy to jack up the car and remove the wheel since you will be spending a lot of time here testing and replacing parts as well. Be careful removing the plastic shield, the clips are easy to break. Remove the 3 hoses that go to the EVAP Canister and then unbolt the 2 bolts that hold it to the car carefully. If you strip the bolts, zip ties will be holding up your new canister! If you had charcoal pieces up front, then you can probably spend 15 minutes just emptying the canister. I tried to replace the canister and the EVAP Vent Control Valve only and it did nothing for me (underbody lines needed to be cleaned!!!). My EVAP Vent Control Valve plunger was stuck and would not move. I decided to replace it and didn't bother testing it. You can follow the same 12V solenoid test above to verify that it is working. This part is a common failure on these cars from what I�ve read.
As mentioned earlier, cars produced up to and including 4/97 will need the valve that has a flat face and a canister which requires an O-Ring. Cars made after 4/97 will need the other style valve which has a nipple and O-ring that pushes into the canister. I do not know if you can use the later model canister on the earlier 4th gens but the canister must use the corresponding valve. The sensors cost about the same but the canister is $28 more for the earlier version. Do not buy these parts from Autozone/Advance/Pep Boys, they are usually $50 more than what RockAuto.com sells the exact same part for.
Production dates up to and including 4/97:
Canister: https://www.rockauto.com/catalog/mor...nid=458&jpid=3
Vent: https://www.rockauto.com/catalog/mor...nid=457&jpid=1
Production dates 5/97+:
Canister: https://www.rockauto.com/catalog/mor...nid=458&jpid=1
Vent: https://www.rockauto.com/catalog/mor...nid=457&jpid=2
Try not to damage the O-ring when removing the valve, the replacement part does not come with a new one. Also, DO NOT overtighten the valve to the canister because the bolt can cause the nut on the canister to start stripping the plastic and removal without damaging the canister/valve becomes impossible. If you think the seal is not adequate on the new replacement parts, use some RTV silicone. I was able to get away without using RTV.
EVAP Water Separator
I did not clean or remove this part. It has the thick hose that connects to the EVAP Vent Control Valve. Use some compressed air inside the hose just to make sure there are no charcoal particles in there.
Vacuum Cut Valve & Vacuum Cut Bypass Valve
Remove the small hose that comes from the fuel tank to the Vacuum Cut Valve and unbolt that assembly from the car. Leave the Vacuum Cut Bypass Valves intact with the hoses. Lightly blow some air through the two open ports on the Vacuum Cut Valve. I am not sure if this is necessary but I did it anyway. Perform the same 12V solenoid test on the Vacuum Cut Bypass Valve.
Vacuum Cut Valve: https://www.rockauto.com/catalog/mor...nid=459&jpid=1
Vacuum Cut Bypass Valve: https://www.rockauto.com/catalog/mor...nid=457&jpid=0
EVAP Pressure Sensor
Unbolt the senor and remove the hose carefully. This sensor has about a 1" plastic nipple. Follow the test procedure on the bottom of FSM EC-335 and refer to this video from 4:58-8:48: https://www.youtube.com/watch?v=QnVU...ature=youtu.be
Cleaning the Purge Lines
Refer to this TSB under the Step Motor Purge Volume Control Valve for non-99s: http://www.lyberty.com/car/Maxima_A3...NTB00-085a.pdf
You should have all the lines and sensors isolated by now. My rubber hose under the hood coming off the EVAP Purge Cut Valve was completely blocked with charcoal particles. I was unable to even squeeze the hose with my fingers! Start at the front and keep working your way back and forth sending air both ways. Keep an eye on your pressure because you don't want to cause any leaks on the rubber hoses. Keep doing this until the air blows free and clean. When this is done right, you will end up with charcoal particles all over your intake manifold and under the spare tire. It�s a good idea to cover up the exposed hoses you have in the engine bay so you don�t get debris in other lines. Once that is done, plug one end of the line and perform a vacuum test to verify there are no air leaks and the rubber hoses and metal are good from throughout the underbody.
Gas Cap
I've heard that this could be causing issues with pressure in the system. For a $5 part, you may want to try this first providing that your EVAP canister is not busted and already clogged your entire system.
At this point you can re-install everything back on the car. Make sure all vacuum lines are connected properly and free of any tears/cracks especially from moving stubborn hose clamps. Reset your ECU because you may have various codes from turning the ignition on with the system/sensors disconnected (P0440, P0443, P0446, P0450, P1441, P1445, etc)
After you reset the ECU follow this TSB for the drive cycle pattern based on your year, page 24-27: http://www.lyberty.com/car/Maxima_A3...NTB98-018c.pdf
This applies to 96/97, I am not sure how different the other years are but I was never able to get an ECU ready in such a short time. We would not have access of knowing the B/F schedule but try to follow everything else. The 5spd ECU only knows if the transmission is in Neutral, Reverse or in any of the 5 gears (not the specific individual gears) but I'm sure the load the engine sees in the gears listed may give the proper B/F schedule.
After performing all these steps with ~� of gas and never filling up, I am pleased to report that I passed inspection with 2 monitors being not ready. Currently, I have 1 more showing not ready which is my 02 sensor. I installed one of those spark plug non-fouler to avoid the P0420 code I was getting possibly due to my replacement 02 sensor combined with an aftermarket y-pipe, and high flow cat.
I hope this write-up will help people get rid of the annoying P1447 code. I tried to type everything out while it�s still fresh in my head. If you have any questions or comments, don�t hesitate to ask.
Patrick*
Especially the brittle plastic hose connections! Great write up, just got a 97 maxima for $475! So far it had beed great. Since then i drained 10.5L of oil from the v6...
05-14-2020, 01:14 AM
#7
Newbie - Just Registered
Join Date: May 2020
Location: Oregon
Posts: 8
I filled up to 5 qt jugs and then some during an oil change. The guy I bought it from said it was burning oil. He was probably reading the dipstick wrong (going off of the bends in it and not the etching and having it inserted upside down). It does burn a little coolant and had a multiple misfire P0300 code. But after new plugs and the oil change it hasn't misfired since.
Ran a compression test and the range was 157 - 163
Cleaning the Evap system now. Thankful for the free FSM I found online
Ran a compression test and the range was 157 - 163
Cleaning the Evap system now. Thankful for the free FSM I found online
05-14-2020, 10:20 AM
#8
Senior Member

Join Date: Oct 2012
Location: Portland, Oregon
Posts: 2,979
I filled up to 5 qt jugs and then some during an oil change. The guy I bought it from said it was burning oil. He was probably reading the dipstick wrong (going off of the bends in it and not the etching and having it inserted upside down). It does burn a little coolant and had a multiple misfire P0300 code. But after new plugs and the oil change it hasn't misfired since.
Ran a compression test and the range wlopas 157 - 163
Cleaning the Evap system now. Thankful for the free FSM I found online
Ran a compression test and the range wlopas 157 - 163
Cleaning the Evap system now. Thankful for the free FSM I found online
how do you know it's burning coolant?
do any of the spark plugs look like they were steam cleaned?
05-14-2020, 12:30 PM
#9
Newbie - Just Registered
Join Date: May 2020
Location: Oregon
Posts: 8
*There is a vacuum line coming off of the transmission that is not connected to anything and there is also what looks like a brake/clutch line that has been "Red-necked/ghetto-rigged" so to speak and also not connected. There is a mount for that on the right suspension mount next to the battery. I'll add some pictures later today when I get in the garage.
I can smell burning coolant, white smoke out of the tailpipe and the only two fluids that I need to refill are the coolant and clutch system. The coolant more so than the clutch.
Since the oil and spark plug change (same time), it smokes 1/10th of what it used to before.
Last edited by Jeremy Thomas; 05-14-2020 at 12:43 PM. Reason: Update Info
05-14-2020, 12:49 PM
#10
Senior Member
Join Date: Oct 2012
Location: Portland, Oregon
Posts: 2,979
Does one side of the engine have whiter plugs than the other side.
did the oil look normal, or milky.
the clutch lines should not leak at all. There are two rubber lines near the slave cylinder. They like to leak. Bleeding air from the clutch lines is a pita.
a,one piece stainless steel clutch line is available to by pass all that.
Bit first things first. You need to do know if your head gasket is leaking or not. If it is, there is no point to spending additional money on your car.
Look for signs of leaking coolant from the radiator. It might have wet spots. Do you see coolant on the ground under the radiator or under the engine on the passenger side of the car?
Let's do a simple test for possible blown head gasket. You will need a plastic bag and some masking tape. Also a towel.
Remove the radiator cap.
Wipe any coolant from the outside or the radiator where the cap was.
Tape the bag tightly to the radiator neck. You want an air tight seal.
Then run the engine till it's nice and warm. Does the bag inflate?
The "vacuum line" from the transmission is actually a vent line. It is supposed to be open to the atmosphere. So that's as it should be.
Last edited by JvG; 05-14-2020 at 01:27 PM.
 05-14-2020, 03:49 PM
#12
Senior Member
Join Date: Oct 2012
Location: Portland, Oregon
Posts: 2,979
That is how the line is supposed to look.
Please check the other end of the line at the slave cylinder. It's on the clutch bell housing. You will probably notice one or two rubber hoses in the clutch hydraulic line. I expect them to be wet. That's where they leak.
Don't bother with replacing any of that yet. The whole system is a pita.
We disconnect all that. We use a special stainless steel tube instead. It connects directly to clutch master and slave cylinders.
Let's concentrate on looking for coolant leaks for now. Especially the plastic bag test.
05-15-2020, 01:06 AM
#15
Senior Member
Join Date: Oct 2012
Location: Portland, Oregon
Posts: 2,979
it's very difficult to replace head gaskets on this engine. So generally a bad one means junking the car or installing a used engine.
One more test before you are out of the woods.
Are you familiar with how a coolant block test is done? It uses a fluid to detect exhaust gas in the coolant.
I just read that you are in Salem Oregon. .
I'm in Portland.
Last edited by JvG; 05-15-2020 at 01:10 AM.
05-15-2020, 10:18 AM
#17
Senior Member
Join Date: Oct 2012
Location: Portland, Oregon
Posts: 2,979
look it up on you tube.
The device is called a Block Tester. O Reilly might rent it. I bought mine at NAPA years ago.
 05-17-2020, 06:24 AM
#19
Newbie - Just Registered
Join Date: May 2020
Location: Oregon
Posts: 8
Oh. Wow. I was wayyyy overthinking it. I will check it out.
Also I drove to a friends house the other day and noticed that the smoke is coming from the far side of the rear bank. Guessing burning off the exhaust. I could have been wrong about the smoke out of the tailpipe and got it confused with condensation. Going to check fluids again and see what's low and get a good look from above as well as underneath.
Also I drove to a friends house the other day and noticed that the smoke is coming from the far side of the rear bank. Guessing burning off the exhaust. I could have been wrong about the smoke out of the tailpipe and got it confused with condensation. Going to check fluids again and see what's low and get a good look from above as well as underneath.
05-17-2020, 11:22 AM
#20
Senior Member
Join Date: Oct 2012
Location: Portland, Oregon
Posts: 2,979
Oh. Wow. I was wayyyy overthinking it. I will check it out.
Also I drove to a friends house the other day and noticed that the smoke is coming from the far side of the rear bank. Guessing burning off the exhaust. I could have been wrong about the smoke out of the tailpipe and got it confused with condensation. Going to check fluids again and see what's low and get a good look from above as well as underneath.
Also I drove to a friends house the other day and noticed that the smoke is coming from the far side of the rear bank. Guessing burning off the exhaust. I could have been wrong about the smoke out of the tailpipe and got it confused with condensation. Going to check fluids again and see what's low and get a good look from above as well as underneath.
Perhaps the rear valve cover gasket needs to be replaced. If it does, consider it an opportunity to work on several other items under the intake manifold. You will need to remove that manifold. It's kinda a pita. So you don't want to remove it again soon. The rear injectors live under there. As does the egr system. It likes to clog. The knock sensor is under there too. All of that will need service some day. The car will run better and be more reliable once it's done.
05-19-2020, 03:01 AM
#21
Newbie - Just Registered
Join Date: May 2020
Location: Oregon
Posts: 8
New
Do you smell oil fumes while you drive the car?
Perhaps the rear valve cover gasket needs to be replaced. If it does, consider it an opportunity to work on several other items under the intake manifold. You will need to remove that manifold. It's kinda a pita. So you don't want to remove it again soon. The rear injectors live under there. As does the egr system. It likes to clog. The knock sensor is under there too. All of that will need service some day. The car will run better and be more reliable once it's done.
Perhaps the rear valve cover gasket needs to be replaced. If it does, consider it an opportunity to work on several other items under the intake manifold. You will need to remove that manifold. It's kinda a pita. So you don't want to remove it again soon. The rear injectors live under there. As does the egr system. It likes to clog. The knock sensor is under there too. All of that will need service some day. The car will run better and be more reliable once it's done.
I'm going to create my own thread for my car.

Thread
Thread Starter
Forum
Replies
Last Post
MaximaMan
4th Generation Maxima (1995-1999)
1
08-26-2008 12:11 AM
proguitar04
4th Generation Maxima (1995-1999)
11
01-27-2004 10:26 PM