02-03 Bose 6CD changer Audio cutout fix!!
 08-28-2009, 08:02 PM
#161
Senior Member

Join Date: Dec 2008
Location: NYC
Posts: 1,779
^^Interesting, I had similar results, of playing for a while with the side being cut off, and then it would turn on by it self, but only until I hit the next bump on the road, worked only for a few seconds.
Trying to order the ribbon cable from Pac Parts: IBBON CABLE, 45P (J101 TO J1) Part Number: 039195701
The price of the cable is $4.88 and the shipping is $11.50 lol (shipping sucks!)
Going to be doing this fix as soon as the new ribbon cable arrives, will definitely post feed back (so far everyone has positive responses, which is great). Really hope I wont have to solder anything, although it doesn't seem difficult.
Just one question: How hard was it to removing the HU from the center console and a few steps after that? Any special tools needed? (except for a wide range of small Philips drivers)
Thanks to everything in this thread, you guys are awesome!
http://home.comcast.net/~earevalos/BoseFix.htm

 08-30-2009, 10:18 AM
#163

 10-02-2009, 06:49 PM
#165
Hey, finally got around to do the fix, everything worked out great, no more cut out.
I've simply replaced the ribbon cable with a new one, and the cd player along with everything else is working as it should.
The whole fix took about 2.5 hours, including taking out the HU from the car. Getting the mounting brackets off was tough; I had the proper Philips but was only able to take out 1 screw out of 8. So I reached for the drill, using the same size Philips bit, I was able to get them off in seconds. No soldering was needed, just took out the side daughter board by removing its 3 mounting screws and the whole cd assembly comes apart. The rubber dampers was quite difficult to put back on, I've used the q-tip with some soapy water, didnt take more than 5 minutes.
So far so good, thanks to Chris's awesome write up and IMJD's side board info for no soldering, and everyone who contributed to the fix.
I am located in brooklyn and if anyone needs some help with the left speaker cut out, shoot me a PM and I'll help you out.
Thanks
10-12-2009, 10:35 AM
#166
Newbie - Just Registered

Join Date: Oct 2009
Posts: 3
I pulled the unit out of the dash yesterday and then ran into a wall on the very first step of the fix. Those screws holding the audio units to the metal placeholders just will not come out of the sides. Anyone else have this problem and figure a way around it? Any suggestions?
Thanks in advance.
Thanks in advance.
10-12-2009, 10:47 AM
#167
I pulled the unit out of the dash yesterday and then ran into a wall on the very first step of the fix. Those screws holding the audio units to the metal placeholders just will not come out of the sides. Anyone else have this problem and figure a way around it? Any suggestions?
Thanks in advance.
Thanks in advance.
10-12-2009, 12:01 PM
#168

Yea man, make sure you don't strip them. I used a drill with a Philips tip. I put the unit on the floor and pressed down on the drill as hard as I could, press the button slowly to keep the rpm low and it will come out easy. Once I used the drill, it took seconds to get them all out.
10-13-2009, 05:38 AM
#169
Senior Member
Join Date: Dec 2008
Location: NYC
Posts: 1,779
I pulled the unit out of the dash yesterday and then ran into a wall on the very first step of the fix. Those screws holding the audio units to the metal placeholders just will not come out of the sides. Anyone else have this problem and figure a way around it? Any suggestions?
Thanks in advance.
Thanks in advance.
10-13-2009, 05:39 AM
#170
Senior Member
Join Date: Dec 2008
Location: NYC
Posts: 1,779
Hey, finally got around to do the fix, everything worked out great, no more cut out.
I've simply replaced the ribbon cable with a new one, and the cd player along with everything else is working as it should.
The whole fix took about 2.5 hours, including taking out the HU from the car. Getting the mounting brackets off was tough; I had the proper Philips but was only able to take out 1 screw out of 8. So I reached for the drill, using the same size Philips bit, I was able to get them off in seconds. No soldering was needed, just took out the side daughter board by removing its 3 mounting screws and the whole cd assembly comes apart. The rubber dampers was quite difficult to put back on, I've used the q-tip with some soapy water, didnt take more than 5 minutes.
So far so good, thanks to Chris's awesome write up and IMJD's side board info for no soldering, and everyone who contributed to the fix.
I am located in brooklyn and if anyone needs some help with the left speaker cut out, shoot me a PM and I'll help you out.
Thanks
I've simply replaced the ribbon cable with a new one, and the cd player along with everything else is working as it should.
The whole fix took about 2.5 hours, including taking out the HU from the car. Getting the mounting brackets off was tough; I had the proper Philips but was only able to take out 1 screw out of 8. So I reached for the drill, using the same size Philips bit, I was able to get them off in seconds. No soldering was needed, just took out the side daughter board by removing its 3 mounting screws and the whole cd assembly comes apart. The rubber dampers was quite difficult to put back on, I've used the q-tip with some soapy water, didnt take more than 5 minutes.
So far so good, thanks to Chris's awesome write up and IMJD's side board info for no soldering, and everyone who contributed to the fix.
I am located in brooklyn and if anyone needs some help with the left speaker cut out, shoot me a PM and I'll help you out.
Thanks
10-13-2009, 07:29 PM
#172
Senior Member
Join Date: Dec 2008
Location: NYC
Posts: 1,779
Thanks. I plan on doing it this weekend and reusing the old one like the others but may swap it out in the spring for a new one if it acts up again over the winter.
10-13-2009, 08:57 PM
#173
Member

Join Date: Sep 2007
Posts: 101

First I tried a regular screw driver, no go. Then onto a ratchet with a phillips head. I actually chipped the phillips head. It was made by Husky too. Not some no name brand. I tried the tightening and loosening method as well. No go!! At this point, I was genuinely pissed off, and decided to drill through them. My drill bit broke upon impact with the screw. WTF....
Its weird though because the two screws holding the automatic climate control were easy to screw off. Only the 4 holding the stereo with a biatch.
I guess 7+ years of being tightly screwed did them in for good....
 10-14-2009, 08:11 PM
#174
The 2 screws holding the climate control are screwed into plastic groves, whereas the HU is metal on metal =/ There was only one screw that I had to Tighten and then unscrew with the drill, the rest came out butter.
10-21-2009, 10:57 AM
#175
Newbie - Just Registered
Join Date: Oct 2009
Posts: 3
I finally got the screws out using an impact driver and proceeded through the whole fix. Everything went well until I plugged the unit back in and tested it. No lights, no sound, nothing. (The AC unit works fine) I tried all buttons, etc... and got no reaction from the audio unit.
Is there a fuse that may have blown since I accidentally plugged it in with battery connected? Otherwise, I am assuming I'm up a creek without a paddle here.
Is there a fuse that may have blown since I accidentally plugged it in with battery connected? Otherwise, I am assuming I'm up a creek without a paddle here.
10-25-2009, 06:56 PM
#176
Oh man thats not cool. Are you sure you did everything correctly assembly wise and didnt ruin anything inside? I'm trying to think where you went wrong, for me the tedious part was the daughter on the side, those 2 screws that are kinda hard to get to but I have all the tools so it wasnt all that bad. I'm not sure what you did wrong, I didnt unplug the battery when I removed or installed the unit, I also drove the car without it.
I dont know what to tell you man, you can go back inside and see if you missed anything or take the car to the dealer and say power went out but dont mention that you opened it up and everthing. =[
I dont know what to tell you man, you can go back inside and see if you missed anything or take the car to the dealer and say power went out but dont mention that you opened it up and everthing. =[
10-26-2009, 08:43 AM
#177

Well it was fun while it lasted but I'm sorry to say that my cd is cutting out again. I first did the fix in Dec of 07 and now 22 months later the same problem has returned. I fixed it with a brand new ribbon and since it only lasted just short of 2 yrs I guess I'm gonna go aftermarket.
10-26-2009, 10:19 AM
#178

Well it was fun while it lasted but I'm sorry to say that my cd is cutting out again. I first did the fix in Dec of 07 and now 22 months later the same problem has returned. I fixed it with a brand new ribbon and since it only lasted just short of 2 yrs I guess I'm gonna go aftermarket.
Once again I would like to point out in my car on long trip a solid connection is typically established.
I havent gotten around to doing this. I kinda got used to it over time.. as it is just cds anyway. I am thankful these things have the tapes though!
Note: I have noticed during long trips.... the electrons build up enough at the broken connections to find a way to bridge the gap and actually create a full connection! and 30mins into a trip and the cutouts are eliminated. I had tested it a few times now.
Note: I have noticed during long trips.... the electrons build up enough at the broken connections to find a way to bridge the gap and actually create a full connection! and 30mins into a trip and the cutouts are eliminated. I had tested it a few times now.
10-26-2009, 12:22 PM
#179
Newbie - Just Registered

Join Date: Nov 2008
Posts: 11
Thanks for this procedure, did it this week-end and it it sounds great, no more cut out. Besides not only was my cd playing only on the right side, the quality was so bad you could baery hear anything other than noise (somehow the radio worked well on all speakers...). Now the CD sound quality is amazing, so thanks again for the write-up!
I also soldered a TRS connector (3 wires only, right, left and Ground) as on the picture below (altough he has more than 3 wires) in hope to use my mp3 player using the tape player, did anyone try this out, I can't get the thing to play, pressing the tape button while the mp3 plays does nothing.
Thanks


 11-09-2009, 12:50 AM
#180
Junior Member

Join Date: Jan 2001
Posts: 97
I have 2002 I35 with a Bose stereo and I'm experiencing the same CD cutting out/skipping issue as most people with the same stereo unit. From reading the posts above, it seems that a loose ribbon is responsible for the annoying CD skipping issue that i am experiencing. I am just wondering if it's possible to use liquid tape stuff to secure the ribbon in place so it will not wiggle or come loose thus causing the annoying CD skipping issue.
Is this ribbon also responsible for the sub woofer cutout problem too? Or is it a completely another problem?
Thanks!
Is this ribbon also responsible for the sub woofer cutout problem too? Or is it a completely another problem?
Thanks!
11-09-2009, 08:06 AM
#182

I just bought a cheapo tape adapter with headphone jack, and use that with my mp3 player.
The audio quality isn't great, but it works good enuff for me.
I pulled the dash apart, and ran the wire under the console and up thru the cupholder, so it stows away when I'm out of the car.
Now if someone could come-up with a fix for the 5.5gen subwoofer....I could actually tolerate the mediocre sound quality of my Blose Stereo!!
gr
 12-29-2010, 01:28 PM
#184
Newbie - Just Registered

Join Date: Sep 2006
Posts: 4
My Repair Went to Pieces After a 1 Year & a half or so!
Just checked back in after about FOUR years! Still have the same 2003 Maxima... Car runs GREAT... No problems, No repairs, Never have had it in the shop for ANYTHING!
BUT... The lousy CD player went back to losing the left channel after about a year and a half of working good. Then probably about a year ago or so, CDs starting stopping, skipping, doing all kinds of whacked out stuff, along with the left channel fading in and out!
I'm going to see if I can find a compatible player that I can just switch out, without having to do any rewiring, or having to replace parts.
Luckily, I listen to various radio shows most of the time, BUT... That still SUCKS when I feel like listening to a CD!
02-20-2012, 03:55 PM
#185
Junior Member

Join Date: Nov 2007
Location: Erie, PA
Posts: 35
Thanks for the great How-To! I have been living by smacking the HU for two years now, and I finally gave up. I followed your instructions and everything was like butter! It took me an hour and a half, and it gave me a chance to clean the lens in the process! My 100K Maxima is back to 100%!!!! Thank you so much!!!
04-04-2012, 03:42 PM
#186
Newbie - Just Registered

Join Date: Jul 2005
Posts: 7
Hi is there anyone in Southeast Florida that did this fix and will like to do it again? I'm willing to pay for it. Email me at mannytavarez@hotmail.com
12-13-2012, 05:47 PM
#187
Newbie - Just Registered

Join Date: Dec 2012
Location: Minnesota
Posts: 11
ha ive been looking trough this... my 2002 se is having cutout problems but I'm not sure if I wanna replace this ribbon thing on the board wouldn't it just be better to throw in a double DIN touch screen?

 12-16-2012, 09:50 PM
#189
Newbie - Just Registered
Join Date: Dec 2012
Location: Minnesota
Posts: 11
I finished the ribbon a couple days ago the hardest part was getting off those dang bracket screws i ended up taking a impact wrench to them just apply ALOT of pressure on that screw or you'll strip them like i did one... wasnt fun to drill that sucker out though
12-19-2012, 09:48 AM
#190
I have to do this again, since it started back a year later and now I even have CD ERR F3 which no one knows about.


 01-10-2013, 11:48 AM
#192
Newbie - Just Registered

Join Date: Jan 2013
Posts: 1
can anyone upload or send me the pdf plz,i got this problem too,thanks a lot!
crazyboylukai@yahoo.com.cn
crazyboylukai@yahoo.com.cn
 08-28-2013, 09:31 PM
#194
Senior Member

Join Date: Feb 2012
Location: Bronx, NY
Posts: 973
I fixed my left speaker cutout problem this weekend wanna say thank you org members for so much help and information on here. Love the maxima community. All the steps were on point and there is short cut right at the very end that imjd mentioned
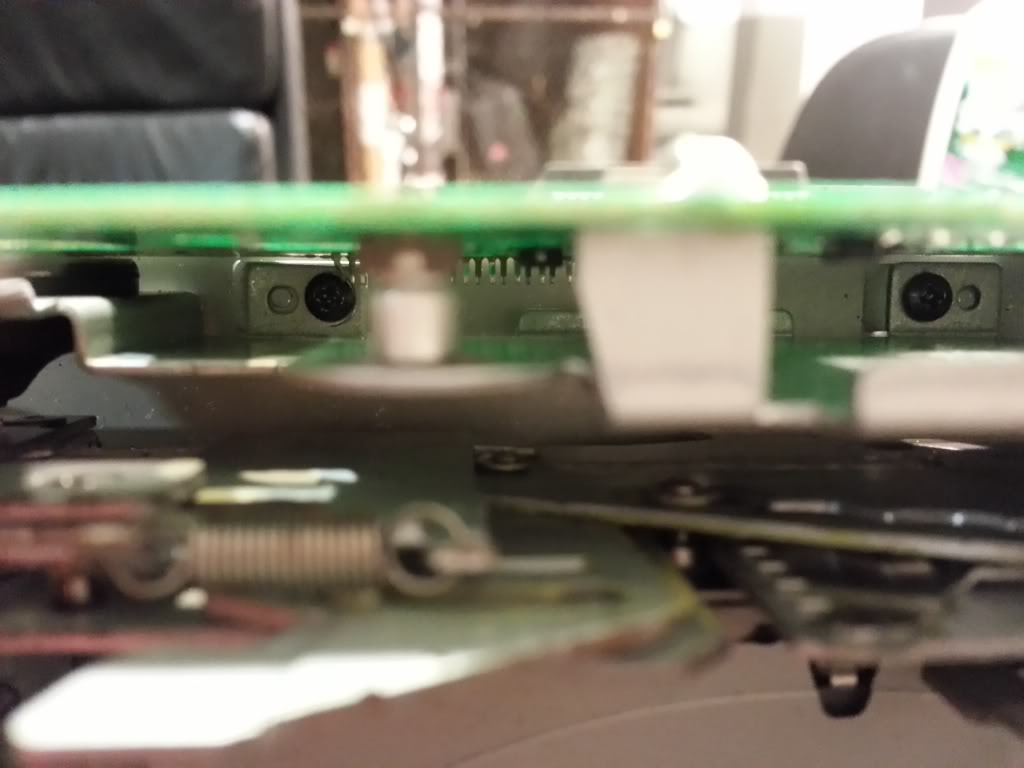
When you get down to the last circuit board, the one on the left of the CD changer that has two soldered stakes, you do not need to unsolder the stakes and remove the springs from that side. The steel sub-frame is mounted by two screws at the bottom and one on the rear. Remove those and the whole assembly lifts out, springs and dampers attached - you will have unobstructed access to both connectors. To re-insert the screws at the bottom of the frame, put the screws upside-down on the head of a small Philips screwdriver and guide them in while holding the unit upside-down, or use a magnetic screwdriver. It is not the easiest in the world but it is faster and less hassle than the unsoldering and fooling with the springs and the rubber dampers.
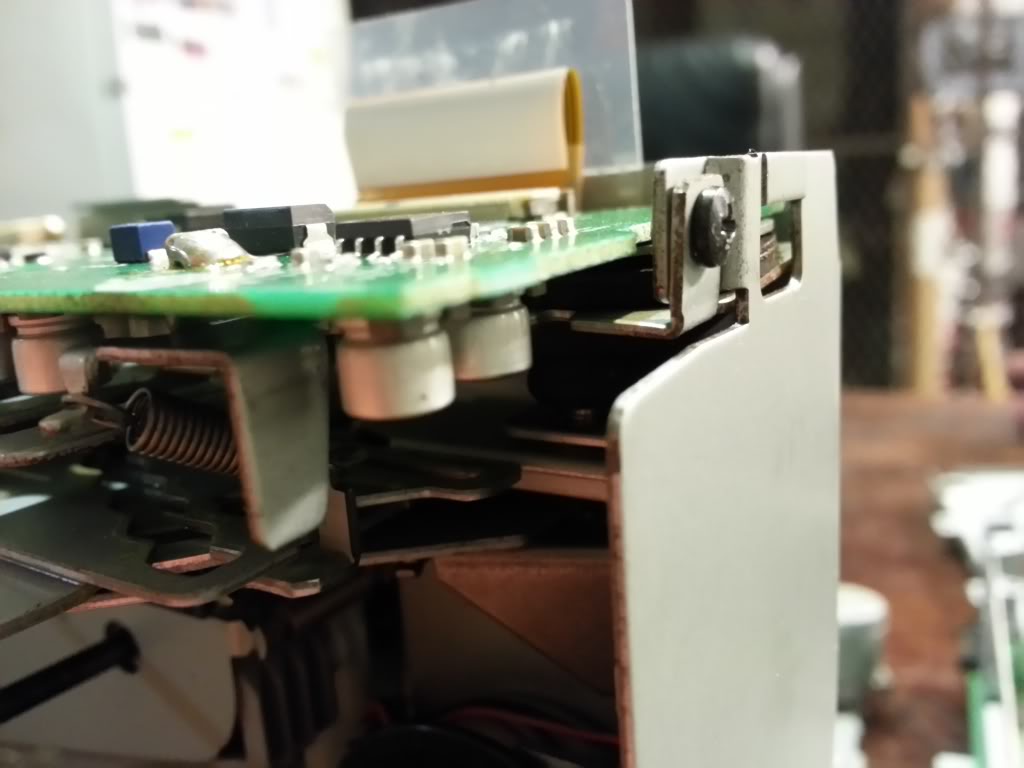
this was a very good tip and it might be difficult to identify the screws hes talking about so i took some pictures of those 3 screws he mentioned to clarify that for other ppls future reference because it was so helpful
here u can see the 2 screws holding the lower frame on. The right screw is the trickiest youll need a long skinny driver to get in there preferably magnetic.
Heres the 3rd screw on the rear he mentions
My cd player sounds so much better, better than its ever sounded the quality is very clear now and no more left speaker cutout very happy this is fixed i ordered a new cable from pac parts # 039195701 heres the link
http://www.pacparts.com/part.cfm?MFG...T_NO=039195701
All the screws are a philips 1 size. After u start assembling the frame make sure the locking tabs for the cable are pushed all the way in cuz they lossen up from the moving around till u start to close it back up. I counted around 66 screws to get here so its a lil complicated. I added an aux aswell at this time since i was already tearing it down, total time was 5 hours with the aux.
When you get down to the last circuit board, the one on the left of the CD changer that has two soldered stakes, you do not need to unsolder the stakes and remove the springs from that side. The steel sub-frame is mounted by two screws at the bottom and one on the rear. Remove those and the whole assembly lifts out, springs and dampers attached - you will have unobstructed access to both connectors. To re-insert the screws at the bottom of the frame, put the screws upside-down on the head of a small Philips screwdriver and guide them in while holding the unit upside-down, or use a magnetic screwdriver. It is not the easiest in the world but it is faster and less hassle than the unsoldering and fooling with the springs and the rubber dampers.
here u can see the 2 screws holding the lower frame on. The right screw is the trickiest youll need a long skinny driver to get in there preferably magnetic.
Heres the 3rd screw on the rear he mentions
My cd player sounds so much better, better than its ever sounded the quality is very clear now and no more left speaker cutout very happy this is fixed i ordered a new cable from pac parts # 039195701 heres the link
http://www.pacparts.com/part.cfm?MFG...T_NO=039195701
All the screws are a philips 1 size. After u start assembling the frame make sure the locking tabs for the cable are pushed all the way in cuz they lossen up from the moving around till u start to close it back up. I counted around 66 screws to get here so its a lil complicated. I added an aux aswell at this time since i was already tearing it down, total time was 5 hours with the aux.
Last edited by DjHackStyle; 08-28-2013 at 09:34 PM.
08-29-2013, 10:11 AM
#195
nice post about your results, and thanks for the pics!
after reading the 3 or so write up's on this (best one in this thread) I really was happy with the "non" soldering way also. Good to post pics because it was a bit difficult to understand through words, kinda like you have to be there to understand the description.
Thanks for a new link on the cable too, I did this in 2011 and 1 year later it came back, and now I have a CD ERR F3, I really hope opening it up and redoing this fix will help that seperate unknown error.
I haven't used the cd player now...in 15 months.... some sad way kinda used to it.
08-29-2013, 05:05 PM
#196
Senior Member
Join Date: Feb 2012
Location: Bronx, NY
Posts: 973
nice post about your results, and thanks for the pics!
after reading the 3 or so write up's on this (best one in this thread) I really was happy with the "non" soldering way also. Good to post pics because it was a bit difficult to understand through words, kinda like you have to be there to understand the description.
Thanks for a new link on the cable too, I did this in 2011 and 1 year later it came back, and now I have a CD ERR F3, I really hope opening it up and redoing this fix will help that seperate unknown error.
I haven't used the cd player now...in 15 months.... some sad way kinda used to it.
after reading the 3 or so write up's on this (best one in this thread) I really was happy with the "non" soldering way also. Good to post pics because it was a bit difficult to understand through words, kinda like you have to be there to understand the description.
Thanks for a new link on the cable too, I did this in 2011 and 1 year later it came back, and now I have a CD ERR F3, I really hope opening it up and redoing this fix will help that seperate unknown error.
I haven't used the cd player now...in 15 months.... some sad way kinda used to it.
08-30-2013, 05:21 AM
#197
i did not use a new cable, but the issue is not the cable it self, it is the way it "seats" and "unseats"
I am trying a new cable this time, and hoping for a longer fix, I am rolling dice because I have this unknown CD ERR F3, not sure what it is. It dosen't even play cd's any more in general.
I am trying a new cable this time, and hoping for a longer fix, I am rolling dice because I have this unknown CD ERR F3, not sure what it is. It dosen't even play cd's any more in general.
08-30-2013, 05:32 AM
#198
Senior Member
Join Date: Feb 2012
Location: Bronx, NY
Posts: 973
i did not use a new cable, but the issue is not the cable it self, it is the way it "seats" and "unseats"
I am trying a new cable this time, and hoping for a longer fix, I am rolling dice because I have this unknown CD ERR F3, not sure what it is. It dosen't even play cd's any more in general.
I am trying a new cable this time, and hoping for a longer fix, I am rolling dice because I have this unknown CD ERR F3, not sure what it is. It dosen't even play cd's any more in general.
Anywayz i think a new cable will last u much longer, im hoping this lasts till i sell the car in 3 more years. That cd error might be the laser not reading the cd, try cleaning the laser when u open it up, if not u might need a new headunit all together.
08-30-2013, 09:47 AM
#199
Right i understood that overtime the clamped cable sort of looses its tightness just because the clamped part is thinner from being clamped for so long.
Anywayz i think a new cable will last u much longer, im hoping this lasts till i sell the car in 3 more years. That cd error might be the laser not reading the cd, try cleaning the laser when u open it up, if not u might need a new headunit all together.
Anywayz i think a new cable will last u much longer, im hoping this lasts till i sell the car in 3 more years. That cd error might be the laser not reading the cd, try cleaning the laser when u open it up, if not u might need a new headunit all together.

Thread
Thread Starter
Forum
Replies
Last Post
hez8813
5th Generation Maxima (2000-2003)
11
03-12-2020 12:06 AM
popdedop
7th Generation Maxima (2009-2015)
6
09-11-2015 11:17 AM