Bose 6 Disc Lockup CD ERR F0 !!FIXED!!
 04-14-2008, 11:46 AM
#1
Member
Thread Starter

Join Date: Sep 2005
Posts: 60
Bose 6 Disc Lockup CD ERR F0 !!FIXED!!
I recently had to deal with a problem that is apparently very common in 5.5 Gen Max's with the Bose system,
The dreaded CD ERR F0 message and a completely non-functional 6 disc changer.
After speaking with my dear old pops (who happens to work in the field of electronics) we decided that if the power were disconnected from the unit and it was allowed to sit for a while (sat for 45min in this case) it would reset itself.
I proceeded to remove the unit from the dash (a real pain in the *****, requiring removal of the entire center part of the dash including the shifter surround, upper vent surround, and climate control HU), unplugged it, and went to Tex Mex for lunch. Came back, plugged it back in and reassembled the whole stack piece by piece.
Turned my key to ON and listened as the 6 CD stack in the changer sat down to the bottom of its travel and checked all 6 CD slots one by one, each time taking a bit longer as it traveled further until it reached slot 6.
Now for the moment of truth, press the Power On button and the radio fires up (lost all the presets but whatever that isn't a big deal). Press the CD button, the suspense mounts as the Bose begins to read the CD.
Suddenly the sweet sweet opening notes of CCR's Born On The Bayou begin to spill out of all 7 speakers and a huge grin appears on my face as I do a fist pump. A sense of accomplishment fills my head as I realized that people have actually spent many of their hard earned dollars to buy new HUs, all because of a problem I Just dealt with in a matter of 2 hours.
TEMPORARY SOLUTION:
Remove HU, disconnect power, allow to sit and reset itself, reconnect, enjoy CDs.
SEMI-PERMANENT SOLUTION:
We will be wiring a switch to the power supply for the HU and placing it in a discreet location under the dash, to save the trouble of having to remove the HU.
Will certainly post a write up on that once it is done, should be pretty simple. Probably in a few weeks i'll do it.
PERMANENT SOLUTION:
Hah, I wishhhh.
Hopefully this helps a lot of people with their Bose issues. Happy to finally contribute something useful to the forum which has helped me out so many times.
Happy Driving and Happy Listening folks


 04-17-2008, 07:37 AM
#8
Member
Thread Starter
Join Date: Sep 2005
Posts: 60
The concern with disconnecting the battery was that it would possibly also reset the engine management memory and/or the antitheft key system that we all hate to replace keys for $100+.
Anybody have any definitive info on that stuff?
Anybody have any definitive info on that stuff?
04-17-2008, 07:27 PM
#9
Senior Member

Join Date: Nov 2006
Location: Omaha
Posts: 319
it should work to reset the radio though, kinda like the ecu if you have a check engine light.
i dont think unplugging it from the back of the radio really did anything different. shoulda just pulled the negative battery cable... IMO
05-28-2008, 06:14 AM
#10
Newbie - Just Registered

Join Date: Nov 2006
Posts: 4
Bose Cd changer ERR FO lock-up etc.
I'm now on my third Bose unit. The OEM lasted about 30,000 miles before constant left channel drop. I lived with banging the dash until 87,000 miles. Found the fix on this forum. Didn't work. Easy to get unit out of dash. Second unit cost $360 from Nissan dealer, my own labor. Lasted until 98,000 miles doing constant disc check routines, occasional lock-up . Third unit is free, the second unit carries a 12 months 0r 12,000 miles warranty by Clarion. Disconnecting the neg terminal can result in your windows or sunroof not working properly. Found fix for that on this forum. Nissan dealer will tell you your glass needs to be re-timed, to the tune of an hour of labor. The fix took five seconds, no kidding. Looked at aftermarket units, varying opinions on sound quality and old bose plugs need to be cut off and a new connecting harness used to mate the Bose system. This is very common to 5th Gen MAximas with the Bose CD changer and as far as I can tell really can't be fixed correctly even by Clarion in California. The only good news is the warranty. My '03 Maxima has 100,000 miles on it so I may be looking at swapping out the radio every 10,000 miles regardless of it's performance. What a pain.
 05-28-2008, 07:08 AM
#12
Supporting Maxima.org Member

iTrader: (1)

Join Date: Sep 2007
Location: Fort Lauderdale, FL
Posts: 385
i recently had my first error... and all i did was remove all the CDs and reload them in... worked after that
but yea.. pulling the fuse should do the trick... shouldnt have to pull the entire HU out of the car...
but yea.. pulling the fuse should do the trick... shouldnt have to pull the entire HU out of the car...
05-29-2008, 02:48 PM
#14
I was also getting this same error. I assumed it was a mechanical problem, thinking my ex gf tried jamming a CD in there before it was ready to take it (as the error appeared when she was putting one in).
I took the thing apart. Found no mechanical problems. It was disconnected for definitely more than 45 minutes (more like 2 or 3 hours). Assembled it back together. Connected it back to the car, and still was getting the error.
Then I installed a Panasonic HU and have been happy ever since (it's been almost a year now).
05-27-2012, 09:02 PM
#15
Supporting Maxima.org Member

Join Date: Oct 2002
Posts: 109
How to fix CD Err F0
I lived with the CD Err F0 problem for several years. It would occasionally fix itself if I banged on the dashboard on top of the radio, but that was annoying and I was afraid I would break something. Also, it worked less and less as time went on. I gave up listening to CDs, which I guess is one solution, but that wasn't really satisfactory!
I took apart the radio a couple of times, thinking the problem must be something mechanical - either a little part got worn out, or some grease got old and dirty and sticky. Either way I hoped I could repair it or clean it. But I could never find anything.
Eventually I took a stab at another solution, and this has worked for nearly a year now. I had the audio drop-out problem again recently, so I had to take apart the radio again to fix that, and this time I took a couple of photos so I can now post them and show how to fix this annoying problem!
The CD Err F0 problem is essentially the same as the left channel drop-out problem - a connector on the CD player circuit board fails. So, the first part of fixing it is to follow the disassembly instructions here:
http://forums.maxima.org/5th-generat...utout-fix.html
(except that where he suggests that you desolder the staked circuit board on the left side of the CD player chassis, it is actually easier to remove two small screws that are down at the bottom of the circuit board. To replace them, put the screw on the tip of your Philips screw driver and hold the unit upside-down while you guide the screw up into place.)
Once you get the thing apart, you will be able to fix your problems. They are the cables that attach here:
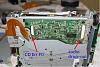
The way that I fix these is to place a layer of Scotch "magic tape" (the frosty kind) on the white plastic backing behind the cable fingers. Then, carefully trim the tape using a razor blade. This seems to work for 5+ years. (Much longer than the original factory design!)
The other end of the audio cable is easy to get at and make the same fix. However, the other end of the cable that causes the error is attached to a small circuit board. You have to remove two screws holding that, and then, with care, you can remove the cable and fix it. Inserting this end of the cable is tricky and takes patience. You can carefully peel up the stiff plastic part of the cable to help a little. When you re-assemble the circuit board, be careful of the small black microswitch lever, which has to go behind a metal tab on the frame.
Attachment 2495
05-29-2012, 05:17 AM
#16

Very nice post, pictures seriously help. thanks! And everyone needs to know about the non solder way which is much easier.
so you are suggesting re-taping a 2nd cable on the left of your first picture and not just the audio cut out cable ?
in other words unplug, and replug and tape 3 ends of the associated wires? (2 for ends for the CD ERR F0, and 1 end for Audio Cut out)
so you are suggesting re-taping a 2nd cable on the left of your first picture and not just the audio cut out cable ?
in other words unplug, and replug and tape 3 ends of the associated wires? (2 for ends for the CD ERR F0, and 1 end for Audio Cut out)
05-29-2012, 09:11 PM
#17
Supporting Maxima.org Member
Join Date: Oct 2002
Posts: 109
I treated all four ends. There is no obvious way to tell which end of either cable has failed, so might as well do all. I believe the "fix" works because the tape that you put on increases the thickness of the plastic backing tab a little bit, so that when the cable is clamped the fingers will remain in contact for a longer time.
The audio cable is easy to remove and replace, once you get the unit disassembled. It's easy to treat both ends of that.
The other cable, the one that causes the CD changer error, is easy to do at the end on the main circuit board which you can see in the first picture. Once you get the other end loose, it is not too hard to apply the tape treatment to that end too. The cable is taped down to a motor, at the arrow that says "peel up for easier access" in the second picture. You could probably peel up the whole thing, but I was afraid of damaging it so I only lifted a corner. But that was for reassembly, it wasn't necessary in order to put the tape on.
The problem is that it is quite difficult to re-seat that end of the cable in its socket on the small circuit board - you can poke it in, but when you try to clamp the connector, the cable wants to pop out. You can't free the circuit board without unsoldering a two-conductor flat ribbon cable, which I didn't want to do. Eventually I got it back together but I just wanted to warn people that it is a bit tricky, and you need to be patient and gentle with it. (It might be easier if you can get someone with small fingers to lend a third hand and set the clamp while you hold the cable and the circuit board.) If you are too aggressive and rip loose some other wires, I don't know what will happen, but probably nothing good.
I didn't mention it in the original post, but it also helps, when you are putting your tape on the white plastic tab, if you trim the tape on all four corners of the plastic. You need to do that at the free end and the sides simply in order to fit the tab back into the connector. But if you also trim the part of the tape that lays back onto the amber-colored plastic cable, then you get a tiny edge that you can press on with a small screwdriver to help re-seat the cable. If you don't do that, the tape will form a smooth slope and you can't press on it. Just be real careful when trimming the tape that you don't cut the white plastic tab or the cable. A really sharp xacto knife or a fresh razor blade is indispensible, and some small tweezers or surgical forceps will help a lot too.
06-13-2012, 10:51 AM
#18
I have CD ERR F3....... is my HU toast?
I feel like if I try to perform what IMJD figured out to do for his CD ERR F0 fix that it might help... i may be totally wrong.
I tried searching and alot of the results have a very vague CD ERR but no codes as IMJD and I have described either
CD ERR F0 or
CD ERR F3
Whats the difference?
I feel like if I try to perform what IMJD figured out to do for his CD ERR F0 fix that it might help... i may be totally wrong.
I tried searching and alot of the results have a very vague CD ERR but no codes as IMJD and I have described either
CD ERR F0 or
CD ERR F3
Whats the difference?
06-13-2012, 11:04 AM
#19
by the way I allready opened the HU up to perform the left side audio cut out fix with successful results for about 11 months... so I am willing to open it up again having done it before.
IMJDs fix seems pretty reasonable and may be associated/and a fix for the f3 error.
IMJDs fix seems pretty reasonable and may be associated/and a fix for the f3 error.
04-03-2013, 12:49 AM
#20
Junior Member

Join Date: Aug 2012
Location: Vancouver
Posts: 31
Left audio drop out fixed!
Thank you IMJD! Scotch tape has done the trick for me. It is a bit of a hassle but I am glad I did it. I like to tinker and it took a few hours. Did both ribbons just in case. Thanks for the pics and info! 
I treated all four ends. There is no obvious way to tell which end of either cable has failed, so might as well do all. I believe the "fix" works because the tape that you put on increases the thickness of the plastic backing tab a little bit, so that when the cable is clamped the fingers will remain in contact for a longer time.
The audio cable is easy to remove and replace, once you get the unit disassembled. It's easy to treat both ends of that.
I didn't mention it in the original post, but it also helps, when you are putting your tape on the white plastic tab, if you trim the tape on all four corners of the plastic. You need to do that at the free end and the sides simply in order to fit the tab back into the connector. But if you also trim the part of the tape that lays back onto the amber-colored plastic cable, then you get a tiny edge that you can press on with a small screwdriver to help re-seat the cable. If you don't do that, the tape will form a smooth slope and you can't press on it. Just be real careful when trimming the tape that you don't cut the white plastic tab or the cable. A really sharp xacto knife or a fresh razor blade is indispensible, and some small tweezers or surgical forceps will help a lot too.

Thread
Thread Starter
Forum
Replies
Last Post