Free STS - Improved version. Perfect parts list.


 03-21-2010, 08:22 PM
#43
Senior Member
Thread Starter
iTrader: (3)

Join Date: Feb 2006
Location: Lewis Center, OH
Posts: 1,806
No. You stated...
If you purchased a 2001 or older Maxima, you can not use this mod. This only works on 2002 6 speeds and newer. It moves shift points just like aftermarket piece in second picture, but is much cheaper and still reversible...
Example of a 5 speed short throw (TOP) and a cheap version of a 6 speed short throw (BOTTOM):

Example of a much nicer 6 speed short throw:

If you purchased a 2001 or older Maxima, you can not use this mod. This only works on 2002 6 speeds and newer. It moves shift points just like aftermarket piece in second picture, but is much cheaper and still reversible...
Example of a 5 speed short throw (TOP) and a cheap version of a 6 speed short throw (BOTTOM):
Example of a much nicer 6 speed short throw:
03-23-2010, 11:12 PM
#44

I just did mine today. Feels great.  I took some pics, but didn't go through them yet, if there is anything worth posting, I'll do that tomorrow.
Question... When I took all of the intake pieces out, and looked at that area and the stock post, I tried moving that bushing up and down, and there was about 3/8 of an inch of play up and down. Is that normal? Now with the clevis pin, and bushing over top, and washer on, I have no play at all. Is there supposed to be a bit or is that good?
And for people wondering how much it shortens the throw, I measured mine. From 3rd gear, down to 4th gear, there was about 5 1/2" of movement. After doing this mod, there is about 3 1/4" of movement. That depends on where you drill your hole, but my hole was 1" on center away from the factory post.
I took some pics, but didn't go through them yet, if there is anything worth posting, I'll do that tomorrow.Question... When I took all of the intake pieces out, and looked at that area and the stock post, I tried moving that bushing up and down, and there was about 3/8 of an inch of play up and down. Is that normal? Now with the clevis pin, and bushing over top, and washer on, I have no play at all. Is there supposed to be a bit or is that good?
And for people wondering how much it shortens the throw, I measured mine. From 3rd gear, down to 4th gear, there was about 5 1/2" of movement. After doing this mod, there is about 3 1/4" of movement. That depends on where you drill your hole, but my hole was 1" on center away from the factory post.


 03-24-2010, 02:26 PM
#48

So, anyone know if that bushing sliding up and down the factory post is normal? After I modded it, I put in a washer to eliminate the play on the new pin that I used, but I'm wondering if that little bit of play was necessary maybe?
09-12-2010, 03:58 PM
#51

Join Date: Aug 2010
Posts: 17
Just made this mod today, after not even having the car on the road for a week. What a difference!
Before starting, I took a piece of string and cut it to the exact length of the shifter cable (from where the cable comes out of its casing to the factory support on the shift lever.) Then I used that string to mark where to drill the hole, this made sure that the new hole wouldn't move the shifter's position inside the car. A compass would work too but space was limited under the hood.
This forum has already answered a million questions I've had about the car, and all answers were found in faq's and stickies. Thanks guys!!!
10-18-2010, 10:36 AM
#52

Great mod!
nismopc, thanks for posting this, just did it today.
Thought I would share some additional hints if you haven't messed with stuff like this before, and post a few pictures.
First step, get rid of all the air intake plumbing!
You need to loosen the hose clamp around the pleated rubber that connects to the throttle body, you need to remove the breather hose where it connects to the block, you need to pinch the clip and pull off the MAF connector, and then you need to remove 4 screws to take out all the air intake plumbing.
That takes 5 or 6 minutes if you have not done it before.
When that plastic crap is off, this is what you will see. The area you are going to be working in is in the lower right of this photo, under that red electrical connection you see. Speaking of which, watch your drill, make sure the chuck is not spinning against it. You don't want to mess up the wires or the connector there.

The hole you are going to drill is DEEP, I don't think anyone mentioned that before. It is about an inch of metal you drill through. I used regular 30-wt motor oil to keep the tip of the 5/16 bit cool, putting a few drops into the hole every couple minutes. I just took my time, running the drill at a slow speed with moderate pressure on it. If you drill on high speed, you better have some really nice bits or you are going to destroy them. Take your time.
Drill a pilot hole first with a 3/16 or 1/8 inch bit, but then you can use a sharp 5/16 to go all the way through. You do not have to drill the hole twice with 2 bits, just get your pilot hole set so the 5/16 doesn't "walk" the surface metal. The drilling took about 20 minutes.
I got the same clevis pin at Lowes, but it didn't fit neatly into the new hole, as there were burrs on the holes in the pin. I had to put it in a vise and take some crocus cloth to it to smooth it down, then it worked OK.
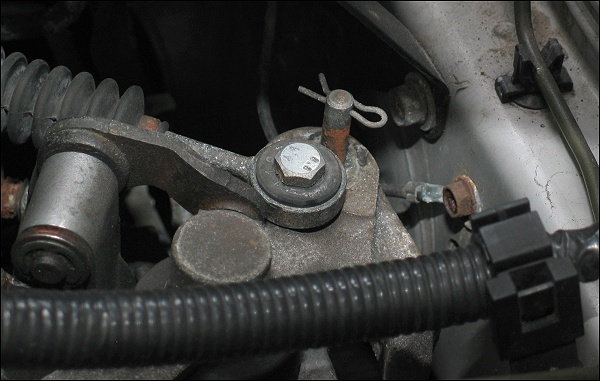
Here is a photo of the location where I put the hole. NOTE in this image the pin is upside down, just there for the purpose of seeing the location. You have to install the pin from below.

OK, I don't know if anyone can put the clevis pin in from above the car; not enough area to get your hand into. I jacked up the front of the car (be safe!) and crawled under, still could not get my hand with the pin in my fingers up into that area.
I ended up using one of those long magnetic flexible things you use to get nuts and bolts out of hard to get places that they fall into. I put the clevis pin on the magnet and got it up through the hole then an assistant grabbed and held it while I got out from under the car.
I used needle nosed pliers to hold the lower part of the pin while I slid the linkage back over it, and installed the factory lock clip. You can see the end result in this photo.

Nothing binds, everything works well, and the "smile factor" is definitely there. I don't think this mod affects the side-to-side movement of the shift ****, but it has a big impact on the up-down travel of the shift handle. Way shorter throw, I did not notice a change in 'notchiness', but it is a lot of fun.
You will notice I did not re-install the factory washer, I could not get it to fit under the hole the lock pin slides through. I don't think that will have any effect on the shifting of the car or the life of the bushing in that location.
Took me about an hour and a half from the time I popped the hood to the time I drove out and tested it.
Hope this helps if you are not a regular Maxima mechanic!
Thought I would share some additional hints if you haven't messed with stuff like this before, and post a few pictures.
First step, get rid of all the air intake plumbing!
You need to loosen the hose clamp around the pleated rubber that connects to the throttle body, you need to remove the breather hose where it connects to the block, you need to pinch the clip and pull off the MAF connector, and then you need to remove 4 screws to take out all the air intake plumbing.
That takes 5 or 6 minutes if you have not done it before.
When that plastic crap is off, this is what you will see. The area you are going to be working in is in the lower right of this photo, under that red electrical connection you see. Speaking of which, watch your drill, make sure the chuck is not spinning against it. You don't want to mess up the wires or the connector there.
The hole you are going to drill is DEEP, I don't think anyone mentioned that before. It is about an inch of metal you drill through. I used regular 30-wt motor oil to keep the tip of the 5/16 bit cool, putting a few drops into the hole every couple minutes. I just took my time, running the drill at a slow speed with moderate pressure on it. If you drill on high speed, you better have some really nice bits or you are going to destroy them. Take your time.
Drill a pilot hole first with a 3/16 or 1/8 inch bit, but then you can use a sharp 5/16 to go all the way through. You do not have to drill the hole twice with 2 bits, just get your pilot hole set so the 5/16 doesn't "walk" the surface metal. The drilling took about 20 minutes.
I got the same clevis pin at Lowes, but it didn't fit neatly into the new hole, as there were burrs on the holes in the pin. I had to put it in a vise and take some crocus cloth to it to smooth it down, then it worked OK.
Here is a photo of the location where I put the hole. NOTE in this image the pin is upside down, just there for the purpose of seeing the location. You have to install the pin from below.
OK, I don't know if anyone can put the clevis pin in from above the car; not enough area to get your hand into. I jacked up the front of the car (be safe!) and crawled under, still could not get my hand with the pin in my fingers up into that area.
I ended up using one of those long magnetic flexible things you use to get nuts and bolts out of hard to get places that they fall into. I put the clevis pin on the magnet and got it up through the hole then an assistant grabbed and held it while I got out from under the car.
I used needle nosed pliers to hold the lower part of the pin while I slid the linkage back over it, and installed the factory lock clip. You can see the end result in this photo.
Nothing binds, everything works well, and the "smile factor" is definitely there. I don't think this mod affects the side-to-side movement of the shift ****, but it has a big impact on the up-down travel of the shift handle. Way shorter throw, I did not notice a change in 'notchiness', but it is a lot of fun.
You will notice I did not re-install the factory washer, I could not get it to fit under the hole the lock pin slides through. I don't think that will have any effect on the shifting of the car or the life of the bushing in that location.
Took me about an hour and a half from the time I popped the hood to the time I drove out and tested it.
Hope this helps if you are not a regular Maxima mechanic!
Last edited by trooplewis; 10-18-2010 at 10:56 AM.
10-18-2010, 11:25 AM
#53
Supporting Maxima.org Member

iTrader: (5)
Join Date: Jul 2007
Location: North Shore, MA
Posts: 1,795
Nice write up.....great extra detail.
The only instructions missing are installing the ES bushings!!!! Get that stock bushing out of there!!!!
I would have switched that banjo bushing while I was in there.....
The only instructions missing are installing the ES bushings!!!! Get that stock bushing out of there!!!!
I would have switched that banjo bushing while I was in there.....
10-23-2010, 01:15 PM
#54

Just did this yesterday! GREAT little mod. Wish they did this for us originally, though i do enjoy the feeling of accomplishment.
Thanks nismo, deckdout, and SR20!!!
Thanks nismo, deckdout, and SR20!!!
Last edited by shdwonthsun; 10-23-2010 at 01:19 PM.
11-13-2010, 06:14 PM
#55
Member

Join Date: Sep 2007
Location: bergen county nj
Posts: 143
soo... i was doin this and my tap broke off in the hole... snapon too... soo ive been messing with it for a while its not coming out
so i guess i gotta get a new one and start over... does anyone know what that part is called?
so i guess i gotta get a new one and start over... does anyone know what that part is called?


 Welcome to the STS club!
11-15-2010, 05:48 AM
Welcome to the STS club!
11-15-2010, 05:48 AM
#59
I've had the tap-and-bolt version now for a few years without issue.
But if I were to do it all over again, I rather like this clevis pin approach here in this thread.
However, I can say with first-hand experience, if you can get your hands on an old Watkins STS Adapter kit, that's truly the superior approach. Wish I could find one.
But if I were to do it all over again, I rather like this clevis pin approach here in this thread.
However, I can say with first-hand experience, if you can get your hands on an old Watkins STS Adapter kit, that's truly the superior approach. Wish I could find one.
01-26-2011, 06:07 PM
#60

I have a question:
I looked at both the old and new method of doing this mod. For the first one, it said not to drill a hole through it. I was under the assumption that the same applied to this one but then since the head of the clevis pin seems to be bigger than the rest of it, I would expect there to be some play (please correct me if I'm wrong).
So I was wondering, if I do this method, do I have to drill a hole through the metal piece, and then stick the pin up from the bottom, or am I supposed to just be able to drill the hole and drop the clevis pin in from the top?
01-26-2011, 06:13 PM
#61
its easier than it looks. took me about 10 mins from hood pop to road test. have a friend keep a decent stream of WD-40 going to cool the bit when it starts smoking. drill straight, slow, and true
08-05-2011, 10:38 PM
#62
Junior Member

Join Date: Oct 2007
Location: Indianapolis, IN
Posts: 38
I apologize for resurrecting this thread but I have a dilemma. I am a complete IDIOT and managed to drill 95% of the hole before my Titanium drill bit broke off in the hole. Everything is lined up, I used a 3/16" bit to start my hole, 5/16" to finish and the very tip of the bit has just broken through to the other side.
Any suggestions for getting a Ti bit out of the hole? I used a hand grinder to get the surface flush so I could hopefully drill it out with a Cobalt drill bit but that isn't really working.
The frustration of being so close, yet so far. Help!!
Any suggestions for getting a Ti bit out of the hole? I used a hand grinder to get the surface flush so I could hopefully drill it out with a Cobalt drill bit but that isn't really working.
The frustration of being so close, yet so far. Help!!
08-06-2011, 04:19 AM
#63
I apologize for resurrecting this thread but I have a dilemma. I am a complete IDIOT and managed to drill 95% of the hole before my Titanium drill bit broke off in the hole. Everything is lined up, I used a 3/16" bit to start my hole, 5/16" to finish and the very tip of the bit has just broken through to the other side.
Any suggestions for getting a Ti bit out of the hole? I used a hand grinder to get the surface flush so I could hopefully drill it out with a Cobalt drill bit but that isn't really working.
The frustration of being so close, yet so far. Help!!
Any suggestions for getting a Ti bit out of the hole? I used a hand grinder to get the surface flush so I could hopefully drill it out with a Cobalt drill bit but that isn't really working.
The frustration of being so close, yet so far. Help!!
08-06-2011, 09:30 AM
#64
Junior Member
Join Date: Oct 2007
Location: Indianapolis, IN
Posts: 38
You're pretty much !@#$ed if you're trying to use a hand drill, forget cobalt it'll burn out faster than you can say uh oh! You could try a special (expensive) Carbide "Hard Cut Drill" BUT it needs to be done on a vertical milling machine at about 1500RPM spindle speed with a lot of pressure on the "Hard Cut" drill (to get it red hot) and anneal the broken drill as it cuts. Best bet take the part off find a shop that can EDM the sucker out.
Yeah, I think I am going to have to take the control assembly off and have them get it out.
On a side note, I just replaced the transmission fluid with MT-90 and the OEM shifter bushings with ES shifter bushings and it feels like a completely different car. NWP intake spacers put a grin on my passenger's face as well!

 For a great thread!
  11-29-2011, 04:03 PM
#67

damn what an awesome mod, it was just a PITA to drill through. I bought a dewalt titanium bit and it went about a half way through before it just stopped actually making the hole deeper, i used the oil drops to keep it cool. they actually took it back at home depot with no prob, got a Rigid drill bit and finished no prob... what a difference! 
completely recommend this anyone and everyone! and thanks for the great write up(s)
guess now its time for some es shifter bushings, do they really make that much of a difference?
completely recommend this anyone and everyone! and thanks for the great write up(s)
guess now its time for some es shifter bushings, do they really make that much of a difference?
11-29-2011, 06:47 PM
#68


 12-30-2011, 06:04 PM
#72
Junior Member
Join Date: Oct 2007
Location: Indianapolis, IN
Posts: 38
When I did this, I first made sure the car was in neutral and then pulled the linkage off the post, moving the linkage sideways with my finger (to where the earlier pictures showed it). I held it there with a screwdriver and had someone get inside my car and move the shifter from side to side to make sure the car was still in neutral. Then I took a punch and hit where the screwdriver was holding it. After you have marked the spot, you can just drill a hole where you marked. No need for the assembly to be removed - you can just drill while it is still in the car.
I would try the drill bit listed above as my titanium bit cracked when it was almost through the bottom. I also was an idiot and didn't use oil as I was drilling. Had to have a shop take the whole assembly out of the car and get the bit out = $100 and no longer a "free STS".
When you do this, replace the shifter bushings and replace your tranny fluid with MT-90 and it will feel like a completely different car.
12-30-2011, 07:16 PM
#73
My mechanic did this with the bracket on the car as most instructions suggest is all that's necessary. As I recall, he drilled very, very slowly, while I applied oil to the area being drilled.
I've had the free STS now for almost 3 years, and no problems. The loss of leverage did make winter shifting rather stiff while the car was warming up, but MT-85 gear oil resolved that nicely.
I've had the free STS now for almost 3 years, and no problems. The loss of leverage did make winter shifting rather stiff while the car was warming up, but MT-85 gear oil resolved that nicely.
12-30-2011, 07:26 PM
#74
well thank you guys. im a mehanic and i only use Snap-On tools so ill snag my drill and bits and my cutting oil from the drill press and ill just use extreme caution on the drilling. i figured i could do it on the car. already have es shifter bushings and ill switch to the 85 weight oil here prolly right after work tomorrow we got some mobile one oil in boxes in the back is it the same thing?
12-30-2011, 07:32 PM
#75
Redline MT-85 Gear Oil for the transmission, at $15/quart. You'll need 3, but only replace what you take out. I think the capacity is 2.6 quarts.
I paid the dealership for a half-hour labor one afternoon while there for an oil change. In, out, no fuss, no mess.
I paid the dealership for a half-hour labor one afternoon while there for an oil change. In, out, no fuss, no mess.
07-06-2012, 11:13 AM
#76
Junior Member

Join Date: Jul 2010
Location: Bogota, COL
Posts: 87
I might be the last person doing this mod, but I gotta say great STS mod, did it at the same time of ES bushings and the feel is amazing! thanks guys for the write-up, I would reiterate (for those who have not done it yet) the slow drilling and being careful as only the surface (upper and lower) is hardened, the inside of the bracket is softer, I could feel the drill bit going faster after I passed the hard part of the surface until I got to the other side, and there is not much room but just enough to push the pin through, no need to crawl under the car. I also added a little bracket to the shifter in the cabin to help with the side-to-side motion and it helped with the play of the shifter , I will post pics later.
09-17-2012, 02:43 PM
#77

Join Date: Oct 2010
Location: Tampa, Fl
Posts: 16
Yeah, I think I am going to have to take the control assembly off and have them get it out.
On a side note, I just replaced the transmission fluid with MT-90 and the OEM shifter bushings with ES shifter bushings and it feels like a completely different car. NWP intake spacers put a grin on my passenger's face as well!
On a side note, I just replaced the transmission fluid with MT-90 and the OEM shifter bushings with ES shifter bushings and it feels like a completely different car. NWP intake spacers put a grin on my passenger's face as well!
01-08-2013, 11:30 AM
#79
Junior Member

Join Date: Aug 2012
Location: Ontario, Canada
Posts: 30
Thanks for the great write-up's everyone. I did this mod over the holidays and wow what a difference!! I grabbed a jug of used motor oil I had lying around to cool the bit and drilled slowly and no problems. I have the ES bushings but have to install the ones in the car still.
This has to be the best $1.15 I've spent in a long time, makes driving the car much more enjoyable.
Now i just have to fix the awful wind noise from the back of the car!!
This has to be the best $1.15 I've spent in a long time, makes driving the car much more enjoyable.
Now i just have to fix the awful wind noise from the back of the car!!
