Rusted out rocker panels.
 07-26-2010, 02:13 PM
#1
Junior Member
Thread Starter

Join Date: May 2007
Location: Springfield Twp, Ohio
Posts: 88
Rusted out rocker panels.
On both sides of my 96 Maxima the rear foot or so on both rockers ended up rusting through. They both started with silver dollar sized hole under I sanded it down and they crumbled a good foot or so. I bent up new patch panels and welded them in. I was told that this was a problem with the 4th gens. Why is this? Is there a way to prevent them from rotting out again? I was told maybe drill drain holes on the bottoms?
 07-26-2010, 09:13 PM
#2

Rocker Panel Rust.
I have the same problem with my 97 Maxima. I am not sure how to prevent future rust after repairing accept keep it away from salt and excessive water. I got a quote to replace one quarter panel and rocker panel and it was around $3200.00. That was only one side I need to do both sides.
07-27-2010, 05:11 AM
#4
Supporting Maxima.org Member

iTrader: (1)

Join Date: Nov 2002
Location: Montreal, QC,Canada
Posts: 253
Join the club
I have the same situation with my 99...go figure, since I live in Montreal, the road salting capital of the world. I've been looking for a source for new rocker panels for over a year without success. Seems the only solution is to cut the metal out and replace it, as you did tire. As far as preventing a repeat, I'm going to shoot the inner rocker (as much as possible) with epoxy primer or POR15, then treat it with a sticky/oily rustproofing aerosol I use on the underside. Drain holes, sort of..I'm going to drill some access holes and install removable plugs so that I can go in every year and spray more rustproofing oil. If anyone knows of a source for complete rocker panels, please sound in.
Cheers.
Cheers.
 07-27-2010, 07:23 PM
#6
Senior Member

Join Date: Nov 2000
Posts: 3,883
Isn't there a T that joins the sunroof drain tube and the power antenna drain tube that breaks, allowing water to collect inside the rear-right 1/4? That happened to me....I used bondo to fix the inside, and simply rust reformer, primer, and paint on the outside...
09-11-2010, 10:20 AM
#7
Senior Member

Join Date: Oct 2003
Location: Mississauga, Ontario
Posts: 438
My 98 Max too has rust holes on both rocker panels. Damn, who did I miss that, the rest of vehicle has so little rust, only some on hood near the windshield. (A yearly sand down and touch paint controls that).
We're speaking about the outer panels below the doors?
Just bought some body filler kit, but that is really no solution and a time waster now.
$3000 for a body shop job?
Hope to keep the car as long as possible. Can I get away with aluminum duct tape?
Serious.
Any other options other than supporting the local body shop?
Last edited by holymoly; 09-11-2010 at 10:39 AM.
09-12-2010, 04:09 PM
#8
Member

Join Date: May 2009
Location: South Dakota
Posts: 282
mine has the same issue. both rockers are rusting out..the passenger side's the worst.i need to fix those cuz it looks really bad...i got mine in minnesota but i live in south dakota and they dont use salt on the roads here so if i fix it i'll probably not have that problem again. is it really that much to fix it? $3000??
 09-12-2010, 08:45 PM
#10
Member

Join Date: Feb 2003
Posts: 113
I'm glad I live out west, we salt roads but not as much. One thing I noticed is the front wheels will throw a lot of mud and dirt up under the area where some cars have mudflaps . When I put my mudflaps on I pulled out a bunch of it. I would think it would be best to find donors from wrecking yards out west, $3k does sound like a lot.
09-12-2010, 08:48 PM
#11

suprisingly enough, mine hasnt started rustting...that i know of:/....but i do have silver dollar size bubble and paint chip area starting to rush through behind my passenger rear tire right at the 90 degree spot...obviously where all the ground debris collects, i try my best to clean it out whenever possible...but..its impossiblt to keep spotless all the time....just wondering if this is a common thing on our 4th gens..
ps...im a newb, is this considered thread jacking?...like asking the same question about another part of the car? sorry if it is:/..just wanna learn quick about what to and not to do on threads
ps...im a newb, is this considered thread jacking?...like asking the same question about another part of the car? sorry if it is:/..just wanna learn quick about what to and not to do on threads
09-12-2010, 08:51 PM
#12

just fix it yourself, its not that hard. i got quoted at MINIMUM $2500 for mine, and with someone elses help we did it ourselves in a week and with a few hundred bucks in parts
09-15-2010, 06:35 AM
#13
Senior Member
Join Date: Oct 2003
Location: Mississauga, Ontario
Posts: 438
What exactly did you do? If for a few hundred it looks like the real deal, may be worth it.
A few of us are counting on ya.
 09-15-2010, 07:38 AM
#14
well cliffs are i bought my Max with the passenger rear wheel well eaten through, the part from the rear of the wheel well to the bumper being eaten through, drivers front wheel well had bad surface rust, and passenger wheel well had a bit of surface rust as well as the drivers. both rear doors near the wheel well had nasty surface rust too because thats where the rear doors drain
someone else worked with me on the rust because i didnt know what to do either. first, we rough sanded the rust out with a sander, the rear doors needed a angle grinder to get the rust out. then, we used a fine sander to smooth things out until there was no rust showing and only clean shiny metal.
then, mixed up Bondo and applied it over the shiny metal, sanded it and sometimes added more Bondo. when the Bondo looked good, sanded it down all the way and used a block sander to feather it out smooth. afterwards, used filler to get any small craters that were left after
then, some parts we used metal tape and just prime, paint, clearcoat. you can go more extensive with painting but i didnt want to go that extensive because the cars going into racing.
the eaten through parts we just made up some metal and held it with rivets and Bondo'd over it, again you can go more extensive with welding but i didnt have the need.
where my windshield meets the roof, it was rusting and bubbling and someone just put black silicone over it used a sander and screwdriver to get it out, sanded out the rust, and repaired the rust and used clear silicone to seal the windshield again
a year and a bit later, only the rear door rust has come back (you can faintly see it in my sig) but thats unhelpable with winter and water draining.
i think shops charge so much because to do it properly, its time consuming. feathering Bondo takes some time as well.
someone else worked with me on the rust because i didnt know what to do either. first, we rough sanded the rust out with a sander, the rear doors needed a angle grinder to get the rust out. then, we used a fine sander to smooth things out until there was no rust showing and only clean shiny metal.
then, mixed up Bondo and applied it over the shiny metal, sanded it and sometimes added more Bondo. when the Bondo looked good, sanded it down all the way and used a block sander to feather it out smooth. afterwards, used filler to get any small craters that were left after
then, some parts we used metal tape and just prime, paint, clearcoat. you can go more extensive with painting but i didnt want to go that extensive because the cars going into racing.
the eaten through parts we just made up some metal and held it with rivets and Bondo'd over it, again you can go more extensive with welding but i didnt have the need.
where my windshield meets the roof, it was rusting and bubbling and someone just put black silicone over it
used a sander and screwdriver to get it out, sanded out the rust, and repaired the rust and used clear silicone to seal the windshield againa year and a bit later, only the rear door rust has come back (you can faintly see it in my sig) but thats unhelpable with winter and water draining.
i think shops charge so much because to do it properly, its time consuming. feathering Bondo takes some time as well.
Last edited by chrome91; 09-15-2010 at 07:40 AM.
09-15-2010, 08:00 AM
#15
Member

Join Date: Aug 2010
Posts: 85
 09-15-2010, 10:28 AM
#16
yeah welding is crazy. Bondo sells a metal piece that you can use for eaten out wheel wells and you shape it to the curve of a wheel well but i just used a L metal bar i had laying around and curved it with a vice, you cant even tell the wheel well had a eaten through spot

 09-30-2010, 08:00 AM
#20
Senior Member
Join Date: Oct 2003
Location: Mississauga, Ontario
Posts: 438
Just put a three inch square of fiberglass at end of rear rocker panel just below rear door beside the wheel wheel.
Is it important to then use body filler on top? I can only get touchup paint to cover then over the primed area if I go the filler route.
It looks ok without the body filler as is. Just want to contain the rust, even if annual job.
My intention is to minimize my work because the rust will come back, but slower.
Last edited by holymoly; 09-30-2010 at 08:51 AM.
10-03-2010, 07:29 PM
#21
Senior Member

Join Date: Mar 2004
Location: MA
Posts: 540
my car sat for 2 years and i noticed a hole on the seem of the rocker under the driver side rear door. touched it with my hand and it turned into a hole the size of a softball. went to maaco to get a quote and they quoted me 360 to cut, weld and repaint the rocker. i just dont know if i am a fan of their work. you get what you pay for but to have an autobody fix it its 3 times that. i think id trust them to fix that one spot, still on the fence about it though.
10-03-2010, 07:51 PM
#22
my car sat for 2 years and i noticed a hole on the seem of the rocker under the driver side rear door. touched it with my hand and it turned into a hole the size of a softball. went to maaco to get a quote and they quoted me 360 to cut, weld and repaint the rocker. i just dont know if i am a fan of their work. you get what you pay for but to have an autobody fix it its 3 times that. i think id trust them to fix that one spot, still on the fence about it though.
theyre HORRIBLE, just read online reviews. the ONLY single, and ONLY way i would ever go to Maaco is if i prepped a car myself and just let them paint. and i mean 100% prep myself so they dont fukc up anything (which they probably would anyways)
honestly $360 seems cheap IMO
10-03-2010, 09:36 PM
#23

I would recommend fiberglass body filler, as it is 100% water resistant. Regular body filler (bondo) is not water resistant, and can absorb water.
For primers, I would only recommend epoxy primer, as that is water resistant as well.
For primers, I would only recommend epoxy primer, as that is water resistant as well.
10-04-2010, 07:59 AM
#24
Senior Member
Join Date: Oct 2003
Location: Mississauga, Ontario
Posts: 438
Here is a pic of the right side rocker. Will need the long strand filler.

I put some fiberglas-only on left side, but this won't last by itself, better apply fiberglas filler?
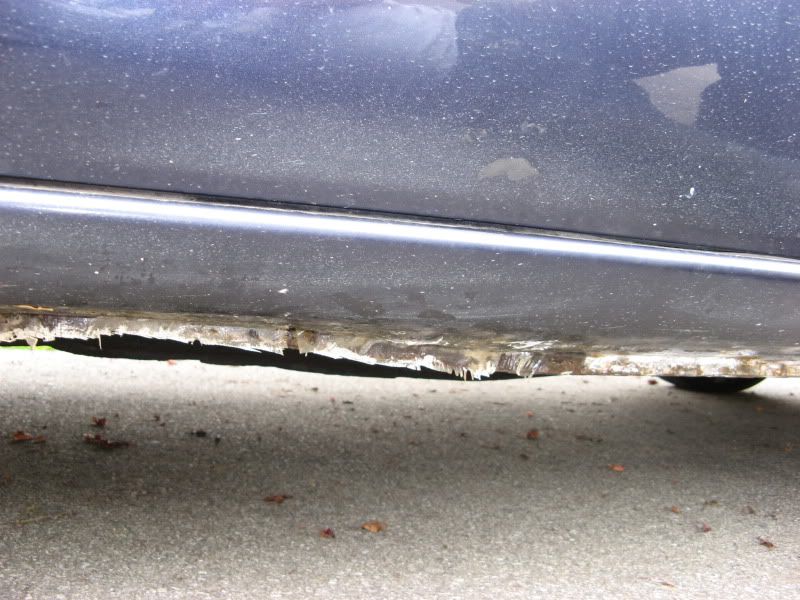
Here is my fiberglass DIY work. Probably leave as is, and not prime or paint.
================================================== ===================
Best quote I got was $600 per side. Thing is I want to keep the 98 max long time to come.
But $1200?

Last edited by holymoly; 10-10-2010 at 08:31 AM.
10-10-2010, 08:35 AM
#27
Senior Member
Join Date: Oct 2003
Location: Mississauga, Ontario
Posts: 438
Looks like Canadian tire no longer carries the touch-up paint for a 98 Maxima.
I recall Nissan doesn't keep it either, as last time they directed me to Canadian Tire. So, how does one find paint?
I recall Nissan doesn't keep it either, as last time they directed me to Canadian Tire. So, how does one find paint?
 10-10-2010, 08:21 PM
#30
just go to the Nissan dealership, when i needed paint while fixing my rust i went there but they could only provide a small bottle of touch up paint, i just went to the Napa paint shop and got a few spray cans. as long as you have your paint code, youre set. i would imagine if Nissan could make touch up paint for my 3rd gen a 4th gen is doable
10-10-2010, 09:41 PM
#31
Member

Join Date: Sep 2010
Location: Buffalo NY
Posts: 51
Here is a "not so short" but very thorough ten step plan for fixing rust on Maximas, I perfected these from hondas *yes I know* but they are notorious for rear quarter rot. and the procedures for repairing this are identical..
...Deep breath ace ventura style.
Step One: Wash car, let air dry, solvent wash area to remove oils/grease *I like to start with as clean a surface as possible*
Step Two: Gutting time -if your going to fix the rust there's no "I'll just make it look good for now", you either do it or not - take a screwdriver or tool of choice and poke away all the easy to get rust, all the stuff that is easy to knock out.
Step Three:Clean up all now loose rust.
Step Four: Now you should be left with a gaping hole with jagged edges of just slightly rusted metal, here you can take one of two paths, one you can spray some rust converter on these edges, make them suitable for welding, or two -my personal choice - cut the slightly rusty metal clean away minding that your going to have to make a patch to match that hole so try to keep the shape simple enough.
Step Five: Patch making time! Start with some nice clean sheet metal, it will be slightly greasy don't remove this it's a rust prevention tool and will defeat the purpose of all this. Have fun with a sheet metal press, bender or snips and get the shape you want making sure your patch doesn't just line up but has a slight overlap. Once done weld the patch together and your ready to start.
Step Six: Prep your patch, take some solvent wash and give the patch a good cleaning, spray the backside -The side that will be inside the car - with some good high quality undercoating. And scuff the front of the patch to ready it for weld.
Step Seven: Prep your car, re-wash the area around your rust-out with solvent wash, and scuff up the edges. Undercoat the area inside the quarter panel, I like to spray some rust converter in there during step four, after all it can't hurt. Note* some people are inclined to use spray foam (Great Stuff) inside the quarter panel, don't do this it will just help collect water/moisture and that's a no no.
Step Eight: Clamp in patch and get really familiar with a Mig welder, you don't want to char the metal or burn thru or god forbid light a fire inside the quarter *I've done it before but what can u do, it happens.* Apply short spot welds starting about an inch apart, then go back and slowly fill in the gaps, the goal here is to allow the metal to cool before the second round of welds, this not only helps prevent fires but more importantly -yes even more important than fire- stops your patch and quarter from warping due to the intense heat.
Step Nine: Now your patch is in and looking nice except for those ugly welds, if you did your welds right you should have a slight lump of weld and need minimal welding, if not break out the grinder and grind away taking note to not overheat the metal - warping!. The welds don't have to be smooth as can be, remember body filler works wonders.
Step Ten: Filler Time! Believe it or not, the easy part is over, to me making the patch and getting it in there is simple, applying filler is equal parts science and art, you can learn to do this but practice makes perfect here, It's easy to apply more if not enough than have to grind/sand a ****load back off. A tip here is since your going to be applying multiple layers of filler, use different color hardener each time, that way when sanding you can tell how far you've gone down. Once good with the filler, apply a nice coat of glaze, which is pretty much filler but very thin and helps fill all those pesky pits you tend to get with filler. DO NOT, i repeat DO NOT wet sand filler, just don't. Once you've achieved the look your satisfied with, start spraying some high build primer in thin layers, sanding as you go.
And there you go! In a nutshell that's everything you will need to know in fixing rust not only on your quarter panel but pretty much anywhere on your vehicle, instructions can be adapted to work on scratches and dents by removing some steps. I've left out the final step which is prep/paint because I've dragged this on too much as it is and that's a whole other bag of snakes. Hope this helps let me know if you have any other questions!
...Exhale!
10-14-2010, 11:59 AM
#32
Newbie - Just Registered

Join Date: Jul 2010
Location: Dighton, Ma
Posts: 7
i got the same problem on my passenger side rocker its a pretty good size rot hole. im just gunna cut some aluminum & fiberglass over it & put some rubber undercoating on both sides on the bottom. i live in new england & i bought my max from R.I. & its got a few rust spots like in the tire well on the rear drivers side & both front fenders at the bottom are rotted
10-14-2010, 06:04 PM
#33
Senior Member
Join Date: Mar 2004
Location: MA
Posts: 540
couldnt we just go to the salvage yard and cut out a nice size part of a rocker panel, then cut and weld that we needed in place? i think that's what i'm gonna do. what should i bring to the salvage yard to be able to cut out a chunk of a rocker panel? mine is right where the seam is!
10-14-2010, 10:14 PM
#34
Member
Join Date: Sep 2010
Location: Buffalo NY
Posts: 51
cutting out a piece of metal from an existing vehicle wouldn't be advisable.
Best bet would be to cut that piece out, use it as a template and make a patch using new thicker sheetmetal. If you don't want to do the job twice do it right the first time. esp with bodywork!
*Edit* To cut out sheetmetal on a car you would need either a plasma cutter *best but highly inpractical*, acetalyne torch *messy cut, good luck getting the gas into the j.yard* or a cutter wheel *electric or air*
Last edited by RustyMax; 10-14-2010 at 10:19 PM.
10-15-2010, 02:11 PM
#35
Senior Member
Join Date: Mar 2004
Location: MA
Posts: 540
cutting out a piece of metal from an existing vehicle wouldn't be advisable.
Best bet would be to cut that piece out, use it as a template and make a patch using new thicker sheetmetal. If you don't want to do the job twice do it right the first time. esp with bodywork!
*Edit* To cut out sheetmetal on a car you would need either a plasma cutter *best but highly inpractical*, acetalyne torch *messy cut, good luck getting the gas into the j.yard* or a cutter wheel *electric or air*
Best bet would be to cut that piece out, use it as a template and make a patch using new thicker sheetmetal. If you don't want to do the job twice do it right the first time. esp with bodywork!
*Edit* To cut out sheetmetal on a car you would need either a plasma cutter *best but highly inpractical*, acetalyne torch *messy cut, good luck getting the gas into the j.yard* or a cutter wheel *electric or air*
 10-03-2011, 04:54 AM
#38

cutting out a piece of metal from an existing vehicle wouldn't be advisable.
Best bet would be to cut that piece out, use it as a template and make a patch using new thicker sheetmetal. If you don't want to do the job twice do it right the first time. esp with bodywork!
*Edit* To cut out sheetmetal on a car you would need either a plasma cutter *best but highly inpractical*, acetalyne torch *messy cut, good luck getting the gas into the j.yard* or a cutter wheel *electric or air*
Best bet would be to cut that piece out, use it as a template and make a patch using new thicker sheetmetal. If you don't want to do the job twice do it right the first time. esp with bodywork!
*Edit* To cut out sheetmetal on a car you would need either a plasma cutter *best but highly inpractical*, acetalyne torch *messy cut, good luck getting the gas into the j.yard* or a cutter wheel *electric or air*
10-03-2011, 05:09 AM
#39
That would classify as "just getting by". To fix it right, you should use sheetmetal. Bending sheetmetal isn't hard - you just need to be able to clamp it to a workbench and clamp wood or metal to it to help you bend it.
04-26-2012, 05:09 PM
#40

cutting out a piece of metal from an existing vehicle wouldn't be advisable.
Best bet would be to cut that piece out, use it as a template and make a patch using new thicker sheetmetal. If you don't want to do the job twice do it right the first time. esp with bodywork!
*Edit* To cut out sheetmetal on a car you would need either a plasma cutter *best but highly inpractical*, acetalyne torch *messy cut, good luck getting the gas into the j.yard* or a cutter wheel *electric or air*
Best bet would be to cut that piece out, use it as a template and make a patch using new thicker sheetmetal. If you don't want to do the job twice do it right the first time. esp with bodywork!
*Edit* To cut out sheetmetal on a car you would need either a plasma cutter *best but highly inpractical*, acetalyne torch *messy cut, good luck getting the gas into the j.yard* or a cutter wheel *electric or air*