Philips Daylight 4 Daytime Running Lights (DRL) with Auto-Dim module Instructions!
 02-14-2014, 11:16 PM
#1
Junior Member
Thread Starter

Join Date: Dec 2013
Posts: 23
Philips Daylight 4 Daytime Running Lights (DRL) with Auto-Dim module Instructions!
Purchased some
and just installed them the other day and they look awesome. Initially, was was going to install them in the brake duck area like everyone else here on the forum, but instead installed them in between the fog light area very easy, and I must say, looks amazing. They fit perfectly flush with the front of the car, so nothing sticks out, and look factory installed. I chose the Philips Daylight 4 over the 8 because I don't care for the 8 individual LED dots look, and because the Daylight 4 has 4 Luxeon Rebel Led's per light unit that split 6 watts, which is running each LED at around 1.5 watts, versus the Daylight 8 that has 8 LED's and splits 7 watts between them, running each LED around 0.875 watts. Needless to say the Daylight 4's are significantly brighter and better looking in my mind.
Things to know: Philips Daylight 4 comes with a regular on/off module, NO AUTODIM. Only the Philips daylight 8 comes with the Autodim module. """IT IS NOT HARD TO GET THE PHILIPS DAYLIGHT 8 REPLACEMENT MODULE FOR FREE, when the one that comes in the package is faulty for US cars and causes flickering, as the Philips Daylight was designed for UK cars! Just contact Philips and they will ask you for your mailing address""" Read through the Philips daylight 8 reviews from amazon and you will see how easy it is to get a Auto-dim module. Mine was sent UPS overnight!
Anyways on to the good stuff.
Installation was as simple as could be.
Once you have gotten your replacement Philips Daylight 8 module in the mail for FREE, proceed to installation.
10 STEP DAYTIME RUNNING LIGHT INSTALL GUIDE!
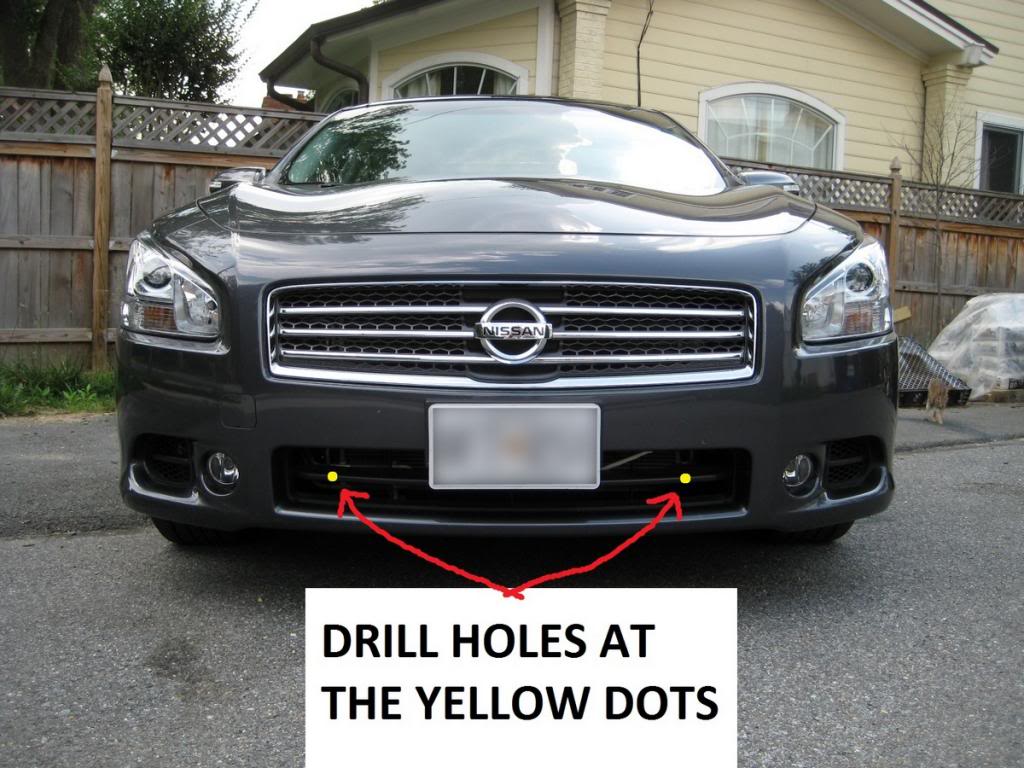
1. Place bracket where you plan to mount and drill holes in center area for wire connector to fit through, as shown in first pic. Confirm the ends of the DRL wire connector's can fit through the hole, if not make it bigger.
2. Screw on DRL mounting brackets, making sure to center the middle hole on brackets to hole you previously drilled.
3. Install DRL's, but DON'T snap into place just yet.
4. Connect control module's positive and negative wires to there respective battery leads.
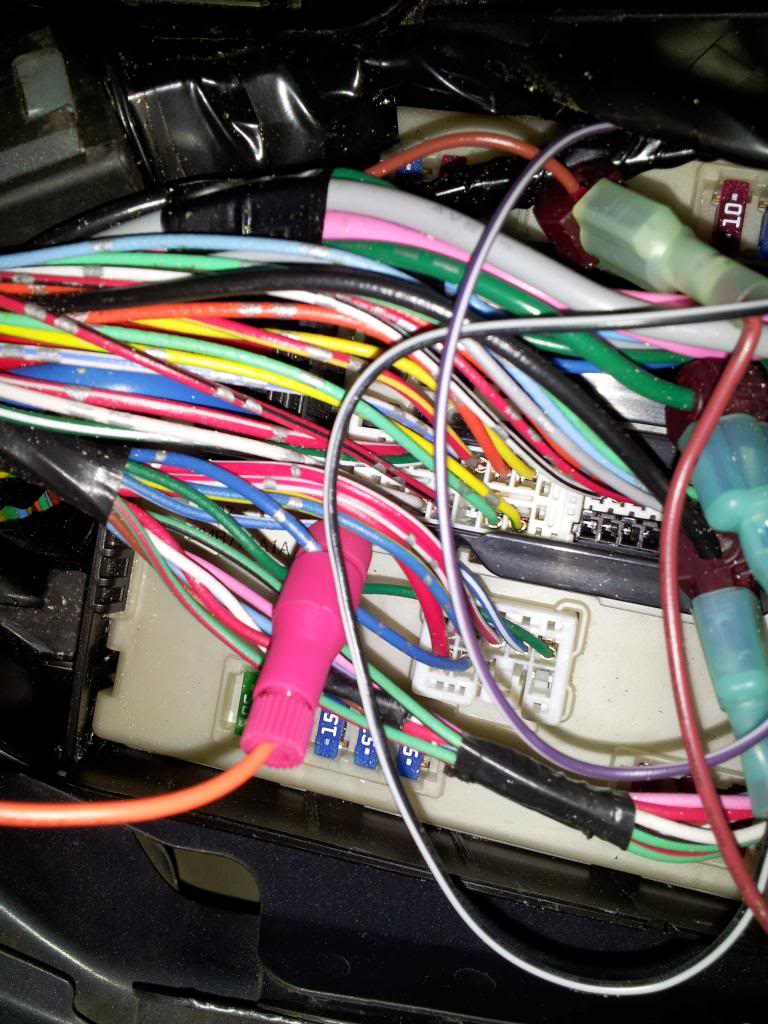
5. Secure control module's ORANGE WIRE to left headlight wire in the hood fusebox, as shown in the picture, with a Posi-tap connector. You can also use a T-tap instead or solder it if you prefer. YOU DO NOT NEED TO CONNECT THE BLUE WIRE.
6. Connect DRL's to module and confirm they power on.
7. Turn headlight control **** to off, and confirm DRL's are at full brightness. Turn headlights on and confirm DRL's autodim. Turn headlights to Auto and make sure they are working correctly as well. Turn off the car and lock the doors to confirm DRL's auto shut off. Turn on the car and make sure they power up correctly.
8. Once everything is confirmed working, snap DRL's into brackets, making sure they are securely in place.
9. Screw down or zip tie the control module anywhere you want. Neatly zip tie all the excess wiring from the DRL's.
10. Enjoy!
Pay careful attention to the blue wire I tapped into, which is the left low beam headlight. If unsure, consult the fuse guide on the underside of the fuse cover!
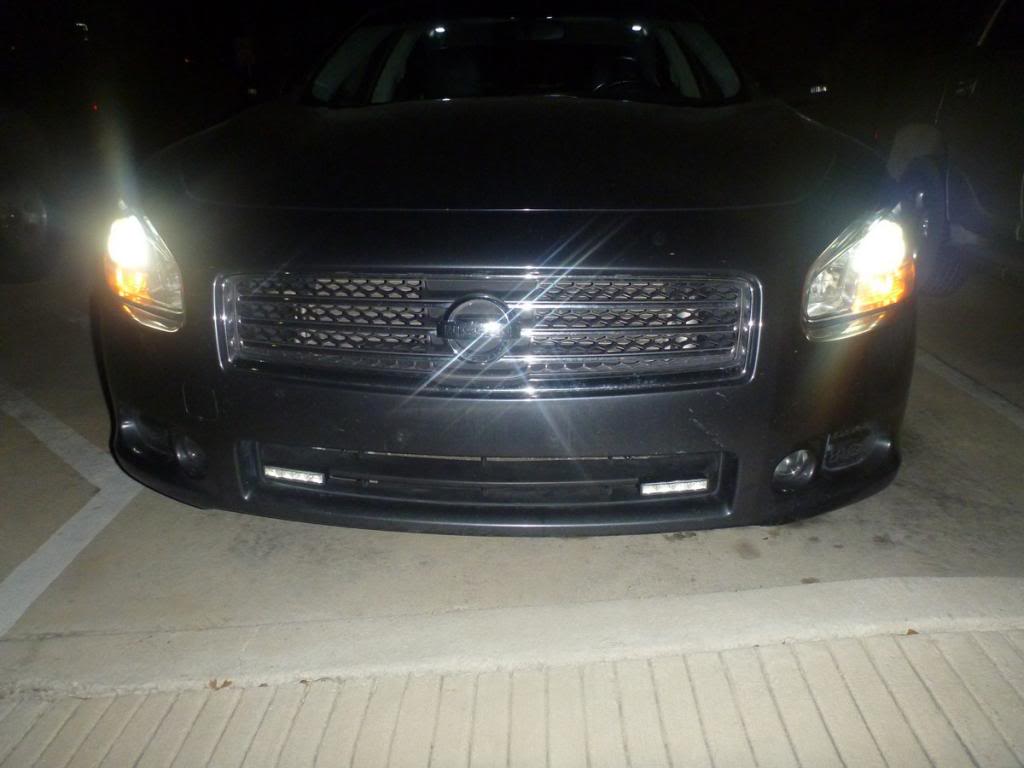
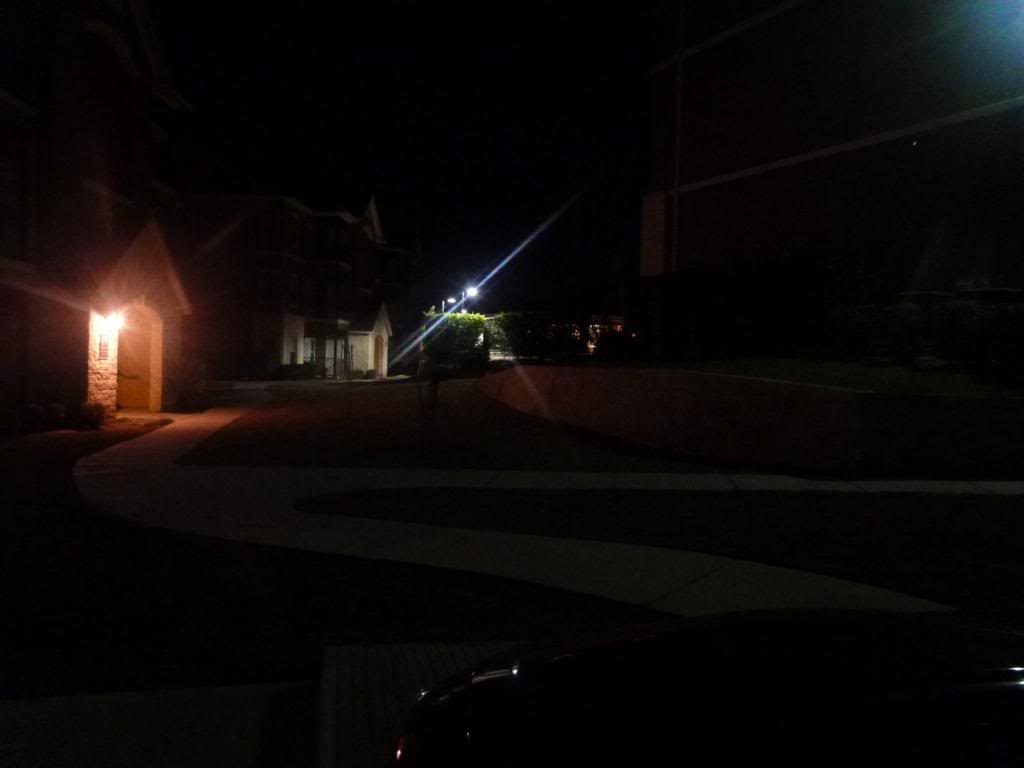
HID's/Xenon's On with Philips Daylight 4 Auto-Dimmed. Headlights are on Auto.
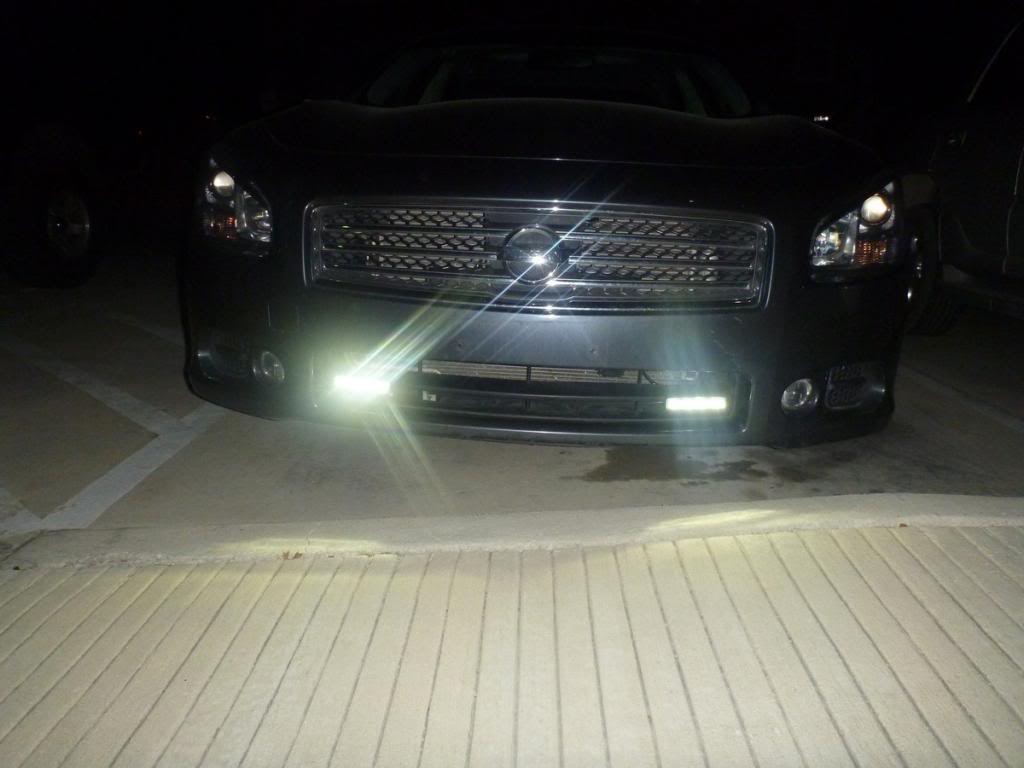
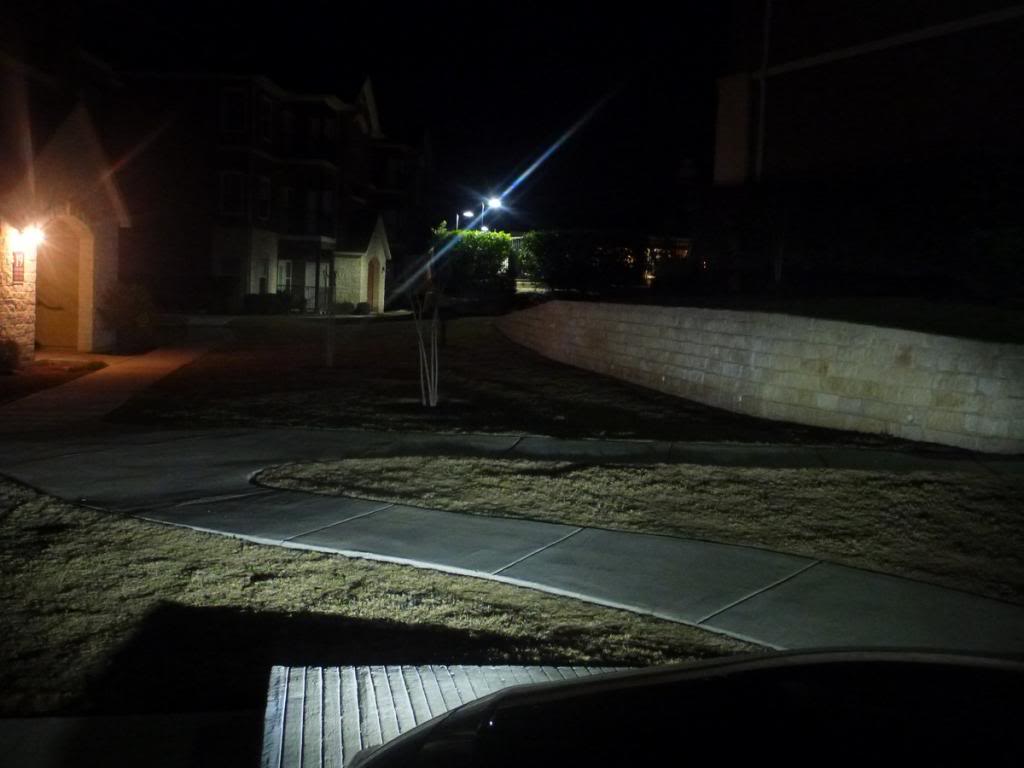
Headlights turned off. Philips Daylight 4 at full brightness
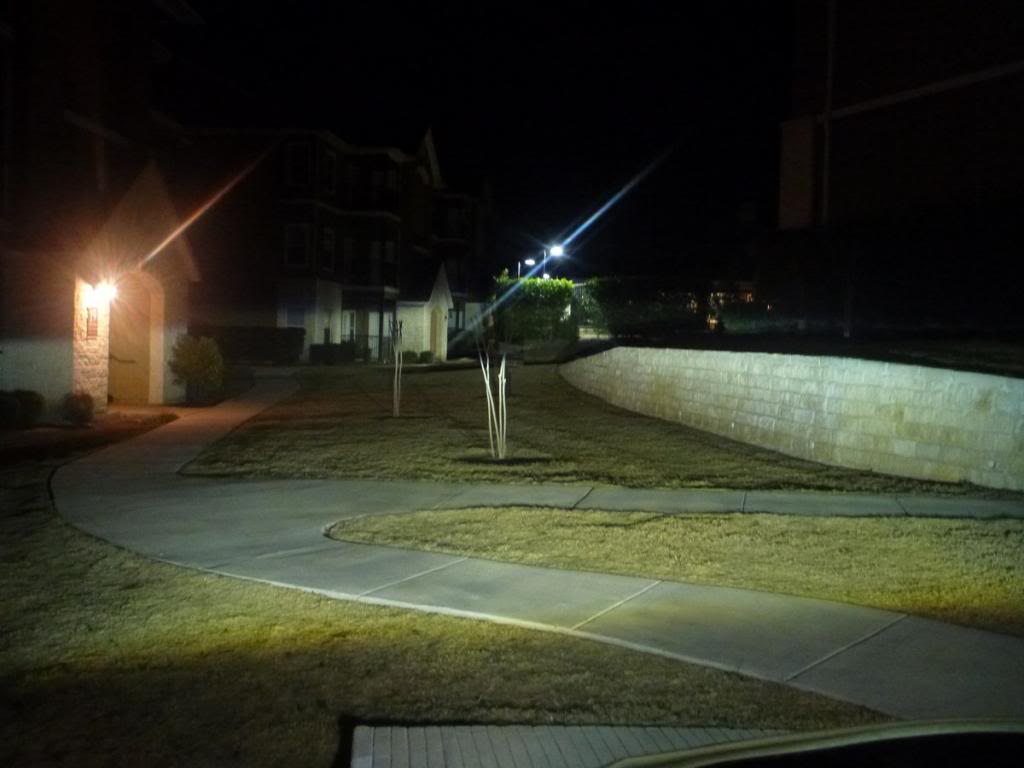
Control shot with no lights on.
HID's/Xenon's turned on, with Philips Daylight 4 auto-dimmed
Headlights turned off. Philips Daylight 4 at full brightness!!!
I hope this guide helps anyone that wants DRL's installed, especially since the Philips Daylight 4's use Luxeon rebel LED's, some of the best, energy efficient and brightest 1 watt leds on the market.
Things to know: Philips Daylight 4 comes with a regular on/off module, NO AUTODIM. Only the Philips daylight 8 comes with the Autodim module. """IT IS NOT HARD TO GET THE PHILIPS DAYLIGHT 8 REPLACEMENT MODULE FOR FREE, when the one that comes in the package is faulty for US cars and causes flickering, as the Philips Daylight was designed for UK cars! Just contact Philips and they will ask you for your mailing address""" Read through the Philips daylight 8 reviews from amazon and you will see how easy it is to get a Auto-dim module. Mine was sent UPS overnight!
Anyways on to the good stuff.
Installation was as simple as could be.
Once you have gotten your replacement Philips Daylight 8 module in the mail for FREE, proceed to installation.
10 STEP DAYTIME RUNNING LIGHT INSTALL GUIDE!
1. Place bracket where you plan to mount and drill holes in center area for wire connector to fit through, as shown in first pic. Confirm the ends of the DRL wire connector's can fit through the hole, if not make it bigger.
2. Screw on DRL mounting brackets, making sure to center the middle hole on brackets to hole you previously drilled.
3. Install DRL's, but DON'T snap into place just yet.
4. Connect control module's positive and negative wires to there respective battery leads.
5. Secure control module's ORANGE WIRE to left headlight wire in the hood fusebox, as shown in the picture, with a Posi-tap connector. You can also use a T-tap instead or solder it if you prefer. YOU DO NOT NEED TO CONNECT THE BLUE WIRE.
6. Connect DRL's to module and confirm they power on.
7. Turn headlight control **** to off, and confirm DRL's are at full brightness. Turn headlights on and confirm DRL's autodim. Turn headlights to Auto and make sure they are working correctly as well. Turn off the car and lock the doors to confirm DRL's auto shut off. Turn on the car and make sure they power up correctly.
8. Once everything is confirmed working, snap DRL's into brackets, making sure they are securely in place.
9. Screw down or zip tie the control module anywhere you want. Neatly zip tie all the excess wiring from the DRL's.
10. Enjoy!
Pay careful attention to the blue wire I tapped into, which is the left low beam headlight. If unsure, consult the fuse guide on the underside of the fuse cover!
HID's/Xenon's On with Philips Daylight 4 Auto-Dimmed. Headlights are on Auto.
Headlights turned off. Philips Daylight 4 at full brightness
Control shot with no lights on.
HID's/Xenon's turned on, with Philips Daylight 4 auto-dimmed
Headlights turned off. Philips Daylight 4 at full brightness!!!
I hope this guide helps anyone that wants DRL's installed, especially since the Philips Daylight 4's use Luxeon rebel LED's, some of the best, energy efficient and brightest 1 watt leds on the market.
Last edited by nissandemigod; 02-15-2014 at 02:17 AM.


 03-24-2014, 07:05 AM
#4
Junior Member
Thread Starter
Join Date: Dec 2013
Posts: 23
I would but I have now upgraded them to the
, which is around $220 on Amazon
But I can take a pic of those, as they are a little longer than the Daylight 4's.

After having both, I really like them both equally to be honest. I plan on putting the 4's in my headlight turn signal area though, and adding some halo's.
But I can take a pic of those, as they are a little longer than the Daylight 4's.
After having both, I really like them both equally to be honest. I plan on putting the 4's in my headlight turn signal area though, and adding some halo's.
Last edited by nissandemigod; 03-24-2014 at 07:15 AM.
03-24-2014, 07:55 AM
#5
Thanks. They both seem like good choices, depends how much one wants to spend. The daylight guides appear to have a wider beam so maybe aimimg is not as critical as compared to the 4 LED units? Post a pic of the new setup if you get a chance.
Last edited by Nopike; 03-24-2014 at 08:07 AM.
05-20-2014, 09:21 AM
#7
Senior Member

Join Date: Apr 2006
Location: Houston, TX
Posts: 966
Oh wow, that looks good. I would certainly do this on my own but I really don't know anything about wiring. It actually makes me nervous thinking about doing this. I'll find someone to do this for me. Great write up and it definitely does great and bright!
 06-07-2014, 12:33 PM
#10
Senior Member

Join Date: May 2014
Location: Houston, TX
Posts: 302
AFAIK, the Philips Daylight 8 comes with a separate module box with a blue wire that you tap into the headlights for. The module box will then automatically dim the LED, so you don't blind oncoming traffic whilst the Daylight 4 will shut off when your headlights come on. The OP found a loophole to get the module box that comes with the Daylight 8.
06-07-2014, 12:42 PM
#11
Member

Join Date: Nov 2013
Posts: 260
AFAIK, the Philips Daylight 8 comes with a separate module box with a blue wire that you tap into the headlights for. The module box will then automatically dim the LED, so you don't blind oncoming traffic whilst the Daylight 4 will shut off when your headlights come on. The OP found a loophole to get the module box that comes with the Daylight 8.
06-07-2014, 12:51 PM
#12
Senior Member
Join Date: May 2014
Location: Houston, TX
Posts: 302

How do they compare to the eBay ones you had installed?


 06-07-2014, 05:18 PM
#15
Senior Member
Join Date: May 2014
Location: Houston, TX
Posts: 302
Thanks for the pictures. Any chance we can see this in direct sunlight instead of in the shade if you have the time? Still deciding where to place these if I bought them as I do not want to hack up the brake ducts yet since they are not a replaceable trim piece.
06-07-2014, 05:25 PM
#16
Member
Join Date: Nov 2013
Posts: 260

 06-10-2014, 11:56 AM
#17
Junior Member

Join Date: Oct 2006
Posts: 20
AFAIK, the Philips Daylight 8 comes with a separate module box with a blue wire that you tap into the headlights for. The module box will then automatically dim the LED, so you don't blind oncoming traffic whilst the Daylight 4 will shut off when your headlights come on. The OP found a loophole to get the module box that comes with the Daylight 8.
Daaavid, your saying to connect the blue wire, from the module box, to the headlights? OP is saying not to connect the blue wire from the module box, but to connect the orange wire to the headlights.
Last edited by slvrmax420; 06-10-2014 at 12:02 PM.
06-10-2014, 10:20 PM
#18
Senior Member
Join Date: May 2014
Location: Houston, TX
Posts: 302
5. Secure control module's ORANGE WIRE to left headlight wire in the hood fusebox, as shown in the picture, with a Posi-tap connector. You can also use a T-tap instead or solder it if you prefer. YOU DO NOT NEED TO CONNECT THE BLUE WIRE.
Daaavid, your saying to connect the blue wire, from the module box, to the headlights? OP is saying not to connect the blue wire from the module box, but to connect the orange wire to the headlights.
Daaavid, your saying to connect the blue wire, from the module box, to the headlights? OP is saying not to connect the blue wire from the module box, but to connect the orange wire to the headlights.

 02-15-2015, 06:55 PM
#21
Newbie - Just Registered

Join Date: Feb 2015
Location: Southeast
Posts: 4
I have a 2012 Maxima SV that I want to install the Philips DRL 4 in the brake duct. I wanted to know 2 things, 1) Is the lens on the units plastic or glass? 2) I want to keep the brightness of the light the same at night as during the day, is this possible? I saw that someone mentioned that the dimming feature is great as to not blind oncoming traffic, I believe that installing them in the brake duct, being that low on the car that it shouldn't blind oncoming traffic but those are my thoughts, I could be wrong. Thanks in advance. 1st time on here.
02-15-2015, 09:19 PM
#22
Junior Member
Thread Starter
Join Date: Dec 2013
Posts: 23
The cover is plastic, but a very solid plastic, and super hard to get off. Everything onthe Philips DRL is industrial grade quality. I had to use a heat gun to get mine off, and somewhat ruined the mirror reflectors the LEDs bounce off. My advice, don't try to take it if.
Secondly, do not make the DRL's one brightness, they are very very bright and will blind everyone, even being in the brake duct. I tried it both ways, and people were so mad at me at night, including my friends. Trust me, the auto dim night feature is great, and you will still be definitely noticed at night, even being dimmed.
Secondly, do not make the DRL's one brightness, they are very very bright and will blind everyone, even being in the brake duct. I tried it both ways, and people were so mad at me at night, including my friends. Trust me, the auto dim night feature is great, and you will still be definitely noticed at night, even being dimmed.
02-16-2015, 08:53 PM
#24
Junior Member

Join Date: Dec 2013
Posts: 42
I installed the drl4 in the brake ducts about a month ago and have them on full brightness all the time,no problems so far but i also live in chicago,they look great at night,look like i have led fog lights like the infiniti and don't even use my regular fogs no more...
02-25-2015, 06:11 PM
#25
Newbie - Just Registered
Join Date: Feb 2015
Location: Southeast
Posts: 4
Drl 4
@CHIBLACKMAX09 Hope that all is good. I ordered a set of Philips DRL4 for my Maxima. I am going to install them in the brake ducts. I was wondering if you had any pictures of the lights on the vehicle? If not, any recommendations? How easy was to install them? I am thinking of placing mine underneath the dividing bar within the brake ducts. Any info that you may be able to forward me would be greatly appreciated. Stay Warm & Be Good.
02-28-2015, 05:43 PM
#27
Newbie - Just Registered
Join Date: Feb 2015
Location: Southeast
Posts: 4
DRL 4 Installed
@CHIBLACKMAX09, Hope that all is good. Just wanted to update you on my project. I installed the DRL 4. I am happy with the way that they came out. I have full brightness, I see why they don't bother oncoming vehicles because in the brake duct, the angle is toward the corner of the car. I think I might want to get another set to put on the inside of the fog lights, lol. I won't, that would be too much. Thanks for the pics by the way. Stay warm.
Last edited by DomiChe; 02-28-2015 at 10:12 PM.

Thread
Thread Starter
Forum
Replies
Last Post
tsi6001
5th Generation Maxima (2000-2003)
12
10-03-2022 10:23 PM
Viralkill
7th Generation Maxima (2009-2015)
1
08-17-2015 10:54 AM

