Detailing 101
 10-11-2007, 04:34 PM
#1
Senior Member
Thread Starter

Join Date: Sep 2005
Location: NY
Posts: 1,113
Detailing 101
In the next couple of posts I will post articals from differant sources.
Hope these articals help you guys out.
(Some of these articals were copied from DetailUniversity.com.)
Hope these articals help you guys out.
(Some of these articals were copied from DetailUniversity.com.)
Last edited by spdfreak; 10-11-2007 at 04:41 PM.
 10-11-2007, 04:36 PM
#2
Senior Member
Thread Starter
Join Date: Sep 2005
Location: NY
Posts: 1,113
Microfiber... Why it is effective and how to care for them
Microfiber towels have quickly become the industry standard for automotive detailing because of their exceptional performance compared to regular cotton towels, paper towels, etc. In this article we�ll look at what microfiber towels are, how they work and what applications maximize the benefits of microfiber towels.
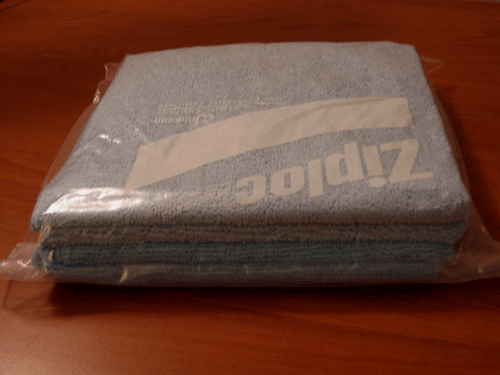
4 General Purpose Microfiber Towels in a gallon Ziploc bag.
Microfiber towels use a unique blend of materials with innovative weave and fiber designs to create a special product. The blend of materials is a special ultra fine synthetic yarn made of polyester and nylon. How fine? Each strand is approximately 0.2 denier, which is equivalent to 1/20th of a strand of silk or 1/100th of a human hair. Despite its ultra thin design it�s extremely durable, soft and virtually lint free. During manufacturing the fiber starts off as a round strand, when you look at a cross section of the fiber, and then microscopic wedges are removed from the outer edge to create pockets. If you can visualize an asterisk (*), this is a good example of what a cross sectional picture looks like after the wedges have been removed. This has two main benefits: 1.) it greatly increases the surface area of each fiber, 2.) gives dust and contaminates a place to collect. Microfiber towels can be put in the washer and dryer with regular detergents, just don�t use fabric softeners and dry on low settings.
This design is really revolutionary because it helps collect and trap contaminates as opposed to pushing them around. Traditional fabrics are significantly flatter and tend to push around contaminates and not pick them up. On dry surfaces the microfiber towels use electro static energy to easily lift and collect large amounts of dust, dirt, oil, liquid and more in the micro wedges of the fiber. These towels are excellent drying tools because the wedge design in the fiber allows the towel to absorb large amounts of water. The fibers capillary action forces any liquid it comes in contact with to be readily absorbed. Best of all these towels dry significantly faster than regular towels because air more readily dries the fibers due to the increased surface area.
Microfiber towels have unlimited applications while detailing your vehicle or around the house. Today�s automotive clear coats can have fine scratches added to them rather easily from automated car washes, nylon stitching on towels, improper washing and drying tools, abrasions, daily driving, etc. After applying a polish, sealant or wax you want to remove the excess product safely and effectively. Often times cotton towels and rags can have coarse material/edges that can add fine scratches which dull the clear coat. Microfiber towels easily wipe up the excess product and are completely safe on your clear coat, so you don�t add fine scratches during the removal process. You�ll immediately notice these towels leave no residue behind and you�re doing less wiping. The microfiber industry has also created a special weave for drying towels called waffle weave. This design incorporates the same clear coat safe microfiber materials with an especially absorbent, tufted, high pile loop that allows for maximum water absorption. While drying these microfiber waffle weave towels can hold 5 � 10 times their natural weight and continue soaking up large amounts of water. When you�re cleaning the interior it�s very common for other towels to collect some dust but also put a lot of dust back in to the air, which then resettles on the surfaces you just cleaned. For the interior microfiber towels use electro static energy to collect and trap the particles so you only clean once. These towels are also great on delicate surfaces such as gauges, DVD/Navigation screens, coated hardwood and more. These delicate surfaces can scratch extremely easily so it�s important to have the right tools for cleaning them. If you need more cutting power to remove stains just spray your favorite cleaning product on your microfiber towel and watch as the towel helps break up and pick up contaminates. Microfiber towels also work great on glass so you can clean it thoroughly and leave no streaks behind.
Caring for your microfiber is very important too. Derek (derek80) shares some of his useful tips with us on the forum: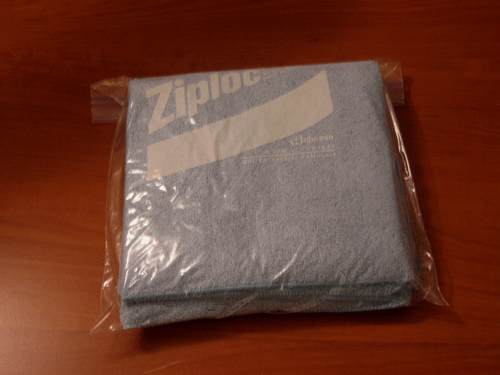
- Always take off tags.
- Always wash MF towels before 1st usage.
- Store 3-5 towels using Ziploc double zipper "gallon" bags ("quart" bags for applicator pads)
- Always rinse towels immediately after usage before a product, like a polish or wax, can dry on them.
- Wash towels prior to next usage.
- Wash between 25~30 towels per load.
- Do not wash MF towels with other fabric.
- Use liquid detergent with no fabric softener, bleach, smell...something like Tide Free.
- Use less detergent than the suggested amount by manufacturer (about half or more than half).
- During rinse cycle, add some white distilled vinegar to help dissolve detergent. (1 tablespoon per 16x16 towel)
- You can wash with hot water. There is no household water hot enough to ruin your towel/performance.
- When drying, you can air dry / hot / medium / tumble, anything you like, but never ever use fabric softener.
- Deposits a chemical coating on the fabric that you really don't want to transfer to your car's finish or windows.
- Clogs the microfiber strands, reducing absorbency and cleaning ability, leading to possible streaking.
- Fabric softener in any form (in detergent, rinse additive, dryer sheets) deposits silicone on the fabric to make it appear softer to the touch but reduce absorbency.
10-11-2007, 04:39 PM
#3
Senior Member
Thread Starter
Join Date: Sep 2005
Location: NY
Posts: 1,113
Developing a Detailing Routine
Detailing can mean different things to different people. To some people detailing is something they do occasionally while for other people it�s a lifestyle that includes countless hours. No matter what your process is, it�s important to get the most out of your time and effort while maintaining your vehicle. To optimize your detailing efforts it�s important to: assess your vehicle, know what options you have for products and tools, create realistic goals, determine how much time you have available and finally create a routine. By understanding these areas of a detail you can have a more organized routine and process that helps you efficiently reach your goals.
Assessment
Assessing your vehicle is the step where you observe your vehicle�s present condition and start formulating your general goals. The state of your vehicle will always vary from others because of the unique factors that comprise how your vehicle got to this point such as: year, make, model, color, mileage, storage (i.e. garaged), previous care, weather conditions, temperature, etc. Look over your entire vehicle and try to make notes of any imperfections you see. If you see major problems such as deep scratches/chips, dented panels or tears in the leather and you want to fix them you have two basic options. You can tackle the job yourself or you may want to have these handled professionally. Other imperfections such as stains, swirls marks, tar and contamination build-ups can generally be fixed during a detail. One of the main areas everyone focuses on when detailing is the exterior paint. To help you understand where to start you should check for: protection on the paint, contamination build ups and surface imperfections. To help assess the needs of your paint there are some simple tests you can try.
To see if there is any protection (wax or sealant) left on your paint you can spray water on your paint from a spray bottle. Generally speaking the smaller, taller and tighter the beads of water are the more protection there is on the paint. If there is no beading, flatter drops or pools of water there is probably little to no protection left on the paint. While this process is not an exact science, it�s a great indicator of how much protection is on the paint. We recommend misting water on a panel, both before and after completing a detail, to see the differences in the beading and to give you a base line for future tests. Usually if you�re trying to complete a full detail you�ll want to start with a fresh surface to ensure maximum results. If you want to strip off the protection and start with a fresh surface there is a variety of techniques you can use. After you have washed and dried the vehicle you can polish, clay or wipe down the surface with isopropyl alcohol (aka rubbing alcohol) and a clean microfiber towel. Polishing and wiping down the surface with a 50/50 mix of water and isopropyl alcohol are very thorough options. Clay bar will help remove previous layers of protection but may not be able to remove all of it, especially if there is a strong layer of protection. Another option is to wash the vehicle with dish soap, like Dawn, which contains powerful stripping agents. Unfortunately this method can also prematurely fade vinyl and plastic trim so only use it as a last resort.
After you have washed the vehicle the majority of the loose contaminates should have been removed. To examine how much contamination is still on your paint you can put your hand in a plastic sandwich bag and gently glide it over the surface. The sandwich bag helps amplify the amount of contamination remaining on the surface so it�s easier to notice. Often times, contaminates adhere to the clear coat�s surface or get stuck in the micro ridges in the clear coat. Many people are very surprised at how bumpy or rough their paint feels after completing this test. A common solution to removing tightly embedded contaminates is to use a clay bar after washing. By completely removing contamination, you can help maximize the results from your polish, glaze, sealant and wax.
One of the most common problems vehicle owners complain about is imperfections such as swirls marks and other micro-scratches in the clear coat. Imperfections, such as swirl marks, can be troubling because they fragment light and prevent the deepest and glossiest shine from being reflected. Swirl marks are somewhat inevitable on a �daily driver�, however there are lots of things you can do to prevent them and remove them. To more accurately observe the condition of your vehicle�s paint you should wash and dry the paint first so there is not contaminates obstructing your view. Your ability to observe swirls is also greatly affected by the lighting conditions you view the paint under. If you observe the paint in direct sunlight or under florescent lighting you are more likely to be able to see the imperfections. If you want to remove these imperfections you will typically need to polish the surface. Glazes are designed to hide imperfections and waxes and sealants will hide imperfections to varying degrees as well.
Steps in the Detailing Routine
Most of your vehicles surfaces can be both cleaned and protected including the: leather, glass, fabrics, vinyl, plastics, metals, paint/clear coat, wheels, tires, exterior trim, convertible tops and more. Sometimes you can clean and protect in one step while other surfaces are more commonly treated with a separate cleaner and protectant. Some surfaces can also be conditioned by replacing properties that fade from UV rays, heat and normal wear and tear. The type of environment your vehicle is exposed to on a regular basis will impact what steps are most important to you. If you regularly have young children in your vehicle you�re probably going to need to care for the interior more regularly. If your vehicle regularly travels past construction sites then you may need to care for the exterior more regularly. Try to understand the variables that affect the condition of your vehicle and mitigate them as you see fit. Examine the information and charts below to see what steps and products are available to you to help you clean and protect your vehicle.
Pre-Wash Treatment - Before starting a wash you may want to go around the vehicle and apply a pre-wash spray to areas that have bug smear, tar, tire sling, road grime and other areas with heavy contamination build up. This will help loosen these contaminates and save you from scrubbing the surface and potentially harming the surface.
Washing & Drying - Washing should remove loose surface contamination. When you dry the vehicle you only want to remove water from freshly cleaned surfaces to prevent getting contaminates on your drying tool. Washing and drying is where most swirls are added to the clear coat so be sure to use proper techniques with the right tools.
Clay Bar - Remove surface contamination bonded to clear coat or stuck in the micro ridges of the clear coat. You can also use these products on coated wheels, metals, coated plastic, glass and more.
Polish - Polishes are designed to remove surface imperfections such as swirls, fine scratches and oxidation. When you polish you want to use the least aggressive polish possible and only use more aggressive options if needed. We categorize polishes in to three categories: compounds, cutting, finishing. Compounds are the most aggressive polishes and can buff out the deepest imperfection in the clear coat but will leave a haze that must be buffed out by lighter polishes. Cutting polishes have strong cutting power and will generally leave a light haze on the surface. Finishing polishes will help buff out the haze left from more aggressive polishes, correct very light surface imperfections and leave the surface very smooth and glossy.
Glaze - Glazes use oils that cling to surface imperfections and help fill them in and reflect the surrounding paint. This gives the illusion of flawless paint and adds a lot of gloss to the surface.
All In One (AIO) � All-in-One products are generally referring to products that both chemically clean the surface and leave a coating of protection on the surface. This means that you can help clean the surface while simultaneously protect the paint and enhance the shine. Generally polishing and protecting the polish with two different steps is more effective but these products are good time savers.
Paint Sealant - Sealants are created in labs to replicate what waxes by extracting any properties that don�t add to increased shine, protection, ease of use, etc. Sealants typically provide the longest lasting form of protection which lasts 3 � 6 months depending on conditions. Sealants generally apply extremely thin, wipe on and off very easy and add a fantastic shine to any color paint.
Wax - Waxes are a strong form of protection but do not last as long as sealants (approximately 2 � 8 weeks). Waxes provide a very deep reflection with lots of gloss for maximum shine. Waxes are commonly layered over sealants for the ideal combination of protection and shine.
Quick Detailers & Waterless Washes � These products can be used as clay lube to help glide the bar across the surface and safely remove contaminates. It can also be used to clean the clear coat, wheels, glass and more with a clean microfiber towel. Spray it on the surface and wipe it off with a clean microfiber towel. These products are great for cleaning freshly detailed vehicles that have very light contamination build-ups.
Spray on Protection - These products add a layer of wax or sealant to further protect and shine the surface. Typically you spray it on the clear coat and wipe it off with a clean microfiber towel. These products are perfect to use after a maintenance wash so your vehicle looks like it�s freshly detailed.
Buffers - There is a wide variety of buffers on the market that can help you complete your detail with better results and using less energy. Rotary buffers are very effective tools but potentially dangerous if you�re not an experienced user. Orbital buffers are very safe and effective tools depending on what model you have. The Porter Cable 7424 orbital buffer has quickly become the industry favorite for both professional and weekend detailers alike. To learn more about how to use the Porter Cable 7424 for any of the above steps please read our How To section.
Microfiber Towels - Microfiber towels have quickly become the standard tool for safe car care. Microfiber towels are extremely good at cleaning virtually every surface (console, glass, clear coat, wheels, etc) on and in a vehicle. Using microfiber towels helps ensure that you don�t add micro-scratches to the clear coat, gauges, navigation screens, etc.
Below is a chart explaining what surface each process applies to, the function of the process and some recommended products for each process.

Here is a chart of varying surfaces that explains where these surfaces are typically located, as well as suggested products to clean, condition and protect each surface.

Goals
Now that you have assessed your paint and understand what kinds of products are available to you can start formulating more specific goals. You should go through all the products and steps listed above and see what ones are most important to you. We recommend doing full details 1 � 2 times per year and then develop a maintenance schedule. Some steps you�ll want to do regularly with your maintenance schedule while others can be done less often during a full detail.
Selecting your detailing goals also depends on what values are most important to you. When you trade in or sell your vehicle the condition of your vehicle can often affect the price by several thousand dollars. To maximize the value of your vehicle you should try to clean and protect it as much as reasonably possible. While detailing your vehicle when it�s being sold is important, regular maintenance will help prevent major problems that detract from the sale price. A potential buyer will often have a much higher confidence in the quality of the vehicle if they talk to an owner who has passionately cared for the vehicle. Vehicles that look their best often sell faster and at a much higher value.
To see just how much the condition of your vehicle affects the resale value we examined some figures from Kelly�s Blue Book. The chart shows four different vehicles and the only variable that changed for each vehicle was its condition, rated fair or excellent, with a scale of poor, fair, good or excellent. The chart clearly shows the significant differences in the value of maintaining your vehicle. The average difference was over three thousand dollars or 16% more when comparing the value from fair to excellent.

Your vehicle is a direct reflection of you so it�s important to represent yourself well. Having a clean vehicle with glossy paint is a tremendous source of pride that really boosts ones self esteem. Watching the sun reflect off the paint and create a head turning shine has always made detailing a fun and rewarding hobby. Many people find the detailing process to be therapeutic and relaxing as well. Detailing is a positive hobby that gives you a chance to escape from other pressures and just focus on your vehicle. There is an undeniable joy to owning an automobile that is well taken care of and looking its best! Therefore with regular care you�ll really enjoy getting in to your vehicle on a regular basis and be rewarded with an increased resale value.
Time
The more time and effort you put in to your detail the better your vehicle will look and you can expect more in the vehicle�s resale value. Determining how many days a year and how much time in a day you can allocate to detailing can be a hard decision. Try and come up with a realistic amount of time that you�re willing to set aside for detailing based on your current availability. Your time commitment and process will constantly evolve as you change your detailing goals or as your vehicle�s condition warrants. Even if you change your plan it�s important to have a plan and follow through with it so your vehicle can be protected year round. Your vehicle should always have a coat of sealant and/or wax on it so you minimize the risks of damage from water marks, acid rain, UV rays, bird droppings, road grime, etc. Products will vary in durability, but protecting your paint with a sealant will typically last 3 � 6 months and a wax will last about 2 � 8 weeks. Manufacturers tend to over estimate the durability of a product so do not assume they are guaranteeing protection for as long as stated. If you don�t want to detail too often then you may want to apply a coat of sealant for longer lasting protection. If you detail very regularly than you may be able to just wax the vehicle. Ideally we recommend layering a wax on top of a sealant to get the best combination of enduring protection and a great shine.
Routine
We have now gone through all the preparation steps and it�s time to create a routine that is going to keep your vehicle looking it�s best for years to come. There is no best or right detailing process, only what works best for you and your particular situation. Typically, we recommend doing a full detail 1 � 2 times per year and then develop a maintenance routine for the in between months. A full detail can be something as simple as a quick vacuum through, wash, dry and a coat of protection. To others a full detail may be a much more involved process that takes a day or more to complete. The Spring and Fall is when we recommend doing a full details, which basically means you do your most thorough work and address major issues that are the most time consuming. After that you�ll want to develop a maintenance routine that keeps the vehicle clean and protected year round.
We�ve created three basic detailing routines below that will help you understand what steps can be involved in a detailing routine. These options are only guidelines to help you determine what type of detailing routine may work best with your schedule. Each option has many different steps listed in it at various point during the year that should consider doing. These options are strictly suggestions and you should add and delete steps in the routine based on your specific goals and time commitment. All three options below will keep your paint protected year round but as discussed above there are many other steps you might want to include in your routine. When the words �Full Detail� are listed you�ll need to read through the �Full Exterior, Interior and Engine� detailing section and select what steps you want to complete. After you have selected your �Full Exterior� we have outlined a maintenance routine that will require varying levels of time commitment. Option # 1 is very basic and gives you the minimum coverage you will need to keep your paint protected all year and your vehicle looking good. Option # 2 has two �Full Details� and a monthly detail that will protect the paint year round and add a fantastic shine. Option # 3 has two �Full Details� and a bi-weekly maintenance routine that will have the paint thoroughly protected while looking exceptional.
Full Exterior - Pre-Wash Treatment, Wash, Dry, Clay Bar, Compound Polish, Cutting Polish, Finishing Polish, Glaze, Sealant, Wax, Clean and Dress Tires, Clean and Dress Trim, Clean Wiper Blades, Scrub Wheel Wells, Clean and Protect Glass, Polish and Protect Metals, Polish and Protect Wheels)
Full Interior � Spot Treat Stains, Brush, Vacuum and Protect Fabrics, Wipe Down and Protect All Vinyl, Protect Interior, Clean and Condition Leather, Clean Glass, Clean Door Jambs, Shampoo Carpets, Fabric Guard Carpets
Full Engine � Degrease and Wash Bay, Polish Metal Surfaces, Clean and Protect Vinyl, Clean and Protect Rubber, Protect Painted Surfaces
Option # 1
April � Full Detail
July � Wash, Dry, Sealant, Wipe Down Vinyl and Vacuum
October � Wash, Dry, Sealant Quick Interior Vacuum, Wipe Down, Clean and Condition Leather
January � Wash, Dry, Sealant, Wipe Down Vinyl and Vacuum
Option # 2
April � Full Detail
May - Wash, Dry, Wax, Quick Interior Vacuum and Wipe Down
June - Wash, Dry, Sealant, Wax, Quick Interior Vacuum and Wipe Down
July - Wash, Dry, Wax, Quick Interior Vacuum, Wipe Down, Clean and Condition Leather
August - Wash, Dry, Wax, Quick Interior Vacuum and Wipe Down
September - Wash, Dry, Wax, Quick Interior Vacuum and Wipe Down
October - Full Detail
November - Wash, Dry, Wax, Quick Interior Vacuum and Wipe Down
December - Wash, Dry, Wax, Quick Interior Vacuum and Wipe Down
January - Wash, Dry, Sealant, Wax, Quick Interior Vacuum, Wipe Down, Clean and Condition Leather
February - Wash, Dry, Wax, Quick Interior Vacuum and Wipe Down
March - Wash, Dry, Wax, Quick Interior Vacuum and Wipe Down
Option # 3
April 1st � Full Detail
April 15th � Wash, Dry, Spray Wax
May 1st - Wash, Dry, Wax, Quick Interior Vacuum and Wipe Down
May 15th - Wash, Dry, Spray Wax
June 1st - Wash, Dry, Wax, Quick Interior Vacuum and Wipe Down
June 15th - Wash, Dry, Spray Wax
July 1st - Wash, Dry, Sealant, Wax, Quick Interior Vacuum, Wipe Down, Clean and Condition Leather
July 15th - Wash, Dry, Spray Wax
August 1st - Wash, Dry, Wax, Quick Interior Vacuum and Wipe Down
August 15th - Wash, Dry, Spray Wax
September 1st - Wash, Dry, Wax, Quick Interior Vacuum and Wipe Down
September 15th - Wash, Dry, Spray Wax
October 1st � Full Detail
October 15th - Wash, Dry, Spray Wax
November 1st - Wash, Dry, Wax, Quick Interior Vacuum and Wipe Down
November 15th - Wash, Dry, Spray Wax
December 1st - Wash, Dry, Wax, Quick Interior Vacuum and Wipe Down
December 15th - Wash, Dry, Spray Wax
January 1st - Wash, Dry, Sealant, Wax, Quick Interior Vacuum, Wipe Down, Clean and Condition Leather
January 15th - Wash, Dry, Spray Wax
February 1st - Wash, Dry, Wax, Quick Interior Vacuum and Wipe Down
February 15th - Wash, Dry, Spray Wax
March 1st - Wash, Dry, Wax, Quick Interior Vacuum and Wipe Down
March 15th - Wash, Dry, Spray Wax
If you follow the process above you should have assessed your vehicle, understand the basic products and tools available, created goals, selected a time commitment and created a routine. Try to write out a detailing routine that you feel best fits your needs based on your personal situation and the information above. In a very short period of time you�ll get more comfortable with your routine and adjust it as needed. Having this thorough and methodical process will ensure you are getting the most out of your detail and keep your vehicle looking it�s best. Good luck and enjoy your detail!
Assessment
Assessing your vehicle is the step where you observe your vehicle�s present condition and start formulating your general goals. The state of your vehicle will always vary from others because of the unique factors that comprise how your vehicle got to this point such as: year, make, model, color, mileage, storage (i.e. garaged), previous care, weather conditions, temperature, etc. Look over your entire vehicle and try to make notes of any imperfections you see. If you see major problems such as deep scratches/chips, dented panels or tears in the leather and you want to fix them you have two basic options. You can tackle the job yourself or you may want to have these handled professionally. Other imperfections such as stains, swirls marks, tar and contamination build-ups can generally be fixed during a detail. One of the main areas everyone focuses on when detailing is the exterior paint. To help you understand where to start you should check for: protection on the paint, contamination build ups and surface imperfections. To help assess the needs of your paint there are some simple tests you can try.
To see if there is any protection (wax or sealant) left on your paint you can spray water on your paint from a spray bottle. Generally speaking the smaller, taller and tighter the beads of water are the more protection there is on the paint. If there is no beading, flatter drops or pools of water there is probably little to no protection left on the paint. While this process is not an exact science, it�s a great indicator of how much protection is on the paint. We recommend misting water on a panel, both before and after completing a detail, to see the differences in the beading and to give you a base line for future tests. Usually if you�re trying to complete a full detail you�ll want to start with a fresh surface to ensure maximum results. If you want to strip off the protection and start with a fresh surface there is a variety of techniques you can use. After you have washed and dried the vehicle you can polish, clay or wipe down the surface with isopropyl alcohol (aka rubbing alcohol) and a clean microfiber towel. Polishing and wiping down the surface with a 50/50 mix of water and isopropyl alcohol are very thorough options. Clay bar will help remove previous layers of protection but may not be able to remove all of it, especially if there is a strong layer of protection. Another option is to wash the vehicle with dish soap, like Dawn, which contains powerful stripping agents. Unfortunately this method can also prematurely fade vinyl and plastic trim so only use it as a last resort.
After you have washed the vehicle the majority of the loose contaminates should have been removed. To examine how much contamination is still on your paint you can put your hand in a plastic sandwich bag and gently glide it over the surface. The sandwich bag helps amplify the amount of contamination remaining on the surface so it�s easier to notice. Often times, contaminates adhere to the clear coat�s surface or get stuck in the micro ridges in the clear coat. Many people are very surprised at how bumpy or rough their paint feels after completing this test. A common solution to removing tightly embedded contaminates is to use a clay bar after washing. By completely removing contamination, you can help maximize the results from your polish, glaze, sealant and wax.
One of the most common problems vehicle owners complain about is imperfections such as swirls marks and other micro-scratches in the clear coat. Imperfections, such as swirl marks, can be troubling because they fragment light and prevent the deepest and glossiest shine from being reflected. Swirl marks are somewhat inevitable on a �daily driver�, however there are lots of things you can do to prevent them and remove them. To more accurately observe the condition of your vehicle�s paint you should wash and dry the paint first so there is not contaminates obstructing your view. Your ability to observe swirls is also greatly affected by the lighting conditions you view the paint under. If you observe the paint in direct sunlight or under florescent lighting you are more likely to be able to see the imperfections. If you want to remove these imperfections you will typically need to polish the surface. Glazes are designed to hide imperfections and waxes and sealants will hide imperfections to varying degrees as well.
Steps in the Detailing Routine
Most of your vehicles surfaces can be both cleaned and protected including the: leather, glass, fabrics, vinyl, plastics, metals, paint/clear coat, wheels, tires, exterior trim, convertible tops and more. Sometimes you can clean and protect in one step while other surfaces are more commonly treated with a separate cleaner and protectant. Some surfaces can also be conditioned by replacing properties that fade from UV rays, heat and normal wear and tear. The type of environment your vehicle is exposed to on a regular basis will impact what steps are most important to you. If you regularly have young children in your vehicle you�re probably going to need to care for the interior more regularly. If your vehicle regularly travels past construction sites then you may need to care for the exterior more regularly. Try to understand the variables that affect the condition of your vehicle and mitigate them as you see fit. Examine the information and charts below to see what steps and products are available to you to help you clean and protect your vehicle.
Pre-Wash Treatment - Before starting a wash you may want to go around the vehicle and apply a pre-wash spray to areas that have bug smear, tar, tire sling, road grime and other areas with heavy contamination build up. This will help loosen these contaminates and save you from scrubbing the surface and potentially harming the surface.
Washing & Drying - Washing should remove loose surface contamination. When you dry the vehicle you only want to remove water from freshly cleaned surfaces to prevent getting contaminates on your drying tool. Washing and drying is where most swirls are added to the clear coat so be sure to use proper techniques with the right tools.
Clay Bar - Remove surface contamination bonded to clear coat or stuck in the micro ridges of the clear coat. You can also use these products on coated wheels, metals, coated plastic, glass and more.
Polish - Polishes are designed to remove surface imperfections such as swirls, fine scratches and oxidation. When you polish you want to use the least aggressive polish possible and only use more aggressive options if needed. We categorize polishes in to three categories: compounds, cutting, finishing. Compounds are the most aggressive polishes and can buff out the deepest imperfection in the clear coat but will leave a haze that must be buffed out by lighter polishes. Cutting polishes have strong cutting power and will generally leave a light haze on the surface. Finishing polishes will help buff out the haze left from more aggressive polishes, correct very light surface imperfections and leave the surface very smooth and glossy.
Glaze - Glazes use oils that cling to surface imperfections and help fill them in and reflect the surrounding paint. This gives the illusion of flawless paint and adds a lot of gloss to the surface.
All In One (AIO) � All-in-One products are generally referring to products that both chemically clean the surface and leave a coating of protection on the surface. This means that you can help clean the surface while simultaneously protect the paint and enhance the shine. Generally polishing and protecting the polish with two different steps is more effective but these products are good time savers.
Paint Sealant - Sealants are created in labs to replicate what waxes by extracting any properties that don�t add to increased shine, protection, ease of use, etc. Sealants typically provide the longest lasting form of protection which lasts 3 � 6 months depending on conditions. Sealants generally apply extremely thin, wipe on and off very easy and add a fantastic shine to any color paint.
Wax - Waxes are a strong form of protection but do not last as long as sealants (approximately 2 � 8 weeks). Waxes provide a very deep reflection with lots of gloss for maximum shine. Waxes are commonly layered over sealants for the ideal combination of protection and shine.
Quick Detailers & Waterless Washes � These products can be used as clay lube to help glide the bar across the surface and safely remove contaminates. It can also be used to clean the clear coat, wheels, glass and more with a clean microfiber towel. Spray it on the surface and wipe it off with a clean microfiber towel. These products are great for cleaning freshly detailed vehicles that have very light contamination build-ups.
Spray on Protection - These products add a layer of wax or sealant to further protect and shine the surface. Typically you spray it on the clear coat and wipe it off with a clean microfiber towel. These products are perfect to use after a maintenance wash so your vehicle looks like it�s freshly detailed.
Buffers - There is a wide variety of buffers on the market that can help you complete your detail with better results and using less energy. Rotary buffers are very effective tools but potentially dangerous if you�re not an experienced user. Orbital buffers are very safe and effective tools depending on what model you have. The Porter Cable 7424 orbital buffer has quickly become the industry favorite for both professional and weekend detailers alike. To learn more about how to use the Porter Cable 7424 for any of the above steps please read our How To section.
Microfiber Towels - Microfiber towels have quickly become the standard tool for safe car care. Microfiber towels are extremely good at cleaning virtually every surface (console, glass, clear coat, wheels, etc) on and in a vehicle. Using microfiber towels helps ensure that you don�t add micro-scratches to the clear coat, gauges, navigation screens, etc.
Below is a chart explaining what surface each process applies to, the function of the process and some recommended products for each process.
Here is a chart of varying surfaces that explains where these surfaces are typically located, as well as suggested products to clean, condition and protect each surface.
Goals
Now that you have assessed your paint and understand what kinds of products are available to you can start formulating more specific goals. You should go through all the products and steps listed above and see what ones are most important to you. We recommend doing full details 1 � 2 times per year and then develop a maintenance schedule. Some steps you�ll want to do regularly with your maintenance schedule while others can be done less often during a full detail.
Selecting your detailing goals also depends on what values are most important to you. When you trade in or sell your vehicle the condition of your vehicle can often affect the price by several thousand dollars. To maximize the value of your vehicle you should try to clean and protect it as much as reasonably possible. While detailing your vehicle when it�s being sold is important, regular maintenance will help prevent major problems that detract from the sale price. A potential buyer will often have a much higher confidence in the quality of the vehicle if they talk to an owner who has passionately cared for the vehicle. Vehicles that look their best often sell faster and at a much higher value.
To see just how much the condition of your vehicle affects the resale value we examined some figures from Kelly�s Blue Book. The chart shows four different vehicles and the only variable that changed for each vehicle was its condition, rated fair or excellent, with a scale of poor, fair, good or excellent. The chart clearly shows the significant differences in the value of maintaining your vehicle. The average difference was over three thousand dollars or 16% more when comparing the value from fair to excellent.
Your vehicle is a direct reflection of you so it�s important to represent yourself well. Having a clean vehicle with glossy paint is a tremendous source of pride that really boosts ones self esteem. Watching the sun reflect off the paint and create a head turning shine has always made detailing a fun and rewarding hobby. Many people find the detailing process to be therapeutic and relaxing as well. Detailing is a positive hobby that gives you a chance to escape from other pressures and just focus on your vehicle. There is an undeniable joy to owning an automobile that is well taken care of and looking its best! Therefore with regular care you�ll really enjoy getting in to your vehicle on a regular basis and be rewarded with an increased resale value.
Time
The more time and effort you put in to your detail the better your vehicle will look and you can expect more in the vehicle�s resale value. Determining how many days a year and how much time in a day you can allocate to detailing can be a hard decision. Try and come up with a realistic amount of time that you�re willing to set aside for detailing based on your current availability. Your time commitment and process will constantly evolve as you change your detailing goals or as your vehicle�s condition warrants. Even if you change your plan it�s important to have a plan and follow through with it so your vehicle can be protected year round. Your vehicle should always have a coat of sealant and/or wax on it so you minimize the risks of damage from water marks, acid rain, UV rays, bird droppings, road grime, etc. Products will vary in durability, but protecting your paint with a sealant will typically last 3 � 6 months and a wax will last about 2 � 8 weeks. Manufacturers tend to over estimate the durability of a product so do not assume they are guaranteeing protection for as long as stated. If you don�t want to detail too often then you may want to apply a coat of sealant for longer lasting protection. If you detail very regularly than you may be able to just wax the vehicle. Ideally we recommend layering a wax on top of a sealant to get the best combination of enduring protection and a great shine.
Routine
We have now gone through all the preparation steps and it�s time to create a routine that is going to keep your vehicle looking it�s best for years to come. There is no best or right detailing process, only what works best for you and your particular situation. Typically, we recommend doing a full detail 1 � 2 times per year and then develop a maintenance routine for the in between months. A full detail can be something as simple as a quick vacuum through, wash, dry and a coat of protection. To others a full detail may be a much more involved process that takes a day or more to complete. The Spring and Fall is when we recommend doing a full details, which basically means you do your most thorough work and address major issues that are the most time consuming. After that you�ll want to develop a maintenance routine that keeps the vehicle clean and protected year round.
We�ve created three basic detailing routines below that will help you understand what steps can be involved in a detailing routine. These options are only guidelines to help you determine what type of detailing routine may work best with your schedule. Each option has many different steps listed in it at various point during the year that should consider doing. These options are strictly suggestions and you should add and delete steps in the routine based on your specific goals and time commitment. All three options below will keep your paint protected year round but as discussed above there are many other steps you might want to include in your routine. When the words �Full Detail� are listed you�ll need to read through the �Full Exterior, Interior and Engine� detailing section and select what steps you want to complete. After you have selected your �Full Exterior� we have outlined a maintenance routine that will require varying levels of time commitment. Option # 1 is very basic and gives you the minimum coverage you will need to keep your paint protected all year and your vehicle looking good. Option # 2 has two �Full Details� and a monthly detail that will protect the paint year round and add a fantastic shine. Option # 3 has two �Full Details� and a bi-weekly maintenance routine that will have the paint thoroughly protected while looking exceptional.
Full Exterior - Pre-Wash Treatment, Wash, Dry, Clay Bar, Compound Polish, Cutting Polish, Finishing Polish, Glaze, Sealant, Wax, Clean and Dress Tires, Clean and Dress Trim, Clean Wiper Blades, Scrub Wheel Wells, Clean and Protect Glass, Polish and Protect Metals, Polish and Protect Wheels)
Full Interior � Spot Treat Stains, Brush, Vacuum and Protect Fabrics, Wipe Down and Protect All Vinyl, Protect Interior, Clean and Condition Leather, Clean Glass, Clean Door Jambs, Shampoo Carpets, Fabric Guard Carpets
Full Engine � Degrease and Wash Bay, Polish Metal Surfaces, Clean and Protect Vinyl, Clean and Protect Rubber, Protect Painted Surfaces
Option # 1
April � Full Detail
July � Wash, Dry, Sealant, Wipe Down Vinyl and Vacuum
October � Wash, Dry, Sealant Quick Interior Vacuum, Wipe Down, Clean and Condition Leather
January � Wash, Dry, Sealant, Wipe Down Vinyl and Vacuum
Option # 2
April � Full Detail
May - Wash, Dry, Wax, Quick Interior Vacuum and Wipe Down
June - Wash, Dry, Sealant, Wax, Quick Interior Vacuum and Wipe Down
July - Wash, Dry, Wax, Quick Interior Vacuum, Wipe Down, Clean and Condition Leather
August - Wash, Dry, Wax, Quick Interior Vacuum and Wipe Down
September - Wash, Dry, Wax, Quick Interior Vacuum and Wipe Down
October - Full Detail
November - Wash, Dry, Wax, Quick Interior Vacuum and Wipe Down
December - Wash, Dry, Wax, Quick Interior Vacuum and Wipe Down
January - Wash, Dry, Sealant, Wax, Quick Interior Vacuum, Wipe Down, Clean and Condition Leather
February - Wash, Dry, Wax, Quick Interior Vacuum and Wipe Down
March - Wash, Dry, Wax, Quick Interior Vacuum and Wipe Down
Option # 3
April 1st � Full Detail
April 15th � Wash, Dry, Spray Wax
May 1st - Wash, Dry, Wax, Quick Interior Vacuum and Wipe Down
May 15th - Wash, Dry, Spray Wax
June 1st - Wash, Dry, Wax, Quick Interior Vacuum and Wipe Down
June 15th - Wash, Dry, Spray Wax
July 1st - Wash, Dry, Sealant, Wax, Quick Interior Vacuum, Wipe Down, Clean and Condition Leather
July 15th - Wash, Dry, Spray Wax
August 1st - Wash, Dry, Wax, Quick Interior Vacuum and Wipe Down
August 15th - Wash, Dry, Spray Wax
September 1st - Wash, Dry, Wax, Quick Interior Vacuum and Wipe Down
September 15th - Wash, Dry, Spray Wax
October 1st � Full Detail
October 15th - Wash, Dry, Spray Wax
November 1st - Wash, Dry, Wax, Quick Interior Vacuum and Wipe Down
November 15th - Wash, Dry, Spray Wax
December 1st - Wash, Dry, Wax, Quick Interior Vacuum and Wipe Down
December 15th - Wash, Dry, Spray Wax
January 1st - Wash, Dry, Sealant, Wax, Quick Interior Vacuum, Wipe Down, Clean and Condition Leather
January 15th - Wash, Dry, Spray Wax
February 1st - Wash, Dry, Wax, Quick Interior Vacuum and Wipe Down
February 15th - Wash, Dry, Spray Wax
March 1st - Wash, Dry, Wax, Quick Interior Vacuum and Wipe Down
March 15th - Wash, Dry, Spray Wax
If you follow the process above you should have assessed your vehicle, understand the basic products and tools available, created goals, selected a time commitment and created a routine. Try to write out a detailing routine that you feel best fits your needs based on your personal situation and the information above. In a very short period of time you�ll get more comfortable with your routine and adjust it as needed. Having this thorough and methodical process will ensure you are getting the most out of your detail and keep your vehicle looking it�s best. Good luck and enjoy your detail!
10-11-2007, 04:45 PM
#4
Senior Member
Thread Starter
Join Date: Sep 2005
Location: NY
Posts: 1,113
Why you should remove your tags from Microfiber Towels
Microfiber has quickly become the norm in the automotive detailing industry and is even taking over other markets like furniture, clothing, etc. Is just using a microfiber safe enough or are there other things you can do to help improve upon them?
This writeup will explain the importance of why you should remove the tags of your microfiber towels (or purchase tagless towels). Just because a towel claims it is microfiber does not mean it is 100% paint safe for your vehicle. A simple way we can test this theory is by taking the back of a CD and seeing if the towel will scratch it.
Here is my test CD:

*As you can see the CD isn't perfect to start with but it gets the point across, notice the light scratches between 7 and 9 o'clock.
Next I marked off the CD into two distinct sections and wiped the area with as much pressure as I would removing a typical detailing product:

*I must have rotated the CD so that the light scratches are now on the right side of the CD, now between 4 and 6 o'clock.
On the right side of the CD, I applied the same pressure I did with the microfiber towel, but now I did it with the tag rubbing on the CD surface.

Results of the CD Test:

This writeup will explain the importance of why you should remove the tags of your microfiber towels (or purchase tagless towels). Just because a towel claims it is microfiber does not mean it is 100% paint safe for your vehicle. A simple way we can test this theory is by taking the back of a CD and seeing if the towel will scratch it.
Here is my test CD:
*As you can see the CD isn't perfect to start with but it gets the point across, notice the light scratches between 7 and 9 o'clock.
Next I marked off the CD into two distinct sections and wiped the area with as much pressure as I would removing a typical detailing product:
*I must have rotated the CD so that the light scratches are now on the right side of the CD, now between 4 and 6 o'clock.
On the right side of the CD, I applied the same pressure I did with the microfiber towel, but now I did it with the tag rubbing on the CD surface.
Results of the CD Test:
10-11-2007, 04:46 PM
#5
Senior Member
Thread Starter
Join Date: Sep 2005
Location: NY
Posts: 1,113
Playing with contrast and levels in Photoshop to show more of the scratches created:

As you can see. If the tags are easily creating scratches and swirls on a CD, they certainly will do the same on your clear coat. Next I decided to remove the tags.
Showing both sides of the tag:


Next I tried to cut the tag as close to the binding as possible:

As you can see. If the tags are easily creating scratches and swirls on a CD, they certainly will do the same on your clear coat. Next I decided to remove the tags.
Showing both sides of the tag:
Next I tried to cut the tag as close to the binding as possible:
10-11-2007, 04:46 PM
#6
Senior Member
Thread Starter
Join Date: Sep 2005
Location: NY
Posts: 1,113
I then proceeded to pick out the tag with a pair of tweezers. As you can see I ruined the binding on the towel which could easily begin to fall apart when you wash the towels, this is not the result I was looking for.

I proceeded to grab a new towel and had Greg cut the tag even closer to the binding this time.

Finally I took the tweezers and just tidied up the edges so the tag was hidden by the binding as much as possible.


I proceeded to grab a new towel and had Greg cut the tag even closer to the binding this time.
Finally I took the tweezers and just tidied up the edges so the tag was hidden by the binding as much as possible.
10-11-2007, 04:47 PM
#7
Senior Member
Thread Starter
Join Date: Sep 2005
Location: NY
Posts: 1,113
Time to test the results... Will the remaining portion of the tag be detrimental to the CD or better yet your clear coat? I proceeded to rub the binding of the towel where the tag is with the same amount of pressure I performed in the beginning. Notice I marked off half of the unscratched side of the CD to get a new area to view our results side by side.


Results:

Playing with levels and balance:

Conclusion:
While I wasn't successful in removing the tag completely from the towel, we seemed to find the next best possible solution, which is removing the tag as much as you can without ruining the binding. From the results of the test, which I couldn't get my camera to document completely, removing most of the tag, is SIGNIFICANTLY safer than leaving the tag on. Even if you were to use the towel on the spot where you cut off the tag, the chance of adding imperfections are pretty minor. This also says a lot about the binding of the towels tested, which were the Detailed Image General Purpose Microfiber Towels. Some cheaper towels will use nylon edging or another material that may scratch your clear coat.
Results:
Playing with levels and balance:
Conclusion:
While I wasn't successful in removing the tag completely from the towel, we seemed to find the next best possible solution, which is removing the tag as much as you can without ruining the binding. From the results of the test, which I couldn't get my camera to document completely, removing most of the tag, is SIGNIFICANTLY safer than leaving the tag on. Even if you were to use the towel on the spot where you cut off the tag, the chance of adding imperfections are pretty minor. This also says a lot about the binding of the towels tested, which were the Detailed Image General Purpose Microfiber Towels. Some cheaper towels will use nylon edging or another material that may scratch your clear coat.
10-11-2007, 04:50 PM
#8
Senior Member
Thread Starter
Join Date: Sep 2005
Location: NY
Posts: 1,113
Doing your own new car prep...
This great tutorial has been written by picus, from GTA in Detail.
Hey guys, some of you have asked how I recommend prep'ing a new car, here it is.
Before I start when I say "prep a new car" I mean you do everything non-mechanical to the car. Your dealer will remove the shipping blocks, program the idrive and key fobs, etc, but you're asking them to leave the shipping tape on the inside and outside of the car, and not to wash or wax it. Why are you doing this? Well, you're in the detailing forum so odds are you know, but in case you don't *in general* dealership washes tend to be rather harsh and can cause swirls. At Autopia we like to call them "dealer installed swirl option".
So I know some of you may think this is nuts but remember, a lot of guys *enjoy* this stuff.
So ok, you've told your dealer not to do any washing/waxing or interior prep to the car. Your car should have the following on it (let's see if I can remember!)
- shipping tape on the hood, roof, and rear deck
- shipping tape on the front and rear fender
- Styrofoam guards on the doors
- plastic over the seats
- a plastic cover in the driver side foot well
- random tape/protective tape over the seat belt bulter (if you have it), and on some arm rests.
- tape on the kick plates, and cardboard on the door.
- A lot of stickers on windows.
Now some dealers will make you remove the outside shipping tape before you drive off. Why? Well, unfortunately in North America it is perfectly ok for shipping companies to repair damage incurred while shipping, and they don't need to disclose it, so they want to check for damage; that's good because you should too! Don't sweat the removal of the tape much, it comes right off. One quick tip though: The tape that extends up the front window to the roof, then continues on the roof - it's taped to the rubber liner around the front window. If you tear it off you'll pull a bit of this rubber off and it looks a little ghetto, so be careful with that piece.
OK, so you get in the car and drive home, time to prep it! Stuff you'll need:
An automotive car soap
One or two buckets
A couple sheepskin mitts
One or two good drying towels
A bar of automotive clay (this is imperative)
A bottle of quick detailer
A chemical cleaner polish (optional)
A light abrasive (optional)
A paint sealant or wax
A trim dressing
A wheel cleaner and sealant (optional)
a tire dressing
For inside:
303 Aerospace Protectant or equivilant (poorboys natural look, meguiars quick interior detailer, etc)
A leather conditioner
Scotchguard (optional)
A window cleaner (important, I will address this in a bit)
OK, so I do the inside first. Why? Because I don't like doing the inside when I am dirty after doing the outside. Just me. You can do either.
OK, so here it is in bullet points.
- Remove all the plastic over the seats. To do this is pretty easy, a quick tip is that the plastic is connected through the seats, so tear it from the back and just slide it through the seats, it's easy.
- Remove all the tape on the dash, doors, kick plates, etc.
- Windows, this part is a little tricky, not hard, but...well, annoying. Some of the stickers will peel right off, some of them on the front window won't. Peel them off as best you can and when they are off you'll have some glue residue. Now, take a small piece of your clay and some quick detailer, spray the quick detailer and rub the clay on the glue, flip the clay a lot. Watch it take the glue off like magic! (this will take a few minutes, just be patient) I actually clay the inside of ALL the windows. Why? They have glue bits and gunk all over them. If you shoot a 500W halogen at them you'll see what I mean, very spotty.
- Vacuum the carpets, then Scotchgard if you're using it. Scotchgard is very easy to use, just hold the can 12 inches above the mats and spray a thin even layer, it will dissolve into the mats.
- Treat the dash, doors, trim, plastic, rubber with 303 or the equivalent. There are "how to use" 303 blurbs all over the site. A few quick tips on 303 use. 303 likes to leave a "blotchy" finish, to avoid this use two microfiber cloths. Spray a small amount on the area you're treating them use one cloth to rub it into the area. Use the next cloth to *fully* buff the 303 dry. If you leave any wet spots they will turn blotchy. If you miss any don't worry, use a lightly damp cloth over the effected panel and it will look uniform again.
- Condition your leather or leatherette (or use 303 on leatherette). I like Zaino Z9/Z10 because they smell delicious.
- Put in your mats and Scotchgard them.
- Clean the windows with either a quick detailer or your window cleaner. I like using a quick detailer or even a spray sealant; they both have silicone so both will dry streak free. Remember, the key to clean windows is to buff off your product well.
Viola! Now the outside.
- Remove all the tape, now if you did this at the dealer all you'll have is the styrofoam on the doors, so peel it off carefully.
- Wash the car *as normal*, do not scrub areas with glue or tape residue, you will scratch the car.
- Don't dry the car. I know, it sounds weird. Leave it damp. If you're outside keep it wet with the hose.
- Get your clay and cut off a small peice, then start the claying process. Again, here is a "how to clay" section. One note; you'll want to be very thorough when claying a new car for two reasons. One, there will be random bits of glue and tape residue all over it, the clay will remove those. Two, it will likely have a pretty decent amount of rail dust on it from transport, mine did.
- Re-wash if you think you need it. I almost never re-wash, if you use enough lubricant when claying you won't need to.
- This step is only if you need it - polish any imperfections in the paint based on their severity. In most cases a light polish (Final Polish II, ZPC, etc) will do. Wipe down the car with a 50/50 solution of isopropyl alcohol and water (iso alcohol is regular 70% off the shelf rubbing alcohol). Put it in a spray bottle, spray a panel and remove. This is to remove any polish residue.
- If you're using a chemical cleaner do it now. I usually use Klasse AIO or Jeffs Werkstatt Prime on a white lake country pad via PC at this point. I do this as a sealant base and to chemically clean the paint. I recommend this step, you can do it by hand too and it is very helpful. When I do a new car prep I always use either ZPC, AIO, or Prime before sealing.
- If you DID NOT use a chemical cleaner OR polish, wipe down the car with a 50/50 solution of isopropyl alcohol and water (iso alcohol is regular 70% off the shelf rubbing alcohol). Put it in a spray bottle, spray a panel and remove. This is to remove any dealer applied wax.
- Seal or wax the car. Which sealant or wax you use is up to you, you can do this by hand or by machine. Generally I use one of two sealants this time of year. 1) Zaino Z5pro on dark colors or 2) Jeffs Werkstatt Acrylic Jett (or trigger version) on light colors. Why? They both last a long time, are easy to use, and look good. I use these on all surfaces including windows. While the sealant is hazing do the following:
- Clean the wheels with either your leftover wash water, or a non-acid wheel cleaner. Then seal them with Poorboys Wheel Sealant / Wheel Wax, or a paint sealant.
- Dress your wheel wells with a product of your choice. I use diluted 303 (1:1 with water)
- Dress your tires based on your "shiny bling" desired amount.
- Dress your trim (around mirrors and wiper blades)
- Polish your exhaust, and seal it with your wheel sealant.
- Buff off sealant
- Enjoy!
10-11-2007, 04:52 PM
#9
Senior Member
Thread Starter
Join Date: Sep 2005
Location: NY
Posts: 1,113
Developing a Routine that Works for You
This thread will try to give you some pointers on picking out how to build the an ideal detailing schedule based on your needs. The detailer who wants to just protect their vehicle for as long as they can and do minimal amounts of maintenance steps will have a different agenda from the detailer who likes to apply a wax monthly or even sooner. I'll outline a few basics on developing a routine that fits your needs.
First Things First - Understand the Process
Knowing what products and steps available to you, and knowing what each step of the detailing process accomplishes, will really enhance how you choose and develop your routine. I like to say there are roughly 12 major processes that are available to do, which I'll outline below:
Washing & Drying - This is an important step to master because this is the foundation of any detail. This is also the process in which most imperfections are added to your paint, so take the time to research the proper washing and drying techniques.
Waterless Washing - This is a great step to learn if you do not have access to a hose on a regular basis. It works great for people who reside in apartment complexes and mobile detailers.
Using a Clay Bar - This step will help further remove surface contamination that was left behind during the wash stage of the detail. It properly preps the surface for the next steps.
Compounding - This step is used to correct paint with severe defects. Only use this step as a last resort after other, less aggressive methods have been tried and failed. You will almost always leave a haze or marring behind with this step which will need to be corrected by polishing or finishing the paint. You are removing part of the clear coat during this step.
Polishing - This step will take care of most imperfections, like light swirls, water marks, light surface scratches, etc. You are removing a minimal amount of clear coat during this step.
Finishing - This step will remove any hazing left behind from a more aggressive polish or a rotary buffer. This is when you diminish swirls and other imperfections to a minimum and the gloss and depth really jumps out. You will typically remove a tiny bit of the clear coat during this step.
All In One Products - This step is used to save time by combining some cleaning or polishing characteristics along with some form of protection. While the results are not quite as good as doing the steps separately, these products save time for people looking for great results in less time.
Glazes - Glazes typically have oils and clay in their formula in order to help fill in and hide imperfections. This is only a temporary solution as the fillers will wash out over time.
Sealants - This step adds a barrier of protection that typically lasts 3 - 6 months. A majority of sealants are easy to apply and remove, while giving off a reflective, mirror like look. These products are usually created in a lab.
Waxes - This step will add protection that typically lasts 2 - 8 weeks. A benefit of waxing is you add depth and dimension that sealants are unable to achieve. This is commonly used at car shows to really give off the wet look.
Spray on Protectants - This step usually enhances either a sealant or wax and is often used after a wash and dry during a maintenance step.
Quick Detailers - These products often have light cleaners in them and are great for removing a light dusting after performing a full detail.
Getting to know each step of the detailing process will really help you grow and learn when and why you are performing a detail on your vehicle. This is especially important if you plan on detailing for other people. It will save you a lot of time and you will best meet the customers needs by understanding what happens during each step of the process.
Choose the proper products to fit your time schedule.
If your goal of detailing is to provide protection for a vehicle and you only wish to perform a detail twice a year, do not choose a product that leaves you with 3 weeks of protection. You figure at a minimum you'll want to detail your vehicle twice a year (typically Spring and Fall). There are very few, if any, products that will provide you with longer than 6 months of protection on a daily driver. This should be used as a base line for choosing which products you plan on using. If you know you only want to detail a couple times a year, then a sealant would be a wise decision. Polymer and acrylic sealants will typically give you 3 - 6 months of protection. From my experience, many products over state their durability for most applications. They can often claim my sealant lasts 12 months, well maybe, under ideal conditions if your vehicle is never driven in an air tight vacuum. I typically will always take the low side of a range and even sometimes subtract a little bit of time off that. For example, if a product states 4 - 6 months of protection, I'll often apply that every 3 months to ensure I have proper protection on my vehicle at all times.
If you plan on detailing on a more regular basis, weekly, monthly, etc. then you open up a door to using more products such as waxes or spray on sealant or spray on wax. You can always use a product that would out last the frequency of you detailing, so if there is a sealant you fell in love with and wish to apply that weekly, although I do not suggest this, it certainly wouldn't hurt anything. Typically speaking, waxes and spray on protective products typically last 2 - 8 weeks. That being said, you would not want to develop a routine where you detail seasonally with your only protectant being a wax that lasts you 4 weeks. That leaves large gaps of time in which your paint is unprotected.
Once you have chosen your products you have available to you, its time to begin designing your detailing routine.
Assess your goals and current paint condition
If you have a brand new car that has just rolled off the truck from the factory with no imperfections in the paint, you certainly will have a different agenda then the person who just purchased their dream car, a black Porsche 911 Turbo, owned and babied by a local doctor who visited the local car wash weekly, which happens to use an automated wash process with scrubbing bristles (in other words, a swirl monster).
The first thing I do is assess my paint and perform a few routine checks.
Protection Test - One of the first things I do while I'm washing my vehicle is to see if there is still protection left on the paint. If there is, you should notice water beading or sheeting off the paint, not accumulating on the surface in a pool of water. This will give you some indication on which steps are needed to protect your paint.
Plastic Bag Test - One of the things I'll do is test to see if my paint can benefit from a clay bar. A quick way to do so is to wrap your fingers in a plastic sandwich bag and glide your fingers over the paint. By doing so, the bag amplifies your sense of touch and can help determine the amount of surface contamination. If the paint feels rough, I know I can benefit from a clay bar.
Direct Sun or Florescent Light Test - Next thing I'll do is check the condition of the clear coat or paint. I typically will check the condition of the paint after the washing and drying phase or after a clay bar stage if I decide to do so. Roll your vehicle in direct sunlight so that you are looking at a clear view of the entire sun (not shaded by clouds) reflecting on your paint. This typically will help bring out the flaws in your paint such as swirl marks, oxidation, water spots, scratches, etc. Another test is to bring the paint under florescent lighting, this yields a similar effect of the direct sun test. If you decide you want to tackle removing any imperfections, you will want to properly polish your paint.
Once you've assessed your paint and understand how your vehicle is holding up you can begin to develop your routine.
Determine how much time you can allocate to this detail and estimate when your next detail is going to happen
If you only have an hour, do not expect to be able to achieve a perfect show quality finish. Come up with a time frame that fits your schedule and needs. If this is a maintenance step for you with a wash and dry and some spray on protection, you should allocate at least an hour or so. If you are trying to remove imperfections such as swirls and scratches, estimate spending anywhere from 4 - 12+ hours on the paint, depending on how big of a perfectionist you are.
If you know in the near future you have a lot of things coming up preventing you from detailing again for a few months, then I recommend you apply a sealant so you protect your paint for an extended period of time.
If you have imperfections and only have 2.5 hours today but know you can set aside a full day to detailing in 2 weeks but you want to make your car look great tonight for a car show, you may want to perform a wash and dry, glaze and wax for now, then tackle the imperfections in 2 weeks when you have adequate time.
Going through scenarios like this after you understand the entire process will help you determine how to formulate your detailing schedule. I personally try to create a routine and post it on my calendar. I have my example exterior routine posted here.
10-11-2007, 04:53 PM
#10
Senior Member
Thread Starter
Join Date: Sep 2005
Location: NY
Posts: 1,113
Using a Wax - Understanding & How-To
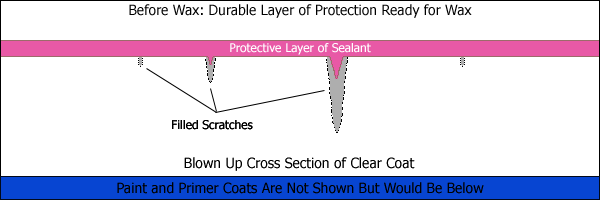
Waxing Overview:
Waxing is a great way to really enhance the depth and gloss of your vehicle�s paint. When you have the right wax it can take your paint to another level where the paint really �pops�. These waxes will give you protection against harmful UV rays, contaminates, moisture and more. This protection is essential to preserving your vehicle�s finish. Most natural waxes will protect your painted surfaces for 2 � 8 weeks. We recommend layering waxes over sealants for increased protection, which is discussed in the previous step.
Prep Stage:
At this point the vehicle should be freshly washed, dried and already treated with clay bar, cutting polish, finishing polish, glaze and sealant if desired. For ease of use and best results the vehicle should be worked on in a shaded area where the paint is cool to the touch. Attach the appropriate pad to the Porter Cable 7424, centering the pad on the backing plate. Whether doing the application by hand or with a buffer be sure to match the aggressiveness of the product with the aggressiveness of the pad (refer to Waxes Info). Prime the pad, especially new ones, with a couple mists of quick detailer solution. This will help keep the product on the pads surface and enhance your results. A general tip for using the PC is to move relatively slow and keep the pad flat when possible.
Instructions for Machine Buffing:Waxing is a great way to really enhance the depth and gloss of your vehicle�s paint. When you have the right wax it can take your paint to another level where the paint really �pops�. These waxes will give you protection against harmful UV rays, contaminates, moisture and more. This protection is essential to preserving your vehicle�s finish. Most natural waxes will protect your painted surfaces for 2 � 8 weeks. We recommend layering waxes over sealants for increased protection, which is discussed in the previous step.
Prep Stage:
At this point the vehicle should be freshly washed, dried and already treated with clay bar, cutting polish, finishing polish, glaze and sealant if desired. For ease of use and best results the vehicle should be worked on in a shaded area where the paint is cool to the touch. Attach the appropriate pad to the Porter Cable 7424, centering the pad on the backing plate. Whether doing the application by hand or with a buffer be sure to match the aggressiveness of the product with the aggressiveness of the pad (refer to Waxes Info). Prime the pad, especially new ones, with a couple mists of quick detailer solution. This will help keep the product on the pads surface and enhance your results. A general tip for using the PC is to move relatively slow and keep the pad flat when possible.
- Dispense a thin ring of product around the outer edge of the pad. (Note: If the pad is brand new add a little extra product, so the pad doesn�t run dry)
- With the PC off smear the product over a 2� x 2� area on the clear coat.
- Turn on the PC and with the speed setting between 3 � 5. Begin to apply light pressure to the head of the PC unit. If the PC bogs down, you are applying too much pressure.
- Start in the top left corner of your 2� x 2� area and move the PC from left to right at a pace of 3� per second, overlapping each pass by 50%.
- With the PC still on work the buffer from top to bottom moving at 3" per second, while overlapping each pass by 50%. Use light pressure only so the pad spins freely for this set of passes until the entire 2' x 2' area has been completed. After completing the 2' x 2' area turn the buffer off. (Note: At this time the entire 2' x 2' panel should have received four passes.)
- After completing a section or panel use a paint safe microfiber towel to wipe off any remaining excess product After a few panels take the time to wipe off excess product from the pad so it does not get saturated. Another option is to spin the buffer on a low speed and agitate it with a clean toothbrush to remove product build up the pores of the foam pad. Re-mist the pad with some quick detailer spray to increase lubrication and keep the product on the surface as needed
- After a few panels take the time to wipe off excess product from the pad so it does not get saturated. Another option is to spin the buffer on a low speed and agitate it with a clean toothbrush to remove product build up the pores of the foam pad.
- Continue this entire process until the entire vehicle has been buffed.
- When finished, clean pads with Snappy Clean pad cleaners to ensure pads are in proper working condition.
- Dispense a nickel to quarter sized drop of product on the applicator pad.
- Spread the product and outline a 2� x 2� area that you plan on working the sealant.
- Start in the top left corner of your 2� x 2� area and work the polish in small circles with medium pressure moving from left to right, overlapping each pass by 50%.
- Repeat this process moving up and down.
- After completing a section or panel use a paint safe microfiber towel to wipe off any remaining excess product. Replace towel if it smears or becomes saturated with product.
- Continue this process until the entire vehicle has been glazed. Re-mist the pad with some quick detailer spray every couple of panels to increase lubrication and keep the product on the surface.
- Clean the applicator pad with the Snappy Clean pad cleaning solution to remove excess product and to ensure the pad is clean for the next use.
10-11-2007, 04:54 PM
#11
Senior Member
Thread Starter
Join Date: Sep 2005
Location: NY
Posts: 1,113
Using a Sealant - Understanding & How-To
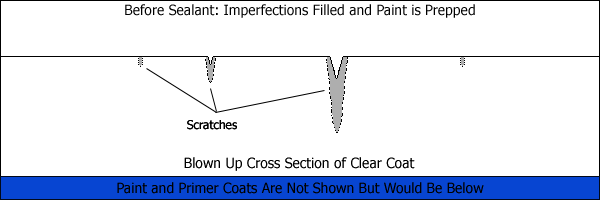
Sealants are made in labs to replicate what waxes do, but better. In general sealants give you a longer lasting shine and better protection than natural waxes. For best results make sure you have taken all the necessary preparation steps to clean and smooth out the clear coat. The cleaner and smoother the clear coat is, the better the sealant will bond to it. As the picture above shows, the sealant will adhere to the clear coat, providing a micro thin barrier of protection. The very high melting point of sealants makes them more durable and resistant to nature�s elements, abrasions and harmful contaminates. Contaminates have a more difficult time bonding to the clear coat, through the sealant, therefore its easier to remove contaminates during the washing process. Sealants typically give you full protection for 3 � 12 months depending on the sealant you select and how many coats are applied. It will also enhance the looks of the vehicle by providing a more reflective surface. To add even more depth and gloss to the paint, consider doing multiple coats or applying a wax over the sealant, which is discussed in the next step.
Recommended Products For Machine Buffing:
Instructions for Hand Buffing:
- Porter Cable 7424 Buffer
- Velcro Backing Plate
- Finishing Pad or Finessing Pad
- Sealant
- 1 - 3x Microfiber Towels
- Lake Country Hand Applicator w/ Appropriate Pad
or 1x Microfiber Applicator Pad - Sealant
- 1 - 3x Microfiber Towels
At this point the vehicle should be freshly washed, dried and already treated with clay bar, cutting polish, finishing polish and glaze if desired. For ease of use and best results the vehicle should be worked on in a shaded area where the paint is cool to the touch. Attach the appropriate pad to the Porter Cable 7424, centering the pad on the backing plate. Whether doing the application by hand or with a buffer be sure to match the aggressiveness of the product with the aggressiveness of the pad (refer to Sealants Info). Prime the pad, especially new ones, with a couple mists of quick detailer solution. This will help keep the product on the pads surface and enhance your results. A general tip for using the PC is to move relatively slow and keep the pad flat when possible.
Instructions for Machine Sealing:- Dispense a thin ring of product around the outer edge of the pad. (Note: If the pad is brand new add a little extra product, so the pad does not run dry)
- With the PC off smear the product over a 2� x 2� area on the clear coat.
- Turn on the PC and with the speed setting between 3 � 5. Begin to apply light pressure to the head of the PC unit. If the PC bogs down, you are applying too much pressure.
- Start in the top left corner of your 2� x 2� area and move the PC from left to right at a pace of 3� per second, overlapping each pass by 50%.
- With the PC still on work the buffer from top to bottom moving at 3" per second, while overlapping each pass by 50%. Use light pressure only so the pad spins freely for this set of passes until the entire 2' x 2' area has been completed. After completing the 2' x 2' area turn the buffer off. (Note: At this time the entire 2' x 2' panel should have received four passes.)
- After completing a section or panel use a paint safe microfiber towel to wipe off any remaining excess product. Replace towel if it smears or becomes saturated with product.
- After a few panels take the time to wipe off excess product from the pad so it does not get saturated. Another option is to spin the buffer on a low speed and agitate it with a clean toothbrush to remove product build up the pores of the foam pad. Re-mist the pad with some quick detailer spray to increase lubrication and keep the product on the surface as needed
- Continue this entire process until the entire vehicle has been buffed.
- When finished, clean pads with Snappy Clean pad cleaners to ensure pads are in proper working condition.
- Dispense a nickel to quarter sized drop of product on the applicator pad.
- Spread the product and outline a 2� x 2� area that you plan on working the sealant.
- Start in the top left corner of your 2� x 2� area and work the polish in small circles with medium pressure moving from left to right, overlapping each pass by 50%.
- Repeat this process moving up and down.
- After completing a section or panel use a paint safe microfiber towel to wipe off any remaining excess product. Replace towel if it smears or becomes saturated with product.
- Continue this process until the entire vehicle has been glazed. Re-mist the pad with some quick detailer spray every couple of panels to increase lubrication and keep the product on the surface.
- Clean the applicator pad with the Snappy Clean pad cleaning solution to remove excess product and to ensure the pad is clean for the next use.
10-11-2007, 04:55 PM
#12
Senior Member
Thread Starter
Join Date: Sep 2005
Location: NY
Posts: 1,113
Using a Glaze - Understanding & How-To

Glazing your paint is a step that many professional detailers have used for years that is now becoming popular among weekend detailers. The reason glazes are so popular is for how well they work at hiding imperfections and adding gloss to the finish. True glazes are ultra fine polishes designed to cling to imperfections and fill them in. The oils in the glaze will reflect the color of the surrounding paint to make the paint�s finish look uniform. The glaze will also make the surface look rich and glossy for a show room finish. This is a perfect step for: after using polishes, newer vehicles that do not want to use polishes yet, vehicle�s entered in shows and anyone looking to really make their paint �pop�.
Glaze Overview
Glazes can really make the paint glow and look its best. You�ll be very happy with the deep shine that a glaze leaves behind. This step will not remove swirls and other imperfections but it will fill them in as you can see in the picture above. A variety of factors will affect the results of the detail such as: manufacturer�s clear coating process, age and condition of vehicle, type of product, hand or buffer application, type of pad or applicator, skill of detailer and more. All of these factors ultimately mean that finding out what works best for your particular vehicle takes a little bit of trial and error.
The picture above shows how the glaze will help fill in and hide swirls and scratches that could not be removed by buffing. The oil fillers cling to the sides of the imperfection and optically make the paint look like the imperfections have disappeared or been reduced. Make sure you follow up with a sealant or wax to protect the glaze and extend its life. This is discussed in detail during the next step.
Recommended Products For Machine Buffing:
Instructions for Hand Buffing:
- Porter Cable 7424 Buffer
- Velcro Backing Plate
- Polishing Pad or Finishing Pad
- Glaze
- 1 - 3x Microfiber Towels
- Lake Country Hand Applicator w/ Appropriate Pad
or 1x Microfiber Applicator Pad - Glaze
- 1 - 3x Microfiber Towels
Prep Stage:
At this point the vehicle should be freshly washed, dried and already treated with clay bar, cutting polish and finishing polish if desired. For ease of use and best results the vehicle should be worked on in a shaded area where the paint is cool to the touch. Attach the appropriate pad to the Porter Cable 7424, centering the pad on the backing plate. Whether doing the application by hand or with a buffer be sure to match the aggressiveness of the product with the aggressiveness of the pad (refer to Glazes Info). Prime the pad, especially new ones, with a couple mists of quick detailer solution. This will help keep the product on the pads surface and enhance your results. A general tip for using the PC is to move relatively slow and keep the pad flat when possible.
Instructions for Machine Glazing:At this point the vehicle should be freshly washed, dried and already treated with clay bar, cutting polish and finishing polish if desired. For ease of use and best results the vehicle should be worked on in a shaded area where the paint is cool to the touch. Attach the appropriate pad to the Porter Cable 7424, centering the pad on the backing plate. Whether doing the application by hand or with a buffer be sure to match the aggressiveness of the product with the aggressiveness of the pad (refer to Glazes Info). Prime the pad, especially new ones, with a couple mists of quick detailer solution. This will help keep the product on the pads surface and enhance your results. A general tip for using the PC is to move relatively slow and keep the pad flat when possible.
- Dispense a ring of product around the outer edge of the pad. (Note: If the pad is brand new add a little extra product, so the pad does not run dry)
- With the PC off smear the product over a 2� x 2� area on the clear coat.
- Turn on the PC and with the speed setting between 3 � 5. Begin to apply light pressure to the head of the PC unit. If the PC bogs down, you are applying too much pressure.
- Start in the top left corner of your 2� x 2� area and move the PC from left to right at a pace of 3� per second, overlapping each pass by 50%.
- With the PC still on work the buffer from top to bottom moving at 3" per second, while overlapping each pass by 50%. Use light pressure only so the pad spins freely for this set of passes until the entire 2' x 2' area has been completed. After completing the 2' x 2' area turn the buffer off. (Note: At this time the entire 2' x 2' panel should have received four passes.)
- After completing a section or panel use a paint safe microfiber towel to wipe off any remaining excess product. Replace towel if it smears or becomes saturated with product.
- After a few panels take the time to wipe off excess product from the pad so it does not get saturated. Another option is to spin the buffer on a low speed and agitate it with a clean toothbrush to remove product build up the pores of the foam pad.
- Continue this entire process until the entire vehicle has been buffed.
- When finished, clean pads with Snappy Clean pad cleaners to ensure pads are in proper working condition.
- Dispense a nickel to quarter sized drop of product on the applicator pad.
- Spread the product and outline a 2� x 2� area that you plan on working the glaze.
- Start in the top left corner of your 2� x 2� area and work the polish in small circles with medium pressure moving from left to right, overlapping each pass by 50%.
- Repeat this process moving up and down.
- After completing a section or panel use a paint safe microfiber towel to wipe off any remaining excess product. Replace towel if it smears or becomes saturated with product.
- Continue this process until the entire vehicle has been glazed.
- Clean the applicator pad with the Snappy Clean pad cleaning solution to remove excess product and to ensure the pad is clean for the next use.
10-11-2007, 04:55 PM
#13
Senior Member
Thread Starter
Join Date: Sep 2005
Location: NY
Posts: 1,113
Finishing Polish Understanding & How-To

Finishing Polishes are light polishes designed to really shine the paint and restore a glossy finish. As most detailers know it�s how you prep the surface that really determines the end result of your detail. Finishing polishes will help remove old wax or sealant, oxidation, embedded contaminates, very fine surface imperfections and more. This process helps clean the clear coat, which allows more light to pass through, thus creating a deeper shine. As you can see from the picture above the cutting polish may leave a slight haze in the clear coat. Using a finishing polish will restore a brilliant gloss. The haze should be completely removed and the surface should be extremely smooth to the touch. This is the perfect step to take to prep your paint after using a cutting polish or before you use a glaze, sealant or wax.
Recommended Products For Machine Buffing:
Is A Buffer Necessary?- Porter Cable 7424 Buffer or Cyclo Polisher
- Velcro Backing Plate
- Polishing Pad or Finishing Pad
- Light Cutting Polish or Non-Abrasive Polish
- Quick Detailer Solution
- 1 - 3x Microfiber Towels
- Lake Country Hand Applicator w/ Appropriate Pad
or Microfiber Applicator Pad - Light Cutting Polish or Non-Abrasive Polish
- 1 - 3x Microfiber Towels
Below are some of the major benefits of using the PC7424 with the velcro backing plate. The velcro backing plate screws directly into the PC7424 and allows you to easily swap pads on and off. The velcro backing plate is also 6� in diameter, which evenly distributes pressure from the buffer throughout the entire 6.5� diameter of the pad. This ensures that you get perfectly even coverage with the sealant and that it has properly bonded to the surface. Here are some other benefits:
A) It saves you time and energy. When applying coat after coat by hand, you tend to get tired and slow down. Your fingertips exert pressure over a very small area so it requires many passes just to cover a small area. The 6.5" circular pad on the PC7424 can cover a larger surface area quickly and easily. The Porter Cable is only 6lbs and has two comfortable places for your hands to guide the buffer. The buffer completes 2,500 to 6,000 orbits per minute, which creates plenty of pressure that�s nearly impossible to duplicate by hand. On average the buffer can help you complete a coat in 50% - 75% of the time it takes to complete hand applications.
B) You achieve more consistent results. When you guide the buffer across the clear coat it creates pressure that breaks down the product and works it into the clear coat. Alternatively, hand applications force you to attempt to apply the same exact force through a multiple step detailing process. Most hand applications yield varying levels of pressure that may leave the process looking slightly inconsistent or blotchy. You are exerting a lot of energy during hand applications, especially for polishes, which require steady pressure to perform their best. The Porter Cable comes with a dial that controls the buffer�s speed, so you get the exact same results throughout each coat.
C) You obtain better results. Because of the Porter Cable�s random orbit pattern you will not risk burning the paint like you would with traditional rotary buffers. The even distribution of heat and pressure will break down the product evenly so the results are perfectly uniform. This uniform application is essential for even protection and shine over all the clear-coated surfaces. The PC7424 is compatible with a variety of different pads that help best work in certain products. Sealants and waxes should generally be applied with a soft finishing pad. The correct pad selection is crucial to achieving maximum results.
Choosing the Proper Polish:
Deciding on which polish to use can be a difficult decision. Some of it will depend on if you are trying to tackle the job by hand or with a buffer, severity of the imperfections, ease of use and more.
Finishing Polishes Overview
One thing to keep in mind is that detailing is an art form and you�ll get better with experience. It is nearly impossible and generally not safe to remove every single scratch and swirl. Therefore have a realistic expectation on how much you can really buff out. A variety of factors will affect the results of the detail such as: manufacturer�s clear coating process, age and condition of vehicle, type of product, hand or buffer application, type of pad or applicator, skill of detailer and more. All of these factors ultimately mean that finding out what works best for your particular vehicle takes a little bit of trial and error.
Prep Stage:
At this point the vehicle should be freshly washed, dried and already treated with clay bar and a cutting polish if needed. For ease of use and best results the vehicle should be worked on in a shaded area where the paint is cool to the touch. Attach the appropriate pad to the Porter Cable 7424, centering the pad on the backing plate. Whether doing the application by hand or with a buffer be sure to match the aggressiveness of the product with the aggressiveness of the pad (refer to Finishing Polishes Info). Prime the pad, especially new ones, with a couple mists of quick detailer solution. This will help keep the product on the pads surface and enhance your polishing results. A general tip for using the PC is to move relatively slow and keep the pad flat when possible.
Instructions for Machine Buffing:One thing to keep in mind is that detailing is an art form and you�ll get better with experience. It is nearly impossible and generally not safe to remove every single scratch and swirl. Therefore have a realistic expectation on how much you can really buff out. A variety of factors will affect the results of the detail such as: manufacturer�s clear coating process, age and condition of vehicle, type of product, hand or buffer application, type of pad or applicator, skill of detailer and more. All of these factors ultimately mean that finding out what works best for your particular vehicle takes a little bit of trial and error.
Prep Stage:
At this point the vehicle should be freshly washed, dried and already treated with clay bar and a cutting polish if needed. For ease of use and best results the vehicle should be worked on in a shaded area where the paint is cool to the touch. Attach the appropriate pad to the Porter Cable 7424, centering the pad on the backing plate. Whether doing the application by hand or with a buffer be sure to match the aggressiveness of the product with the aggressiveness of the pad (refer to Finishing Polishes Info). Prime the pad, especially new ones, with a couple mists of quick detailer solution. This will help keep the product on the pads surface and enhance your polishing results. A general tip for using the PC is to move relatively slow and keep the pad flat when possible.
- Dispense a ring of product around the outer edge of the pad.
(Note: If the pad is brand new add a little extra product, so the pad does not run dry) - With the PC off smear the product over a 2� x 2� area on the clear coat.
- (Optional) To help spread the product you can turn the PC unit on at a low speed setting and spread the product out evenly over the 2� x 2� section
- Increase the speed setting to 4 - 6 and begin to apply light to medium pressure to the head of the PC unit. If the PC bogs down, you are applying too much pressure. (More experienced users may want use higher speed settings to attain better results. Newer users should start at lower speed levels.)
- Start in the top left corner of your 2� x 2� area and move the PC from left to right at a pace of 3� per second, overlapping each pass by 50%.
- With the PC still on work the buffer from top to bottom moving at no faster than 3" per second, while overlapping each pass by 50%. Use light pressure only so the pad spins freely for this set of passes until the entire 2' x 2' area has been completed. After completing the 2' x 2' area turn the buffer off. (Note: At this time the entire 2' x 2' panel should have received four passes. If the polish dusts excessively, the product was overworked.)
- After completing a section or panel use a paint safe microfiber towel to wipe off any remaining excess product. Replace towel if it smears or becomes saturated with product.
- After a few panels take the time to wipe off excess product from the pad so it does not get saturated. Another option is to spin the buffer on a low speed and agitate it with a clean toothbrush to remove product build up the pores of the foam pad. Re-mist the pad with some quick detailer spray to increase lubrication and keep the product on the surface as needed
- Continue this entire process until the entire vehicle has been buffed.
- When finished, clean pads with Snappy Clean pad cleaners to ensure pads are in proper working condition.
- Dispense a quarter sized drop of product on the applicator pad.
- Spread the product and outline a 2� x 2� area that you plan on working the polish
- Start in the top left corner of your 2� x 2� area and work the polish in small circles with medium pressure moving from left to right, overlapping each pass by 50%.
- Repeat this process moving up and down.
- After completing a section or panel use a paint safe microfiber towel to wipe off any remaining excess product. Replace towel if it smears or becomes saturated with product.
- Continue this process until the entire vehicle has been polished. Re-mist the pad with some quick detailer spray every couple of panels to increase lubrication and keep the product on the surface.
- Clean the applicator pad with the Snappy Clean pad cleaning solution to remove excess product and to ensure the pad is clean for the next use.
10-11-2007, 04:59 PM
#14
Senior Member
Thread Starter
Join Date: Sep 2005
Location: NY
Posts: 1,113
Cutting Polish Overview and How-To Steps
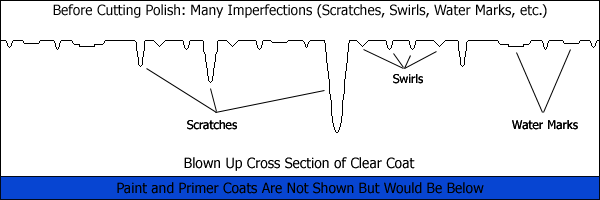
Cutting Polishes can drastically improve the condition of the clear coat. This step can help faded, oxidized, swirled and scratched clear coats look significantly better. The cutting polish helps restore a transparent clear coat, which allows for light to pass directly through the clear coat, thus creating a bright reflection with a deep shine. This step produces some of the most noticeable results that make you proud of your vehicles stunning appearance.
As the pictures show above, a cutting polish will remove a micro-thin layer of your clear coat. It helps smooth out scratches, swirls and buffs out watermarks that are etched into the clear coat. We suggest using a cutting polish once or twice a year or as needed to treat imperfections as they happen. Notice in the picture that the surface is still slightly rough, which can appear hazy from using a cutting polish. This slight haze is to be expected and will be buffed out with finer polishes, also known as finishing polishes in the next step. Finishing Polishes are explained in more detail in the next step.
Recommended Products For Machine Buffing:
While you can still polish by hand, the results are considerably better when you use a quality buffer like the Porter Cable 7424. Below are some of the major benefits of using the PC7424 with the velcro backing plate. The velcro backing plate screws directly into the PC7424 and allows you to easily swap pads on and off. The velcro backing plate is also 6� in diameter, which evenly distributes pressure from the buffer throughout the entire 6.5� diameter of the pad.
A) It saves you time and energy. When applying coat after coat by hand, you tend to get tired and slow down. Your fingertips exert pressure over a very small area so it requires many passes just to cover a small area. The 6.5" circular pad on the PC7424 can cover a larger surface area quickly and easily. The Porter Cable is only 6lbs and has two comfortable places for your hands to guide the buffer. The buffer completes 2,500 to 6,000 orbits per minute, which creates plenty of heat that is nearly impossible to duplicate by hand. On average the buffer can help you complete a coat in 50% - 75% of the time it takes to complete hand applications.
B) You achieve more consistent results. When you guide the buffer across the clear coat it creates pressure that breaks down the product and works it into the clear coat. Alternatively, hand applications force you to attempt to apply the same exact force through a multiple step detailing process. Most hand applications yield varying levels of pressure that may leave the process looking slightly inconsistent or blotchy. You are exerting a lot of energy during hand applications, especially for polishes, which require steady pressure to perform their best. The Porter Cable comes with a dial that controls the buffer�s speed, so you get the exact same results throughout each coat.
C) You obtain better results. Because of the Porter Cable�s random orbit pattern you will not risk burning the paint like you would with traditional rotary buffers. The even distribution of heat and pressure will break down the product evenly so the results are perfectly uniform. This uniform application is essential with polishes to make sure the clear coat is equally bright and vibrant over the entire surface. The PC7424 is compatible with a variety of different pads that help best work in certain products. For polishes you can use a firmer cutting pad or polishing pad, while waxes and sealants can be applied with the ultra soft finishing pad. The correct pad selection is crucial to achieving maximum results.
If you still plan on tackling this project by hand, we strongly suggest investing in the Lake Country Hand Applicator Kit. This kit comes with an ergonomic hand applicator and a variety of pad textures to best work each different kind of product.
Choosing the Proper Polish:
Deciding on which polish to use can be a difficult decision. Some of it will depend on if you are trying to tackle the job by hand or with a buffer, severity of the imperfections, ease of use and more. - Porter Cable 7424 Buffer or Cyclo Polisher
- Velcro Backing Plate
- Cutting Pad or Polishing Pad
- Heavy Cutting Polish or Medium Cutting Polish
- Quick Detailer Solution
- 2 - 4x Microfiber Towels
- Lake Country Hand Applicator w/ Appropriate Pad
or Microfiber Applicator Pad or Terry Cloth Applicator - Heavy Cutting Polish or Medium Cutting Polish
- 2 - 4x Microfiber Towels
While you can still polish by hand, the results are considerably better when you use a quality buffer like the Porter Cable 7424. Below are some of the major benefits of using the PC7424 with the velcro backing plate. The velcro backing plate screws directly into the PC7424 and allows you to easily swap pads on and off. The velcro backing plate is also 6� in diameter, which evenly distributes pressure from the buffer throughout the entire 6.5� diameter of the pad.
A) It saves you time and energy. When applying coat after coat by hand, you tend to get tired and slow down. Your fingertips exert pressure over a very small area so it requires many passes just to cover a small area. The 6.5" circular pad on the PC7424 can cover a larger surface area quickly and easily. The Porter Cable is only 6lbs and has two comfortable places for your hands to guide the buffer. The buffer completes 2,500 to 6,000 orbits per minute, which creates plenty of heat that is nearly impossible to duplicate by hand. On average the buffer can help you complete a coat in 50% - 75% of the time it takes to complete hand applications.
B) You achieve more consistent results. When you guide the buffer across the clear coat it creates pressure that breaks down the product and works it into the clear coat. Alternatively, hand applications force you to attempt to apply the same exact force through a multiple step detailing process. Most hand applications yield varying levels of pressure that may leave the process looking slightly inconsistent or blotchy. You are exerting a lot of energy during hand applications, especially for polishes, which require steady pressure to perform their best. The Porter Cable comes with a dial that controls the buffer�s speed, so you get the exact same results throughout each coat.
C) You obtain better results. Because of the Porter Cable�s random orbit pattern you will not risk burning the paint like you would with traditional rotary buffers. The even distribution of heat and pressure will break down the product evenly so the results are perfectly uniform. This uniform application is essential with polishes to make sure the clear coat is equally bright and vibrant over the entire surface. The PC7424 is compatible with a variety of different pads that help best work in certain products. For polishes you can use a firmer cutting pad or polishing pad, while waxes and sealants can be applied with the ultra soft finishing pad. The correct pad selection is crucial to achieving maximum results.
If you still plan on tackling this project by hand, we strongly suggest investing in the Lake Country Hand Applicator Kit. This kit comes with an ergonomic hand applicator and a variety of pad textures to best work each different kind of product.
Choosing the Proper Polish:
Cutting Polishing Overview
One thing to keep in mind is that detailing is an art form and you will get better with experience. It is nearly impossible and generally not safe to remove every single scratch and swirl. Therefore have a realistic expectation on how much you can really buff out. A variety of factors will affect the results of the detail such as: manufacturer�s clear coating process, age and condition of vehicle, type of product, hand or buffer application, type of pad or applicator, skill of detailer and more. All of these factors ultimately mean that finding out what works best for your particular vehicle takes a little bit of trial and error.
Prep Stage:
At this point the vehicle should be freshly washed, dried and given a clay bar treatment if desired. For ease of use and best results the vehicle should be worked on in a shaded area where the paint is cool to the touch. Attach the appropriate pad to the Porter Cable 7424, centering the pad on the backing plate. Whether doing the application by hand or with a buffer, be sure to match the aggressiveness of the product with the aggressiveness of the pad (refer to Cutting Polishes Info). Prime the pad, especially new ones, with a couple mists of quick detailer solution. This will help keep the product on the pads surface and enhance your polishing results. A general tip for using the PC is to move relatively slow and keep the pad flat when possible.
Instructions for Machine Buffing:One thing to keep in mind is that detailing is an art form and you will get better with experience. It is nearly impossible and generally not safe to remove every single scratch and swirl. Therefore have a realistic expectation on how much you can really buff out. A variety of factors will affect the results of the detail such as: manufacturer�s clear coating process, age and condition of vehicle, type of product, hand or buffer application, type of pad or applicator, skill of detailer and more. All of these factors ultimately mean that finding out what works best for your particular vehicle takes a little bit of trial and error.
Prep Stage:
At this point the vehicle should be freshly washed, dried and given a clay bar treatment if desired. For ease of use and best results the vehicle should be worked on in a shaded area where the paint is cool to the touch. Attach the appropriate pad to the Porter Cable 7424, centering the pad on the backing plate. Whether doing the application by hand or with a buffer, be sure to match the aggressiveness of the product with the aggressiveness of the pad (refer to Cutting Polishes Info). Prime the pad, especially new ones, with a couple mists of quick detailer solution. This will help keep the product on the pads surface and enhance your polishing results. A general tip for using the PC is to move relatively slow and keep the pad flat when possible.
- Dispense a ring of product around the outer edge of the pad. (Note: If the pad is brand new add a little extra product, so the pad doesn�t run dry)
- With the PC off smear the product over a 2� x 2� area on the clear coat.
- (Optional) To help spread the product you can turn the PC unit on at a low speed setting and spread the product out evenly over the 2� x 2� section
- Increase the speed setting to 4 - 6 and begin to apply light to medium pressure to the head of the PC unit. If the PC bogs down, you are applying too much pressure. (More experienced users may want use higher speed settings to attain better results. Newer users should start at lower speed levels)
- Start in the top left corner of your 2� x 2� area and move the PC from left to right at a pace of no faster than 3� per second, overlapping each pass by 50%.
- With the PC still on work the buffer from top to bottom moving at no faster than 3� per second, while overlapping each pass by 50%. Use light pressure only so the pad spins freely for this set of passes until the entire 2� x 2� area has been completed. After completing the 2� x 2� area turn the buffer off.
(Note: At this time the entire 2� x 2� panel should have received four passes. The surface may look a little bit cloudy in direct sunlight or florescent lighting, which is normal. The next polishing step will remove any haze or cloudiness. If the polish dusts excessively, the product was overworked.) - After a few panels take the time to wipe off excess product from the pad so it does not get saturated. Another option is to spin the buffer on a low speed and agitate it with a clean toothbrush to remove product build up the pores of the foam pad. Re-mist the pad with some quick detailer spray to increase lubrication and keep the product on the surface as needed
- Continue this entire process until the entire vehicle has been buffed.
- When finished, clean pads with Snappy Clean pad cleaners to ensure pads are in proper working condition.
- Dispense a quarter sized drop of product on the applicator pad.
- Spread the product and outline a 2� x 2� area that you plan on working the polish.
- Start in the top left corner of your 2� x 2� area and work the polish in small circles with medium pressure moving from left to right, overlapping each pass by 50%.
- Repeat this process moving up and down. (Note: The surface may have a slight cloudy look to it when you are finished, which is to be expected. The next step will use a finishing polish that will remove any haze or cloudiness.)
- After completing a section or panel use a paint safe microfiber towel to wipe off any remaining excess product. Replace towel if it smears or becomes saturated with product.
- Continue this process until the entire vehicle has been polished. Re-mist the pad with some quick detailer spray every couple of panels to increase lubrication and keep the product on the surface.
- Clean the applicator pad with the Snappy Clean pad cleaning solution to remove excess product and to ensure the pad is clean for the next use.
10-11-2007, 05:00 PM
#15
Senior Member
Thread Starter
Join Date: Sep 2005
Location: NY
Posts: 1,113
Clay Bar Facts and How-To
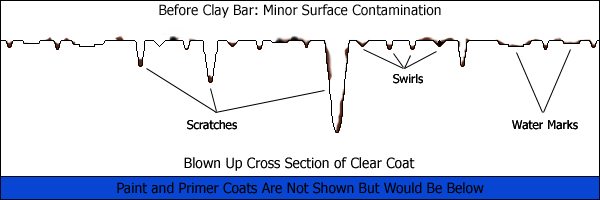
Clay Bar is the ideal prep stage before using polishes, glazes, sealants and waxes. In order to achieve maximum shine, gloss and depth, the surface must be as clean as possible for light to pass through the clear coat and give maximum reflection.
Take a look at the diagram above and notice how much contamination is still on the clear coat. Since you have just washed the vehicle removing the light contamination, most of this contamination is tightly bonded to the clear coat. Using the clay bar on your clear coat will help further remove both the macro-contamination (visible) as well as the micro-contamination (non-visible). With no contamination on the surface sealants and waxes can bond properly to the clear coat, which creates a more durable layer of protection. Sealants and waxes can not bond with most contaminates, so there is little to no protection where contaminates are. Applying any product over contamination can grind contaminates into the clear coat causing swirls, premature break down of detailing product, dirty applicator pads, and diminish overall results. Let the clay bar remove this surface contamination for a higher quality detail. To make the clear coat look even brighter use a polish as discussed in the next step.
Recommended Products:
* (1x) 50g Clay Bars
* (1x) Clay Lube at least 8oz
* (2-3x) Microfiber Towels
Clay Bar Facts:
* Using a clay bar on your paint does NOT remove swirl marks
* Using a clay bar removes contamination and better prepares your paint for the next step
* Dropped clay bars should be thrown directly into the garbage because of the high risk of picking up large contaminates that can seriously damage the vehicles finish
* Shampoo & water mixture is another alternative for clay lube, however, re-washing the vehicle is recommended prior to moving to the next step when using this mixture
* Re-washing after using a clay bar is not necessary if you properly remove any excess clay lube with a clean microfiber towel and/or a quick detail solution
* Using a clay bar should be done in small sections
* When your paints surface is not smooth you should use a clay bar
* Clay bar will remove some bug smear, tar, rail dust and other contamination tightly bound to the clear coat
* Replace clay bar when it becomes heavily contaminated
Clay Bar How-To:
Clay bar will remove both micro and macro contamination so the surface is smooth and clean. The actual process on how to clay bar might intimidate some people, but it is relatively easy once you get the hang of it. If you follow these simple steps you will have effectively prepped your surface for the next step.
Prep Stage:
At this point the vehicle should be freshly washed and dried. For ease of use and best results the vehicle should be worked on in a shaded area where the paint is cool to the touch. If you have a 200g or larger size bar you should break it up into pieces. For ease of use take the piece of clay and flatten it (similar to a pancake shape). Keep the bar flat on the surface for constant contact.
Instructions for Clay Bar:
1. Working in 2� x 2� sections or small panels, mist the desired area with your clay lubricant. Make sure to use enough clay lube so the clay does not skid or stick to the paint. This can cause fine scratches and add more work to remove clay stuck to the surface.
2. Place the clay within the 2� x 2� area and gently glide the bar left to right. You will feel the contamination being absorbed into the clay bar. Once the surface is smooth you are ready to move onto the next step.
3. Using a clean microfiber towel(s), buff off the remaining clay lube.
4. Now reshape the clay bar by compressing it and flattening it, so it exposes a fresh surface on the clay bar.
5. Move in a logical pattern around the entire vehicle repeating the previous steps until all the desired clear coated surfaces are done.
Clay Bar Tips:
* Listening to your clay bar can also give you a good indication if the surface is clean or still has contamination.
* Some people prefer to re-wash their vehicle after using the clay bar to remove any missed clay lubricant.
* If your towel begins to streak when removing excess clay lubrication, flip it over to a dry section or use a fresh towel.
* Use plenty of clay lube to ensure smooth movement of clay bar.
* Do not apply the clay lube in direct sun or to a warm surface.
10-11-2007, 05:01 PM
#16
Senior Member
Thread Starter
Join Date: Sep 2005
Location: NY
Posts: 1,113
Washing & Drying Lesson
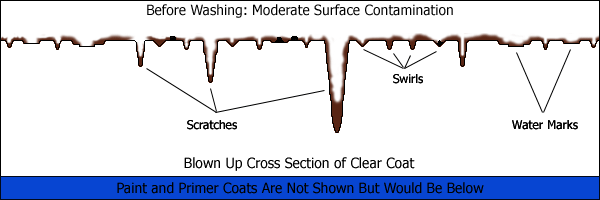
Washing and Drying can be the most overlooked step during a detail, however, in reality is one of the most important steps. You may be asking yourself how washing and drying can be so important. The reason is because many of the imperfections in your paint (scratches, swirl marks, water spots, etc.) are caused due to improper washing and drying techniques. Our goal is to teach you how to effectively remove contamination while minimizing the possibility of creating more imperfections in your paint.
The above diagram displays a cross section of your clear coat and what happens as you wash and dry your paint. The picture will change every 5 seconds to show the before and after effects of washing and drying. Notice how you go from moderate contamination to minor surface contamination. Keep in mind this may not always be visible contamination. Your paint may not be perfectly clean and prepped for the next step with just washing.
Recommended Products:
� (2x) Quality Wash Mitts
� (1x) A good lubricating automotive shampoo
� (1-2x) Quality Drying Towels
� (2x) 5 Gallon Wash Buckets
� (2x) Grit Guards for Each Bucket
� (1x) Water Supply and Hose
� (1x) Bug and Tar Degreaser
� (2x) Quality Wash Mitts
� (1x) A good lubricating automotive shampoo
� (1-2x) Quality Drying Towels
� (2x) 5 Gallon Wash Buckets
� (2x) Grit Guards for Each Bucket
� (1x) Water Supply and Hose
� (1x) Bug and Tar Degreaser
Why do I need these products you may ask? Start with two wash mitts. Is one good enough? We strongly encourage using two wash mitts for many reasons. The main reason is your lower panels, front and rear bumpers, wheels and wheel wells get significantly dirtier than the rest of your vehicle and you do not want to be using the same mitt that just removed large particles of tar to touch your hood. Allocating one wash mitt just for those heavily contaminated areas is a smart move because you will not be using a contaminated wash mitt on your delicate paint. Using one mitt throughout is one major reason why people create swirls during the wash phase. Another reason we suggest using two wash mitts is that if you use one wash mitt for the entire vehicle, the life span of the mitt will be that much shorter due to heavy build up in one mitt. A heavily contaminated mitt requires you to purchase mitts more frequently and creates more risk to your paint. By allocating two wash mitts to your vehicle, you can choose one, preferably a Sheepskin Wash Mitt, for the parts of your vehicle that do not get extremely contaminated (from the knees up) and a second one, perhaps a more durable Microfiber Wash Mitt, for the areas of that see the most contamination (from the knees down).
A good lubricating shampoo is crucial when trying to safely remove contamination. Without proper lubrication you would be pushing dirt, pollen, tar, etc. across your paint and causing many imperfections in your clear coat. Properly lubricated shampoos will help lift contamination from the surface, creating a slick surface for easy contamination removal. A quality shampoo should also have the proper conditioners for your paint unlike dish soap. Dish soap, such as Dawn, will remove previous layers of wax to start with a fresh surface, however there are downsides to washing with dish soap over time. Dish soap can dry out your paint, dry out and discolor plastic, vinyl and rubber trim, and is harmful to your clear coat. There are better methods to strip the previous layers of sealant or wax that are beneficial to your paints surface, such as chemical polishes, abrasive polishes and clay barring your paint. Shampoos with conditioners work well because they can clean your freshly sealed or waxed vehicle without removing this protection.
Investing in high quality drying towels will not only save you time during the drying process while minimizing the possibility of adding swirls. Our towel of choice is a Microfiber Waffle Weave Drying Towel. This design has a small nap to pull contamination away from the surface as well as hold large amounts of water in its pockets. In some cases, you will only need one of these 25� x 32� towels to dry your entire vehicle assuming you follow our helpful tips and techniques (which will be explained in just a moment) during the drying process, but two is always great. It is the safest product we have tested to minimize the possibility of adding swirls to your clear coat. Its also essential that your drying towel stay as clean as possible because dragging a dirty towel across the paint can add swirls and very fine scratches. Make sure you don�t dry area that were not cleaned during the washing process like door jambs.
Two 5 gallon wash buckets is a must for any wash day. The reasoning will be described in further detail as we get into the how-to part of the tutorial, but one will be filled with water and suds and the second one with just water.
Water supply and hose is pretty obvious but should not be over looked. Flooding the surface of your vehicle is the best thing for minimizing the chance of adding imperfections to your paint so plenty of water will be necessary for pre-wash, rinse and final sheet drying.
Bug and tar degreaser is a nice product to have around when you happen to run into stubborn bits of contamination that need to be pre-treated prior to the wash. The most common things this will be used on is tar, bug splatter and rail dust, but works on far more. Usually this product will be used on the lower panels, behind wheels, and the front and rear bumpers.
How To:
Let us start by addressing some proper procedures to follow prior to actually washing the vehicle. First, find an area to work in with plenty of shade. With the sun beating on hot soapy water, it can cause water etching and spots on your vehicles paint. This will add more time in your routine removing them especially if you are just washing and drying for maintenance and not planning on doing a full routine. The paint and wheels should be cool to the touch prior to washing. Next step, take a look at your attire, no jeans, no belts, no buttons, no rivets, no zippers, and no jewelry or other potentially hazardous objects. You may ask why, but the reasoning is pretty simple, they all will easily scratch your paints surface even with very minimal pressure. Also at this time ensure that all windows are completely up and doors, hood and trunk are completely closed and remove license plates or other easily removable items from the vehicle.
Prep Stage:
1. Fill up one 5 gallon wash bucket about 3/4 full of water and the remaining 1/4 full of suds.
2. Fill up the second 5 gallon wash bucket about 1/2 full of water.
Washing:
1. Rinse down an area of the vehicle that you plan on washing. Start from the top of the vehicle and work your way down. Also, work in sections such as front fenders and hood, or passenger side and half of the roof.
2. Walk around your vehicle and pre-treat any areas that have a lot of contamination, such as bug splatter, tar, and other road grime that may be difficult to remove, with a paint safe degreaser.
3. Allow degreaser to sit on the contaminated surface for a few minutes (see manufacturers suggestion)
4. Dunk your wash mitt dedicated for heavily contaminated areas in the bucket of suds.
5. Gently glide your wash mitt across the areas that were treated with degreaser and heavily contaminated areas, such as, lower panels, front bumper and rear bumper.
6. Return to the second wash bucket without suds and shake out your wash mitt in the clean water to remove loose contamination in the pile of the mitt. Then place the mitt back into the bucket of suds to continue washing.
7. Rinse off of each panel of the vehicle as it is completed.
8. Continue washing and rinsing the vehicle in the same fashion for all panels heavily contaminated.
9. Empty the two buckets and refill them per instructions in the prep stage listed above.
10. Dunk your second wash mitt into the suds, which should be your cleanest wash mitt, and gently glide your wash mitt across the rest of the vehicle starting top down. Work in a logical pattern and rinse the vehicle every couple of panels.
11. Return to the second wash bucket without suds and shake out your wash mitt in the clean water to remove loose contamination in the pile of the mitt. Then place the mitt back into the bucket of suds to continue washing.
12. Rinse off of each panel of the vehicle as it is completed.
13. Once the entire vehicle has been washed and rinsed, remove the spray nozzle from the hose. Starting from the top of the vehicle sheet free flowing water from the hose off of the vehicle. You should begin to notice less water accumulation on the surface compared to just rinsing off the vehicle. When working down the sides of the vehicle, move the hose from left to right while getting lower and lower, this will ensure the water floods off of the vehicle and will cut your drying time down considerably.
Drying:
1. After the vehicle has been sheeted off using the technique described above, take out your drying towels.
2. Blot-dry any large pools of water with your drying towel. This will help get the towel damp which can increase its ability to absorb.
3. Continue around the vehicle lightly wiping off any remaining water on your vehicle.
4. If you plan on using a blower or air compressor to blow out any seams and cracks this would be the time to do it.
5. Give the vehicle a final wipe down to ensure there is no water left on the vehicle.
Next Step:
The next logical step in the complete detailing process is to use a clay bar on your vehicle. Washing and drying is the foundation of any detail so you may proceed to any step next.


 I saw some of it on the my350z forums a couple of days ago as well
10-13-2007, 07:45 PM
I saw some of it on the my350z forums a couple of days ago as well
10-13-2007, 07:45 PM
#19
Senior Member
Thread Starter
Join Date: Sep 2005
Location: NY
Posts: 1,113
Yes, it's some real good info.
Go to the website, and search for others, there are allot of good info out there.
Search google video for detailing tips...Gather the info and always think twise before trying something out on your good car...Offer a friend who doesn't take any cear of his or her car to detail it for free. You gain practice, and if you screw up, I dought the person would care (because if they cared they would take care of their car).
10-13-2007, 11:16 PM
#20

as a detailer, none of this was new to me. i've known the benifits of mf for years. 1 thing im sure you mentioned about microfiber is that when its wet its a great cloth for wiping down car when dusty as long as you have a layer of wax on clear coat first. i don't use all the waxes i see you guys using, i just stick to meguires liquid canuba. it does very well after a good wash and claybar. 1 coat only as 2 really does'nt do much difference in my opinion. then a good detailer spray and thats it. 
10-13-2007, 11:54 PM
#21
Senior Member
Thread Starter
Join Date: Sep 2005
Location: NY
Posts: 1,113
as a detailer, none of this was new to me. i've known the benifits of mf for years. 1 thing im sure you mentioned about microfiber is that when its wet its a great cloth for wiping down car when dusty as long as you have a layer of wax on clear coat first. i don't use all the waxes i see you guys using, i just stick to meguires liquid canuba. it does very well after a good wash and claybar. 1 coat only as 2 really does'nt do much difference in my opinion. then a good detailer spray and thats it.
Whats the detailers spray for?
Since your a detailer, check out this post and see if you can answer.
http://forums.maxima.org/showthread.php?t=541299
Thanks
10-14-2007, 04:51 AM
#22
the detailer brings out more shine and luster in my opinion and removes any swirl marks ( if any ) left behind. and yes, when ever you can help out the cars finish by waxing and detailing before the weather turns harsh its definitly a plus. as far as the rust underneath, body shop will probably do that?? i don't do that type of service, just topside of the cars.
Last edited by max ride 41; 10-14-2007 at 04:57 AM.
10-14-2007, 10:00 AM
#23
Senior Member
Thread Starter
Join Date: Sep 2005
Location: NY
Posts: 1,113
the detailer brings out more shine and luster in my opinion and removes any swirl marks ( if any ) left behind. and yes, when ever you can help out the cars finish by waxing and detailing before the weather turns harsh its definitly a plus. as far as the rust underneath, body shop will probably do that?? i don't do that type of service, just topside of the cars.
Do you have a shop, or just do this as a second job?
So do I wipe down the car with the 1/1 mix of alcohol/water mix after claying (after claying but before waxing)?


 09-28-2008, 06:31 PM
#29
Senior Member

Join Date: Sep 2008
Location: 757 VA
Posts: 207
great info.. I had a regimen with my old car(Acura TL) of doing light cleaning every saturday morning and doing a detail once a quarter(Jan, Apr, July, Oct). I probably will stick to the same for my max as well.
11-19-2008, 02:53 PM
#30
Member

Join Date: Dec 2007
Location: Dallas, TX
Posts: 47
Here's a secret finishing touch to make your car look like it rolled off the showroom floor yesterday. Ever notice the difference between a new and used car?
Look at the neglected fender wells and the door, hood and trunk jams. Every time I wash my vehicles (weekly) I wash the fender wells with a wheel brush and when I spray the tires, I also spray the wheel well compartments. It makes it nice and clean appearing and gets cleaner every time I wash it. Once every other month, I pull my wheels and tires to clean and wax the back sides of the wheels and scrub the fender wells with degreaser and a brush.
I end with drying the jams and hinge area and they get cleaner every time I wash and dry.
Call it **** retentive if you wish, but I call it nice and clean enough to eat off of most of the time.


 )
)


