Frequently asked questions.....FAQ I30/I35
 01-09-2003, 01:58 PM
#1

Frequently Asked Questions: FAQs, I30 / I35
This is a question and answer thread for the forums basic and most frequently asked questions.
Table of Contents
Page 1
What is a Cefiro?
What is the difference between my car and the maxima?
What is a Variable Intake and how can I learn more?
Whats the difference between the I30 / I35 and I30t / I35t?
How do I know if my car has VLSD?
I want to install mods myself what are some good sites with how to's?
How do I rewire my 2K I30 foglights?
How can I decode my VIN #?
How do I clear my I30 tails & corners?
Where can we find Infiniti parts online
How do I install clear side markers on my I35?
How to clear corners on a 2000+ I30/35
How to change manual tranny fluid on an I30
How to rewire fogs on a 96-99 I30
I30/35, maxima, and other infiniti wheel off sets
How do I get ahold of an owners manual?
How to swap 2k-2k1 I30 to 2K2-2k4 I35 head lights?
Who do I contact to get Australian Nissan Parts?
Do they make Cefiro one piece headlight protection and where can I find it?
How do I install an aftermarket head unit into my 2k-2k4 Infiniti I30/I35?
What model of 96-99 I30 do I have?
What type of bulb do I need for my 96-99 I30?
A32 Front ans Rear Wheel Alignment Specs
A33 Front Wheel Alignment Specs
Cefiro Headlight Aiming
Cefiro Headlight Installation
I30/I35 Factory Paint Codes
HOW TO INSTALL 2005 PATHFINDER BOSE 6 DISK IN DASH CD CHANGER w/ MP3 CAPABILITY
DO THE EBAY HALO HEADLIGHTS WORK ON THE I35?
Page 2
Brake Pad and Rotor Replacement Write Up
 01-09-2003, 02:01 PM
#2
What is a Cefiro??
The Cefiro is Nissans Japanese version of the I30 / I35. Most of the parts from the Cefiro will bolt perfectly onto our cars. You will only find the I30 / I35's in the US or Canada. The Cefiro is what the I30 / I35 should have looked like, they have alot of nice parts. On some I30s here you will find some 1 piece headlights and chrome accecories that came from the Cefiro.
01-09-2003, 02:10 PM
#3
What is the difference between my car and a Maxima?
The I30 / I35 and the Nissan Maxima are very close in everyway except body wise. They have the same engine, drivetrain, interior, and suspension. The only main difference is that the I30 has a different front and rear end then the Nissan Maxima. All of the mods for the Nissan Maxima except body mods will fit the I30 / I35.
01-09-2003, 02:19 PM
#4
What is a Variable Intake?
A Variable Intake Manifold is a modification only for the I30s / 4th gen Maximas. You can get these imported from Japan or the Middle East, they come stock on Cefiros. By controlling Butterfly Valves the VI adds about 30hp, but before you get too excited it only helps the final 1000 rpm's. It takes a little bit away from your middle power band, but it is well worth it to take the VQ power all the way to redline.
MEVI FAQ
MEVI FAQ
01-09-2003, 02:51 PM
#5
Whats the Difference between the I30 / I35 and I30 / I35t
The t stands for touring and is a slightly more expensive model. The t has a sportier suspension, spoiler, forged BBS rims, and all have VLSD. All of the t's have leather and a sunroof where as a small portion of the I30s have cloth interior and no sunroof.
01-09-2003, 04:00 PM
#7
I want to install mods myself what are some good sites with how to's?
www.maximadriver.com Is ran by Chebosto and one of the best sites when it comes to writeups.
www.vqpower.com ran by gtr_rider is a newer site that is becoming one of the best.
www.motorvate.ca
www.vqpower.com ran by gtr_rider is a newer site that is becoming one of the best.
www.motorvate.ca
01-17-2003, 09:09 AM
#8
How do I rewire my I30 foglights???
I pried open the relay box (passenger side) and located a PINK (not yellow like on maximas) wire with 2 horizontal silver stripes. This is located on the relay named "FR FOG LAMP"
Cut this wire, Tape off with electrical tape the end that comes from the car, and splice a wire about 1.5 feet or so to the other end (the end that comes from the relay box (blue thingy)).
This wire you spliced from the relay box now will be snaked down to your passenger side corner marker lens, tap it into the RED wire. (It may be helpful to remove the side marker and tap it close to the base of the bulb socket. There are only two wires here, pick the one that is red )
BAM! your done. See how easy??
-Credit: JspecMax
02-28-2003, 03:51 PM
#9
How can I decode my VIN #?
The VIN number is on the passenger side firewall in the engine, here is what the numbers mean.http://www.infinitihelp.com/vin.htm
Credit- Eskin
Credit- Eskin
03-05-2003, 01:12 PM
#10
How do I clear my I30 tails & corners?
Tails
Go to www.Maximadriver.com and read the instructions on How to clear out the 97-98 Maxima tails. The prodcedure is exactly the same except that the I30 housing is held together with one screw and multiple clips. The clips must be pushed in with a small flat head screwdirver before the housing will seperate.
I have used the oven, heat-gun, hairdryer, and even the boiling water method for seperating the housing. They will all work but I perfer the heatgun. For those of you scared to melt the lens then use a hair dryer, but be prepared, it will take a real long time.
Corners
Clearing out the corners follows basically the same procedure as the tails. The housing is held together by one screw and the glue. I don't think there were any clips for the front, if there are, then push them in the same way you did with the tails. Heat the glue in the same fashion as the tails.
Now once the housing is apart the orange reflector can be removed. The reclector in the corners is different than the tails. It is secured to the lens, unlike the tails. It must be pryed off with a flat-head screwdriver. This is where it get dangerous. It is very easy to crack the lens when doing this. Just take your time and be carefull.
Cut a piece of transloucent plasitc, the same use in the tails, to fit the space where the reflector was removed. Some glue may have to be used to keep it in place. A very, very small amount superglue will work.
Note: When putting the housing back together make sure you re-heat the glue, and you may want to use a small amount of silicone sealent to keep it water tight. I know I had to in order to keep condensation out.
Enjoy your clear tails and corners.
Credit: I30tMikeD
03-23-2003, 08:16 PM
#11

How about where can we find DISCOUNT Infiniti parts online?
www.infinitipartsusa.com
www.infiniti-parts.com
http://www.infiniti-engine-parts.com
http://www.everythingnissan.com
www.infinitipartsusa.com
www.infiniti-parts.com
http://www.infiniti-engine-parts.com
http://www.everythingnissan.com
Last edited by i30ds; 09-22-2007 at 07:00 PM.
04-05-2003, 06:15 PM
#12
Senior Member

Join Date: Apr 2002
Posts: 282
Frequently Asked Questions....FAQ I30/35
Back by popular request - the "official" clear sidemarkers install writeup:
This can be accomplished by a few very simple steps:
1. Remove new sidemarkers from protective case/wrapping and locate which go where (they should say front left, front right, etc.)
2. Remove old sidemarkers using a flat screwdriver wrapped with cloth (to protect the paint).
3. Remove lense completely (wedge bulb and socket should be visible at this time).
4. The new sidemarkers have different connections than the old ones. What you will need to do is splice the new ones to the old wires (from car).
5.(a) Cut connections (leaving room to splice) from the two wires running from car to origional socket. Leave room to splice!!
(b) Cut pin connectors from new clear sidemarkers. Splice the new wires/sidemarkers to the old wires from the car.
Alternative to #5(credit MeataOrbit).
If you don't feel comfortable cutting and splicing your wiring, you can still use the OEM bulb socket, but you will need to make a modification.
When you look at the OEM bulb socket, you should see something like 4 plastic "tabs" or "nubs" sticking out from the cylindrical base. You'll notice that the clear lenses only have two notches for the socket. To make the OEM socket fit in the clear lenses, you will need to cut/shave two opposing "tabs" on the OEM socket off. My roommate did this very easily with an exacto knife - I imagine it could be done just as easily with any other kind of knife or even a dremel. As soon as two of the tabs are gone, add an extra rubber O-ring (possibly from the aftermarket bulb socket) onto the socket to ensure a tight fit, install into the lense, and you're ready to go.
6. Secure connections with electrical tape. Put em back together. Repeat steps 1-6.
7. (optional) Drive around town knowing that you will probably never run into another I30/35 on the streets with the mod you have just installed, unlike your friend's civics with altezza taillights (LAME!).
Credit: JspecMax
06-25-2003, 11:10 PM
#13
Moderator who thinks he is better than us with his I30

iTrader: (8)
Join Date: May 2002
Posts: 9,335
How to clear corners on a 2000+ 130/35
Tools I used
1- Hairdryer
3- Flathead screwdrivers
1- socket set
1- Phillips Screwdriver
First I unbolted the 2 bolts on top of the HID units. You also will need to get to a bolt that is behind the front bumper. I went thru my wheelwell to get to the bolt. After these three bolts are out I then removed my high beam, parking light and turn signal bulb, also i disconnected the wire that goes to the balast.
Once i got it seperate from the car i took it inside my house to open it up. The whole time i left the HID bulb and balast as they were, i didnt touch them. There is a small screw on the outside edge that i had to first remove. I used the hairdryer to heat the edges of the lamp to warm up the glue/sealent . While heating i used a screwdriver to slowly pull the lense and housing apart. I kept on heating till i had enough of an opening and i stuck a long flat head down the opening and broke off the three places where the orange plastic contacts the lense. If you were to fully remove the lense from the housing then you'll see that its attathed to the lense.
Once you have the orange piece removed you simply put everything back together. Reheat the sealent so you can slip the lense back on and also be sure to apply some sealent to be safe of any future condensation.
This is what the finished product will look like.
http://images.cardomain.com/member_...102_80_full.jpg
http://images.cardomain.com/member_...102_81_full.jpg
http://images.cardomain.com/member_...102_82_full.jpg
http://images.cardomain.com/member_...102_83_full.jpg
http://images.cardomain.com/member_...102_84_full.jpg
http://images.cardomain.com/member_...102_85_full.jpg
http://images.cardomain.com/member_...102_86_full.jpg
credit:Kalbundy
11-13-2003, 07:24 PM
#14
Moderator who thinks he is better than us with his I30
iTrader: (8)
Join Date: May 2002
Posts: 9,335
How to change manual tranny fluid on an I30.
Credit: Taxvictim
Drive the car around to warm up the transmission, then put the car on jack stands.
Second: Fill plug: Get a 1/2" socket wrench. You don't need any sockets: the 1/2" lug goes directly into the fill plug. You will need a piece of pipe as a leverage extender. (I bought mine at Ace Hardware. You slide the pipe over the handle of the socket wrench so you have a really long handle.) It will feel like you are pulling the tranny out of the engine. You have to pull hard. But... after a few seconds you will see a tiny amount of movement in the plug. Remember, you are unscrewing the drain plug. (Counterclockwise.)
Now, because of my experience, I suggest leaving the fill plug in the hole once it has been loosened up a lot. Leave it to block the hole so the fluid won't rush out the bottom in such a gush.
Third: drain plug: The drain plug is located near the shift support rod by the cross member. Remove it with a wrench.
Fourth: once it has all drained, put the drain plug back. Then add the new fluid through the fill plug. I did this with a funnel and hose from the top. It took longer than I thought it would and my back and legs got sore standing in that position so long. Do this with the car level, so you will know when it is full. When the new fluid overflows the fill hole, it is full. Put the fill plug back in. Crank it hard with the wrench.
Good luck! If you have an automatic, ignore this.
11-26-2003, 12:03 AM
#15
Moderator who thinks he is better than us with his I30
iTrader: (8)
Join Date: May 2002
Posts: 9,335
How to rewire fogs on the 96-99 I30
These instructions are very similar to the 4th Gen Maxima instructions
This rewire wil allow you to run your fogs without the headlamps on.
CREDIT NICKSTAM, VQpower.com and Pats5spdI30t
Tools Needed:
Flathead screwdrivers: small and medium
Large philips screwdriver
Rachet - 10mm socket
Voltmeter, Voltage light, or Multimeter
Electrical Tape
Approx. 3 feet of wire
Wire Taps
Estimated time: 1 hr
1. The relay box is located on the passenger side of the engine bay, right next to
the coolant reservoir.
2. You will be ultimately tapping into the fog light relay. Fog Light relay is marked, "FR
FOG LAMP."
3. In front of the relay box is the coolant reservoir. Remove the coolant reservoir
by removing the two hex head screws. You can use a large Philips head screwdriver or
a 10mm socket. Place the reservoir out of the way. I put it in between the engine
and the radiator; it's sits there without disconnection the hose.
4. Remove the top of the relay box. This is easy; there are only a few clips to
undo. Put the top on the side.
5. Now you can see the relays. There are three or four relays that you will have to remove to get access to the bolts that are securing fuse box against the passenger side fender. the in yellow need to be
removed in order to remove the relay box. I believe if you have a manual
transmission that there is a forth relay that needs to be removed (it would be in
the upper right of the relay box). These relays should all be the same, but just in
case make sure you remember where they originally were.
6. Turn the lights on and test the relay with the voltmeter (or other electrical
device). The marked terminal should give around a +12V reading. You can use the
terminal across from it as the ground.
7. The two hex head screws need to be removed. You can use a large Philips head
screwdriver or a 10mm socket.
8. Once the relay box is remove from the frame, it need to be taken apart. There is
an upper and lower piece. In order to take it apart there are three clips on the
side that faces the engine and two of the same clips on the fender wall side. But on
the fender wall side there are also two additional clips. I used a small screwdriver
to unlatch all the clips, be careful not to break anything.
9. With the relay box open, you want to locate the +12V terminal of the Fog light
relay. It's the green/yellow wire. You want to cut this wire, make sure to leave yourself enough wire on the
relay side of the wire to splice into. Once the wire is cut, tape off the +12V wire
with electrical tape (this is the half of the wire that isn't attached to the
relay).
10. Splice into the green/yellow wire with a long wire, around three feet. I used a
wire tap to do this, but it can be done in other ways. Make sure to wrap it with
enough electrical tape.
11. The new long wire needs to be run out of the relay box. So I cut a small hole in
the bottom to run the wire out of. You can also see in the picture the original +12V
wire that is cut and wrapped in black electrical tape.
12. Put the relay box back together. Reattach the box to the car with the two hex
head screws. To test the lights: Turn on the parking lights, and touch the new wire
to the positive terminal (RED) of the battery. The fog lights should turn on when
the wire touches the battery. They should also remain on with the high beams.
13. Remove the corner light with a screwdriver (wrap with a cloth to protect the
lens). It should pop right out. Run the wire through the fender wall to the corner
light.
14. Splice the new relay wire into the red/black wire. On the I30 be sure you tap into the red/black wire from the parking light, not the small yellow corner lamp . (BE CAREFUL BOTH THE CORNER AND TURN SIGNAL HAVE A RED AND BLACK WIRE) Again, YOU ARE TAPPING INTO THE WIRE THAT GOES TO THE PARKING BULB (the larger bulb) I used a wire tap and
then wrapped the entire thing with lots of electrical tape. Push the lens back into
the bumper.
15. Turn the parking lights on and make sure the fog light switch is on too. Your
fogs will now also be on.
16 Turn on your headlights with your high beams on, and your fog lights will remain
on.
I don't have a digital camera but I will get pics.
04-13-2004, 01:41 PM
#16
Moderator who thinks he is better than us with his I30
iTrader: (8)
Join Date: May 2002
Posts: 9,335
Nissan and Infiniti wheel off sets
Nissan:
15" x 6.5" 95-99 SE/GLE 40mm
16" x 6.5" 97-99 SE 40mm
16" x 6.5" 00-01 SE/GLE 40mm
16" x 6.5" 00-01 GXE 40mm
17" x 7" 00-03 SE 45mm
17" x 7" 02/03 GLE 40mm
18" x 8" 350Z 30mm
Infiniti:
15" x 6.5" 96-99 I30 40mm
15" x 6.5" 96-97 I30t 45mm
15" x 7" Q45t 36mm
16" x 6.5" 98-99 I30t 45mm
16" x 7" Q45 40mm
16" x 6.5" 00-01 I30 45mm
17" x 7.5" Q45t 30mm
17" x 7" I30t 45mm
17" x 7" I35 40mm
17" x 7" I35 sport 45mm
17" x 7" G35 45mm
17" x 7" G35 sport 45mm
17" x 7.5" 02 Q45 40mm
18" x 7.5" Q45 45mm
18" x 7.5" M45 35mm
18" x 8" G35 coupe 30mm
Centerbore on all 89+ Nissan/Infiniti cars is 66.1mm.
Credit phenryiv1
 09-22-2004, 03:36 PM
#18
Moderator who thinks he is better than us with his I30
iTrader: (8)
Join Date: May 2002
Posts: 9,335
2k-2k1 I30 to I35 head light swap.
1) Disconnect battery
2) Remove 2 top bolts on each headlight.
3) Go under the car remove a plastic clamp and a plastic screw from each side of the car (same clamps that get removed when you need to change fog light bulb.)
4) reach up and locate the bolt holding the headlight underneath and unscrew it (when you get under the car and remove the clamps you will see the bolt.)
5) There is a clip also holding the headlight in be careful with it is a white plastic clip you will see it when all, the bolts are off (it�s towards the middle of the headlight attached to the actual car.) use a screw driver to disconnect the headlight from the clip CAREFULLY.
6) Take out all bulbs from headlight and move out of the way.
7) Take out low-beam bulb from connector. Cut off the low-beam connector.
8) Take I35 headlight cut HID harness connector. (Just the white plastic tip that connects to the HID harness since we don�t have a connector like that.)
9) connect red wire to red wire and black to black. Get special male to female clips that connect. available any auto store they cost like 2-3 bucks for like 5 pairs you will only use 4. Make sure they are securely connected and the wires are clamped tight.) Tape it over the top for extra security from moisture and other hazards.
10) Connect battery.
11) Test out headlights.
12) Reinsert all bulbs but the low beam for obvious reason.
13) To install headlights: the HID ballast is big so it takes some skill to get them in. wiggle them slowly and they will come in.) Make sure they clip into the white clip that was previously discussed or you will have a gap at the bottom of your headlights by the bumper.)
14) Put all bolts and clips back in place.
15) Enjoy your factory HID�s from Infiniti. You won�t have to worry about where to get a bulb if it burns out or if you wires will melt or burn because this is what Infiniti puts in the I35.
Credti: MikeI302K
09-22-2004, 03:42 PM
#19
Moderator who thinks he is better than us with his I30
iTrader: (8)
Join Date: May 2002
Posts: 9,335
Australian Nissan Parts Contact
Since I've been getting LOTS of emails and PMs regarding where I got such and such, I went digging through my inbox and found bits and pieces of information people might find useful for getting there hands on the Australian Nissan parts that I have - namely my front lip and rear skirts.
I recently purchased and installed rear skirts from a new contact I made: Parry Nissan of Townsville, Australia. They were very professional, prompt in communication, and quick to ship the parts.
Parry Nissan Spare Parts
Jon Schultz
Townsville, Australia
ph 0747 262666
ph 1800 079944
parts@parrynissan.com.au
Part Numbers (A33 only):
Front skirts (as fitted to ST-R) - K6015 3Y100AU
Rear skirts - H5910 3Y100AU
Side skirts - G6850 3Y100AU
Rear spoiler - K6030 3Y100A
Rear window sunguard (aka 'spoiler') - G9890 3Y100A
Cedit: MetaOrbit
09-23-2004, 09:08 PM
#20
Moderator who thinks he is better than us with his I30
iTrader: (8)
Join Date: May 2002
Posts: 9,335
Do they make Cefiro one piece headlight protection and where can I find it?
Yes, a company called Stoneguard makes a thin rubber type material that has a sticky backing on it (like a big sticker) that goes on the outside of your headlights to protect them from flying debris such as rocks and also protects them from fading, scratching, and cracking. They protect your headlight from a rock hitting it at 160 miles per hour. Not a scratch.
Once applied, the protection is crystal clear and can not be seen unless you are looking for it. It does not effect the beam pattern or the light output of your headlights, fog lights, or cornering lights.
You can get Cefiro on piece headlight protection at www.stoneguard.com.
Credit: Dr.Monkey1313
10-27-2004, 07:21 PM
#21
Moderator who thinks he is better than us with his I30
iTrader: (8)
Join Date: May 2002
Posts: 9,335
So, you want to install an aftermarket head unit into your A33 (2000-2004) Infiniti I30/I35?
-First of all - there is NO aftermarket dash kit that fits perfectly. The 5th gen maxima Metra kit will work, but there will be ugly gaps on both sides of the kit.
So, what are your options for a dash kit then?
-Have one custom made from scratch, possibly import a trim piece from overseas (might, or might not fit - hasn't been done yet)
-Get the Metra kit and use fiberglass or the like to widen it out.
As for the BOSE compatibility - refer to the Audio Forum. The sound system is set up IDENTICALLY to that of the 5th gen maxima.
Credit: MetaOrbit
12-09-2004, 09:47 PM
#22
Moderator who thinks he is better than us with his I30
iTrader: (8)
Join Date: May 2002
Posts: 9,335
Complete I30/I35 Specs and package options:
97:
http://www.infinitinews.com/site_lib...30/specs.shtml
98:
http://www.infinitinews.com/site_lib...30/specs.shtml
99:
http://www.infinitinews.com/site_lib...30/specs.shtml
00:
http://www.infinitinews.com/site_lib...30/specs.shtml
01:
http://www.infinitinews.com/site_lib...30/specs.shtml
02:
http://www.infinitinews.com/site_lib...35/specs.shtml
03:
http://www.infinitinews.com/site_lib...35/specs.shtml
04:
http://www.infinitinews.com/site_lib...35/specs.shtml
--------------------------------------------------------------------------------
Credit: i30ds
06-24-2005, 10:43 AM
#23
Moderator who thinks he is better than us with his I30
iTrader: (8)
Join Date: May 2002
Posts: 9,335
Bulbs for a 96-99 I30
1996 INFINITI I30
High & low beam headlamp
9004
9004ST Silverstar High Performance Lighting: the whitest and brightest Halogen
9004XV XtraVision Halogen Upgrade: Up to 20% Brighter
9004CB Cool Blue Halogen Upgrade: White Hot; Super Cool; 100% Street Legal
9004LL Long Life Halogen Upgrade: Lasts two and a half times longer
Parking light
1157
1157LL Long Life Upgrade: Up to twice the life of the standard lamp
Front turn signal
1157
1157LL Long Life Upgrade: Up to twice the life of the standard lamp
Rear turn signal
1156
1156LL Long Life Upgrade: Up to twice the life of the standard lamp
Tail light
1157
1157LL Long Life Upgrade: Up to twice the life of the standard lamp
Stop light
1157
1157LL Long Life Upgrade: Up to twice the life of the standard lamp
High mount stop light
1156
1156LL Long Life Upgrade: Up to twice the life of the standard lamp
Fog/Driving light
H3-55W
H3ST Silverstar High Performance Lighting: the whitest and brightest Halogen
License plate
168
Back up light
1156
1156LL Long Life Upgrade: Up to twice the life of the standard lamp
Front sidemarker
194
194LL Long Life Upgrade: Up to twice the life of the standard lamp
Rear sidemarker
1157
1157LL Long Life Upgrade: Up to twice the life of the standard lamp
Dome light
DE3175
Step/Courtesy light
161
Trunk/Cargo area
158
Credit: Monkey
09-13-2006, 11:46 AM
#24
A32 Front ans Rear Wheel Alignment Specs
FRONT WHEEL ALIGNMENT (UNLADEN*)
Camber
Degree minute (Decimal degree)
Minimum −1�00� (−1.00�)
Nominal −0�15� (−0.25�)
Maximum 0�30� (0.50�)
Left and right difference 45� (0.75�) or less
Caster
Degree minute (Decimal degree)
Minimum 2�00� (2.00�)
Nominal 2�45� (2.75�)
Maximum 3�30� (3.50�)
Left and right difference 45� (0.75�) or less
Total toe-in
Distance (A − B)
mm (in)
Minimum 1 (0.04)
Nominal 2 (0.08)
Maximum 3 (0.12)
Angle (left plus right)
Degree minute (Decimal degree)
Minimum 5.5� (0.09�)
Nominal 11� (0.18�)
Maximum 16� (0.27�)
Wheel turning angle
Full turn
Inside
Degree minute (Decimal degree)
Minimum 36�00� (36.0�)
Nominal 39�30� (39.50�)
Maximum 40�30� (40.50�)
Outside
Degree minute (Decimal degree)
Nominal 32�00� (32.00�)
*: Fuel, radiator coolant and engine oil full. Spare tire, jack, hand tools and mats in designated positions.
REAR WHEEL ALIGNMENT (UNLADEN*)
Camber
Degree minute (Decimal degree)
Minimum −1�45� (−1.75�)
Nominal −1�00� (−1.00�)
Maximum -0�15� (-0.25�)
Total toe-in
Distance (A − B)
mm (in)
Minimum -3 (-0.12)
Nominal 1 (0.04)
Maximum 5 (0.20)
Angle (left plus right)
Degree minute (Decimal degree)
Minimum -16� (-0.27�)
Nominal 5.5� (0.09�)
Maximum 26� (0.43�)
*: Fuel, radiator coolant and engine oil full. Spare tire, jack, hand tools and mats in designated positions.
Camber
Degree minute (Decimal degree)
Minimum −1�00� (−1.00�)
Nominal −0�15� (−0.25�)
Maximum 0�30� (0.50�)
Left and right difference 45� (0.75�) or less
Caster
Degree minute (Decimal degree)
Minimum 2�00� (2.00�)
Nominal 2�45� (2.75�)
Maximum 3�30� (3.50�)
Left and right difference 45� (0.75�) or less
Total toe-in
Distance (A − B)
mm (in)
Minimum 1 (0.04)
Nominal 2 (0.08)
Maximum 3 (0.12)
Angle (left plus right)
Degree minute (Decimal degree)
Minimum 5.5� (0.09�)
Nominal 11� (0.18�)
Maximum 16� (0.27�)
Wheel turning angle
Full turn
Inside
Degree minute (Decimal degree)
Minimum 36�00� (36.0�)
Nominal 39�30� (39.50�)
Maximum 40�30� (40.50�)
Outside
Degree minute (Decimal degree)
Nominal 32�00� (32.00�)
*: Fuel, radiator coolant and engine oil full. Spare tire, jack, hand tools and mats in designated positions.
REAR WHEEL ALIGNMENT (UNLADEN*)
Camber
Degree minute (Decimal degree)
Minimum −1�45� (−1.75�)
Nominal −1�00� (−1.00�)
Maximum -0�15� (-0.25�)
Total toe-in
Distance (A − B)
mm (in)
Minimum -3 (-0.12)
Nominal 1 (0.04)
Maximum 5 (0.20)
Angle (left plus right)
Degree minute (Decimal degree)
Minimum -16� (-0.27�)
Nominal 5.5� (0.09�)
Maximum 26� (0.43�)
*: Fuel, radiator coolant and engine oil full. Spare tire, jack, hand tools and mats in designated positions.
09-13-2006, 11:51 AM
#25
A33 Front Wheel Alignment Specs
FRONT WHEEL ALIGNMENT (UNLADEN*1)
Camber
Degree minute (Decimal degree)
Minimum −1�00� (−1.00�)
Nominal −0�15� (−0.25�)
Maximum 0�30� (0.50�)
Left and right difference 45� (0.75�) or less
Caster
Degree minute (Decimal degree)
Minimum 2�00� (2.00�)
Nominal 2�45� (2.75�)
Maximum 3�30� (3.50�)
Left and right difference 45� (0.75�) or less
Kingpin inclination
Degree minute (Decimal degree)
Minimum 13�30� (13.50�)
Nominal 14�15� (14.25�)
Maximum 15�00� (15.00�)
Total toe-in
Distance (A − B)
mm (in)
Minimum 0 (0)
Nominal 1 (0.04)
Maximum 2 (0.08)
Angle (left plus right)
Degree minute (Decimal degree)
Minimum 18� (0.30�)
Nominal 24� (0.40�)
Maximum 30� (0.50�)
Wheel turning angle
Full turn*2 Inside
Degree minute (Decimal degree)
Minimum 29�30� (29.50�) 36�00� (36.0�)
Nominal 33�00� (33.0�) 39�30� (39.50�)
Maximum 34�00� (34.0�) 40�30� (40.50�)
Outside
Degree minute (Decimal degree)
Nominal 28�30� (28.50�) 32�00� (32.00�)
*1: Fuel, radiator coolant and engine oil full. Spare tire, jack, hand tools and mats in designated positions.
*2: On power steering models, wheel turning force (at circumference of steering wheel) of 98 to 147 N (10 to 15 kg, 22 to 33 lb) with
engine idle.
09-25-2006, 12:59 PM
#26
Cefiro Headlight Aiming
Cefiro Headlight Aiming
Originally Posted by Double E
There's a long brass bolt sticking out the back of each light housing that moves the reflector.
Crank on it for what seems like forever and the aim will be moved slightly. Crank on it till the year changes it will be about right. Now do it again because the whole time you've been going the wrong way!
Seriously, it adjusts slowly. I believe that the adjustment is actually a "sweep up" type of adjustment whereby using the single adjusting screw moves the center of the beam L to R (depending on which way you turn it) and as it moves toward the center if the car, it also "sweeps" to center and also "up".
(I'm just guessing about the sweep-up ...and think this because I hooked up a cordless screwdriver to the adjusting bolt and could finally see the lamp reflector move and it also appeared to move to center, as well as up.)
I still never got mine perfect (it was morning by then) but they are better.
Maybe Sy will chime in and clarify for us.
Originally Posted by SYCEFIRO
Right on.. you got it correctly.... except there are two screws that you can adjust. One is the the long Brass bolt.. and the other one is a small screw next to the City light location. I forget which is for which...
Anyway, one is for up and down movement, the other one is for left & right movement. The OEM headlights do seem to be easier to adjust (don't have to use a cordless screw drive or something to turn forever)... just regular 10mm or philips head screww driver will do..
I guess there is a difference in between the OEM Cefiro and Aftermarket headlights somehow.. (adjustment/ beam pattern, reflector, quality etc).
Hope this helps.
SY
sycefiro@yahoo.com
10-18-2006, 05:37 PM
#27
Cefiro Headlight Installation:
http://www.redlinemax.com/3/CefiroWriteup.htm
Okay, when you remove your stock headlights... you must have done the following:
1. Remove the screw on top of the corner lights....
2. Pop it out...
3. remove the two bolts from the side of the headlights (keep these two bolts.. you will use one later).
4. remove the two nuts from behind the headlights (near the radiator and stuff).
Now, assuming you had splice the H-4 harness and is ready to install the one piece headlights, you will do the following:
1. Put the One piece headlights in place of the OEM headlights, so you will have the longer adjustment stud going through the hole in front of the radioator.
2. screw on two nuts behind the headlights (reverse of what you did to the OEM headlights).
3. Plug in the H-4 harness, and city lights/corner lights(assuming you had done the splicing already).
4. remember the two bolts that you had removed from the side.. Now take one of 'em and screw in on to the fender (with the stick-out plastic tab coming out of the one piece headlights' corner light portion). This will hold the headlight in place.
Now repeat the other side!
Now for the corner lights. Does your one piece headlight come with the socket to the corner lights? If so, splice it to fit and use that one. If your headlights doesn't come with the corner light socket, you may have to do one of the following to make your OEM side markers fit:
1. Trim the hole on the headlight (hmm. not recommanded---> possible water problem)
2. Trim the OEM socket for the corner light to make it fit on the One piece Headlight.
Originally Posted by SYCEFIRO
http://www.redlinemax.com/3/CefiroWriteup.htm
Okay, when you remove your stock headlights... you must have done the following:
1. Remove the screw on top of the corner lights....
2. Pop it out...
3. remove the two bolts from the side of the headlights (keep these two bolts.. you will use one later).
4. remove the two nuts from behind the headlights (near the radiator and stuff).
Now, assuming you had splice the H-4 harness and is ready to install the one piece headlights, you will do the following:
1. Put the One piece headlights in place of the OEM headlights, so you will have the longer adjustment stud going through the hole in front of the radioator.
2. screw on two nuts behind the headlights (reverse of what you did to the OEM headlights).
3. Plug in the H-4 harness, and city lights/corner lights(assuming you had done the splicing already).
4. remember the two bolts that you had removed from the side.. Now take one of 'em and screw in on to the fender (with the stick-out plastic tab coming out of the one piece headlights' corner light portion). This will hold the headlight in place.
Now repeat the other side!
Now for the corner lights. Does your one piece headlight come with the socket to the corner lights? If so, splice it to fit and use that one. If your headlights doesn't come with the corner light socket, you may have to do one of the following to make your OEM side markers fit:
1. Trim the hole on the headlight (hmm. not recommanded---> possible water problem)
2. Trim the OEM socket for the corner light to make it fit on the One piece Headlight.
Last edited by i30ds; 09-29-2007 at 02:12 PM.
10-26-2006, 02:58 PM
#28
I30/I35 Factory Paint Codes
4th Gen I30s:
Bordeaux Pearl - CP2
Deep Evergreen - DP0
Black Obsidian - KH3
White Platinum Pearl - QNO
Silver Crystal Metallic - KL0
Beige Pebble Metallic - CG2
Aspen White Pearl - QT1
Cypress Pearl - JV0
Laguna Blue Pearl Metallic - BS3
Autumn Bronze Pearl - ET1
5th gen I30s:
Aspen White Pearl - QT1
Autumn Bronze Pearl - ET1
Black Obsidian - KH3
Bordeaux Pearl - CP2
Royal Ruby Pearl - AX5
Midnight Blue Pearl - BW9
Millenium Jade Metallic - JW0
Monterey Green Pearl - JV0
Sandrock Beige Metallic - EV0
Titanium Metallic - KR4
5.5 Gen I35s
Autumn Bronze Pearl - ET1
Black Obsidian - KH3
Brilliant Silver - KY0
Royal Ruby Pearl - AX5
Diamond Graphite - WV2
Golden Sand - EY0
Ivory Pearl - QX1
Midnight Blue Pearl - BW9
Millennium Jade Metallic - JW0
Originally Posted by mydecember1985
4th Gen I30s:
Bordeaux Pearl - CP2
Deep Evergreen - DP0
Black Obsidian - KH3
White Platinum Pearl - QNO
Silver Crystal Metallic - KL0
Beige Pebble Metallic - CG2
Aspen White Pearl - QT1
Cypress Pearl - JV0
Laguna Blue Pearl Metallic - BS3
Autumn Bronze Pearl - ET1
5th gen I30s:
Aspen White Pearl - QT1
Autumn Bronze Pearl - ET1
Black Obsidian - KH3
Bordeaux Pearl - CP2
Royal Ruby Pearl - AX5
Midnight Blue Pearl - BW9
Millenium Jade Metallic - JW0
Monterey Green Pearl - JV0
Sandrock Beige Metallic - EV0
Titanium Metallic - KR4
5.5 Gen I35s
Autumn Bronze Pearl - ET1
Black Obsidian - KH3
Brilliant Silver - KY0
Royal Ruby Pearl - AX5
Diamond Graphite - WV2
Golden Sand - EY0
Ivory Pearl - QX1
Midnight Blue Pearl - BW9
Millennium Jade Metallic - JW0
12-18-2006, 05:26 PM
#29
HOW TO INSTALL 2005 PATHFINDER BOSE 6 DISK IN DASH CD CHANGER w/ MP3 CAPABILITY
http://forums.maxima.org/showthread.php?t=372795
Basically in a nut shell:
1. Tap K into D on the P501 connector
2. Drill 2 holes in each stock BOSE mounting bracket so the deck sits back and mounts flush w/ the surrounding trim.
3. Everythong else is plug and play.
Basically in a nut shell:
1. Tap K into D on the P501 connector
2. Drill 2 holes in each stock BOSE mounting bracket so the deck sits back and mounts flush w/ the surrounding trim.
3. Everythong else is plug and play.
Last edited by i30ds; 10-22-2007 at 06:04 PM.
01-17-2007, 11:55 AM
#30
DO THE EBAY HALO HEADLIGHTS WORK ON THE I35?
This ought to be stickied:
Projector halo headlights on eBay are NON-HID, it will not work with an I35 HID components without modification. It uses a H7 low and H1 high bulbs with 9006 and 9005 adapter sockets respectively. The projector's output is sh*t, OK cutoff, no width light pattern. If you really want to use your I35 HID components, you will need a D2S/R to AMP connector harness from eBay, and aftermarket H7 HID bulbs. The quality of construction is also poor and nothing compared to OEM. The halos are also LED, which means they are dim and prob won't be seen in daylight. You can buy brighter 5mm LEDs, but again will require mod on your part to fit them in. You could also swap them for CCFL rings, but will need hard to find 3" diameter rings.
Cliff note: If you have an I30, direct plug and play, enjoy the crappy output. If you have an I35, it could work....just needs lot of work.
04-12-2007, 08:18 PM
#31
Donating Maxima.org Member

Join Date: Jul 2005
Posts: 142
Infiniti 2001 I30 / A33 chassis
Rear brake pad and rotor replacement write-up
Replacement Pads (what i used)
Raybestos pads - from checker auto @ 40.00 for entire rear set
Replacement rotors (what i used)
Brembo blanks - Online group buy from maxima.org
Required tools:
-socket wrench 6”
-14mm socket
-17mm socket
-rubber mallet
-wire hanger
-wire brush
-1oz brake grease
-1oz anti-seize grease
-1 can brake cleaner
-rubbing/isopropyl alcohol
-1 bottle brake fluid (DOT 3/4/5.1)
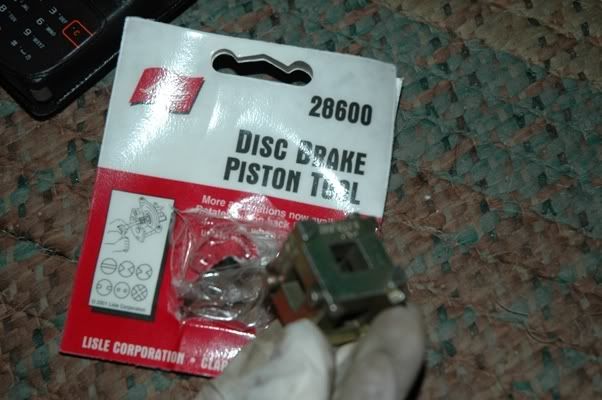
-Piston ratchet tool
Just in case tools/supplies:
-12" breaker bar -- if bolts won’t come off with a regular 6" ratchet wrench
-1oz of high synthetic grease (permatex or other brand) - for caliper pins if necessary
-Gloves
Notes:
I didn’t flush my brakes in this procedure as I was extremely cautious to do them by myself. I’m sure the job isn’t that hard but I didn’t want to get air in my brake system. So after the brake job, I took my car to a local brakes plus to get it flushed for 30 bucks. Not too expensive but since this was my first time on this job, I wanted some quality assurance from the techies that I was doing the right thing.
Procedures
1. The lug nuts on my wheels are always torque to correct specifications (90 ft/lbs). So before I jack the car up, I usually will loosen them before hand; otherwise they will just spin when the car is up while you’re trying to take them off.
2. Jack the car up and remove the wheels. Use the appropriate jack points.
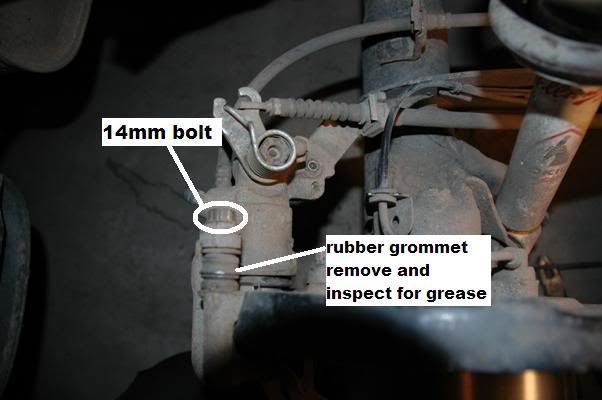
3. Remove the two 14mm bolt that holds the top caliper in place one on top and one at bottom. You will see them right next to the rubber grommets on the top caliper. See picture below

-14mm bolts-
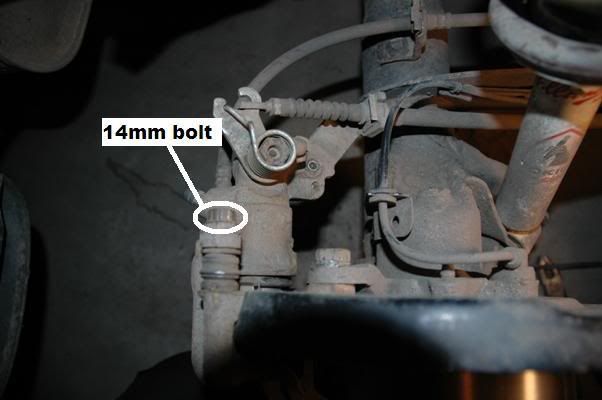
-Another shot of the 14mm bolt-
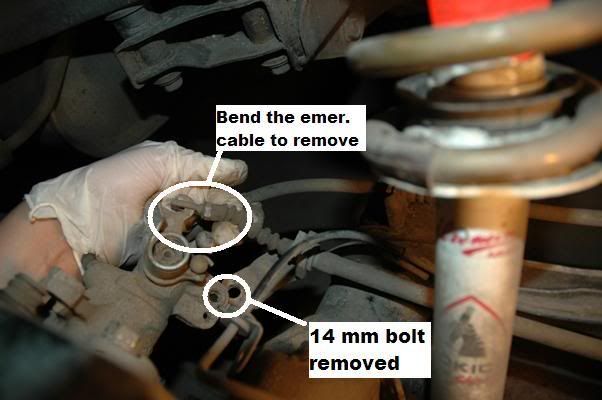
4. Next, remove the other 14mm bolt shown below that holds the emergency brake in place. The picture below shows the holes where the bolt is placed and it is at the bottom of that plate. You may have to use a breaker bar on this bolt as mine was pretty much rusted on. Once that bolt is out you can slightly bend that emergency brake to have it come off that hook however be careful not to clip or bend the emergency wire cable too much.
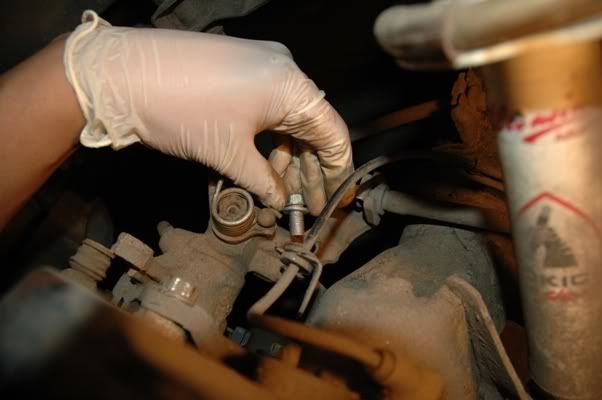
-Removed the 14mm bolt underside-
-Remove the emergency brake wire-
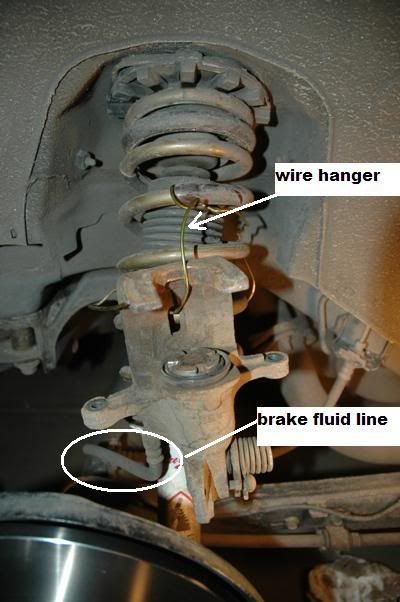
5. Now the caliper should just come right off. I had to wiggle mine out because of all the corrosion build-up around the brake pad shims but nothing too hard to do. When the caliper is free use the wire hanger and hang your caliper on the suspension coil as show below. Do not hang it using the brake hose. The last thing you need is to puncture or tear that brake line hose and get air into the system causing many problems down the road. Depending on the condition of the caliper piston, you should clean it off with some break cleaner if it needs it. You don’t want sticky stuff or build-up on your caliper piston causing your brakes to wear out unevenly or drag in the long run.
Rear brake pad and rotor replacement write-up
Replacement Pads (what i used)
Raybestos pads - from checker auto @ 40.00 for entire rear set
Replacement rotors (what i used)
Brembo blanks - Online group buy from maxima.org
Required tools:
-socket wrench 6”
-14mm socket
-17mm socket
-rubber mallet
-wire hanger
-wire brush
-1oz brake grease
-1oz anti-seize grease
-1 can brake cleaner
-rubbing/isopropyl alcohol
-1 bottle brake fluid (DOT 3/4/5.1)
-Piston ratchet tool
Just in case tools/supplies:
-12" breaker bar -- if bolts won’t come off with a regular 6" ratchet wrench
-1oz of high synthetic grease (permatex or other brand) - for caliper pins if necessary
-Gloves
Notes:
I didn’t flush my brakes in this procedure as I was extremely cautious to do them by myself. I’m sure the job isn’t that hard but I didn’t want to get air in my brake system. So after the brake job, I took my car to a local brakes plus to get it flushed for 30 bucks. Not too expensive but since this was my first time on this job, I wanted some quality assurance from the techies that I was doing the right thing.
Procedures
1. The lug nuts on my wheels are always torque to correct specifications (90 ft/lbs). So before I jack the car up, I usually will loosen them before hand; otherwise they will just spin when the car is up while you’re trying to take them off.
2. Jack the car up and remove the wheels. Use the appropriate jack points.
3. Remove the two 14mm bolt that holds the top caliper in place one on top and one at bottom. You will see them right next to the rubber grommets on the top caliper. See picture below
-14mm bolts-
-Another shot of the 14mm bolt-
4. Next, remove the other 14mm bolt shown below that holds the emergency brake in place. The picture below shows the holes where the bolt is placed and it is at the bottom of that plate. You may have to use a breaker bar on this bolt as mine was pretty much rusted on. Once that bolt is out you can slightly bend that emergency brake to have it come off that hook however be careful not to clip or bend the emergency wire cable too much.
-Removed the 14mm bolt underside-
-Remove the emergency brake wire-
5. Now the caliper should just come right off. I had to wiggle mine out because of all the corrosion build-up around the brake pad shims but nothing too hard to do. When the caliper is free use the wire hanger and hang your caliper on the suspension coil as show below. Do not hang it using the brake hose. The last thing you need is to puncture or tear that brake line hose and get air into the system causing many problems down the road. Depending on the condition of the caliper piston, you should clean it off with some break cleaner if it needs it. You don’t want sticky stuff or build-up on your caliper piston causing your brakes to wear out unevenly or drag in the long run.
04-12-2007, 08:23 PM
#32
Donating Maxima.org Member
Join Date: Jul 2005
Posts: 142
6. Now remove the two 17mm bolt top and bottom that hold the torque member in place (torque member = low caliper/brake pad case). You may have to use a breaker bar on these bolts. Remember lefty loosy right tighty on your bolts. See picture below for these bolts.
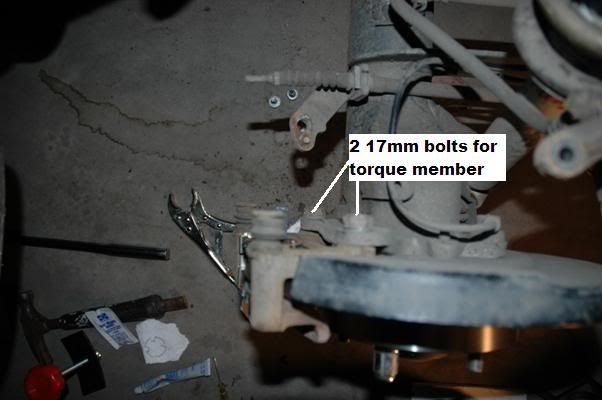
7. At this time you can now wiggle out the torque member unit that holds in place your inner and outer brake pads. If your brake pads come loose then kudos to you, mine were seized up with all of the rust build up. I had to take a mallet and hammer them away once I pulled the torque member off. Remember the orientation to these brake pads, make a self note on which pad is inner and which one is outer. They are the same size so be careful.
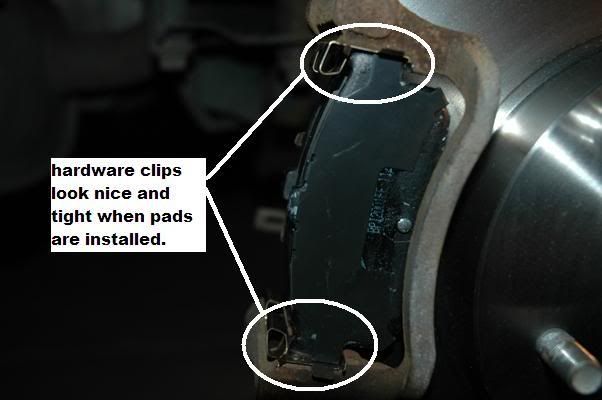
8. Clean up the torque member with some brake cleaner and your wire brush. Mine was still rusty after the cleaning but it was good enough to where there weren�t any thick chucks of build up all around the unit. The 2 metal clips that hold the inner and outer brakes can be replaced. It is called a hardware kit and they usually go for 20-25 bucks for both left and right rear rotor sets. The set comes with a total of 4 metal clips and 2 outer brake pad shims. The inner shim isn�t included and I suppose it was not necessary for installation. Even though my inner shim was rust up pretty bad, I cleaned it up pretty good and used it. Your choice to ditch it or use your old one. Pop the metal clips off using both of your thumbs and either replace them or clean them up. Don�t worry if it doesn�t stick that well back onto the torque member. The brake pads will hold them in place once those are in.
9. The two bolts that have the rubber grommets on them, shown below, those are the caliper pins. Pull them out and expect them for the proper grease. If you see grease at the tip of the caliper pin and its color isn�t black as much then you�re ok. If your grease looks black and "watery" with no "thickness" to it then you must re-grease them. Pull out the rubber grommet from the pin and turn them inside out and clean up all the grease; use gloves because it gets messy. Wipe the grease clean from both pin and grommet and reapply some high temperature synthetic. Don�t put too much grease in, just enough for it to slide in and out easily. Turn the grommet inside out again and put a little bit of grease in the grommet. When you put the pin and grommet back in, it�s ok if it pops out a little but not too much. If it�s hard to push the pin all the way into the torque member then you have too much grease; air can�t get into the hole and this is what can cause brakes to drag over time. Re-grease and try the procedure again.
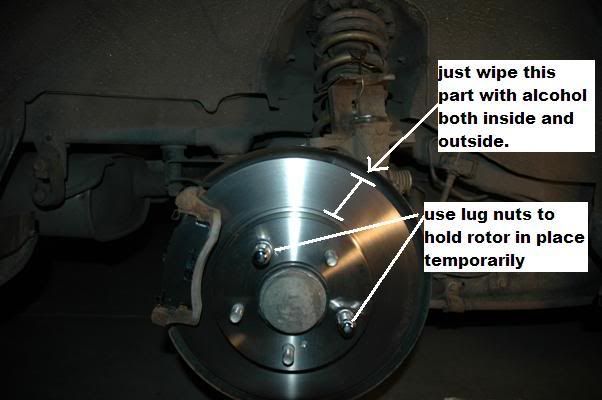
10. Replace the rotor. The old rotor will probably be stuck on to the hub. Use a rubber mallet and smack it around a bit. Use some force if you need to and spin the rotor freely while you continue hitting the rotor. The rotor should come off depending on how much rust is on the back side of the rotor. Once it�s out, clean the surface of plate that holds your 5 lug nuts with some brake cleaner and apply some anti seize grease. I smeared some on there nice and even with moderate amounts. Get some rubbing/isopropyl alcohol and wipe the new rotor completely clean; use a fresh pair of gloves when doing this. There is a thin coat of grease that preserves the new rotor out of the box and you have to clean it off. Wipe the rotor thoroughly with alcohol...both inside and outside. If you skip the cleaning process, it is possible to warp the rotors in no time once installed. Put the new rotor on and use your lug nut to keep it in place until you�re ready to reassemble the whole thing.
11. Mount your lower torque member back onto the car with the 17mm bolts. Use some anti seize grease on the 17mm bolts for easy removal down the road. Tighten them up nice and tight. Now it�s time to put your brake pads in. Remember the notches on each brake pad, designating which one is inner and outer? Place the brake pads in accordingly. See the picture below to see how they clip back on. I had to use a small screw driver to kind of lift up the metal clips to make them sit inside properly. Now put the metal shims from the hardware kit back on but before you do, put some brake grease on the outer side of each brake pad where the shim sits. Next, place your shims on the brake pads and squeeze firmly. Wipe off any excess brake grease that oozes out.
13. Ratchet back in the caliper piston. You will definitely use this tool for this part of the project show below. Get this at Sears, I paid about 12 bucks for it.
7. At this time you can now wiggle out the torque member unit that holds in place your inner and outer brake pads. If your brake pads come loose then kudos to you, mine were seized up with all of the rust build up. I had to take a mallet and hammer them away once I pulled the torque member off. Remember the orientation to these brake pads, make a self note on which pad is inner and which one is outer. They are the same size so be careful.
8. Clean up the torque member with some brake cleaner and your wire brush. Mine was still rusty after the cleaning but it was good enough to where there weren�t any thick chucks of build up all around the unit. The 2 metal clips that hold the inner and outer brakes can be replaced. It is called a hardware kit and they usually go for 20-25 bucks for both left and right rear rotor sets. The set comes with a total of 4 metal clips and 2 outer brake pad shims. The inner shim isn�t included and I suppose it was not necessary for installation. Even though my inner shim was rust up pretty bad, I cleaned it up pretty good and used it. Your choice to ditch it or use your old one. Pop the metal clips off using both of your thumbs and either replace them or clean them up. Don�t worry if it doesn�t stick that well back onto the torque member. The brake pads will hold them in place once those are in.
9. The two bolts that have the rubber grommets on them, shown below, those are the caliper pins. Pull them out and expect them for the proper grease. If you see grease at the tip of the caliper pin and its color isn�t black as much then you�re ok. If your grease looks black and "watery" with no "thickness" to it then you must re-grease them. Pull out the rubber grommet from the pin and turn them inside out and clean up all the grease; use gloves because it gets messy. Wipe the grease clean from both pin and grommet and reapply some high temperature synthetic. Don�t put too much grease in, just enough for it to slide in and out easily. Turn the grommet inside out again and put a little bit of grease in the grommet. When you put the pin and grommet back in, it�s ok if it pops out a little but not too much. If it�s hard to push the pin all the way into the torque member then you have too much grease; air can�t get into the hole and this is what can cause brakes to drag over time. Re-grease and try the procedure again.
10. Replace the rotor. The old rotor will probably be stuck on to the hub. Use a rubber mallet and smack it around a bit. Use some force if you need to and spin the rotor freely while you continue hitting the rotor. The rotor should come off depending on how much rust is on the back side of the rotor. Once it�s out, clean the surface of plate that holds your 5 lug nuts with some brake cleaner and apply some anti seize grease. I smeared some on there nice and even with moderate amounts. Get some rubbing/isopropyl alcohol and wipe the new rotor completely clean; use a fresh pair of gloves when doing this. There is a thin coat of grease that preserves the new rotor out of the box and you have to clean it off. Wipe the rotor thoroughly with alcohol...both inside and outside. If you skip the cleaning process, it is possible to warp the rotors in no time once installed. Put the new rotor on and use your lug nut to keep it in place until you�re ready to reassemble the whole thing.
11. Mount your lower torque member back onto the car with the 17mm bolts. Use some anti seize grease on the 17mm bolts for easy removal down the road. Tighten them up nice and tight. Now it�s time to put your brake pads in. Remember the notches on each brake pad, designating which one is inner and outer? Place the brake pads in accordingly. See the picture below to see how they clip back on. I had to use a small screw driver to kind of lift up the metal clips to make them sit inside properly. Now put the metal shims from the hardware kit back on but before you do, put some brake grease on the outer side of each brake pad where the shim sits. Next, place your shims on the brake pads and squeeze firmly. Wipe off any excess brake grease that oozes out.
13. Ratchet back in the caliper piston. You will definitely use this tool for this part of the project show below. Get this at Sears, I paid about 12 bucks for it.
04-12-2007, 08:32 PM
#33
Donating Maxima.org Member
Join Date: Jul 2005
Posts: 142
At this point you would want to open up the brake fluid reservoir cap in the hood of the car. Wrap a cloth around the brake fluid reservoir so when your compressing your caliper in, the overflow will catch on the rag.
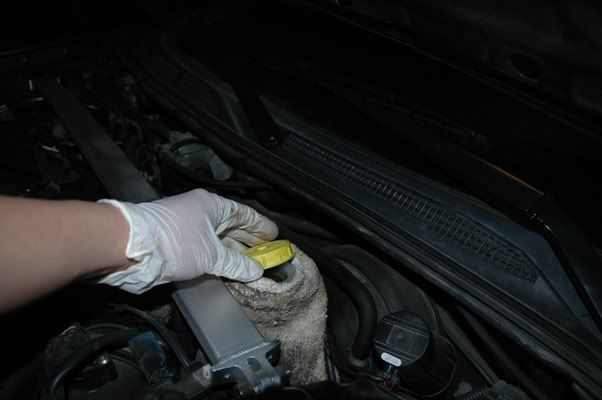
-Wrap the brake fluid reservoir before compressing caliper-
Kind of place the caliper on the springs of the suspension for some leverage but watch out not to rest all of it on the bleeder valve. Use one of the arms where the caliper pins are looped through for some support.
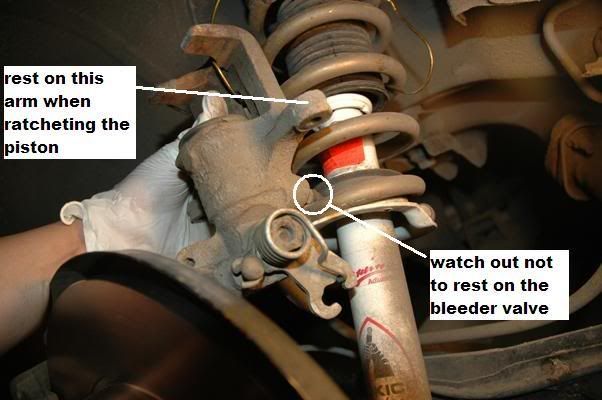
You will need to ratchet the piston clockwise to push the caliper in. It may take some force to turn but not too much. See the picture below for the finish recessed piston on the caliper. You should have a little lip of metal left just above the rubber seal. Also make sure to watch for the rubber seal as it may fold improperly while turning the piston. Absolutely be careful not to tear that rubber seal.
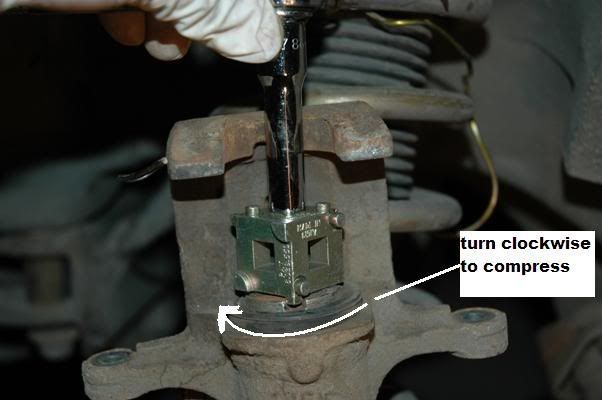

-A completed compressed piston head-
Another important note on this step is when you�re done ratcheting the piston, make sure that the piston head has its holes in a "cross" or �plus� meaning holes are on top, bottom, left and right. See picture below. Look what happens at the next picture if it�s not, that brake pad notch will cause the piston to push the brake pad unevenly. You�d probably screw up the brake pad and piston for sure.
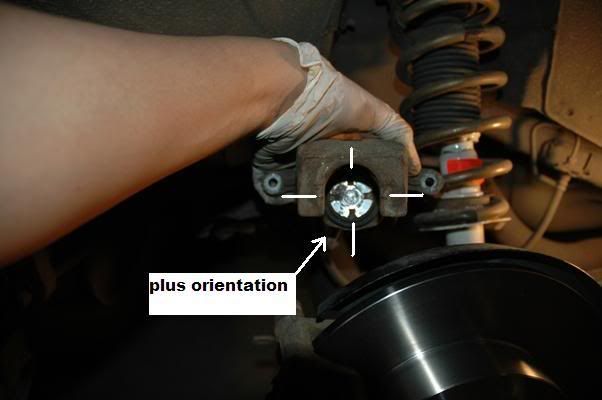
-Wrap the brake fluid reservoir before compressing caliper-
Kind of place the caliper on the springs of the suspension for some leverage but watch out not to rest all of it on the bleeder valve. Use one of the arms where the caliper pins are looped through for some support.
You will need to ratchet the piston clockwise to push the caliper in. It may take some force to turn but not too much. See the picture below for the finish recessed piston on the caliper. You should have a little lip of metal left just above the rubber seal. Also make sure to watch for the rubber seal as it may fold improperly while turning the piston. Absolutely be careful not to tear that rubber seal.
-A completed compressed piston head-
Another important note on this step is when you�re done ratcheting the piston, make sure that the piston head has its holes in a "cross" or �plus� meaning holes are on top, bottom, left and right. See picture below. Look what happens at the next picture if it�s not, that brake pad notch will cause the piston to push the brake pad unevenly. You�d probably screw up the brake pad and piston for sure.
04-12-2007, 08:35 PM
#34
Donating Maxima.org Member
Join Date: Jul 2005
Posts: 142
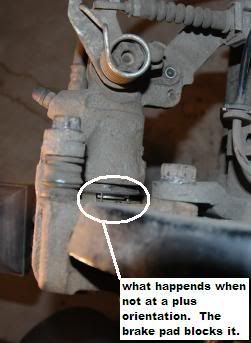
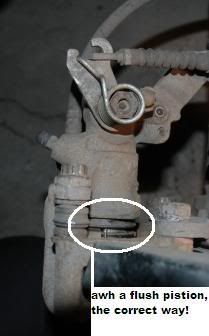
14. At this point, reconnect the emergency brake cable onto the top caliper hook while it’s out. You won’t be able to reconnect it if its bolted back on. Place the top caliper back onto the rotor assembly, use anti seize grease on the 14mm bolts that go into the rubber grommet.
15. Take your lug nuts off the rotor, resemble your wheel and put lug nuts back on. Re-torque to 95ft/lbs in a star orientation.
16. Check the brake fluid reservoir and either drain or fill to the max line with brake fluid. If you need to take some out, you can use a plastic pipet or those turkey baster things. Cap the brake fluid reservoir and pump brakes until brake pedal gets tight.
17. Test drive car. You will smell burning brakes for the first 3 - 4 stops and will most likely hear some grinding as well. This is normal as the brake pads will contour the surface of the rotors.
Hopefully this will be helpful for most of you on this forum. Appologize in advance for such huge pictures. I didnt want the pictures to come out horribly small

Thread
Thread Starter
Forum
Replies
Last Post
My Coffee
New Member Introductions
15
06-06-2017 02:01 PM
Stagnet04
4th Generation Classifieds (1995-1999)
2
10-11-2015 08:16 PM