My Massive I30 Revival and Build Thread


 06-17-2012, 03:02 PM
#82

Oil and Power Steering Coolers
Well it took long enough, but I finally got the oil and power steering coolers installed!
I got interested in getting an oil and PS cooler after talking with Joe (98SEBlackMax) about his exploits on road courses. He had mentioned having his PS fluid boil when running Hoosier slicks at the track, and after using them twice now at auto-x events, I've noticed the same thing occurring after a few runs. I can't be sure it wasn't just the PS fluid cycling through the system, but I've never seen it bubbling that intensely, and the PS cooler is cheap enough (~$30), so I figured why not install it along with the oil cooler.
Between the relatively low oil capacity and the high amount of stress I put my car though, I thought an oil cooler would be nice insurance for my motor. As an added bonus, it adds at least 1.5 quarts oil capacity.
Here are the kits I used:
24 row, 20 mm oil cooler kit
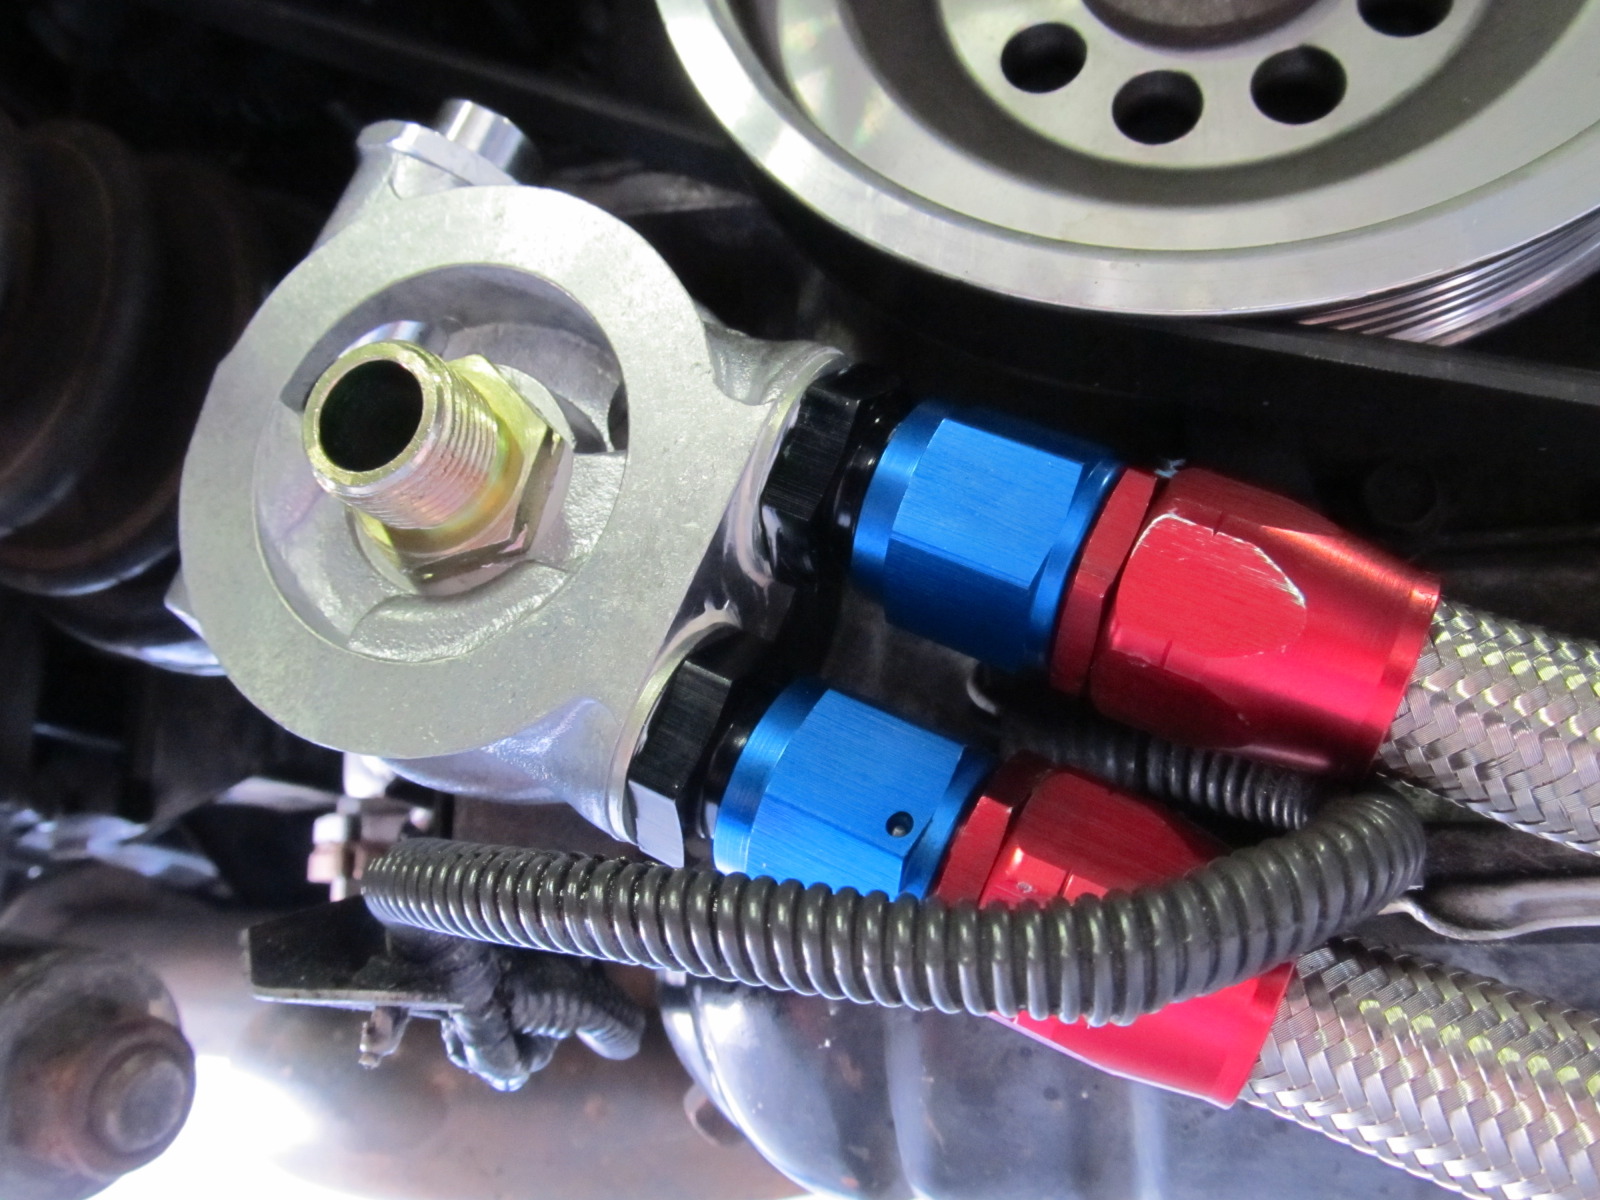
20 mm 1.5 thread oil filter adapter
Power steering cooler
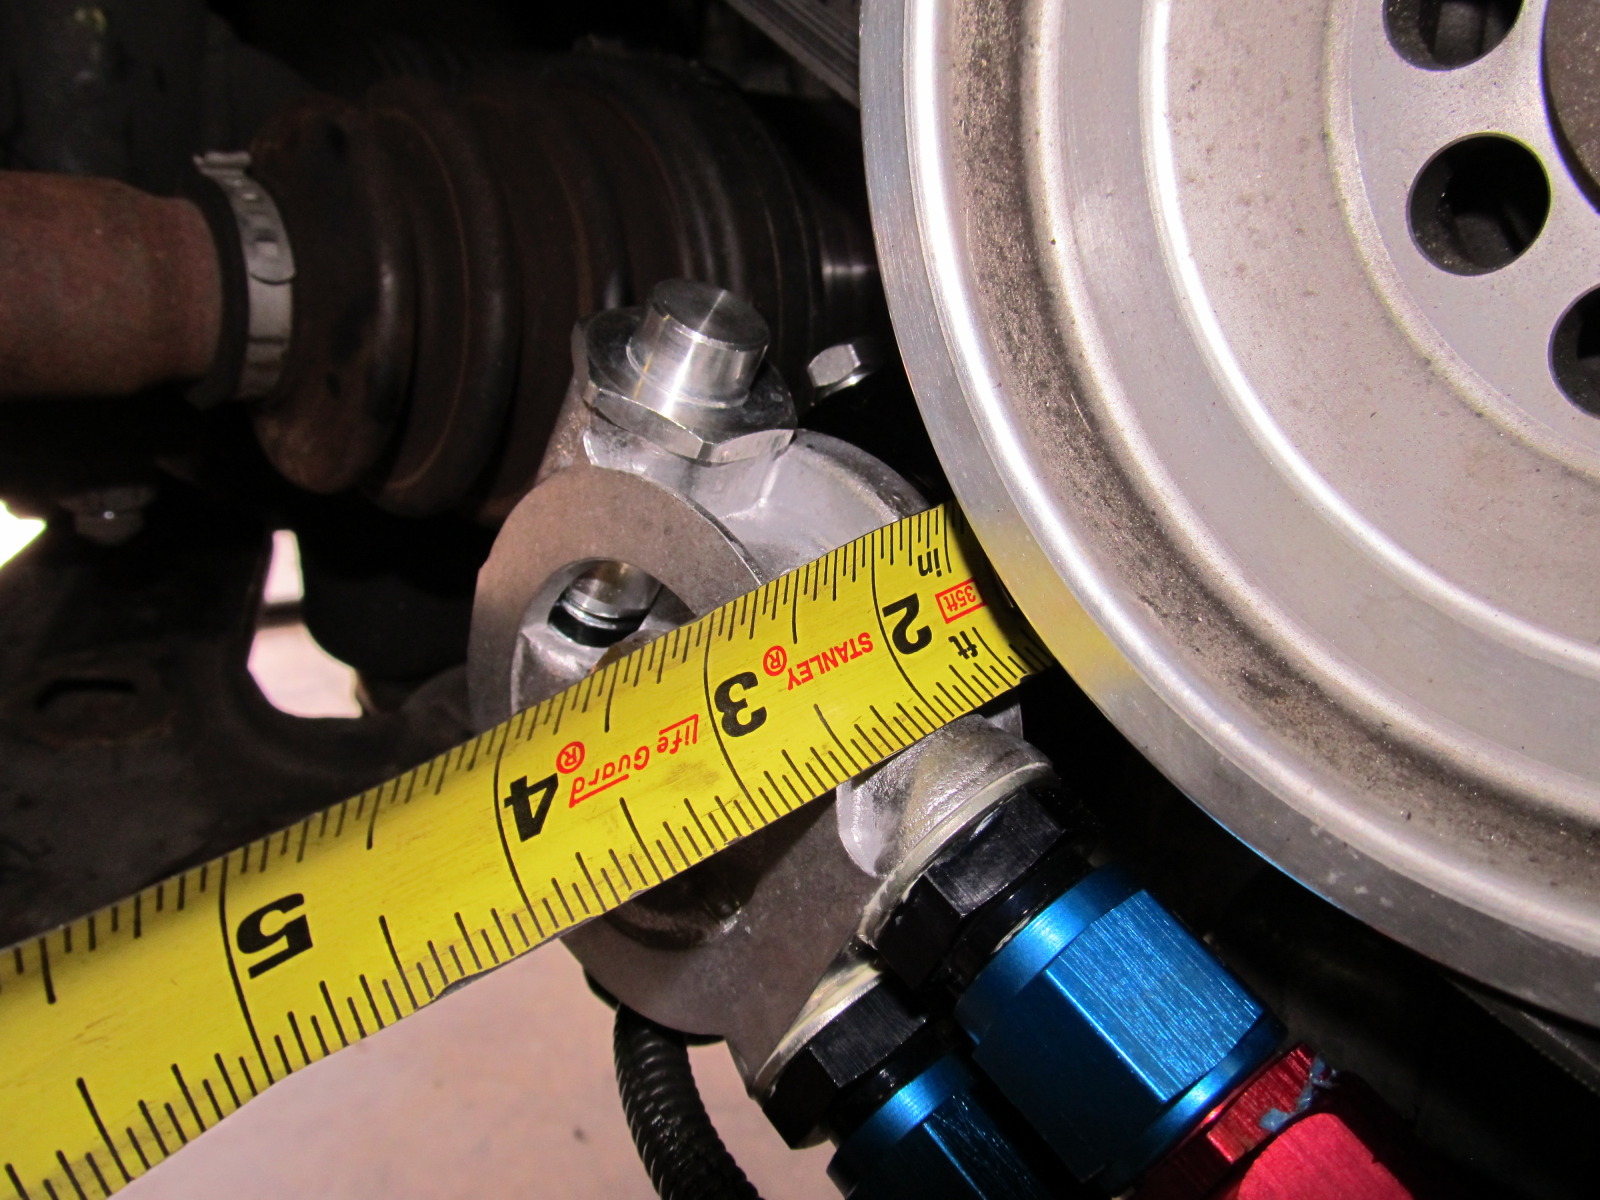
I bought the oil filter adapter to space out the adapter for the oil cooler since Joe had mentioned clearance issues with the drive belts. He also mentioned clearance issues with the PS wheel turned to full lock, but I noticed no such problem. I am running a 10 mm spacer in the front, but even without it it looks like I would have at least an inch of clearance between the filter and the wheel.
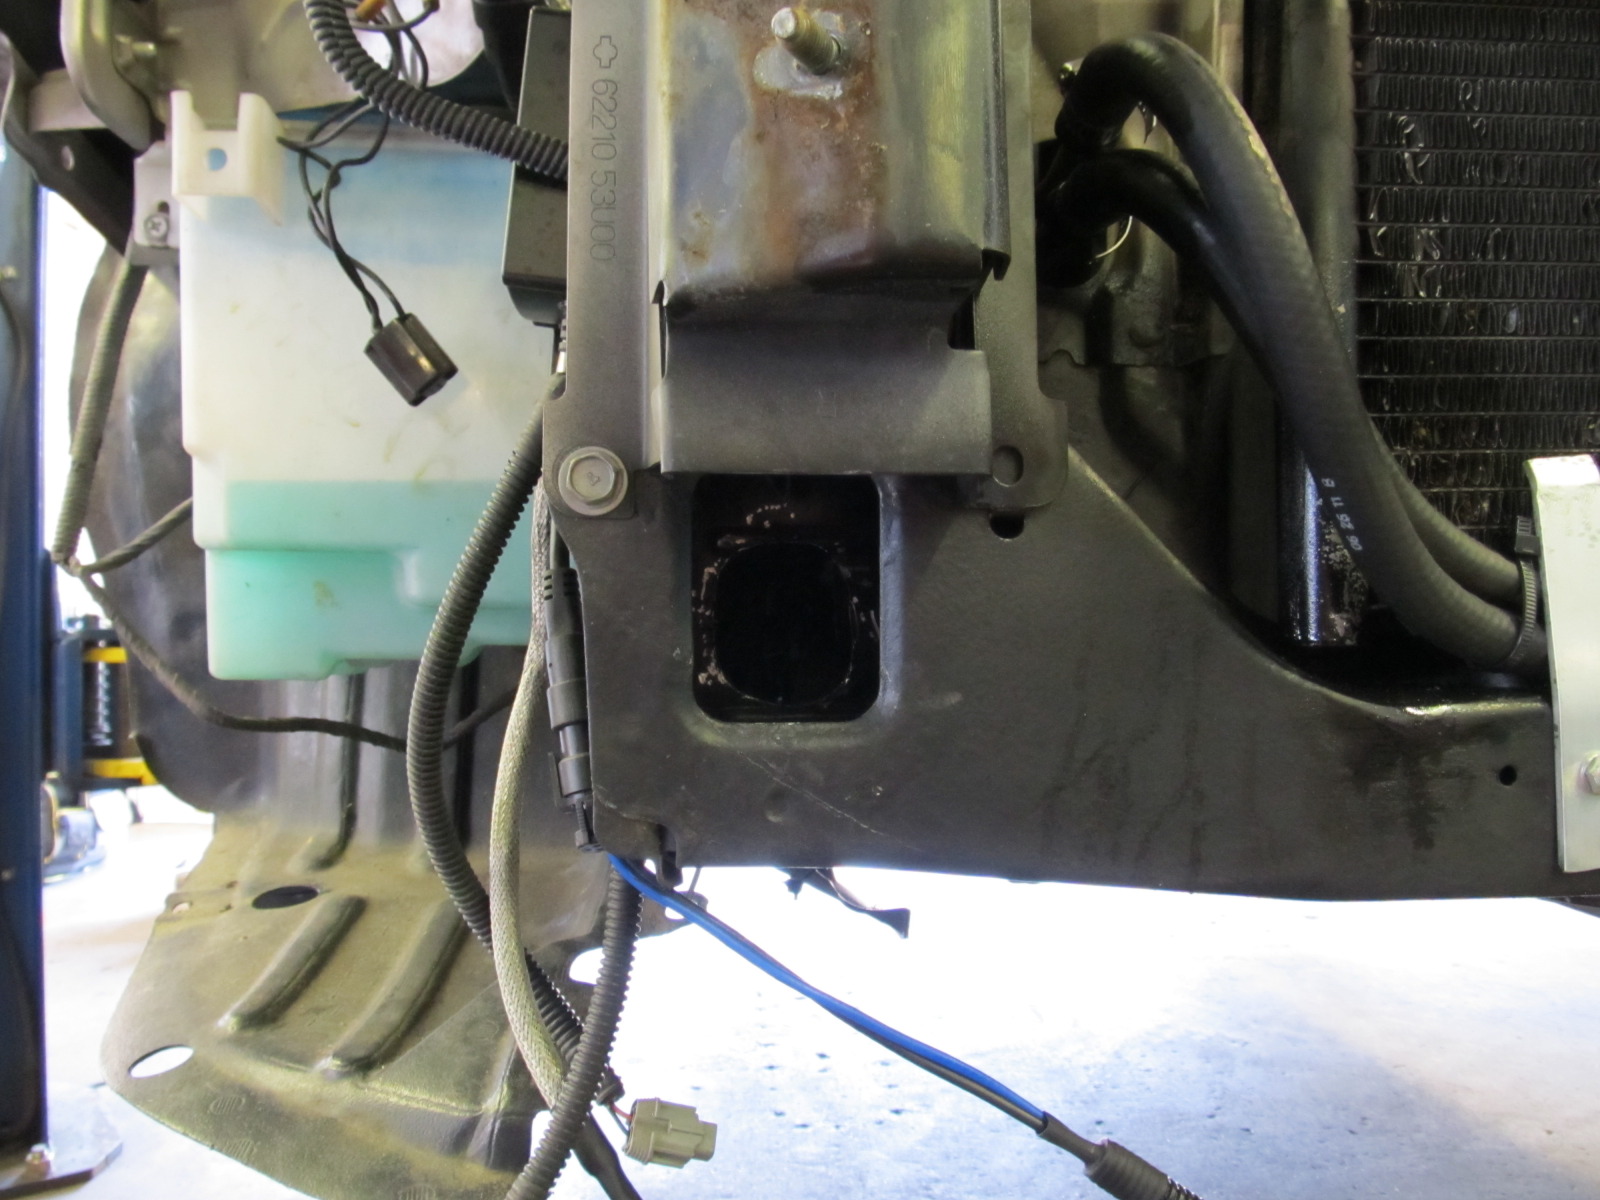
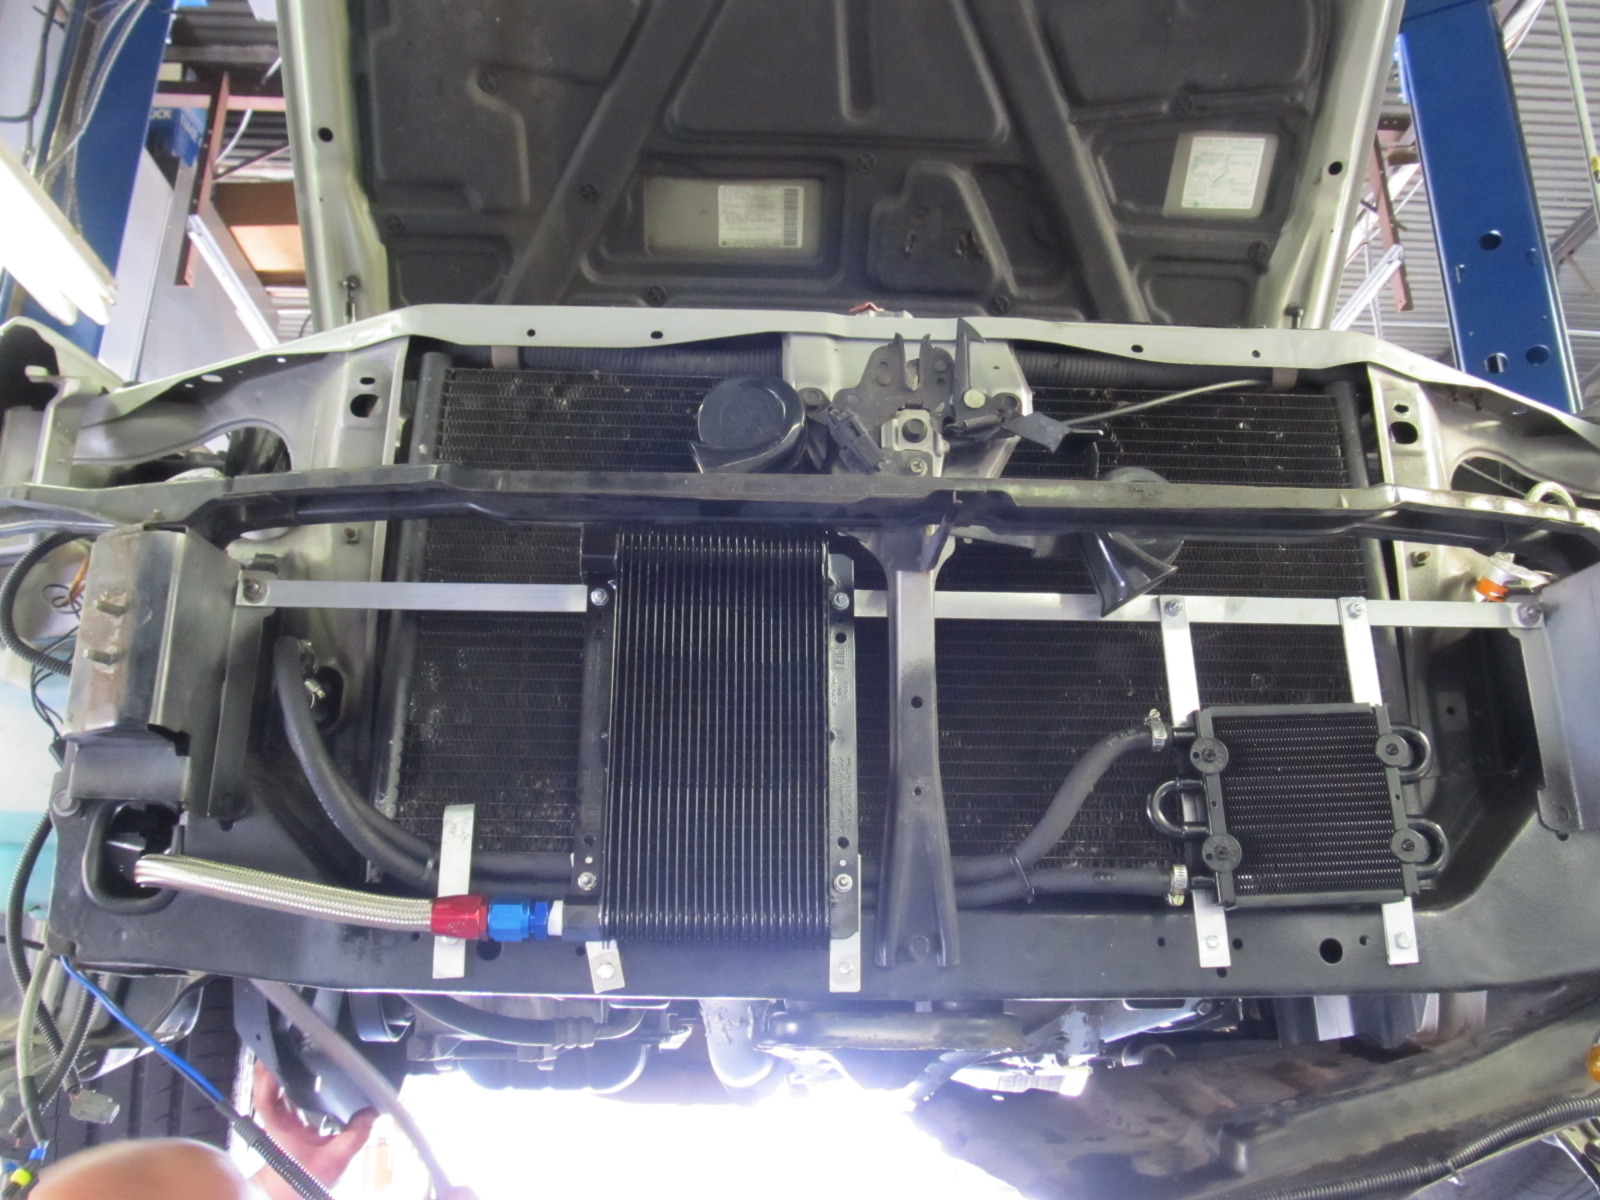
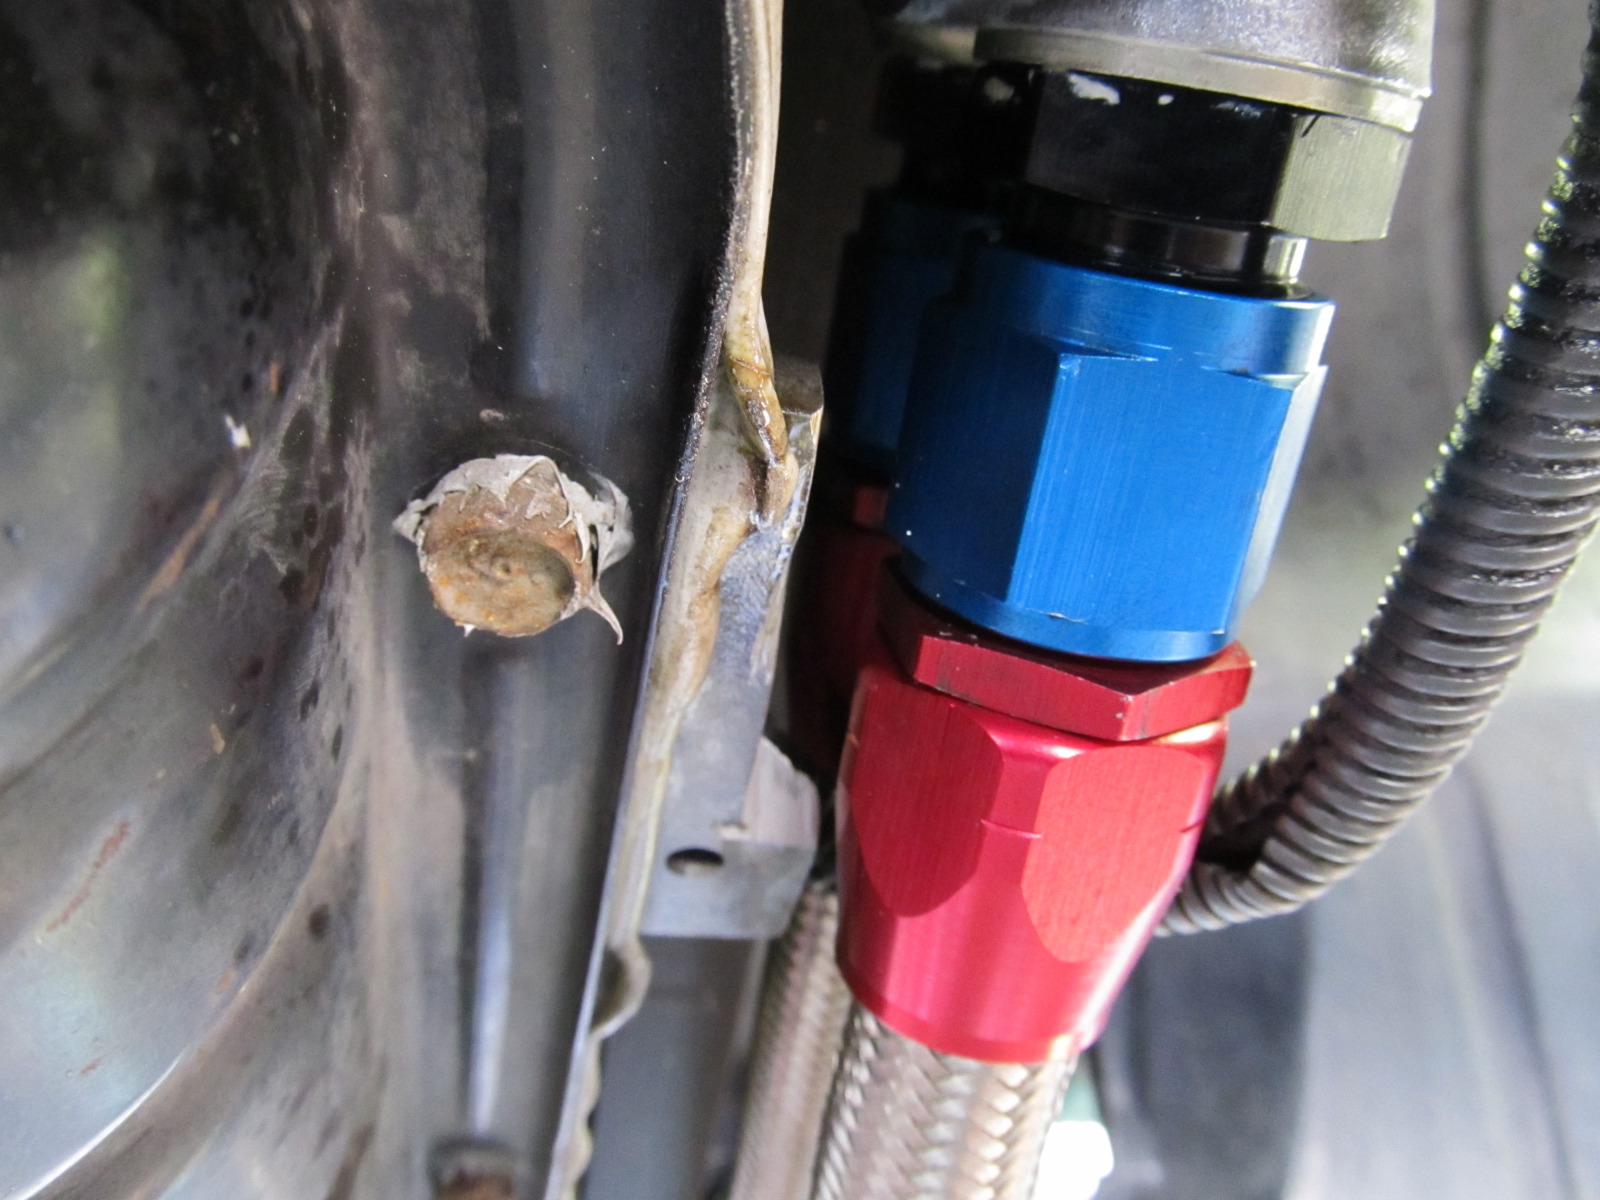
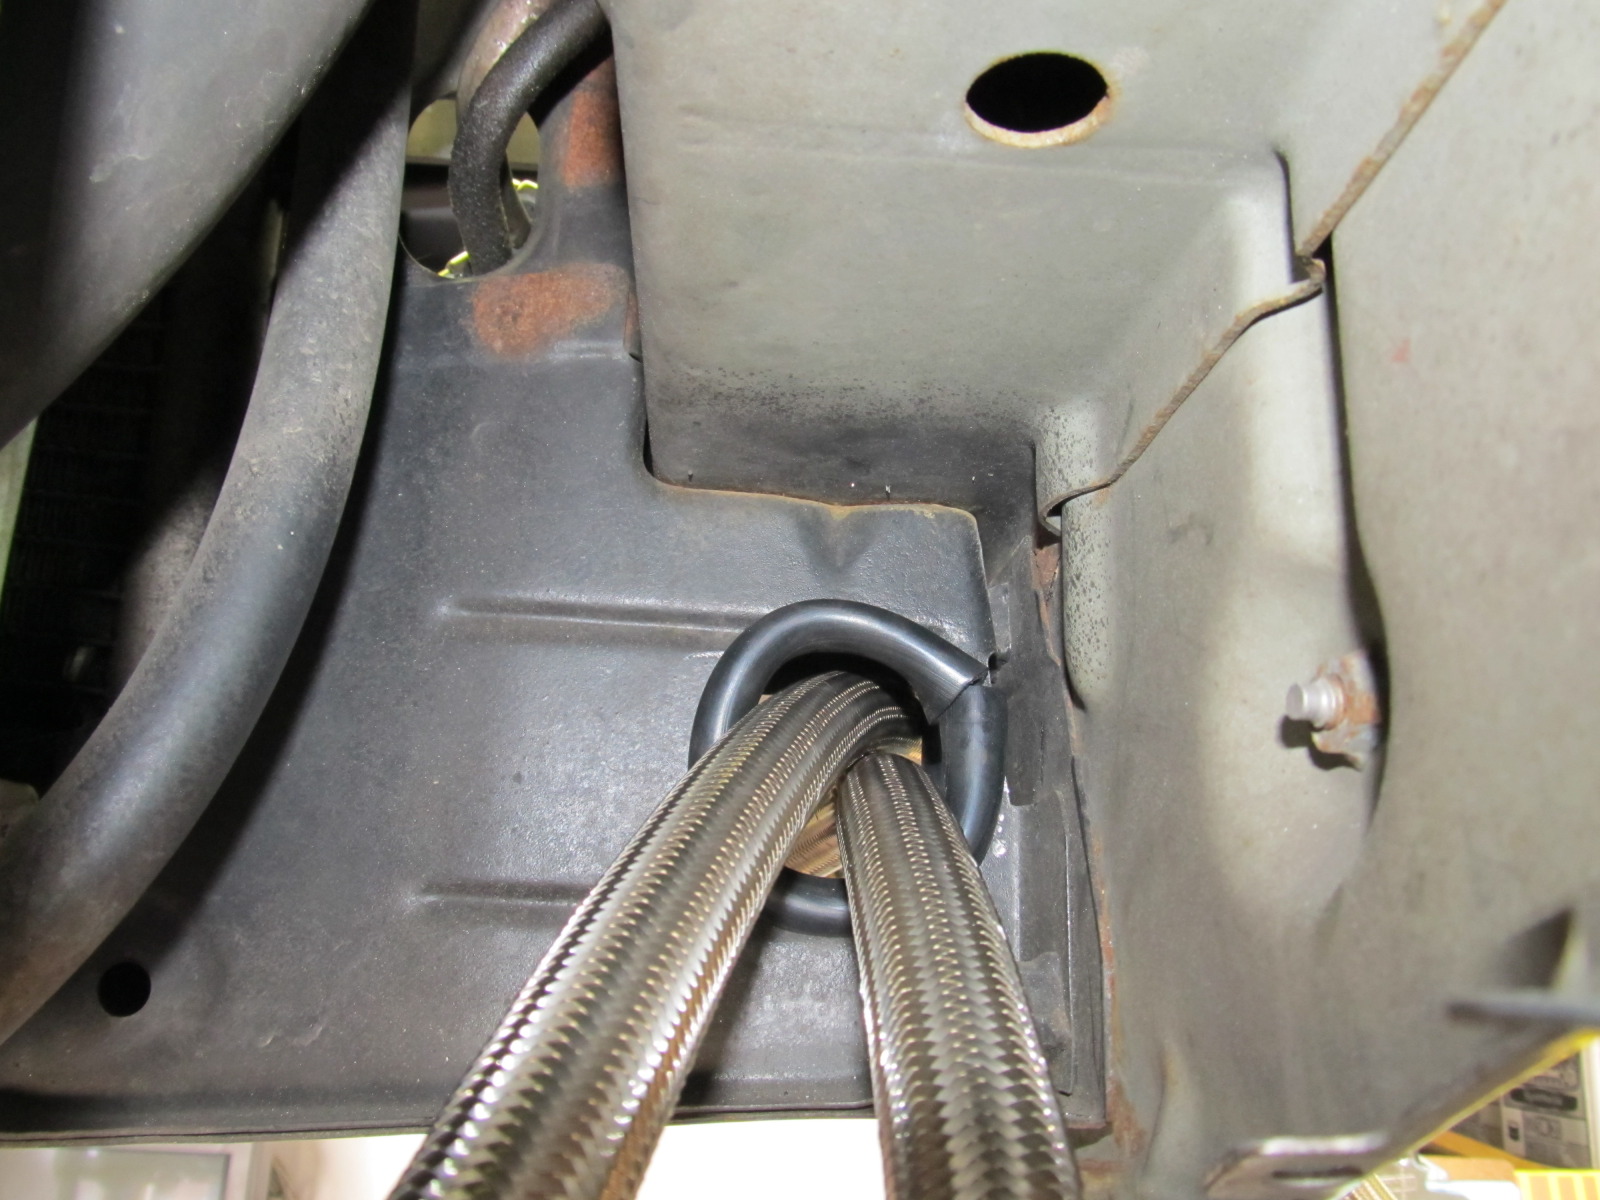
So to begin, we removed the front bumper and support and hogged out a hole to run the oil cooler lines.
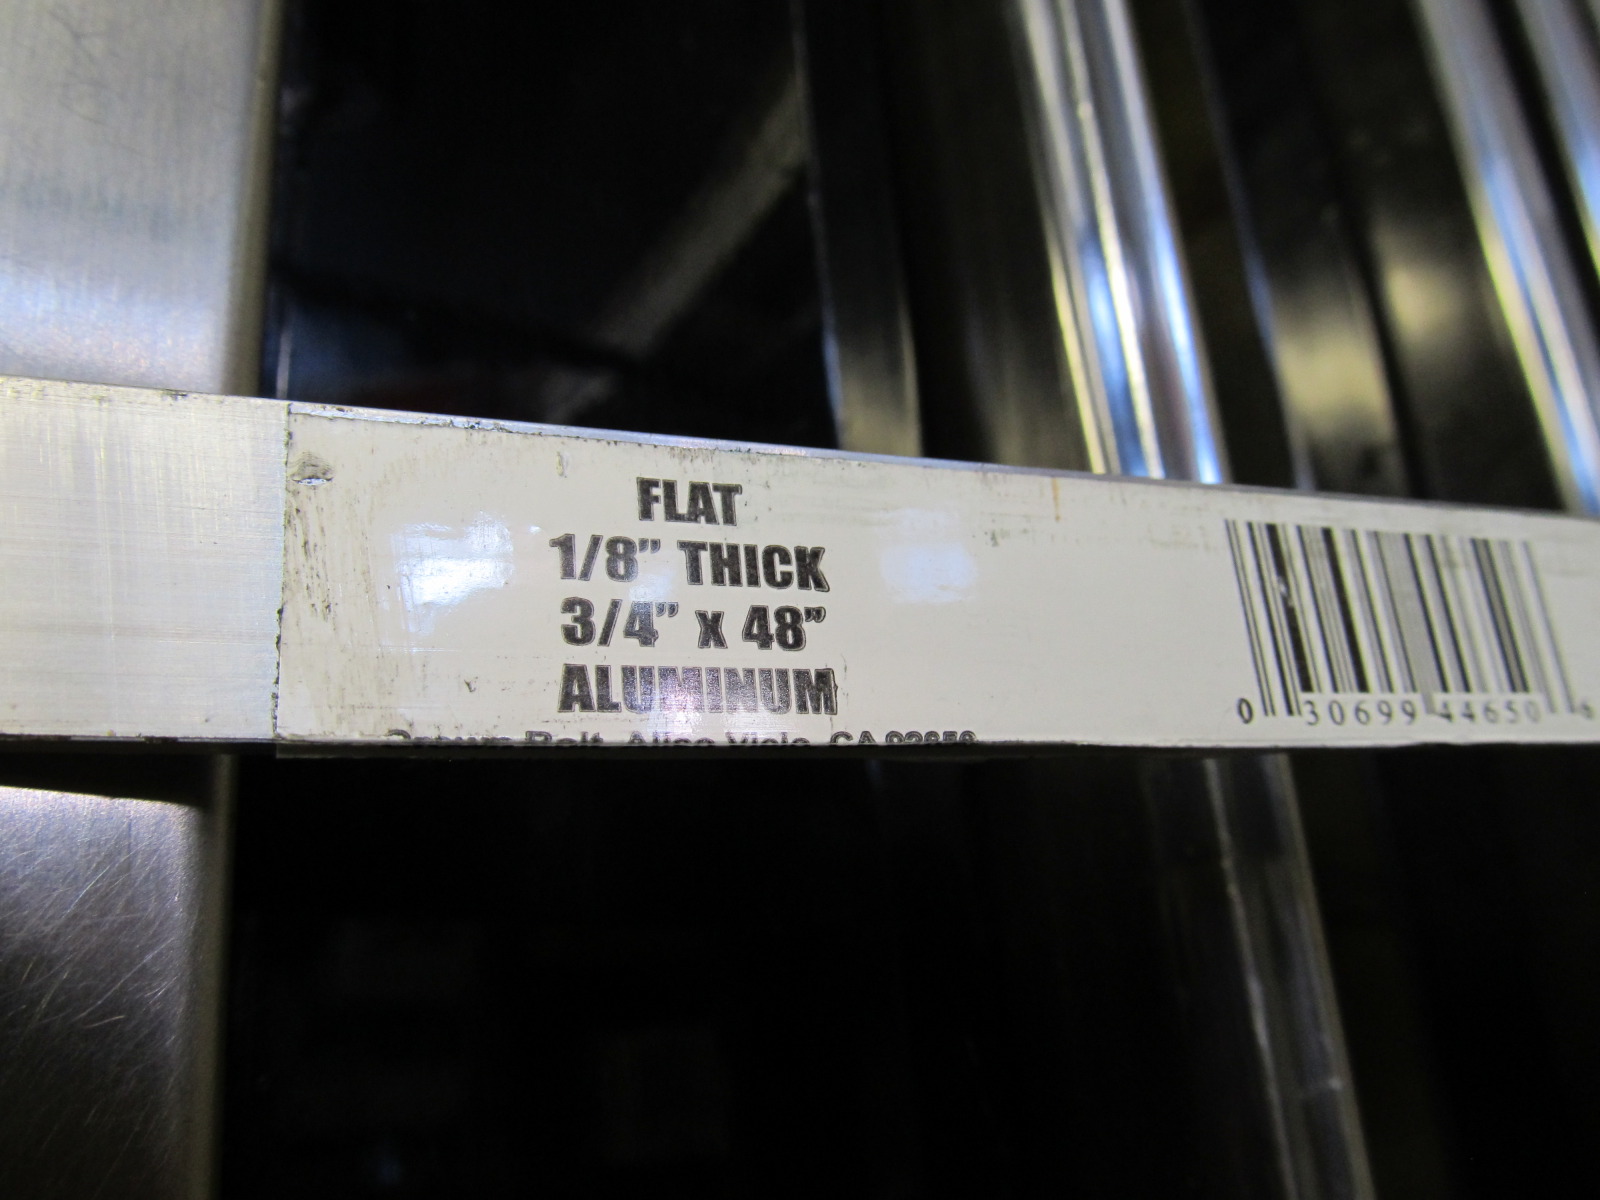
I got two pieces of aluminum to make brackets for the coolers
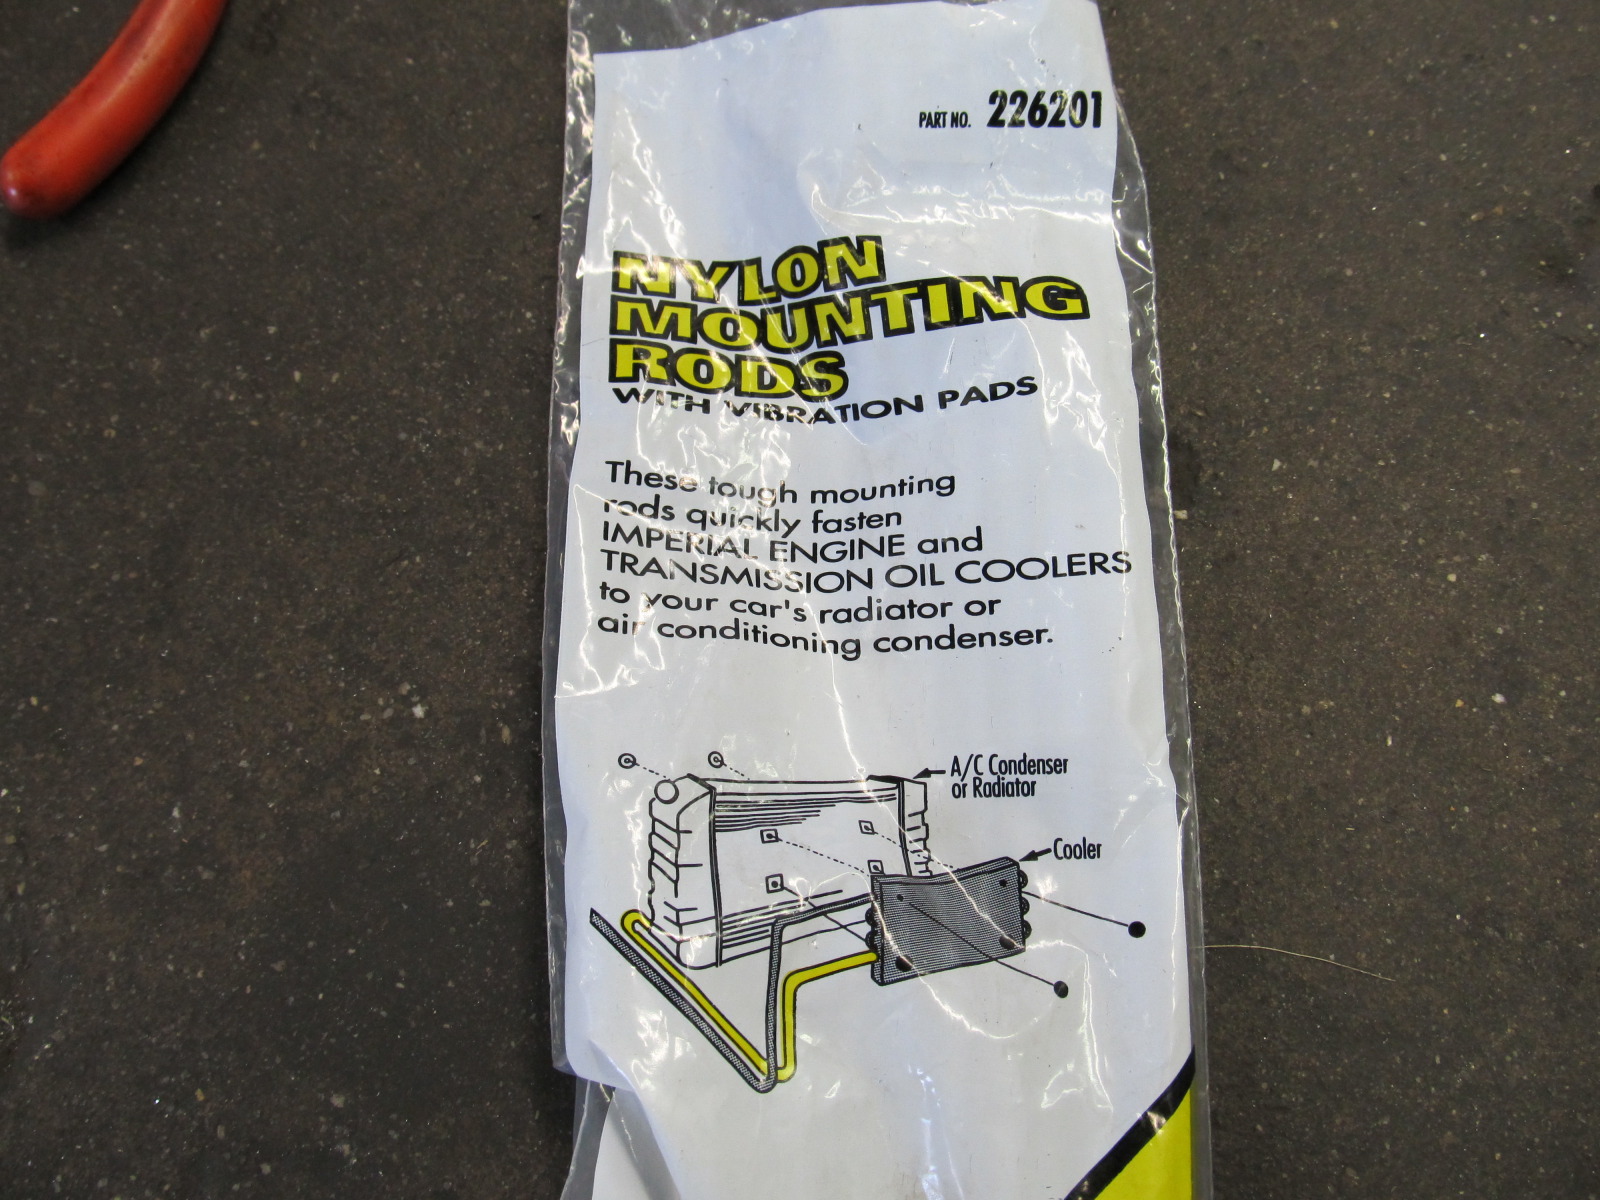
And I had to get some extra nylon mounting rods for the coolers since what came in the kits wasn't quite enough
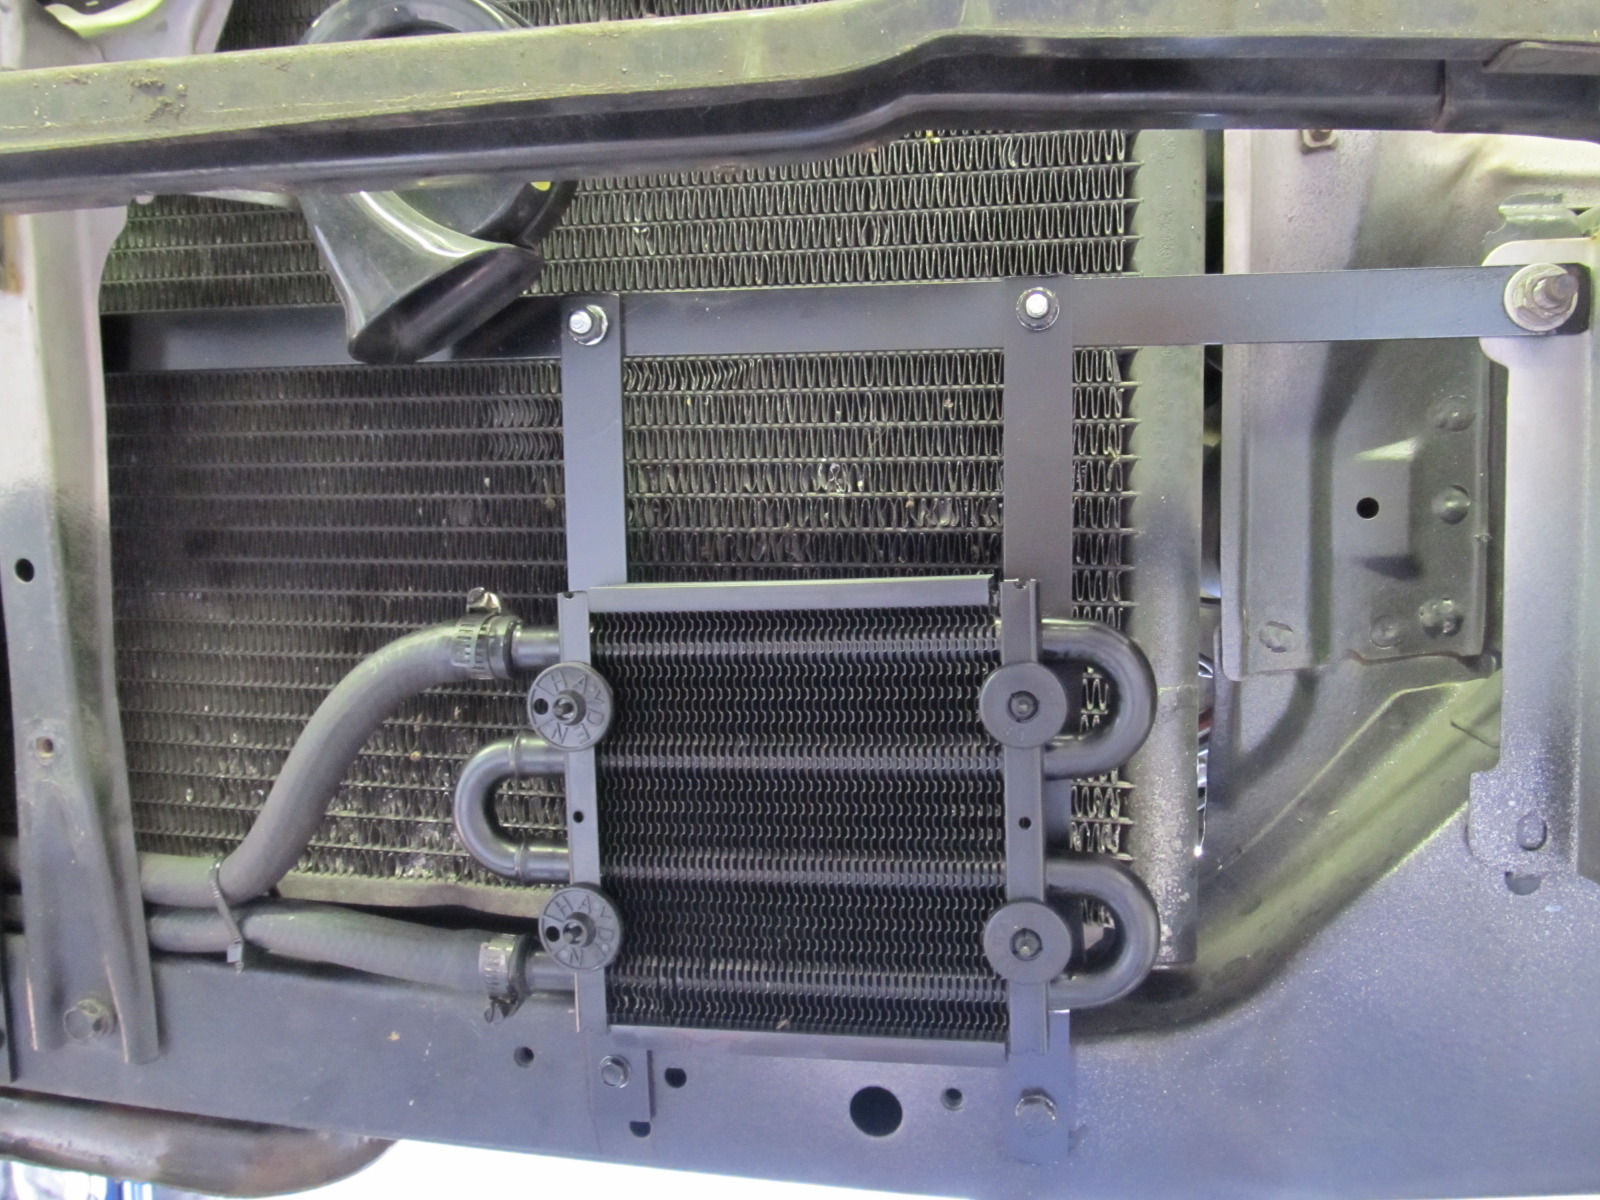
We did the PS cooler first, since it was pretty simple. Most 4th gens already have a PS "cooler" tube running around in front of the condenser, so the lines were already run from the reservoir to the front of the car. All we did was make the brackets and run the new rubber line to the cooler.
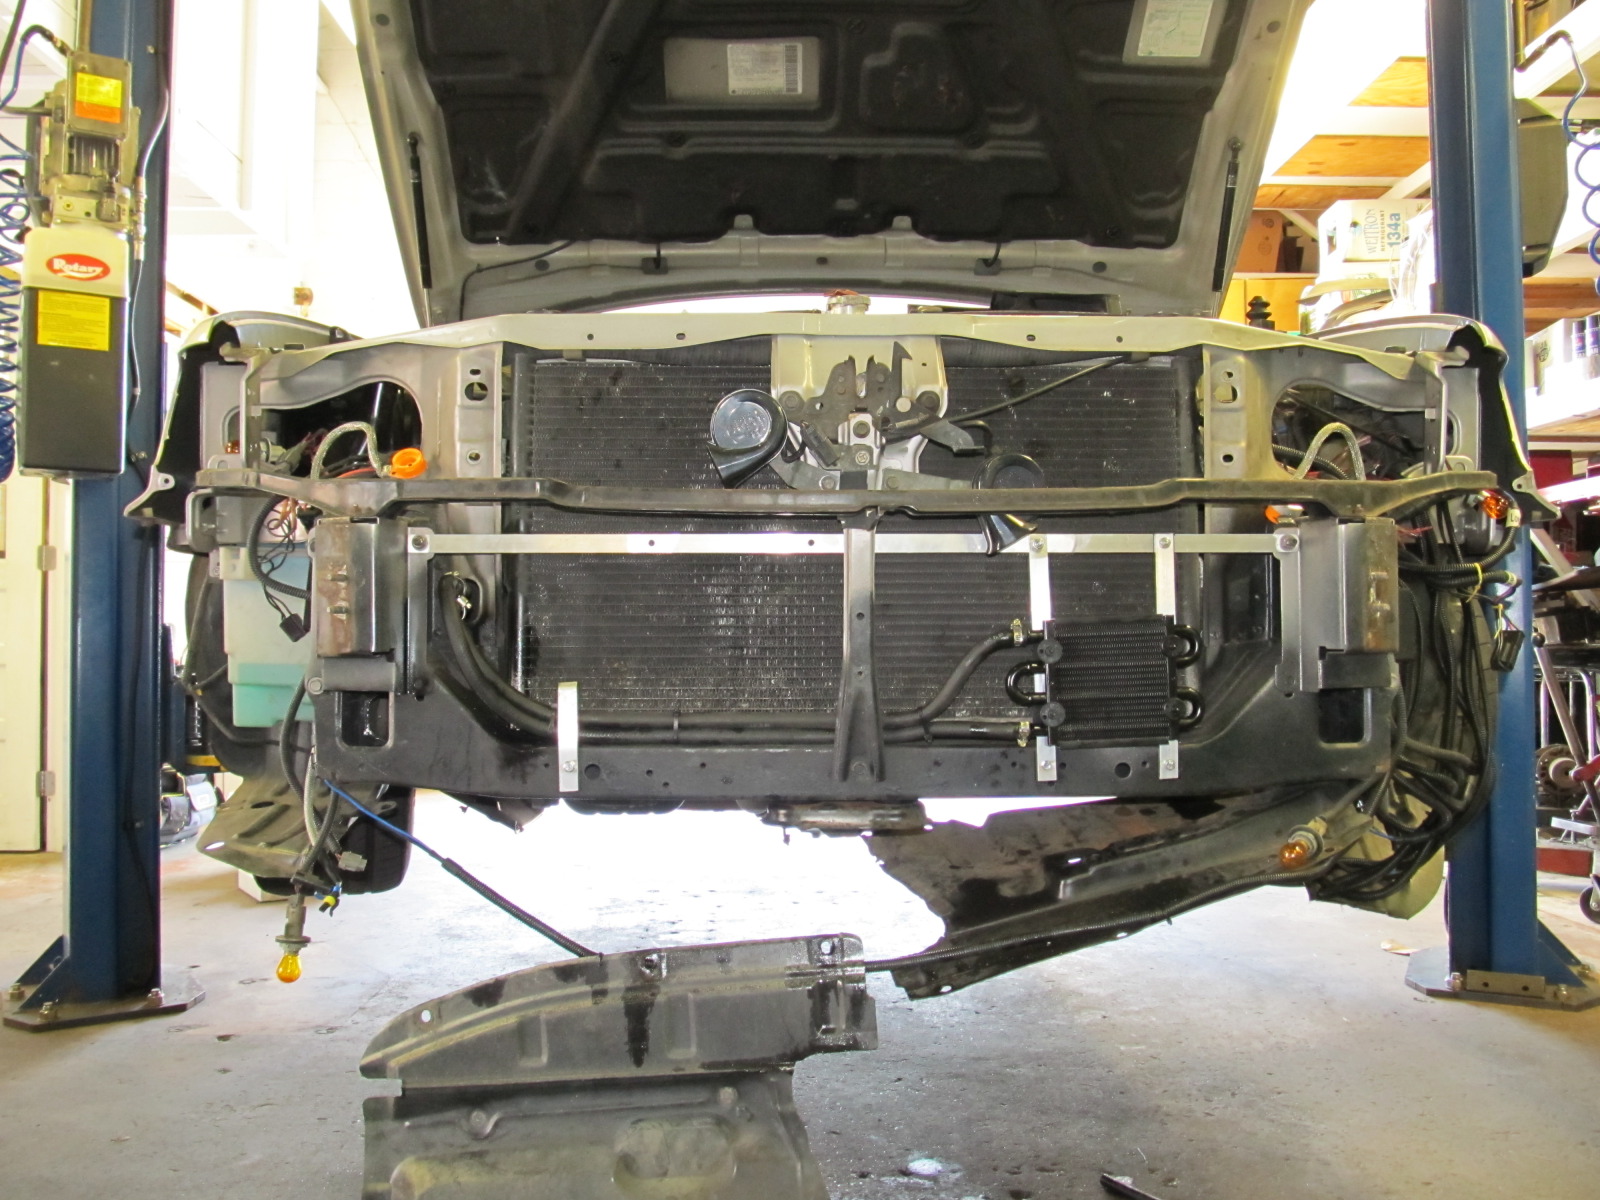
We then mocked up the oil cooler
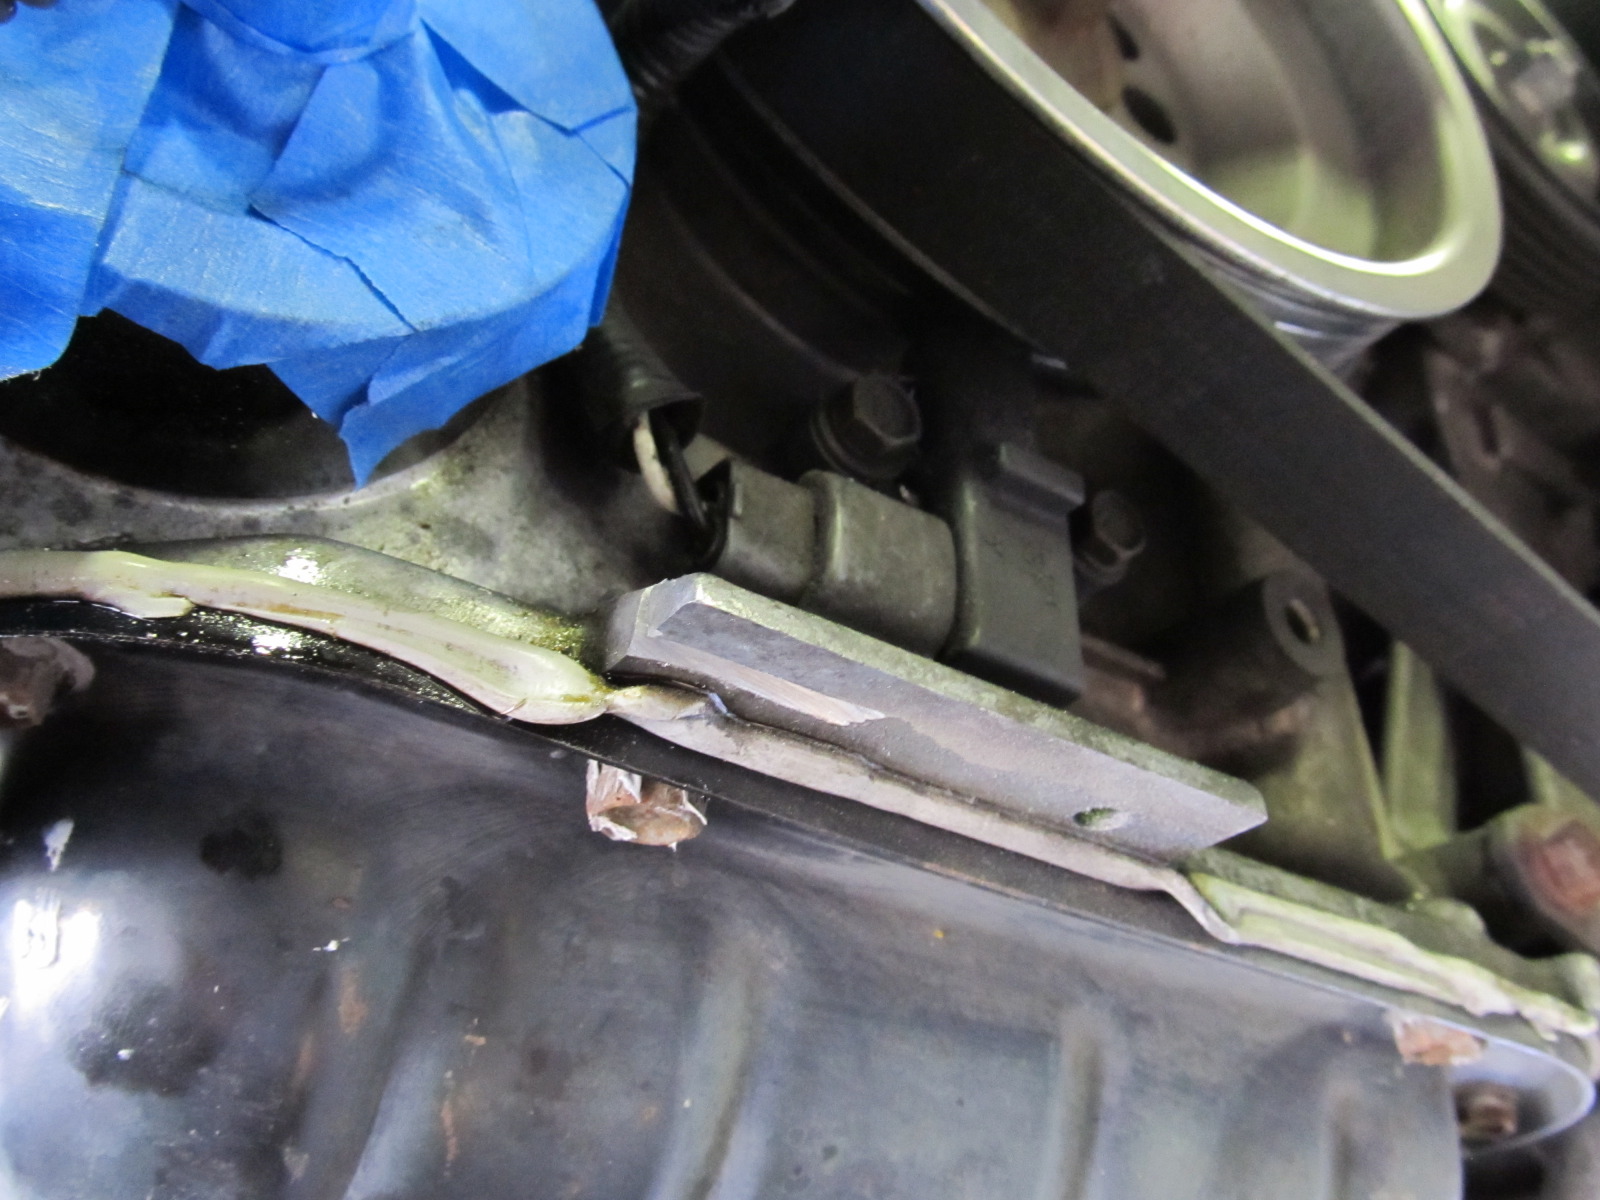
Moving on to the oil cooler, we had to trim a little tab under the drive belts to make room for the AN fittings. This might only be on DEK motors, but I'm not sure.
Test fitting the GloShift adapter

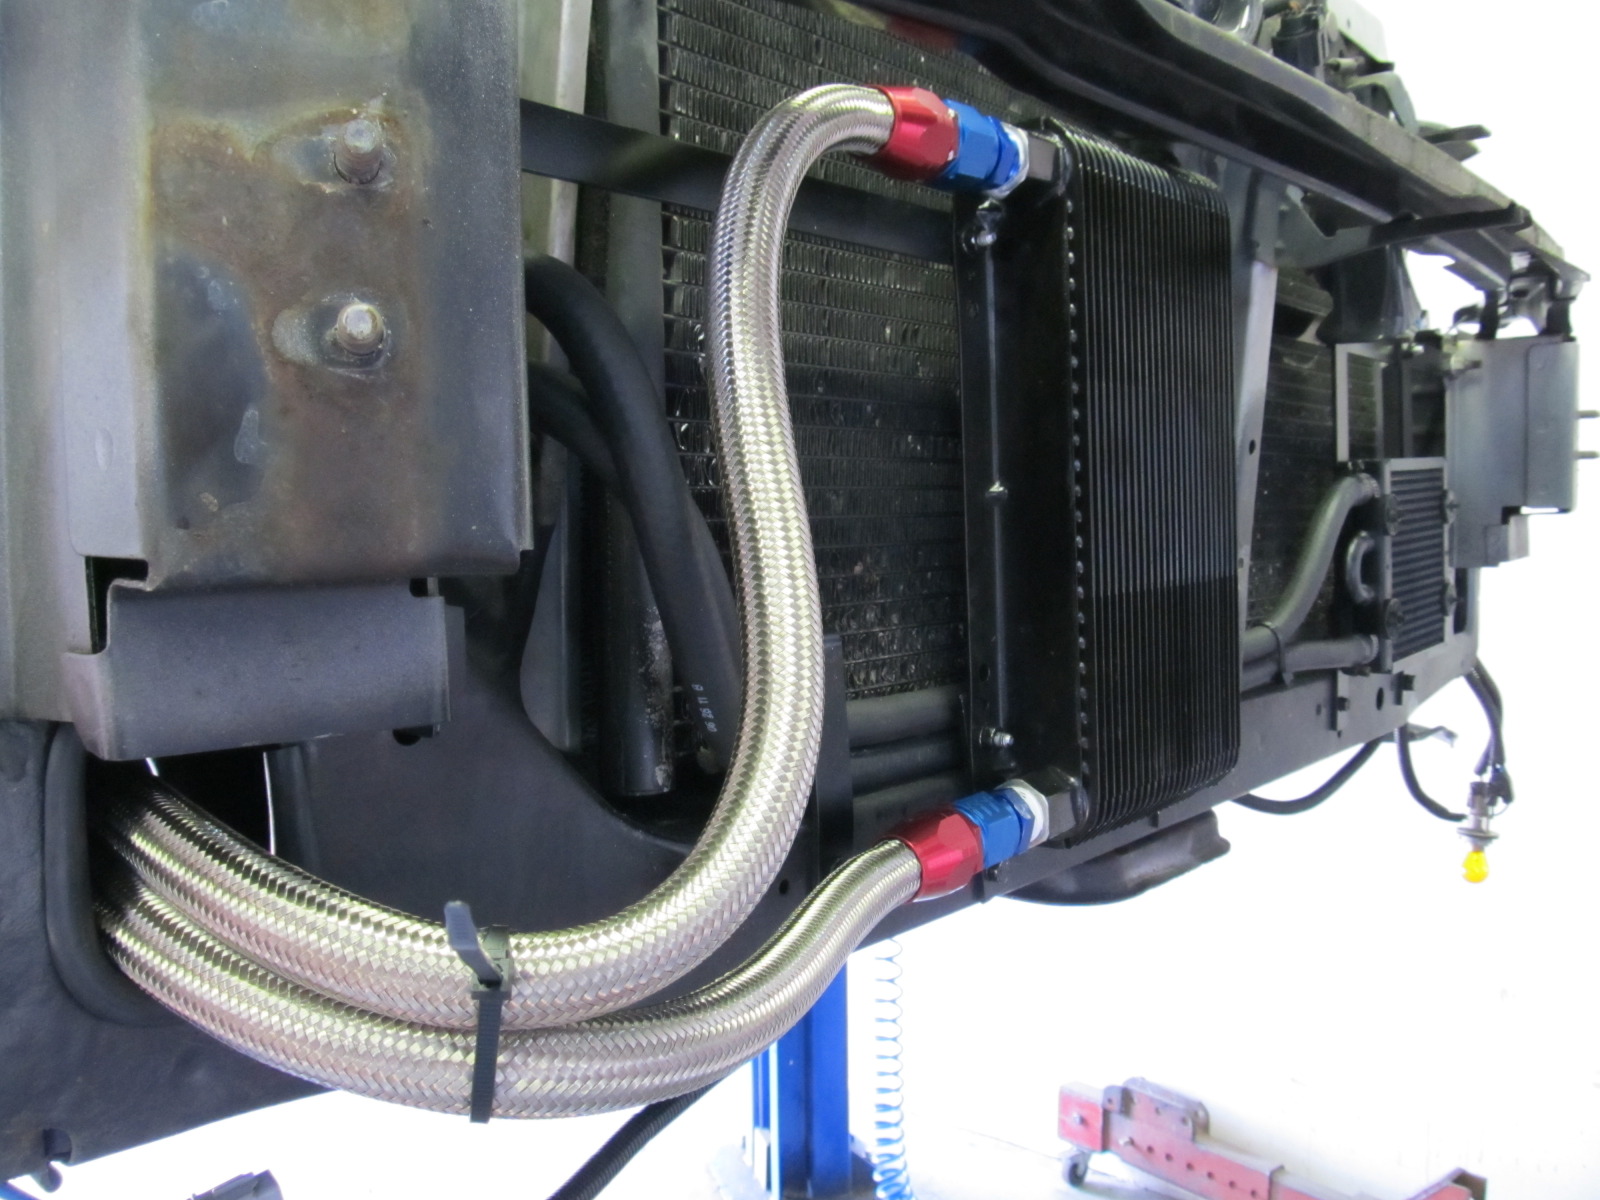
I ended up painting the aluminum brackets since the silver stuck out too much. Here's the rest of the pics!
I'm even able to still use the plastic panel!
I don't have anything to monitor oil temperature or pressure, but I'm still happy to know these are on my car and is as protected as it can be. I will be monitoring the PS fluid whenever I run Hoosiers, but I hope the cooler took care of any future problems.
I was a little worried about starting the car after installing the oil cooler, since there was no oil in it and I wasn't sure if there would be any air pockets with no oil in the engine, so I disconnected the cam sensor and cranked the motor over for about 15 seconds to get the oil throughout the system. I should note that I still had about 4 quarts of oil in the motor, since all we did was remove the filter and not drain the whole system. I think I added about 1.5 quarts back into it after it was all said and done. Another project can be checked off the list!
I got interested in getting an oil and PS cooler after talking with Joe (98SEBlackMax) about his exploits on road courses. He had mentioned having his PS fluid boil when running Hoosier slicks at the track, and after using them twice now at auto-x events, I've noticed the same thing occurring after a few runs. I can't be sure it wasn't just the PS fluid cycling through the system, but I've never seen it bubbling that intensely, and the PS cooler is cheap enough (~$30), so I figured why not install it along with the oil cooler.
Between the relatively low oil capacity and the high amount of stress I put my car though, I thought an oil cooler would be nice insurance for my motor. As an added bonus, it adds at least 1.5 quarts oil capacity.
Here are the kits I used:
24 row, 20 mm oil cooler kit
20 mm 1.5 thread oil filter adapter
Power steering cooler
I bought the oil filter adapter to space out the adapter for the oil cooler since Joe had mentioned clearance issues with the drive belts. He also mentioned clearance issues with the PS wheel turned to full lock, but I noticed no such problem. I am running a 10 mm spacer in the front, but even without it it looks like I would have at least an inch of clearance between the filter and the wheel.
So to begin, we removed the front bumper and support and hogged out a hole to run the oil cooler lines.
I got two pieces of aluminum to make brackets for the coolers
And I had to get some extra nylon mounting rods for the coolers since what came in the kits wasn't quite enough
We did the PS cooler first, since it was pretty simple. Most 4th gens already have a PS "cooler" tube running around in front of the condenser, so the lines were already run from the reservoir to the front of the car. All we did was make the brackets and run the new rubber line to the cooler.
We then mocked up the oil cooler
Moving on to the oil cooler, we had to trim a little tab under the drive belts to make room for the AN fittings. This might only be on DEK motors, but I'm not sure.
Test fitting the GloShift adapter
I ended up painting the aluminum brackets since the silver stuck out too much. Here's the rest of the pics!
I'm even able to still use the plastic panel!
I don't have anything to monitor oil temperature or pressure, but I'm still happy to know these are on my car and is as protected as it can be. I will be monitoring the PS fluid whenever I run Hoosiers, but I hope the cooler took care of any future problems.
I was a little worried about starting the car after installing the oil cooler, since there was no oil in it and I wasn't sure if there would be any air pockets with no oil in the engine, so I disconnected the cam sensor and cranked the motor over for about 15 seconds to get the oil throughout the system. I should note that I still had about 4 quarts of oil in the motor, since all we did was remove the filter and not drain the whole system. I think I added about 1.5 quarts back into it after it was all said and done. Another project can be checked off the list!


 06-18-2012, 12:55 AM
#84

Wow that setup looks familar. 
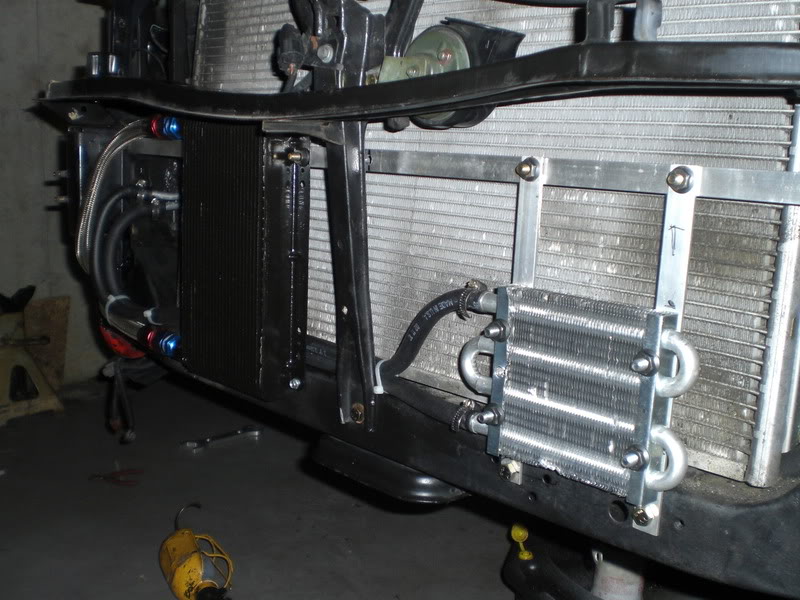
At first I could not figure out where to put all the coolers in a place that got good airflow and looked good. This setup somehow came to me out of nowhere and ended up looking better than I thought.
I found the 3 foot section of 3/4" aluminum bar from Home Depot fits perfectly between the two bolt studs, no need to cut anything just drill the holes. I ended up buying another section to make the little brackets to hold the PS cooler.
When you change the oil, drain the oil pan as normal and remove the old filter. But also remove the sandwich plate with the -AN fittings so the old oil from the cooler drains out as well. When I add the new oil I just put in 6 quarts and let the engine idle till the oil thermostat opens and fills the oil cooler while I check for any leaks. When the cooler gets warm I know oil is moving through the cooler.
Another bit of advice you need to but some mesh grill in front on the bumper to keep bugs and debris off of the coolers. They get covered in bugs, the occasional frog, and bits of rubber after a track day.
Also I have yet to run Hoosiers on a road course. Was using NT01s for a couple of years until they got heat cycled to death. With the NT01s and a hot track day I would see PS fluid come out of the top of the PS resivor and have to clean it up between runs. Now with the upgraded cooler that has yet to happen again.
Last edited by 98SEBlackMax; 06-18-2012 at 12:59 AM.

 06-18-2012, 08:48 AM
#88
07-19-2012, 11:20 AM
#89
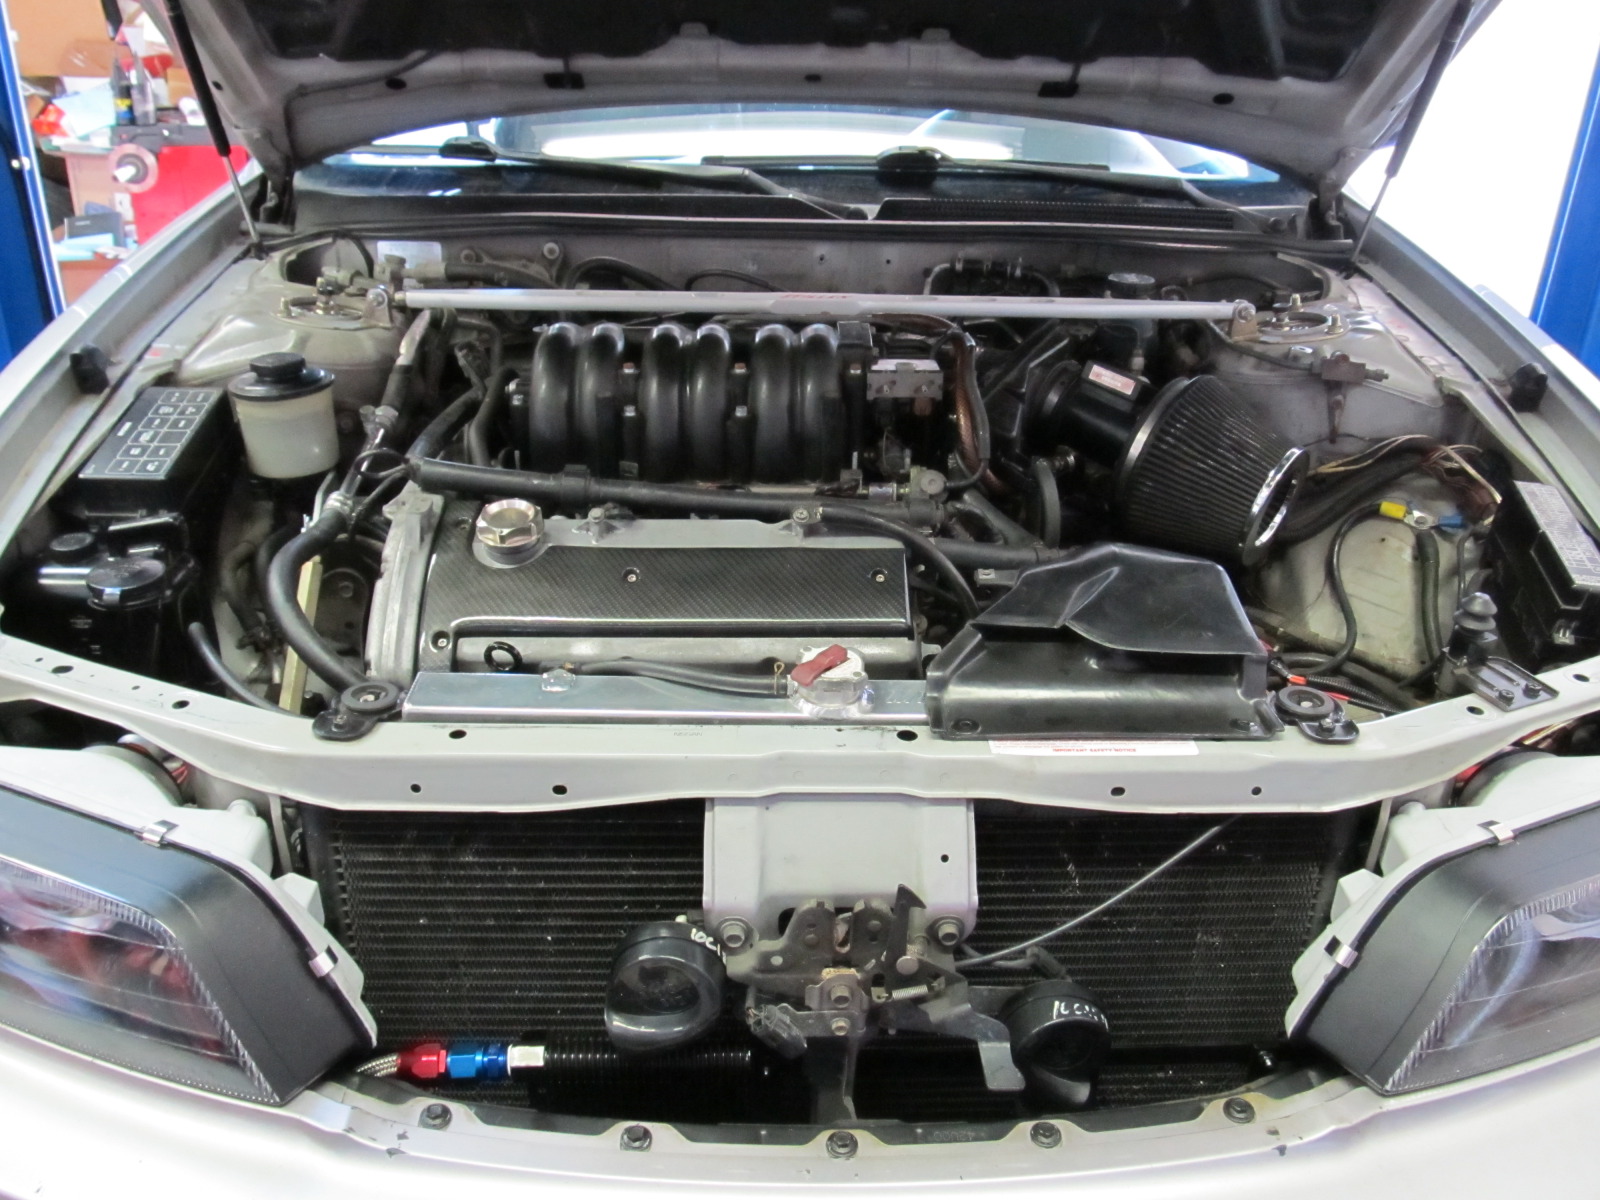
New fuel injectors
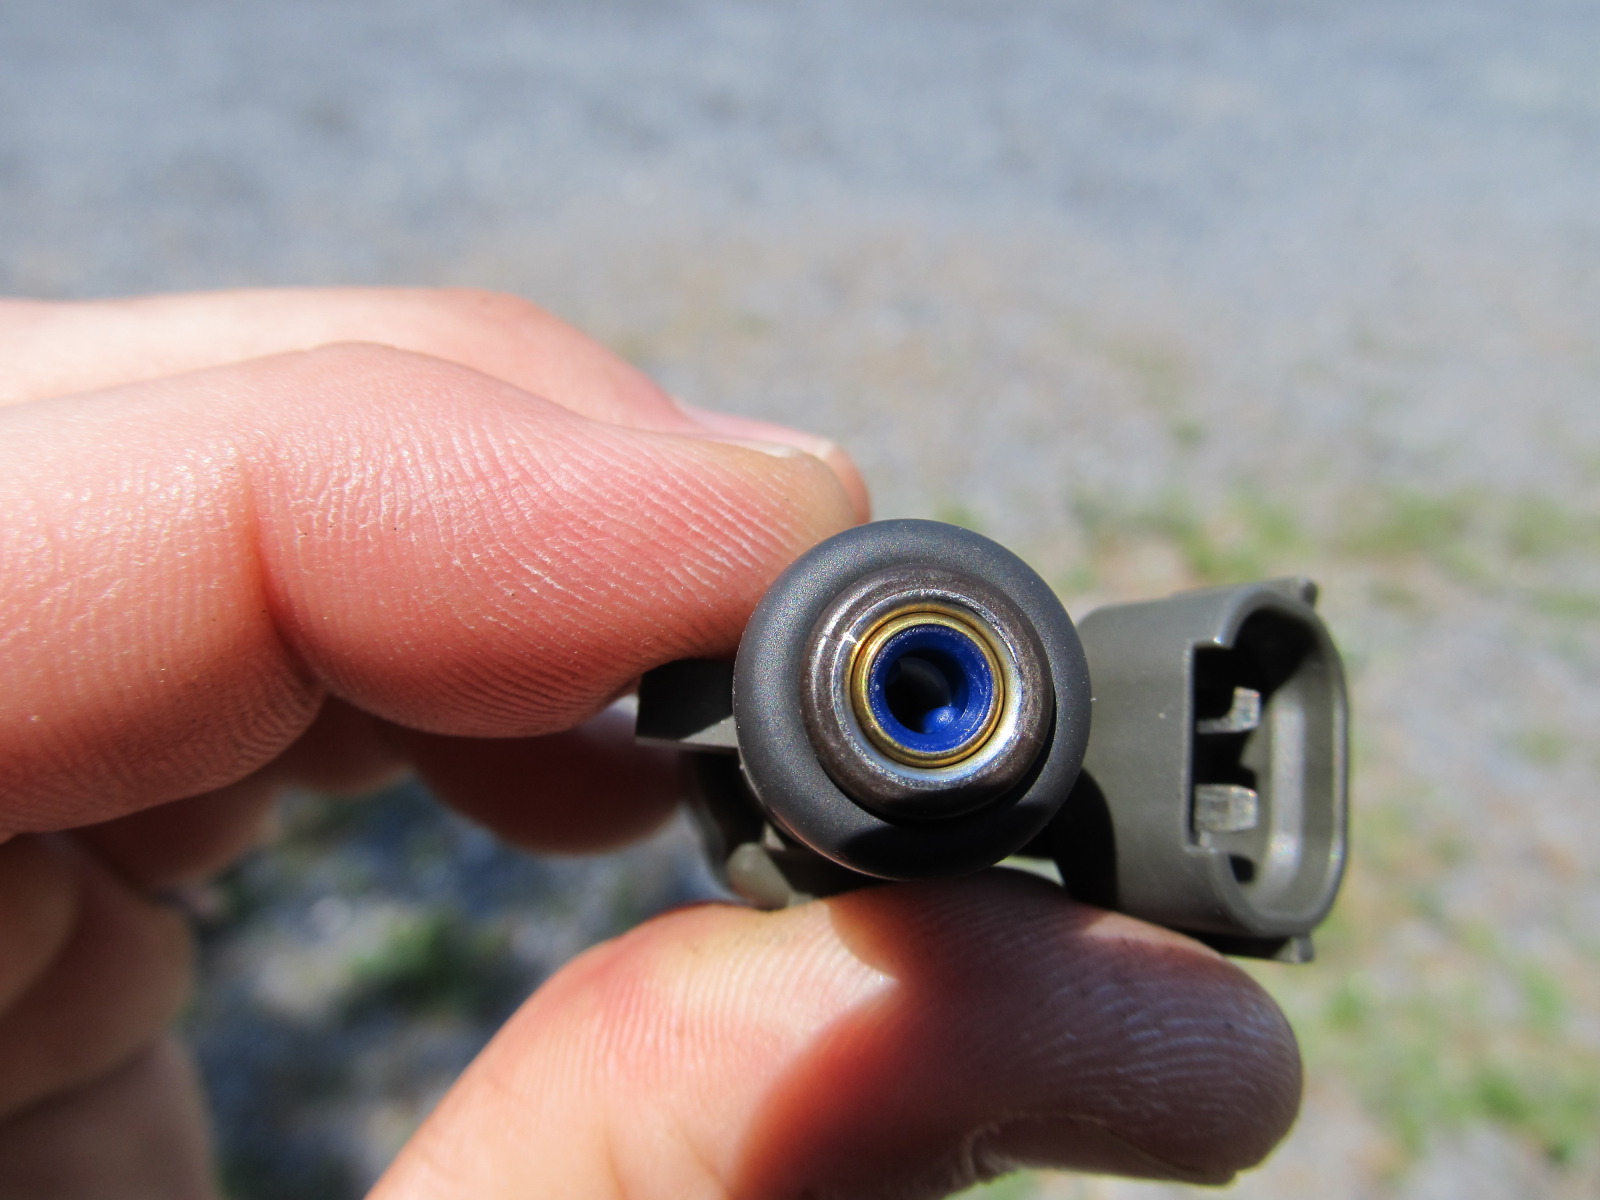
While continuing my never-ending search for the elusive vibration/hesitation, I used a stethoscope on my fuel injectors to see if they all sounded the same. Lo and behold, one of them sounded much different than the others. I got a set of injectors from a junkyard and sent them to RC Engineering to be cleaned, but they told me they were in perfect shape and cleaning wouldn't have done anything, so they sent them back to me.
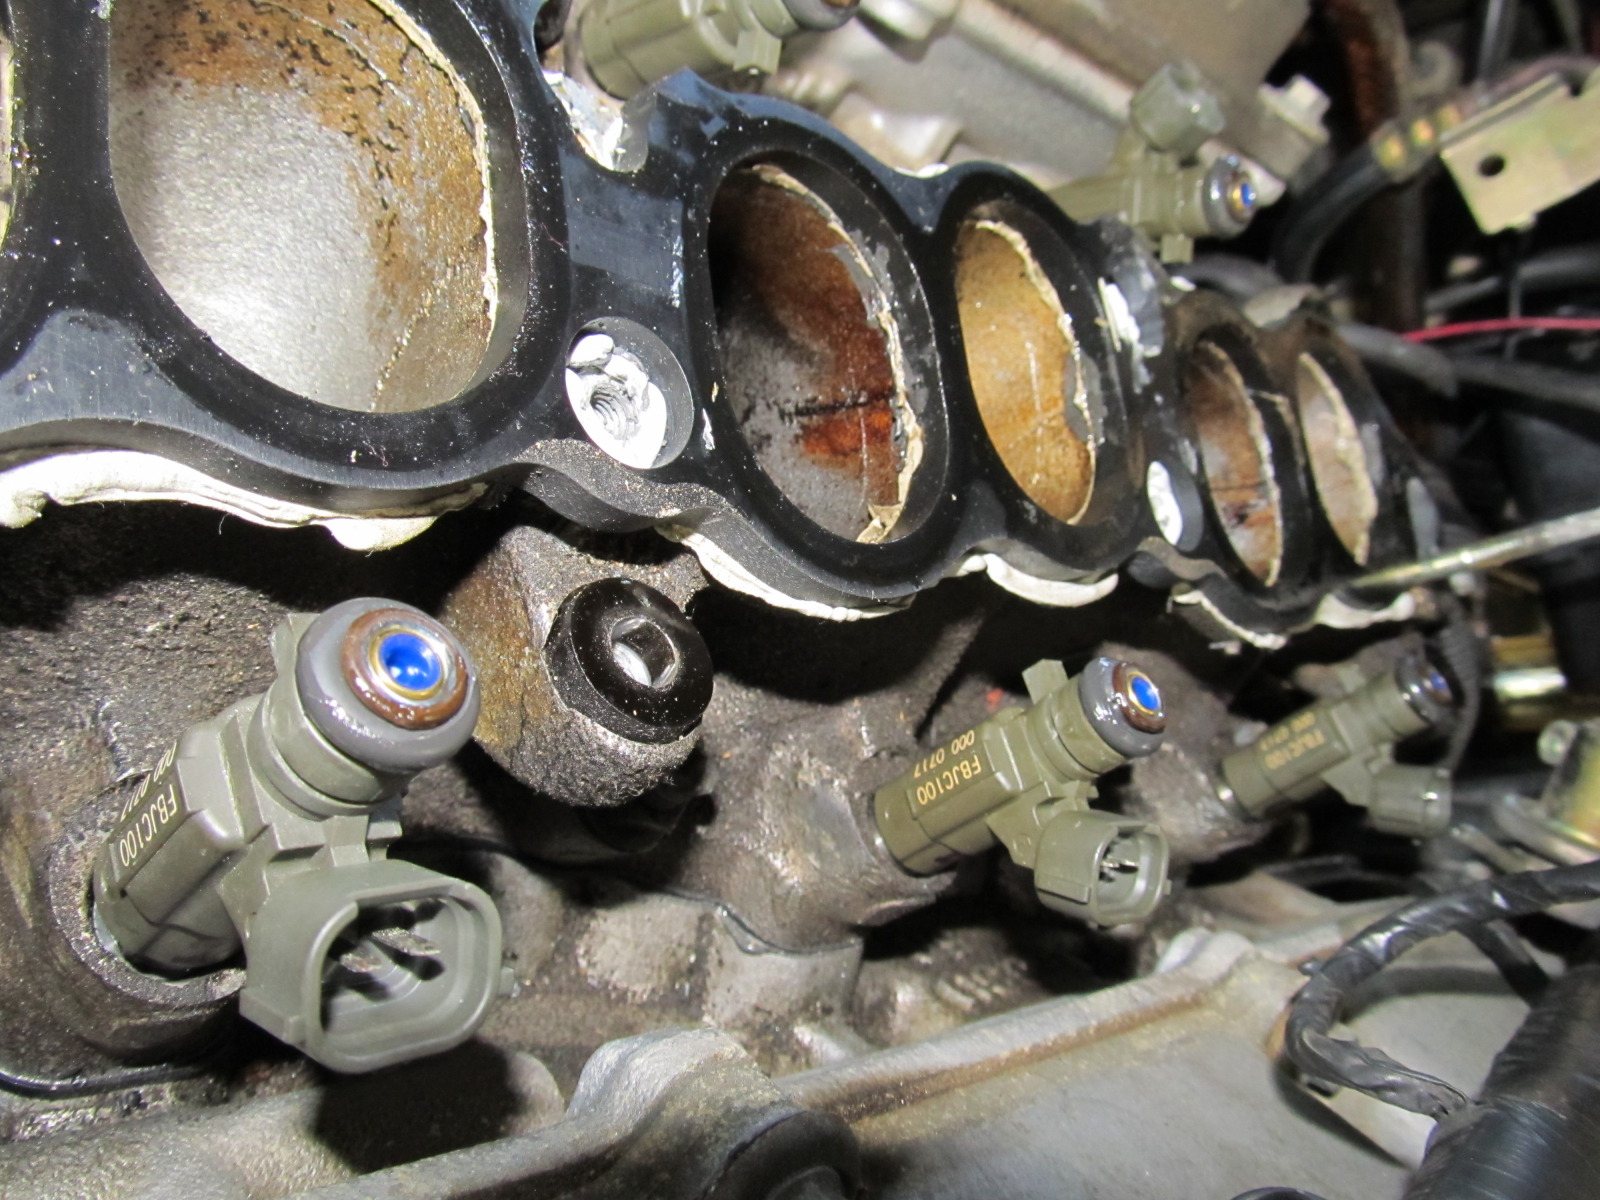
Sure enough, they looked brand new when they arrived. Strangely, they appeared to be quite different than the injectors I pulled from my motor. When we got my injectors out the one that sounded different than the others was very gummed up. Take a look:
Old:
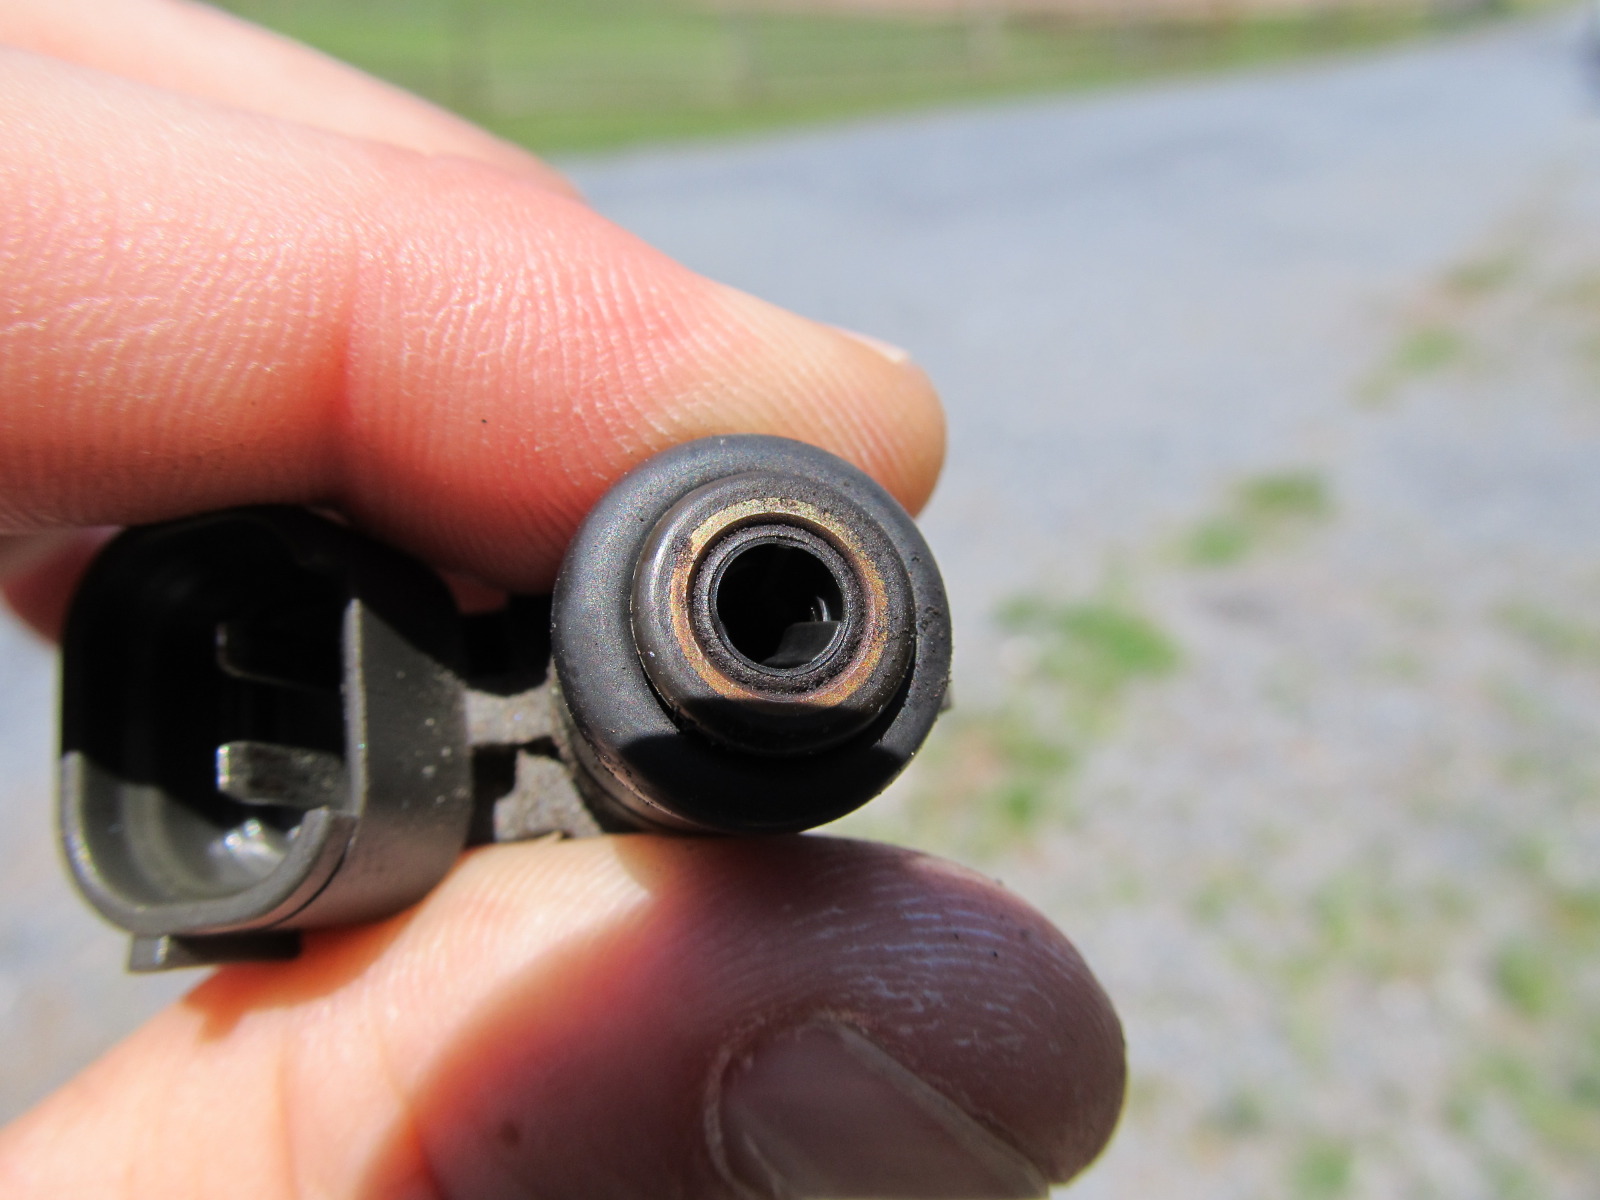
New:
Installed!
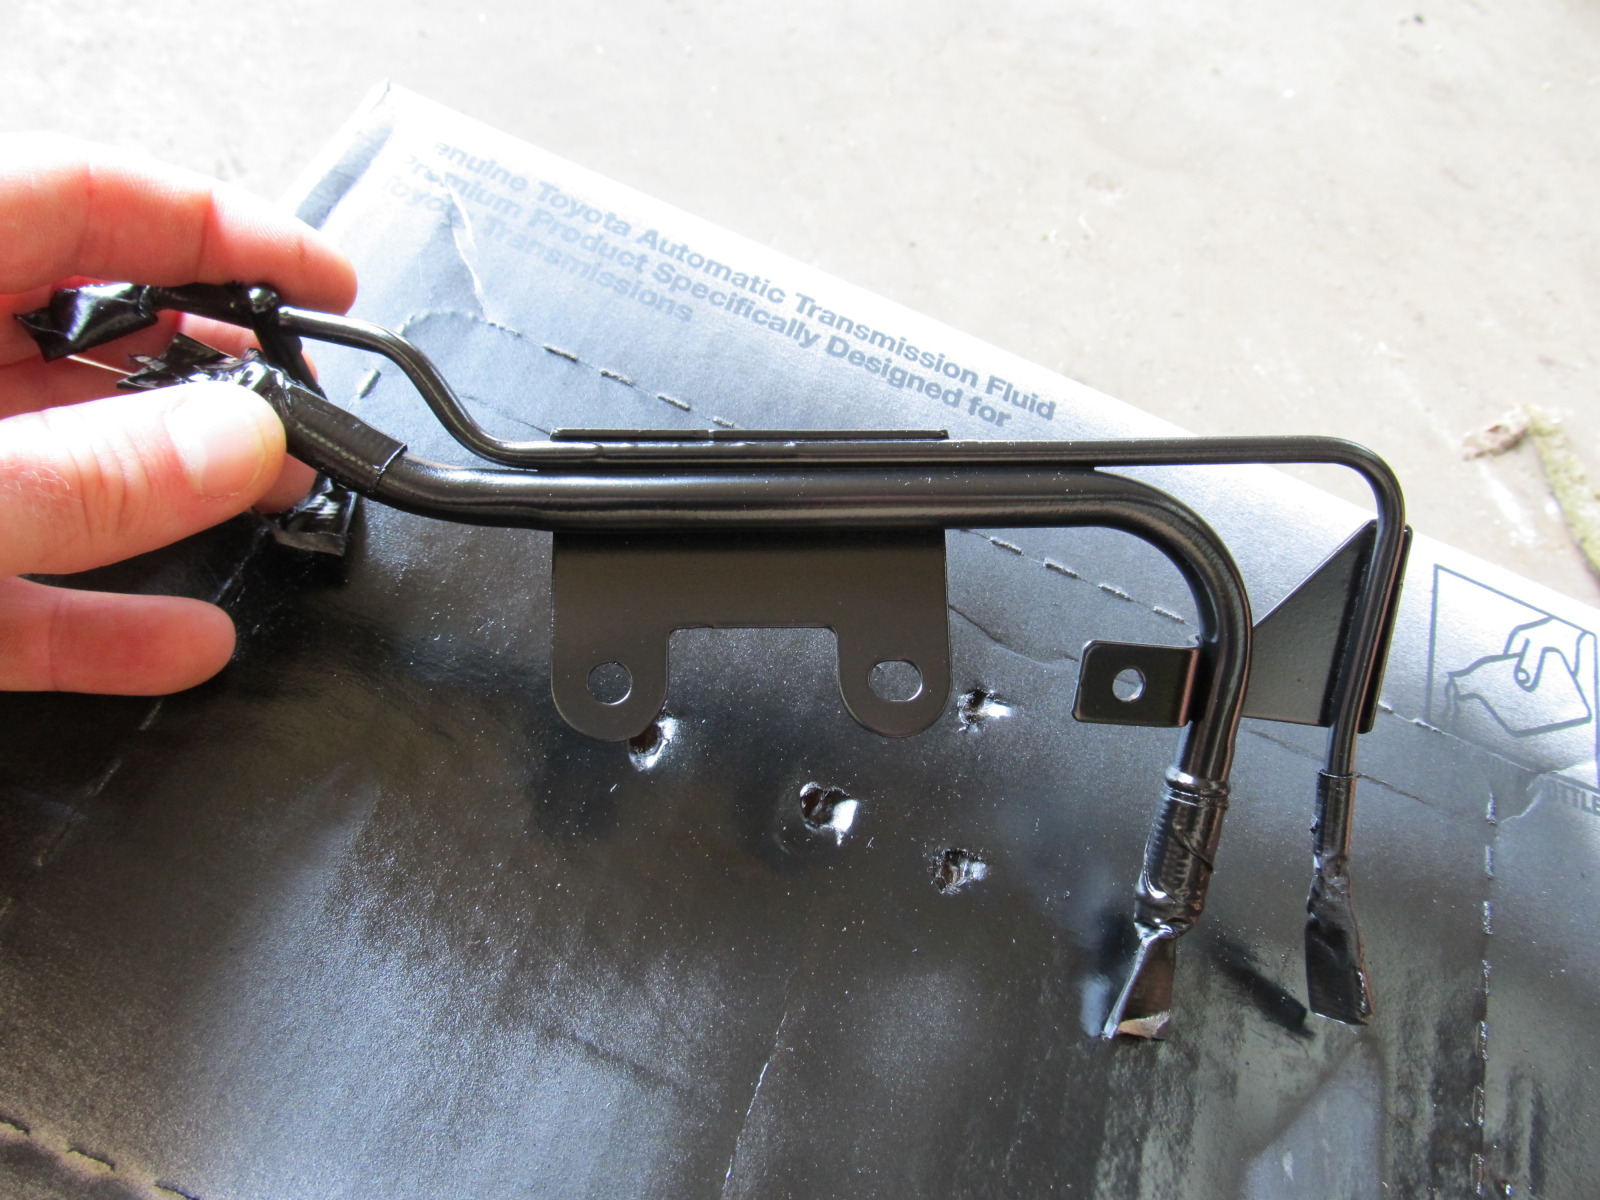
And while the IM was off I cleaned and painted the little metal piece that connects some vacuum lines. I also shortened the two rubber lines that went to it so I could properly attach the metal piece to the IM. Previously, it had only been attached with one of the two necessary bolts, but now it all sits flush and looks pretty decent with the metal piece painted black.
Before:
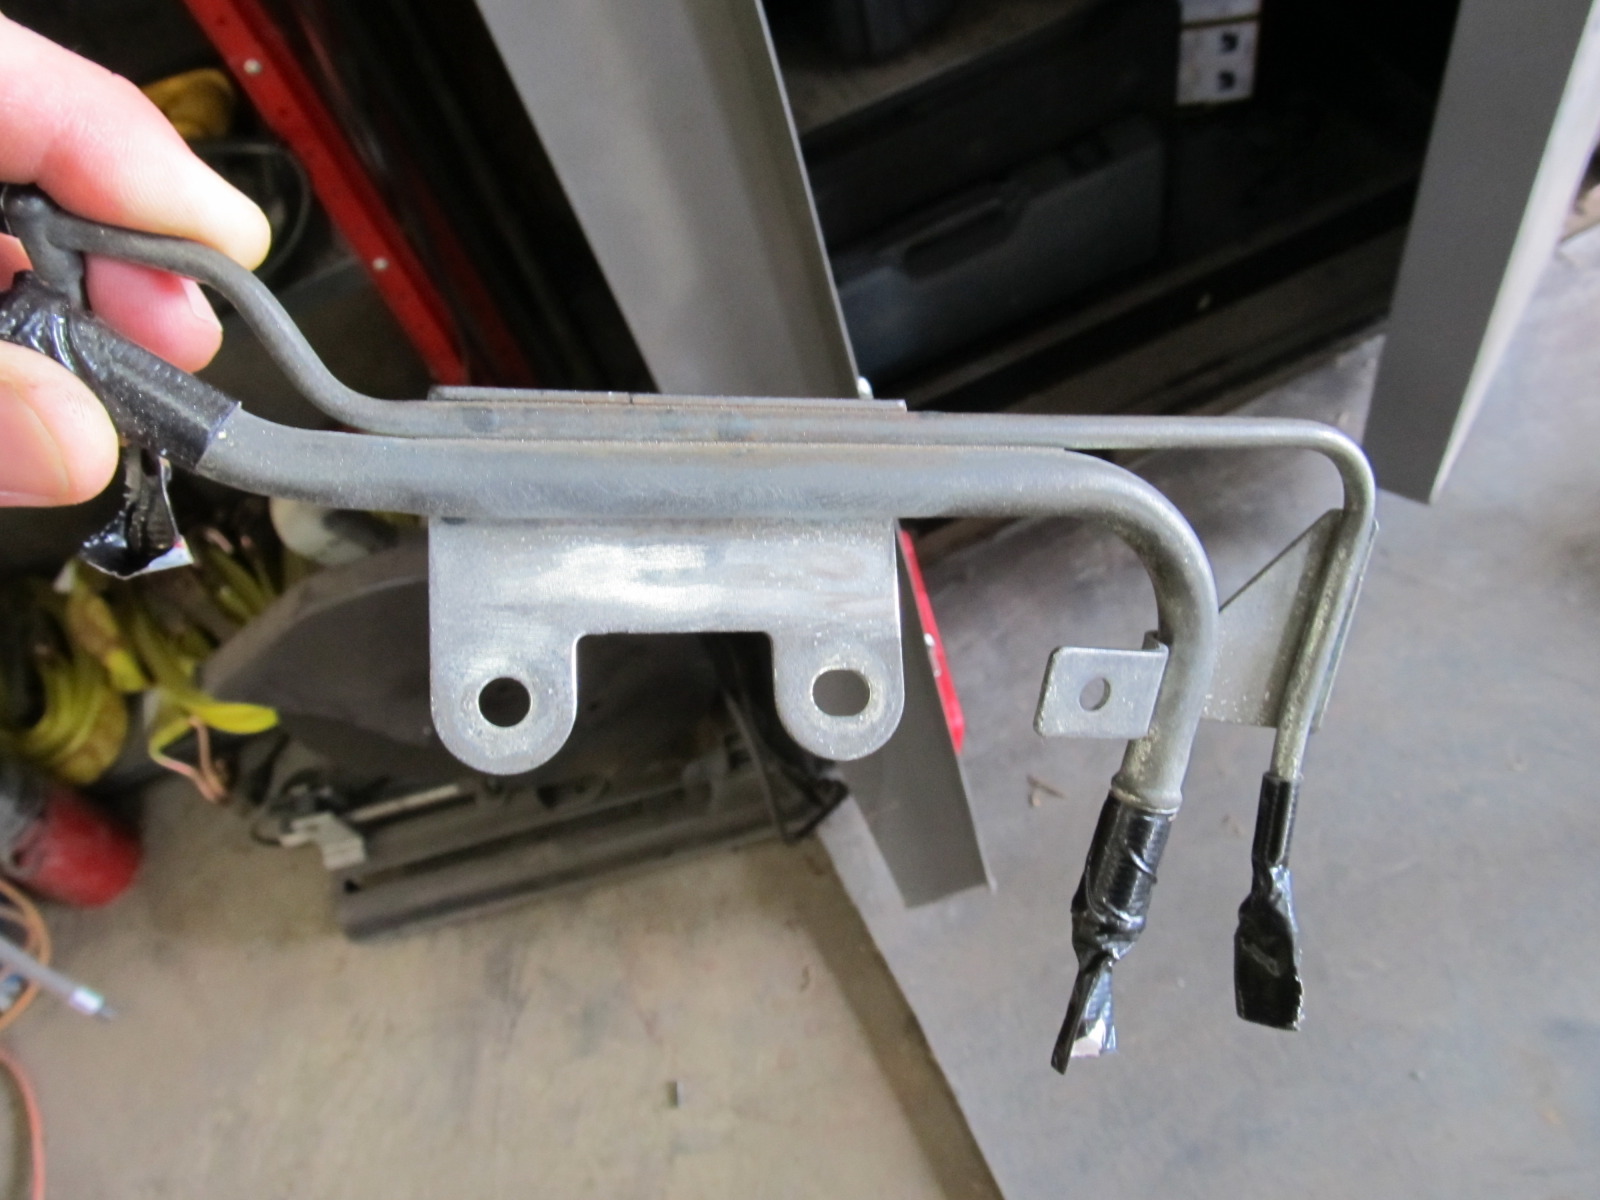
After:
The car idled and ran smoother after the new injectors were installed, but the vibration remained. On to the next project....
Sure enough, they looked brand new when they arrived. Strangely, they appeared to be quite different than the injectors I pulled from my motor. When we got my injectors out the one that sounded different than the others was very gummed up. Take a look:
Old:
New:
Installed!
And while the IM was off I cleaned and painted the little metal piece that connects some vacuum lines. I also shortened the two rubber lines that went to it so I could properly attach the metal piece to the IM. Previously, it had only been attached with one of the two necessary bolts, but now it all sits flush and looks pretty decent with the metal piece painted black.
Before:
After:
The car idled and ran smoother after the new injectors were installed, but the vibration remained. On to the next project....
07-19-2012, 11:34 AM
#90
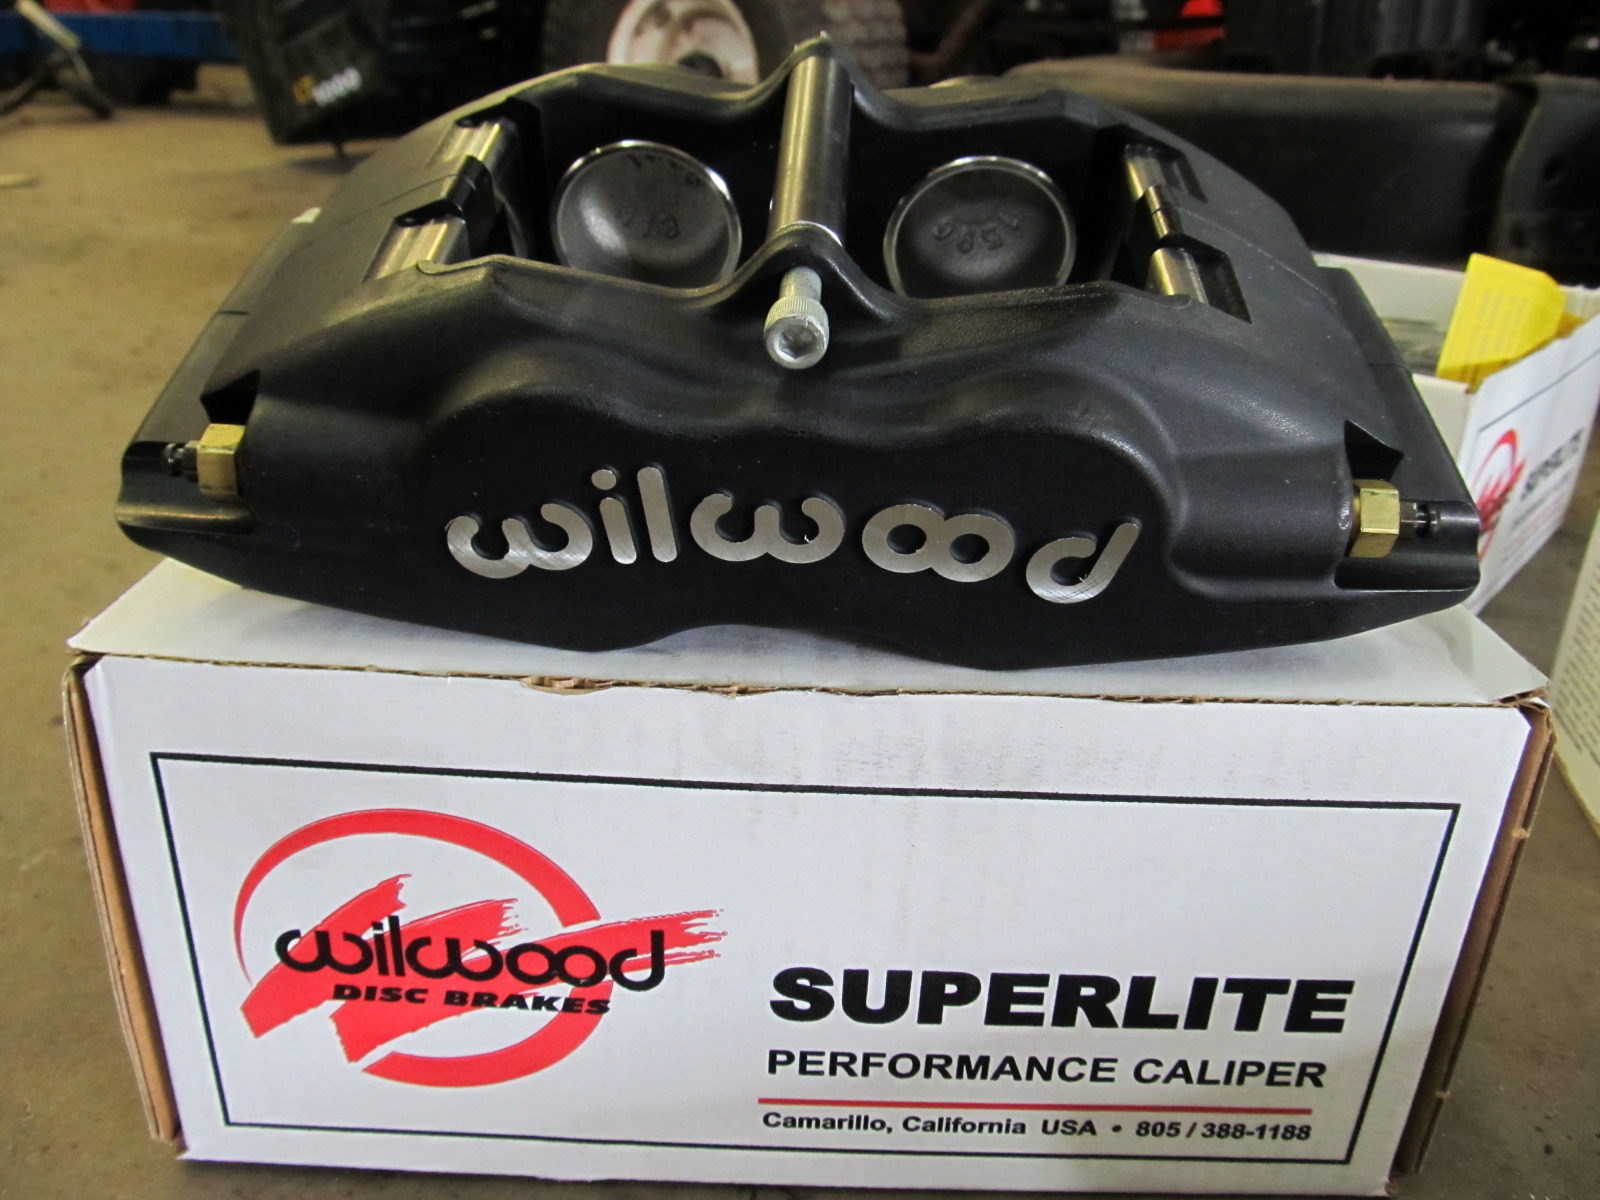
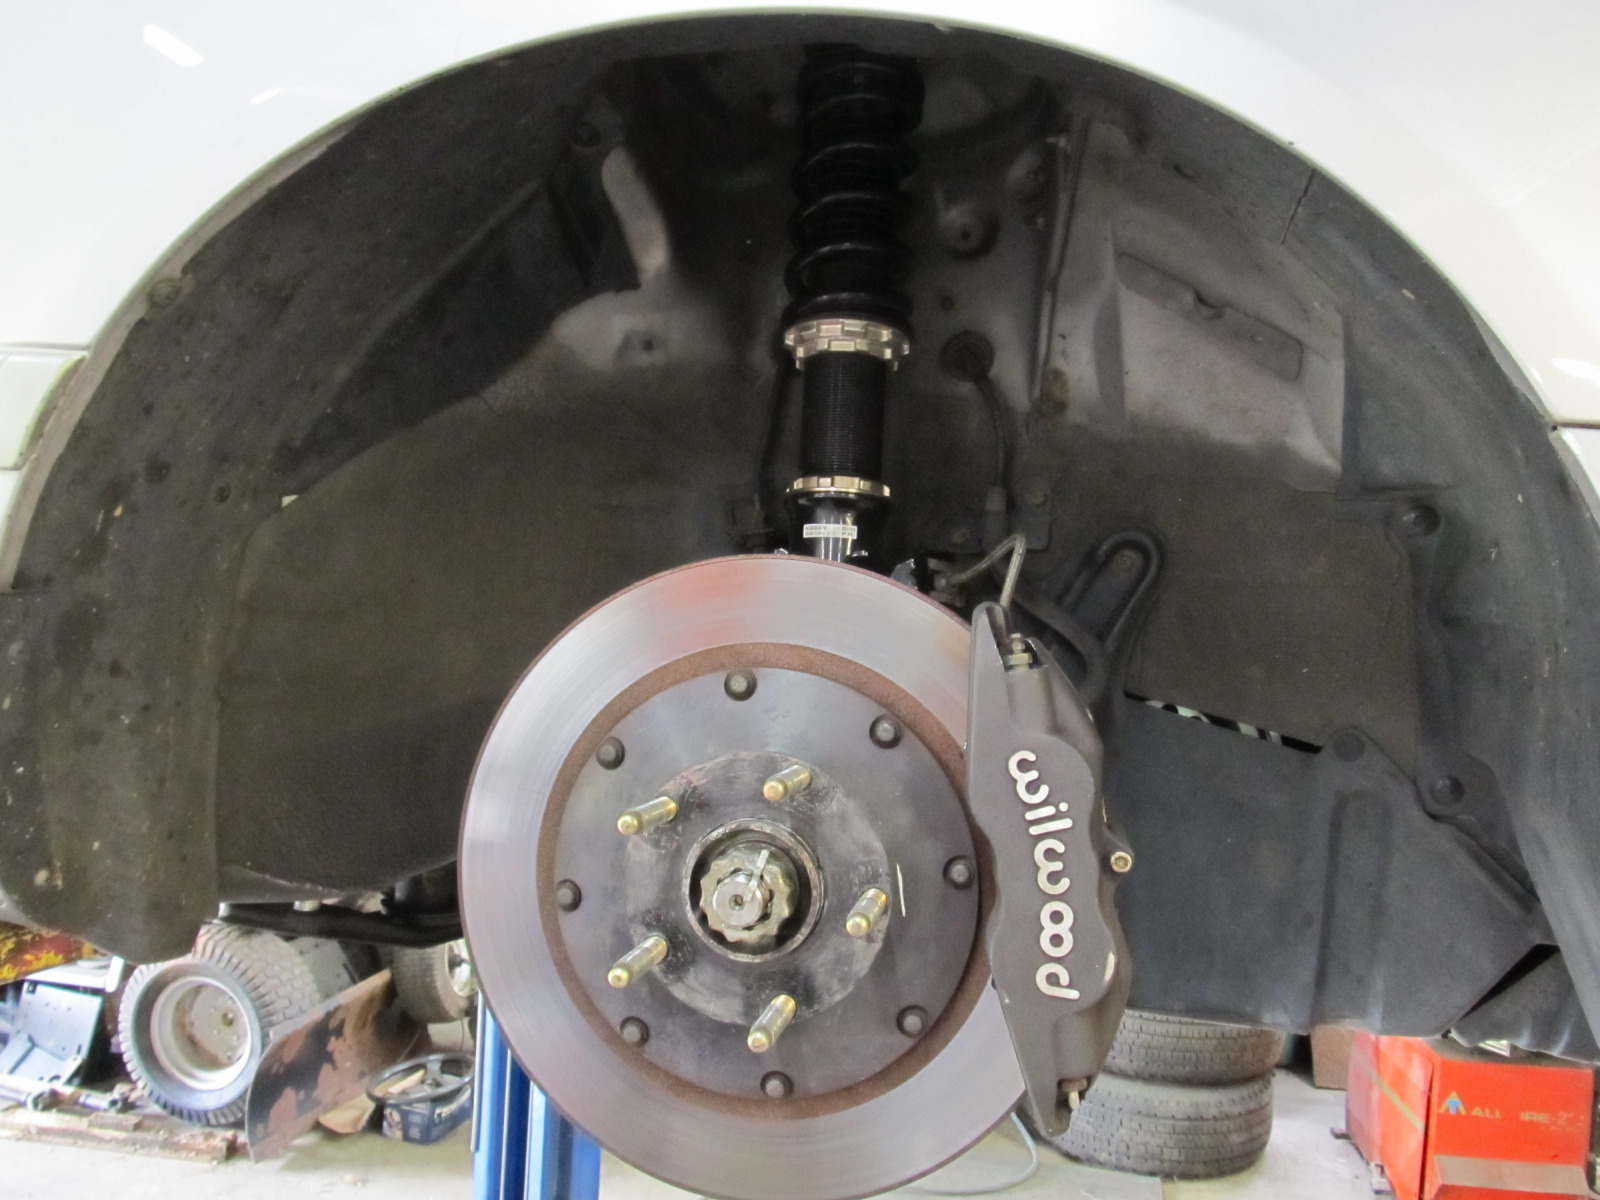
New Wilwood 12.9" 2-piece front BBK
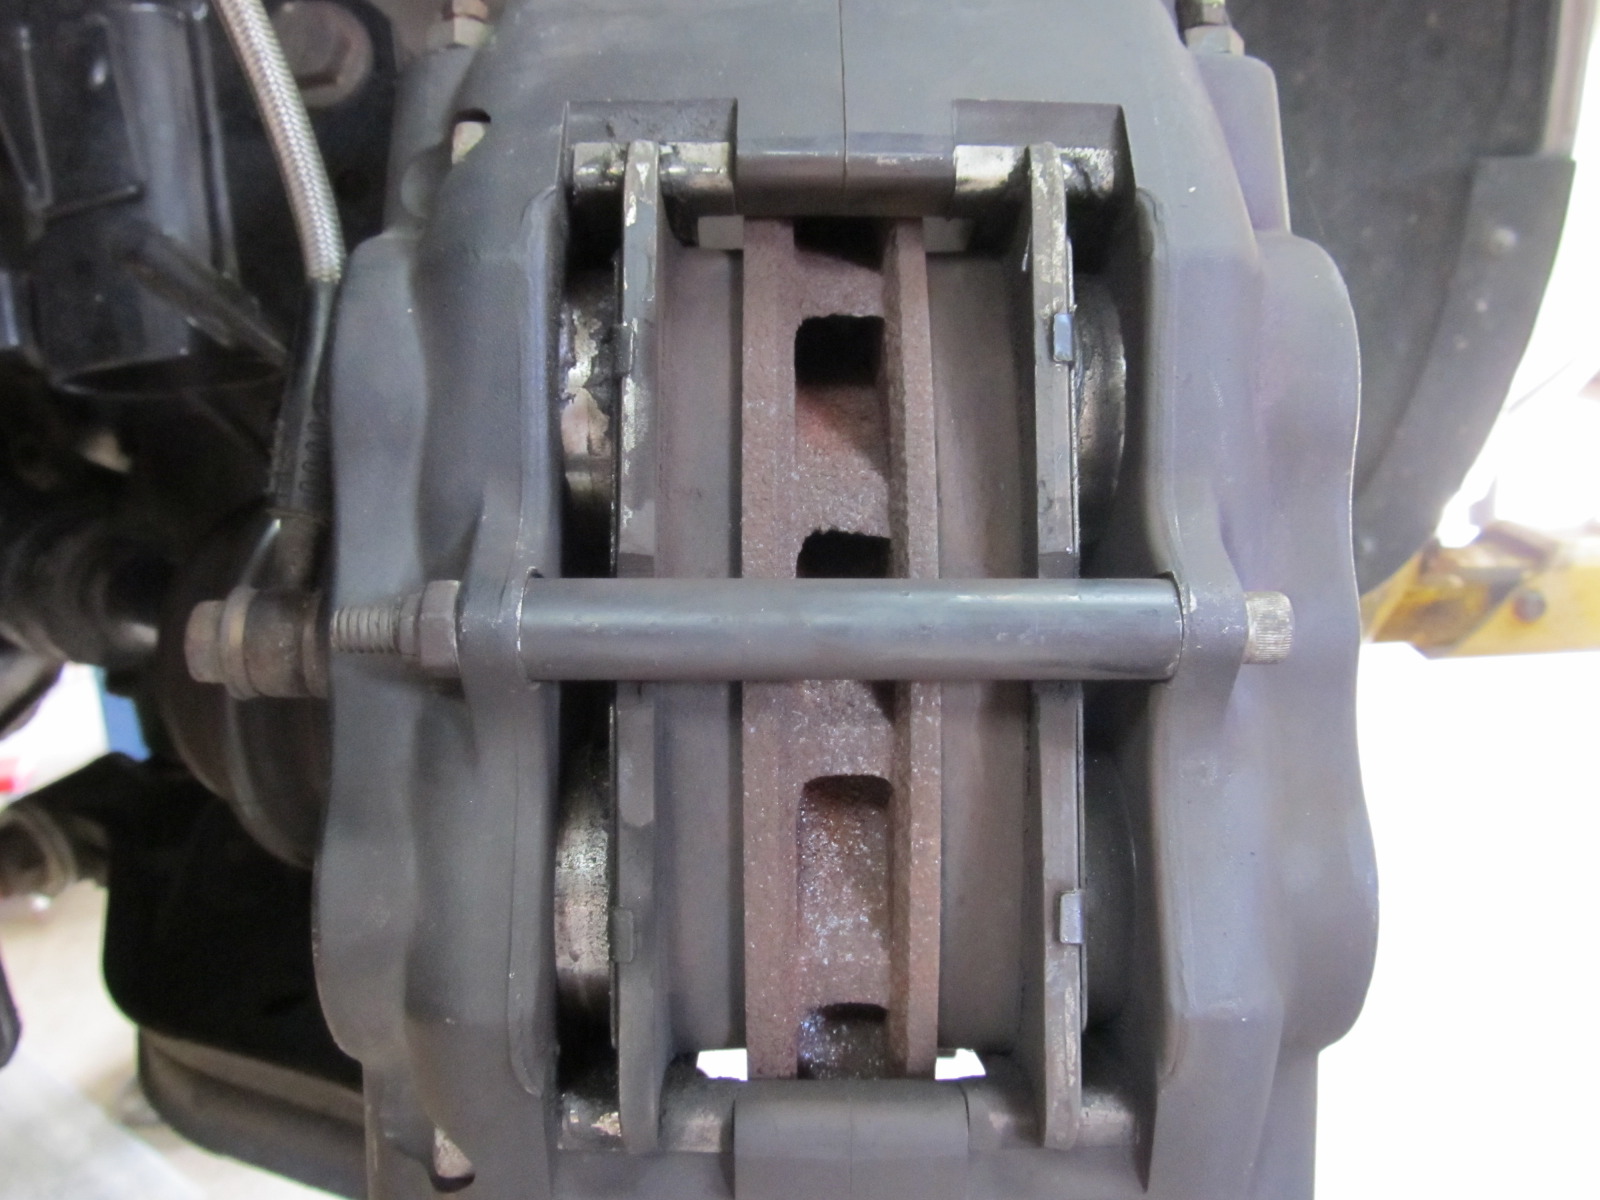
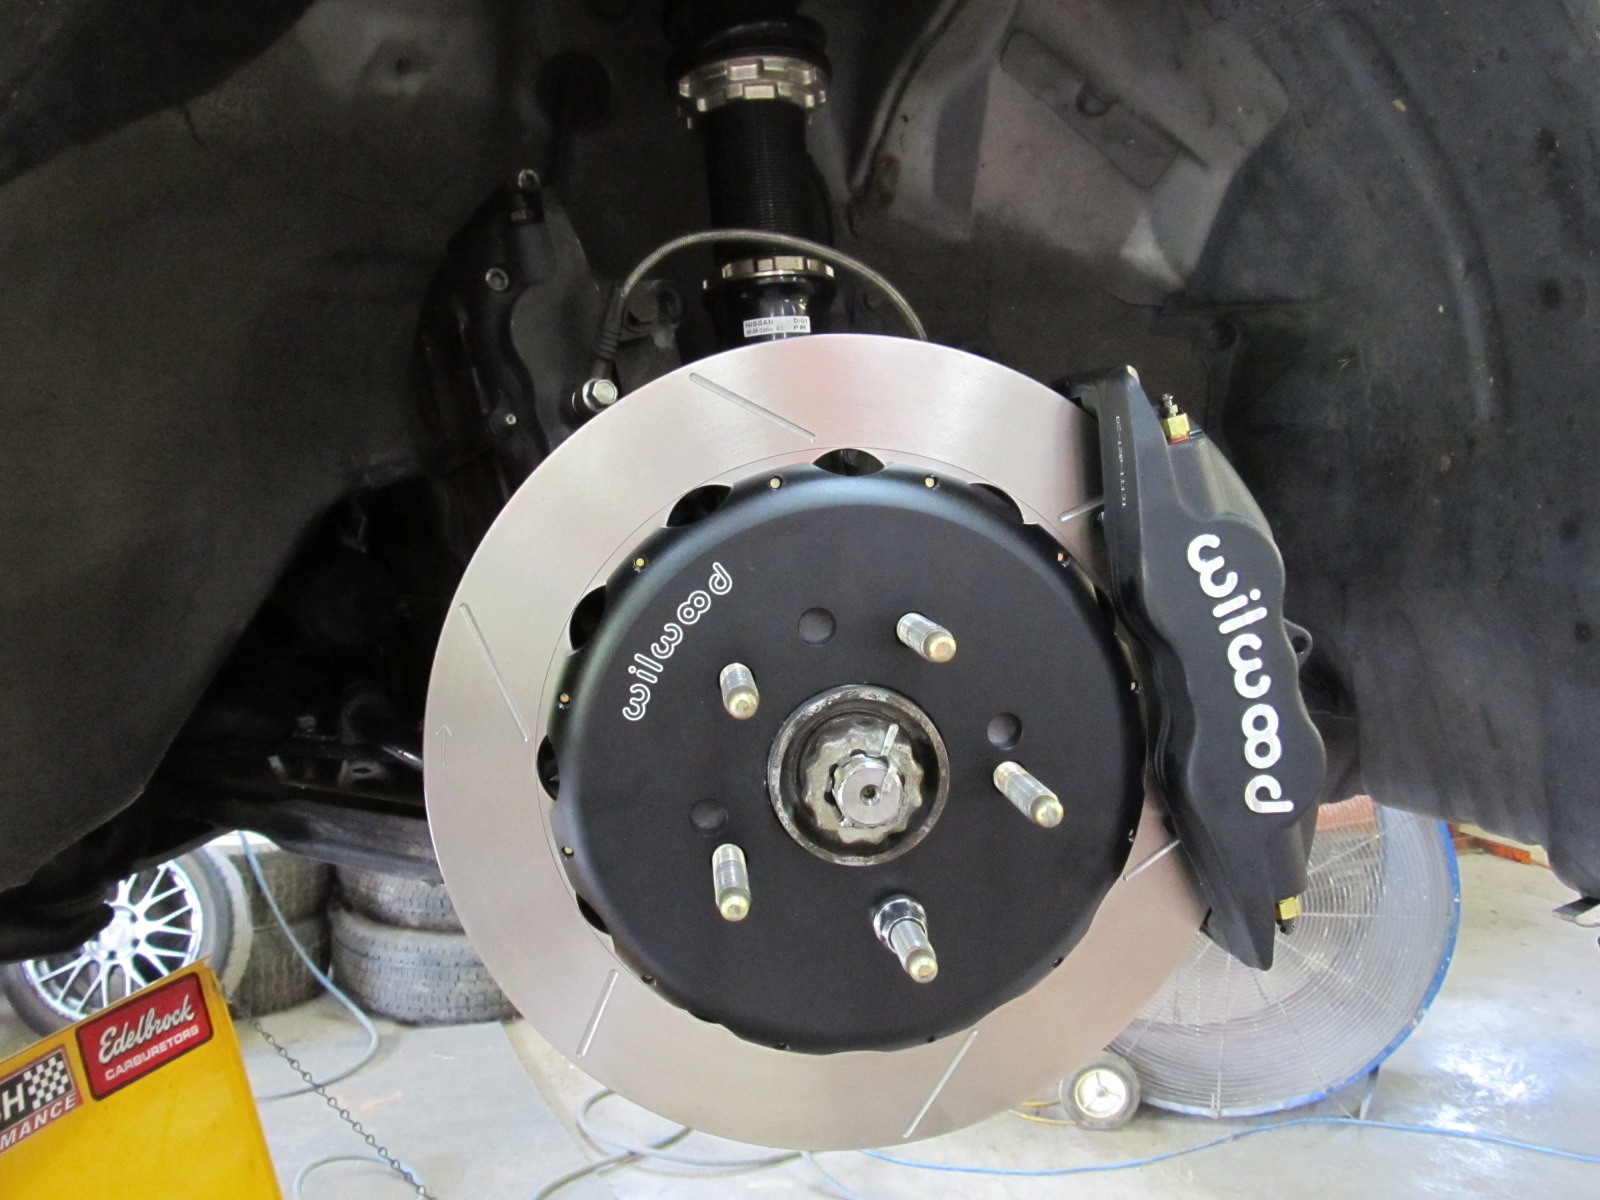
I had been running a used 12.6" Wilwood/BlehmCo setup for a few months now, but wanted a little more bite for the track (among other things) and decided to just spring for a brand new kit from Fastbrakes. This kit is only available with either slotted or D/S rotors; no blanks. So I chose the slotted option, and took a chance on some Carbotech AX-6 pads, which are supposedly good for auto-x and street driving. I was impressed with the design of the relocation bracket, and love the look of the new aluminum hats. The install went off without a hitch, and after a few days of driving the brakes felt great.
I followed Carbotech's bedding instructions as closely as I could on the street, but for these pads, they recommend you bed them in on a track (not possible). The very next day after we installed these I did an SCCA auto-x event, and the pads weren't quite ready yet, as there was still a little mush in the pedal. After a little more regular driving they seem to be really ready for some action. The pedal feel is roughly the same as the old setup, but the bite and overall braking power has increased dramatically. They also look quite awesome, if I do say so myself
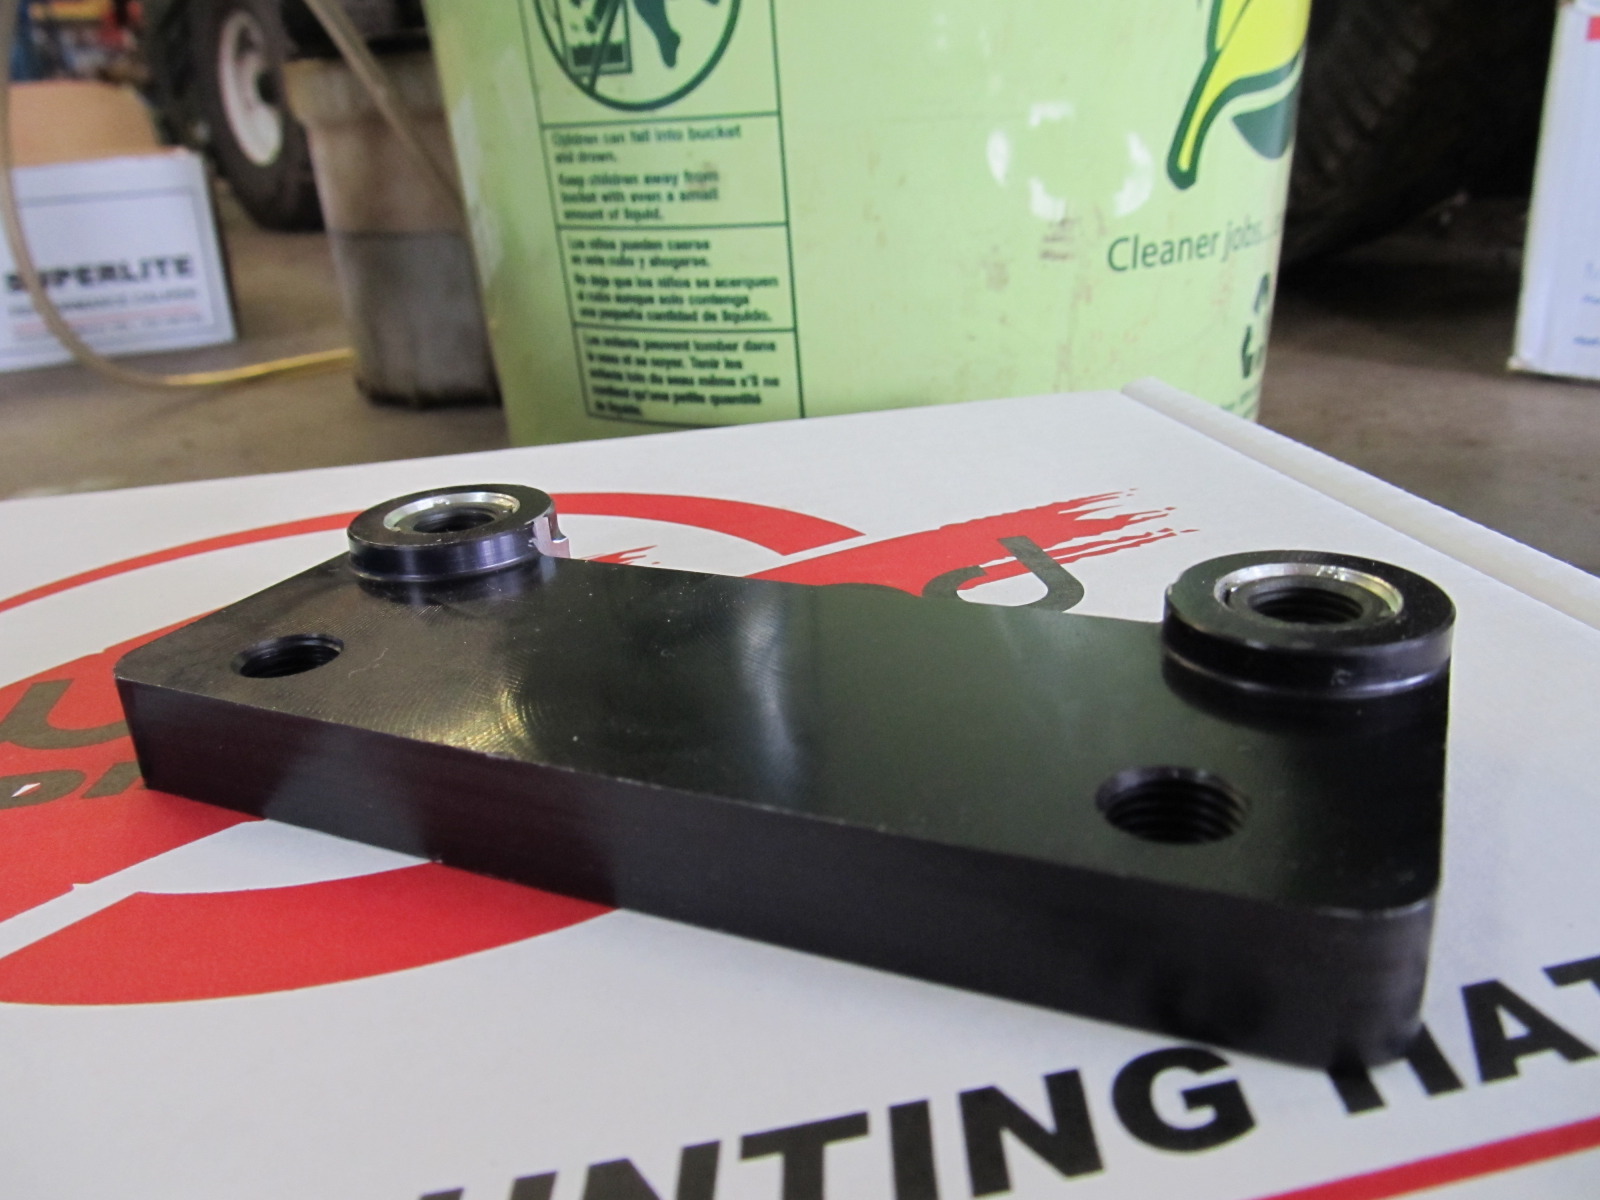
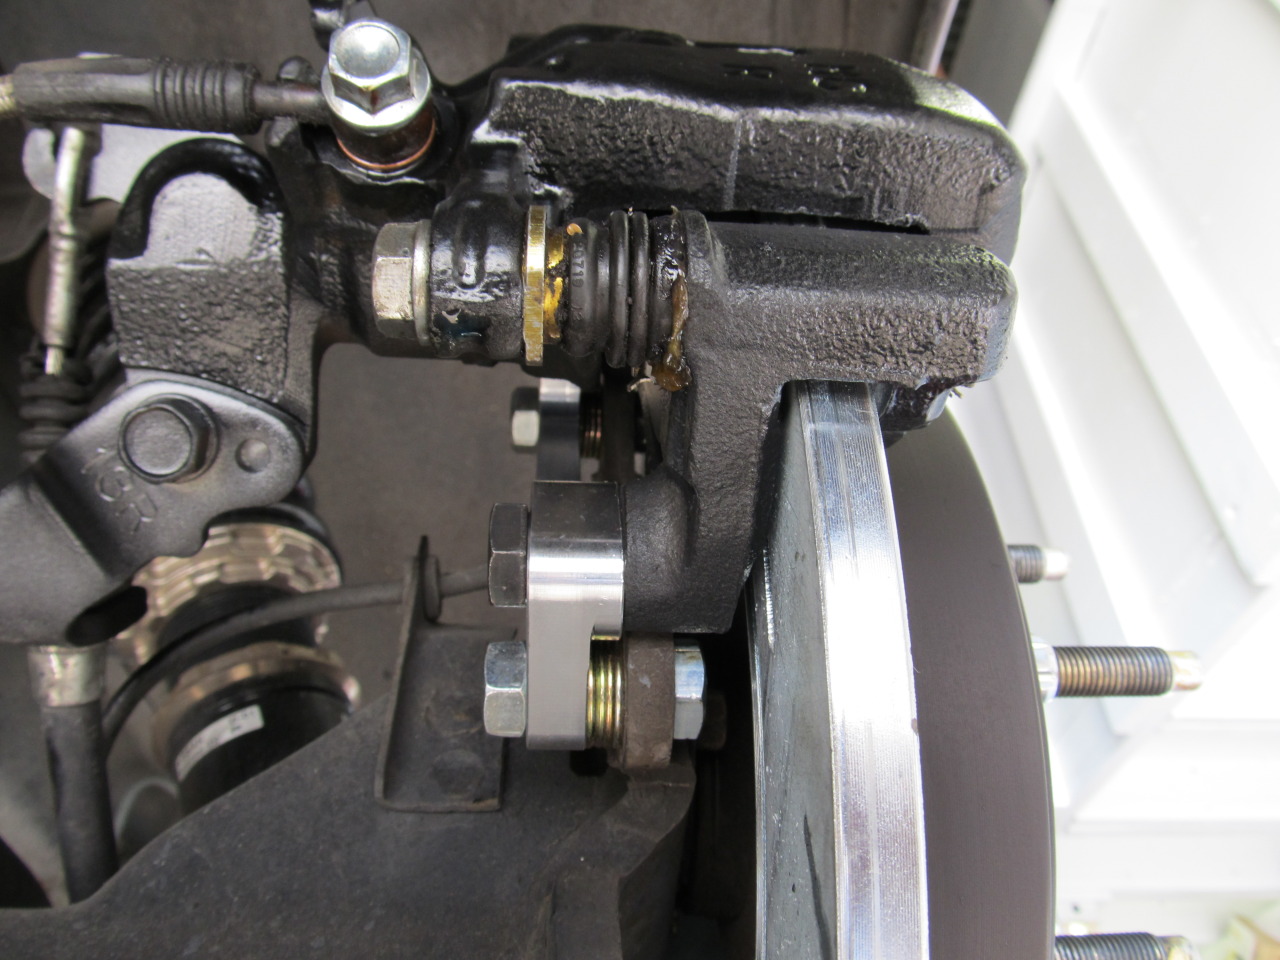
A pic of the old setup's bracket and washers:
Versus the new bracket:

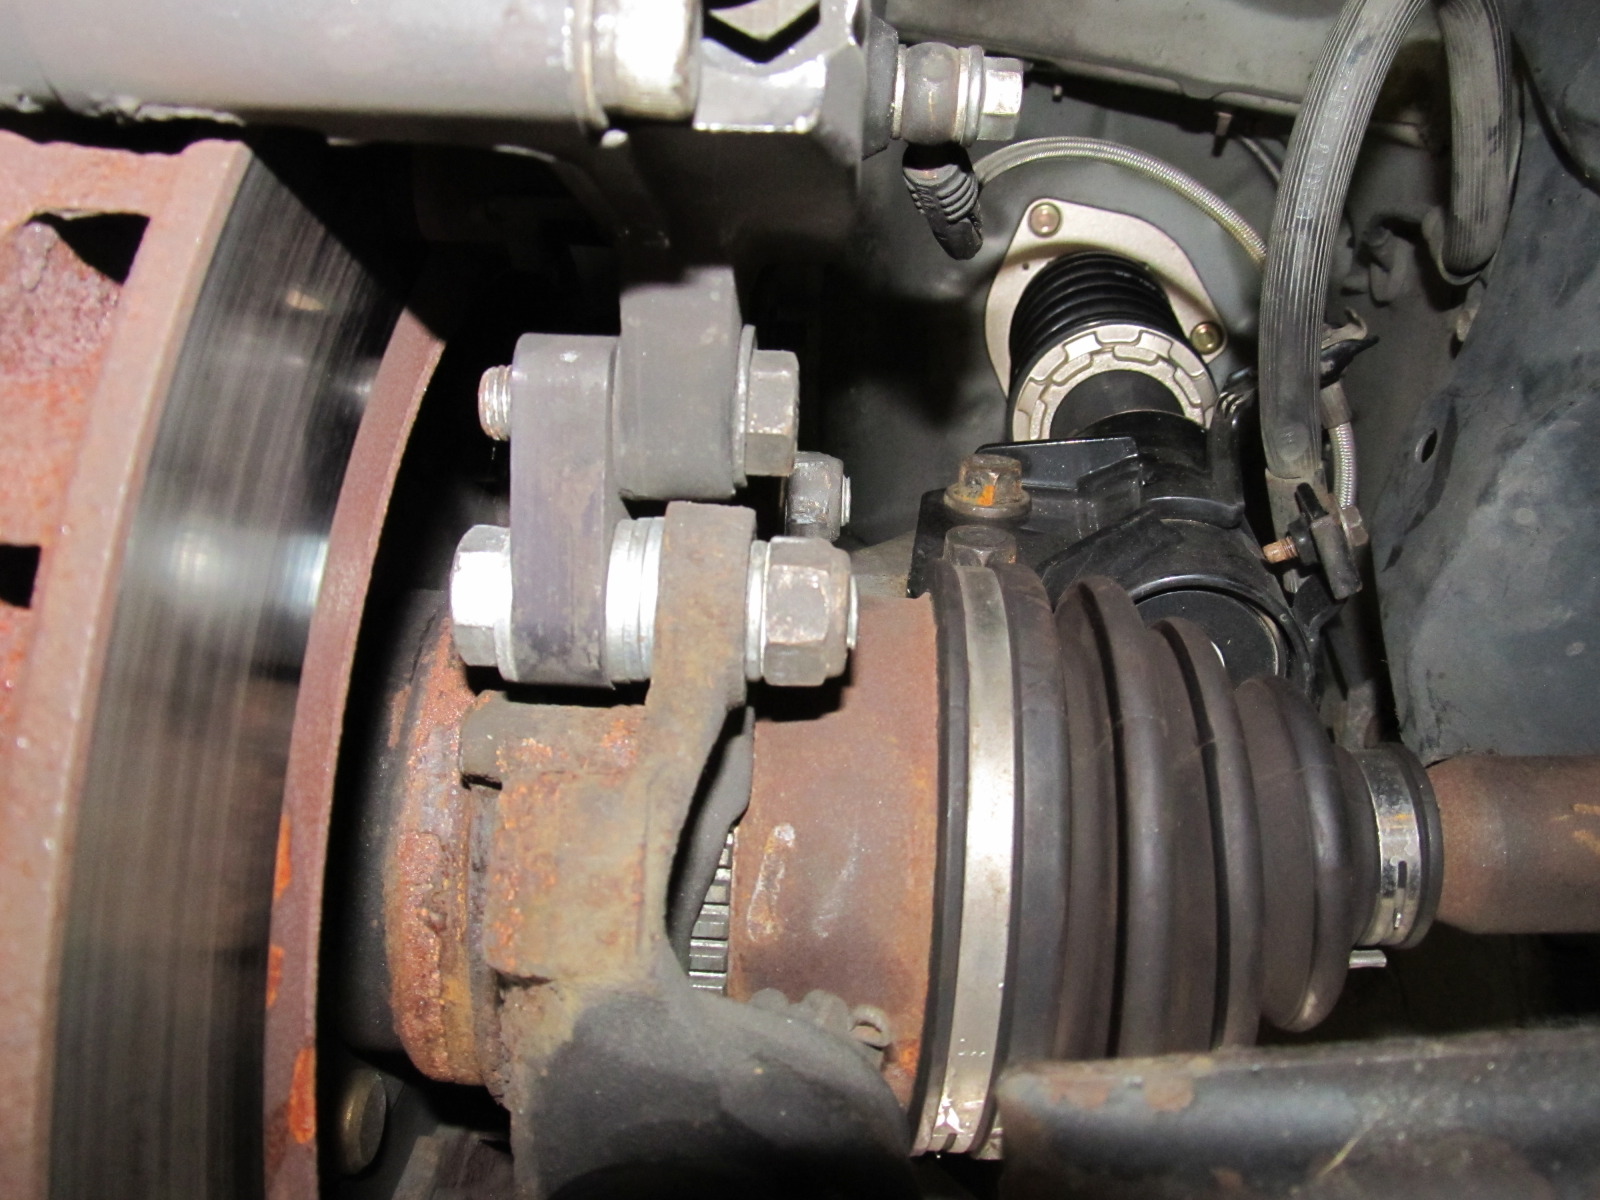
Look how far the old pistons stuck out while at rest:
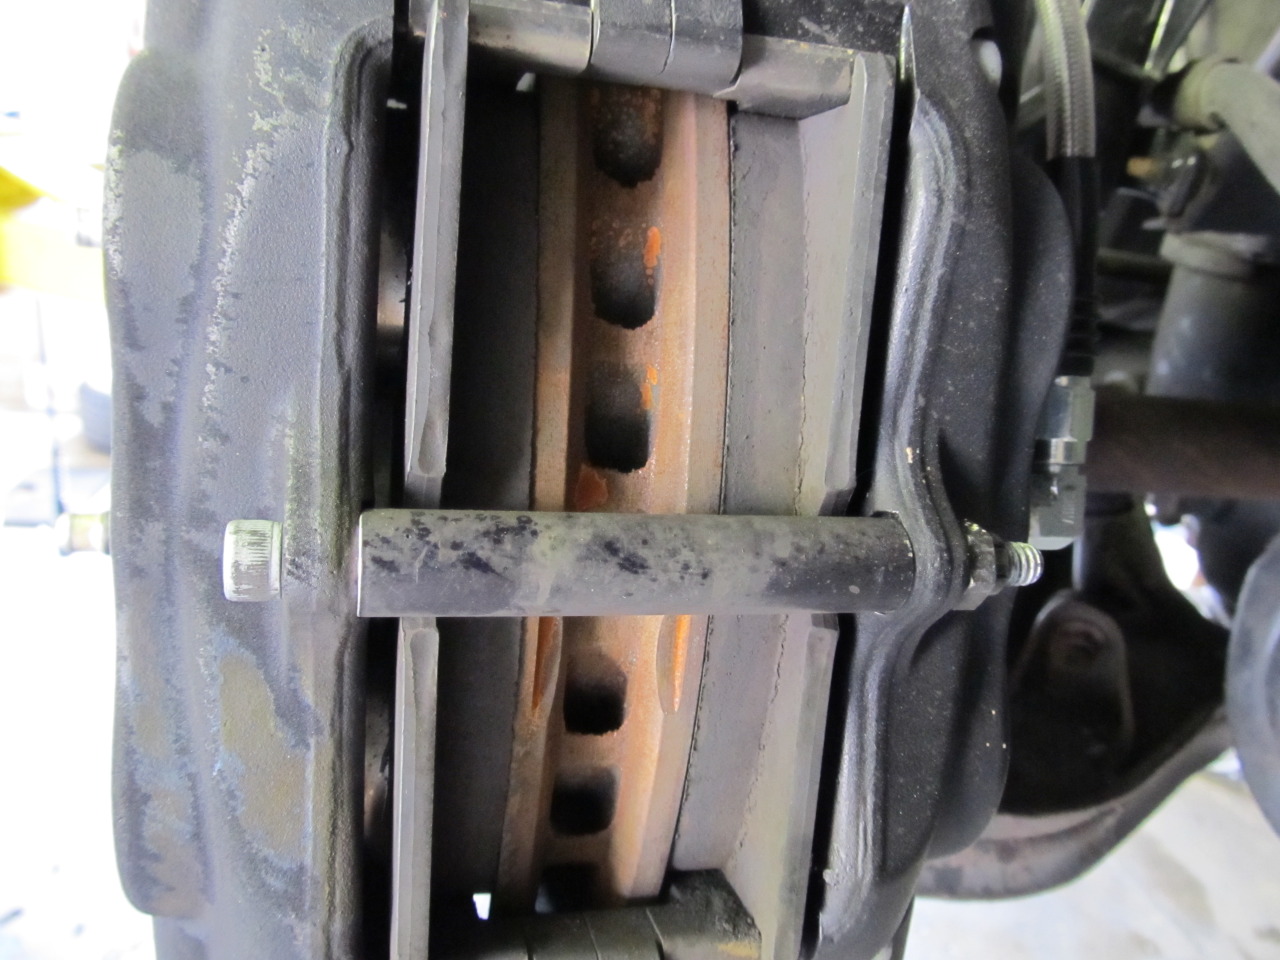
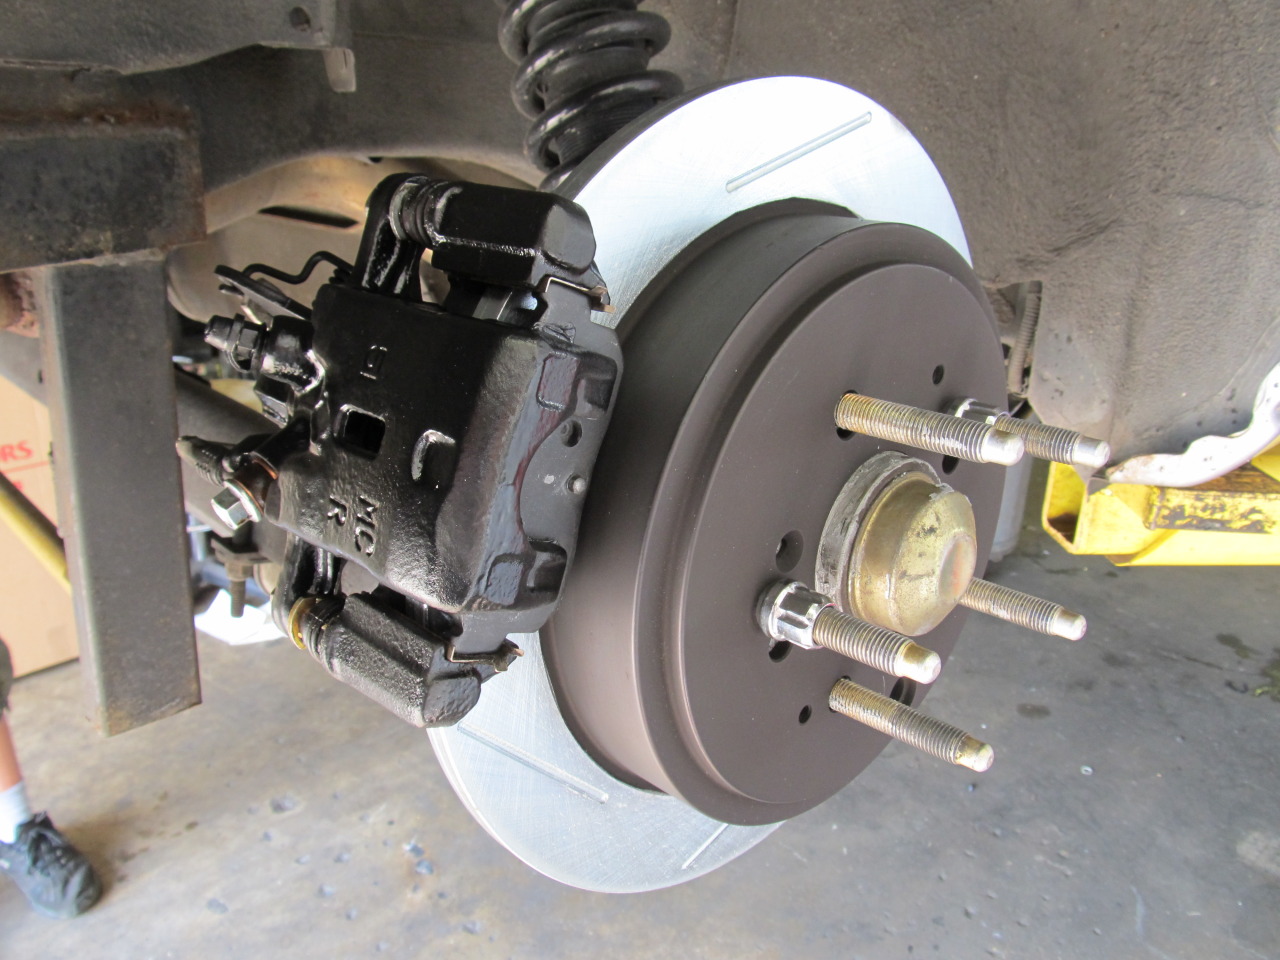
New setup
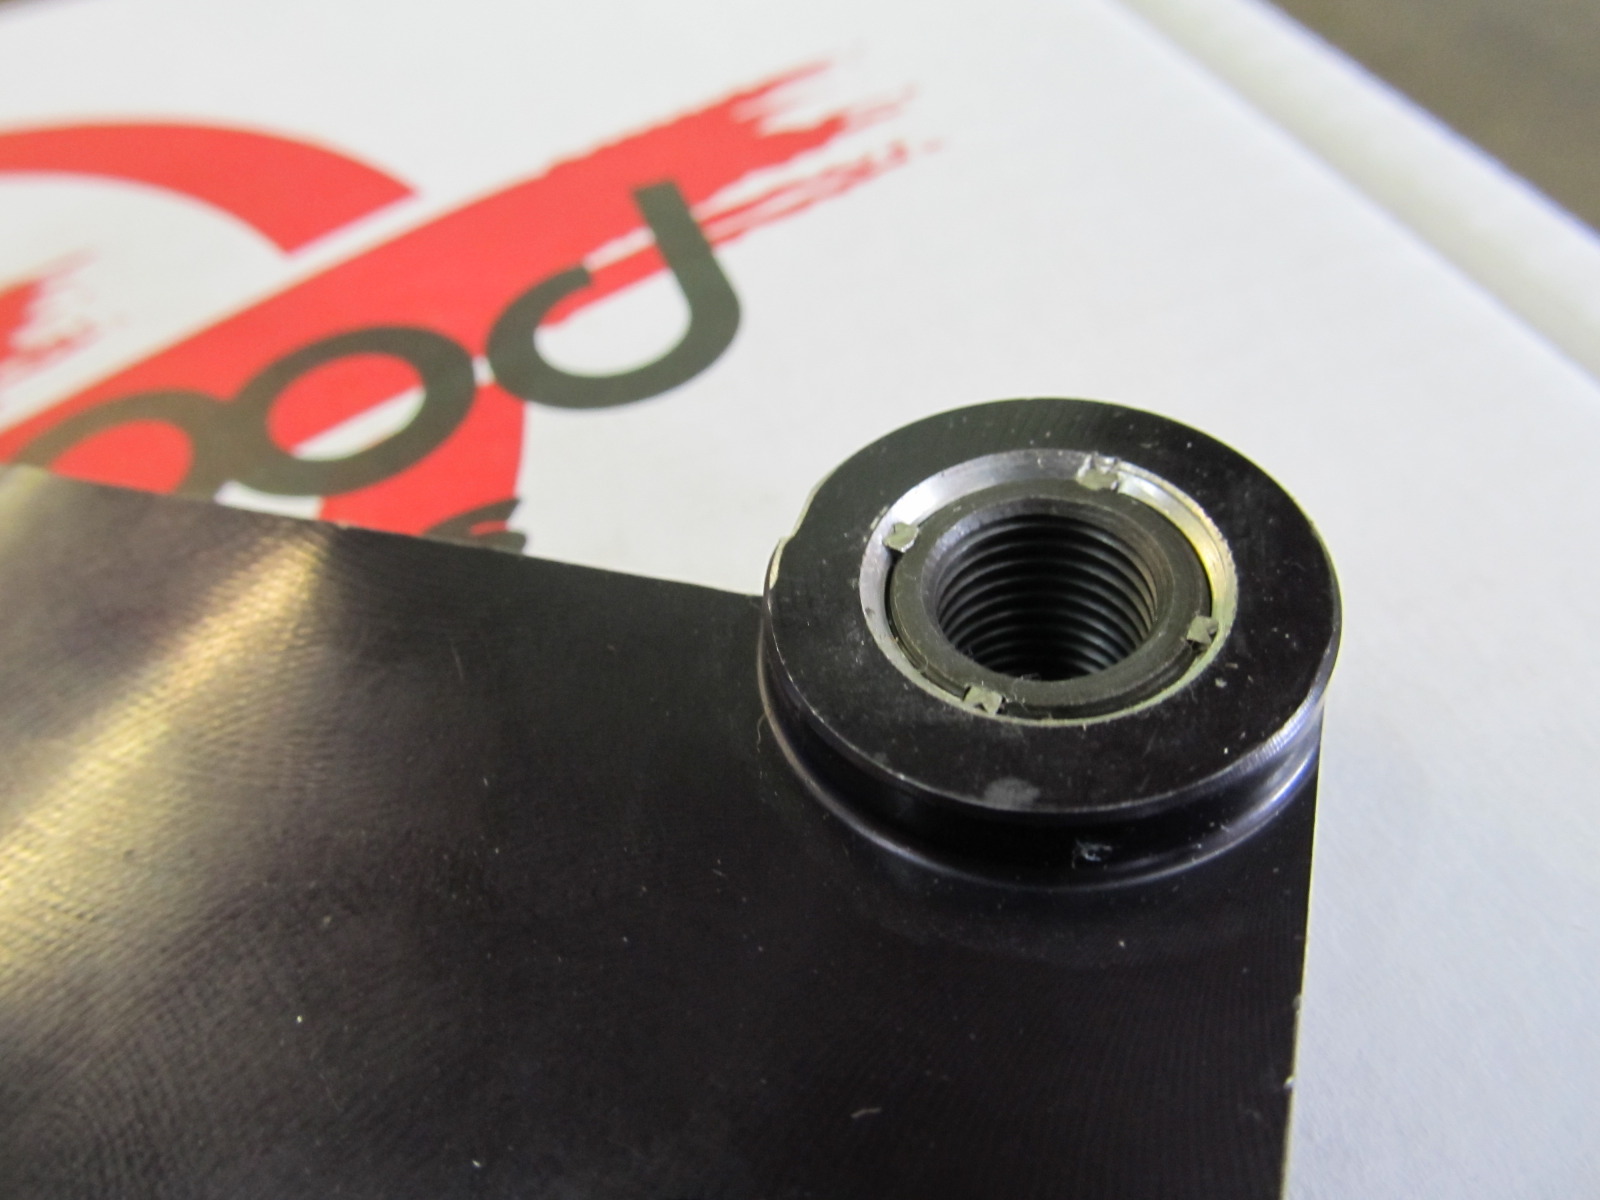
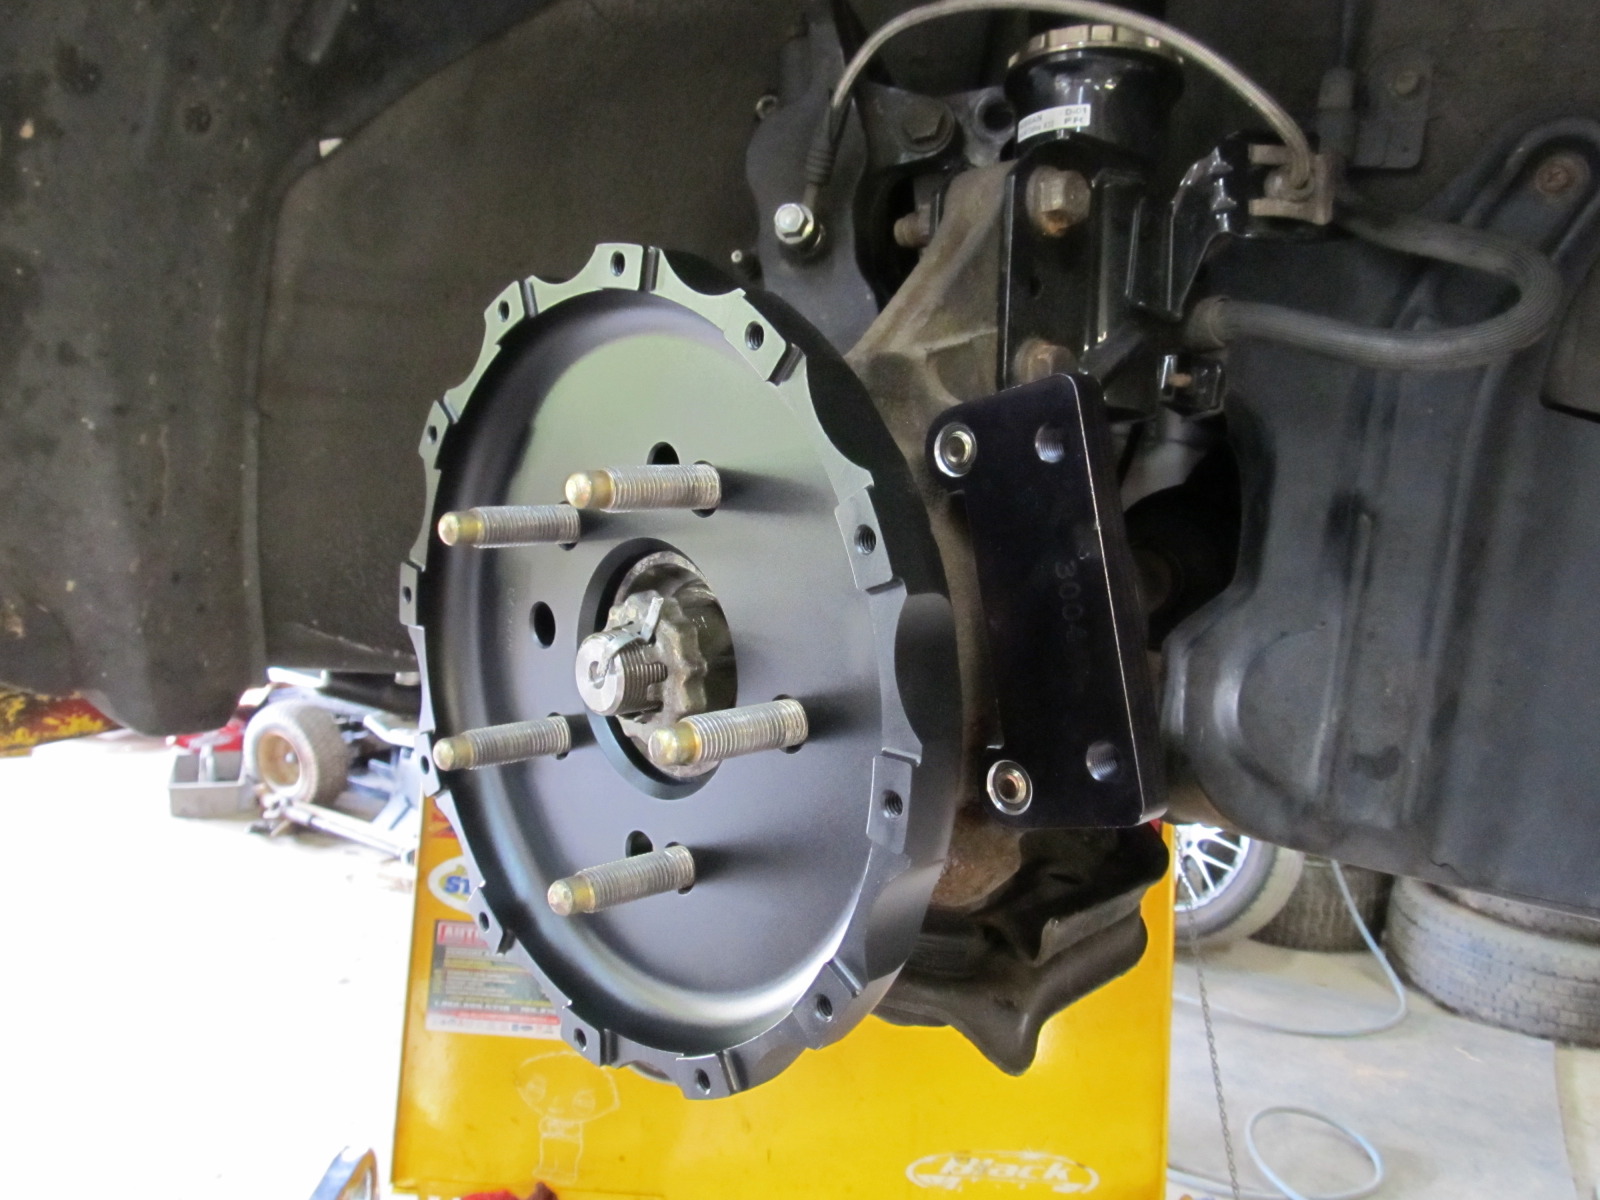
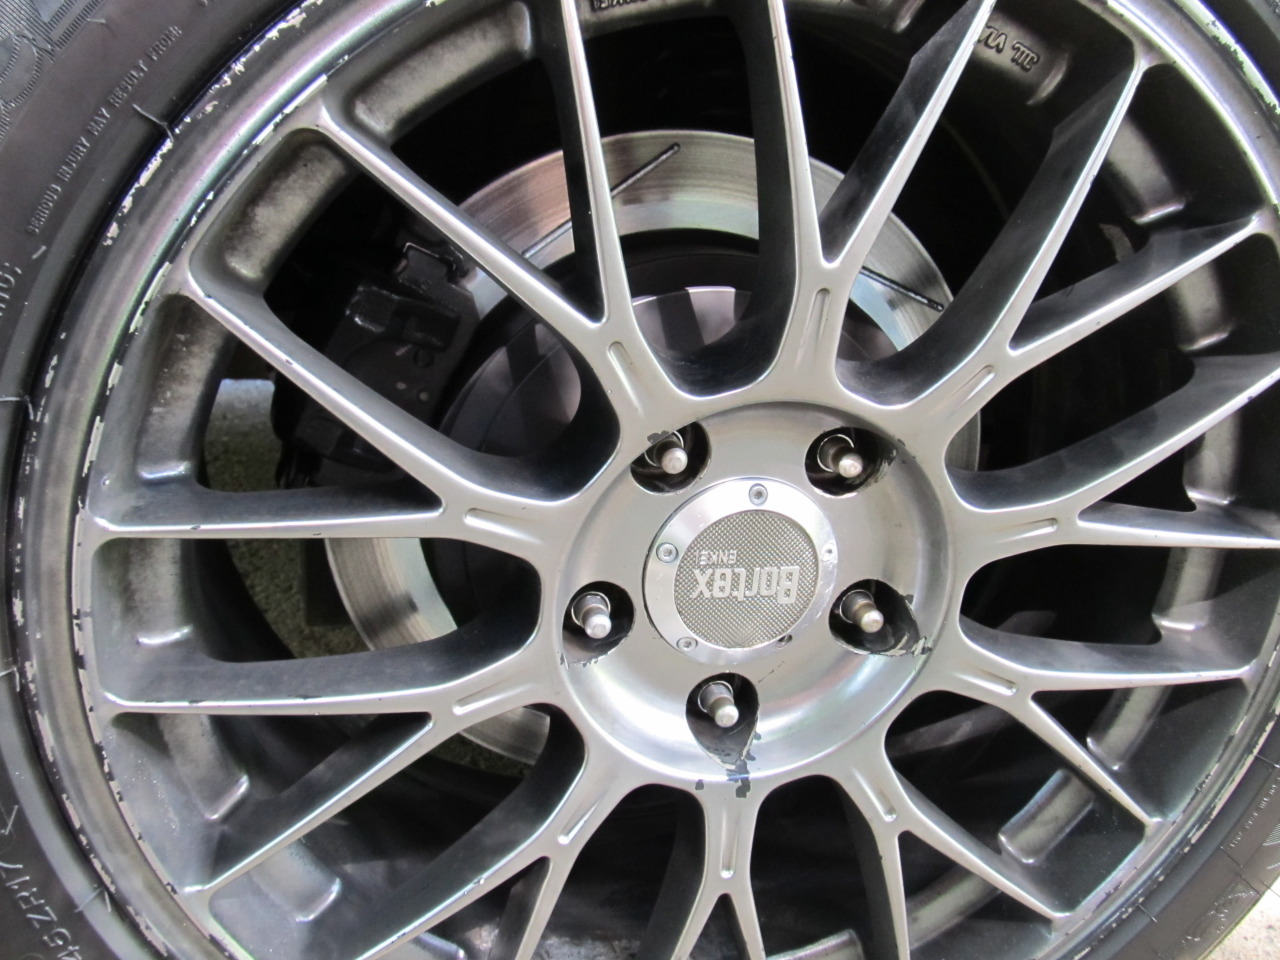
This little guy came with the new kit and was "pressed" into the hub:
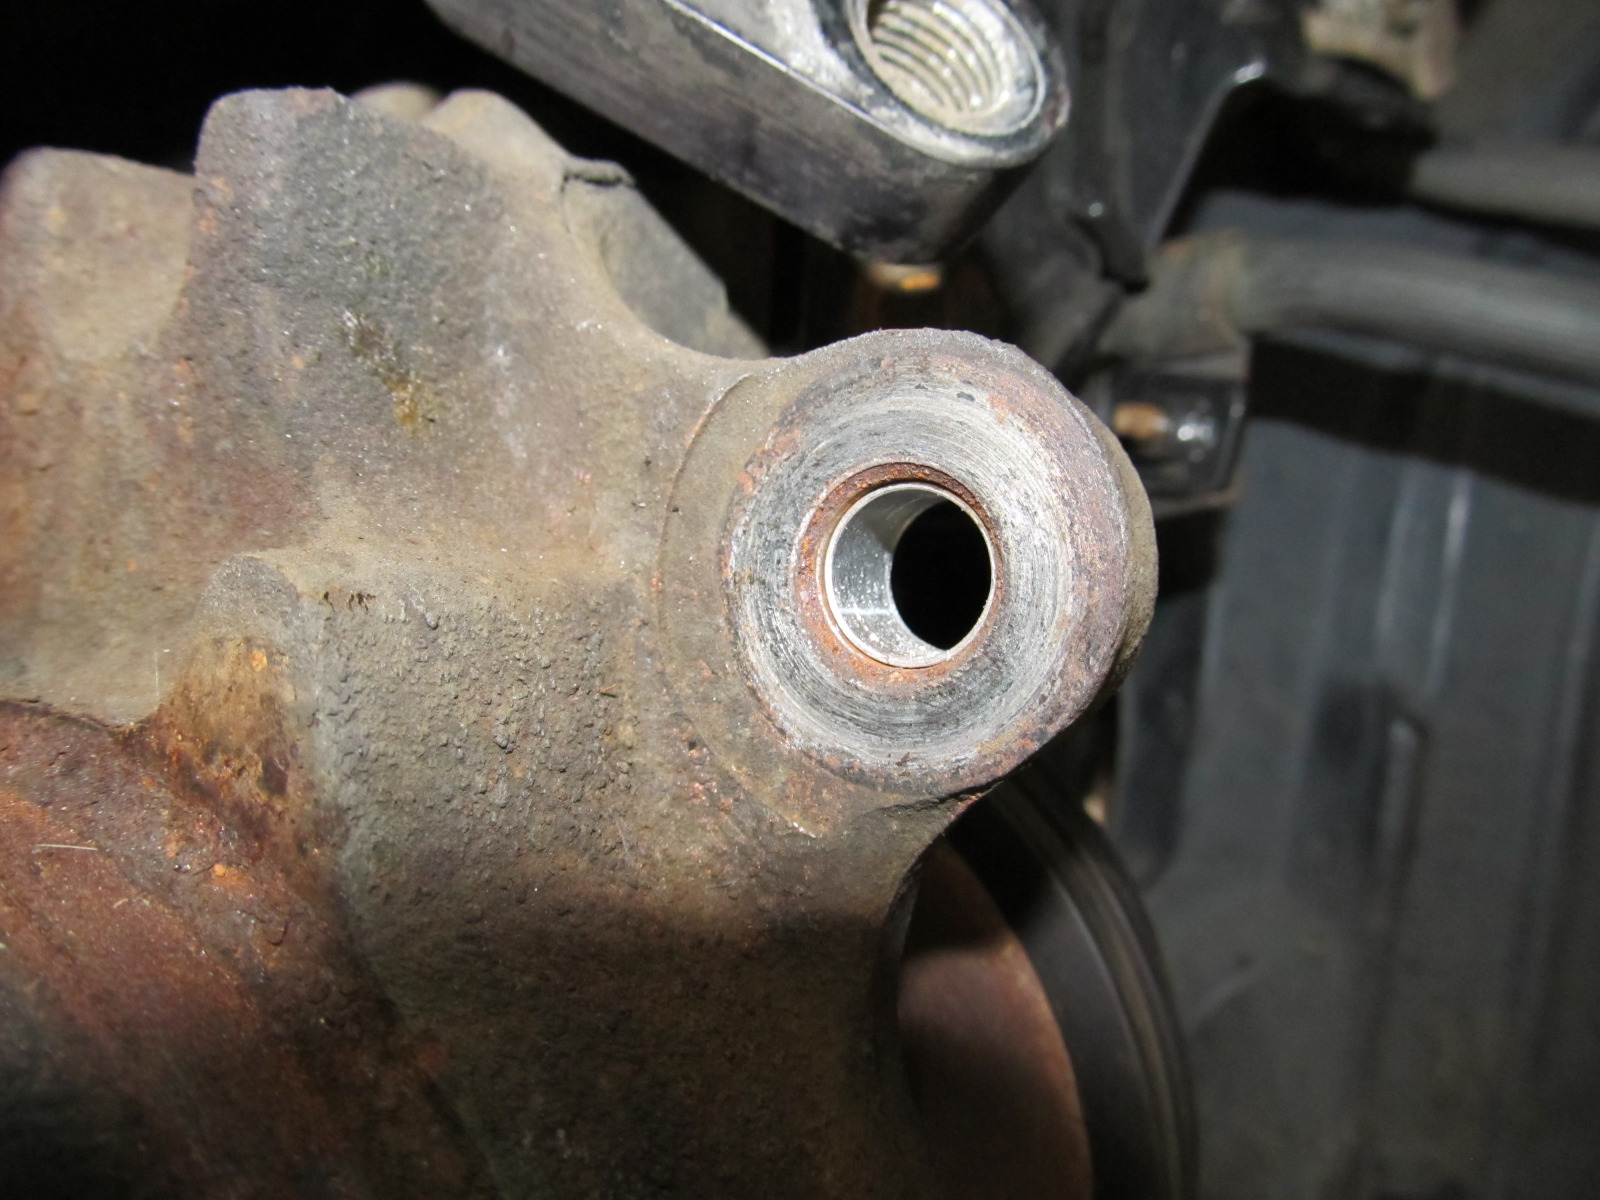
Before:
After:
Next up is the Fastbrakes 12.3" rear BBK
I followed Carbotech's bedding instructions as closely as I could on the street, but for these pads, they recommend you bed them in on a track (not possible). The very next day after we installed these I did an SCCA auto-x event, and the pads weren't quite ready yet, as there was still a little mush in the pedal. After a little more regular driving they seem to be really ready for some action. The pedal feel is roughly the same as the old setup, but the bite and overall braking power has increased dramatically. They also look quite awesome, if I do say so myself
A pic of the old setup's bracket and washers:
Versus the new bracket:
Look how far the old pistons stuck out while at rest:
New setup
This little guy came with the new kit and was "pressed" into the hub:
Before:
After:
Next up is the Fastbrakes 12.3" rear BBK
Last edited by 95maxrider; 07-31-2012 at 06:17 AM.
 07-19-2012, 01:51 PM
#92
07-19-2012, 03:30 PM
#93
They are fine for me. People shouldn't buy base laptops with a lousy screen real estate
Love the brake upgrades. I am jelly of your 2 piece rotors, I have a solid 14" rotor that weighs 26lbs
Love the brake upgrades. I am jelly of your 2 piece rotors, I have a solid 14" rotor that weighs 26lbs
 07-19-2012, 05:52 PM
#95
 07-23-2012, 11:06 AM
#97
Oh yes, the inlet pipe is a full 0.5" bigger. I wasn't able to really measure the outlets, but they are much bigger on the G muffler than the Maxima muffler.
07-23-2012, 11:37 AM
#98
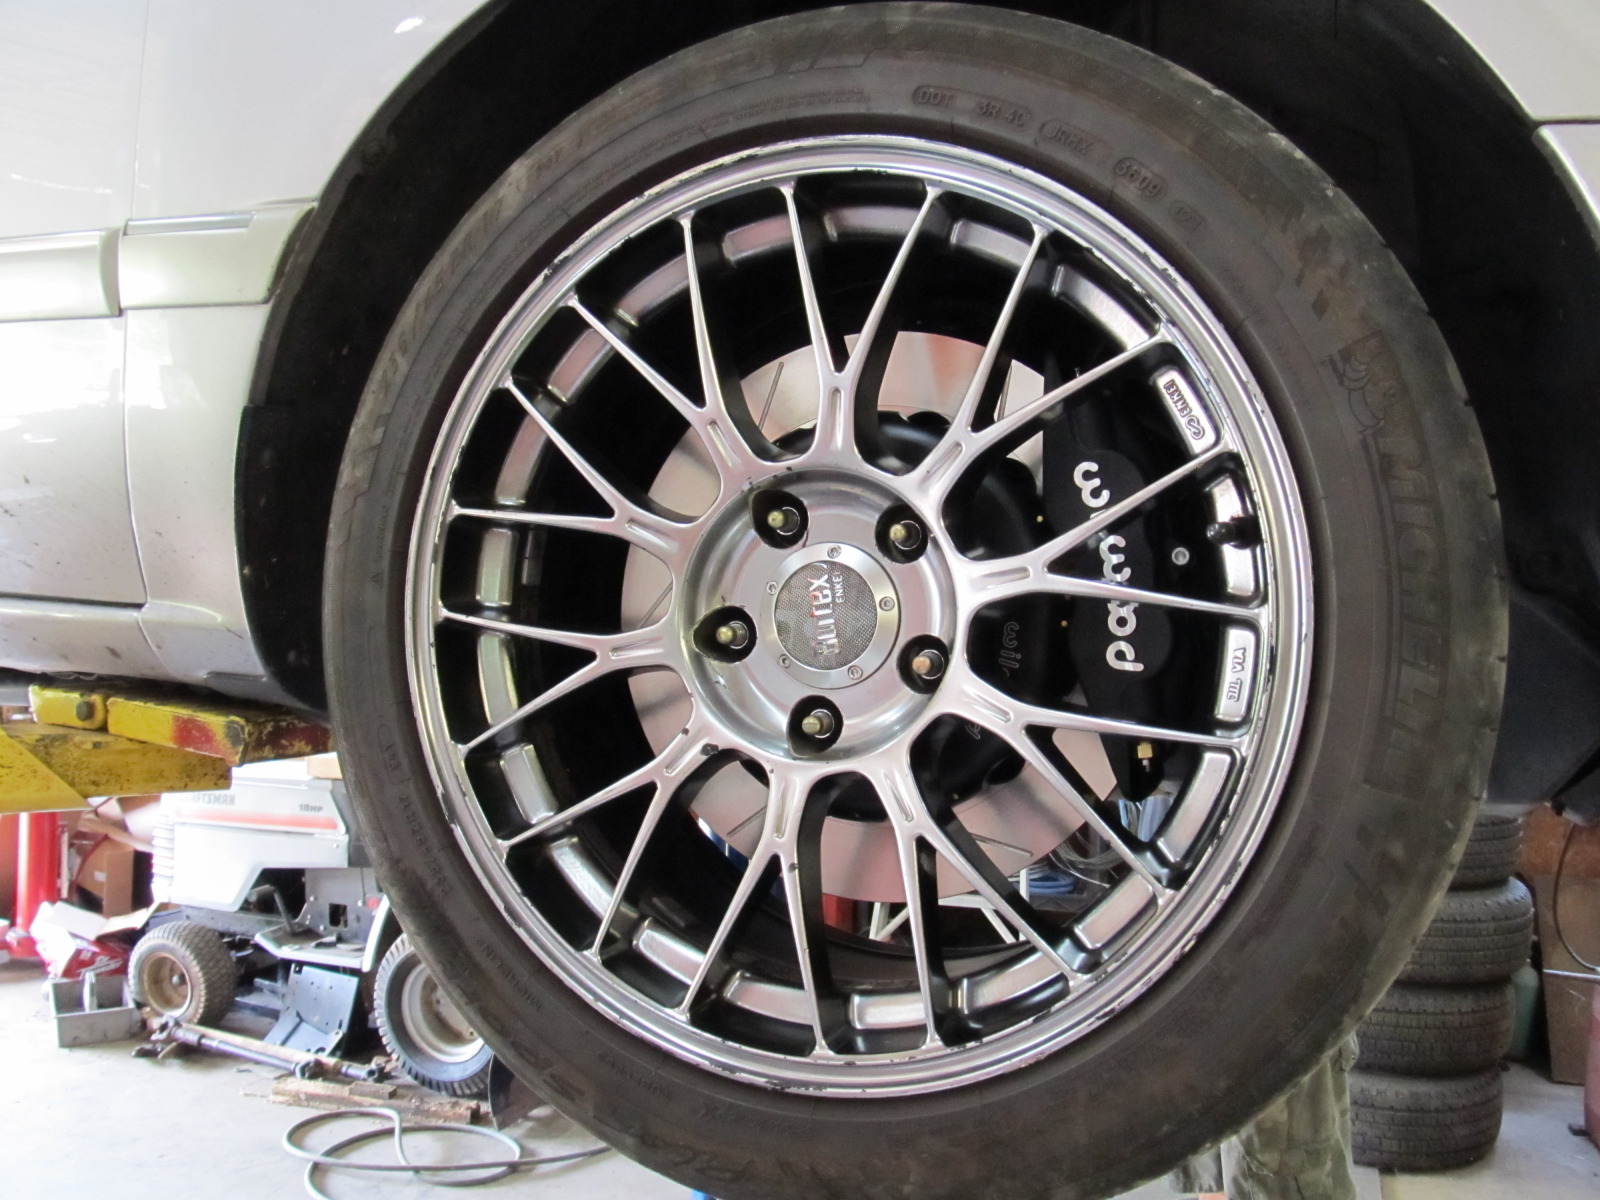
Tires, corner balancing and a proper alignment
A few months ago I had an odd problem occur with my car that caused my steering wheel to get cocked 15* to the left for no apparent reason. My front DS coilover had loosened up a bit, so I raised it back up, thinking that was causing the steering problem, but it had no effect on it. I eventually got a half-a$$ alignment that was able to center the wheel, but not correct any other specs due to the laser beams hitting the engine crossmember. Apparently my car is just low enough to need a newer style alignment machine that uses the reflectors instead of the lasers. This means that for the last three months or so I've been driving around on a completely out of whack alignment.
I have heard conflicting opinions about corner balancing our cars with the solid rear beam, but decided to give it a try. I live in the DC area, and it was not easy finding a shop that does corner balancing. Eventually I located IAG Performance about an hour north of me and made an appointment.
I've also been riding around on a set of two year old Michelin PS2 tires (235/45/17) that are worn past the wear bars, but wanted to wait to put on new tires until the car was getting balanced and aligned. I decided to step up my tire game and get some 245/45/17 Michelin PSS tires, due to the overwhelmingly positive reviews I've read. Given how happy I've been with the PS2s, I have high hope for the PSS tires.
After the tires were installed, IAG began to balance the car and found it to be pretty good to begin with. I believe he only had to adjust one coilover a bit to get it to be "balanced". Here's how everything worked out:
Car had almost full tank of gas
Empty trunk
160 lb. driver
Total weight 3290 lbs.
DS F 991 984 PS F
DS R 662 653 PS R
1975 F 60.0%
1315 R 40.0%
Cross 1646 50%
So without much effort, the car is sitting at 60.0% front/40.0% rear with a 50/50 side to side split. So far so good. It looks like that aluminum front bumper support and battery relocation did some good! I'm just curious if I should have asked to have more weight shifted to the rear of the car to help get the balance closer to 50/50, but I'm not sure if that's even possible or a good idea. Can I ask to have it set to 58/42 if I get it balanced in the future?
On to the alignment. So remember how I adjusted the height of that one coilover in front? Yeah, it kind of messed things up a bit. Here's how the car sat when it came in:
DS PS
Camber -2.55 -1.4
Toe -0.10 out 0.25 in
So for the last three months of racing I've been running wildly different amounts of camber in the front wheels and 0.1* toe out on one wheel and 0.25* toe IN on the other. Basically, the car has been crab-walking all over the place.
I wanted to see what happened to the toe when camber was added, so the tech made notes of what he changed and what effect it had on the other specs. It looks like when you add camber, the toe goes in, and a lot. I believe Joe had experienced this already in his own car. Originally, my foolish goal was to run around with -1* camber on the street and bump it up to -3* at the track, but aside from it completely throwing my toe out the opposite of where I want it, it sounds like it is impossible to get it to perfectly reset to your street setting for the way home, so you would be running around with a useless alignment when on the street. Obviously this would be unacceptable, so I chose to just go a little more aggressive for my street setting and hope it's enough for the track. When the coilovers were installed, I got it aligned to -1.7* camber and 0.1* toe out. When this was all said and done, we set it to -2.0 camber and 0.1* toe out. Here's what happened in between the first adjustment and the final one:
DS PS
Camber -2.55 -1.4
Toe -0.10 out 0.25 in
C *-2.00 -1.4
T -0.81 0.24
C -2.15 -2.0*
T -0.76 1.04
C -2.15 -1.95
T *-0.10 -0.10*
C *-2.00 -2.00*
T -0.25 -0.09
C -2.00 -2.00
T *-0.10 -0.10*
Caster 2.75 2.85
The stars represent the adjustment he made from the last step.
So this put two mysteries to bed for me. One, I can't properly adjust and reset camber adjustments for the track and street use without an alignment every single time. Secondly, even if I could, the toe would go WAY in when adding camber, so it would be a moot point. In talking with Brian, it sounds like I could have added a little more toe out, but I will try it out for now and maybe get it redone in the spring when the rest of the car is really finished (rear BBK, remove PS airbag, less gas, etc.).
I haven't been able to put many miles on the tires yet, so they're still feeling kind of greasy, but the steering feels lighter than before, probably because it's not fighting itself going down the road. After a little more driving I will report back on the tires, but they are already braking the car much better than the old tires. On to the next project (finish CAI, rear BBK, LTB, etc.)!
07-23-2012, 04:51 PM
#99
A few months ago I had an odd problem occur with my car that caused my steering wheel to get cocked 15* to the left for no apparent reason. My front DS coilover had loosened up a bit, so I raised it back up, thinking that was causing the steering problem, but it had no effect on it. I eventually got a half-a$$ alignment that was able to center the wheel, but not correct any other specs due to the laser beams hitting the engine crossmember. Apparently my car is just low enough to need a newer style alignment machine that uses the reflectors instead of the lasers. This means that for the last three months or so I've been driving around on a completely out of whack alignment.
I have heard conflicting opinions about corner balancing our cars with the solid rear beam, but decided to give it a try. I live in the DC area, and it was not easy finding a shop that does corner balancing. Eventually I located IAG Performance about an hour north of me and made an appointment.
I've also been riding around on a set of two year old Michelin PS2 tires (235/45/17) that are worn past the wear bars, but wanted to wait to put on new tires until the car was getting balanced and aligned. I decided to step up my tire game and get some 245/45/17 Michelin PSS tires, due to the overwhelmingly positive reviews I've read. Given how happy I've been with the PS2s, I have high hope for the PSS tires.
After the tires were installed, IAG began to balance the car and found it to be pretty good to begin with. I believe he only had to adjust one coilover a bit to get it to be "balanced". Here's how everything worked out:
Car had almost full tank of gas
Empty trunk
160 lb. driver
Total weight 3290 lbs.
DS F 991 984 PS F
DS R 662 653 PS R
1975 F 60.0%
1315 R 40.0%
Cross 1646 50%
So without much effort, the car is sitting at 60.0% front/40.0% rear with a 50/50 side to side split. So far so good. It looks like that aluminum front bumper support and battery relocation did some good! I'm just curious if I should have asked to have more weight shifted to the rear of the car to help get the balance closer to 50/50, but I'm not sure if that's even possible or a good idea. Can I ask to have it set to 58/42 if I get it balanced in the future?
On to the alignment. So remember how I adjusted the height of that one coilover in front? Yeah, it kind of messed things up a bit. Here's how the car sat when it came in:
DS PS
Camber -2.55 -1.4
Toe -0.10 out 0.25 in
So for the last three months of racing I've been running wildly different amounts of camber in the front wheels and 0.1* toe out on one wheel and 0.25* toe IN on the other. Basically, the car has been crab-walking all over the place.
I wanted to see what happened to the toe when camber was added, so the tech made notes of what he changed and what effect it had on the other specs. It looks like when you add camber, the toe goes in, and a lot. I believe Joe had experienced this already in his own car. Originally, my foolish goal was to run around with -1* camber on the street and bump it up to -3* at the track, but aside from it completely throwing my toe out the opposite of where I want it, it sounds like it is impossible to get it to perfectly reset to your street setting for the way home, so you would be running around with a useless alignment when on the street. Obviously this would be unacceptable, so I chose to just go a little more aggressive for my street setting and hope it's enough for the track. When the coilovers were installed, I got it aligned to -1.7* camber and 0.1* toe out. When this was all said and done, we set it to -2.0 camber and 0.1* toe out. Here's what happened in between the first adjustment and the final one:
DS PS
Camber -2.55 -1.4
Toe -0.10 out 0.25 in
C *-2.00 -1.4
T -0.81 0.24
C -2.15 -2.0*
T -0.76 1.04
C -2.15 -1.95
T *-0.10 -0.10*
C *-2.00 -2.00*
T -0.25 -0.09
C -2.00 -2.00
T *-0.10 -0.10*
Caster 2.75 2.85
The stars represent the adjustment he made from the last step.
So this put two mysteries to bed for me. One, I can't properly adjust and reset camber adjustments for the track and street use without an alignment every single time. Secondly, even if I could, the toe would go WAY in when adding camber, so it would be a moot point. In talking with Brian, it sounds like I could have added a little more toe out, but I will try it out for now and maybe get it redone in the spring when the rest of the car is really finished (rear BBK, remove PS airbag, less gas, etc.).
I haven't been able to put many miles on the tires yet, so they're still feeling kind of greasy, but the steering feels lighter than before, probably because it's not fighting itself going down the road. After a little more driving I will report back on the tires, but they are already braking the car much better than the old tires. On to the next project (finish CAI, rear BBK, LTB, etc.)!
I have heard conflicting opinions about corner balancing our cars with the solid rear beam, but decided to give it a try. I live in the DC area, and it was not easy finding a shop that does corner balancing. Eventually I located IAG Performance about an hour north of me and made an appointment.
I've also been riding around on a set of two year old Michelin PS2 tires (235/45/17) that are worn past the wear bars, but wanted to wait to put on new tires until the car was getting balanced and aligned. I decided to step up my tire game and get some 245/45/17 Michelin PSS tires, due to the overwhelmingly positive reviews I've read. Given how happy I've been with the PS2s, I have high hope for the PSS tires.
After the tires were installed, IAG began to balance the car and found it to be pretty good to begin with. I believe he only had to adjust one coilover a bit to get it to be "balanced". Here's how everything worked out:
Car had almost full tank of gas
Empty trunk
160 lb. driver
Total weight 3290 lbs.
DS F 991 984 PS F
DS R 662 653 PS R
1975 F 60.0%
1315 R 40.0%
Cross 1646 50%
So without much effort, the car is sitting at 60.0% front/40.0% rear with a 50/50 side to side split. So far so good. It looks like that aluminum front bumper support and battery relocation did some good! I'm just curious if I should have asked to have more weight shifted to the rear of the car to help get the balance closer to 50/50, but I'm not sure if that's even possible or a good idea. Can I ask to have it set to 58/42 if I get it balanced in the future?
On to the alignment. So remember how I adjusted the height of that one coilover in front? Yeah, it kind of messed things up a bit. Here's how the car sat when it came in:
DS PS
Camber -2.55 -1.4
Toe -0.10 out 0.25 in
So for the last three months of racing I've been running wildly different amounts of camber in the front wheels and 0.1* toe out on one wheel and 0.25* toe IN on the other. Basically, the car has been crab-walking all over the place.
I wanted to see what happened to the toe when camber was added, so the tech made notes of what he changed and what effect it had on the other specs. It looks like when you add camber, the toe goes in, and a lot. I believe Joe had experienced this already in his own car. Originally, my foolish goal was to run around with -1* camber on the street and bump it up to -3* at the track, but aside from it completely throwing my toe out the opposite of where I want it, it sounds like it is impossible to get it to perfectly reset to your street setting for the way home, so you would be running around with a useless alignment when on the street. Obviously this would be unacceptable, so I chose to just go a little more aggressive for my street setting and hope it's enough for the track. When the coilovers were installed, I got it aligned to -1.7* camber and 0.1* toe out. When this was all said and done, we set it to -2.0 camber and 0.1* toe out. Here's what happened in between the first adjustment and the final one:
DS PS
Camber -2.55 -1.4
Toe -0.10 out 0.25 in
C *-2.00 -1.4
T -0.81 0.24
C -2.15 -2.0*
T -0.76 1.04
C -2.15 -1.95
T *-0.10 -0.10*
C *-2.00 -2.00*
T -0.25 -0.09
C -2.00 -2.00
T *-0.10 -0.10*
Caster 2.75 2.85
The stars represent the adjustment he made from the last step.
So this put two mysteries to bed for me. One, I can't properly adjust and reset camber adjustments for the track and street use without an alignment every single time. Secondly, even if I could, the toe would go WAY in when adding camber, so it would be a moot point. In talking with Brian, it sounds like I could have added a little more toe out, but I will try it out for now and maybe get it redone in the spring when the rest of the car is really finished (rear BBK, remove PS airbag, less gas, etc.).
I haven't been able to put many miles on the tires yet, so they're still feeling kind of greasy, but the steering feels lighter than before, probably because it's not fighting itself going down the road. After a little more driving I will report back on the tires, but they are already braking the car much better than the old tires. On to the next project (finish CAI, rear BBK, LTB, etc.)!

I wished that I weighed 160 pounds, my car in race trim with me in it and a full tank of gas weighs in at 3240 pounds with me in and 2990 pounds without me in the car. Though my car's front/rear bias is 62/38 as the back of the car is stripped out with an '95 aluminum rear bumper support. The side to side got to about 50/50 after I relocated the battery to the trunk.
Anyways this in my opinion is the only way to get a correct race alignment with proper corner balancing of the chassis and simulating the weight of the driver.
The final specs of your alignment look good, very similar to what I run. Though I wish the caster was that equal on each side, think one of my cars' control arms or the front subframe is out of whack. Anyways I would have run some more toe out for auto-x, around 1/4" total toe out things get interesting.
As noted the A32/A33 front suspension have a very weird camber/toe curve, in that when you set for more negative camber the car toes in. Almost every other car toes out when negative camber is increased. My alignment guy says the only other car he has seen that does this is the rear suspension of the EVO 8 & 9s.
Anyways everything else looks good and now your alignment is dialed in better. This should give more consistant handling. For me corner balancing the first time was a great improvement as my coilovers were not even close, something like a 48% cross weight and a whack alignment.
07-29-2012, 01:18 PM
#100
Well, that didn't take long
The new/used transmission is a different story. In addition to clunking occasionally when putting the shifter into first, two more alarming problems have surfaced. The first is that when in third, fourth or fifth gear, the shifter rocks back and forth slightly when I get on/off the throttle. See the video:
That can't be good.
I've checked, and it doesn't happen in first or second, so this leads me to believe there are internal problems in the trans.
As apparent verification of internal problems, check out the two week old Amsoil that came out when we replaced both axle seals this weekend (the first two we installed from Advance Auto Parts were garbage).
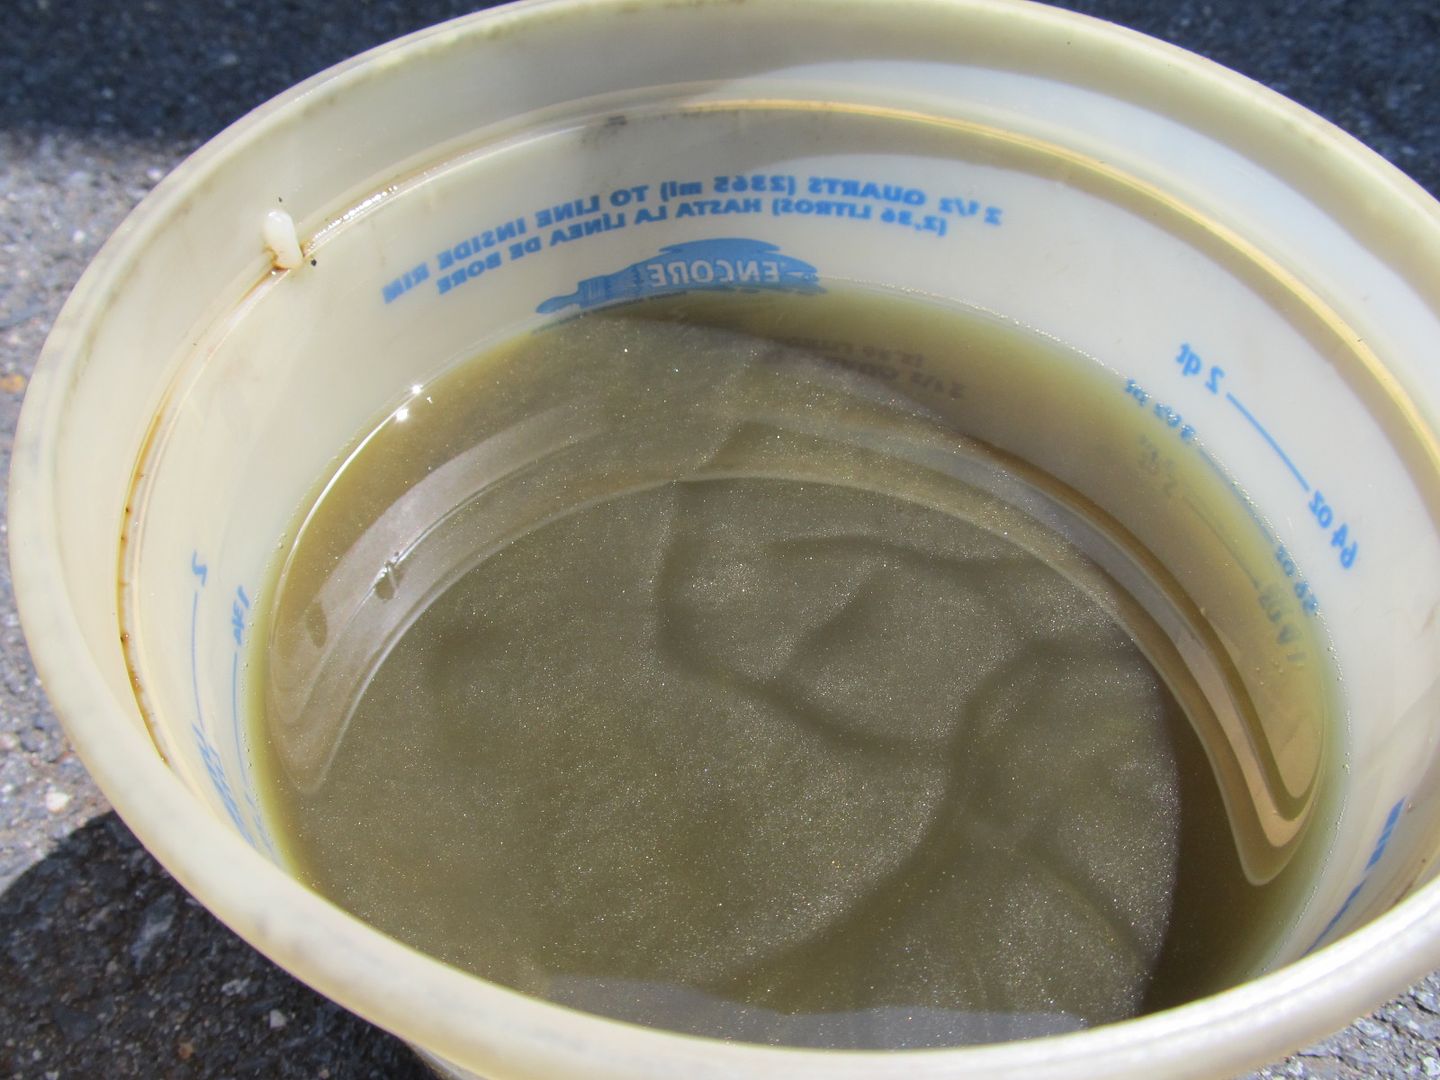
This also, can't be good.
My buddy thinks the metal particles are from the bearings in the trans since it's pretty golden. However, the trans doesn't make any noise or whine, so he's hoping it's just the bearing getting "broken in" since the trans was sitting for so long outside without much fluid in it. I'm thinking of changing out the fluid once to see if the problem continues. If it does, then this thing will probably need a rebuild this winter (if it even lasts that long).
I'm curious to see if anyone has an idea what could be causing my shifter to move like that while in gear, but I wouldn't be surprised to find that it's related to the metal flakes in the fluid and the clunk going into first gear.
That can't be good.
I've checked, and it doesn't happen in first or second, so this leads me to believe there are internal problems in the trans.
As apparent verification of internal problems, check out the two week old Amsoil that came out when we replaced both axle seals this weekend (the first two we installed from Advance Auto Parts were garbage).
This also, can't be good.
My buddy thinks the metal particles are from the bearings in the trans since it's pretty golden. However, the trans doesn't make any noise or whine, so he's hoping it's just the bearing getting "broken in" since the trans was sitting for so long outside without much fluid in it. I'm thinking of changing out the fluid once to see if the problem continues. If it does, then this thing will probably need a rebuild this winter (if it even lasts that long).
I'm curious to see if anyone has an idea what could be causing my shifter to move like that while in gear, but I wouldn't be surprised to find that it's related to the metal flakes in the fluid and the clunk going into first gear.
I was backing into a parking space today and I had put the car back into neutral and was taking my foot off the clutch when the car acted like it was still in reverse and bucked really hard. I knew I had taken it out of gear, but to be sure, I drove forward and backed up again. It did the same damn thing again, and man, is it a terrible feeling when your car makes noises/feelings like that. I was unsure if it would even get me home, but I didn't have a choice and just took it really slow. I thought I heard a faint, constant speed-related noise coming from the trans as I drove along, and by the time I got to my neighborhood, it was very evident that the noise is coming from the trans as it got a little bit louder. I had to leave the car on the street for fear of what would happen if I used reverse again.
Here's the video I took yesterday before reverse went crazy today. I get the car going in reverse then let off the gas and stick the clutch in. So the trans is still in reverse, but the clutch isn't engaged. I've asked two of my mechanic buddies what they think the noise is. One thinks it's the (Quaife) diff and the other thinks it's something to do with the reverse gears. Until today, I was leaning towards the reverse gears, since it never made a peep when in a forward gear, but now that it makes a constant noise when cruising, I'm thinking it could also be the diff now. It's a similar noise a previous trans made before the diff grenaded itself, but who knows. Take a listen and let me know what you think.
And this of course comes some 6 days before I'm scheduled for an all-day track event at Summit Point that I've already paid for. Don't I just have the best luck with these things?
07-31-2012, 06:33 AM
#101
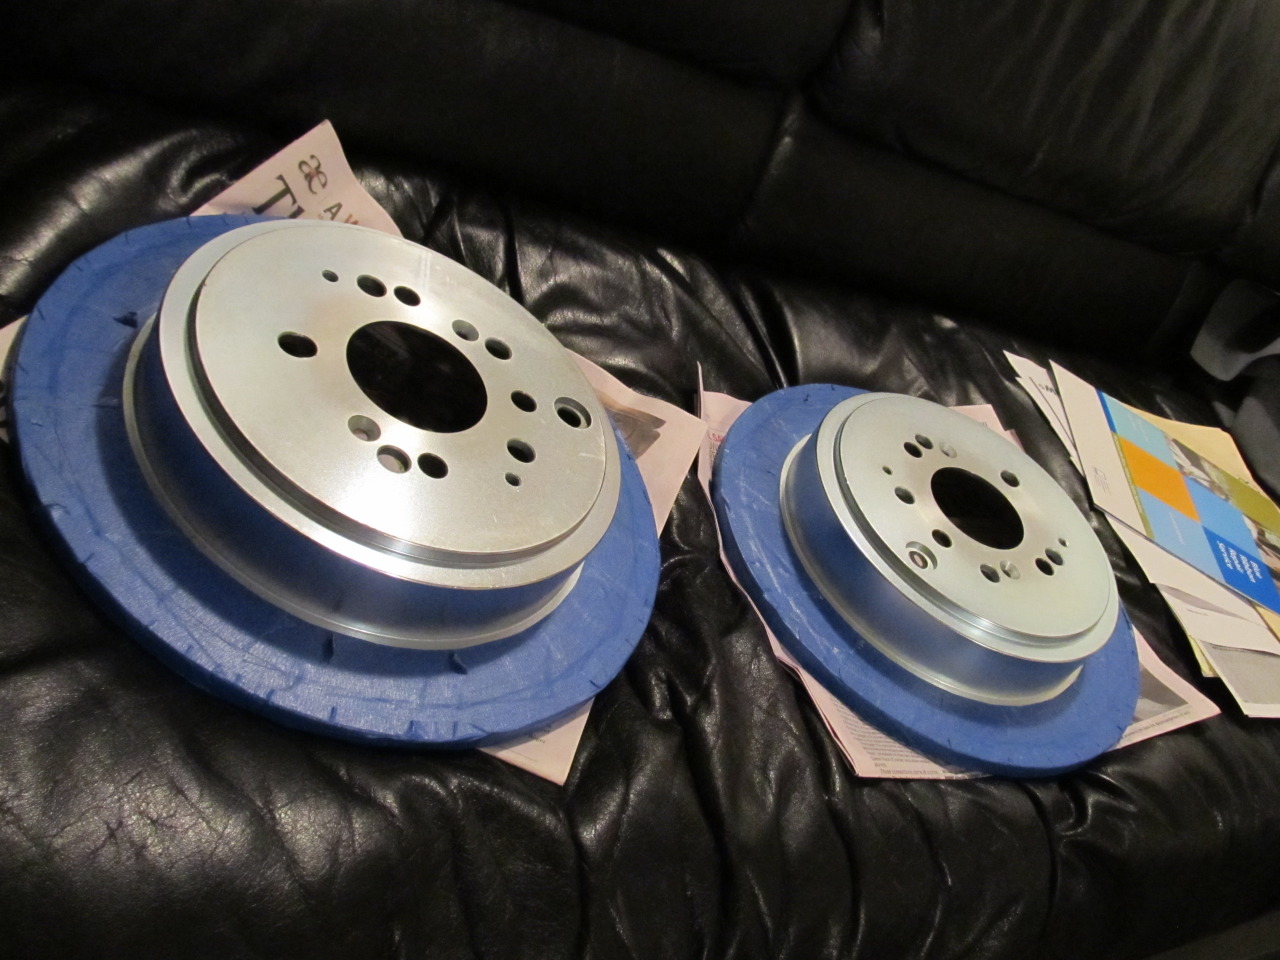
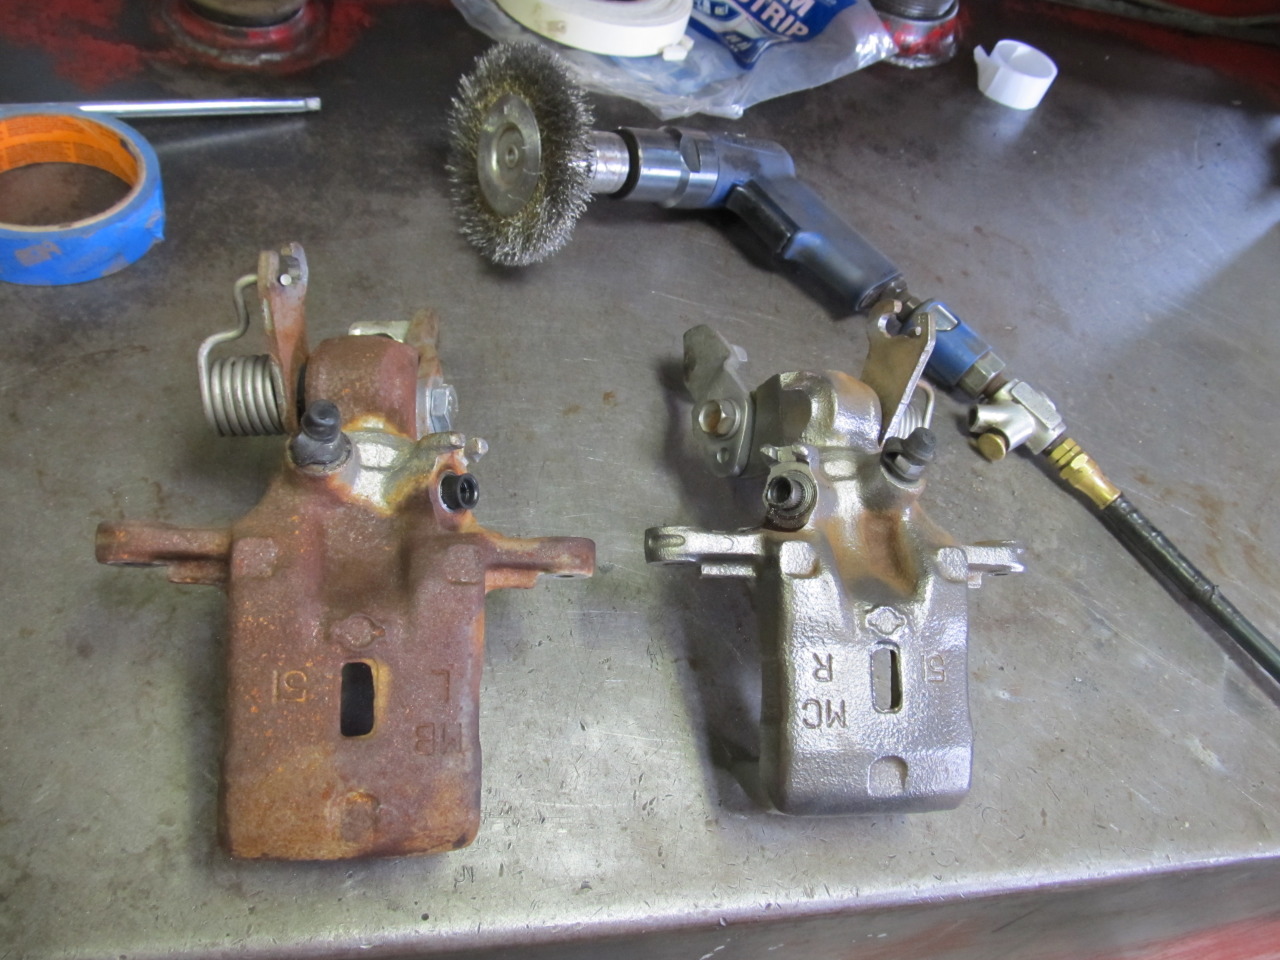
Fast Brakes Rear 12.3" BBK
I finally got around to installing the rear BBK from Fast Brakes. I really liked the feel of the new front BBK, but could tell the ABS was being activated way too easily up front, so I hoped a rear BBK would help move the bias back towards the rear a little bit. While I was at it, I installed matching Carbotech AX-6 pads on the rear.
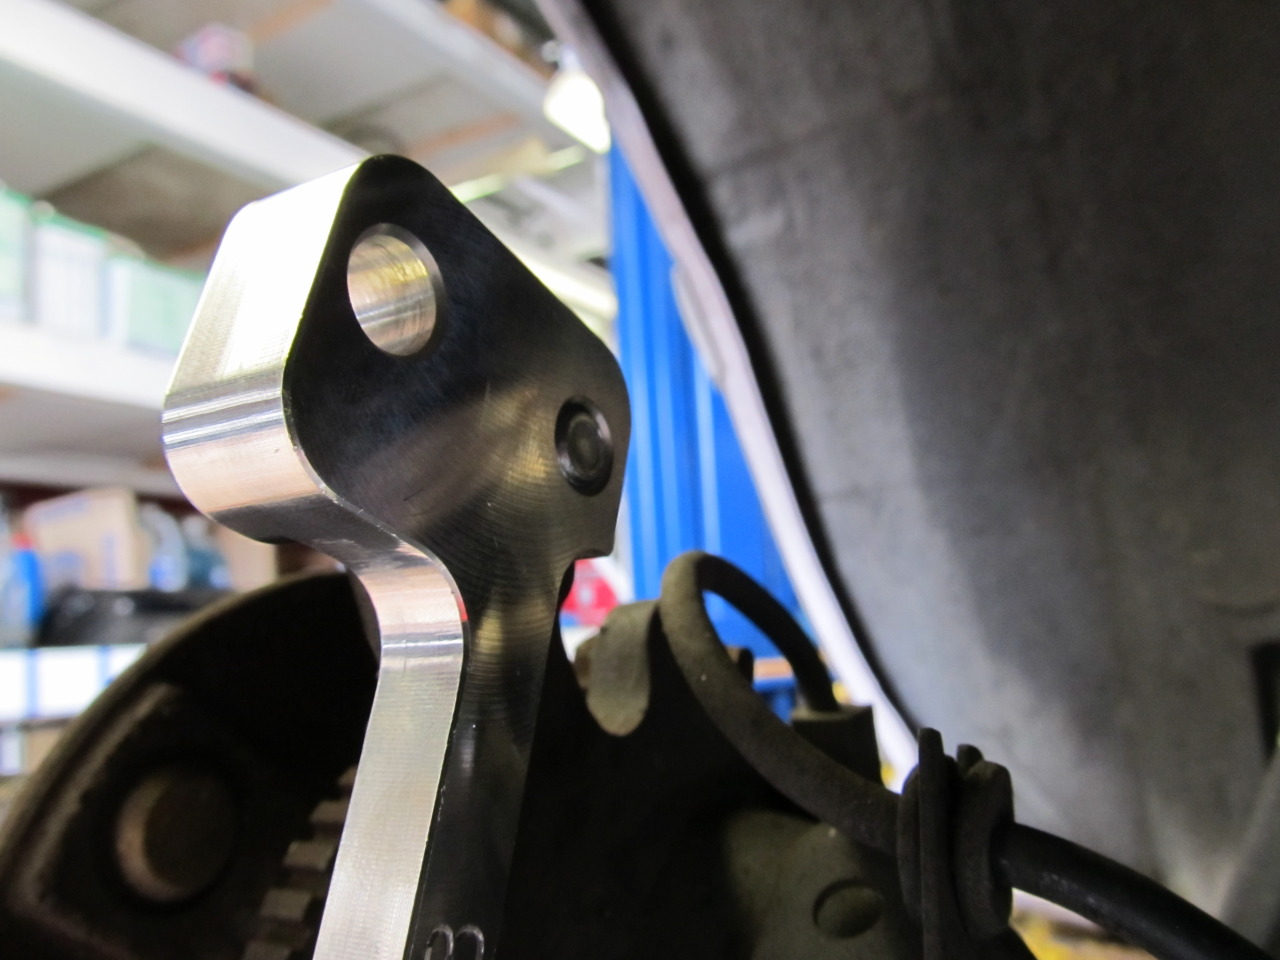
The install went smoothly enough, except we had to use an extra washer or two to space out the dogbone bracket, which meant finding a longer stud to thread through it. It's not a huge deal, but I'm never in favor of using washers, especially four, to space out anything relating to my brakes. I can't figure out why Brian designed to kit like this. It came with I believe three washers for each side. Why not just design the dogbone bracket in a way that doesn't require so many washers?
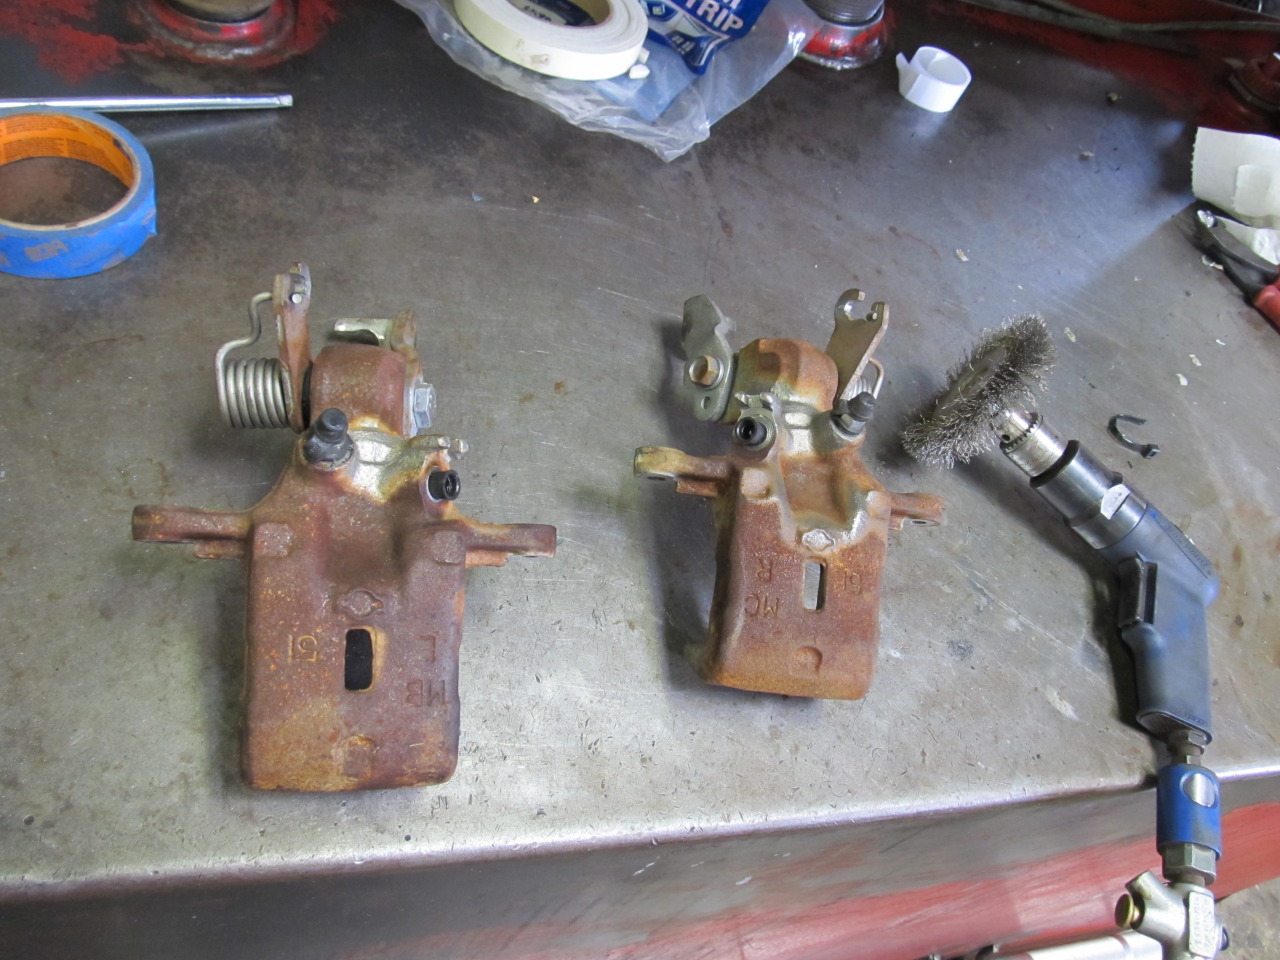
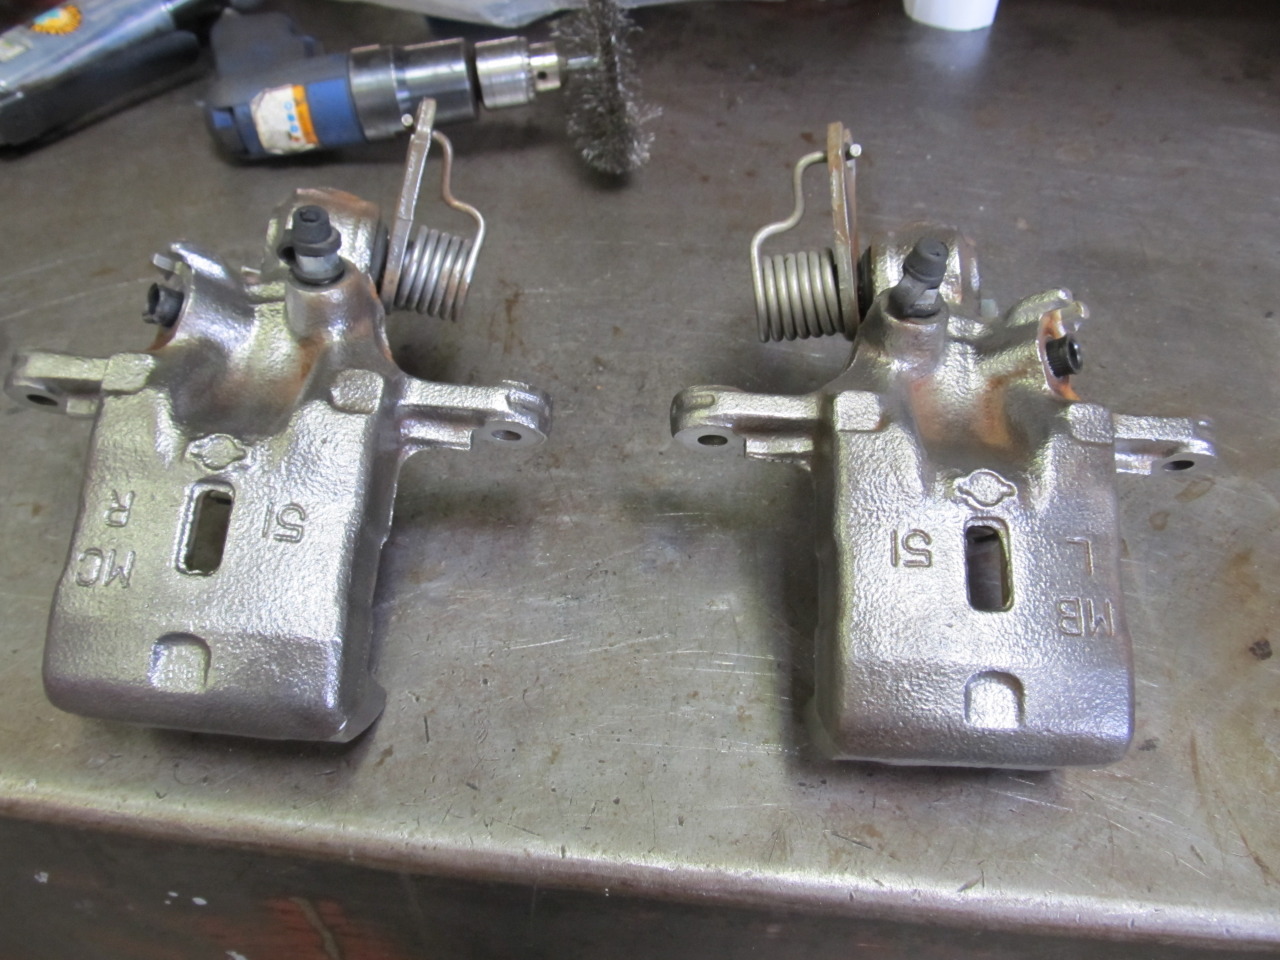
I've been tired of looking at rusted rotors and calipers in the rear, so I taped off the rotors and painted them with the flat black high temp ceramic VHT header spray. I then used the wire wheel at the shop to clean off the calipers and sprayed them with regular black brake paint. I didn't get a chance to bed in the pads yet since my transmission just died, but in the small amount of driving I've done, I could easily feel the increased braking force. It feels incredible! I can't wait to bed the pads in and really get aggressive!
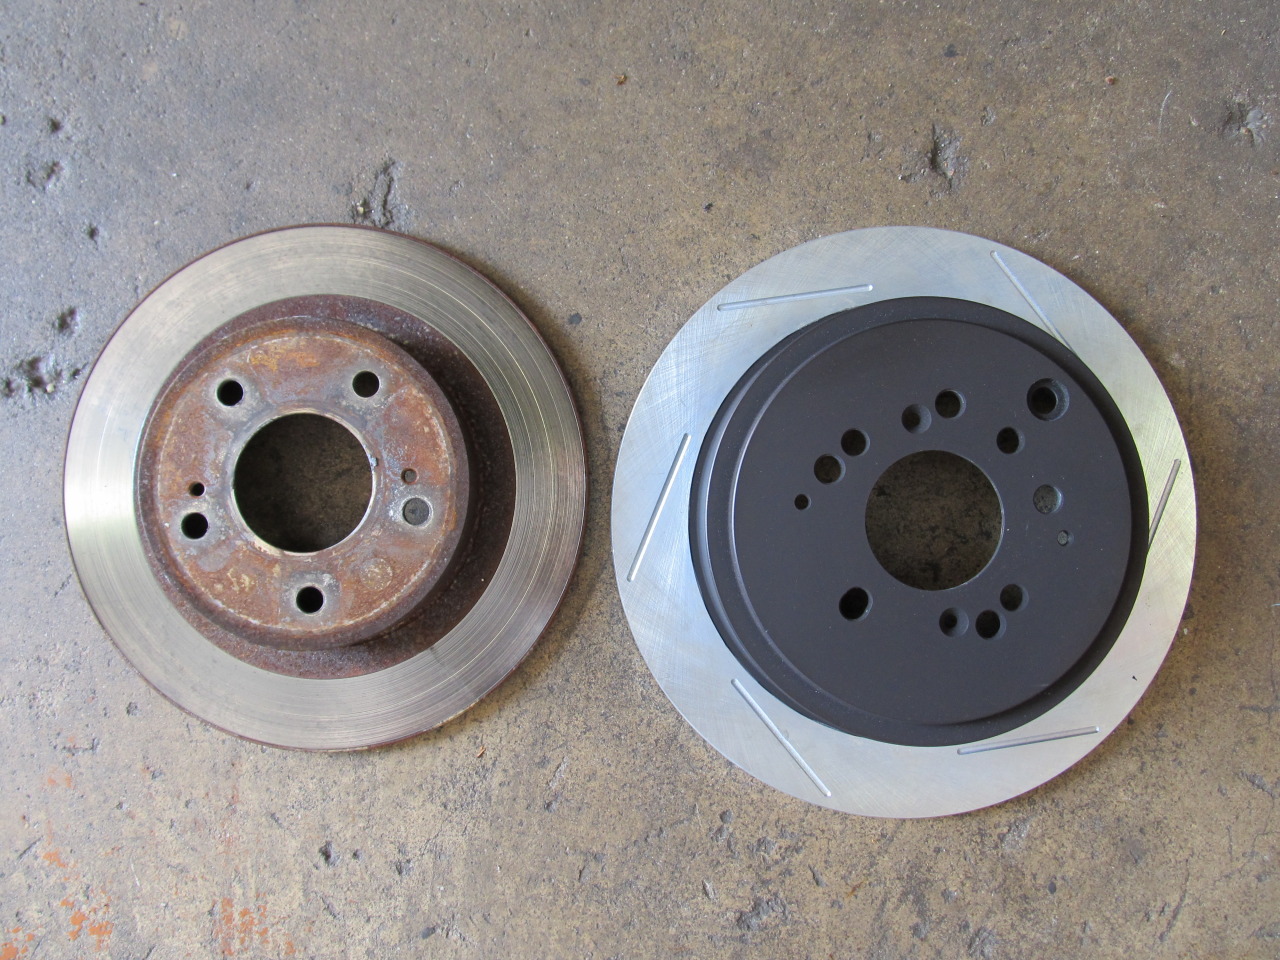
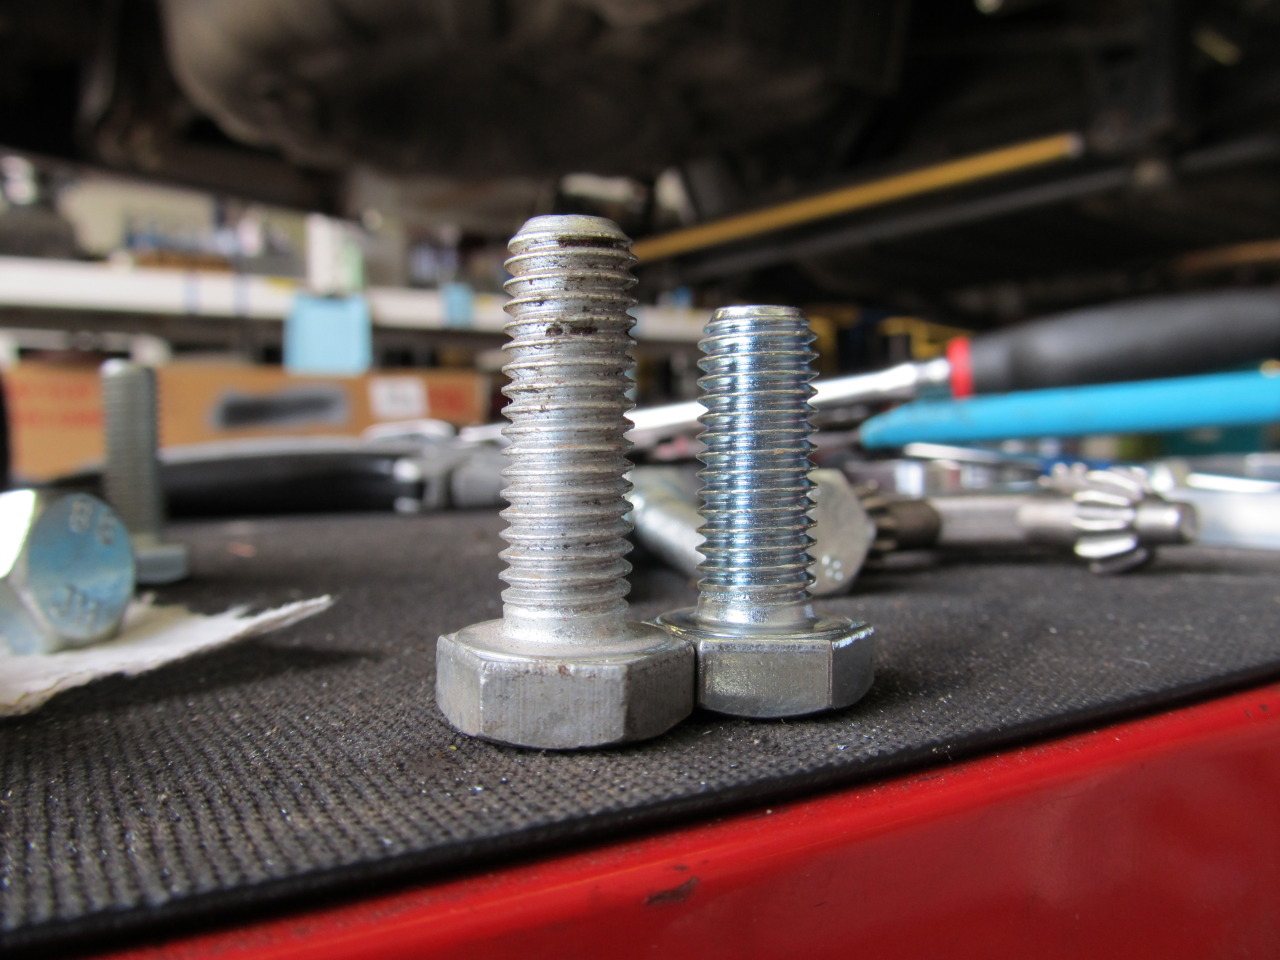
This is how far the bolt that came with the kit came through the bracket with four washers. Since it wasn't 100% threaded, we replaced it with a longer bolt.
And the results:

Four washers:
All done!
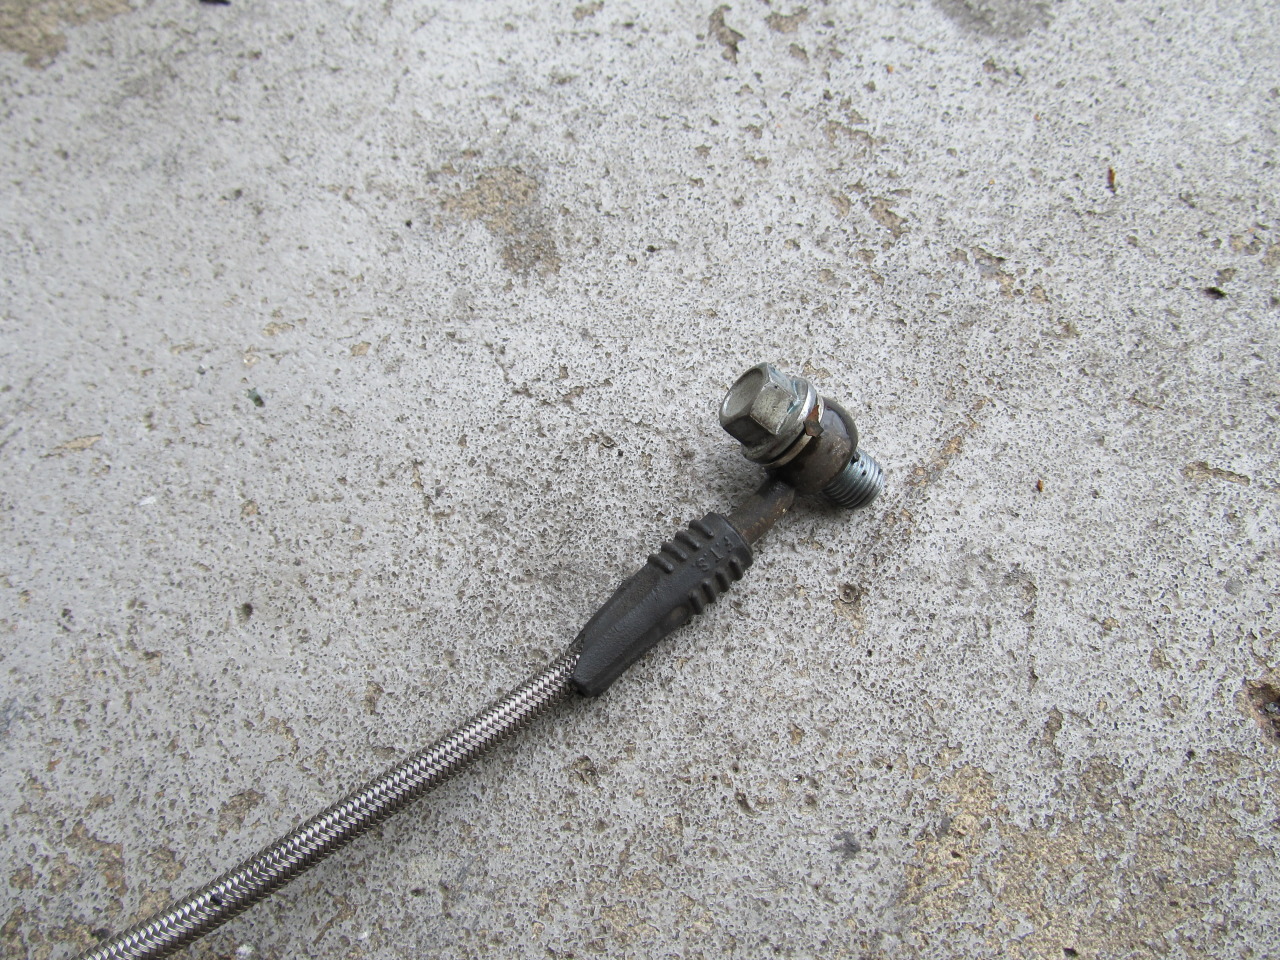
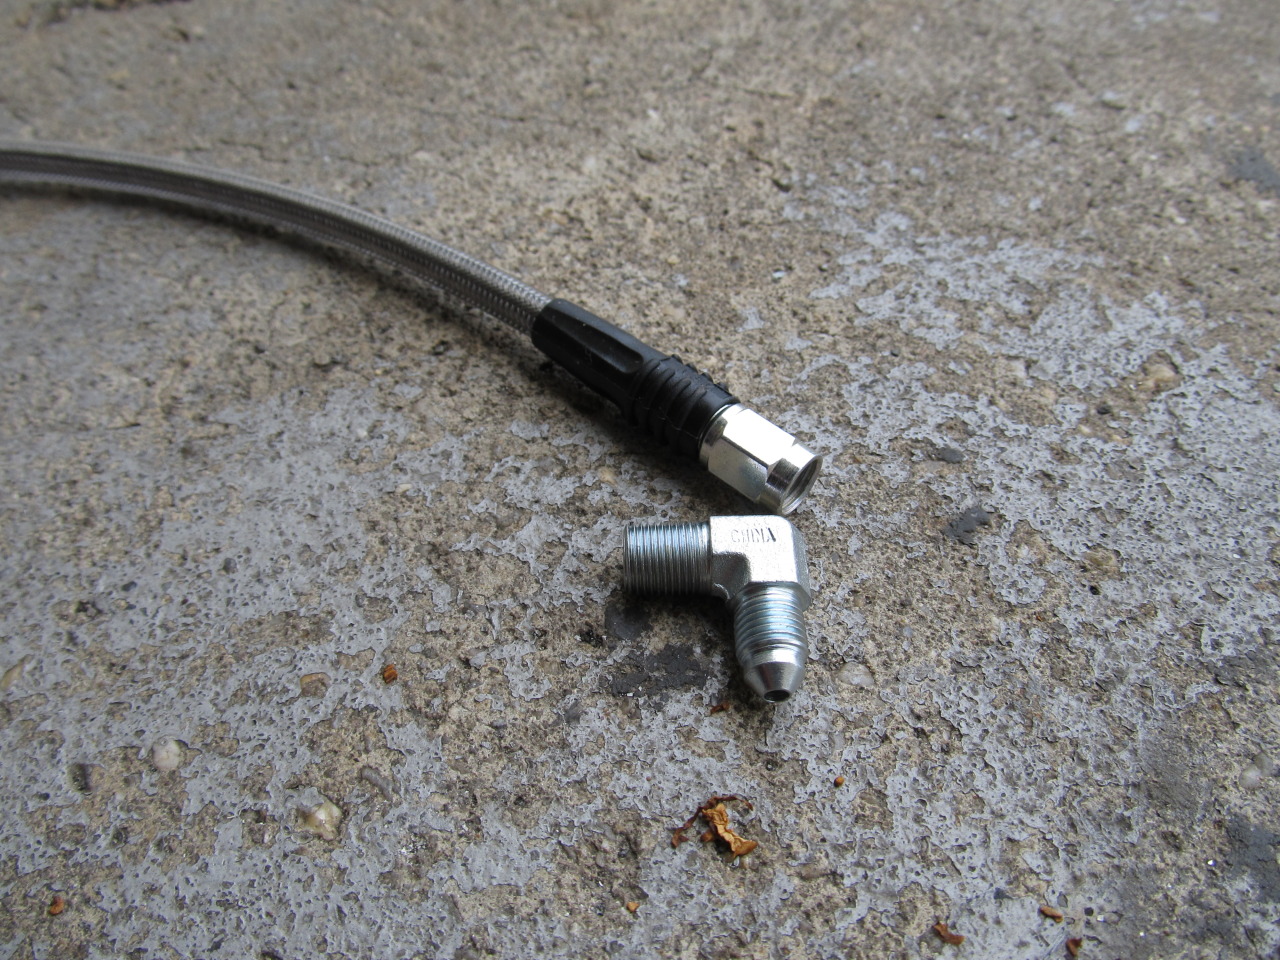
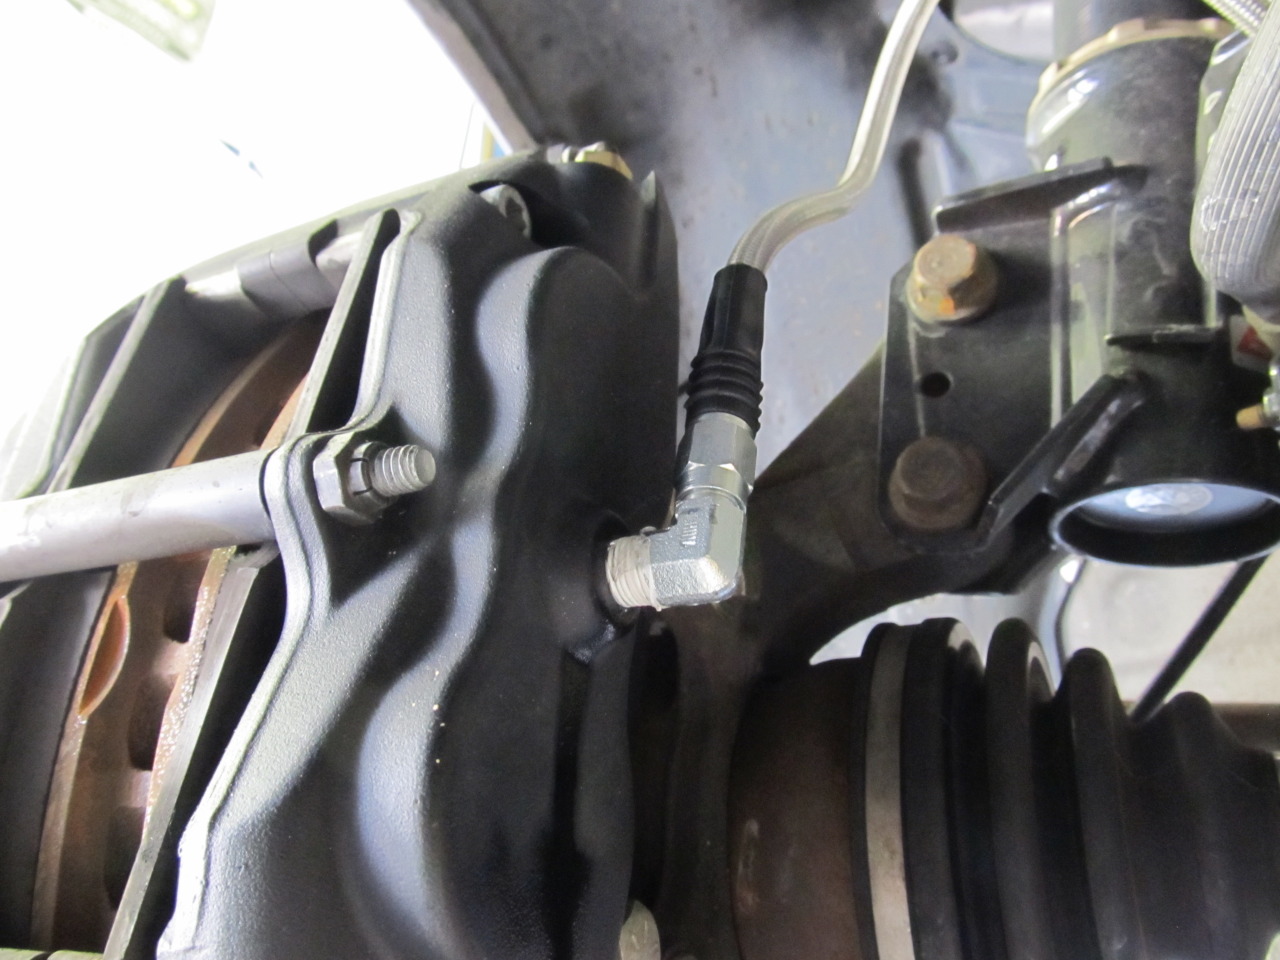
I also installed the new SS lines for the front Wilwoods that arrived late. These have the correct 90* fitting instead of the banjo bolt that was difficult to get a tight seal with.
I will be testing this setup with some Carbotech XP-8 pads this Saturday at Summit Point on the Shenandoah Circuit for about 90 minutes and then on to an SCCA auto-x on Sunday. Wish me luck!
The install went smoothly enough, except we had to use an extra washer or two to space out the dogbone bracket, which meant finding a longer stud to thread through it. It's not a huge deal, but I'm never in favor of using washers, especially four, to space out anything relating to my brakes. I can't figure out why Brian designed to kit like this. It came with I believe three washers for each side. Why not just design the dogbone bracket in a way that doesn't require so many washers?
I've been tired of looking at rusted rotors and calipers in the rear, so I taped off the rotors and painted them with the flat black high temp ceramic VHT header spray. I then used the wire wheel at the shop to clean off the calipers and sprayed them with regular black brake paint. I didn't get a chance to bed in the pads yet since my transmission just died, but in the small amount of driving I've done, I could easily feel the increased braking force. It feels incredible! I can't wait to bed the pads in and really get aggressive!
This is how far the bolt that came with the kit came through the bracket with four washers. Since it wasn't 100% threaded, we replaced it with a longer bolt.
And the results:
Four washers:
All done!
I also installed the new SS lines for the front Wilwoods that arrived late. These have the correct 90* fitting instead of the banjo bolt that was difficult to get a tight seal with.
I will be testing this setup with some Carbotech XP-8 pads this Saturday at Summit Point on the Shenandoah Circuit for about 90 minutes and then on to an SCCA auto-x on Sunday. Wish me luck!

 07-31-2012, 07:46 PM
#104

I installed mine over the weekend as well, or more specifically I installed Z32 calipers with the Fastbrakes 12.8" bracket and their rear BBK set up as well with braided lines and Hawk HPS.
Definitely a nice difference in braking power over before. I haven't got them fully broken in yet.
I also only used two washers to mount the T-bone bracket and used thread lock on everything to keep it from vibrating loose over time since their weren't any lock washers included.
The only frustrating part is that some of the Speed Bleeders didn't work right and we had to use the stock bleeders to get the air out.
Unfortunately, as noted by others, when installing the Z32 calipers you get a little more pedal travel and it's screwing up my heel toe downshifts, and that's while their at the proper height, imagine what will happen on track days when the brakes heat up and the pedal travels more.
 08-02-2012, 08:18 AM
#106
Nice! I've been super busy since my trans died on Sunday and we got the other one installed last night at like midnight, so I will dig around for the rebuild kit today and try and send them out tomorrow. PM me you address again!
08-02-2012, 11:34 AM
#108
The old VLSD is back in with a new OEM flywheel and clutch (both 5th gen) and is filled with Redline MT-90 since I didn't have enough Amsoil.
The fluid that came out of the Quaife trans might as well have been gold flake paint. It was hilariously metallic.
The old flywheel (probably original, probably resurfaced three times) had many bent teeth on the ring that the crankshaft position sensor reads off of. I'll post up pics later. I'm not sure how something like that would happen. It also had a couple different kinds of marks on the face. Some I think are 'burn' marks, and some I think are high spots. Either way, it was ugly.
I did my first round of heat cycling last night when I got done (around 1 am) and so far clutch take up/engagement going into first is much smoother than before.
More miles and heat cycling tonight! Pray to god that this solves my vibration/hesitation issue.
08-06-2012, 09:06 AM
#109
Glad to hear you fixed the trans, that was some ER work right there. I don't get it, your car sounded fine when I saw it. Guess that' just how it is with older cars. I'll pm you my address. Thanks!
 08-14-2012, 06:11 AM
#111
Back to the VLSD trans....goodbye Quaife
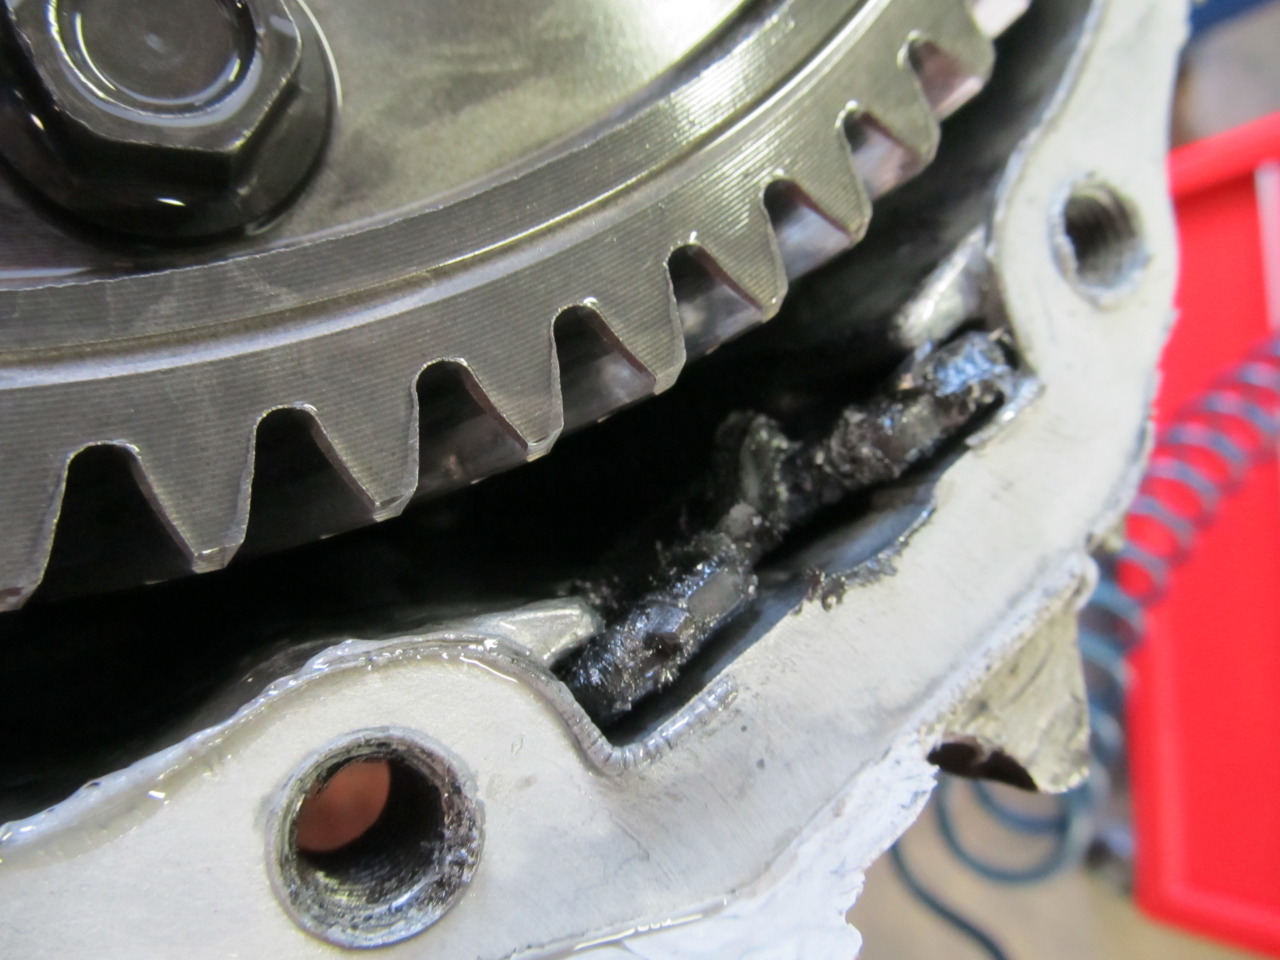
Well as I mentioned earlier, the Quaife trans is out and the VLSD is back in with a new 5th gen clutch and flywheel. The clutch that was in the car was only 18 months old, but I had a suspicion that the flywheel was warped, so I wanted to start fresh and hopefully not touch them again for a long time. Turns out the flywheel had all sorts of problems. Take a look for yourself:
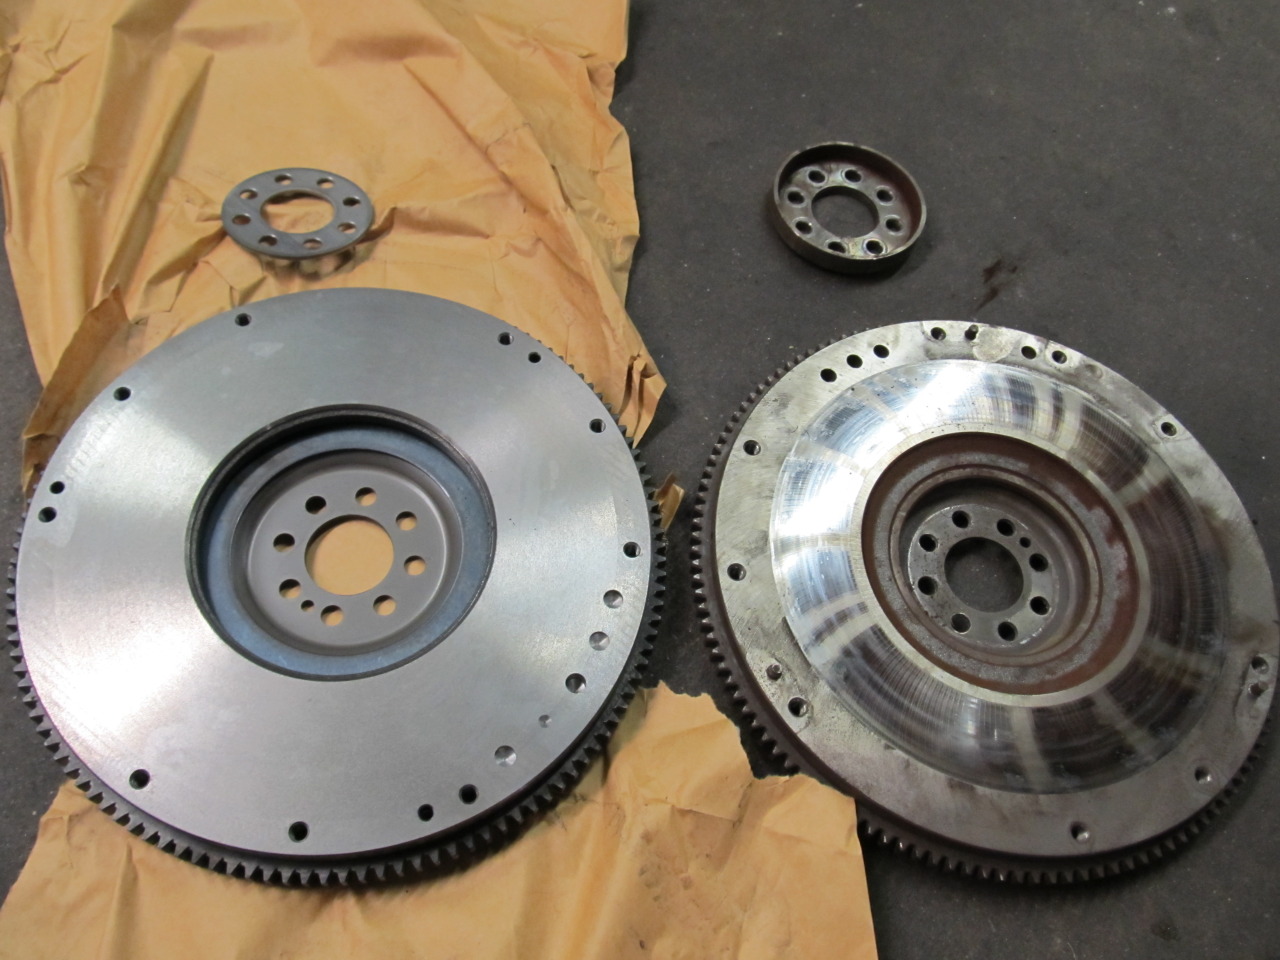
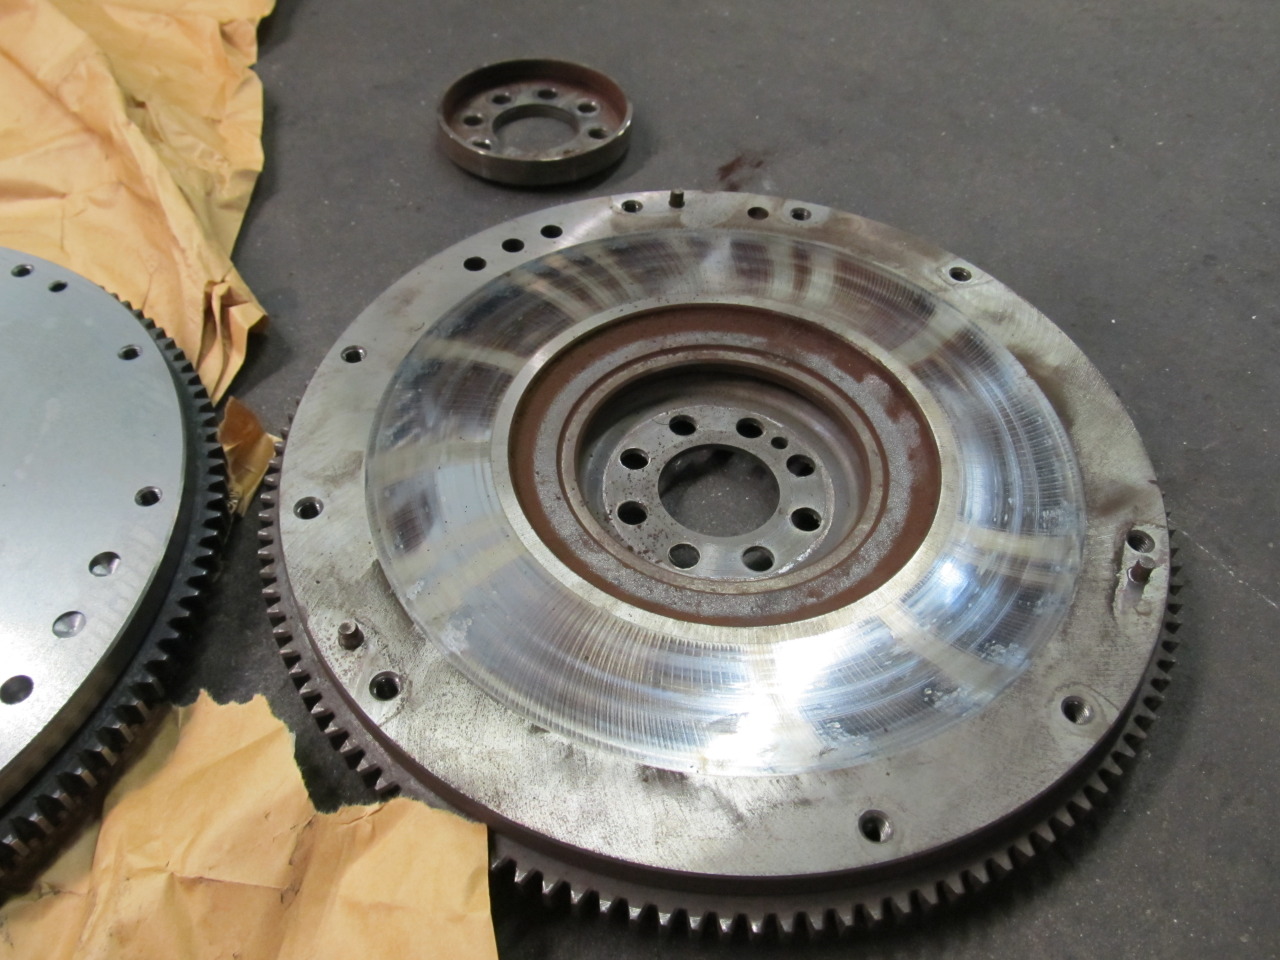

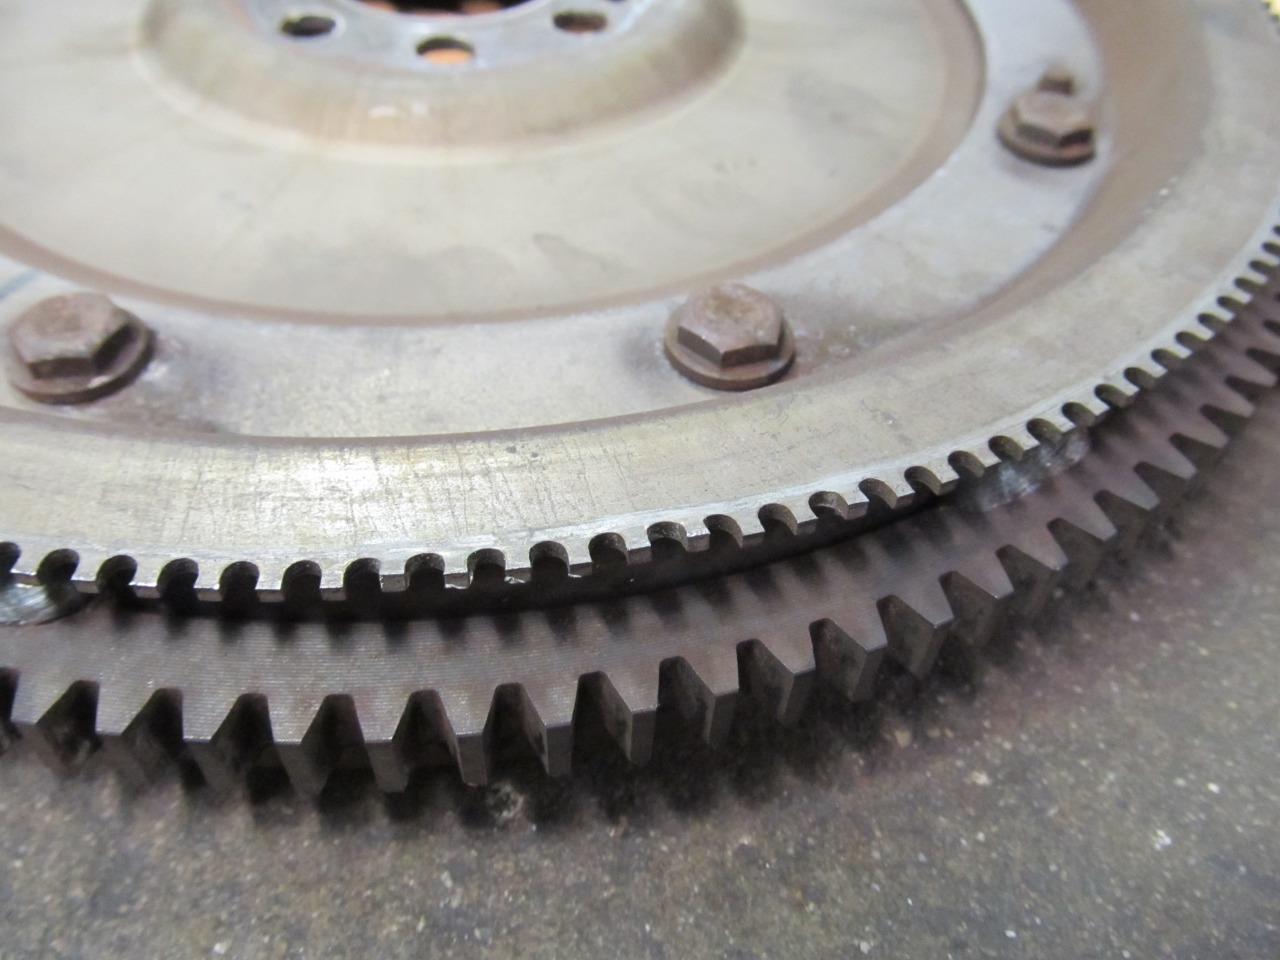

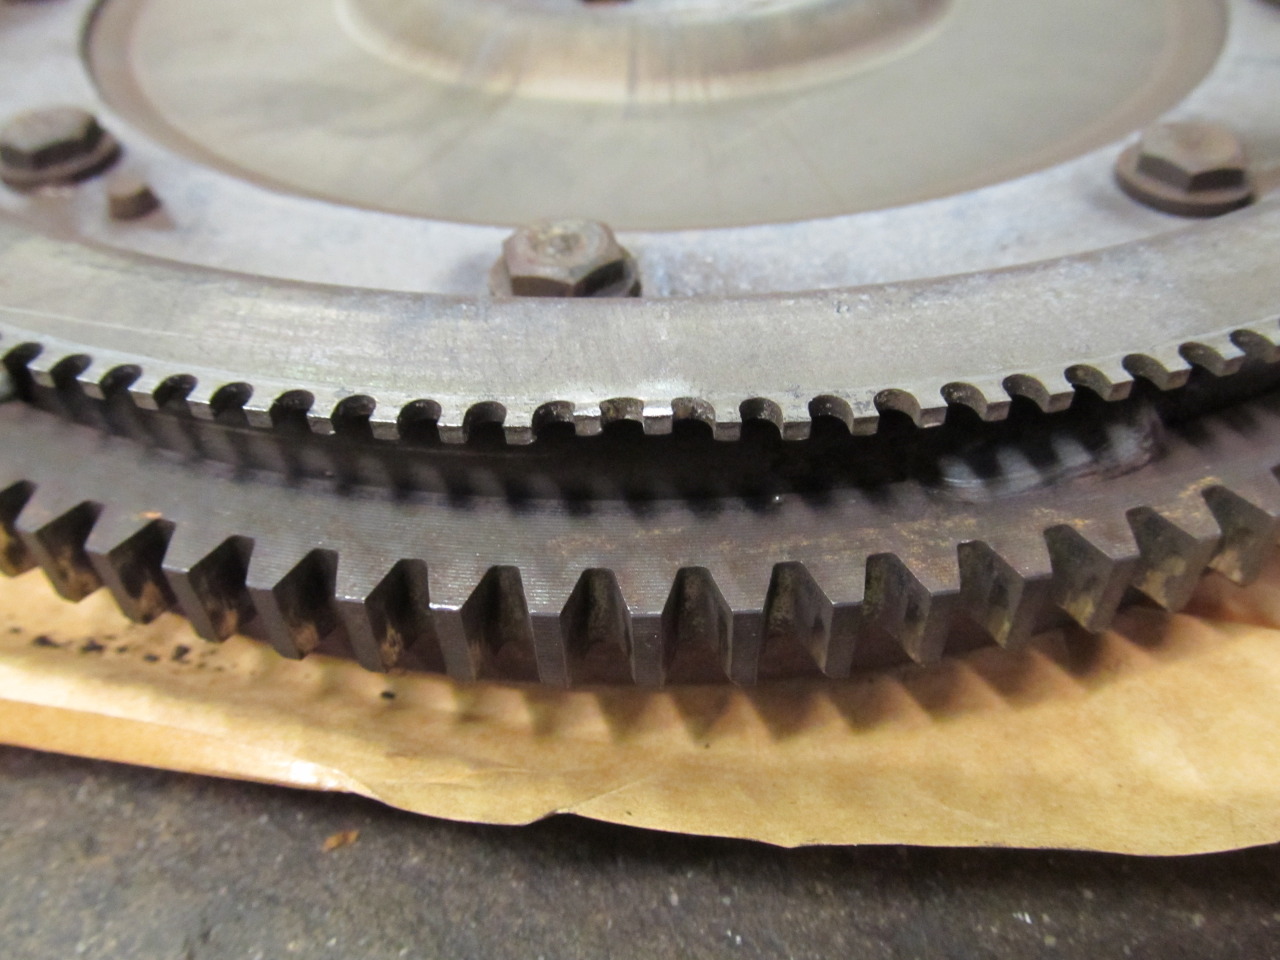
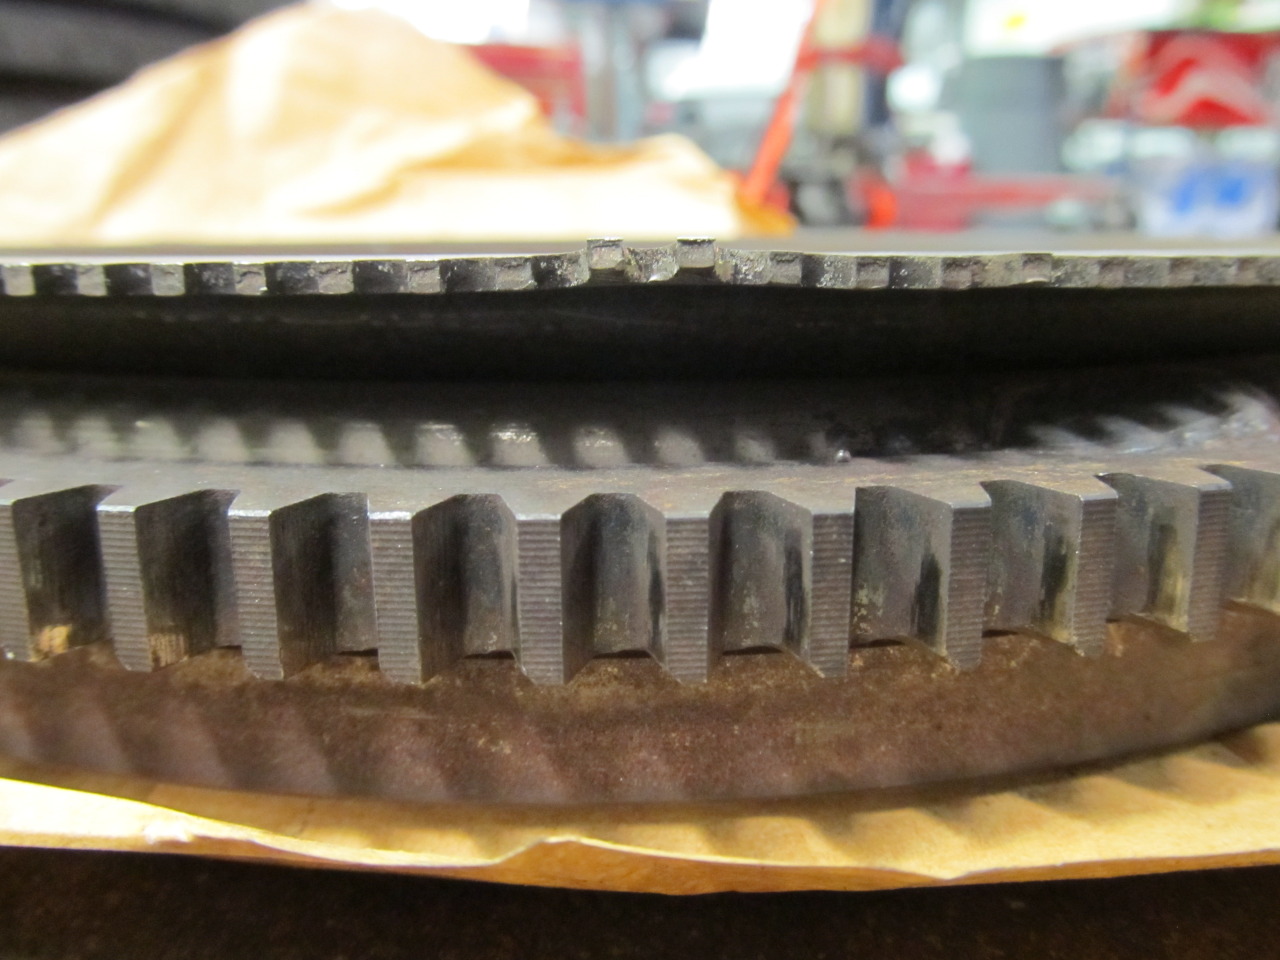
I've got NO idea how those bent teeth happened, but the car is so much smoother to drive now than it was before. Did I mention that the rear crankshaft position sensor had been worn down on one side where apparently those bent teeth had been rubbing against it??
I put on about 50 miles of stop and go driving through neighborhoods (plus 100 miles of normal driving) before my track day at Summit Point and the clutch seems to be holding up quite well. More mods and videos to come!
08-14-2012, 06:20 AM
#112
The dead Quaift transmission
I got around to opening up the busted trans and found some interesting things, but I don't really know what I'm looking at, so I sure would appreciate the help of any transmission experts!
Metal shavings on magnet:
Scratched case from metal chunks flying around:

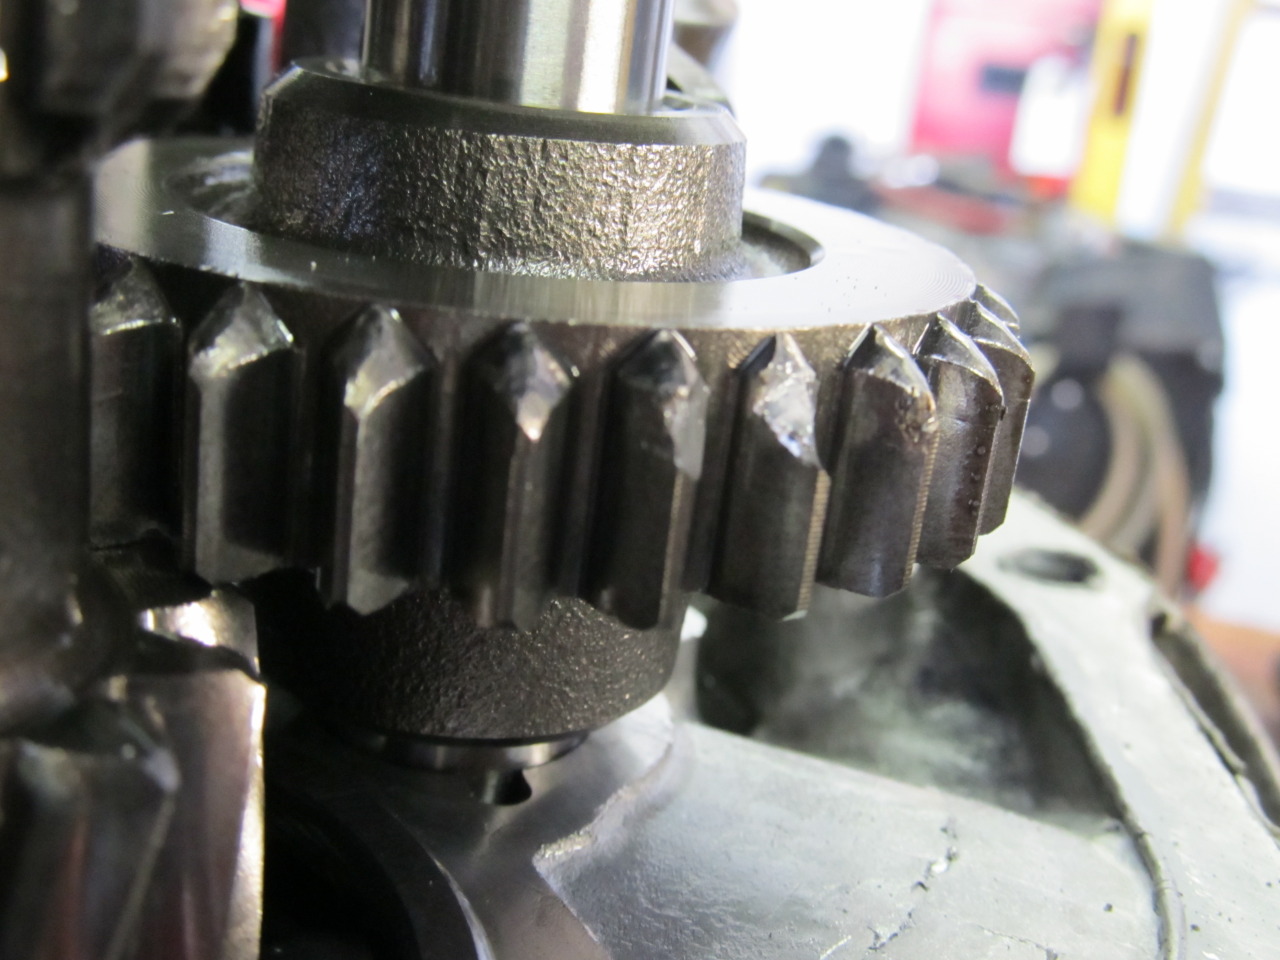
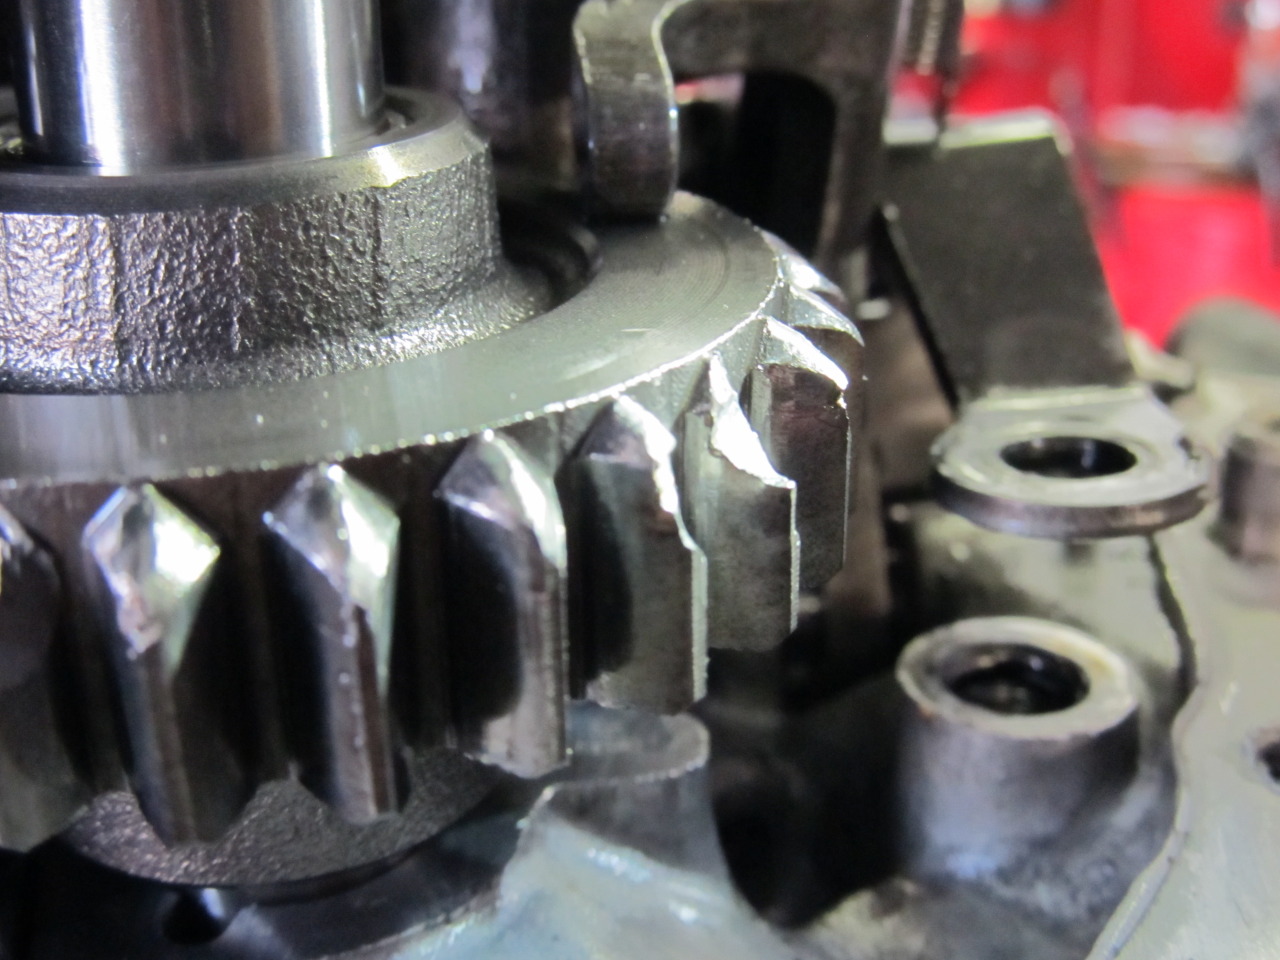
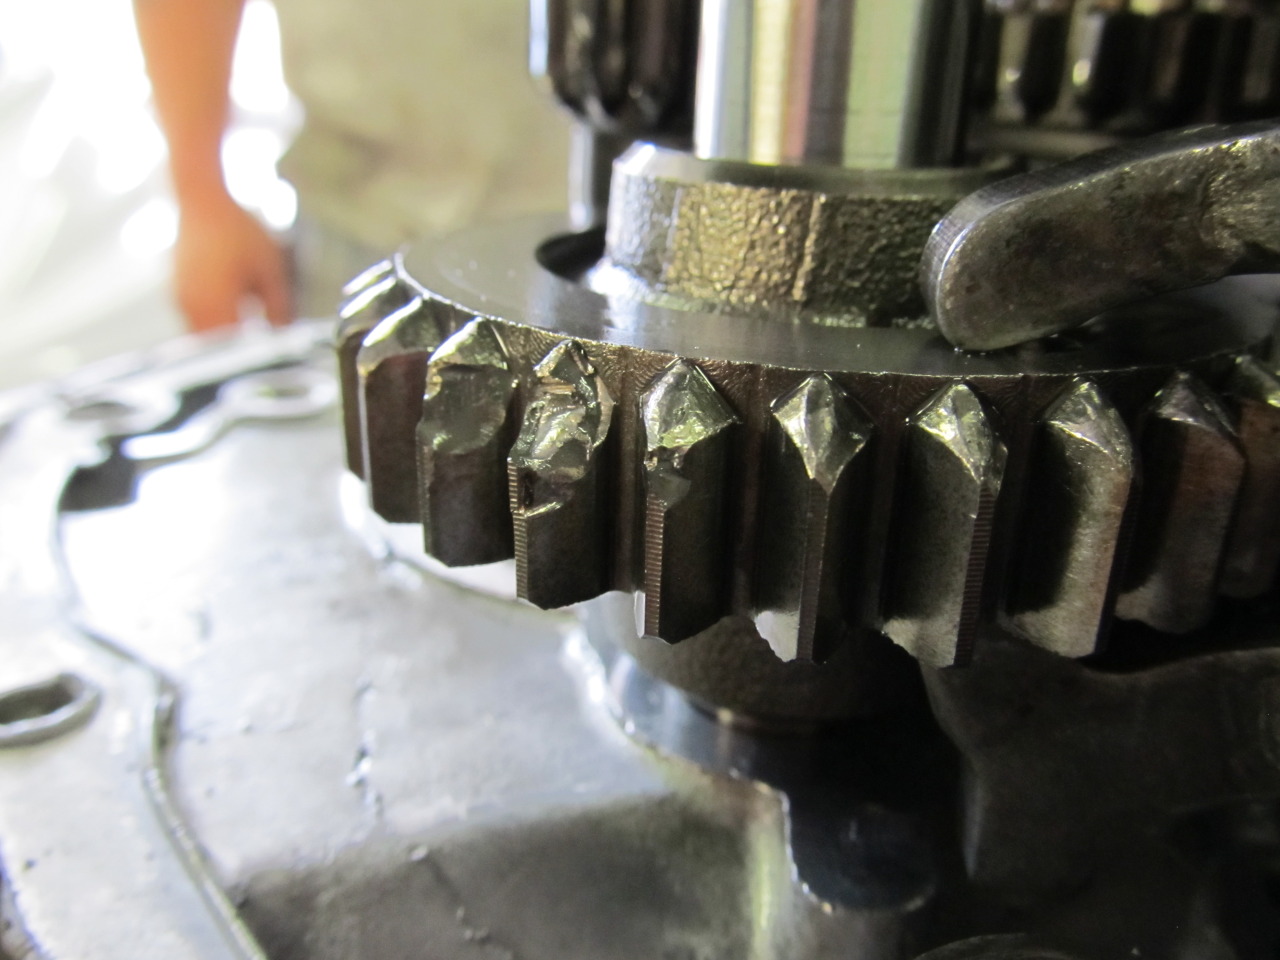
As previously mentioned, the trans had a problem where it would 'pop' when taking the trans out of reverse and made all sorts of terrible noises when in reverse, so I can only assume the gear with the busted teeth is the reverse gear. It's the one down there alone on the right:
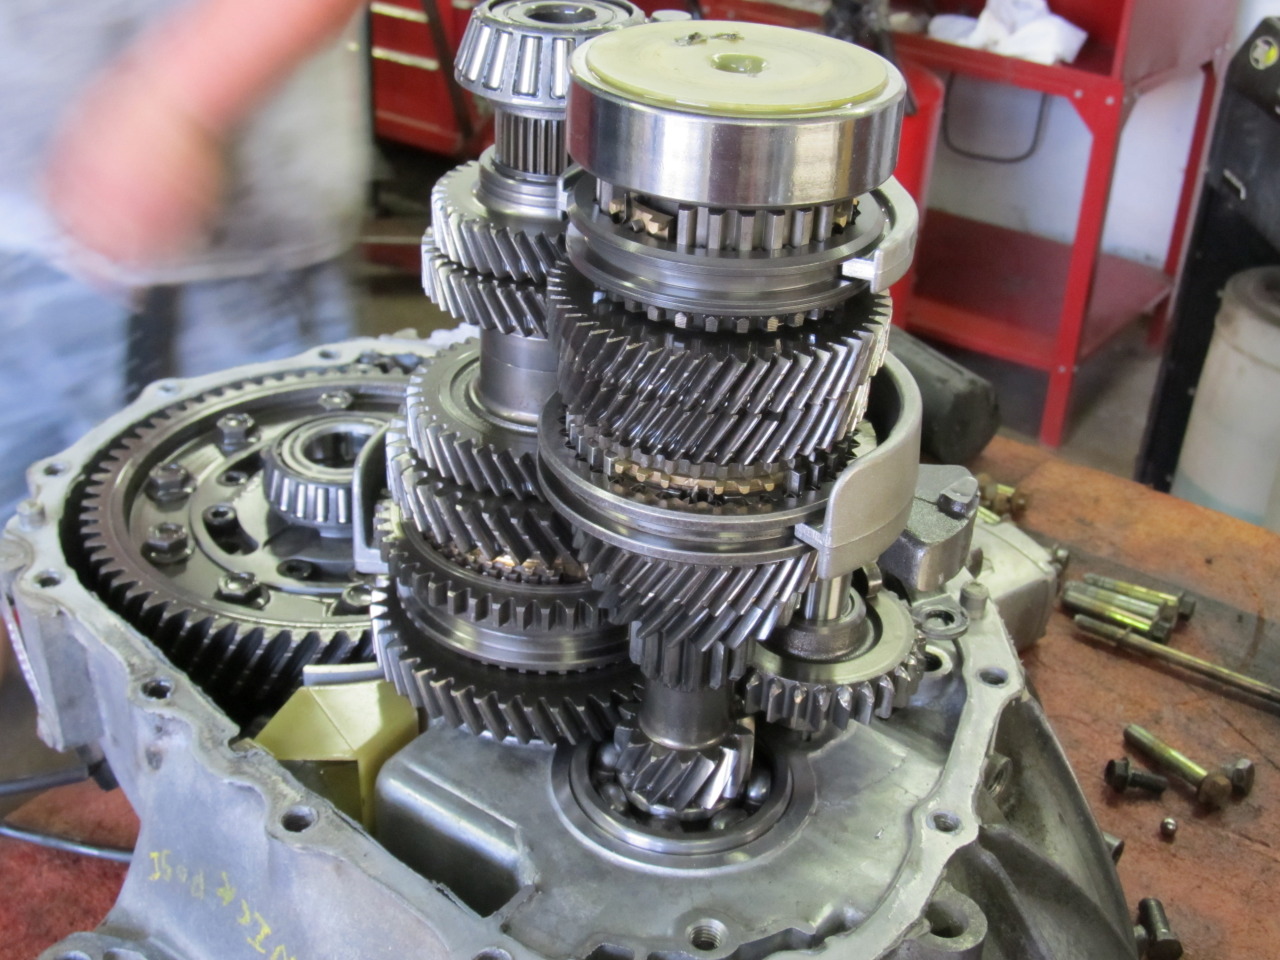
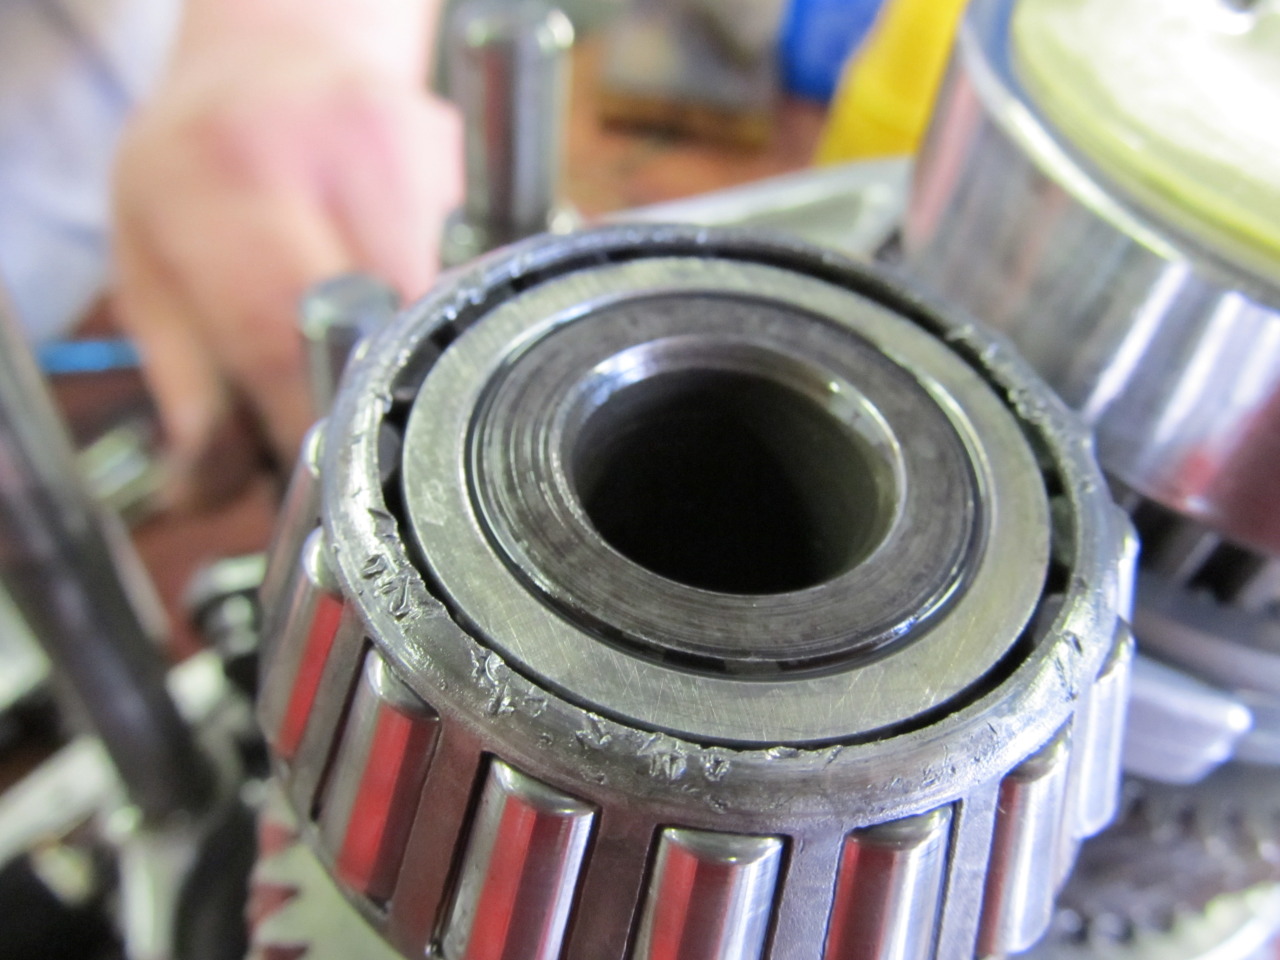
The input and output shafts have some damage as well, but maybe it's just the bearings?
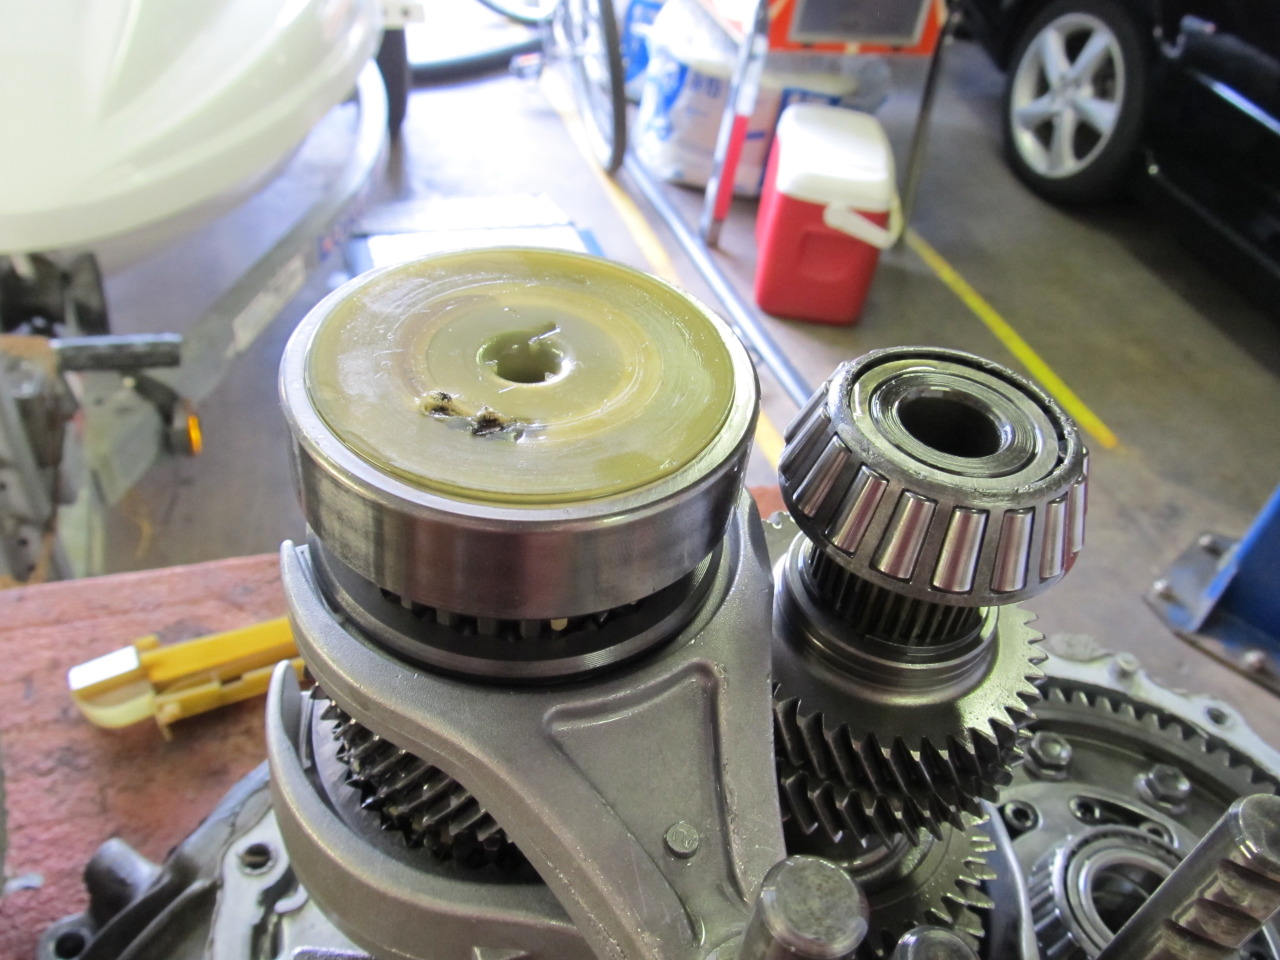
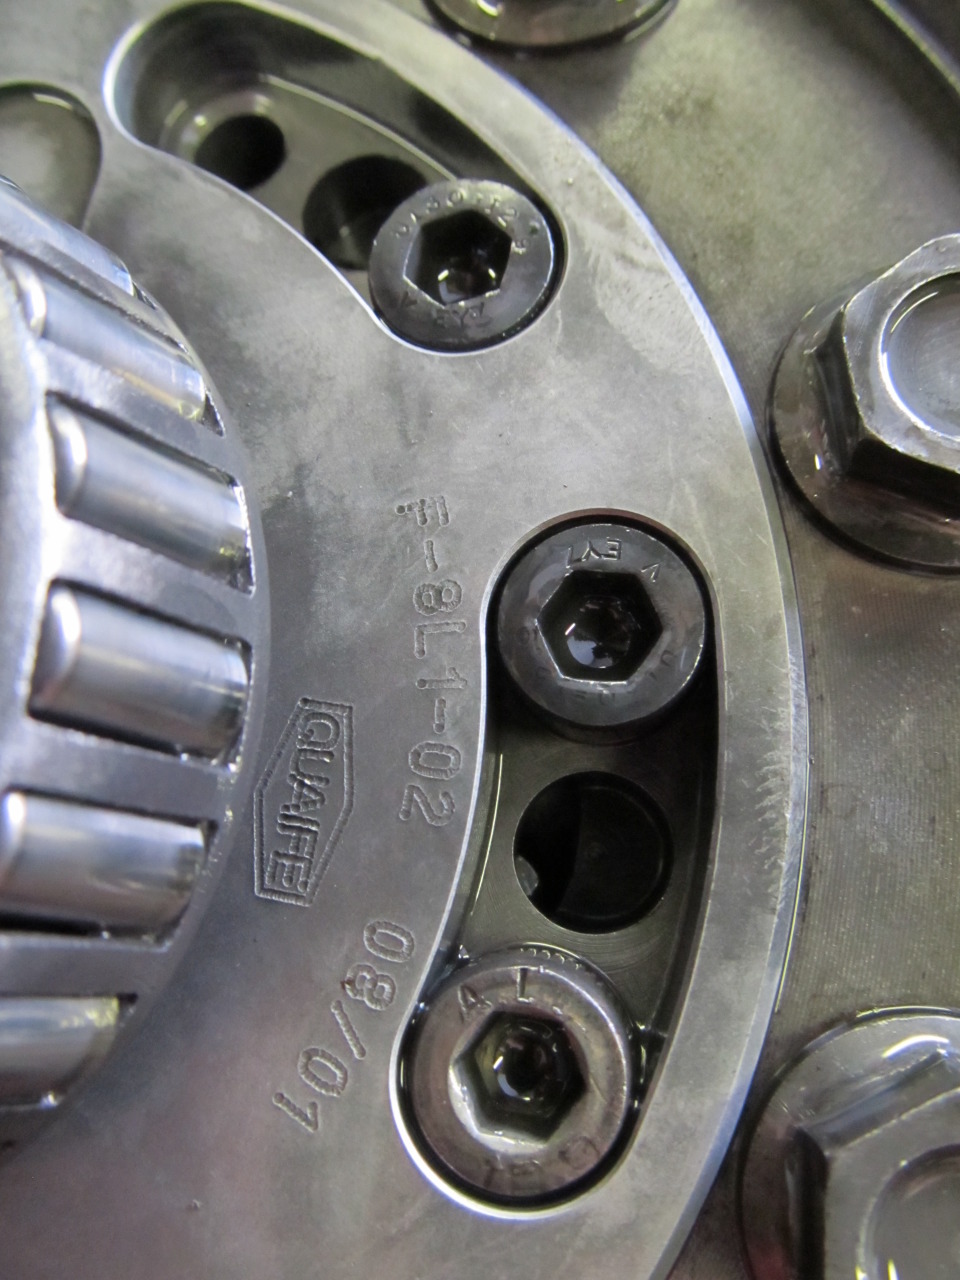
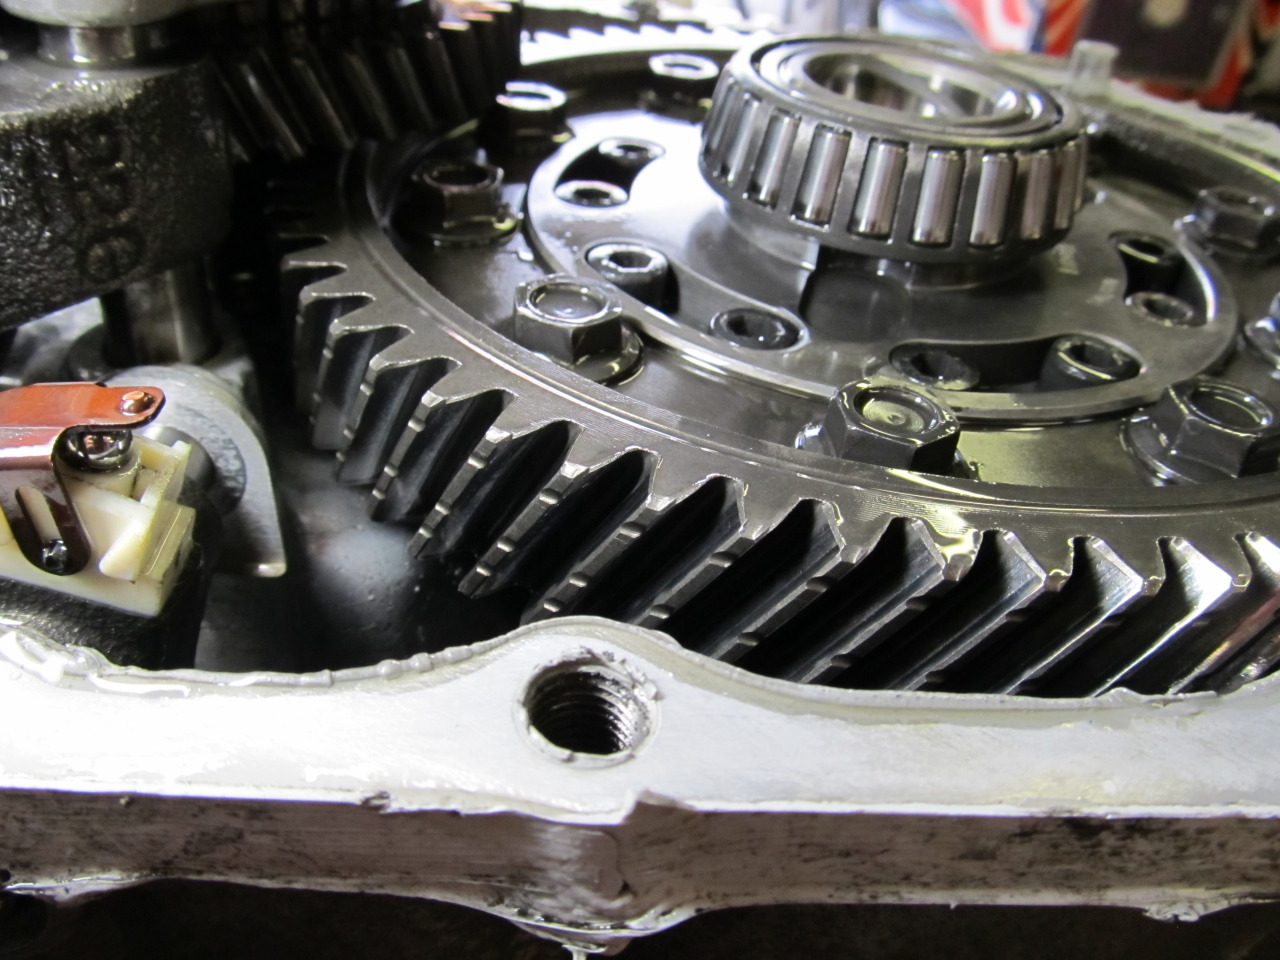
The Quaife doesn't have any visible damage to the teeth:
Due to the damage to the reverse gear and to the I/O shafts, I think the best thing would be to trash this trans and throw the Quaife in another, less broken trans. What do you think?
Metal shavings on magnet:
Scratched case from metal chunks flying around:
As previously mentioned, the trans had a problem where it would 'pop' when taking the trans out of reverse and made all sorts of terrible noises when in reverse, so I can only assume the gear with the busted teeth is the reverse gear. It's the one down there alone on the right:
The input and output shafts have some damage as well, but maybe it's just the bearings?
The Quaife doesn't have any visible damage to the teeth:
Due to the damage to the reverse gear and to the I/O shafts, I think the best thing would be to trash this trans and throw the Quaife in another, less broken trans. What do you think?
Last edited by 95maxrider; 08-14-2012 at 07:41 PM.
08-14-2012, 08:17 AM
#113
I got around to opening up the busted trans and found some interesting things, but I don't really know what I'm looking at, so I sure would appreciate the help of any transmission experts!
The Quaife doesn't have any visible damage to the teeth:
Due to the damage to the reverse gear and to the I/O shafts, I think the best thing would be to trash this trans and throw the Quaife in another, less broken trans. What do you think?
The Quaife doesn't have any visible damage to the teeth:
Due to the damage to the reverse gear and to the I/O shafts, I think the best thing would be to trash this trans and throw the Quaife in another, less broken trans. What do you think?
08-14-2012, 11:32 AM
#114
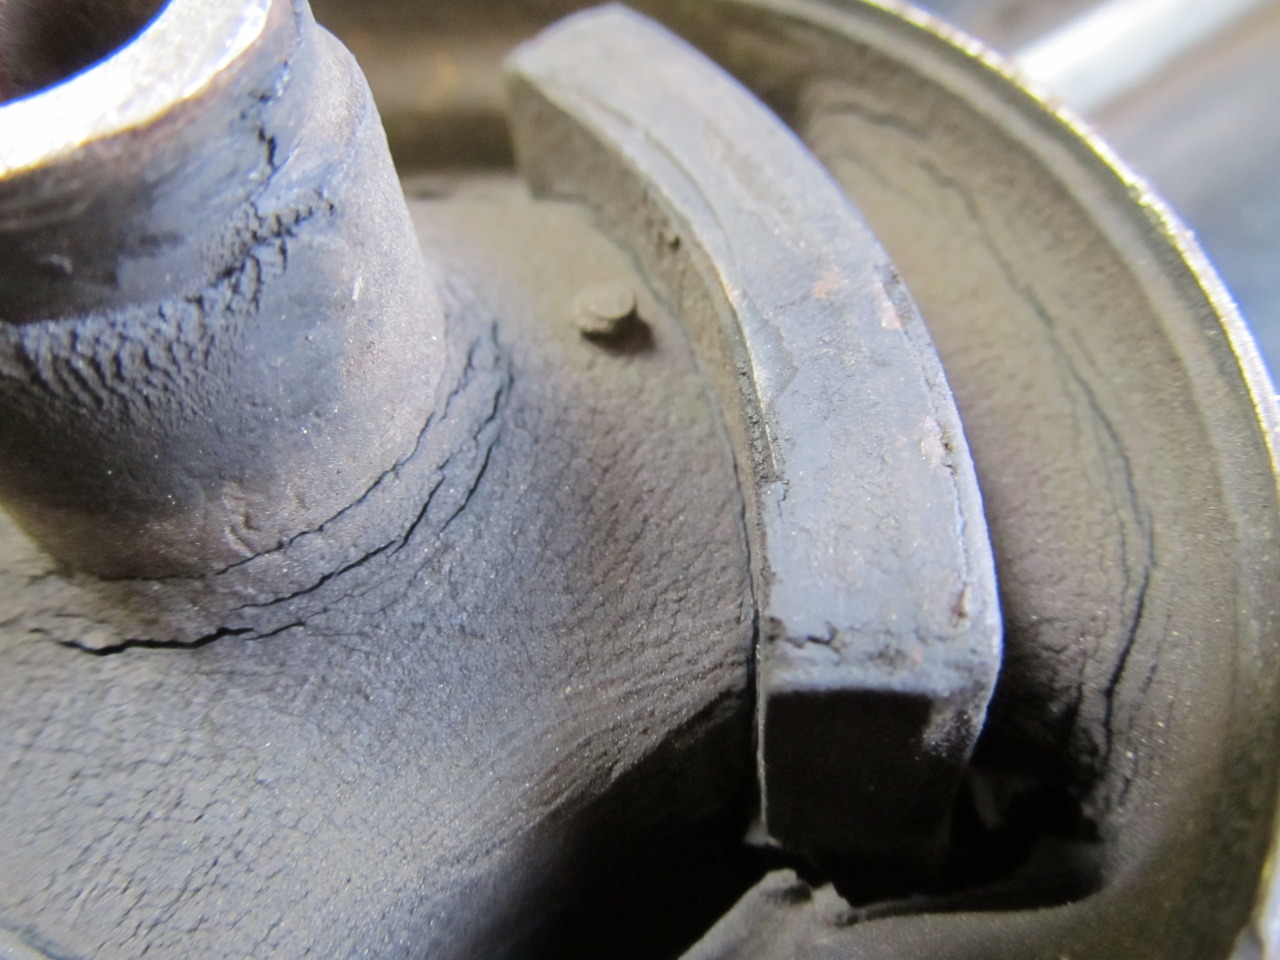
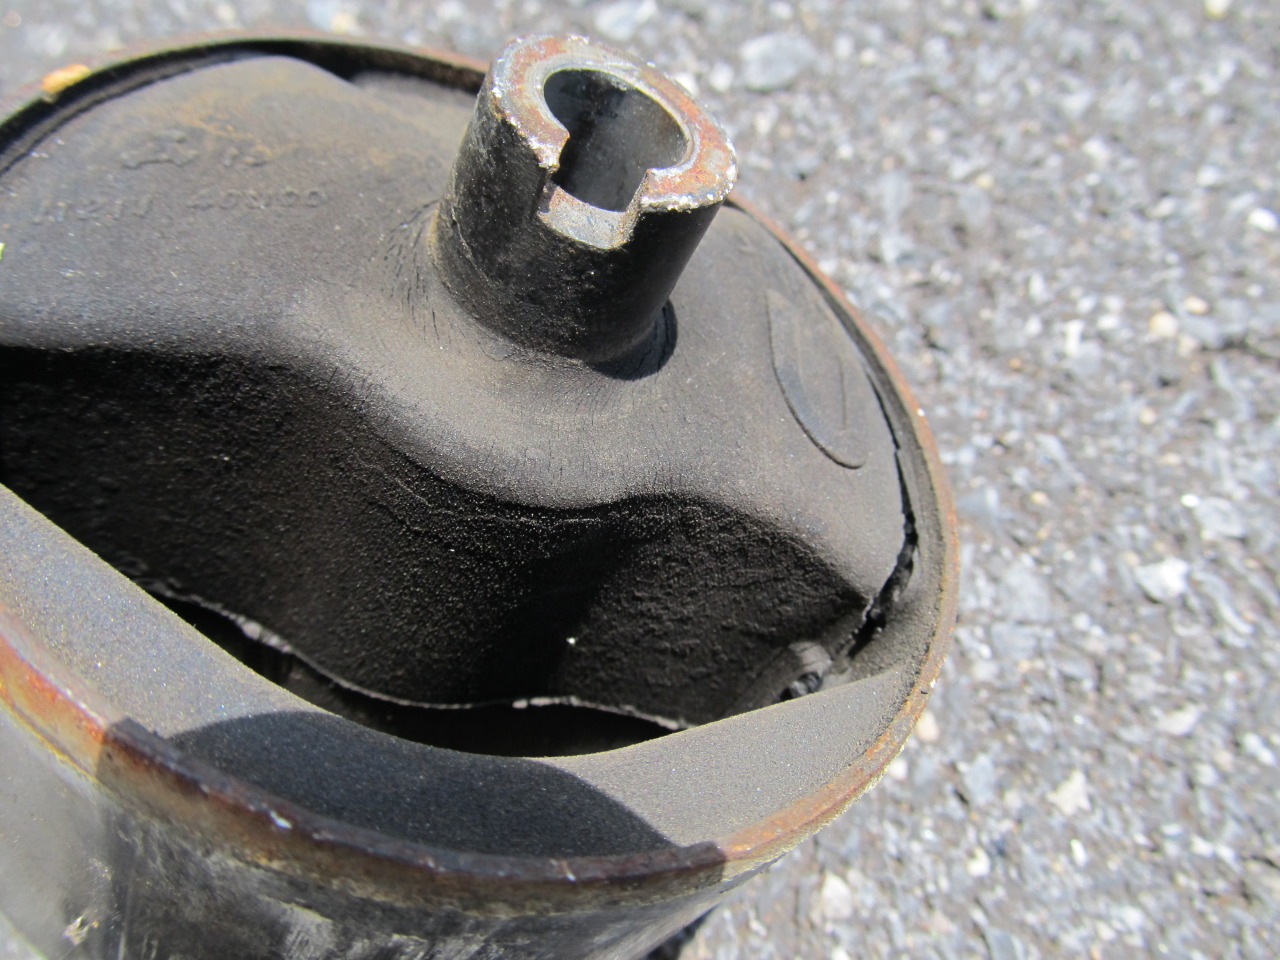
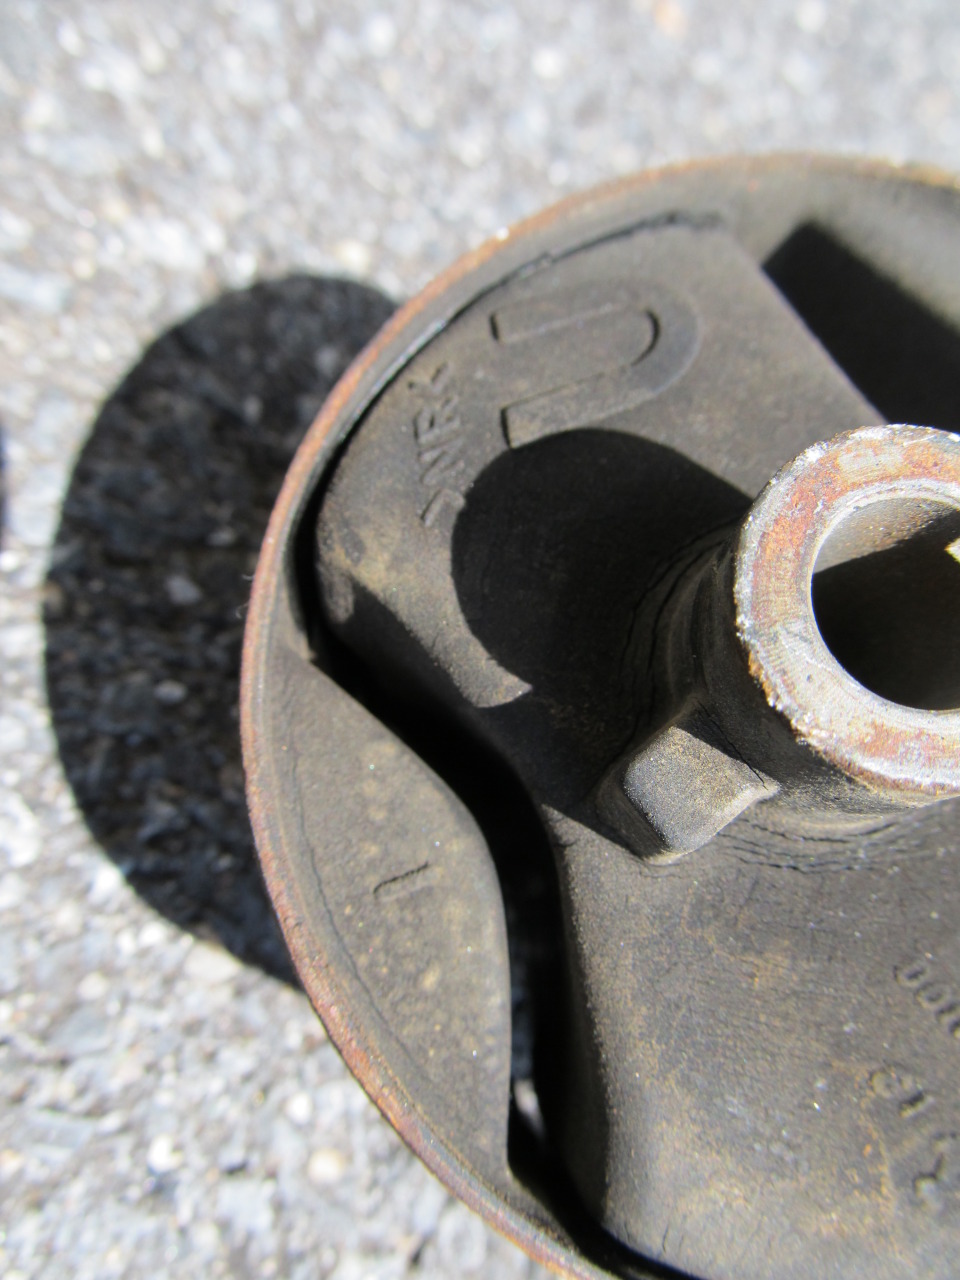
Poly side motor/trans mounts
After weeks of waiting, the poly side mounts from knight_yyz arrived and I got them pressed into the old mounts. Boy, were the old ones shot! The one on the passenger side had started to come apart from the metal housing on one side, and both had plenty of minor cracks in them.
The install went pretty smoothly except I wasn't aware that the two outer lips on the driver's mount needed to be trimmed off, so that took a little extra time. The car does vibrate more at idle and even while in gear, but I think it's acceptable enough. I haven't really pushed the car very hard yet or tried to spin the wheels/test for wheel hop, but shifting the car seems to be a little smoother/easier. I have the NWP torque link, but it is currently disconnected until I get a good feel for what these do to the car. On to the pics!
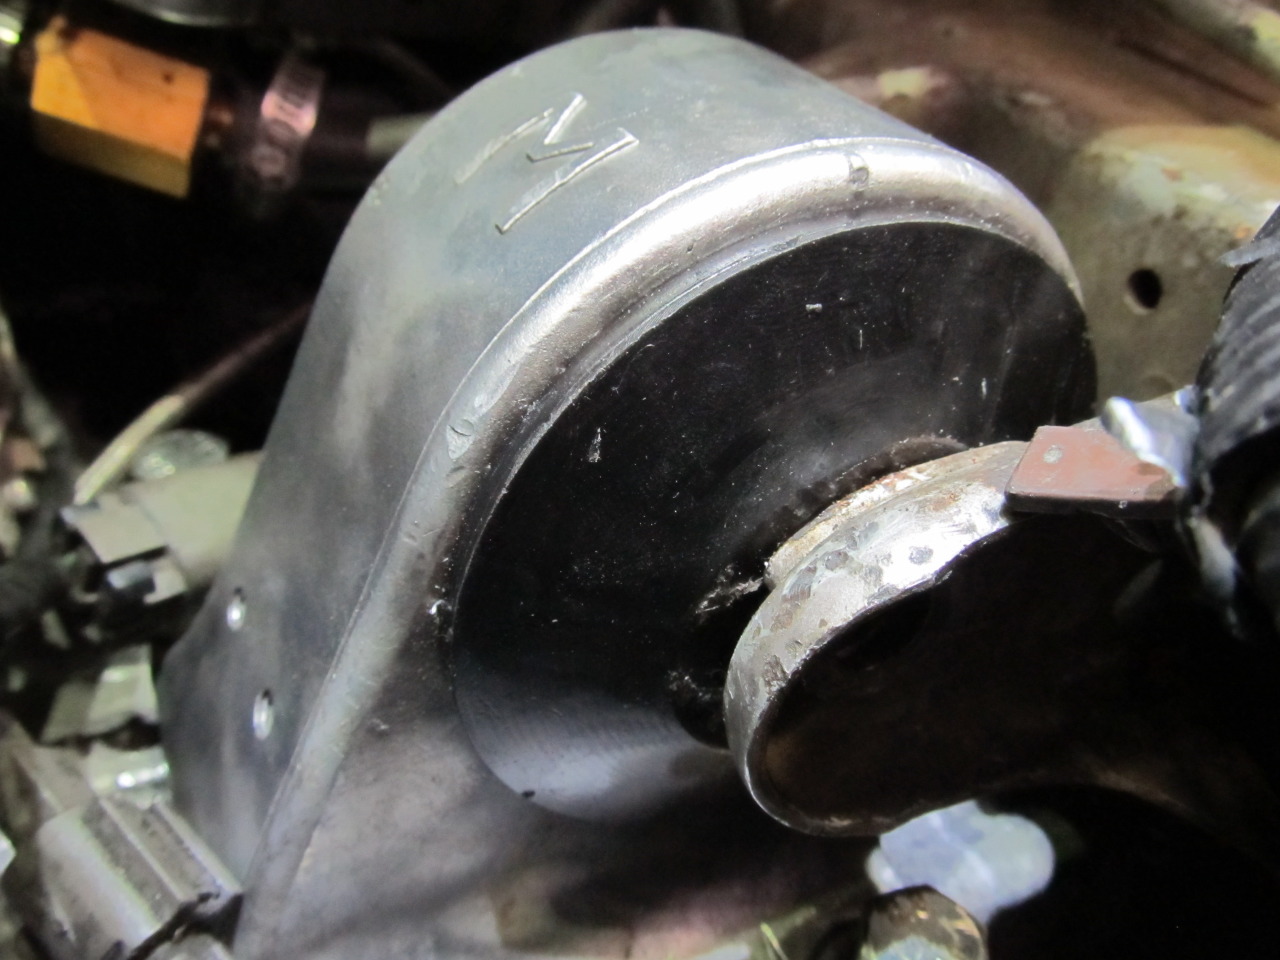
The install went pretty smoothly except I wasn't aware that the two outer lips on the driver's mount needed to be trimmed off, so that took a little extra time. The car does vibrate more at idle and even while in gear, but I think it's acceptable enough. I haven't really pushed the car very hard yet or tried to spin the wheels/test for wheel hop, but shifting the car seems to be a little smoother/easier. I have the NWP torque link, but it is currently disconnected until I get a good feel for what these do to the car. On to the pics!
08-14-2012, 11:49 AM
#115
Other random things
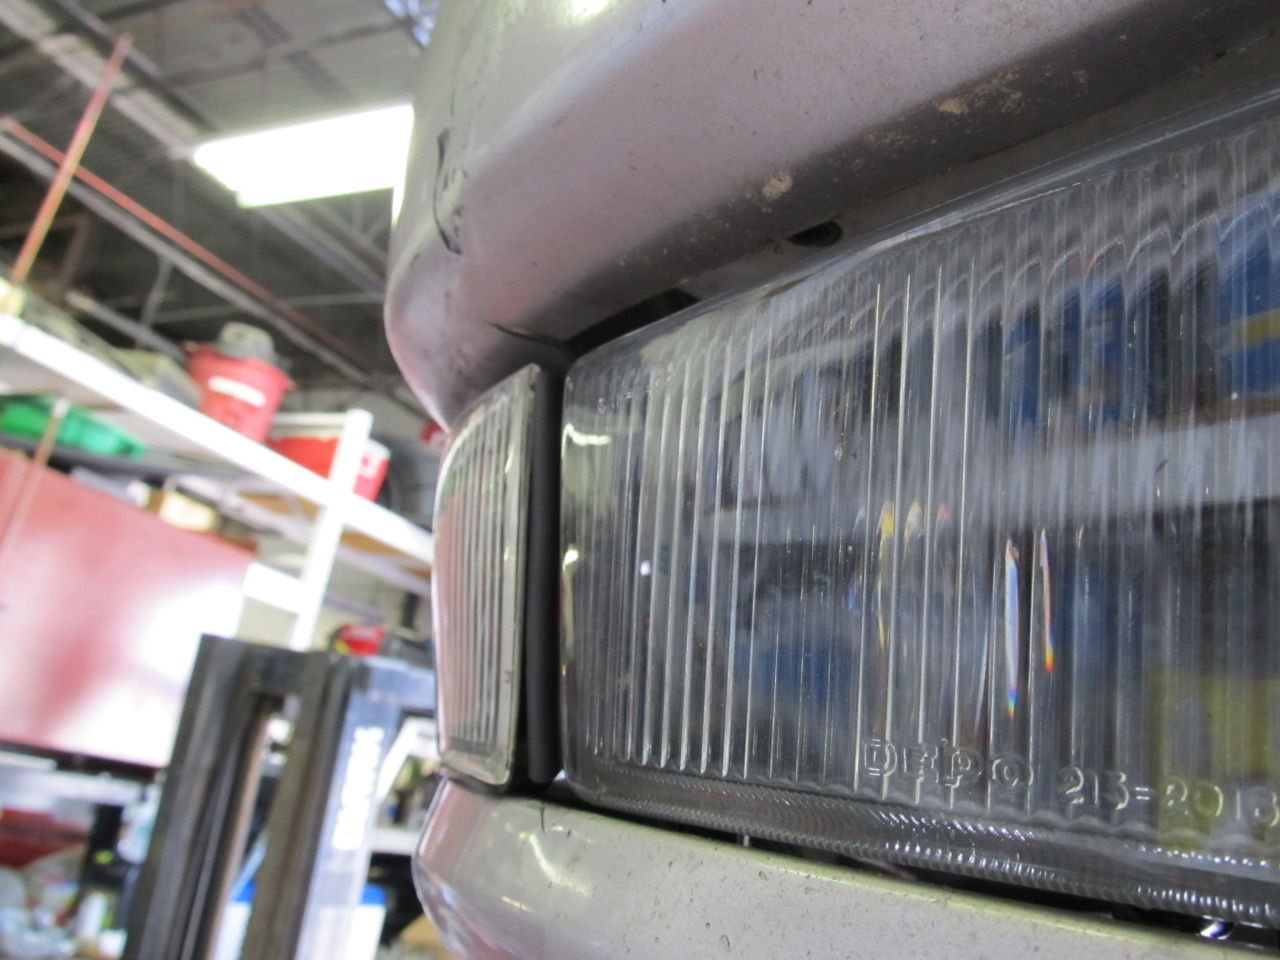
I've been noticing that the passenger side fog light seems to be angled up pretty high, so I bent the bracket holding it in place down a little bit. Seems to have worked!
Before:
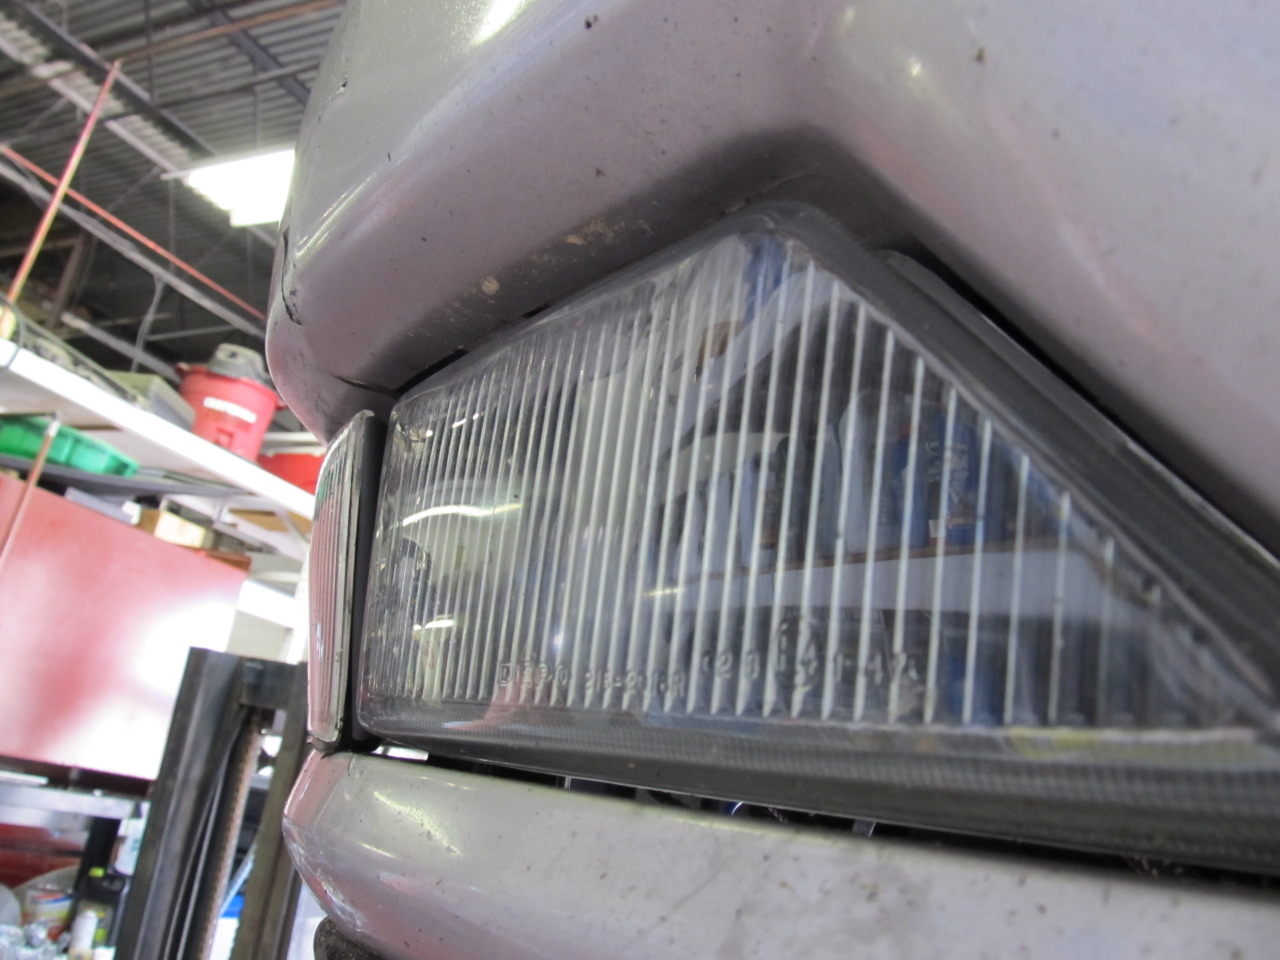
After:
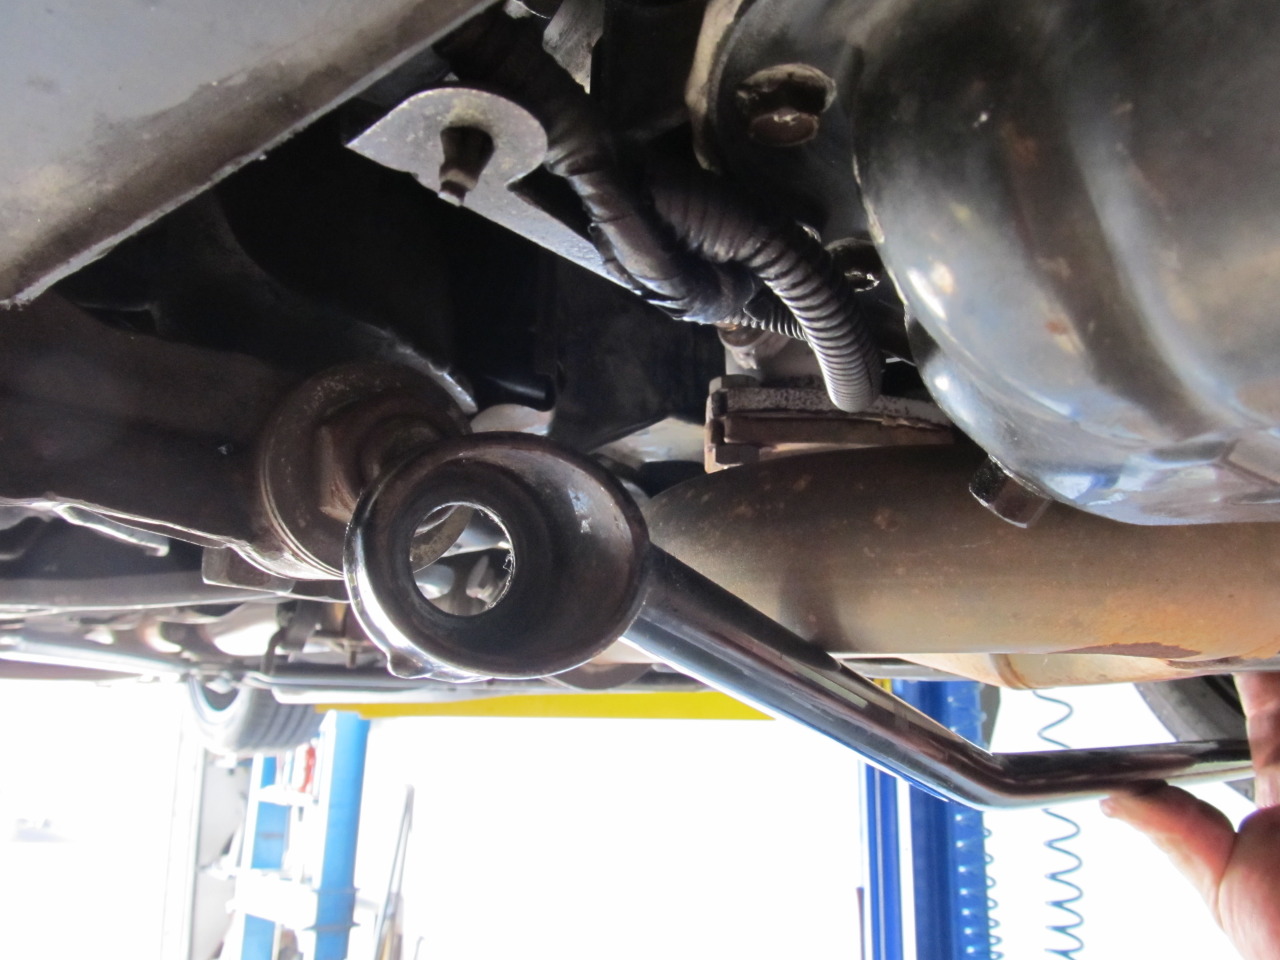
I also bought a stage 1 LTB from a member in the hopes it would clear my Cattman headers. No such luck on that. Now I have both stage 1+2 sitting around not being used. I was considering having a custom one made to fit, but I'm worried about ground clearance....
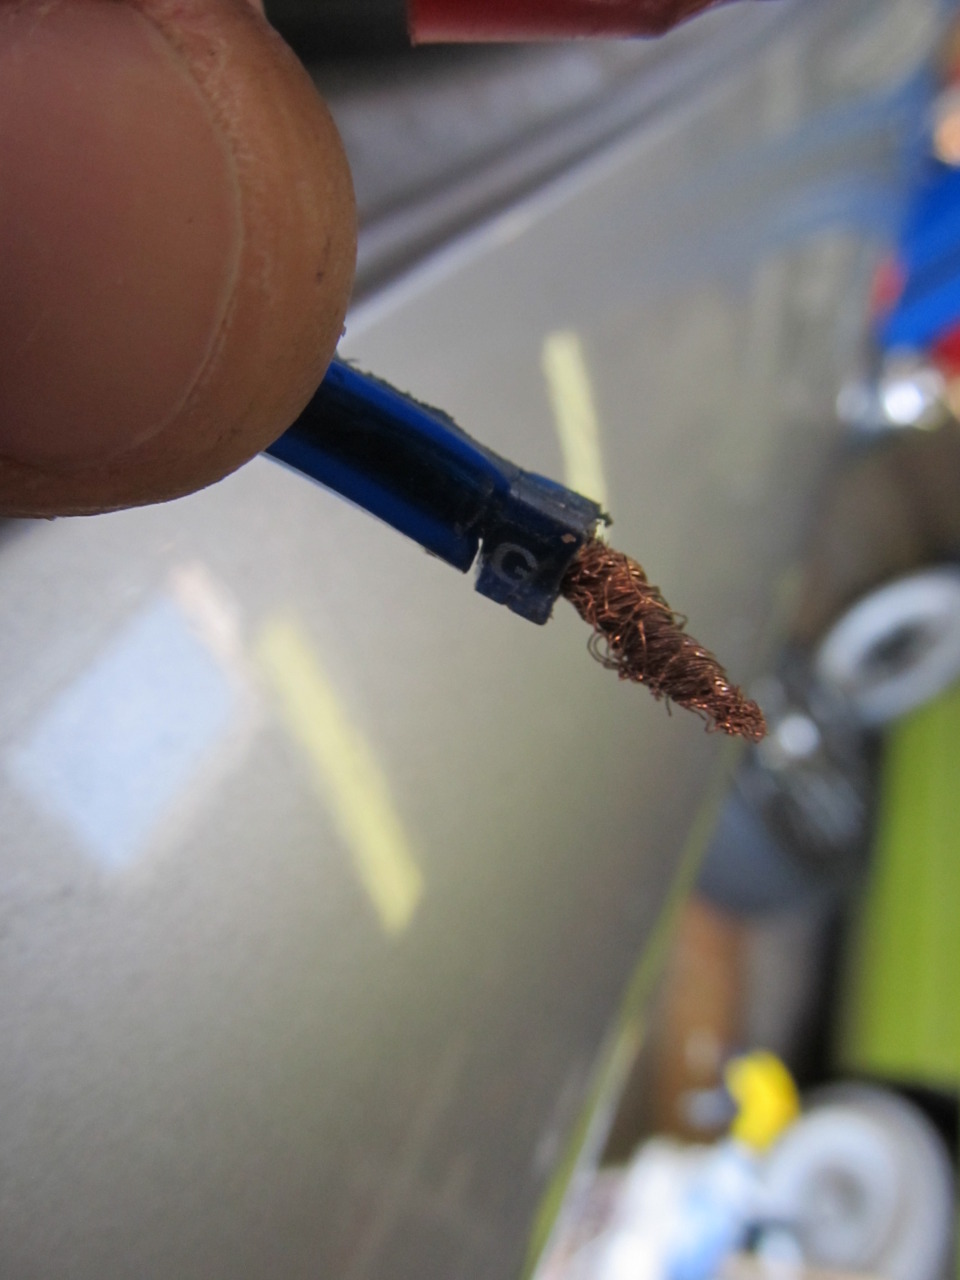
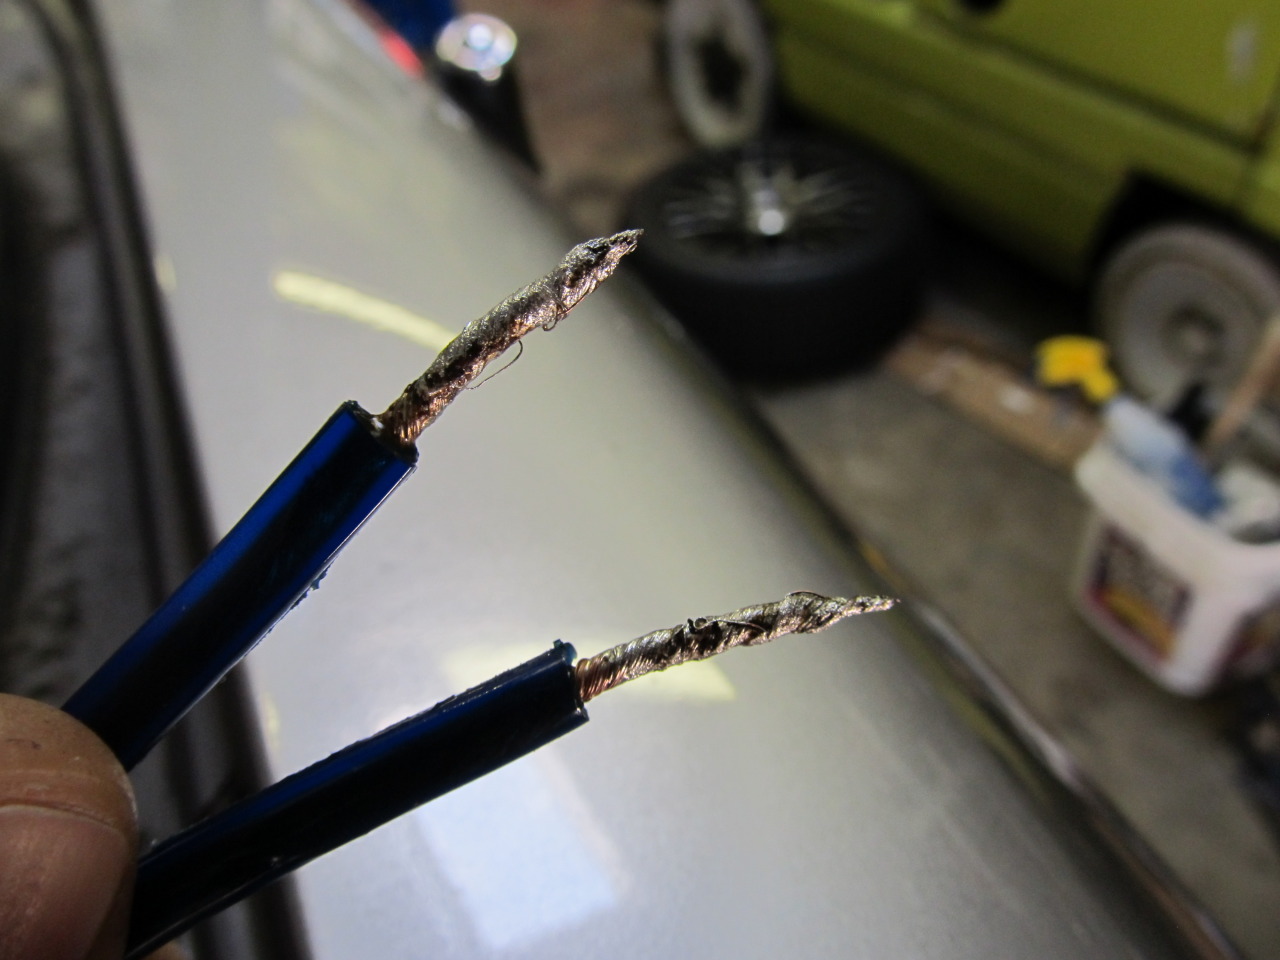
I also did some cleanup in the trunk. The wires for my sub have gotten pretty frayed since I disconnect them almost every week for races, so I cut it down to some fresh wire and then soldered them up so they don't fray so easily. I also moved the sub and holding brackets from the DS of the trunk to the PS so there is a bigger area of open space to work with.

CAI issues
So I installed the CAI a while ago, but after monitoring air intake temperatures while racing, I was unimpressed by its ability to get cold air to the motor. Before, with the SRI, I saw intake air temps as high as 150* by my final auto-x run of the day, which was some 50* hotter than the ambient air temp. After the CAI, I saw temps go almost as high, up to 145*, on a slightly cooler day. Obviously the CAI isn't doing its job. Or so I thought.
So I had the idea of wrapping the CAI piping with some Frost King insulation for home ducting. So I started feeling around for the IAT sensor that was supposed to be on the bottom of one of the pipes for the CAI, but it wasn't in it! Apparently the rubber grommet on the CAI wasn't making a tight seal and the sensor would pretty much fall right out of it. This means that I've been driving around with a fairly massive vacuum leak for the last month or so, and the sensor has just been hanging out in the engine bay, which would explain the high temps it was reading.
After we zip tied the sensor in the piping, I threw on a little of the insulation around it all, but after watching my intake temps again, I'm not sure if it did anything. Either way, my vacuum leak is fixed and the car feels great now! I just need to see if there is a way to keep the CAI piping from heat soaking, because it's clear the IAT sensor isn't reading as cool as I would hope from a CAI.
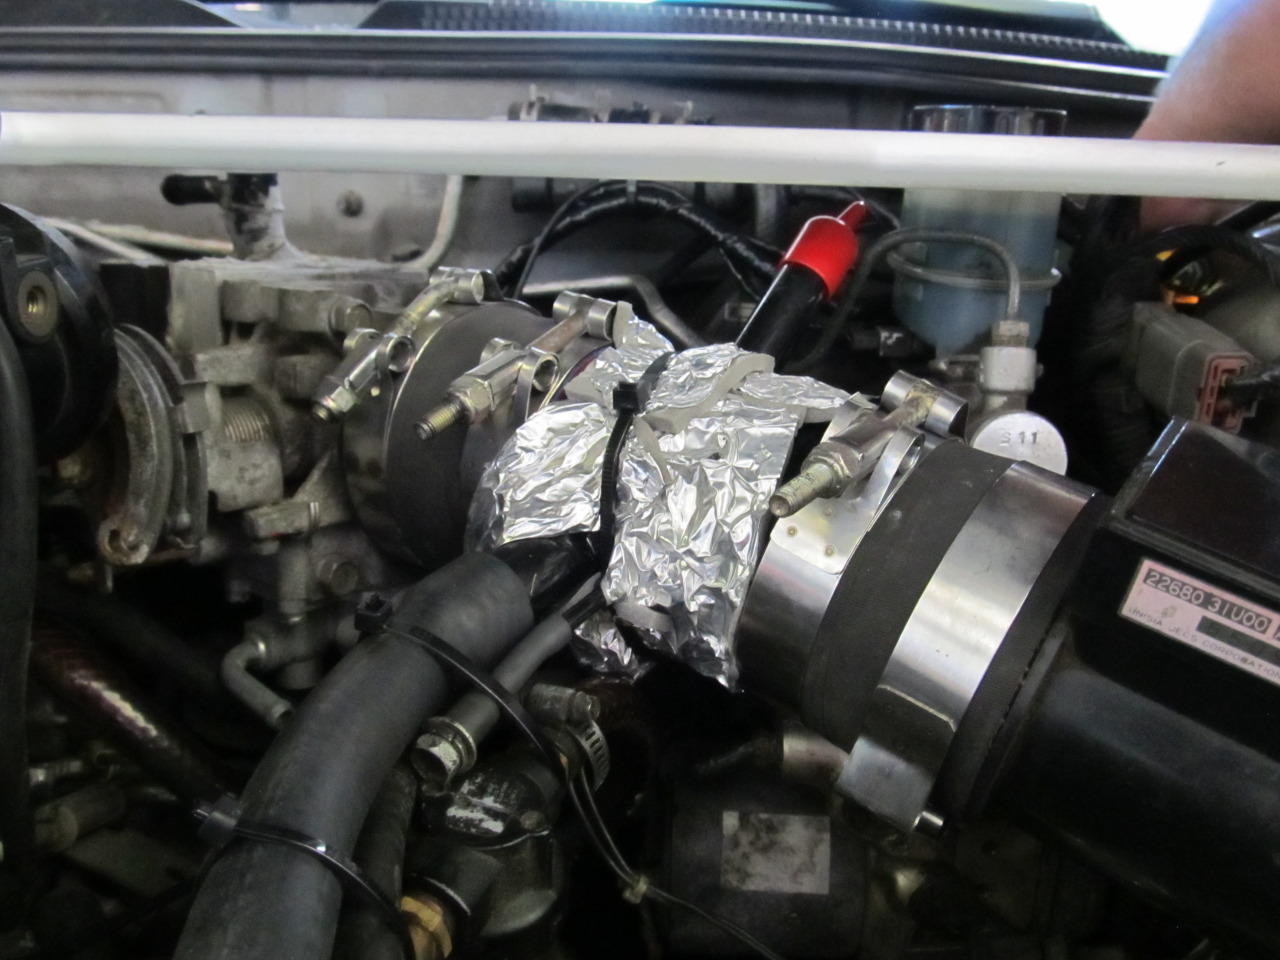
I didn't say it was gonna be pretty!
And a general pic from before the wrapping
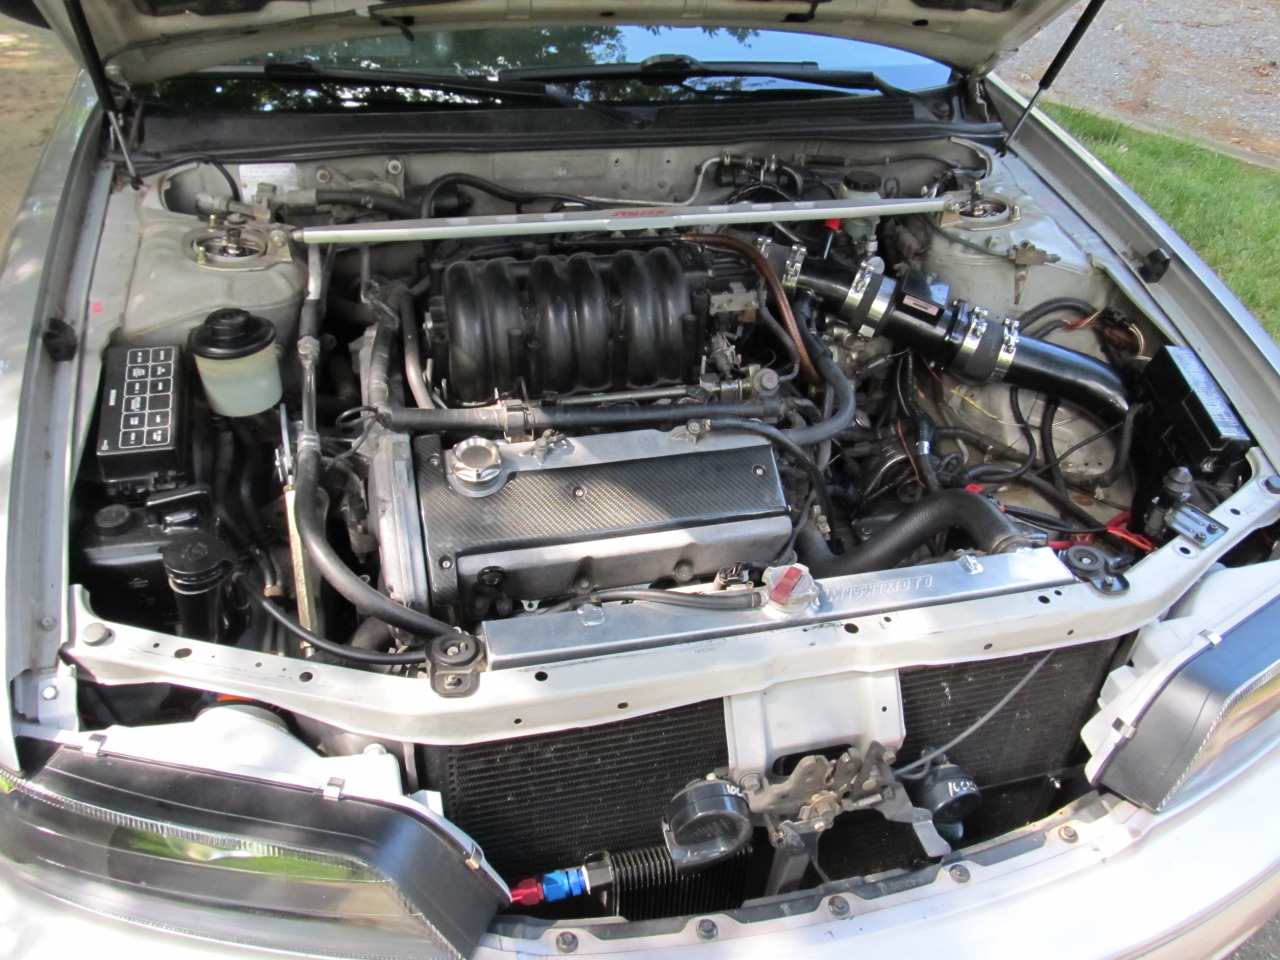
So what are people's thoughts on keeping the CAI and IAT sensor cool?
Before:
After:
I also bought a stage 1 LTB from a member in the hopes it would clear my Cattman headers. No such luck on that. Now I have both stage 1+2 sitting around not being used. I was considering having a custom one made to fit, but I'm worried about ground clearance....
I also did some cleanup in the trunk. The wires for my sub have gotten pretty frayed since I disconnect them almost every week for races, so I cut it down to some fresh wire and then soldered them up so they don't fray so easily. I also moved the sub and holding brackets from the DS of the trunk to the PS so there is a bigger area of open space to work with.
CAI issues
So I installed the CAI a while ago, but after monitoring air intake temperatures while racing, I was unimpressed by its ability to get cold air to the motor. Before, with the SRI, I saw intake air temps as high as 150* by my final auto-x run of the day, which was some 50* hotter than the ambient air temp. After the CAI, I saw temps go almost as high, up to 145*, on a slightly cooler day. Obviously the CAI isn't doing its job. Or so I thought.
So I had the idea of wrapping the CAI piping with some Frost King insulation for home ducting. So I started feeling around for the IAT sensor that was supposed to be on the bottom of one of the pipes for the CAI, but it wasn't in it! Apparently the rubber grommet on the CAI wasn't making a tight seal and the sensor would pretty much fall right out of it. This means that I've been driving around with a fairly massive vacuum leak for the last month or so, and the sensor has just been hanging out in the engine bay, which would explain the high temps it was reading.
After we zip tied the sensor in the piping, I threw on a little of the insulation around it all, but after watching my intake temps again, I'm not sure if it did anything. Either way, my vacuum leak is fixed and the car feels great now! I just need to see if there is a way to keep the CAI piping from heat soaking, because it's clear the IAT sensor isn't reading as cool as I would hope from a CAI.
I didn't say it was gonna be pretty!
And a general pic from before the wrapping
So what are people's thoughts on keeping the CAI and IAT sensor cool?

 08-22-2012, 05:31 PM
#118
I think your sensor is getting heat soak from its mounting point and not really getting the true intake air temps.
Suggestion: ridiculous I know this may sound, but extned the sensor with some wires and mount it, just hanging inside the CAI, preferrably before the MAF. That way the entire sensor is cooled by the incoming air.
Of course the ridiculousness of it is the risk of it flying off or something, but you get the idea. I'm sure you can figure something out from that.
DW
