Turbo VG swapped stanza
 09-22-2017, 05:51 AM
#201
Yeah, I drove my VE home about 15 miles once on only 3 injectors. I had the car sitting at my brother's place and finally had to bring it home. I had forgotten that I'd unplugged the entire rear injector bank and was puzzled why it was running so poorly. It never did die on me though the whole way. Got it home and popped the hood and had d'oh moment remembering I had the entire rear bank unplugged 
 09-23-2017, 11:53 PM
#202
Member
Thread Starter

Join Date: Oct 2016
Posts: 284
this is where the car is at right now. i think im basically gonna totally scrap this whole setup and use the top feed vq rails so i can get as much clamping pressure on the seals as possible so i never have to worry about leaks.
the plan for the new injectors since they are slightly larger than the stock ones is to run an adjustable fuel pressure regulator and dial the fuel pressure back a little bit. if i cant get it to run well with that ill just pull the trigger on the megasquirt install that i was gonna wait to do until i ran the car on the stock stuff. im sure everyone would like to see how to install megasquirt, i know i did before i installed it on my Z with absolutely no help lol
the plan for the new injectors since they are slightly larger than the stock ones is to run an adjustable fuel pressure regulator and dial the fuel pressure back a little bit. if i cant get it to run well with that ill just pull the trigger on the megasquirt install that i was gonna wait to do until i ran the car on the stock stuff. im sure everyone would like to see how to install megasquirt, i know i did before i installed it on my Z with absolutely no help lol
Last edited by Nate Boslet; 05-18-2018 at 11:36 AM.
 10-05-2017, 11:12 PM
#204
Member
Thread Starter
Join Date: Oct 2016
Posts: 284
ive had a lot of stuff going on lately, might have a much better job doing what i love which is going to really put the stanza in overdrive cause ill not only have more money but more car related resources for performance parts. cant make any promises just yet but as far as the fuel rails go im about halfway done with them, i wanna keep it all in one update which is why its been so long but they should be all done soon.
10-10-2017, 08:36 PM
#205
Member
Thread Starter
Join Date: Oct 2016
Posts: 284
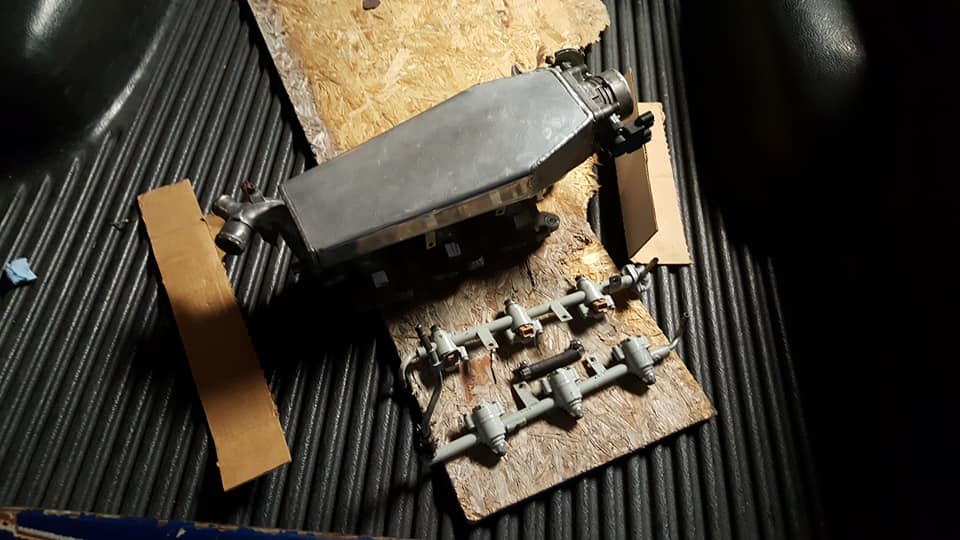
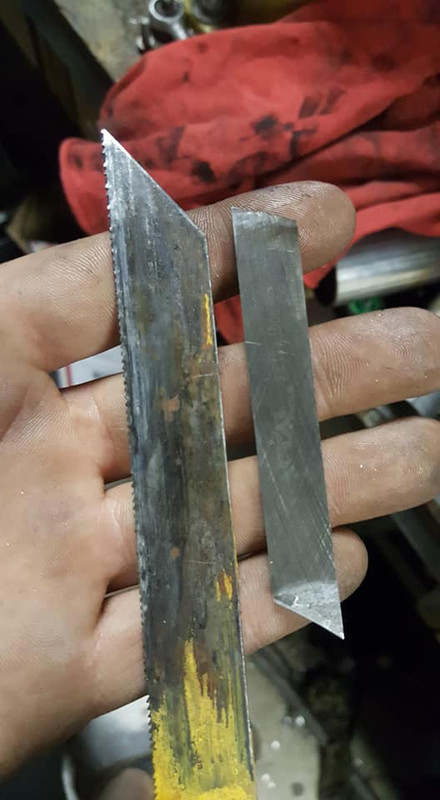
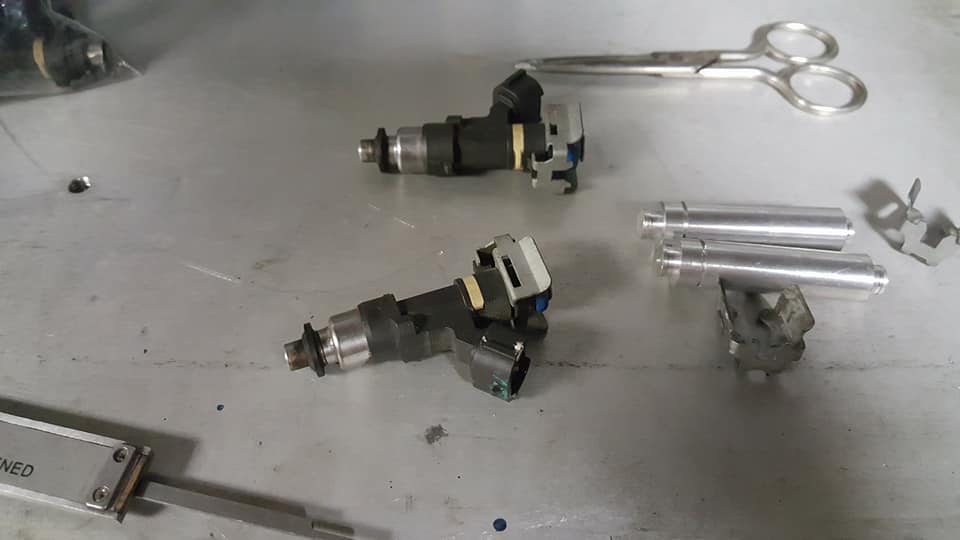
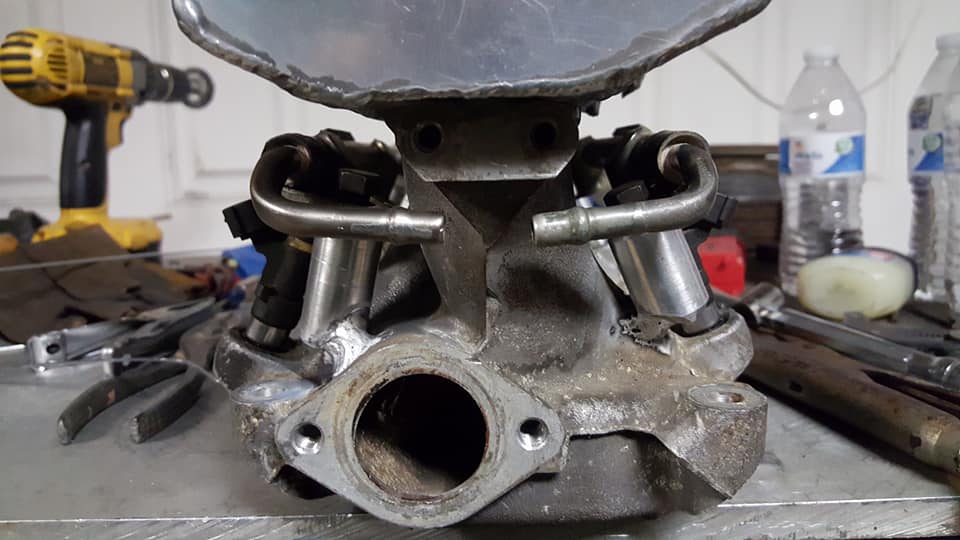
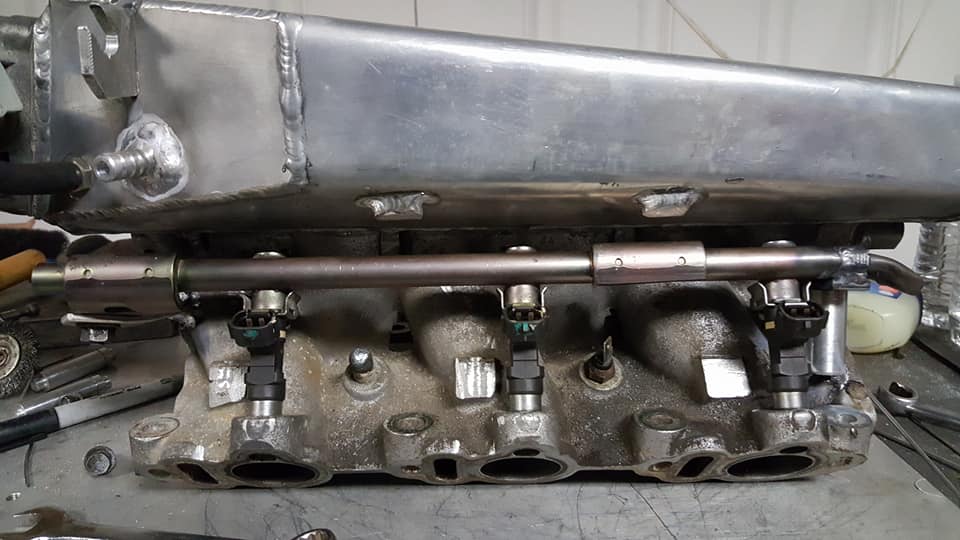
i was gonna make this all one post but i have way too many pictures and splainin to do so ill break it up i guess. this is the fuel rails as they arrived in the mail. in order to fit them onto the intake i had to cut the metal tube that connects the two rails to each other which i spent a lot of time making sure was absolutely necessary lol
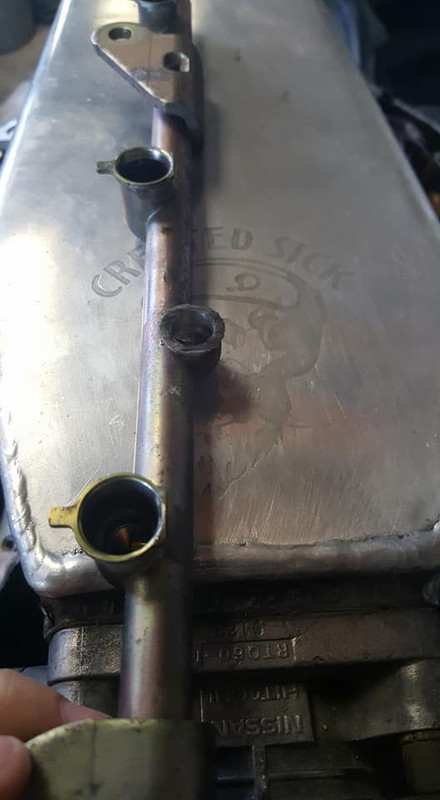
idk what these things in the middle of the rails are, i thought they may be regulators but they dont actually impede fuel flow at all so my second thought was that they may be some kind of diaphragms that compress once fuel pressure is reached and then work almost like capacitors in helping prevent fuel pressure drop when the demand rises. idk i didnt really care enough to research it i just chopped them off lol
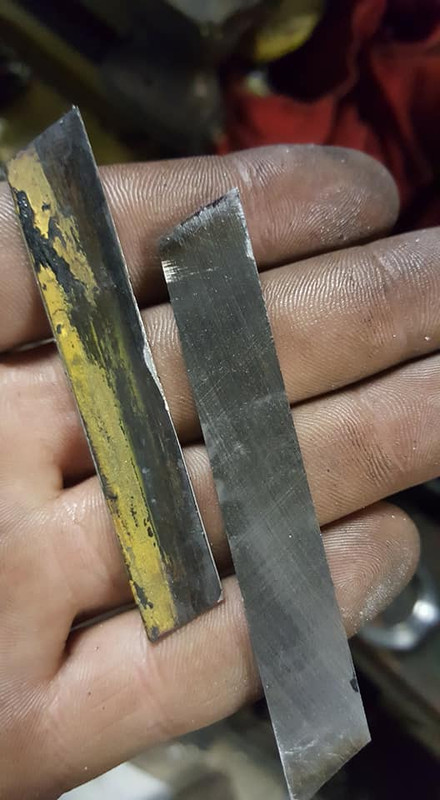
here they are chopped off.
like i said i was probably going to scrap these rails but before i did that i realized it would be easier for me to base the new fuel rail setup on the old one instead of trying to totally reengineer everything in some new way. i considered converting my fuel system to returnless because thats how these rails are designed but i would need a new kind of regulator in the tank and possibly a different fuel pump so the cheaper and easier option was just to convert the rails to return style and retain everything else the way it was on the car.
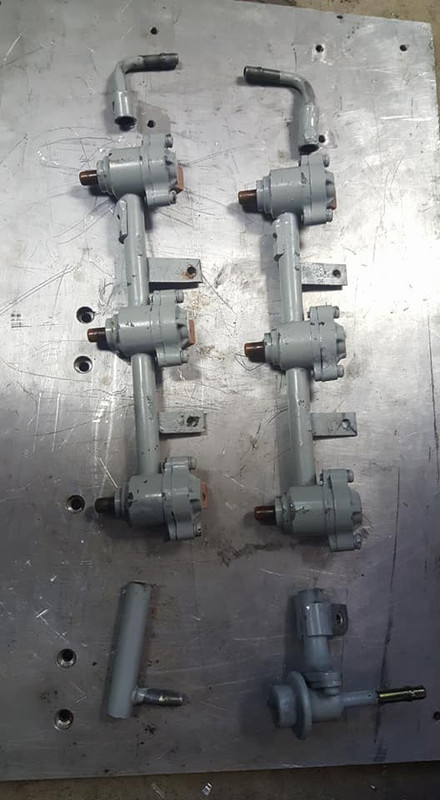
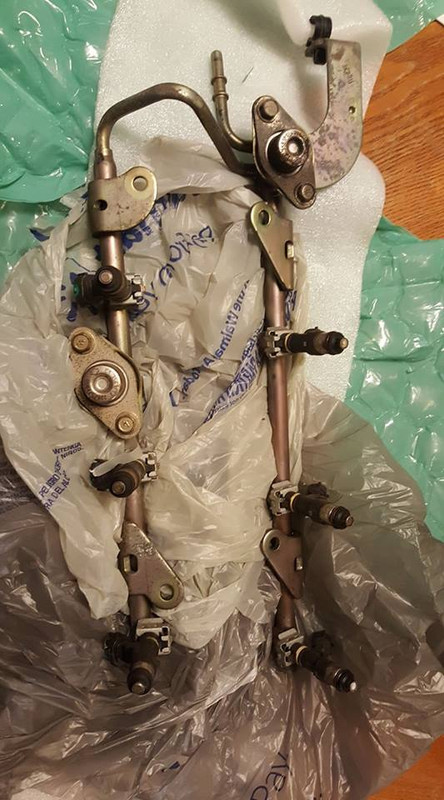
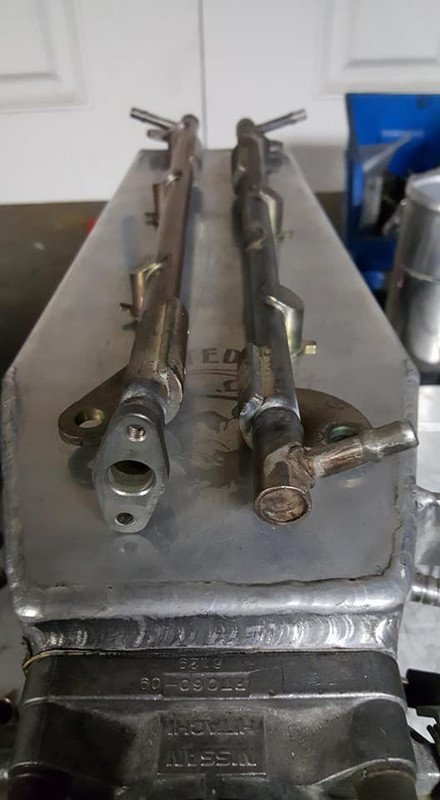
heres the idea
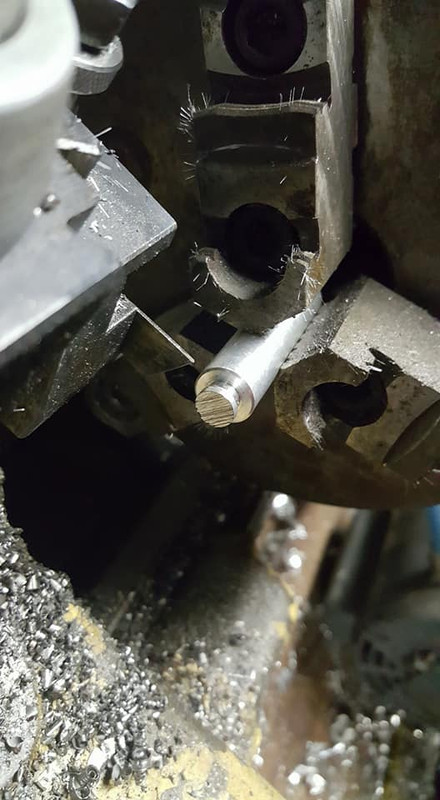
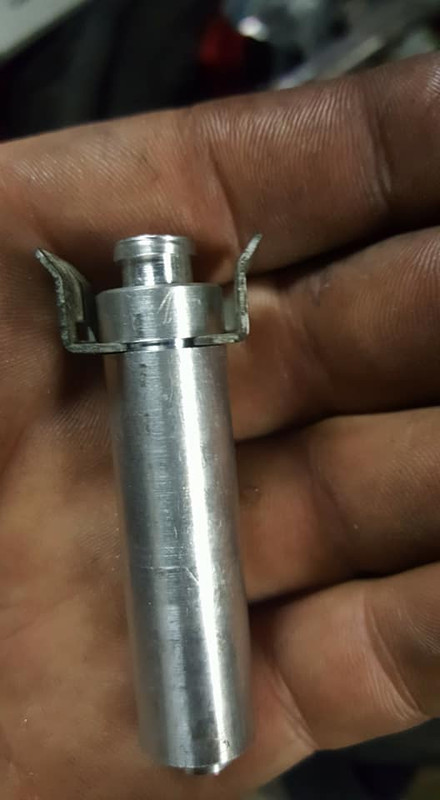
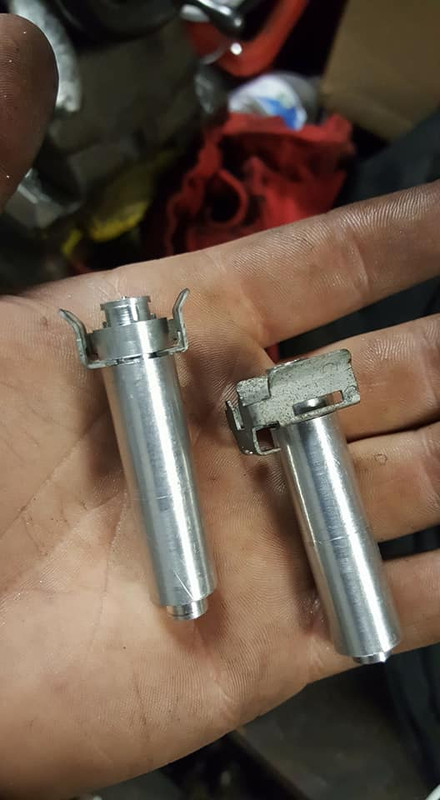
these injectors use this little bracket to hold them in place for some reason, i had already made little blanks for this size of injector when i did the fuel rails on my z31 so all i had to do was cut the groove into the blank that holds the little bracket in place.
i couldnt cut the groove with my parting tool because it was too wide and to grind a HSS tool to this thin of a profile would take a long time and be a waste of material so as usual i made some janky thing from random **** i had lying around.
heres my parting tool next to a sawzall blade.
this is that same sawzall blade after cutting it to the same shape as my parting tool.
a width comparison
using the tool
heres the blank after the groove was cut
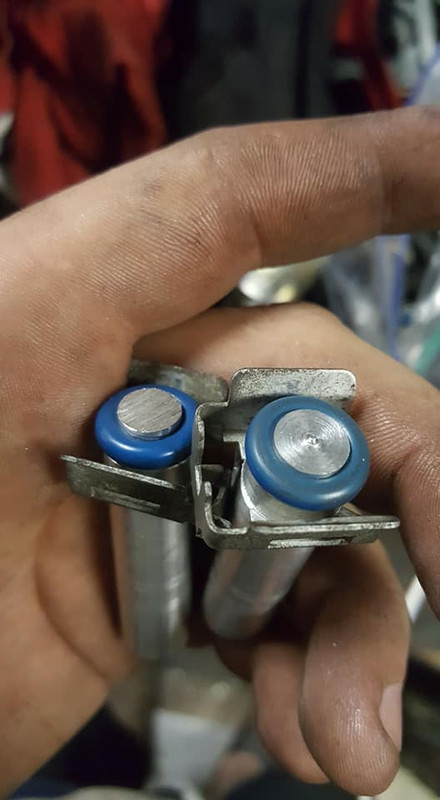
both blanks with the clips in them.
orings from the new fuel rails on the blanks
mocked up on the intake
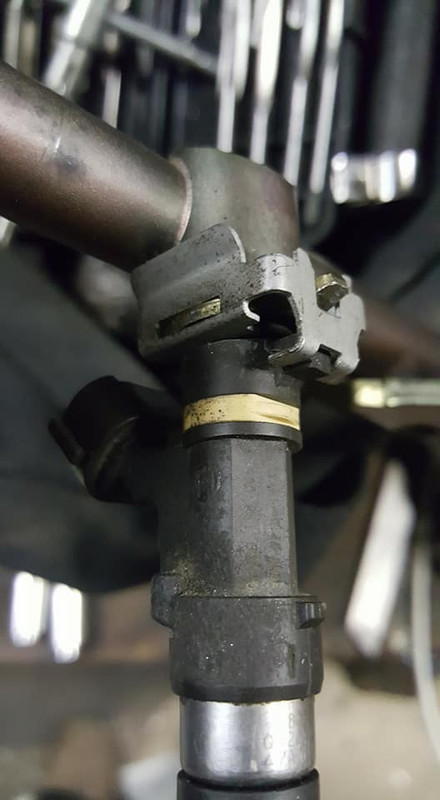
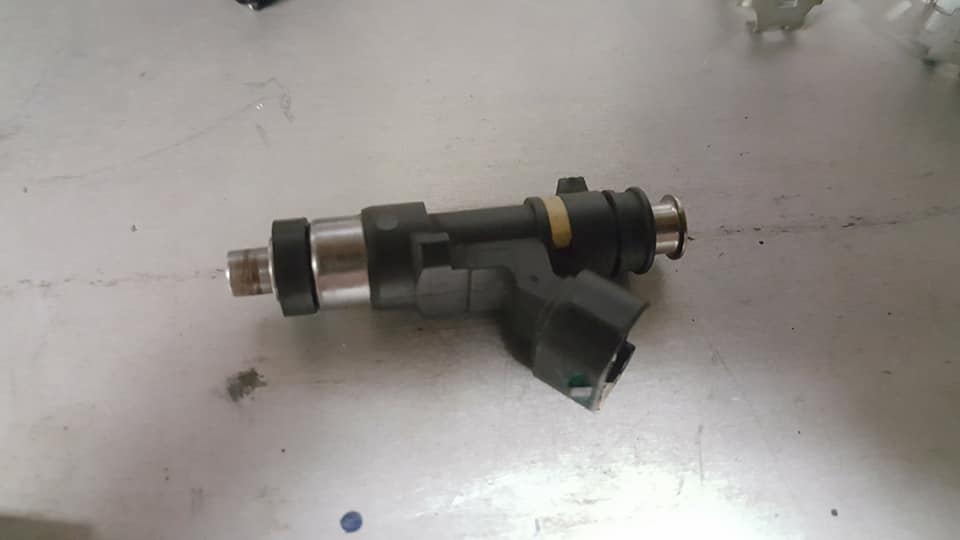
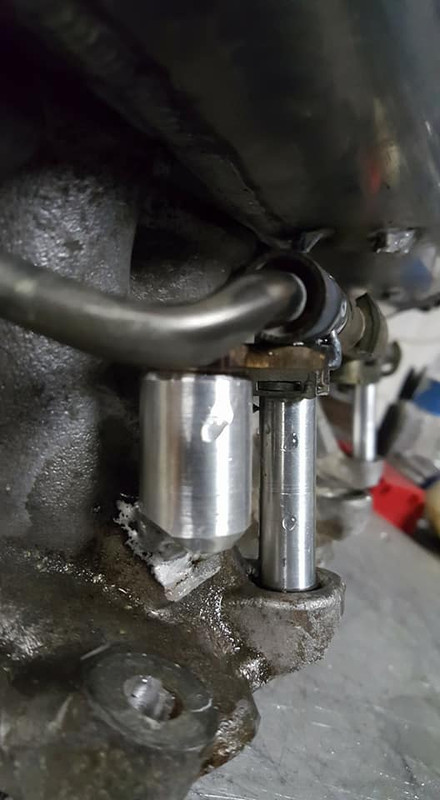
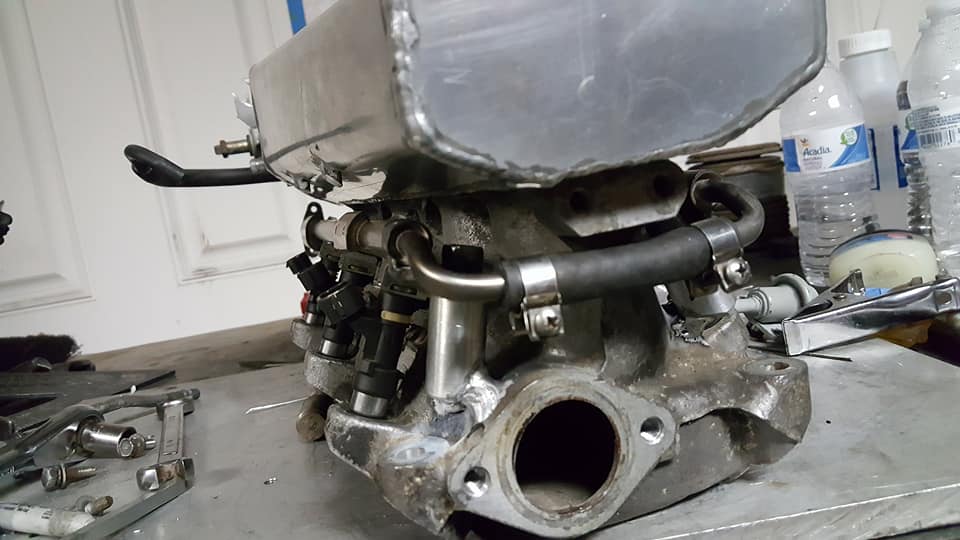
next thing i had to address was the lower oring seat (which i actually addressed right away but for the sake of the thread i am talking about it now) the injectors have this plastic thing that retains the round orings in place.
the plastic retainer is press fit over a ledge that keeps it from coming back off and is tight enough to not even really spin. fortunately its a relatively brittle plastic so i just used some pliers to snap it off. heres the injector without the plastic retainer (looks exactly the same as the injectors on my z)
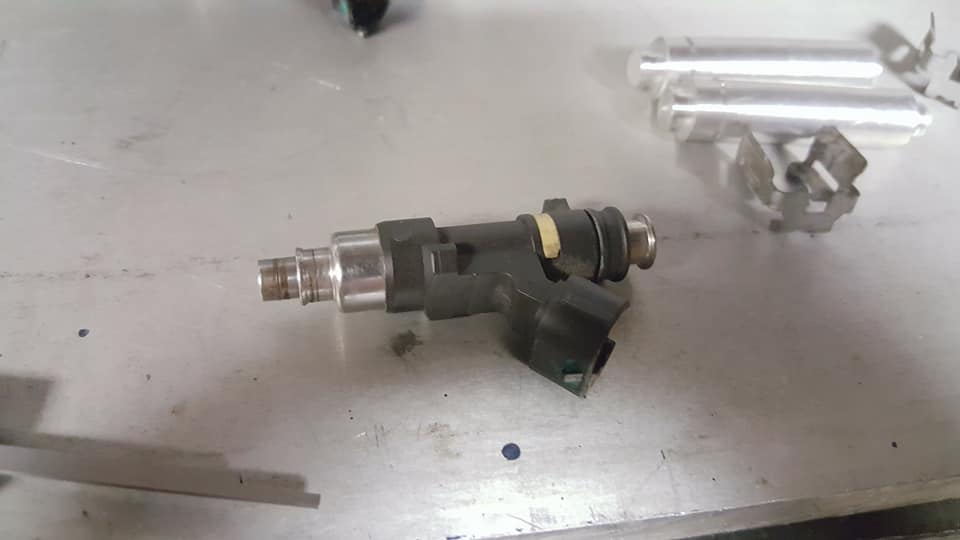
and here is the injector with the lower oring that my lower intake manifold uses. its a surprisingly good fit, i think these injectors may be desinged to be used with these types of orings and the plastic retainer is just to use the other type.
i got a lot more progress done with the mounting of the rails but im going to put all of that into one post once the rails are fully finished. should be this week for sure.
while i was at the junkyard getting plugs for these injectors as i was leaving i found this pile of suspension stuff just sitting on the ground discarded. i didnt think anything of it at first bit the lower knuckle mounts caught my eye and looked similar to what the stanza uses. i figured it was all for a honda or something and just happened to be a similar design but grabbed it anyway, i have a bunch of stuff to scrap soon anyway so its basically just free scrap at the very least.
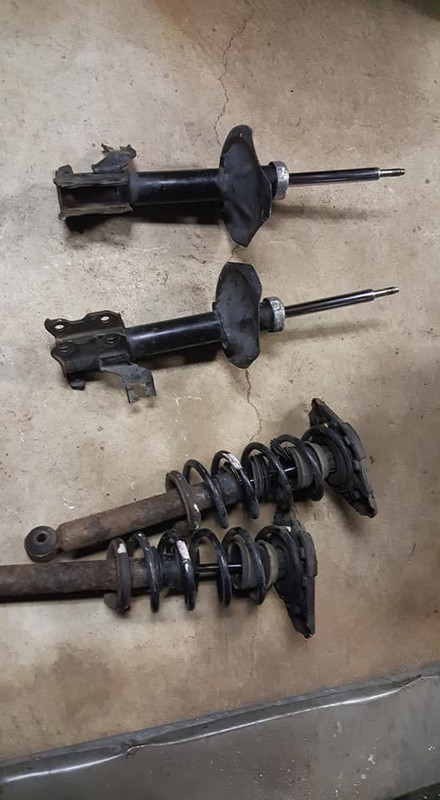
i looked up the part numbers on them and wouldnt you know it.... its from a sentra. the same car i originally got all of my 5 speed stuff that bolted right in. so in the next few days ill be exploring my options with this stuff and possibly modifying them to lower the stanza a few inches but retain an essentially stock amount of suspension travel. more on that later on.
idk what these things in the middle of the rails are, i thought they may be regulators but they dont actually impede fuel flow at all so my second thought was that they may be some kind of diaphragms that compress once fuel pressure is reached and then work almost like capacitors in helping prevent fuel pressure drop when the demand rises. idk i didnt really care enough to research it i just chopped them off lol
here they are chopped off.
like i said i was probably going to scrap these rails but before i did that i realized it would be easier for me to base the new fuel rail setup on the old one instead of trying to totally reengineer everything in some new way. i considered converting my fuel system to returnless because thats how these rails are designed but i would need a new kind of regulator in the tank and possibly a different fuel pump so the cheaper and easier option was just to convert the rails to return style and retain everything else the way it was on the car.
heres the idea
these injectors use this little bracket to hold them in place for some reason, i had already made little blanks for this size of injector when i did the fuel rails on my z31 so all i had to do was cut the groove into the blank that holds the little bracket in place.
i couldnt cut the groove with my parting tool because it was too wide and to grind a HSS tool to this thin of a profile would take a long time and be a waste of material so as usual i made some janky thing from random **** i had lying around.
heres my parting tool next to a sawzall blade.
this is that same sawzall blade after cutting it to the same shape as my parting tool.
a width comparison
using the tool
heres the blank after the groove was cut
both blanks with the clips in them.
orings from the new fuel rails on the blanks
mocked up on the intake
next thing i had to address was the lower oring seat (which i actually addressed right away but for the sake of the thread i am talking about it now) the injectors have this plastic thing that retains the round orings in place.
the plastic retainer is press fit over a ledge that keeps it from coming back off and is tight enough to not even really spin. fortunately its a relatively brittle plastic so i just used some pliers to snap it off. heres the injector without the plastic retainer (looks exactly the same as the injectors on my z)
and here is the injector with the lower oring that my lower intake manifold uses. its a surprisingly good fit, i think these injectors may be desinged to be used with these types of orings and the plastic retainer is just to use the other type.
i got a lot more progress done with the mounting of the rails but im going to put all of that into one post once the rails are fully finished. should be this week for sure.
while i was at the junkyard getting plugs for these injectors as i was leaving i found this pile of suspension stuff just sitting on the ground discarded. i didnt think anything of it at first bit the lower knuckle mounts caught my eye and looked similar to what the stanza uses. i figured it was all for a honda or something and just happened to be a similar design but grabbed it anyway, i have a bunch of stuff to scrap soon anyway so its basically just free scrap at the very least.
i looked up the part numbers on them and wouldnt you know it.... its from a sentra. the same car i originally got all of my 5 speed stuff that bolted right in. so in the next few days ill be exploring my options with this stuff and possibly modifying them to lower the stanza a few inches but retain an essentially stock amount of suspension travel. more on that later on.
Last edited by Nate Boslet; 05-18-2018 at 11:38 AM.
10-13-2017, 07:43 PM
#207
Member
Thread Starter
Join Date: Oct 2016
Posts: 284
Dennis if i had the time and the money i would just build my car entirely from scratch, only problem is it would either never be finished or be total garbage so instead i do this.
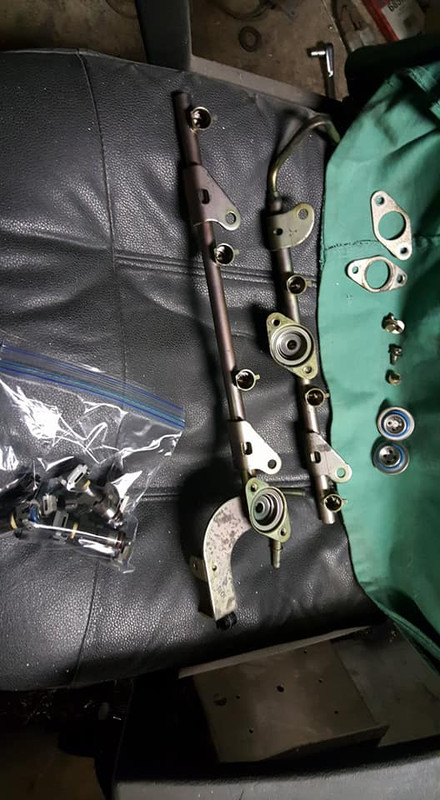
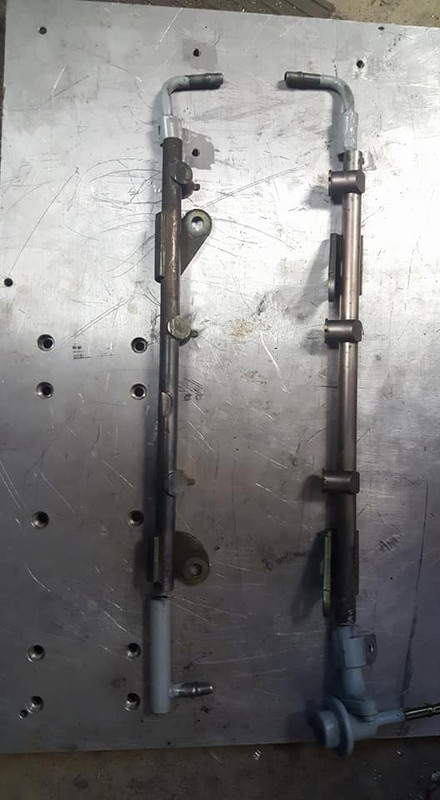
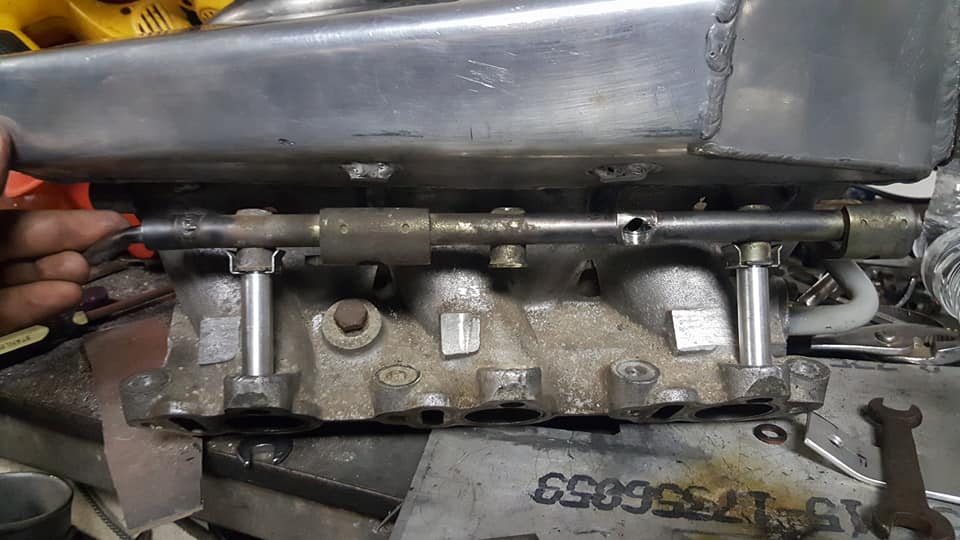
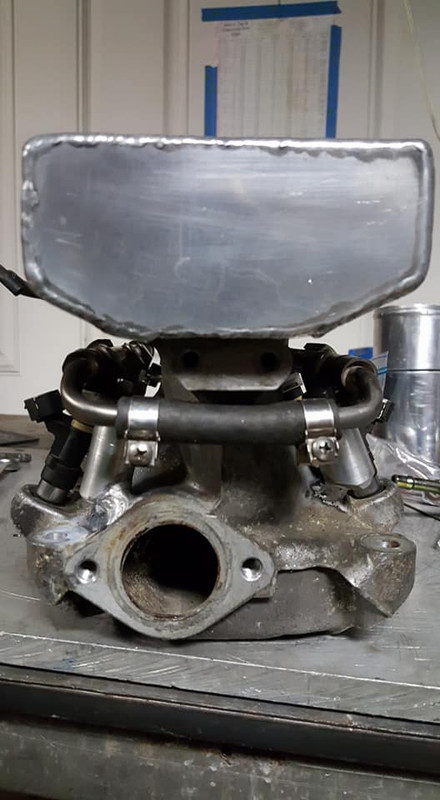
it looks like the mounts are crooked, because they are relative to each other, but they hold the rails in nearly the exact same place and angle relative to the lower seals. i was kind of limited on how to mount up the rails (hence the seemingly inaccessible bolts which i made a tool to tighten up lol) and really just stopped caring about how it looks since its gonna end up being hard to see anyway. i do plan on sanding down the cut off parts of the tabs that are still on the plenum tho.

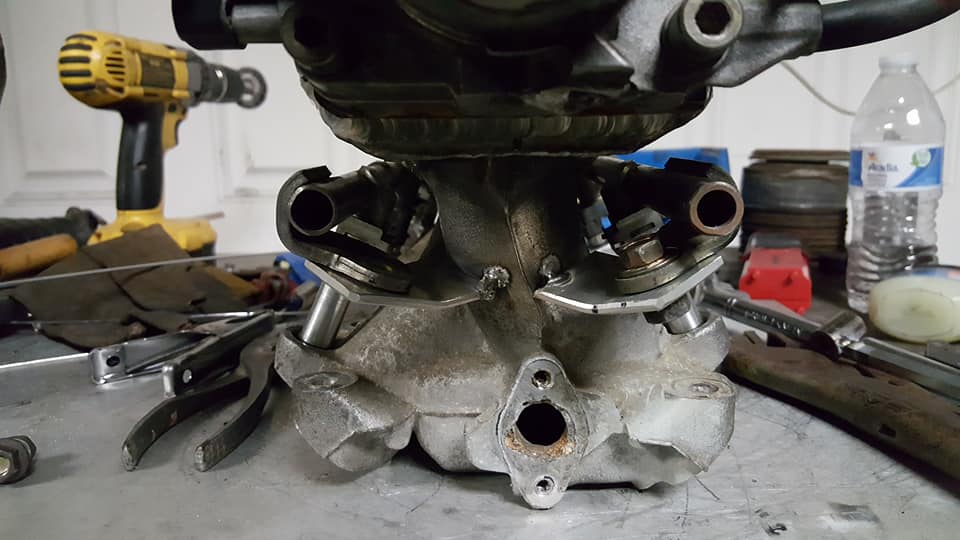

im MUCH more confident in this setup and the injector seals. they all feel tight but still have just a little bit of wiggle so they arent being stressed or anything. using the blanks to line everything up kept the alignment and pressure really uniform across all of the injectors as well. all thats left to do is weld on the ends of the rails and then slap it all back on the car. best part of this rail setup is i can install them onto the intake and then install the intake on the car instead of having to wrestle around in the engine bay with the rails.
it looks like the mounts are crooked, because they are relative to each other, but they hold the rails in nearly the exact same place and angle relative to the lower seals. i was kind of limited on how to mount up the rails (hence the seemingly inaccessible bolts which i made a tool to tighten up lol) and really just stopped caring about how it looks since its gonna end up being hard to see anyway. i do plan on sanding down the cut off parts of the tabs that are still on the plenum tho.
im MUCH more confident in this setup and the injector seals. they all feel tight but still have just a little bit of wiggle so they arent being stressed or anything. using the blanks to line everything up kept the alignment and pressure really uniform across all of the injectors as well. all thats left to do is weld on the ends of the rails and then slap it all back on the car. best part of this rail setup is i can install them onto the intake and then install the intake on the car instead of having to wrestle around in the engine bay with the rails.
Last edited by Nate Boslet; 05-18-2018 at 11:41 AM.
10-15-2017, 10:45 PM
#208
Member
Thread Starter
Join Date: Oct 2016
Posts: 284
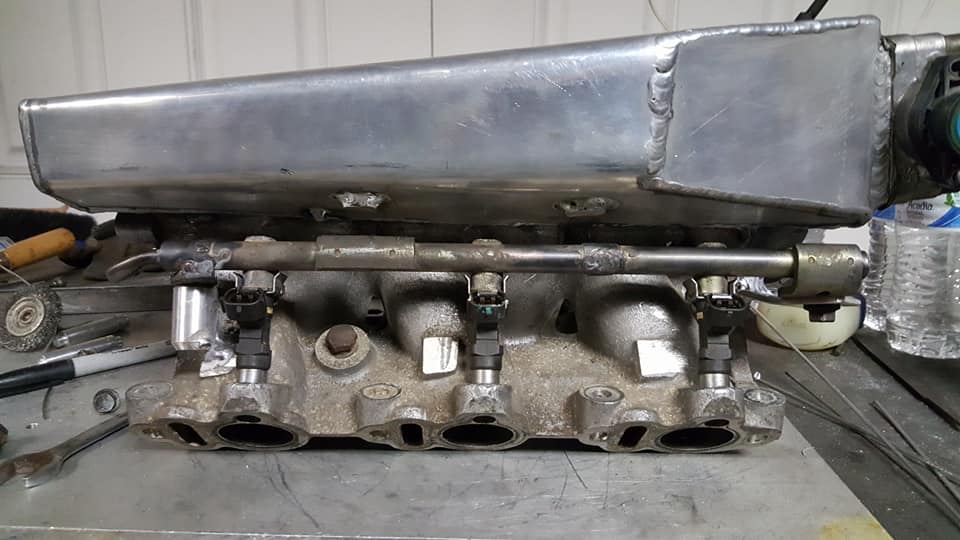
fuel rails are done.
so at some point this week im going to throw it all back in and see if this **** will actually run so the next post will contain either:
A. a video
or
B. an explanation of what went wrong.
so at some point this week im going to throw it all back in and see if this **** will actually run so the next post will contain either:
A. a video
or
B. an explanation of what went wrong.
Last edited by Nate Boslet; 05-18-2018 at 11:42 AM.
10-16-2017, 12:05 PM
#209
Senior Member

Join Date: Apr 2007
Location: Albuquerque, NM
Posts: 1,323
Nice, haven't checked on this in a while (to busy with my stuff) thought about doing VQ injectors on mine when I put in the MS3/MS3X but needed her running so didn't have time to mess with it for now, the things in the middle of the rail are dampeners, due to the return less set up on the VQs they have pressure issues from the injector pulses. What you might want to do is stick with the factory return set up, Y off the input side like it is from the factory put the regulator and return back on, does a couple things 1. gives you even feed on both rails 2. you will have a fuel temp (since I assume you are doing a after market ECU) 3. makes it super simple set up
10-17-2017, 06:20 AM
#210
Member
Thread Starter
Join Date: Oct 2016
Posts: 284
made it this far and attempted to start the car annnnnnddddddddddddd
.....no fuel pump.......
now before you load up your tomato slingshots im like 99% sure what the problem is. the ecu is on all the time when the battery is connected and the pump hasnt primed from key on at all ever. i rewired the inhibitor switch to get my reverse lights to work and then just hard wired all of the other things i needed in there so they just worked all the time, i think somewhere in there i missed the neutral switch or something and the ecu isnt happy and wont run the pump (which it never really did, only if i spun the distributor.. not sure what thats about lol) so thats where im at now. im sure it wont take long to figure out.
Last edited by Nate Boslet; 05-18-2018 at 11:43 AM.


 10-17-2017, 07:17 PM
#212
Member
Thread Starter
Join Date: Oct 2016
Posts: 284
lmao i know im just as impatient as you are. i did crank it over last night a few times tho and the compression sounds really good now that the injectors are sealed up right. it should run half decent its just gonna be a little rich for a while till i megasquirt it and now that i have a new job and can actually afford stuff that will be happening a lot sooner than expected.
also...... turbo is DEFINITELY happening sooner rather than later.
also...... turbo is DEFINITELY happening sooner rather than later.
10-17-2017, 09:58 PM
#213
made it this far and attempted to start the car annnnnnddddddddddddd
.....no fuel pump.......
now before you load up your tomato slingshots im like 99% sure what the problem is. the ecu is on all the time when the battery is connected and the pump hasnt primed from key on at all ever. i rewired the inhibitor switch to get my reverse lights to work and then just hard wired all of the other things i needed in there so they just worked all the time, i think somewhere in there i missed the neutral switch or something and the ecu isnt happy and wont run the pump (which it never really did, only if i spun the distributor.. not sure what thats about lol) so thats where im at now. im sure it wont take long to figure out.
.....no fuel pump.......
now before you load up your tomato slingshots im like 99% sure what the problem is. the ecu is on all the time when the battery is connected and the pump hasnt primed from key on at all ever. i rewired the inhibitor switch to get my reverse lights to work and then just hard wired all of the other things i needed in there so they just worked all the time, i think somewhere in there i missed the neutral switch or something and the ecu isnt happy and wont run the pump (which it never really did, only if i spun the distributor.. not sure what thats about lol) so thats where im at now. im sure it wont take long to figure out.
If the initial prime isn't happening for whatever reason, cranking the engine would cause the pulses and the ECU would turn on the fuel pump.
It sounds like you don't have all the wire connected to the ECU and I suspect this may be why the pump doesn't run at all.
10-19-2017, 10:08 AM
#214
Member
Thread Starter
Join Date: Oct 2016
Posts: 284
In a stock Maxima when you go to start the engine, the fuel pump primes for maybe 2 seconds to pressurize the lines and stops if you don't start the engine. When the engine starts, the ECU gets pulses from either the distributor or the camshaft sensor (maybe both, not 100% sure) and this tells the ECU to keep sending power to the fuel pump.
If the initial prime isn't happening for whatever reason, cranking the engine would cause the pulses and the ECU would turn on the fuel pump.
It sounds like you don't have all the wire connected to the ECU and I suspect this may be why the pump doesn't run at all.
If the initial prime isn't happening for whatever reason, cranking the engine would cause the pulses and the ECU would turn on the fuel pump.
It sounds like you don't have all the wire connected to the ECU and I suspect this may be why the pump doesn't run at all.
10-22-2017, 09:14 AM
#215
yeah i was spinning the distributor by hand and noticed the pump would turn on when i did that but it never primed. i dont think the pump turned on at all so i think youre right there is a circuit that i changed or broke when i messed with the inhibitor switch. im going to start by getting the ecu to turn on and off with the key and then go back through all of the fuel pump circuits till i can get it to turn on the way its supposed to.
Talking stock Maxima again, there is this mysterious (at least to me) signal named START that is created by the ignition switch when in the "start" position. I know that in the 95 and up cars, if you turn the ignition key on and then go under the hood and jumper across the starter solenoid so the engine cranks, the engine will not start. I assume it is an anti-theft thing.
According to the 94 Maxima service manual, this signal is shown for fuel pump operation. The only problem with this is that fuel pump priming takes place when the ignition switch is turned to the "on" position, so the START signal would not be present yet.
The ECU/ECM gets 12 volts on several pins:
pin 58 - direct from the battery through a fuse
pins 49 & 59 - from the ECCS relay, which is energized by the ECU pin 16
The ECU has chassis ground on pins 50 and 60
The START signal goes into the ECU on pin 43
10-22-2017, 07:15 PM
#216
Member
Thread Starter
Join Date: Oct 2016
Posts: 284
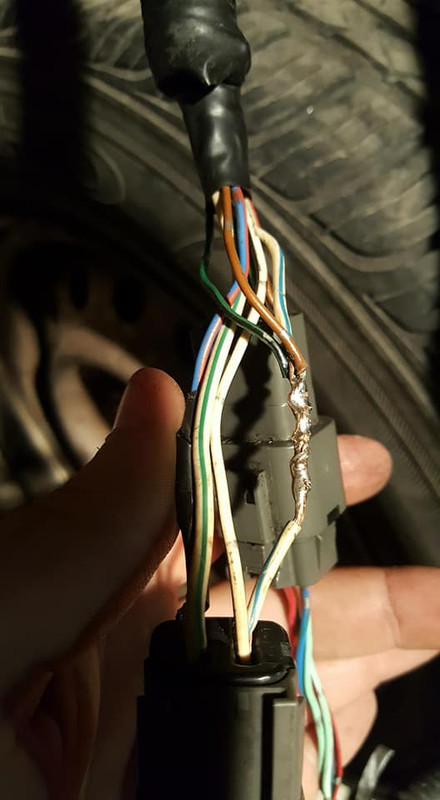
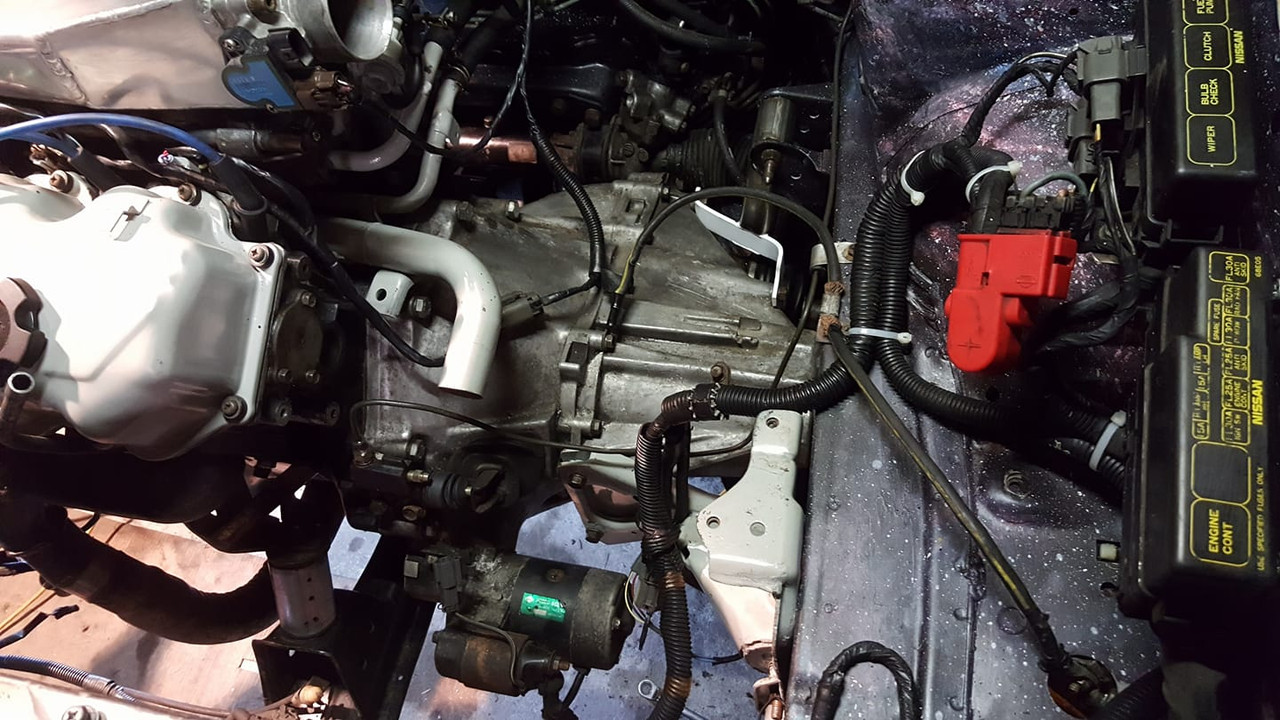
the other night i was working on the wiring and finally got the pump to prime by turning the key on and then unplugging and replugging in the plug with the ecu relay circuit in it so thats what i need to rewire. BUT i noticed a bunch of leaks in my fuel rails and had to pull them off and bring them home to fix the leaks.
initially i thought i was just a failure at life and my welds were bad. what actually happened was these fuel rails are made of some kind of material that doesnt like to be welded, i suspect they are some kind of cast steel. every time i would run a bead on it the weld would crack. i made another injector blank to plug up the third injector hole in the rail, plugged one side of the rail and then filled the rail with soapy water and pressurized it with my shop air at about 120psi (twice what the rail should ever see on the car) and after about 10 welds they FINALLY stopped leaking. it took at least 3 times of completely grinding down the welds and then building them up again. took me probably 3 hours total, very frustrating considering how easy this kind of welding job should be lol
so anyway i just got home after putting everything back together and messing with the wiring to get the pump to prime and stuff and then finally tried to start the car while there was fuel actually in the rails and this happened. (hopefully there is a video link below)
https://www.youtube.com/watch?v=Vk65...ature=youtu.be
IT RUNS..............kinda......
i believe the issue is that the gas its running on is just over a year old lol i brought home 2 5 gallon gas tanks to fill up on my way back to the car this week to try and get it to run a little better. i gotta look up some kind of treatment possibilities for whats still in the tank as well.
so that being said i know the car will at least sort of run and doesnt appear to want to explode, i still need to sort out the wiring issues. i know where the issue lies, its in the area of the harness where the engine harness meets the body harness.
the G/O and G/Y wires are apparently to the inhibitor switch relay which when i touch these two wires they seem to effect nothing as the car will start and the ecu and fuel pump will come on regardless of what they do, i think the black and white wires may be related to this relay somehow but i didnt get to test them because someone killed the batteries in my multimeter when i lent it out, still gotta grab some new batteries lol
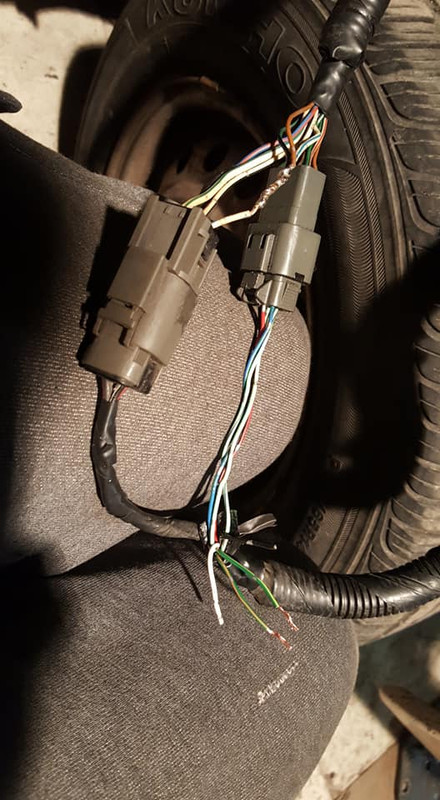
as for the G/B and BR wires here that are tied into the W/L wire they seem to control the engine control relay which turns the ecu on, only problem is that this particular wire is apparently a constant 12v so the ecu doesnt turn on or off with the key which is why i think the pump never primes, the ecu is already on before the key is turned so the car maybe thinks the pump already has primed? im not sure. idk what these wires are actually for either, i dont remember where they went in the diagram. nevermind, as i was writing this i remembered, they went to the inhibitor switch as well i just looked at the diagram. im not gonna rewrite that part cause im working this out as i write this now lol
ok so i think i figured something out maybe, i kept thinking that the BR and G/B wires were the issue but all they do is tell the ecu that the car is in nuetral which it apparently thinks all the time anyway since the pump works and the car primes and stuff, so the issue is with the ecu relay being on all the time. that means that the neutral switch circuit must be providing power to the ecu relay through those two wires. so i need to seperate those two wires from the W/B wire so that the ecu relay will actually turn off, and then if those wires arent getting power anymore i need to rewire them to a switched 12v.
ill try this next time im up there and maybe ill be able to use the inhibitor switch circuit to do that. in the mean time im still looking for a master switch so i can put my window all the way up cause that is driving me insane lol
initially i thought i was just a failure at life and my welds were bad. what actually happened was these fuel rails are made of some kind of material that doesnt like to be welded, i suspect they are some kind of cast steel. every time i would run a bead on it the weld would crack. i made another injector blank to plug up the third injector hole in the rail, plugged one side of the rail and then filled the rail with soapy water and pressurized it with my shop air at about 120psi (twice what the rail should ever see on the car) and after about 10 welds they FINALLY stopped leaking. it took at least 3 times of completely grinding down the welds and then building them up again. took me probably 3 hours total, very frustrating considering how easy this kind of welding job should be lol
so anyway i just got home after putting everything back together and messing with the wiring to get the pump to prime and stuff and then finally tried to start the car while there was fuel actually in the rails and this happened. (hopefully there is a video link below)
https://www.youtube.com/watch?v=Vk65...ature=youtu.be
IT RUNS..............kinda......
i believe the issue is that the gas its running on is just over a year old lol i brought home 2 5 gallon gas tanks to fill up on my way back to the car this week to try and get it to run a little better. i gotta look up some kind of treatment possibilities for whats still in the tank as well.
so that being said i know the car will at least sort of run and doesnt appear to want to explode, i still need to sort out the wiring issues. i know where the issue lies, its in the area of the harness where the engine harness meets the body harness.
the G/O and G/Y wires are apparently to the inhibitor switch relay which when i touch these two wires they seem to effect nothing as the car will start and the ecu and fuel pump will come on regardless of what they do, i think the black and white wires may be related to this relay somehow but i didnt get to test them because someone killed the batteries in my multimeter when i lent it out, still gotta grab some new batteries lol
as for the G/B and BR wires here that are tied into the W/L wire they seem to control the engine control relay which turns the ecu on, only problem is that this particular wire is apparently a constant 12v so the ecu doesnt turn on or off with the key which is why i think the pump never primes, the ecu is already on before the key is turned so the car maybe thinks the pump already has primed? im not sure. idk what these wires are actually for either, i dont remember where they went in the diagram. nevermind, as i was writing this i remembered, they went to the inhibitor switch as well i just looked at the diagram. im not gonna rewrite that part cause im working this out as i write this now lol
ok so i think i figured something out maybe, i kept thinking that the BR and G/B wires were the issue but all they do is tell the ecu that the car is in nuetral which it apparently thinks all the time anyway since the pump works and the car primes and stuff, so the issue is with the ecu relay being on all the time. that means that the neutral switch circuit must be providing power to the ecu relay through those two wires. so i need to seperate those two wires from the W/B wire so that the ecu relay will actually turn off, and then if those wires arent getting power anymore i need to rewire them to a switched 12v.
ill try this next time im up there and maybe ill be able to use the inhibitor switch circuit to do that. in the mean time im still looking for a master switch so i can put my window all the way up cause that is driving me insane lol
Last edited by Nate Boslet; 05-18-2018 at 11:43 AM.
10-24-2017, 10:13 AM
#217
Member
Thread Starter
Join Date: Oct 2016
Posts: 284
i believe the wiring is officially complete and working properly, everything now turns on and off with the key, i am getting fuel and spark and i put about 7 gallons of 93 in the tank, primed the pump 5 or 6 times to try and flush out all the old gas and then went to start it again.
and got nothing... im not exactly sure why it isnt starting or running but i suspect its just too rich and i dont have any IAC to help get it fired up. i pulled the plugs and they all were wet with fuel and i checked for spark and was getting it, injectors click when i spin the distributor so the only explanation i can think of is that these larger vq injectors are just pushing too much fuel for the engine to start up. i am going to check the resistance of the injectors to see if maybe i killed them somehow (maybe the driver is for low impedance and these injectors are high impedance or something idk i would think them clicking would mean they are fine but idk) and i am going to try firing it up with some starter fluid but if those things dont work the only alternative options are reducing my fuel pressure low enough to get a more stoich mix (which would have to be like 25 psi) OR......... go megasquirt.... which i was planning to do anyway but i wanted to see the car run on the stock stuff. we will see what happens.
and got nothing... im not exactly sure why it isnt starting or running but i suspect its just too rich and i dont have any IAC to help get it fired up. i pulled the plugs and they all were wet with fuel and i checked for spark and was getting it, injectors click when i spin the distributor so the only explanation i can think of is that these larger vq injectors are just pushing too much fuel for the engine to start up. i am going to check the resistance of the injectors to see if maybe i killed them somehow (maybe the driver is for low impedance and these injectors are high impedance or something idk i would think them clicking would mean they are fine but idk) and i am going to try firing it up with some starter fluid but if those things dont work the only alternative options are reducing my fuel pressure low enough to get a more stoich mix (which would have to be like 25 psi) OR......... go megasquirt.... which i was planning to do anyway but i wanted to see the car run on the stock stuff. we will see what happens.
10-24-2017, 11:26 AM
#218
Come on man... I'm getting cold sitting out here on my front porch waiting for you to drive by.
I have a different theory on the fuel injectors. You can check the impedance of the injectors if you want, but if they click, they work. Stock VG injectors are 14 ohms and VQ injectors in the 2000 - 2002 Maxima are 15 ohms. Electrically speaking - not much difference. I recall some of the injectors in my 94 VG were running at 70+ ohms.
How much gas gets squirted into the cylinder depends on 3 things. The injector itself, they have different size openings, the fuel pressure and the time duration of the pulse to the injector.
Since you have the ECU for a VG engine, the pulse duration should be good. I think that the flow rate of the injector needs to be looked at and probably reduced. Reducing the fuel pressure would be a good test of this.
10-24-2017, 06:08 PM
#219
Member
Thread Starter
Join Date: Oct 2016
Posts: 284
its only a 70cc difference between the vg and vq injectors from what ive read, i wouldnt think that would completely prevent the car from running. im gonna head over to the garage to see if i can get it to start up with some starting fluid just to see what happens. not sure what else to do for it without having to pull stuff apart again which i really dont want to do.
10-25-2017, 10:31 AM
#220
Senior Member
Join Date: Apr 2007
Location: Albuquerque, NM
Posts: 1,323
glad you got the wiring worked out, yea the ecu has constant power for memory, from what I could tell working on mine the ground wire for the for the cold idle control is what turns the ECU on and I think there was another wire that is powered up from the EFI relay. More then likely the fuel rail is brass or something that won't produce a spark and might be better to braze it then weld but anyways hope you get it started soon
10-25-2017, 08:15 PM
#221
Member
Thread Starter
Join Date: Oct 2016
Posts: 284
glad you got the wiring worked out, yea the ecu has constant power for memory, from what I could tell working on mine the ground wire for the for the cold idle control is what turns the ECU on and I think there was another wire that is powered up from the EFI relay. More then likely the fuel rail is brass or something that won't produce a spark and might be better to braze it then weld but anyways hope you get it started soon
10-28-2017, 09:00 PM
#222
Member
Thread Starter
Join Date: Oct 2016
Posts: 284
i still have yet to check the compression but im remembering all of the times ive turned the motor over and it being really hard because of the vacuum from each cylinder and also having had the whole motor apart the rings and valves all looked good enough for me to decide not to replace them so i really dont feel like compression is the issue, maybe timing belt but since the vg is an interference engine and i always turn the motor over twice or more after doing the timing belt i dont think that was wrong either. it just occurred to me though that the cranking circuit is different than the on circuit and im wondering if when i go to crank the engine im actually turning the ecu off. i figured i wouldnt be able to hear the injectors click over the starter anyway but now im wondering if i didnt hear them because they werent clicking. i mean wiring is by no means my specialty here and i know its had a lot of issues as it is and i cant really test the cranking circuit with out being inside the car so what i think i will do is set up my phone to record the ecu LED's while i crank and if they turn off ill know i need to figure out how to keep everything on while i crank. this explanation is really the only one that makes any sense to me right now as i have been over virtually everything else about 10 times lol
10-29-2017, 08:41 PM
#223
You should be able to see if the injectors are getting the electrical pulse to fire by using a voltmeter. All the injectors have 12 volts on one of the wires that comes from the ignition switch. In the Maxima wire harness, this is a white with green stripe wire. The other wire goesto the ECU and is grounded to fire the injector. This other wire is what you connect the voltmeter. It will be a different color wire on each injector. Set the voltmeter to the lowest voltage range and watch the meter while you crank the engine. All you will see is the voltage reading jumping around. There is no accuracy in the readings If you don't get any reading on DC volts, try AC volts.
I would suggest that you check for 12 volts on the ECU pins 49 & 59 when the key is in the ON position. And also check that you get 12 volts on ECU pin 43 when the ignition switch is in the START position.
I would suggest that you check for 12 volts on the ECU pins 49 & 59 when the key is in the ON position. And also check that you get 12 volts on ECU pin 43 when the ignition switch is in the START position.
10-29-2017, 08:42 PM
#224
Member
Thread Starter
Join Date: Oct 2016
Posts: 284
https://www.youtube.com/watch?v=vbwf...ature=youtu.be
the ecu is shutting off completely when cranking which tells me i was right about my suspicion. all i should have to do to fix this is rewire the ecu relay to a circuit that isnt shut off when cranking. this would explain why everything works when i spin the distributor but not when i go to crank the car. i would have fixed it tonight while i was at the garage but its raining right now and i cant hear anything turn on because im working in a steel building lol
for now i will be looking through my diagrams to see if i can find the correct circuit that the ecu relay should have been wired into in the first place but i suspect that the reason it isnt right now is because that circuit isnt in the same plug between the engine and body harnesses so i will probably have to either run a wire from a different plug or run a totally new circuit from a different relay. we will see but either way i think i should be running very soon.
Last edited by Nate Boslet; 10-29-2017 at 08:51 PM.
10-30-2017, 08:27 AM
#225
The ignition switch routes power for the various key positions.
In the Stanza, you could tap into pin 2 of the ignition stitch wires. This pin will be hot when in the ON or START positions only. While I don't see why you would want to, but if you wanted to power the relay in the ACCESSORY position as well as the others, then you would tap into pin 1.
Sorry, I don't know what the wire colors are, you will have to go by the position of the wires in the connector.
10-30-2017, 09:17 PM
#226
Member
Thread Starter
Join Date: Oct 2016
Posts: 284
thats exactly what it was dennis. the ignition wires are in different pins on either harness and i had them mixed up. now that that is fixed....
https://www.youtube.com/watch?v=mZjy...ature=youtu.be
of course after it runs flawlessly (kinda..) i find a small puddle of gear oil on the floor. the one seal i didnt replace, the input shaft seal, leaks like its not even in the trans. so i gotta pull the trans off to fix that but that shouldnt take me more than a day or so but the important thing is IT RUNS!!!! ill be dailying the only vg30e stanza in the world (as far as im aware of) very soon!
10-31-2017, 11:06 AM
#227
thats exactly what it was dennis. the ignition wires are in different pins on either harness and i had them mixed up. now that that is fixed....
https://www.youtube.com/watch?v=mZjy...ature=youtu.be
of course after it runs flawlessly (kinda..) i find a small puddle of gear oil on the floor. the one seal i didnt replace, the input shaft seal, leaks like its not even in the trans. so i gotta pull the trans off to fix that but that shouldnt take me more than a day or so but the important thing is IT RUNS!!!! ill be dailying the only vg30e stanza in the world (as far as im aware of) very soon!
https://www.youtube.com/watch?v=mZjy...ature=youtu.be
of course after it runs flawlessly (kinda..) i find a small puddle of gear oil on the floor. the one seal i didnt replace, the input shaft seal, leaks like its not even in the trans. so i gotta pull the trans off to fix that but that shouldnt take me more than a day or so but the important thing is IT RUNS!!!! ill be dailying the only vg30e stanza in the world (as far as im aware of) very soon!
 10-31-2017, 09:33 PM
#229
Member
Thread Starter
Join Date: Oct 2016
Posts: 284
thanks guys! i pulled the trans off today to try to find this leak and it turns out the leak was actually coming from the oil pan gasket. its brand new and its leaking from the bottom of the curved section so im not really sure how that happened but im going to partially drop the pan and try to seal it up with some rtv. after i have everything back together maybe ill post a video of me finally driving the car lol before i started working today though, i went to start the car just to see if it would and it didnt, for some reason the ecu is shutting off when cranking again even though i didnt change anything since it was fixed last.... not really sure what thats all about but ill have to address it once the car is all back together. i plan on having everything back together tomorrow night, ill probably have it running again and attempting to drive it thursday. hopefully all the coolant stuff is solid lol (i doubt it)
11-06-2017, 07:37 AM
#230
Member
Thread Starter
Join Date: Oct 2016
Posts: 284
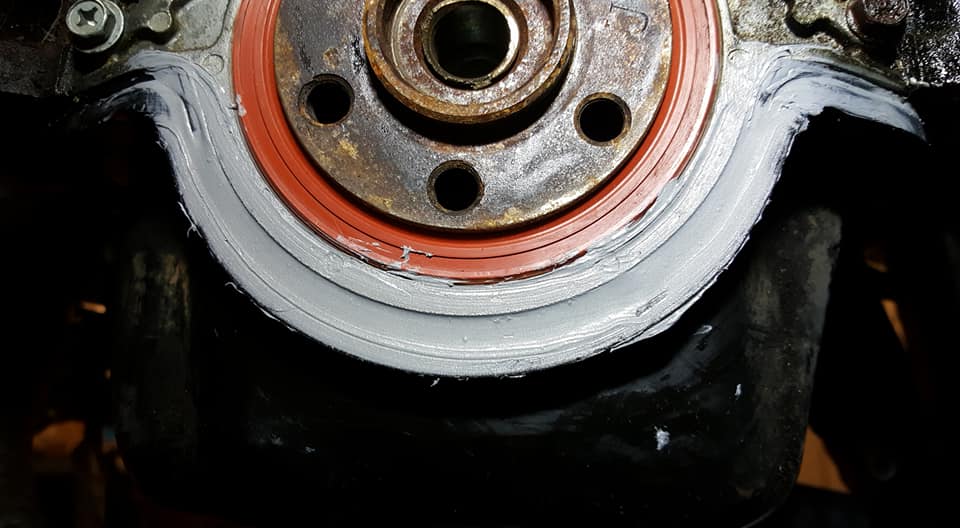
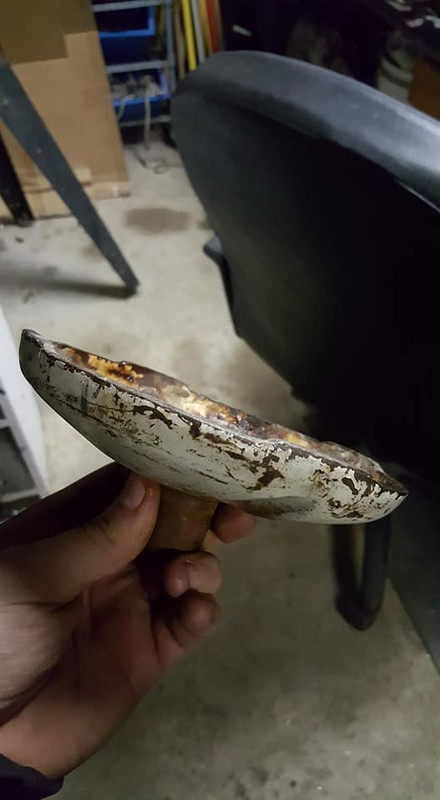
ok so idk if you will really be able to see this gap but its about an 8th inch between the gasket and the pan. idk why this is like this, maybe the rear main seal housing is different between the maxima and z31 but regardless this is the issue i have to fix.
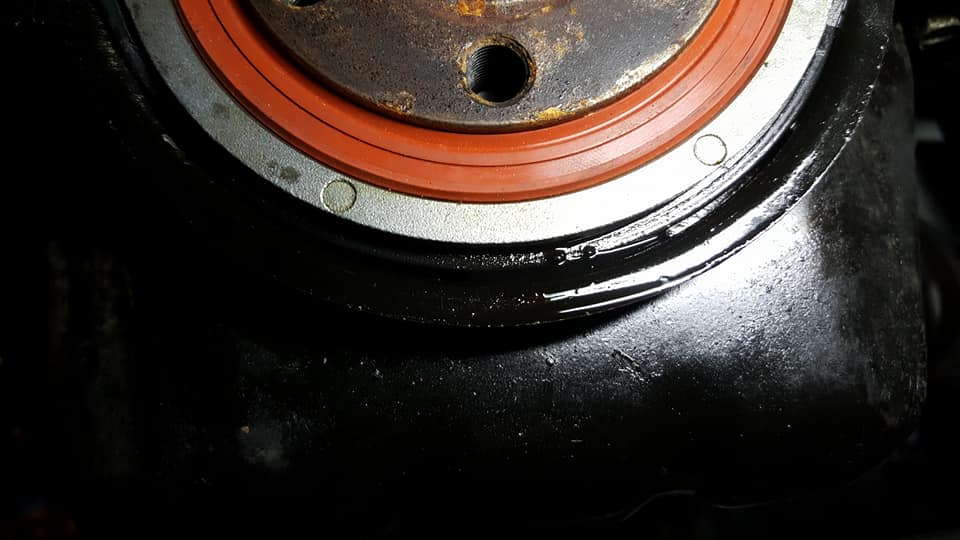

here is the "repair" i need to drop the pan again soonish anyway to fix the fact that i dont have a dipstick so i really dont care if this is a lasting fix or not as long as i can drive the car for a little while but im not really worried about this leaking anymore. i basically just cleaned off as much of the oil as i could, blasted it with some starter fluid and pumped half a tube of rtv in the crack to fill it up and then wiped it smooth with a little piece of cardboard.
i dont have a trans jack and the one jack that i do have is like 200lbs and is made for tractor trailers or something but free beats spending 200 bucks on a tool i probably wont use again for 6 months so i went with the option of making an attachment for my ****ty jack to act as a trans jack.
here is the original jack top
here are the materials i used.
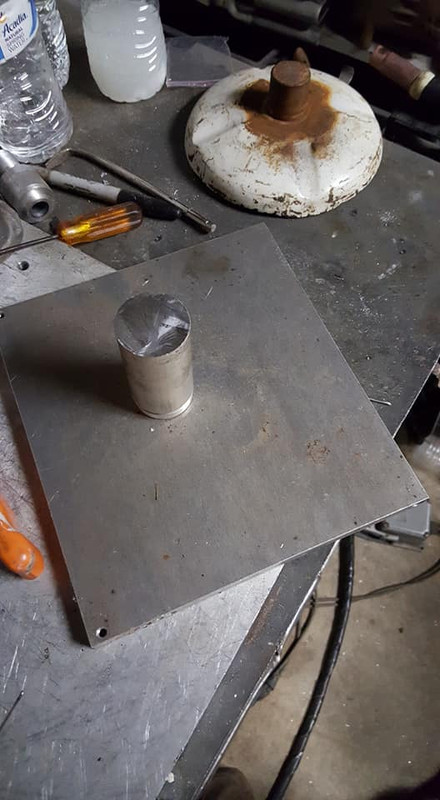
heres the material prepped for welding. the pin is a 1/4 drill bit that broke at some point, all that is for is to keep the materials in place during welding so i dont have to eyeball my tacks, i just know everything is exactly in the center with that pin.
here is everything after welding, my welder is probably designed to weld materials that are maybe half of this size and as everyone likely knows aluminum is a very efficient heat sink so even after spending 20 minutes preheating the plate with a torch, cranking my welder to the absolute maximum and stomping my foot pedal into the floor i still ended up melting just about everything in the immediate area *except* the aluminum.... but eventually i got it done. then i drilled and tapped some holes for the tabs.

i cut up some angle iron and the trans jack attachment is done.
and it worked! trans is back in, axles are back in, shes well on her way.
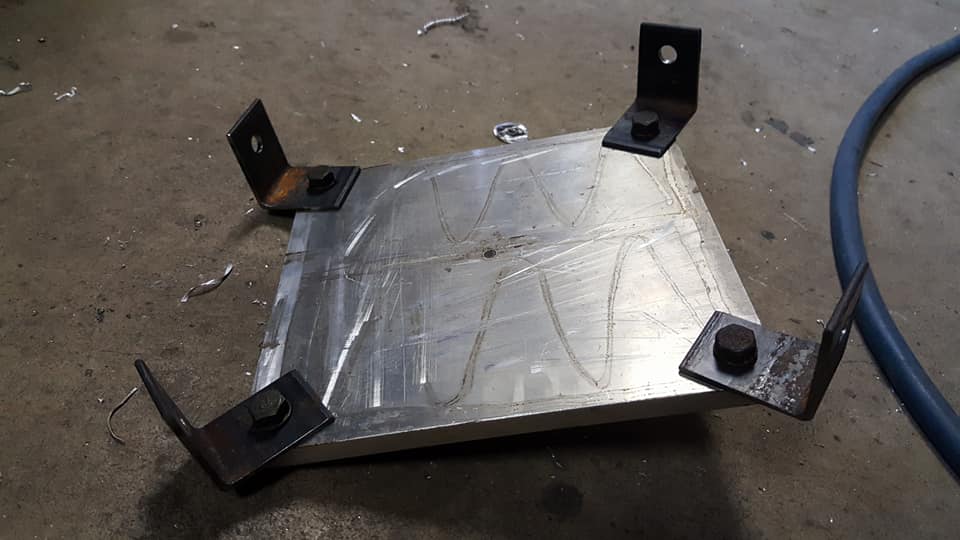
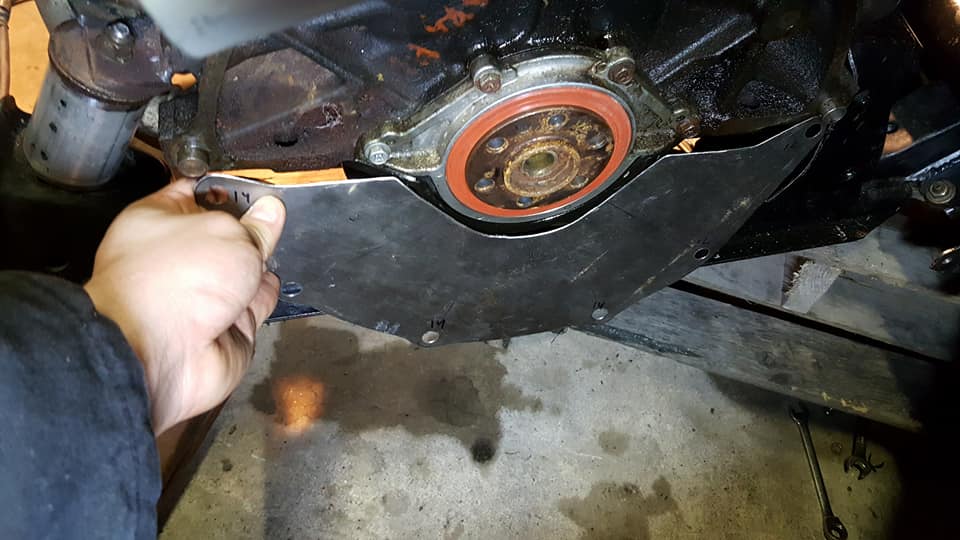
i also have needed a dust cover for the transmission so i made up a template and cut one up out of some stainless sheet i had lying around.
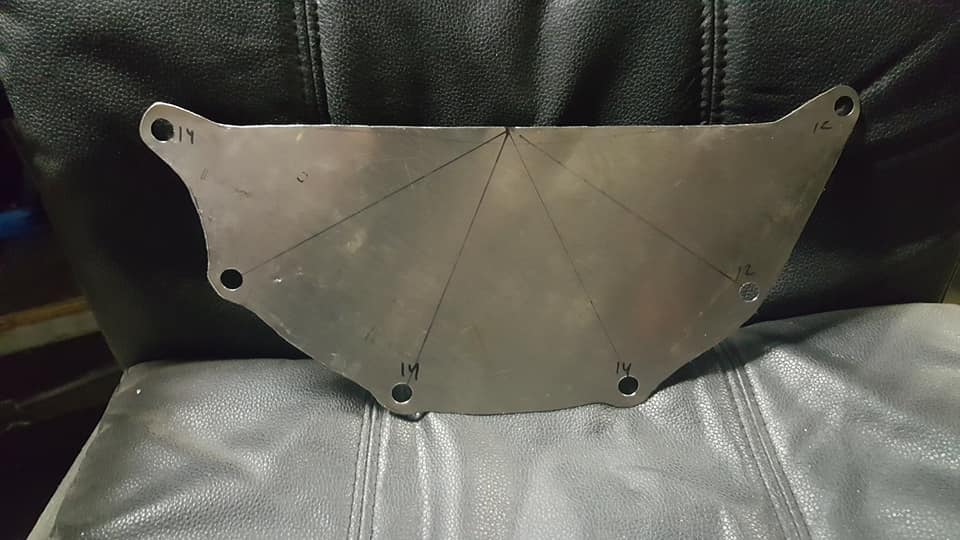
i waited to cut out the extra space for the crank till i brought it back to the garage because i wasnt sure where it was supposed to go and i wanted the maximum amount of coverage for the dust cover.
so this is all bolted together now, i just need to throw the wheels back on and do some other little things here and there and then i can move onto getting the cooling system all tied up and it should be ready to roll. im not sure what is happening with the wiring i think im still having a problem but ill have to sort that out once i get the trans filled back up.
here is the "repair" i need to drop the pan again soonish anyway to fix the fact that i dont have a dipstick so i really dont care if this is a lasting fix or not as long as i can drive the car for a little while but im not really worried about this leaking anymore. i basically just cleaned off as much of the oil as i could, blasted it with some starter fluid and pumped half a tube of rtv in the crack to fill it up and then wiped it smooth with a little piece of cardboard.
i dont have a trans jack and the one jack that i do have is like 200lbs and is made for tractor trailers or something but free beats spending 200 bucks on a tool i probably wont use again for 6 months so i went with the option of making an attachment for my ****ty jack to act as a trans jack.
here is the original jack top
here are the materials i used.
heres the material prepped for welding. the pin is a 1/4 drill bit that broke at some point, all that is for is to keep the materials in place during welding so i dont have to eyeball my tacks, i just know everything is exactly in the center with that pin.
here is everything after welding, my welder is probably designed to weld materials that are maybe half of this size and as everyone likely knows aluminum is a very efficient heat sink so even after spending 20 minutes preheating the plate with a torch, cranking my welder to the absolute maximum and stomping my foot pedal into the floor i still ended up melting just about everything in the immediate area *except* the aluminum.... but eventually i got it done. then i drilled and tapped some holes for the tabs.
i cut up some angle iron and the trans jack attachment is done.
and it worked! trans is back in, axles are back in, shes well on her way.
i also have needed a dust cover for the transmission so i made up a template and cut one up out of some stainless sheet i had lying around.
i waited to cut out the extra space for the crank till i brought it back to the garage because i wasnt sure where it was supposed to go and i wanted the maximum amount of coverage for the dust cover.
so this is all bolted together now, i just need to throw the wheels back on and do some other little things here and there and then i can move onto getting the cooling system all tied up and it should be ready to roll. im not sure what is happening with the wiring i think im still having a problem but ill have to sort that out once i get the trans filled back up.
Last edited by Nate Boslet; 05-18-2018 at 11:47 AM.
11-10-2017, 10:05 AM
#231
Member
Thread Starter
Join Date: Oct 2016
Posts: 284
everything is back on the car, it is essentially the exact same way it was before i had the leak issue. only problem now is the car wont start. i didnt change anything with the wiring since the last time i did start but for some reason now the ecu is shutting off during cranking again and i have no idea why. i might need some help looking at all of the circuits to see where the issue is because right now im basically at a loss. once i get the car to start consistently i can put coolant in it and take it for a test drive so i wanna figure this issue out asap.
11-15-2017, 08:52 PM
#232
Member
Thread Starter
Join Date: Oct 2016
Posts: 284
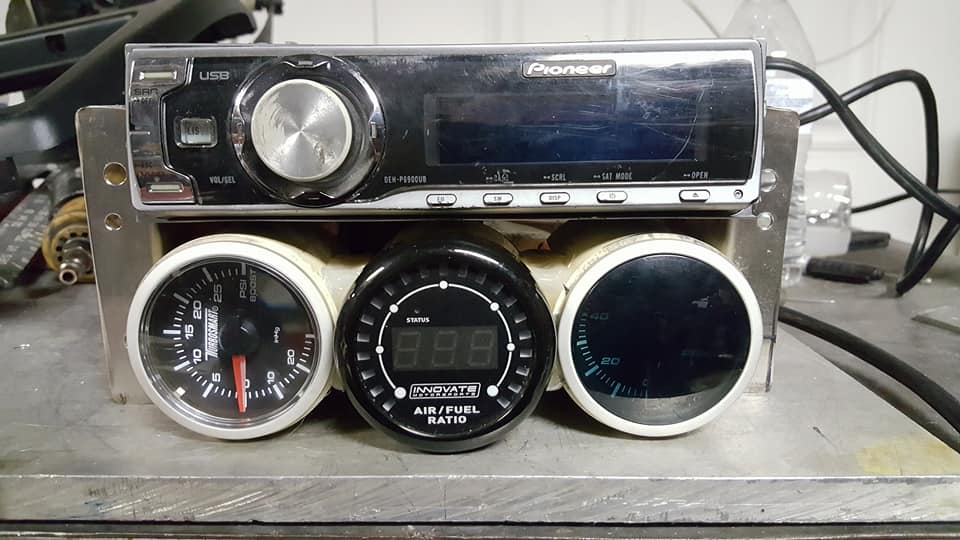
i pulled the stuff off of my z31 and brought it to the garage to start cramming it into the stanza. since im trying to get the car to run on the stock stuff right now all im installing is the gauges until i start putting together a turbo kit.
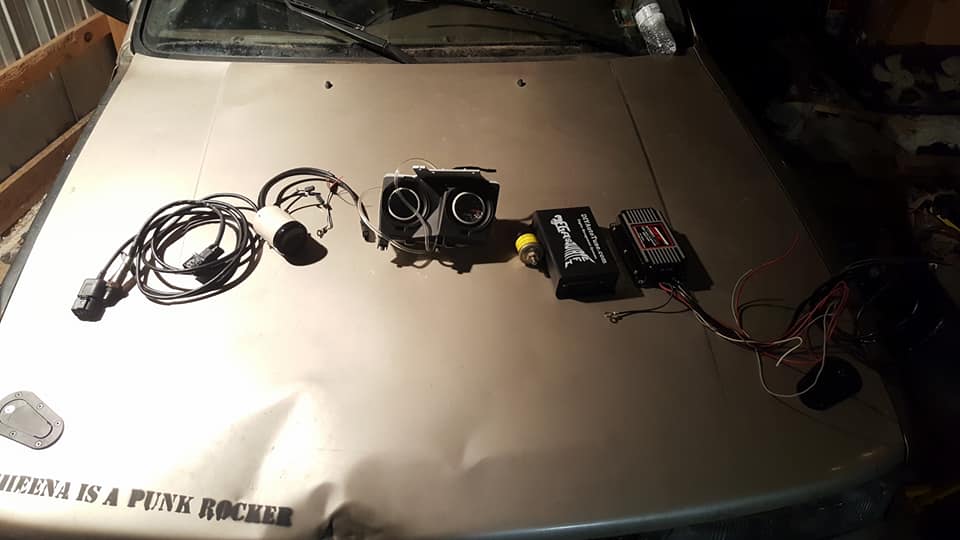
i took the headunit from the z to put into the stanza so its at least getting used but the tray was stolen out of the stanza along with the radio so i have to make a new one (like everything else on this frickin car)
i made a template while i was there out of some random metal i had lying around to bring home to make up some brackets.
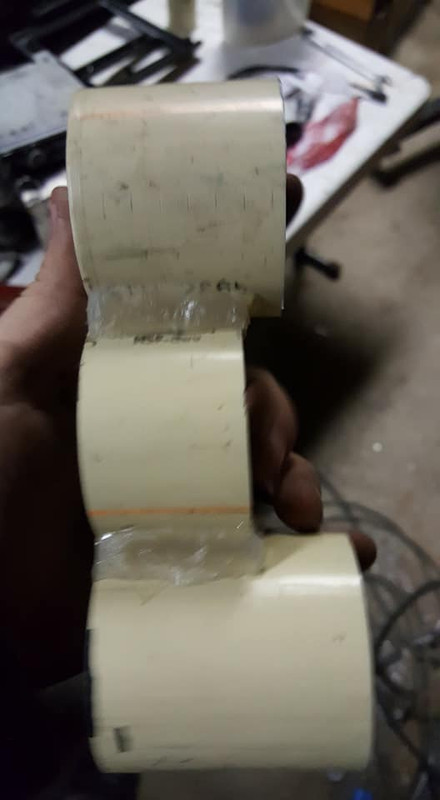
in case you didnt know, pvc tubing (i think its 2 inch, whatever size its supposed to be) will fit almost any standard gauge. so if you want to make a gauge cluster or mount gauges somewhere they normally wouldnt go without having to buy a bunch of fancy stuff, pvc will do it on the cheap. then you can paint it or whatever. here i have cut these 3 sections so that the mounts for the gauges will engage at the back of the pvc and then hot glued them together. normally i would rather use a more mechanical solution but i dont have enough room for anything too crazy on the outside and the gauges fit perfectly on the inside so i cant put anything there, so best thing is to fill those corners with something. you could use jb weld if you really wanted it to never come apart but for now hot snot will work fine.
this is the final orientation of the gauges and radio im going for. everything should fit well inside of the pocket for the radio but the dash trim is gonna hit it so i plan on cutting it away so it forms to the gauges and doesnt look entirely like i just jammed them into the dash, hopefully that turns out well.
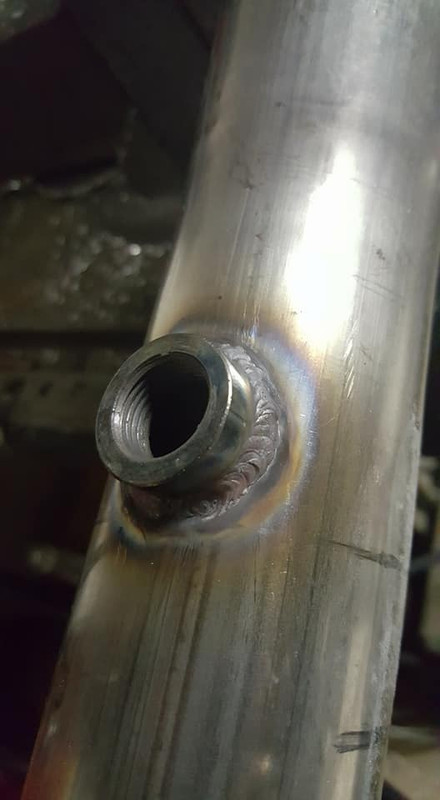
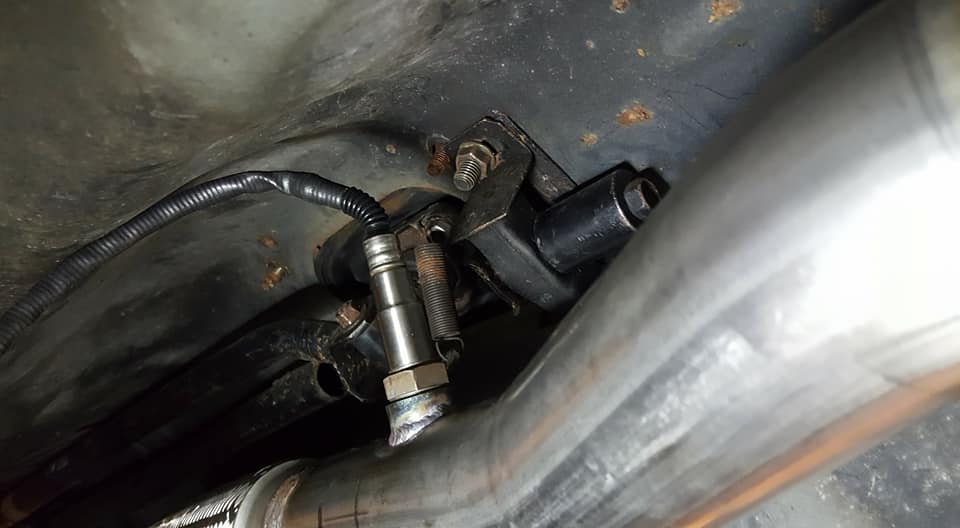
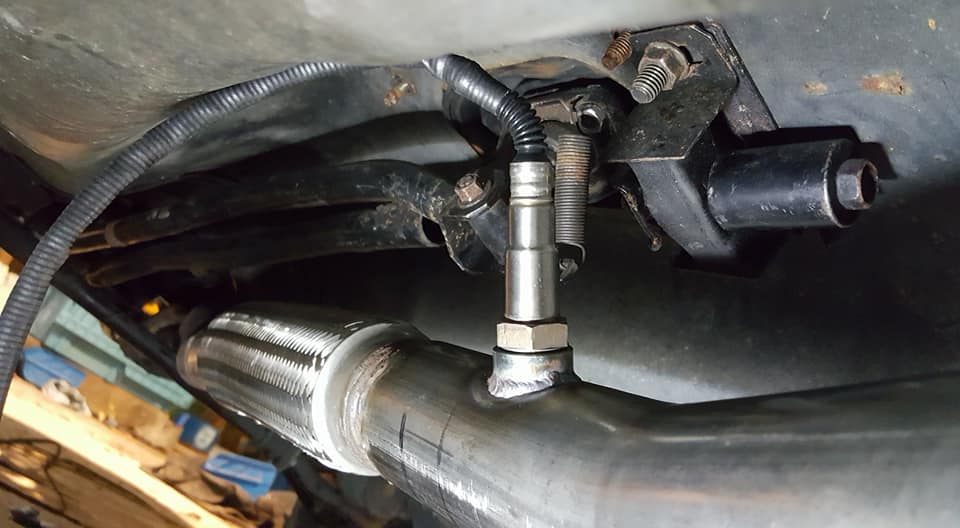
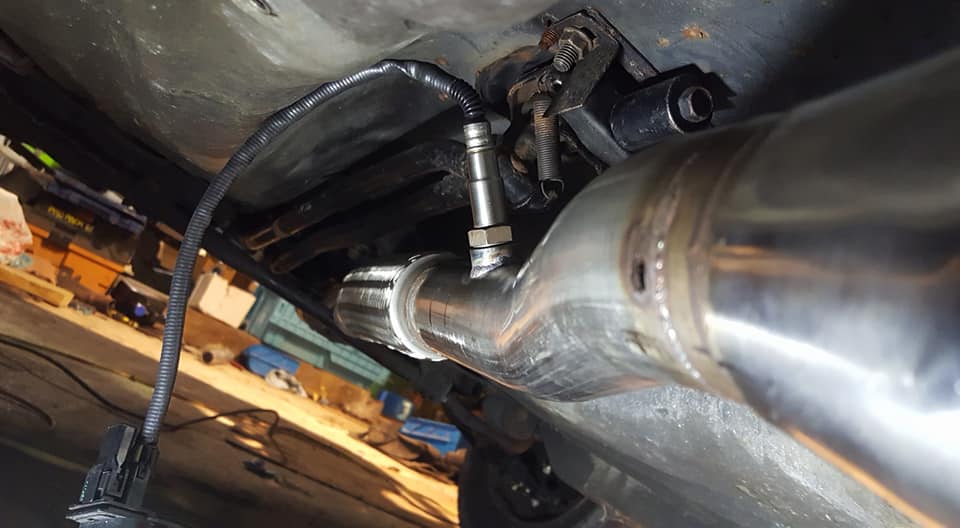
my torch for my welder essentially fell apart a few days ago so tomorrow im gonna try to get a new torch and get the o2 bung welded in the exhaust tomorrow, then once all the gauges are wired up and mounted ill work on sorting the wiring out.
i took the headunit from the z to put into the stanza so its at least getting used but the tray was stolen out of the stanza along with the radio so i have to make a new one (like everything else on this frickin car)
i made a template while i was there out of some random metal i had lying around to bring home to make up some brackets.
in case you didnt know, pvc tubing (i think its 2 inch, whatever size its supposed to be) will fit almost any standard gauge. so if you want to make a gauge cluster or mount gauges somewhere they normally wouldnt go without having to buy a bunch of fancy stuff, pvc will do it on the cheap. then you can paint it or whatever. here i have cut these 3 sections so that the mounts for the gauges will engage at the back of the pvc and then hot glued them together. normally i would rather use a more mechanical solution but i dont have enough room for anything too crazy on the outside and the gauges fit perfectly on the inside so i cant put anything there, so best thing is to fill those corners with something. you could use jb weld if you really wanted it to never come apart but for now hot snot will work fine.
this is the final orientation of the gauges and radio im going for. everything should fit well inside of the pocket for the radio but the dash trim is gonna hit it so i plan on cutting it away so it forms to the gauges and doesnt look entirely like i just jammed them into the dash, hopefully that turns out well.
my torch for my welder essentially fell apart a few days ago so tomorrow im gonna try to get a new torch and get the o2 bung welded in the exhaust tomorrow, then once all the gauges are wired up and mounted ill work on sorting the wiring out.
Last edited by Nate Boslet; 05-18-2018 at 11:49 AM.
11-16-2017, 09:23 PM
#234
Member
Thread Starter
Join Date: Oct 2016
Posts: 284
i mean even if it doesnt ill just jb weld it back together but it seems to be pretty strong and all it has to do is sit in the dash so its not like it has to be anti tank proof but i guess we will see lol
11-17-2017, 10:36 AM
#235
Senior Member
Join Date: Apr 2007
Location: Albuquerque, NM
Posts: 1,323
you might want to drill some holes between them and throw some zip ties in to hold them together for those hot summer days
11-17-2017, 08:54 PM
#236
Member
Thread Starter
Join Date: Oct 2016
Posts: 284
i need parts. the radio tray is giving me a lot of problems and im getting annoyed because i could easily just modify the stock one to do exactly what i need it to if i had it. i also want to put my windows up so im looking for a master switch. ...and a tail light... but i cant find any in the local yards and im not finding any online either. its like the stanza is a common enough car to see them every once in a while driving around, rare enough that no one sells any parts for them but not rare enough that they are cool and niche lol
11-18-2017, 12:53 PM
#237
I looked on rockauto.com for the window switch and they had one left for approx $255!  but they called it a right hand switch
rockauto.com/en/catalog/nissan,1991,stanza,2.4l+l4,1213311,electrical-switch+&+relay,power+window+switch,4624
I saw the same one on e-bay for $301
ebay.com/itm/Door-Power-Window-Switch-Window-Switch-Front-Right-fits-90-92-Nissan-Stanza/252837149682?fits=Year%3A1991%7CModel%3AStanza&epi d=1992739536&hash=item3ade44bbf2:g:EscAAOSwD8ZZ9pd I&vxp=mtr
You may have to try some of these on-line junk yards.
- - - - - - -
I found that Dorman makes a switch, actually 2 of them. I don't know what the difference is. The buttons look different from the ones above. The Dorman part numbers are 901-807 and 901-808. The printing on the buttons is different. But the price is in the $115 range (the 901-808 is $96 at walmart).
I googled Dorman 901-808 and then Dorman 901-807 to find these.
but they called it a right hand switchrockauto.com/en/catalog/nissan,1991,stanza,2.4l+l4,1213311,electrical-switch+&+relay,power+window+switch,4624
I saw the same one on e-bay for $301
ebay.com/itm/Door-Power-Window-Switch-Window-Switch-Front-Right-fits-90-92-Nissan-Stanza/252837149682?fits=Year%3A1991%7CModel%3AStanza&epi d=1992739536&hash=item3ade44bbf2:g:EscAAOSwD8ZZ9pd I&vxp=mtr
You may have to try some of these on-line junk yards.
- - - - - - -
I found that Dorman makes a switch, actually 2 of them. I don't know what the difference is. The buttons look different from the ones above. The Dorman part numbers are 901-807 and 901-808. The printing on the buttons is different. But the price is in the $115 range (the 901-808 is $96 at walmart).
I googled Dorman 901-808 and then Dorman 901-807 to find these.
Last edited by DennisMik; 11-18-2017 at 01:19 PM.
11-18-2017, 01:59 PM
#238
Member
Thread Starter
Join Date: Oct 2016
Posts: 284
I looked on rockauto.com for the window switch and they had one left for approx $255! but they called it a right hand switch
rockauto.com/en/catalog/nissan,1991,stanza,2.4l+l4,1213311,electrical-switch+&+relay,power+window+switch,4624
I saw the same one on e-bay for $301
ebay.com/itm/Door-Power-Window-Switch-Window-Switch-Front-Right-fits-90-92-Nissan-Stanza/252837149682?fits=Year%3A1991%7CModel%3AStanza&epi d=1992739536&hash=item3ade44bbf2:g:EscAAOSwD8ZZ9pd I&vxp=mtr
You may have to try some of these on-line junk yards.
- - - - - - -
I found that Dorman makes a switch, actually 2 of them. I don't know what the difference is. The buttons look different from the ones above. The Dorman part numbers are 901-807 and 901-808. The printing on the buttons is different. But the price is in the $115 range (the 901-808 is $96 at walmart).
I googled Dorman 901-808 and then Dorman 901-807 to find these.
but they called it a right hand switchrockauto.com/en/catalog/nissan,1991,stanza,2.4l+l4,1213311,electrical-switch+&+relay,power+window+switch,4624
I saw the same one on e-bay for $301
ebay.com/itm/Door-Power-Window-Switch-Window-Switch-Front-Right-fits-90-92-Nissan-Stanza/252837149682?fits=Year%3A1991%7CModel%3AStanza&epi d=1992739536&hash=item3ade44bbf2:g:EscAAOSwD8ZZ9pd I&vxp=mtr
You may have to try some of these on-line junk yards.
- - - - - - -
I found that Dorman makes a switch, actually 2 of them. I don't know what the difference is. The buttons look different from the ones above. The Dorman part numbers are 901-807 and 901-808. The printing on the buttons is different. But the price is in the $115 range (the 901-808 is $96 at walmart).
I googled Dorman 901-808 and then Dorman 901-807 to find these.
11-18-2017, 02:46 PM
#239
Member
Thread Starter
Join Date: Oct 2016
Posts: 284
oh and btw, remember how the car billows more smoke than a 67 year old waitress at a crappy diner? i noticed there was a ****LOAD of oil in the exhaust, like several ounces lol and i was like oh **** well the stanza is screwed im gonna have to rebuild the motor and not drive it for another several months..... well while i was talking to vern about it (shout out to vern btw good lookin out) he pointed out that theres really no way for oil to get pushed up into the cylinder even if the rings were not even in the engine. so the only real way for oil to get in would be from the head, coming down from the valve seats (which i replaced) so i thought about it for a while and realized like a month ago or so i actually added like a full two cups of oil into the motor inside of each cylinder (only a few ounces per cylinder to make sure the cylinder walls were fully coated but still probably too much) and apparently it didnt leak down into the crank case like i expected it to... so all of the oil that was previously in the cylinders just got pushed into the exhaust, thats where the smoke and oil was from when i first started the motor. so i have an old busted o2 sensor im gonna use to plug the o2 bung hole i just welded in the exhaust and ill wait to install the wideband until all of the oil is burned off (cause it will foul the sensor if i dont)
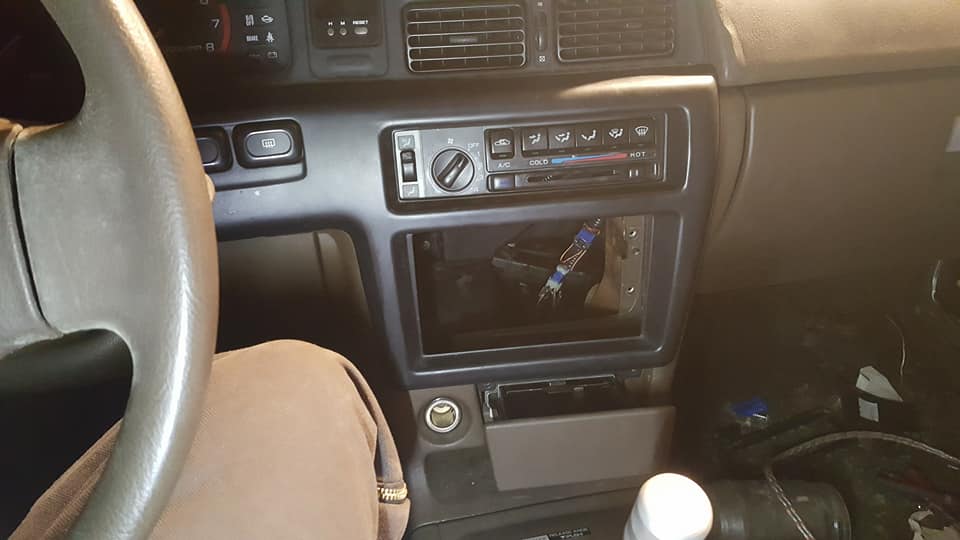
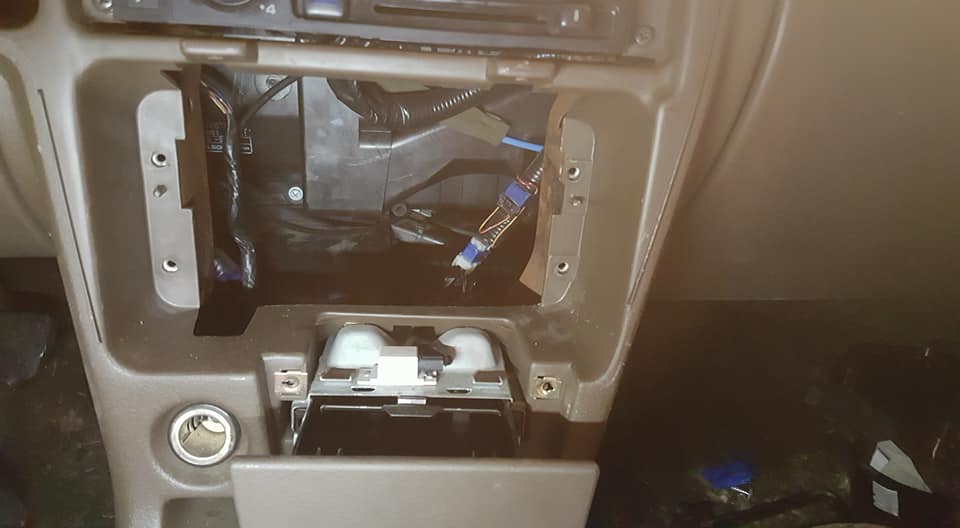
so instead of trying to get the radio all sorted out inside of the car all cramped and uncomfortable i just pulled all of the relevant interior stuff out and brought it home. i would still MUCH rather just get the stock stuff but in all of my searching i have yet to find anyone parting out a stanza in my area or even online lol we will see tho.
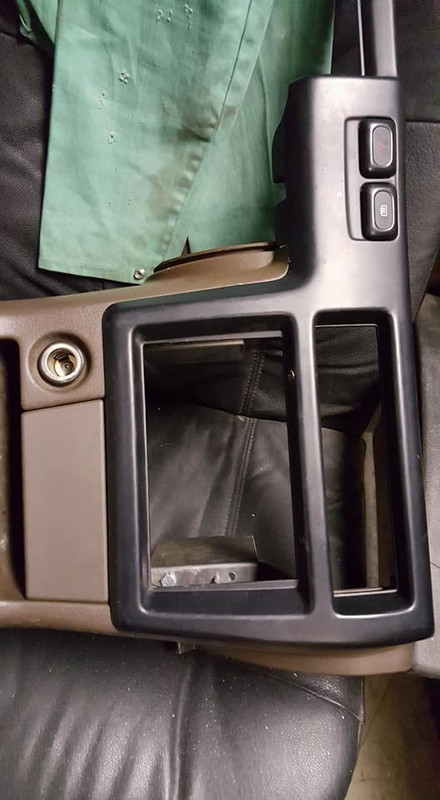
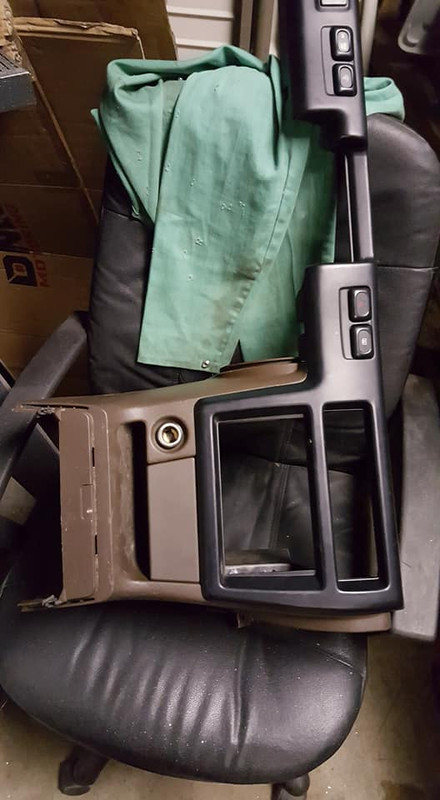
so instead of trying to get the radio all sorted out inside of the car all cramped and uncomfortable i just pulled all of the relevant interior stuff out and brought it home. i would still MUCH rather just get the stock stuff but in all of my searching i have yet to find anyone parting out a stanza in my area or even online lol we will see tho.
Last edited by Nate Boslet; 05-18-2018 at 11:50 AM.
11-20-2017, 04:14 PM
#240
Member
Thread Starter
Join Date: Oct 2016
Posts: 284
i found a place like 130 miles from me with a stanza and they want 95 dollars for the window switch and the headunit bracket shipped which is like 3 times what i expected to pay. im gonna keep looking around to see if i can find them from a Upullit but from what ive seen its just not a common enough or desirable enough car for people to keep around to part out. gonna look on some of the forums maybe i can find someone who has the parts i need and is willing to let them go for a little less than human limb prices.

