Turbo VG swapped stanza
 10-20-2016, 09:38 PM
#1
Member
Thread Starter

Join Date: Oct 2016
Posts: 284
Turbo VG swapped stanza
hello all. ive decided not to scrap my pile of **** stanza and instead make it a dream killer. i am currently stripping out the bay of all of the KA stuff and gathering everything i will need to make mounts. the only real reason i am starting this thread is because i wanted a place to post the progress pictures and see what the community here is like.

and here is a picture of my Z31 for... credibility.
also if anyone happens to know the front to back length of the VG maxima crossmember please let me know.
and here is a picture of my Z31 for... credibility.
also if anyone happens to know the front to back length of the VG maxima crossmember please let me know.
Last edited by Nate Boslet; 05-14-2018 at 03:46 PM.

 10-21-2016, 08:45 AM
#3
Member
Thread Starter
Join Date: Oct 2016
Posts: 284
it doesnt have a driveable tune on it and im doing everything myself with no experience so progress is a little slow. im pretty sure im having some mechanical/harness issues that are preventing me from getting a decent idle so its kind of on the back burner right now. its megasquirt MS1 and i also just got 280 cams for it so ill probably slap those in soon just to make things even harder for myself.
i have a trans from a maxima im gonna use, it looks like the linkages will bolt up with the mounts i made for the 5 speed that was in the stanza before i ripped it out. im definitely going to have to make a trans mount but i did that for the stanza too since all i had was a sentra trans mount (or whatever i had, im not even sure) that was a kind of half assed in there anyway. the main info i need is on the maxima crossmember to see if there is any chance of it bolting in so i have a way of mounting the engine in the general area it needs to be. if i cant do that ill have to suspend it and make everything custom which i really dont want to do but i will if i have to.
i have a trans from a maxima im gonna use, it looks like the linkages will bolt up with the mounts i made for the 5 speed that was in the stanza before i ripped it out. im definitely going to have to make a trans mount but i did that for the stanza too since all i had was a sentra trans mount (or whatever i had, im not even sure) that was a kind of half assed in there anyway. the main info i need is on the maxima crossmember to see if there is any chance of it bolting in so i have a way of mounting the engine in the general area it needs to be. if i cant do that ill have to suspend it and make everything custom which i really dont want to do but i will if i have to.
 10-21-2016, 06:43 PM
#5
Member
Thread Starter
Join Date: Oct 2016
Posts: 284
did some more stripping today.


realized pretty quickly i would have to pull the dash to get the harness out. i considered chopping it briefly before figuring ill just end up having to pull it later to get the VG harness in so away i went. all of the heater/ac/blower motor and dash came out semi easily (aka i didnt break anything) and i didnt even have to pull the wheel (didnt have a puller on me) scraped some more crap out of the engine bay like lines and brackets here and there and pulled the engine out on a pallet so i could get a good look at the space im working with and then i took some measurements.
(these are approximations, particularly where feet are used since my feet are wider than most)
stanza engine bay front to back: 2.5 feet
stanza engine bay left to right: 3 feet
stanza crossmember length: 38 inches
maxima trans length: 16 inches
vg engine length: 20 inches
vg engine width: 2 feet
i can already tell the main area ill have to do some squeezing is the width. i already planned to locate the turbo above the transmission to save space but that is no longer optional, it is necessary. i really want to use the stock radiator, mainly because that means i dont have to buy a radiator, but the fans may need to be flipped around to the other side and ill definitely have to get creative with my intercooler but so far this seems to be physically feasible.
now, can ANYONE tell me how long their maxima crossmember is?
Last edited by Nate Boslet; 05-14-2018 at 03:46 PM.
 10-28-2016, 05:50 PM
#8
Member
Thread Starter
Join Date: Oct 2016
Posts: 284
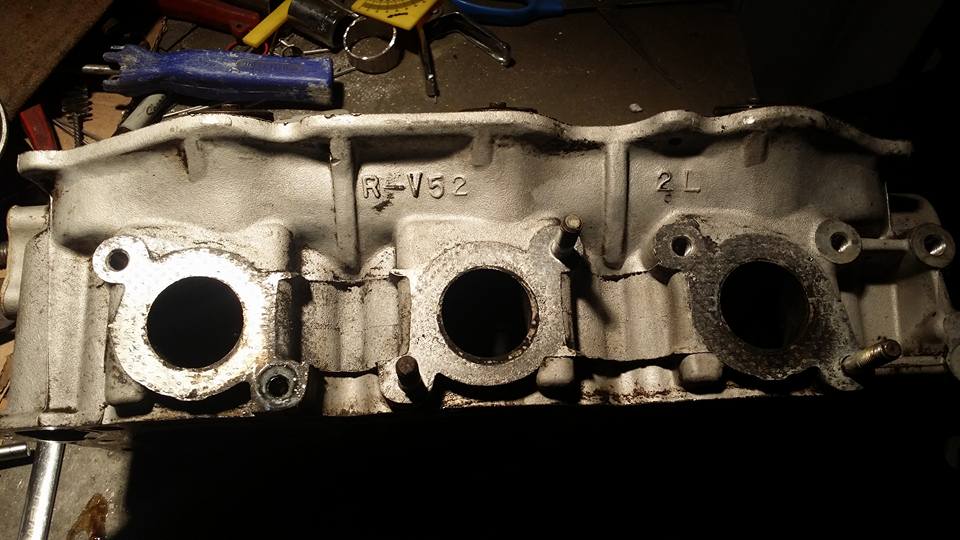
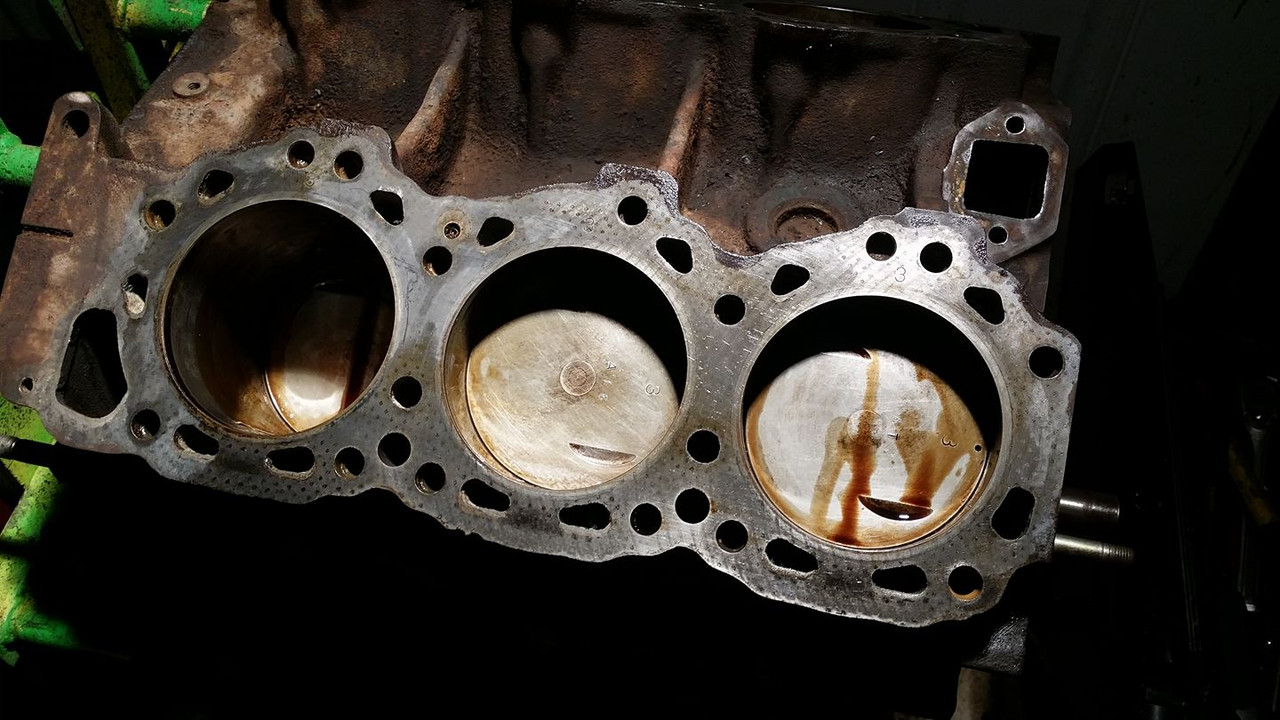
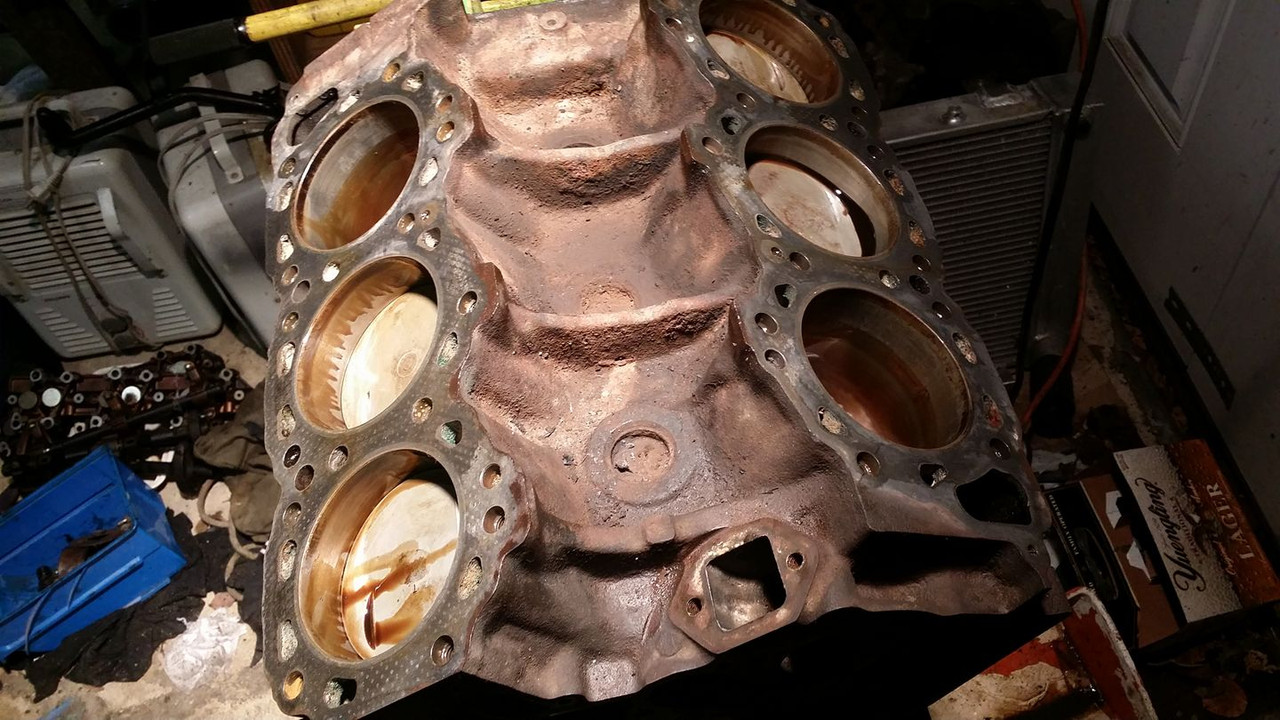
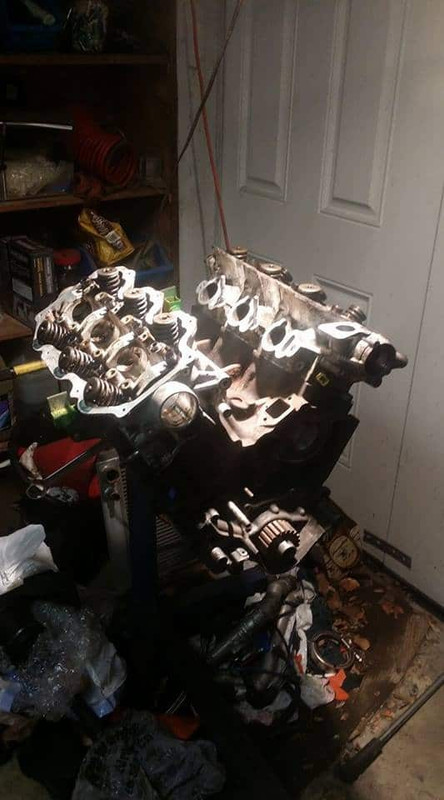
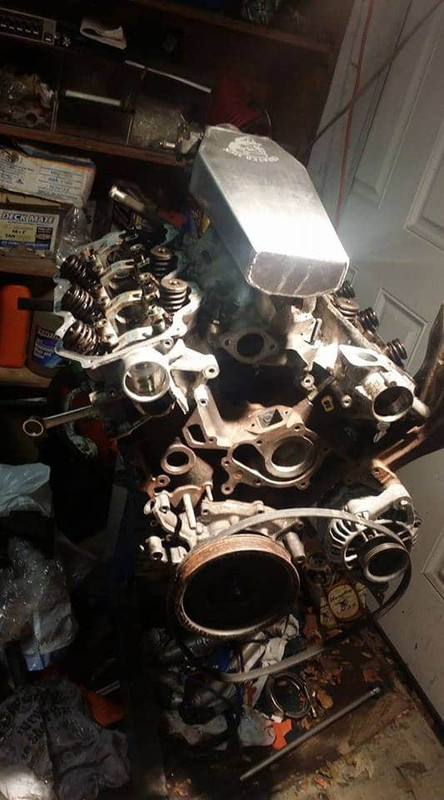
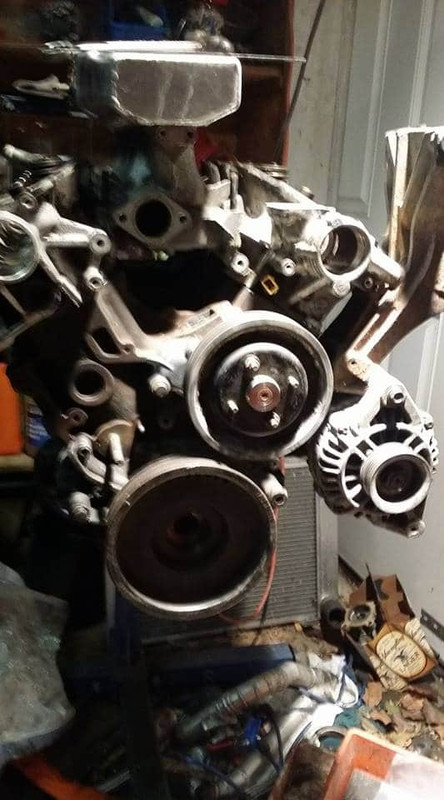
small update: below are some pictures of the motor i will be putting into the stanza, a VG30e from an 84 300zx. the intake on it is actually for a customer, the intake the stanza will be using doesnt have the pipe for the throttle body its just bolted directly to the plenum.
also the finished intakes (along with all of the stuff i make) get my logo etched into them. if you want an intake like this for your vg30 maxima build feel free to message me any questions you may have on my facebook at Nate Boslet or on here in a private message.
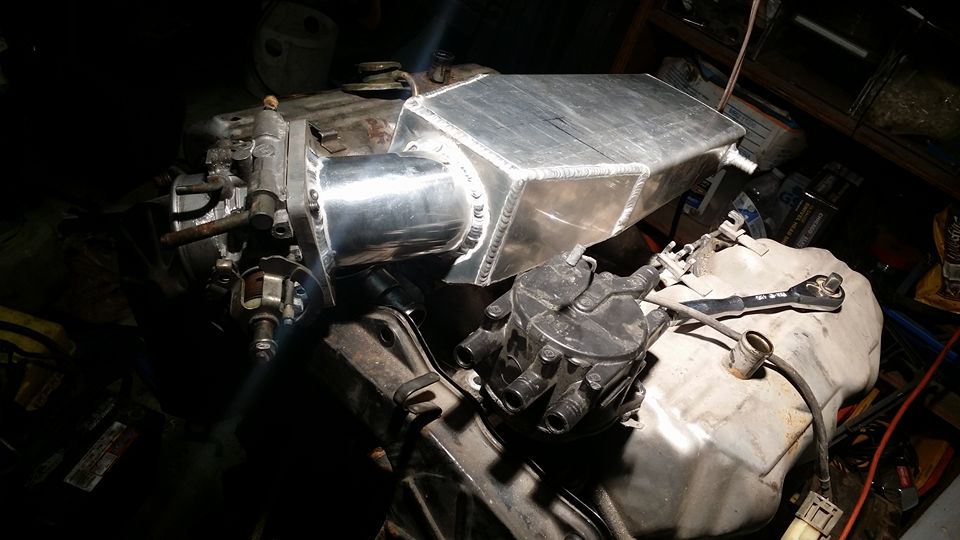
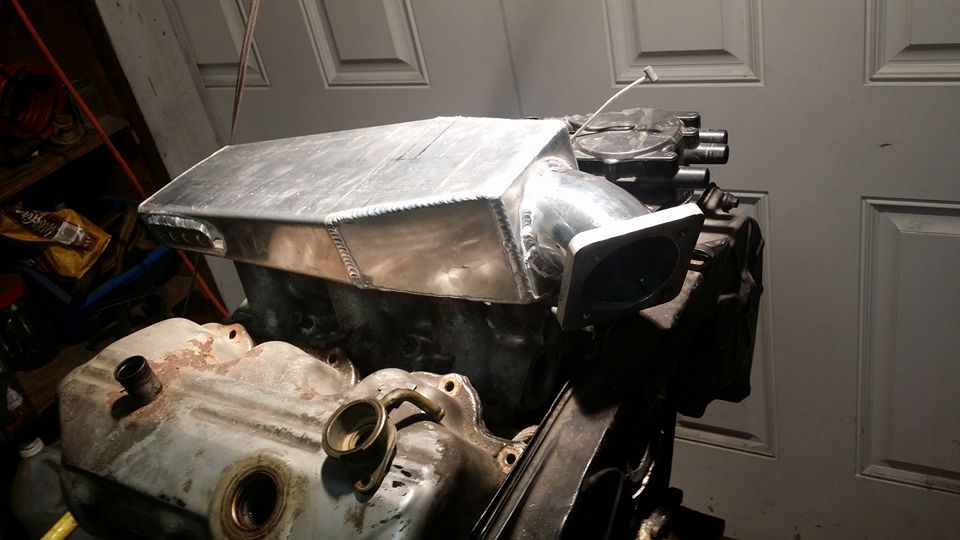
i have some other stuff coming for the motor but its not getting built or anything this is gonna be a mostly stock bottom end, its gonna get the truck cams from my 33 that were in my z since i took the cams from this engine to be reground into 280s for that car but other than that it will be a basically stock junkyard engine, nothing fancy.
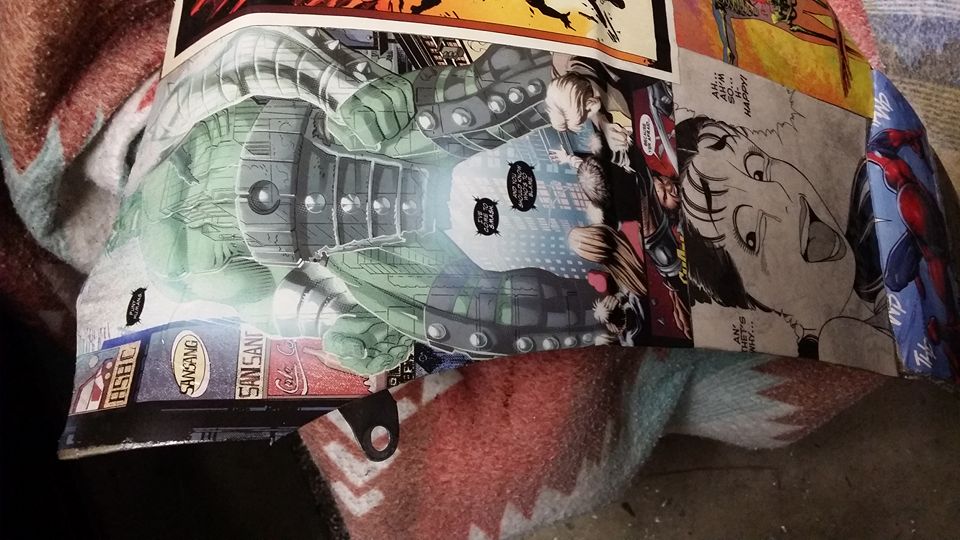
you cant really tell from the other pics but this is what i originally did to my fender.
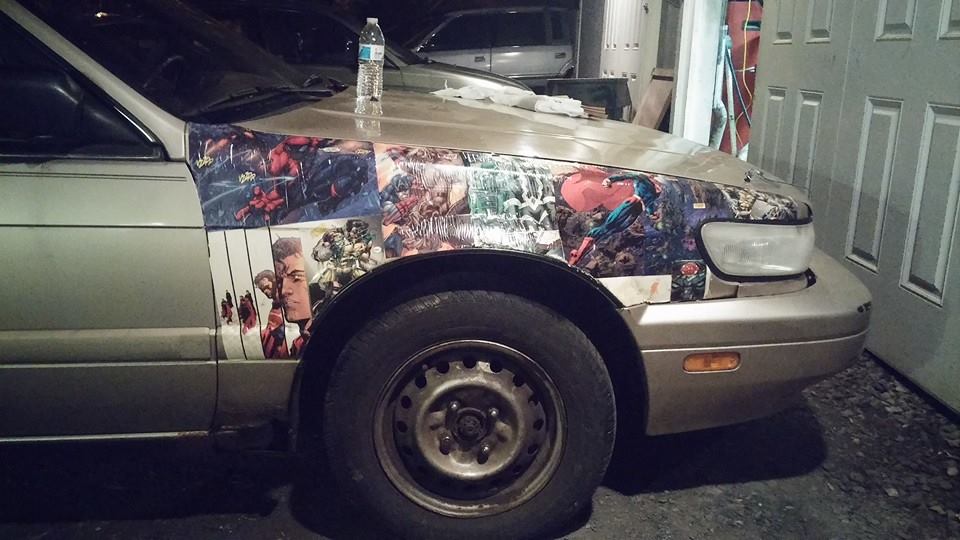
and after sitting outside in weather for about 2 years it looks like this>
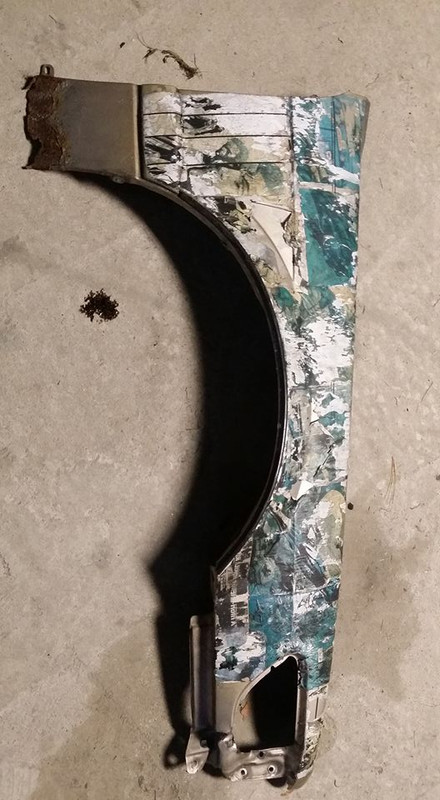
wood glue and interior clear coat dont hold up very well in those conditions. i knew this when i did it and my only regret is that im not more into comic books.
so while i wait for the rest of my parts to come in the mail ill be redoing that fender with more random comic book pages. i might even fix the rust but that would make it look a lot like i care and that is definitely not the vibe i want this car putting out. i want the outside of this car to look as slow as possible, the interior to look completely stock and the engine bay to look like a show car/racecar.
also the finished intakes (along with all of the stuff i make) get my logo etched into them. if you want an intake like this for your vg30 maxima build feel free to message me any questions you may have on my facebook at Nate Boslet or on here in a private message.
i have some other stuff coming for the motor but its not getting built or anything this is gonna be a mostly stock bottom end, its gonna get the truck cams from my 33 that were in my z since i took the cams from this engine to be reground into 280s for that car but other than that it will be a basically stock junkyard engine, nothing fancy.
you cant really tell from the other pics but this is what i originally did to my fender.
and after sitting outside in weather for about 2 years it looks like this>
wood glue and interior clear coat dont hold up very well in those conditions. i knew this when i did it and my only regret is that im not more into comic books.
so while i wait for the rest of my parts to come in the mail ill be redoing that fender with more random comic book pages. i might even fix the rust but that would make it look a lot like i care and that is definitely not the vibe i want this car putting out. i want the outside of this car to look as slow as possible, the interior to look completely stock and the engine bay to look like a show car/racecar.
Last edited by Nate Boslet; 05-14-2018 at 03:47 PM.
10-30-2016, 08:59 PM
#10
Member
Thread Starter
Join Date: Oct 2016
Posts: 284
ok havent gotten a chance to go to the junkyard and im waiting on parts for the motor so in the mean time i decided to **** around with the fender.
first i hit it with a polifan disk to get all the loose junk and wood glue off. i say all but i really mean barely even half of any.
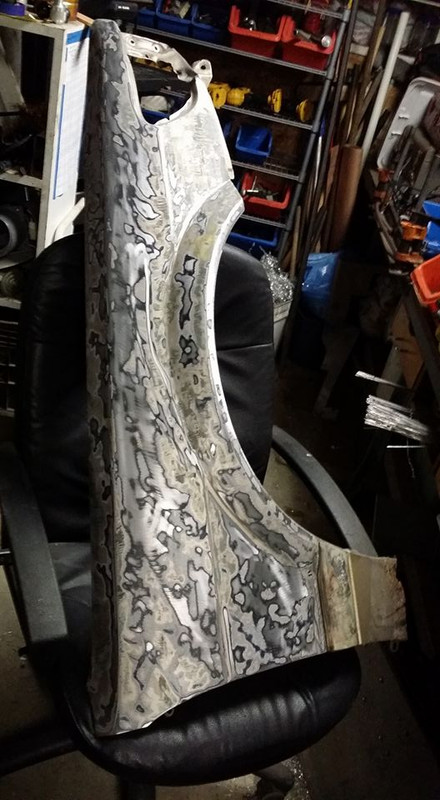
so once i did that and went back over it and got rid of the really egregious rough spots with some sand paper i hit it with some loctite adhesive spray and started slapping comic book pages i thought looked cool onto it.

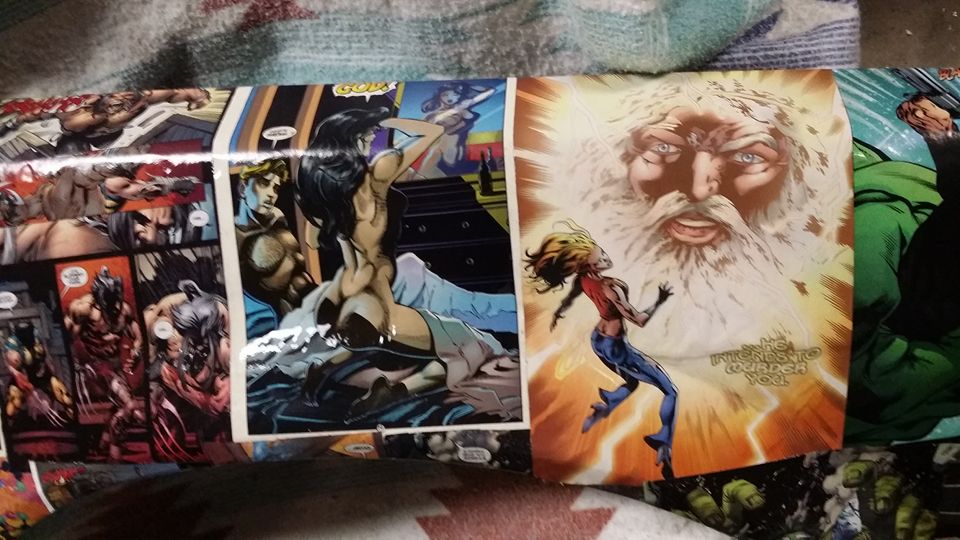

im happy with it. it actually looks better in person besides that one page i slapped literally directly onto that massive rust spot i said i might fix. i think we all knew i never really intended to fix that.... maybe when i do the body work on my z ill prove that i care about my cars.... just not this one lol
first i hit it with a polifan disk to get all the loose junk and wood glue off. i say all but i really mean barely even half of any.
so once i did that and went back over it and got rid of the really egregious rough spots with some sand paper i hit it with some loctite adhesive spray and started slapping comic book pages i thought looked cool onto it.
im happy with it. it actually looks better in person besides that one page i slapped literally directly onto that massive rust spot i said i might fix. i think we all knew i never really intended to fix that.... maybe when i do the body work on my z ill prove that i care about my cars.... just not this one lol
Last edited by Nate Boslet; 05-14-2018 at 03:47 PM.
10-31-2016, 11:33 PM
#11
Member
Thread Starter
Join Date: Oct 2016
Posts: 284
no luck at my local yard. just in case someone has the stuff lying around i figured ill put the list on here.
i would think the difference between 2nd and 3rd gen stuff would be negligible in the context of what im doing so unless im wrong about that im happy to take the parts from either chassis.
i need:
vg30 crank pulley and crank bolt
crossmember, mount brackets, mounts and engine brackets
starter, engine harness and a passenger axle with the carrier bearing bracket.
i have a few mounts from the KA setup i can probably fashion into a trans mount since from the looks of it i wont be able to do anything like the stock maxima trans mount.
ill post more while i clean stuff but i wont have anything very interesting to show until i get those parts and im not sure ill be able to source them locally so if anyone can hook me up that would definitely kick this build into high gear.
11-01-2016, 06:22 AM
#12
no luck at my local yard. just in case someone has the stuff lying around i figured ill put the list on here.
i would think the difference between 2nd and 3rd gen stuff would be negligible in the context of what im doing so unless im wrong about that im happy to take the parts from either chassis.
i need:
vg30 crank pulley and crank bolt
crossmember, mount brackets, mounts and engine brackets
starter, engine harness and a passenger axle with the carrier bearing bracket.
i have a few mounts from the KA setup i can probably fashion into a trans mount since from the looks of it i wont be able to do anything like the stock maxima trans mount.
ill post more while i clean stuff but i wont have anything very interesting to show until i get those parts and im not sure ill be able to source them locally so if anyone can hook me up that would definitely kick this build into high gear.
i would think the difference between 2nd and 3rd gen stuff would be negligible in the context of what im doing so unless im wrong about that im happy to take the parts from either chassis.
i need:
vg30 crank pulley and crank bolt
crossmember, mount brackets, mounts and engine brackets
starter, engine harness and a passenger axle with the carrier bearing bracket.
i have a few mounts from the KA setup i can probably fashion into a trans mount since from the looks of it i wont be able to do anything like the stock maxima trans mount.
ill post more while i clean stuff but i wont have anything very interesting to show until i get those parts and im not sure ill be able to source them locally so if anyone can hook me up that would definitely kick this build into high gear.
mounts might not be in the best condition but some flexane or window weld should fix that.
11-01-2016, 07:57 AM
#13
Member
Thread Starter
Join Date: Oct 2016
Posts: 284
i would also really like to get all or at least the majority of the stuff all in one box to save on shipping.
Last edited by Nate Boslet; 11-02-2016 at 11:10 AM.
11-02-2016, 11:18 AM
#14
Member
Thread Starter
Join Date: Oct 2016
Posts: 284
cant catch a break
while pulling apart my z to do my cams i found that the distributor gear on the left cam was missing a tooth and that tooth had been ground up and evenly distributed inside of my engine. probably going to need a total rebuild but im going to check the oil filter and if its not too horrific i might just put it back together so i can at least get it to my garage before i do any more work to it. the truck cams in my 33 swap were going to go into the stanza but since they are missing that tooth and have scoring on the journals im not so sure i want to use those...
im still putting all of my focus into the stanza but this is definitely not getting things done any quicker.
im still putting all of my focus into the stanza but this is definitely not getting things done any quicker.
11-11-2016, 10:32 PM
#15
Member
Thread Starter
Join Date: Oct 2016
Posts: 284
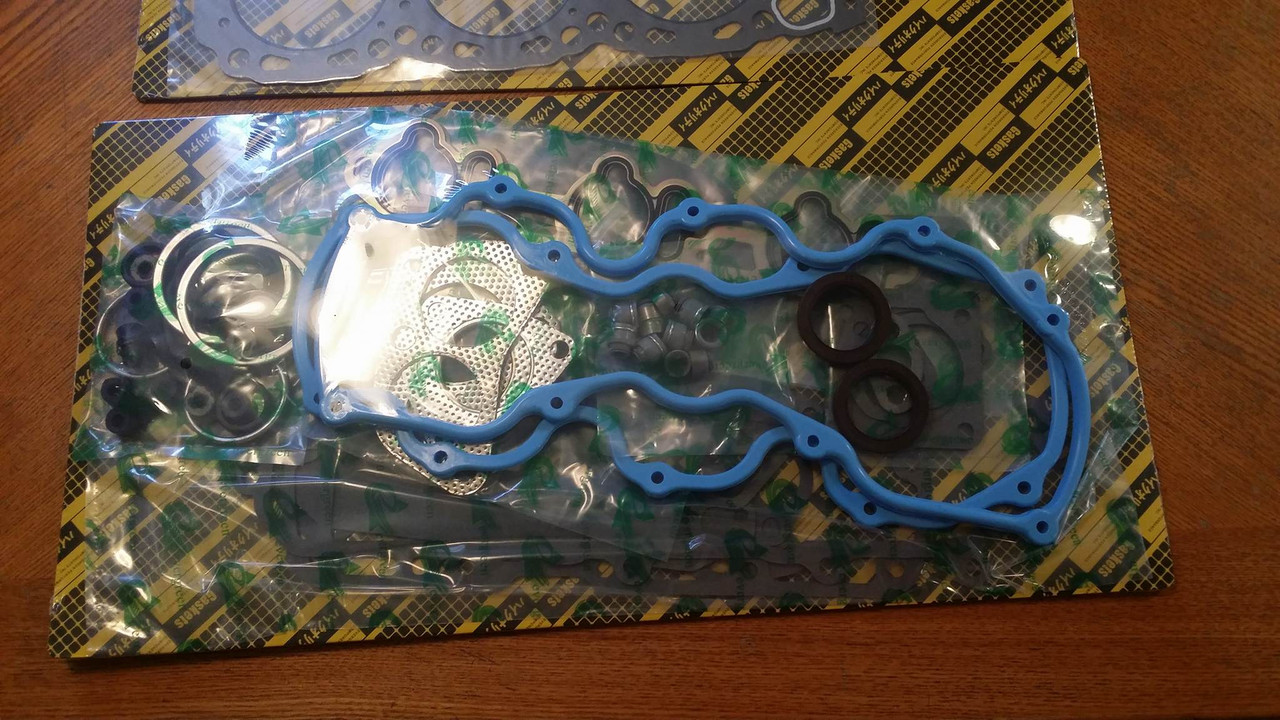
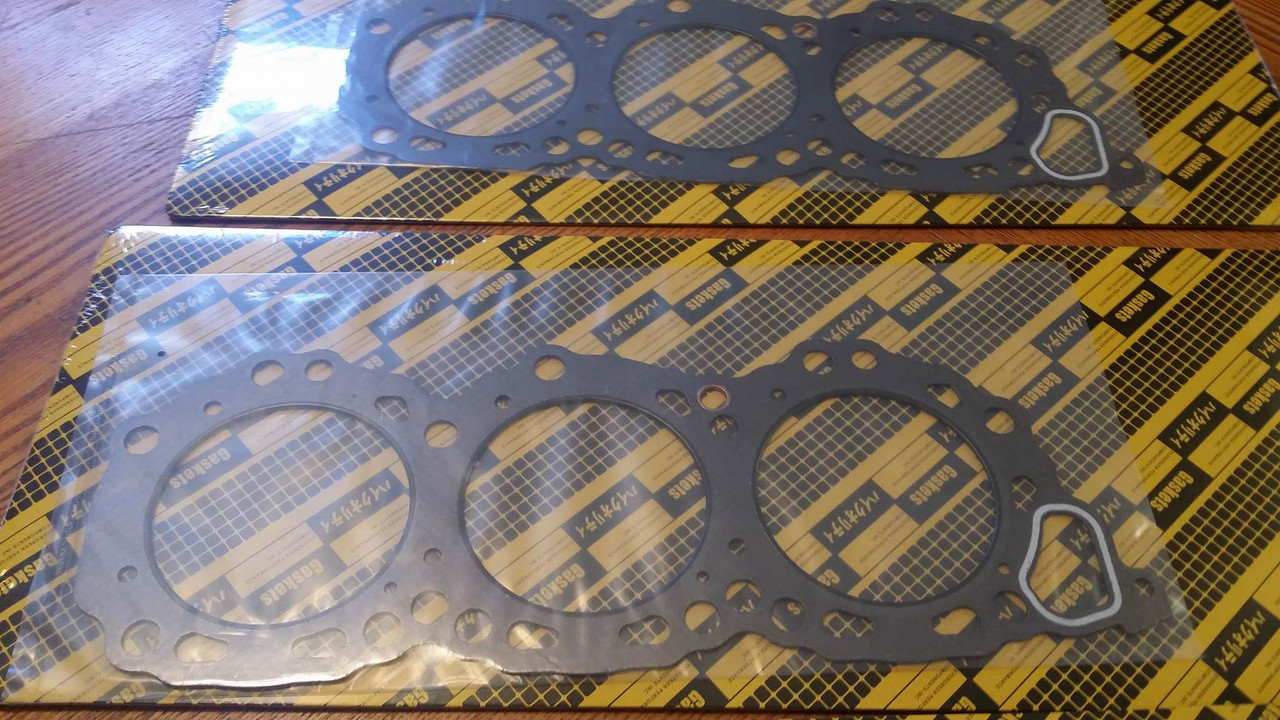
ultra mini tiny update: i got my gaskets in.
one of the super cool dudes on here is hooking me up with all the parts i need to get the fabrication started so ill be able to post that stuff up soon too. in the mean time i will probably make an engine post at some point with a bunch of before and after pictures of engine parts (i already have a whole bunch of before pics) so looking forward to progress and not having my thread sit with no activity for months on end lol
one of the super cool dudes on here is hooking me up with all the parts i need to get the fabrication started so ill be able to post that stuff up soon too. in the mean time i will probably make an engine post at some point with a bunch of before and after pictures of engine parts (i already have a whole bunch of before pics) so looking forward to progress and not having my thread sit with no activity for months on end lol
Last edited by Nate Boslet; 05-14-2018 at 03:48 PM.
11-21-2016, 08:40 PM
#16
Member
Thread Starter
Join Date: Oct 2016
Posts: 284
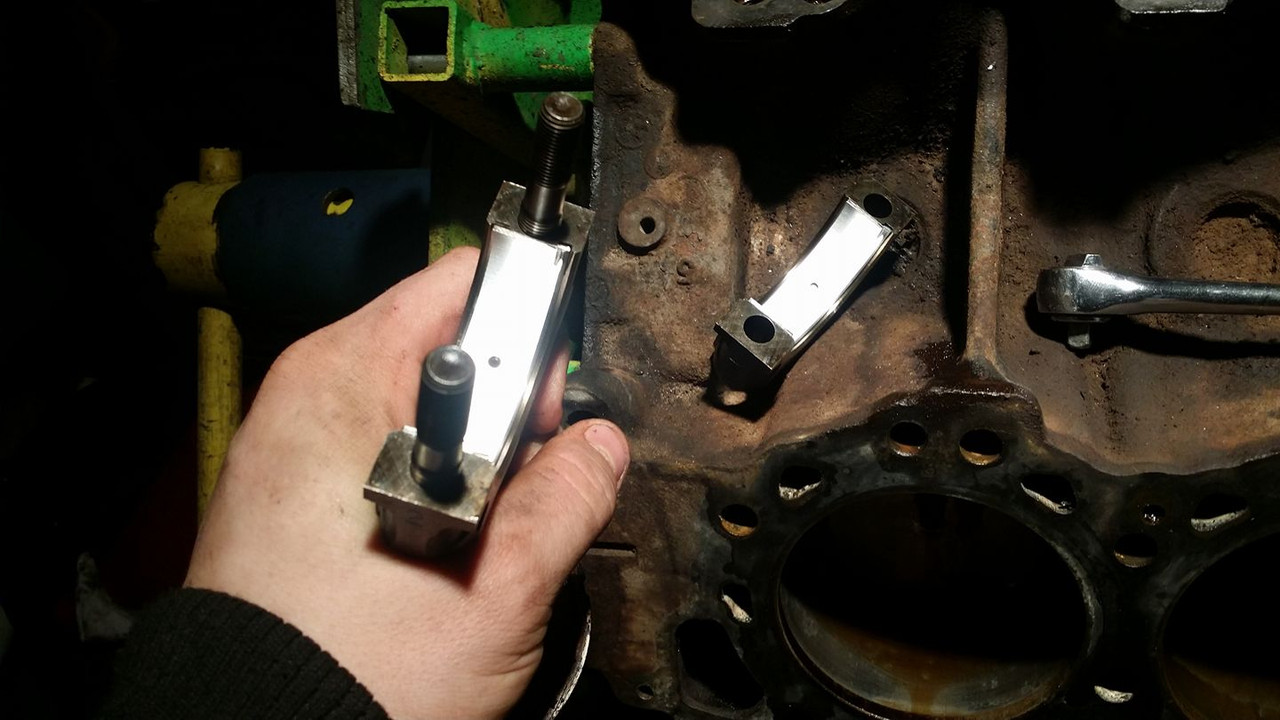
after a half gallon of purple power and an hour or so of scrubbing with a nylon brush and then rinsing with the hose it was time to start replacing the worn out valve stems on this head. here is the process for anyone who is interested:
compress spring:
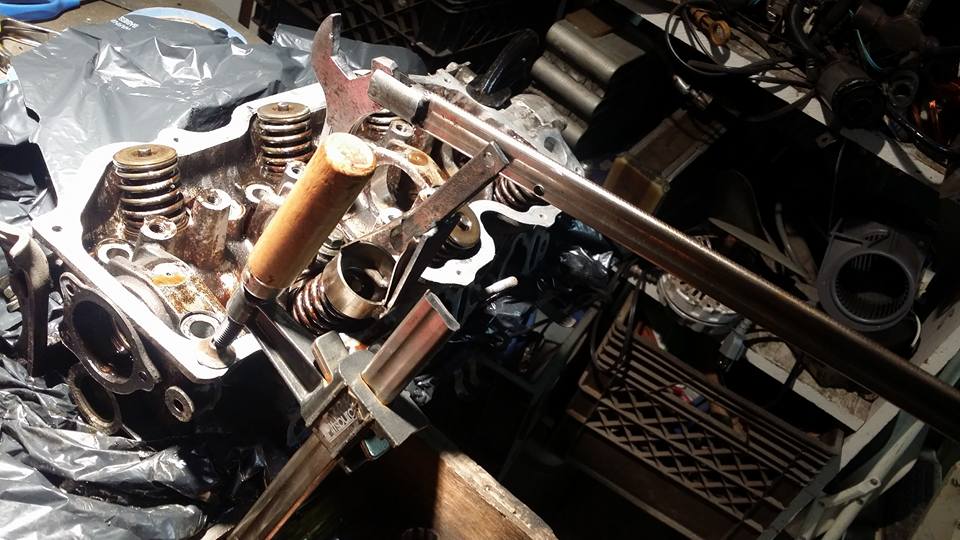
remove locks:
remove spring and retainer:
pull off old seal:
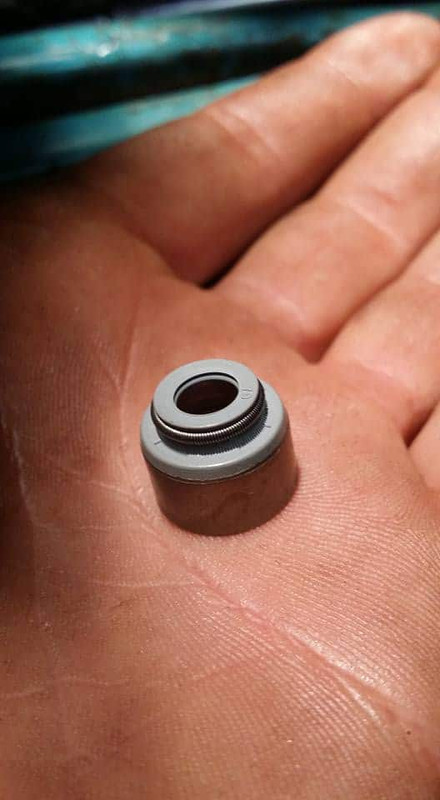
slip new seal over valve stem and over the seat:
i heard you can use a socket for this but its possible to install these crooked and end up with a leak, since i didnt want that and i have a lathe i decided to turn a tool for both the intake and exhaust stem seals. i basically just turned the front to have a recess for the seal to slip into and drilled a through hole for the valve stem to guide the seal straight down onto the seat.
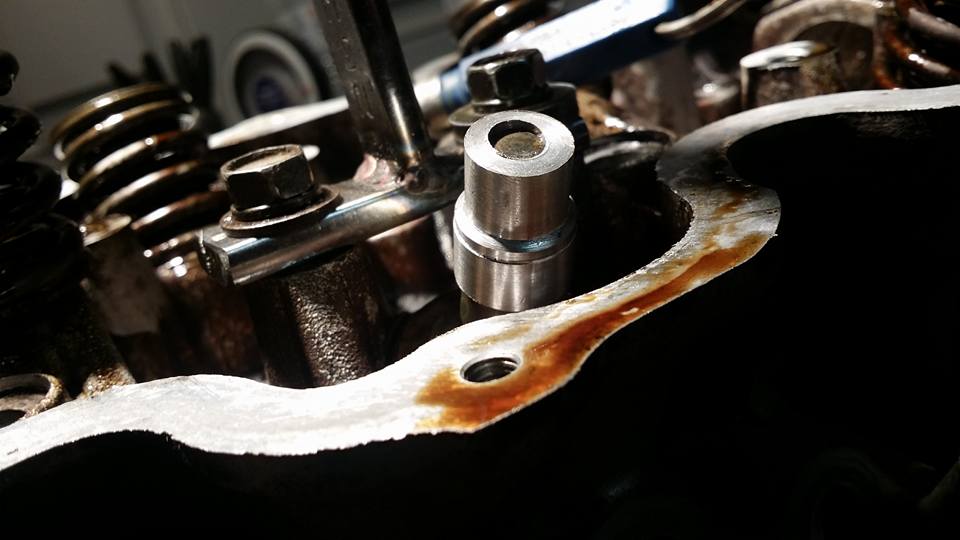
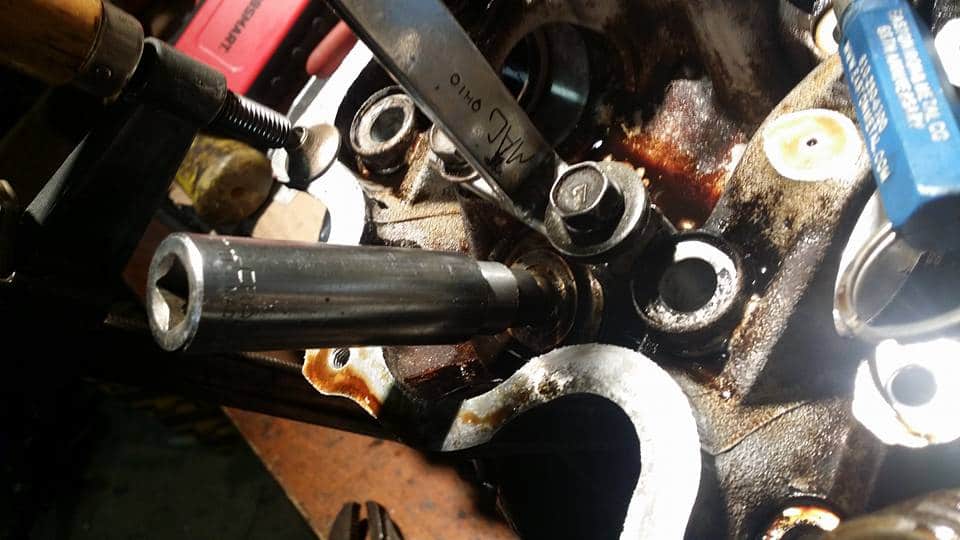
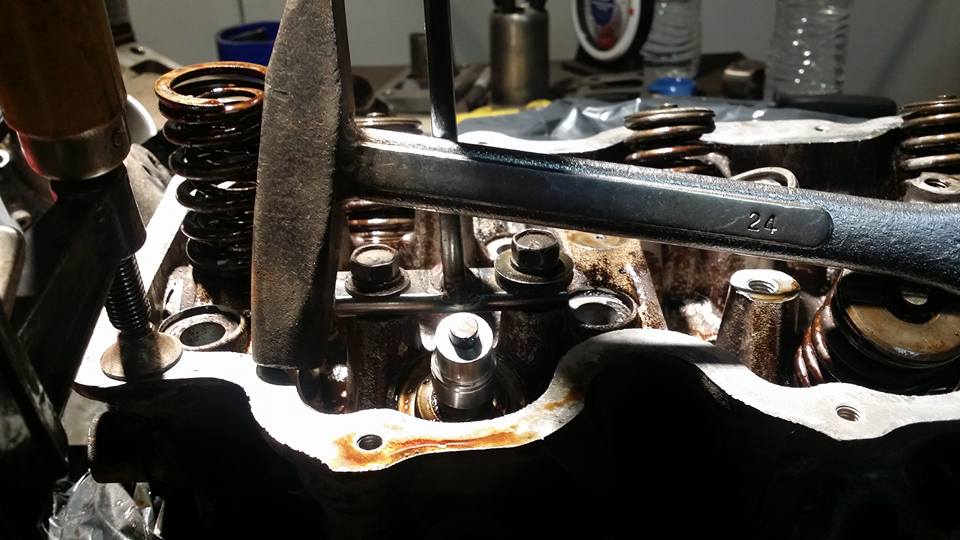
and robert's your mothers brother.
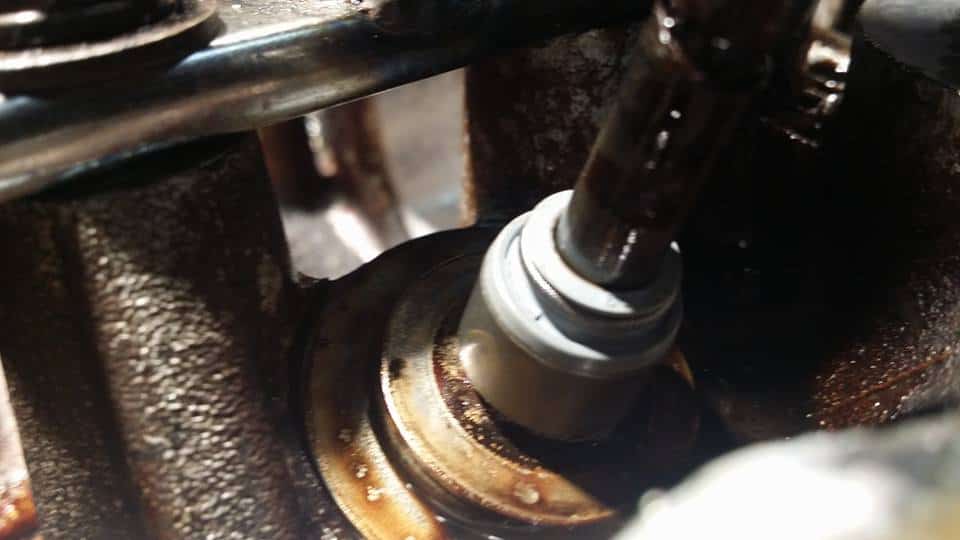
then you just have to reinstall the spring and retainers and youre done. i didnt apply any special lubricant or grease to install these, i did have some oil left on everything tho, idk if installing them dry would hurt but i know oil wont hurt it.
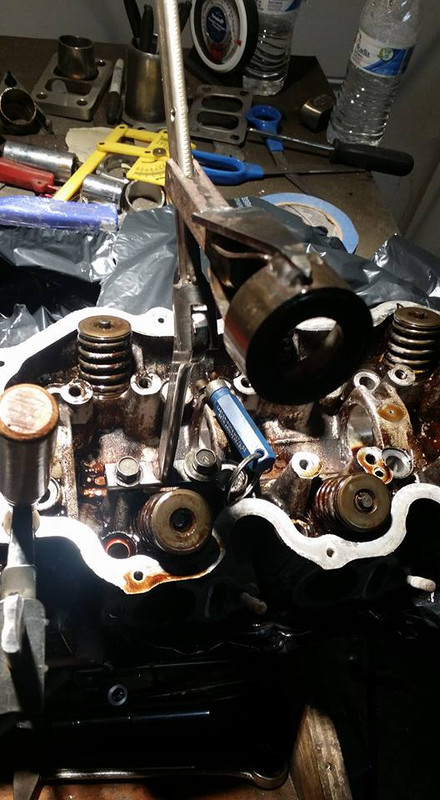
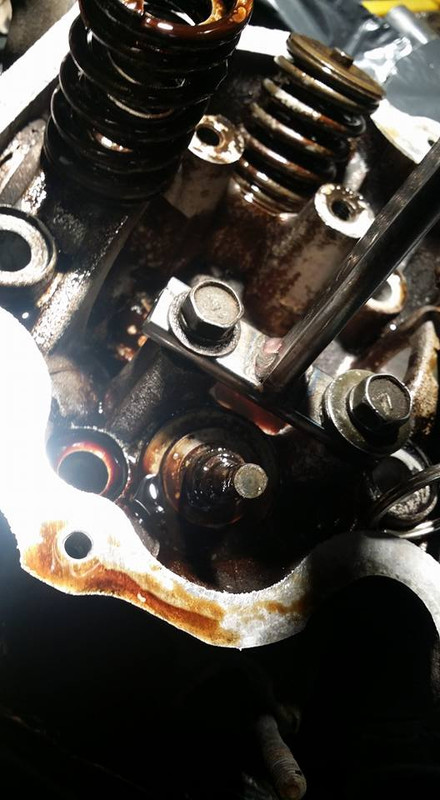
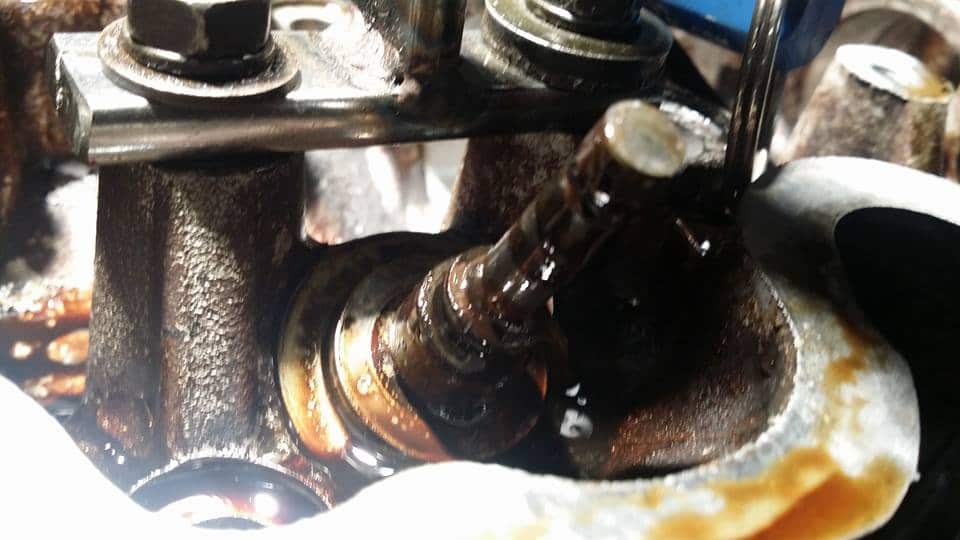
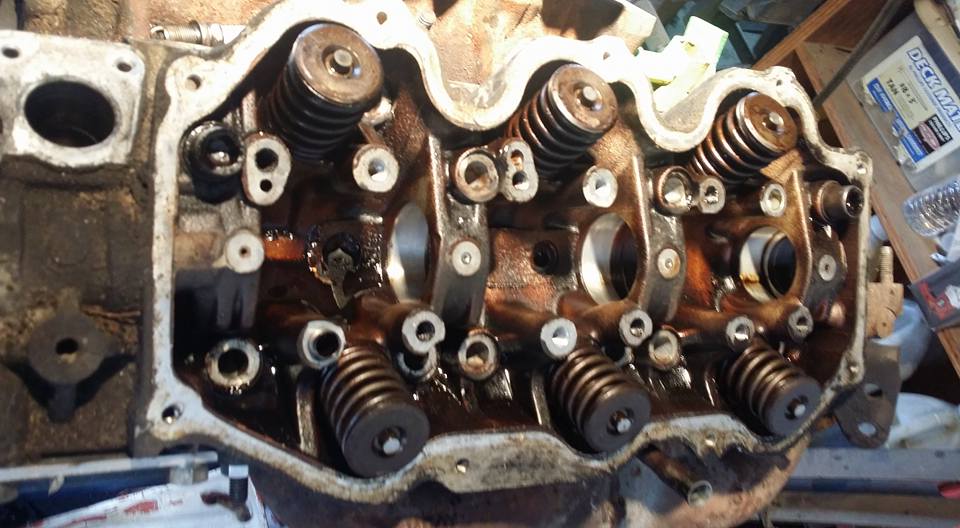
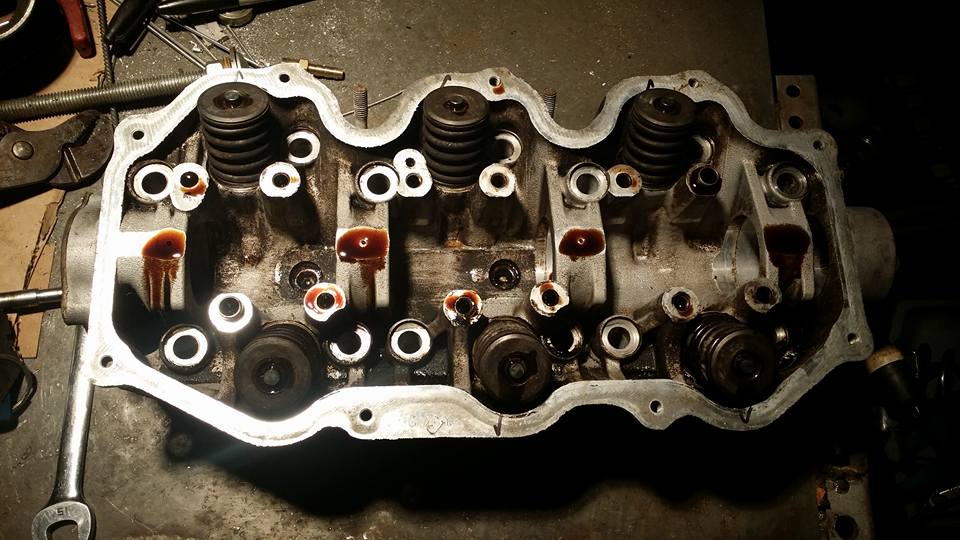
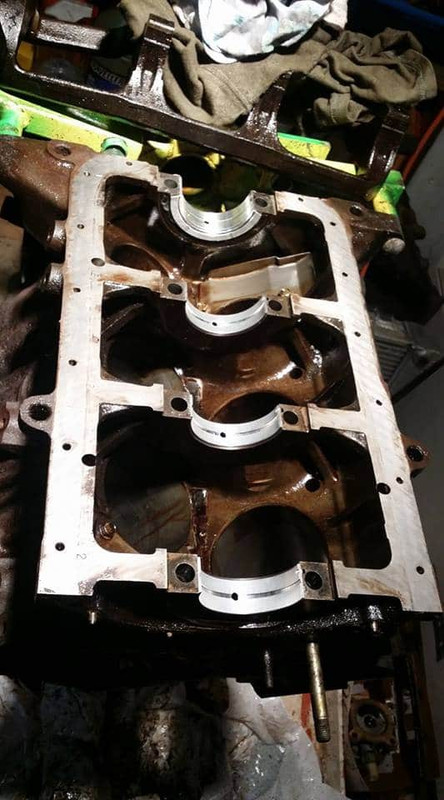
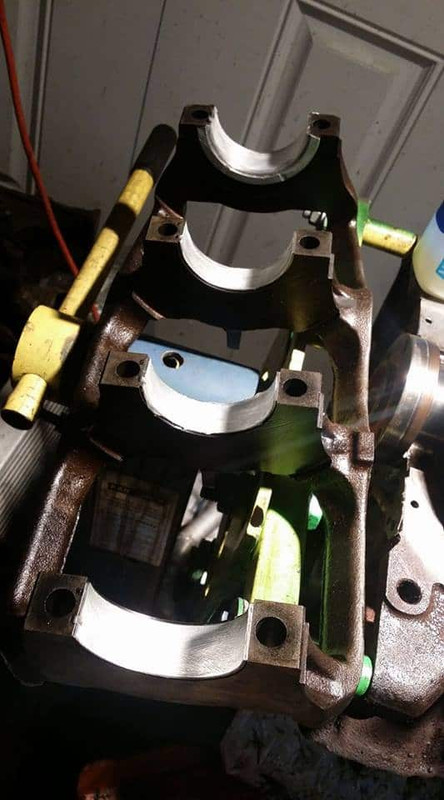
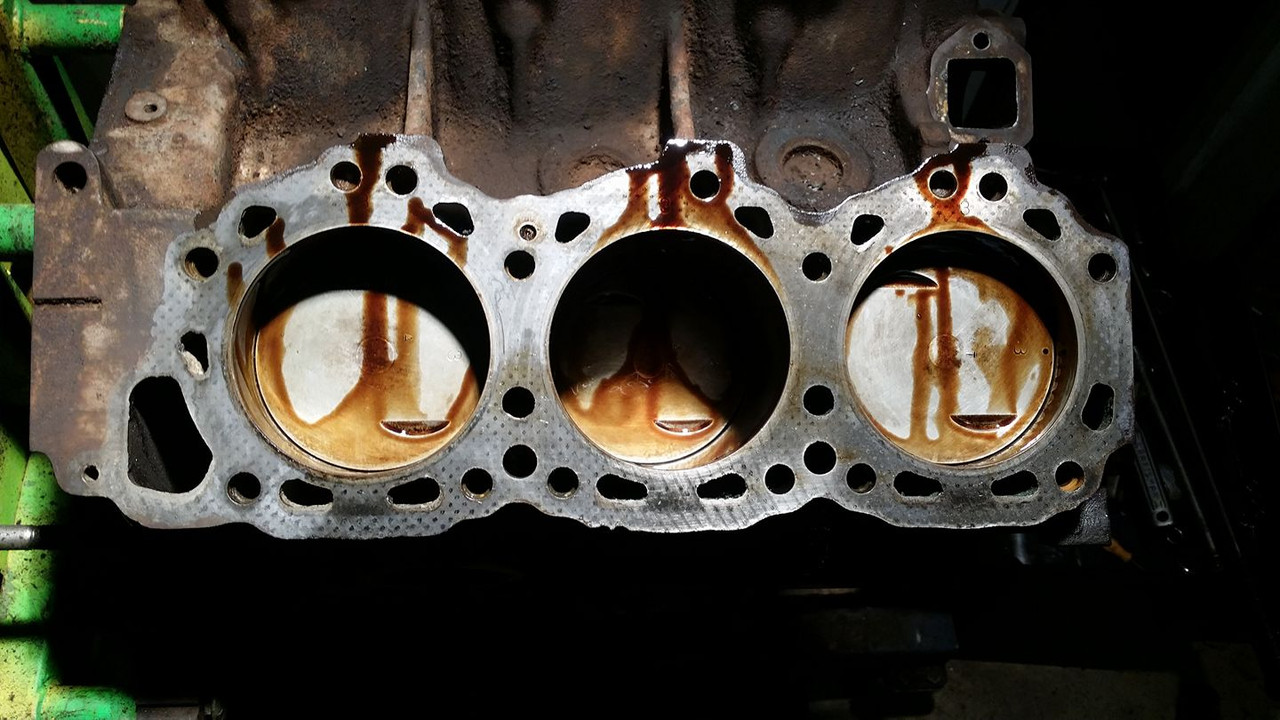
here are the heads prior to cleaning
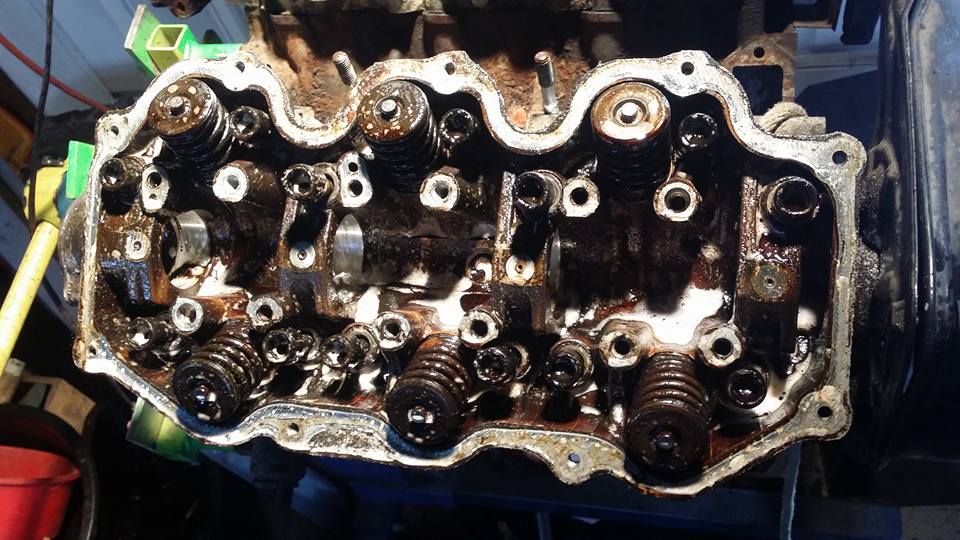
and after all the seats were done. i just dropped a little oil on certain places to try and prevent any rusting and called it a day. im pleased with how everything came out.
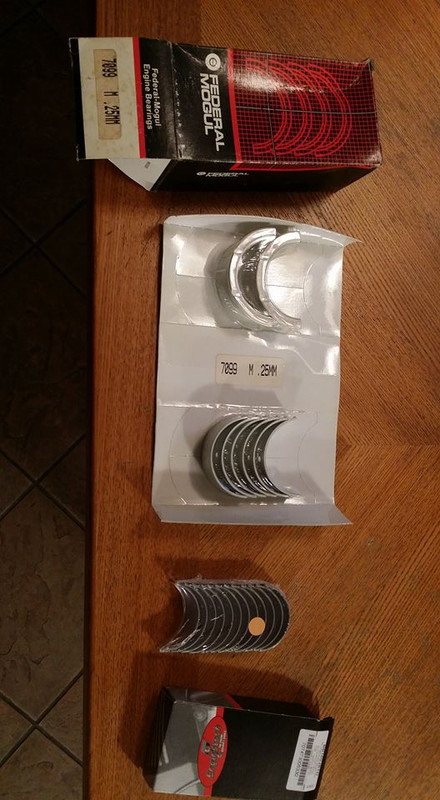
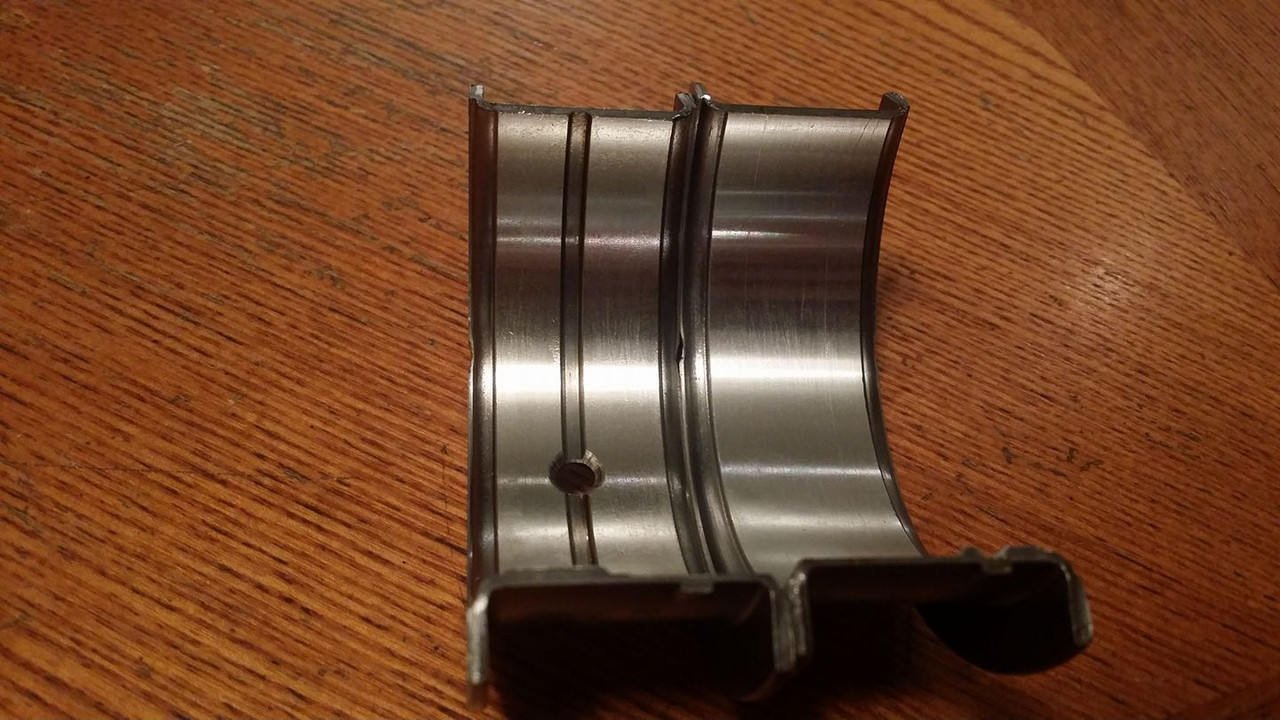
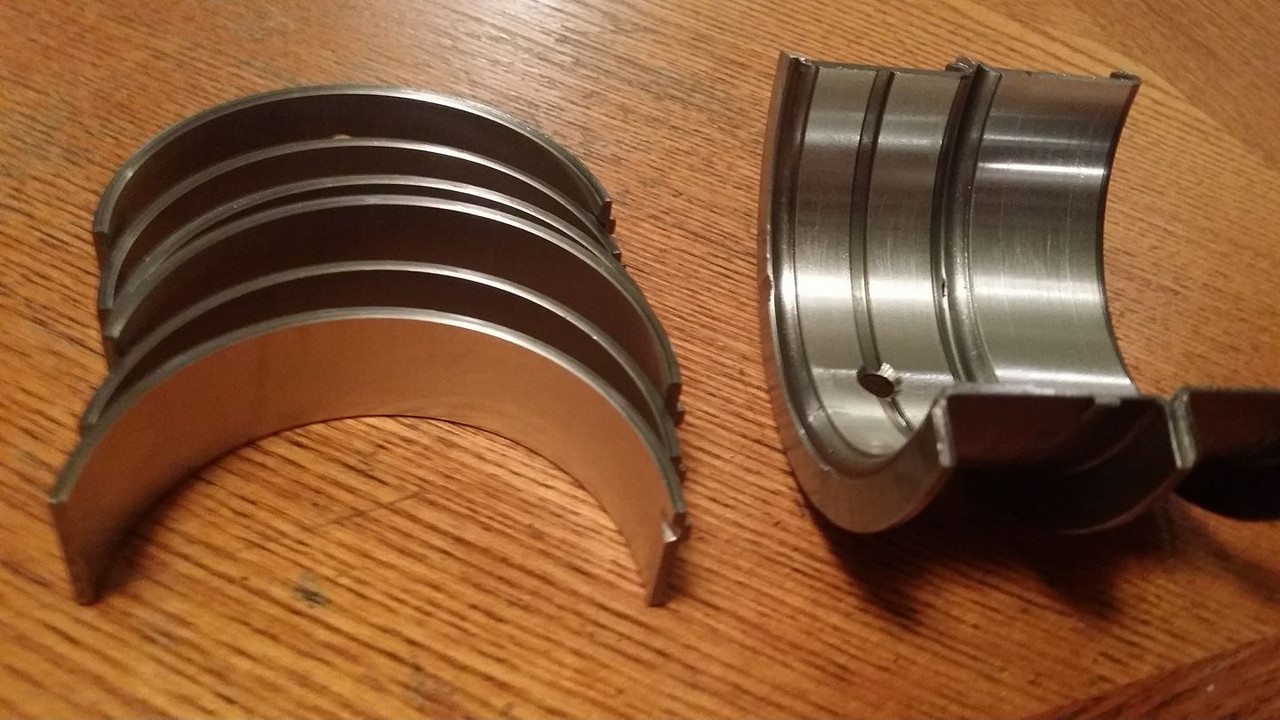
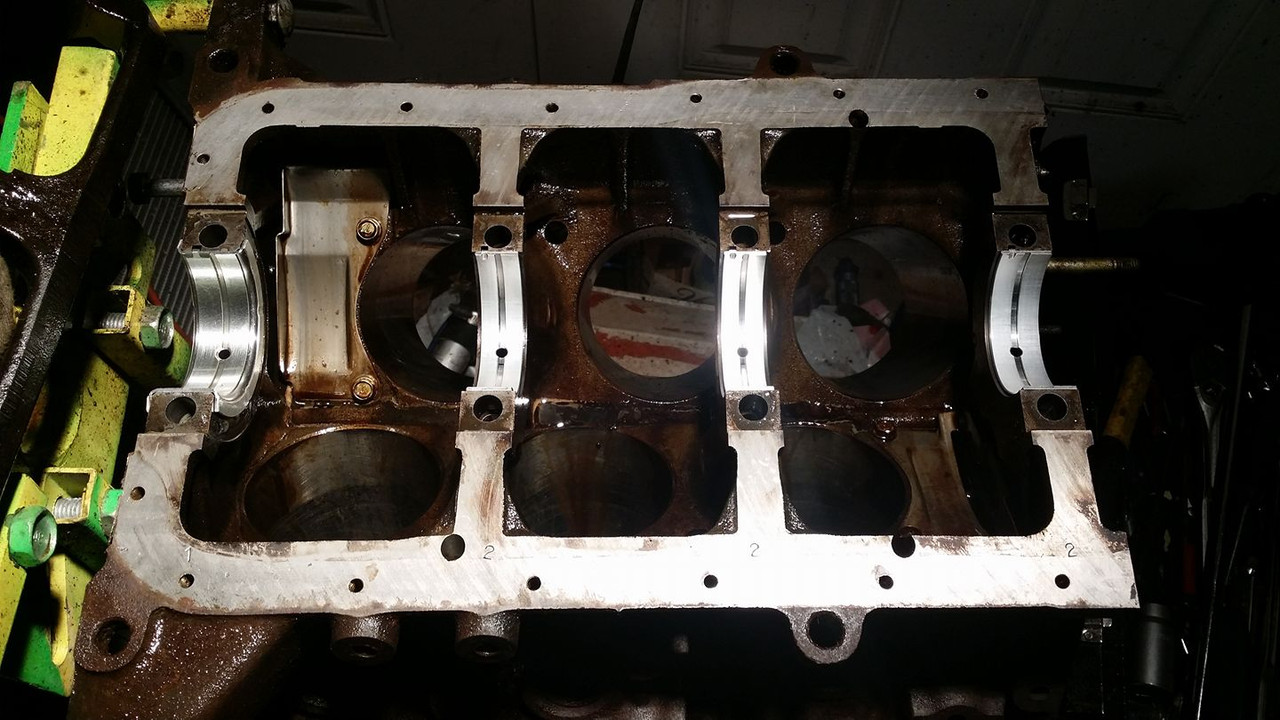
next up is bearings in the bottom end and then probably paint and final assembly once i get the other parts i need.
compress spring:
remove locks:
remove spring and retainer:
pull off old seal:
slip new seal over valve stem and over the seat:
i heard you can use a socket for this but its possible to install these crooked and end up with a leak, since i didnt want that and i have a lathe i decided to turn a tool for both the intake and exhaust stem seals. i basically just turned the front to have a recess for the seal to slip into and drilled a through hole for the valve stem to guide the seal straight down onto the seat.
and robert's your mothers brother.
then you just have to reinstall the spring and retainers and youre done. i didnt apply any special lubricant or grease to install these, i did have some oil left on everything tho, idk if installing them dry would hurt but i know oil wont hurt it.
here are the heads prior to cleaning
and after all the seats were done. i just dropped a little oil on certain places to try and prevent any rusting and called it a day. im pleased with how everything came out.
next up is bearings in the bottom end and then probably paint and final assembly once i get the other parts i need.
Last edited by Nate Boslet; 05-14-2018 at 03:49 PM.
 11-27-2016, 04:49 PM
#18
Member
Thread Starter
Join Date: Oct 2016
Posts: 284
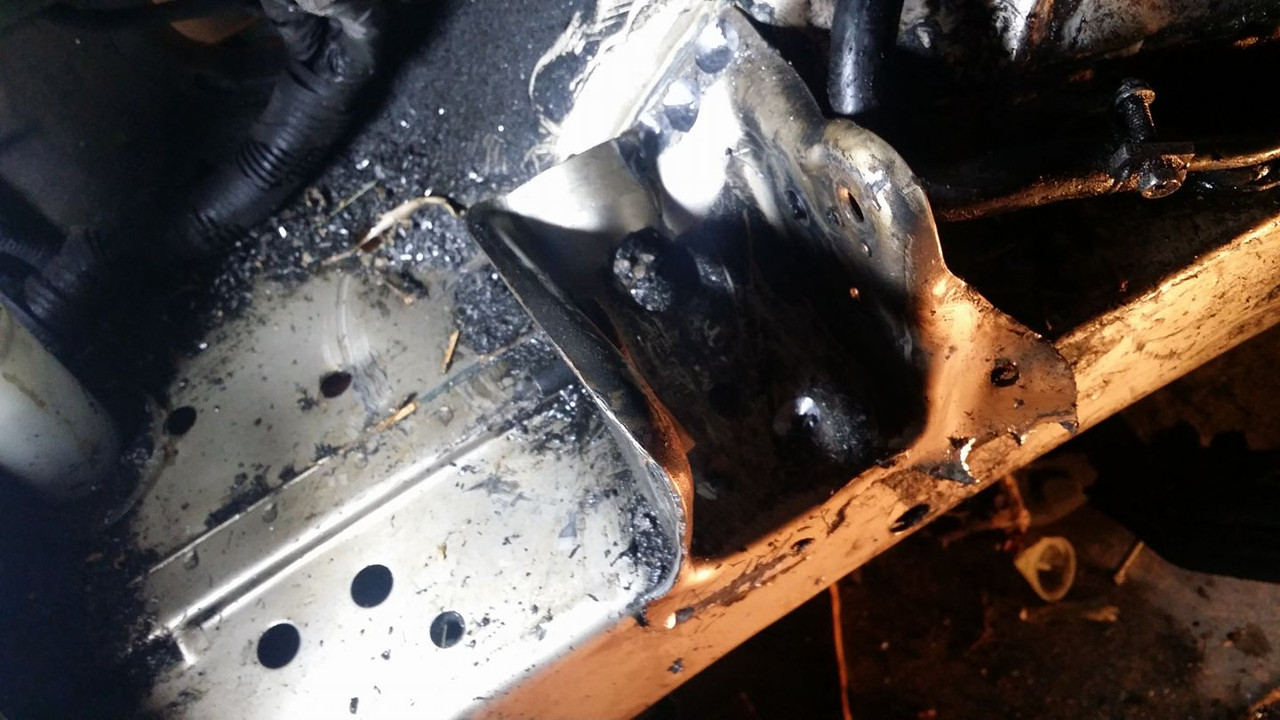
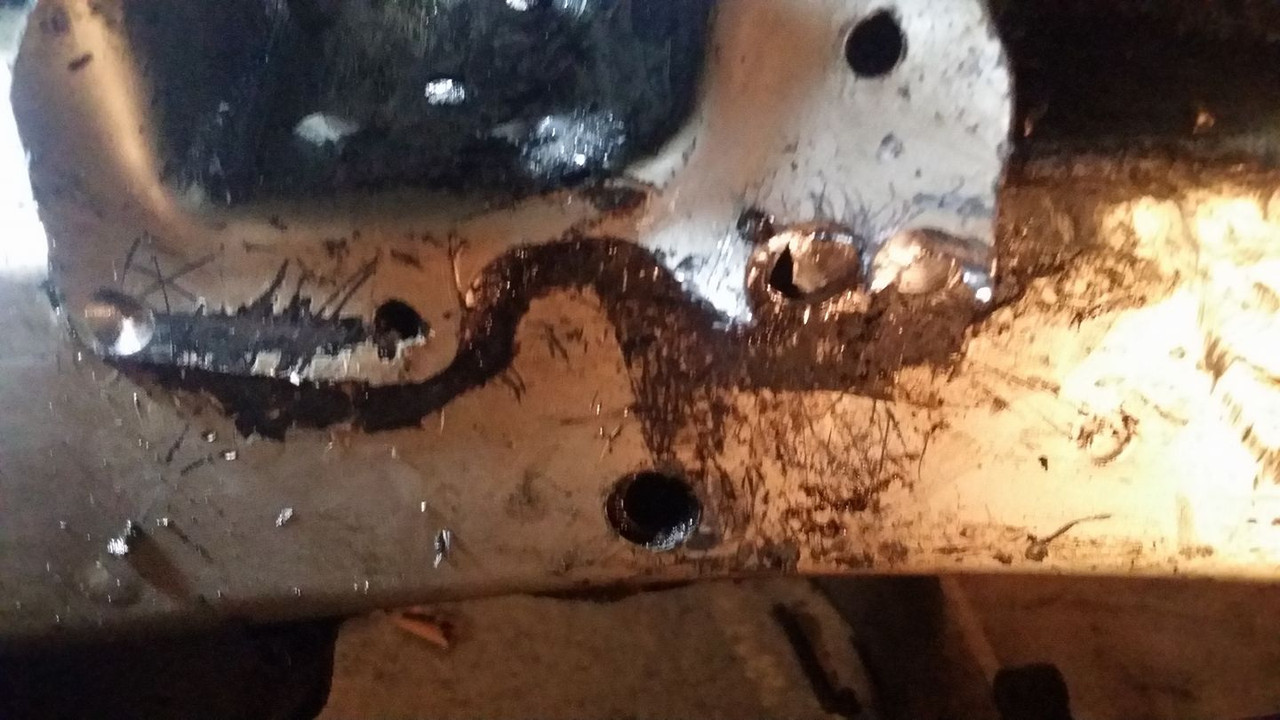
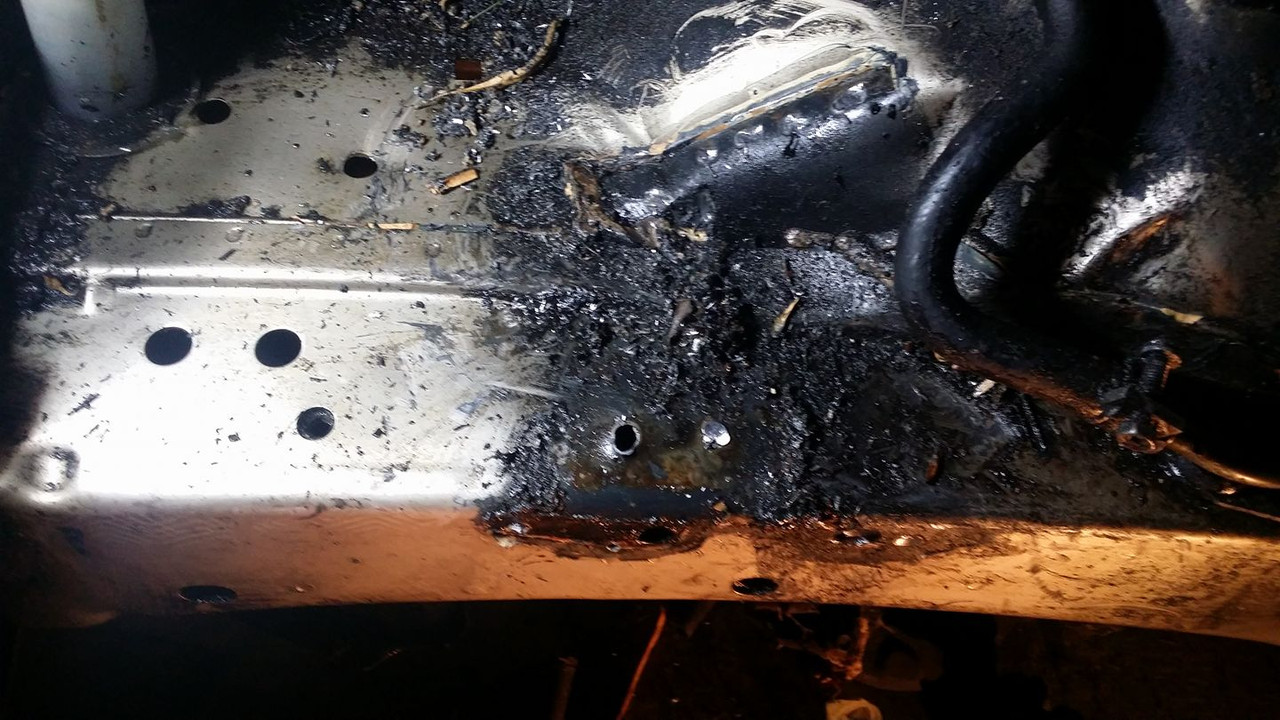
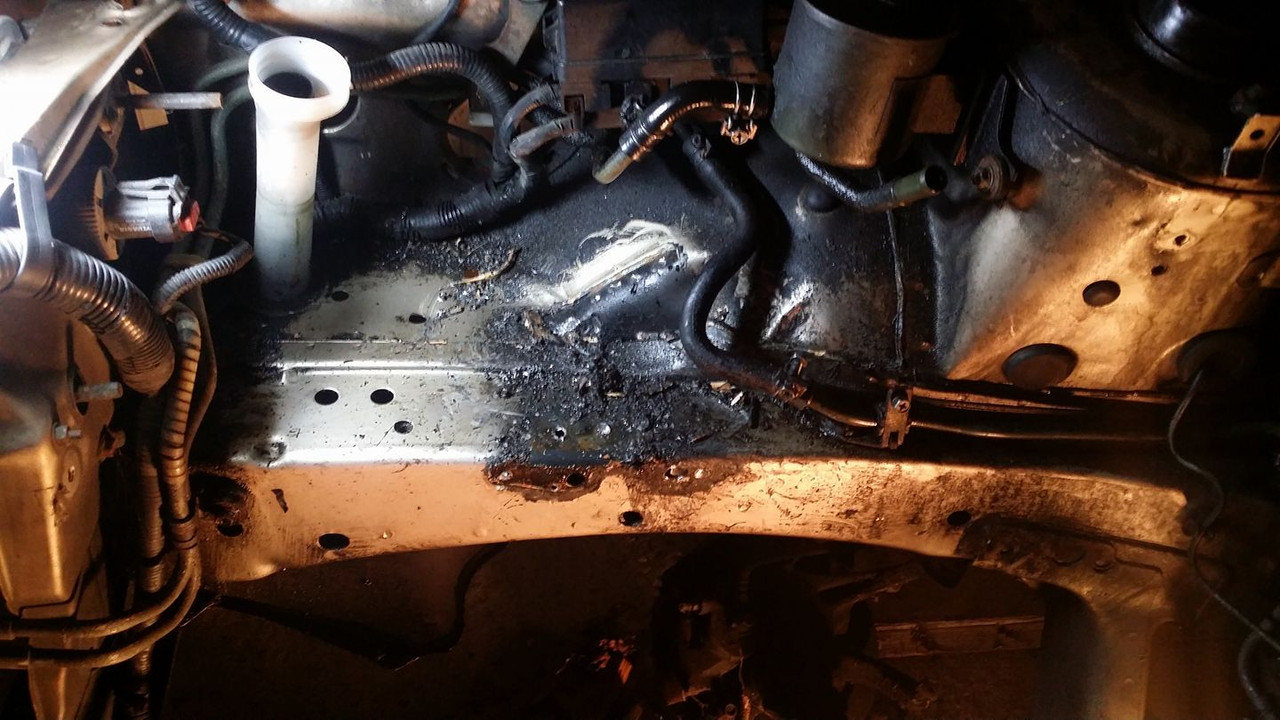
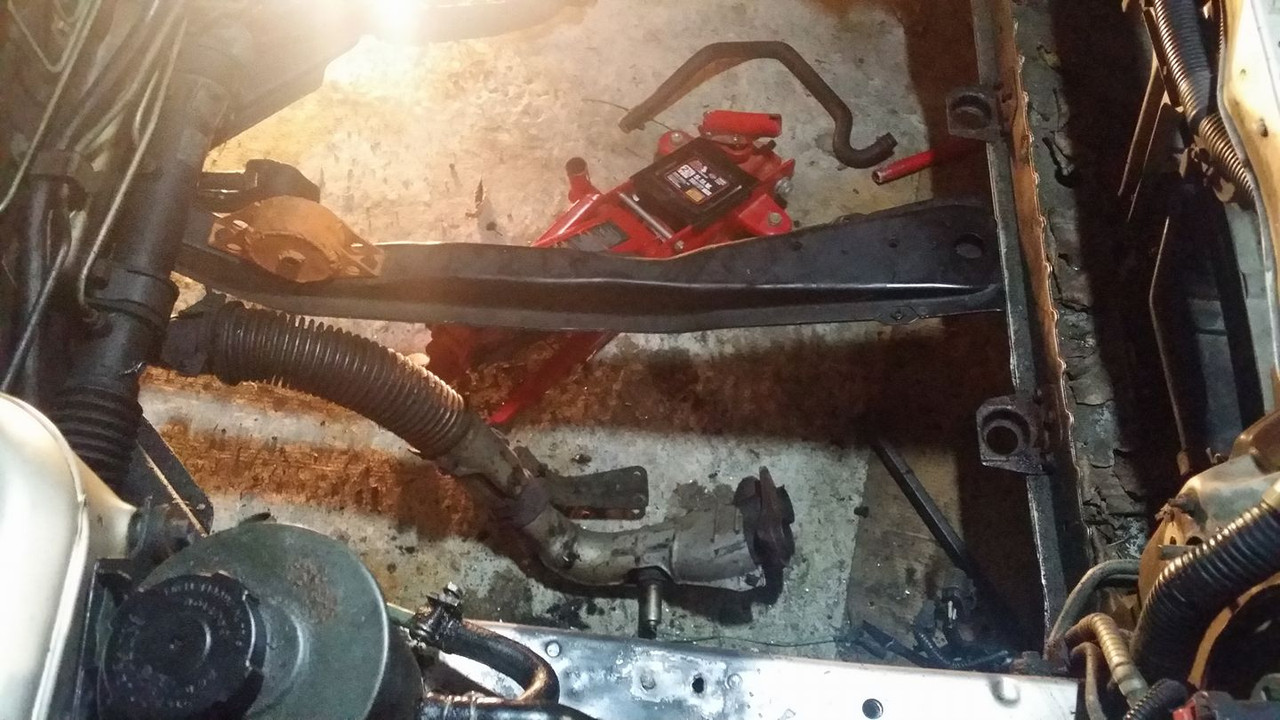
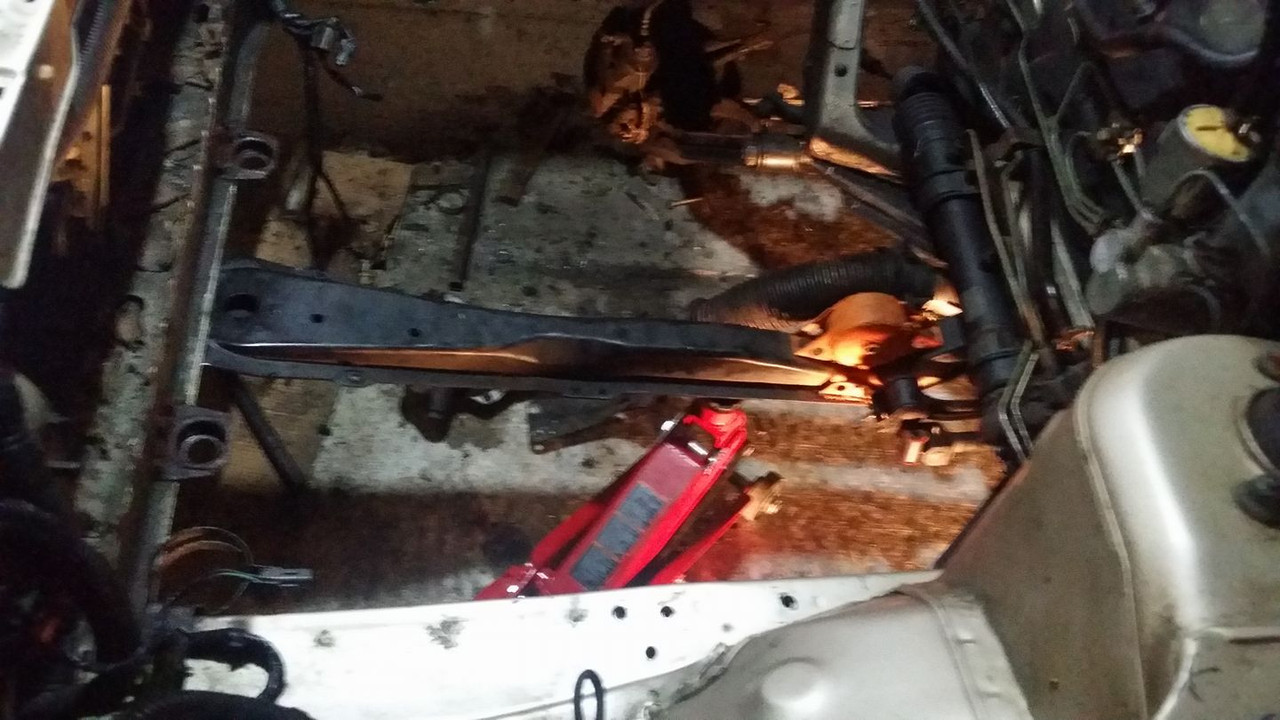
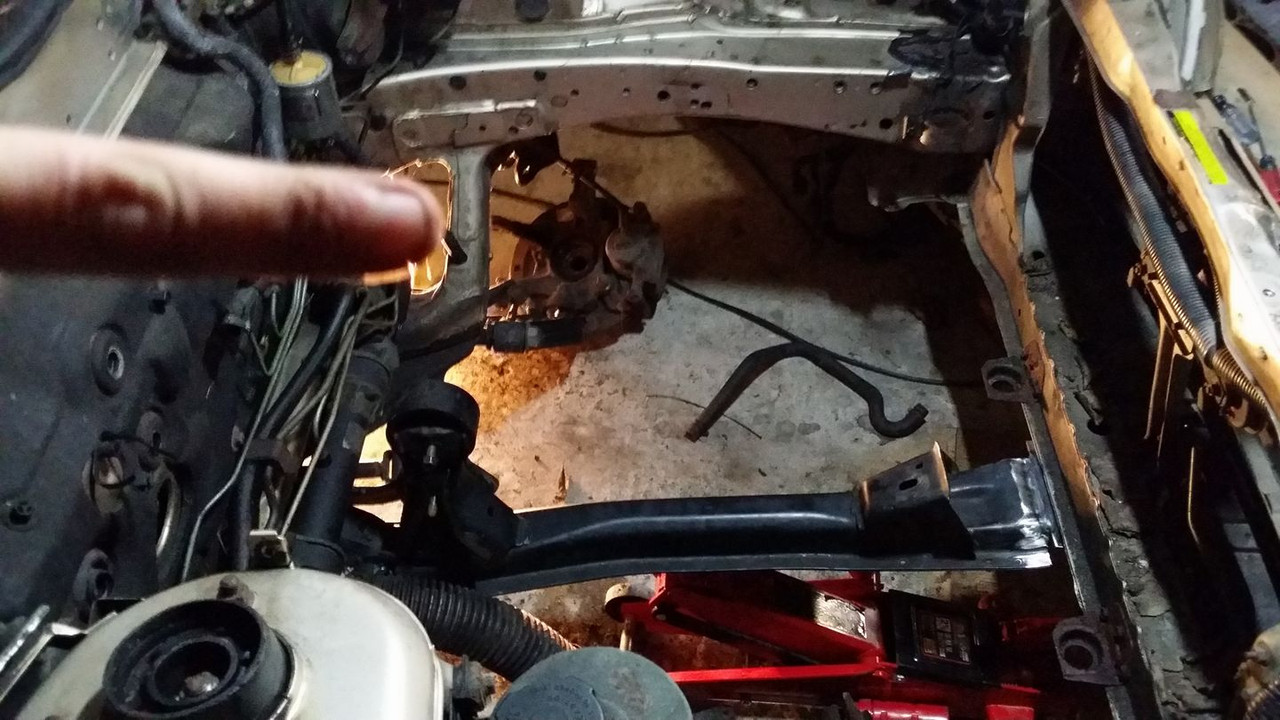
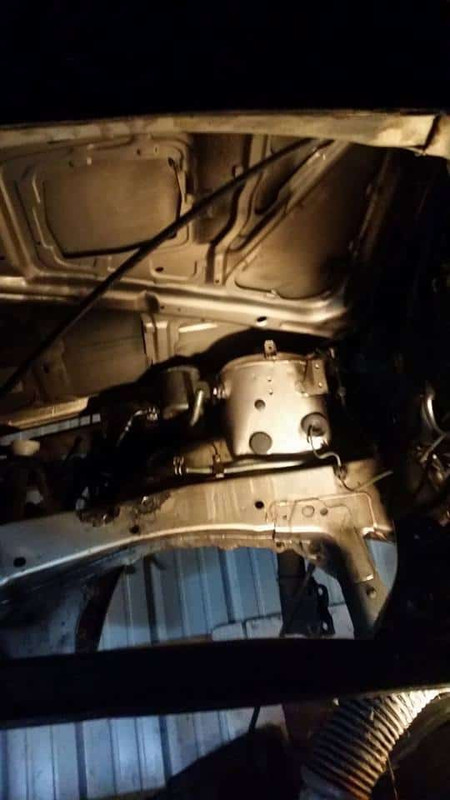
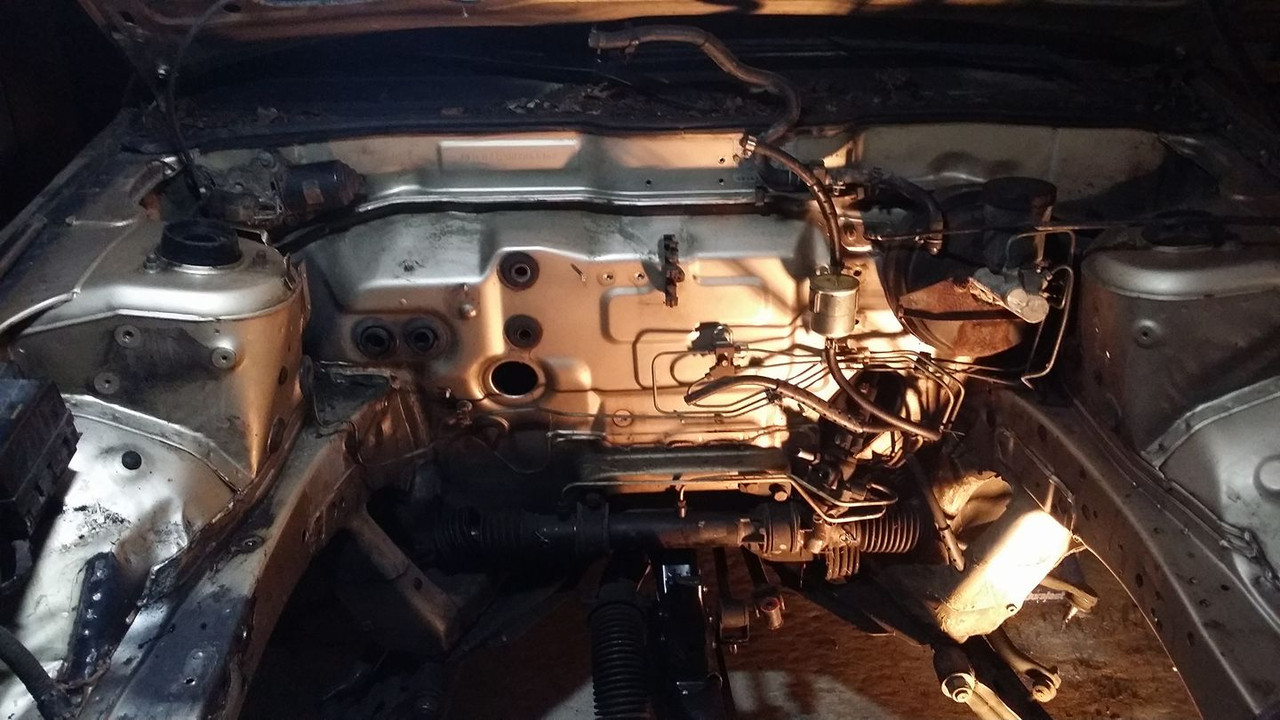
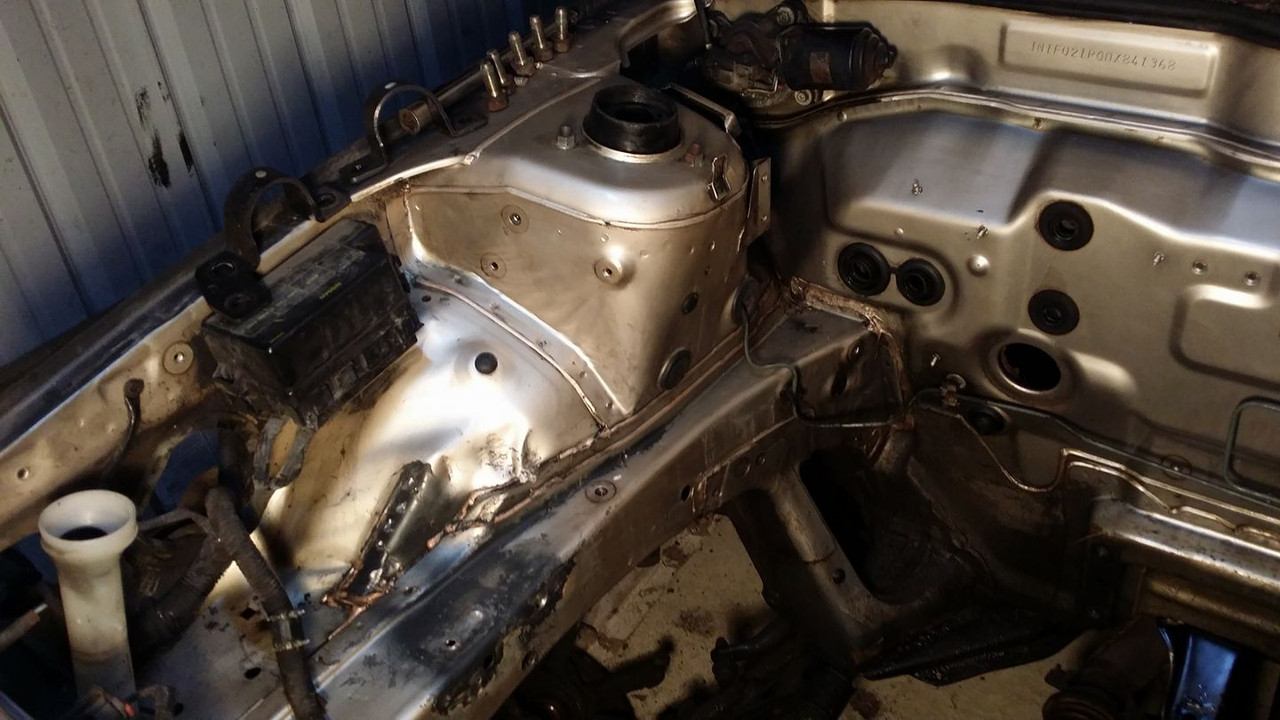
i should have the parts i need in tuesday but in the meantime i did some more cleaning, this time in the engine bay. im not really used to doing this much cleaning....
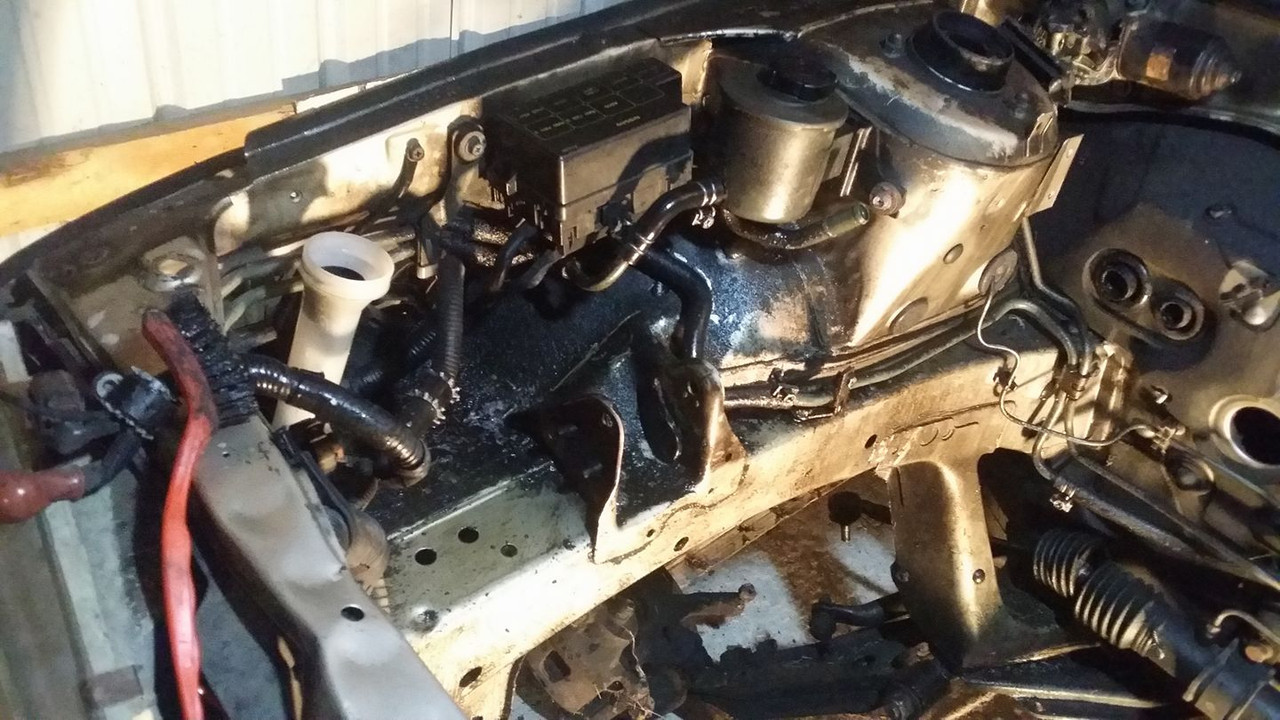
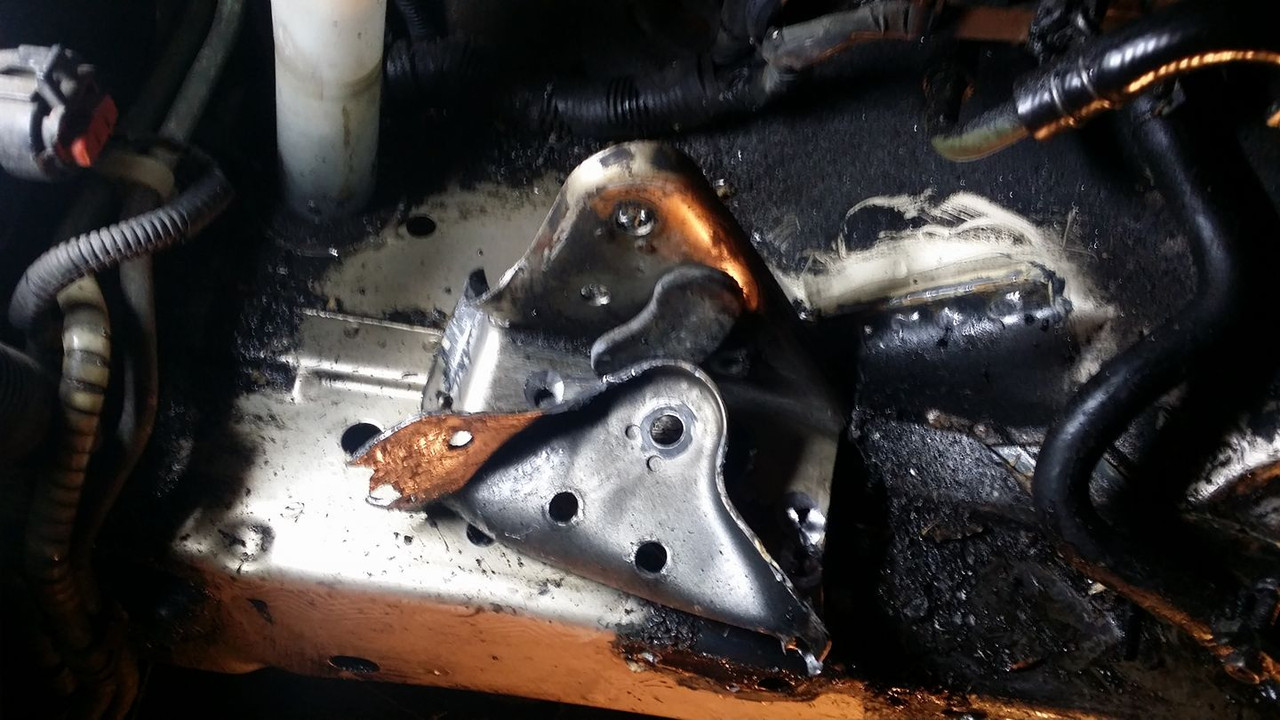
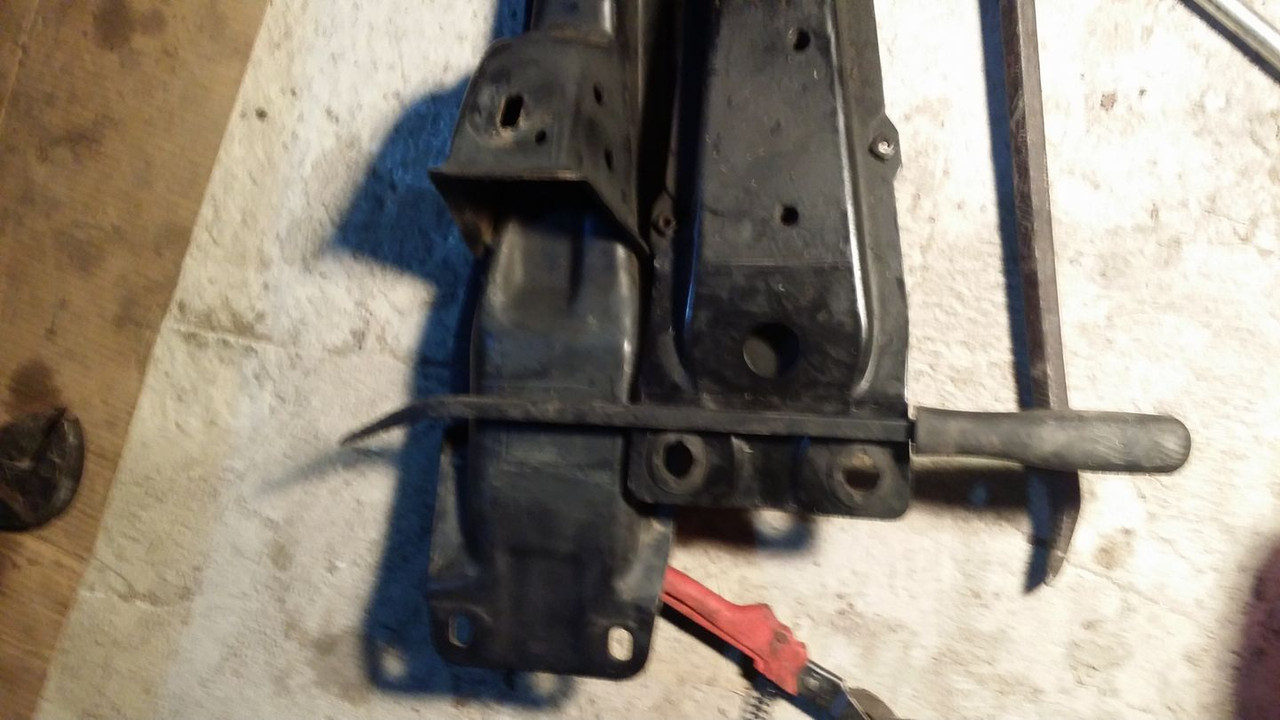
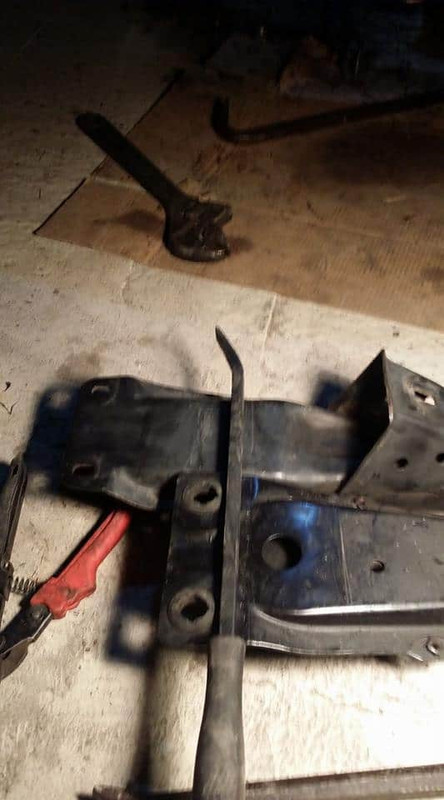
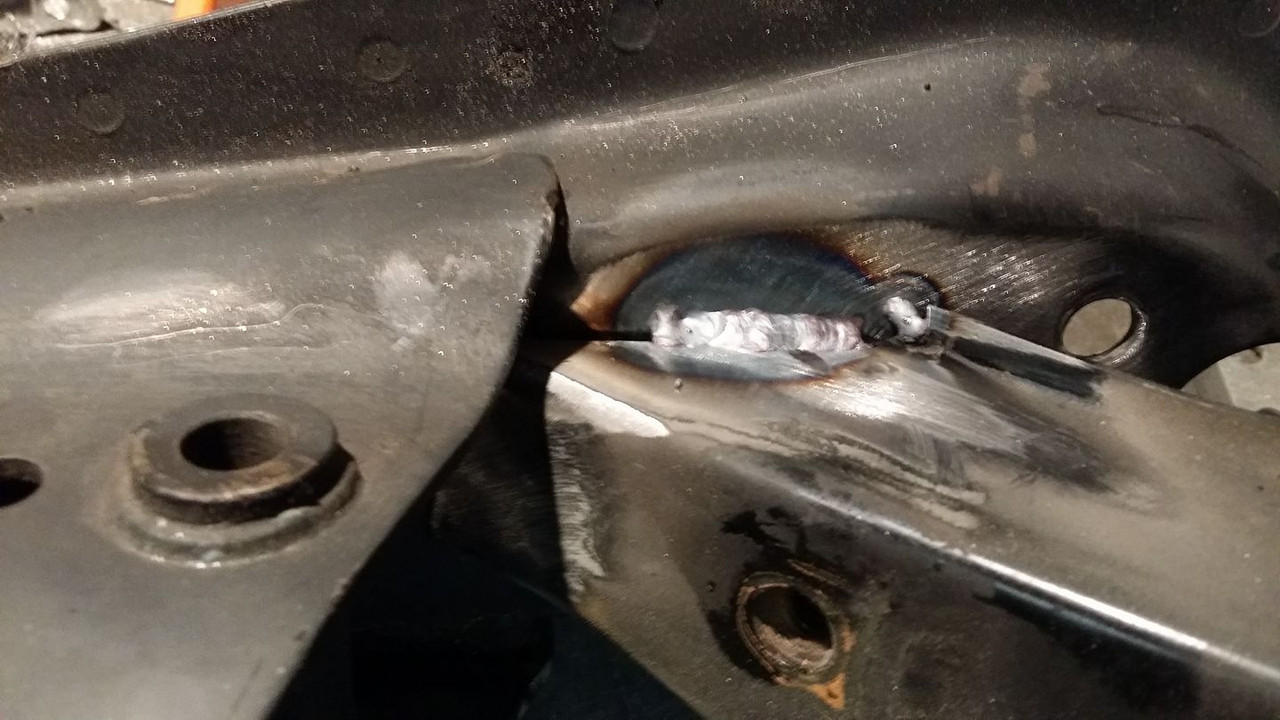
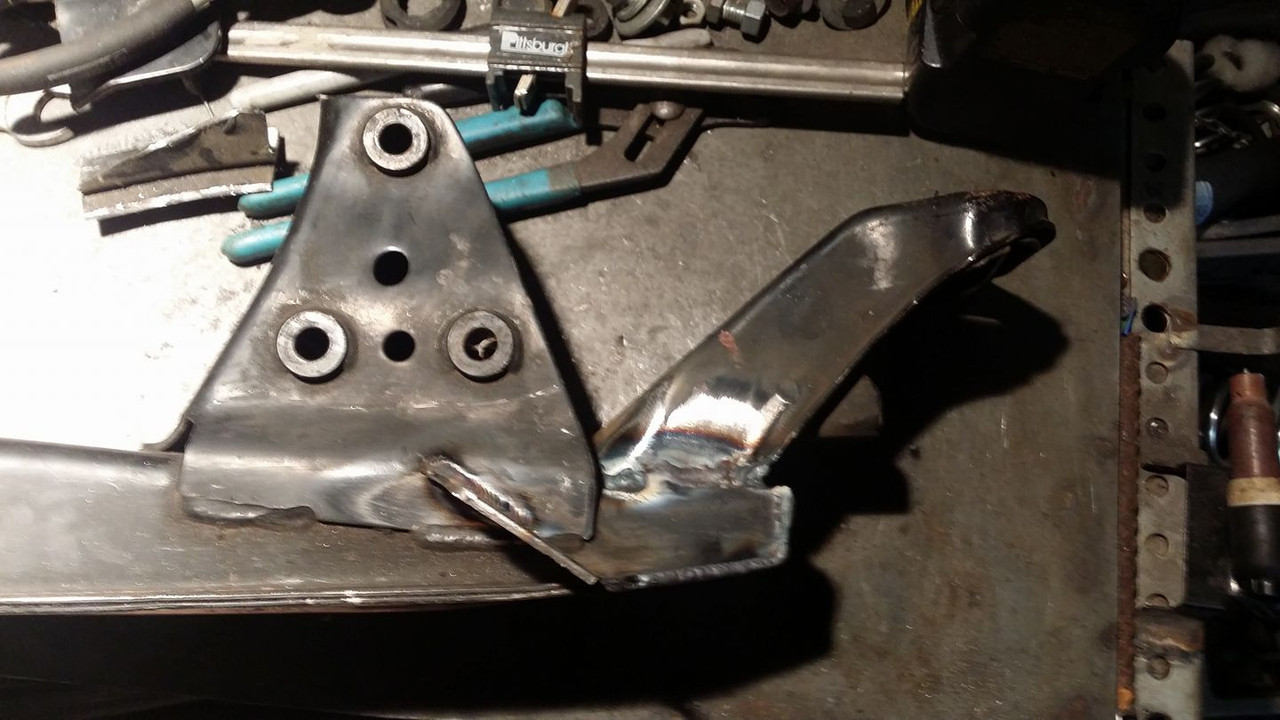
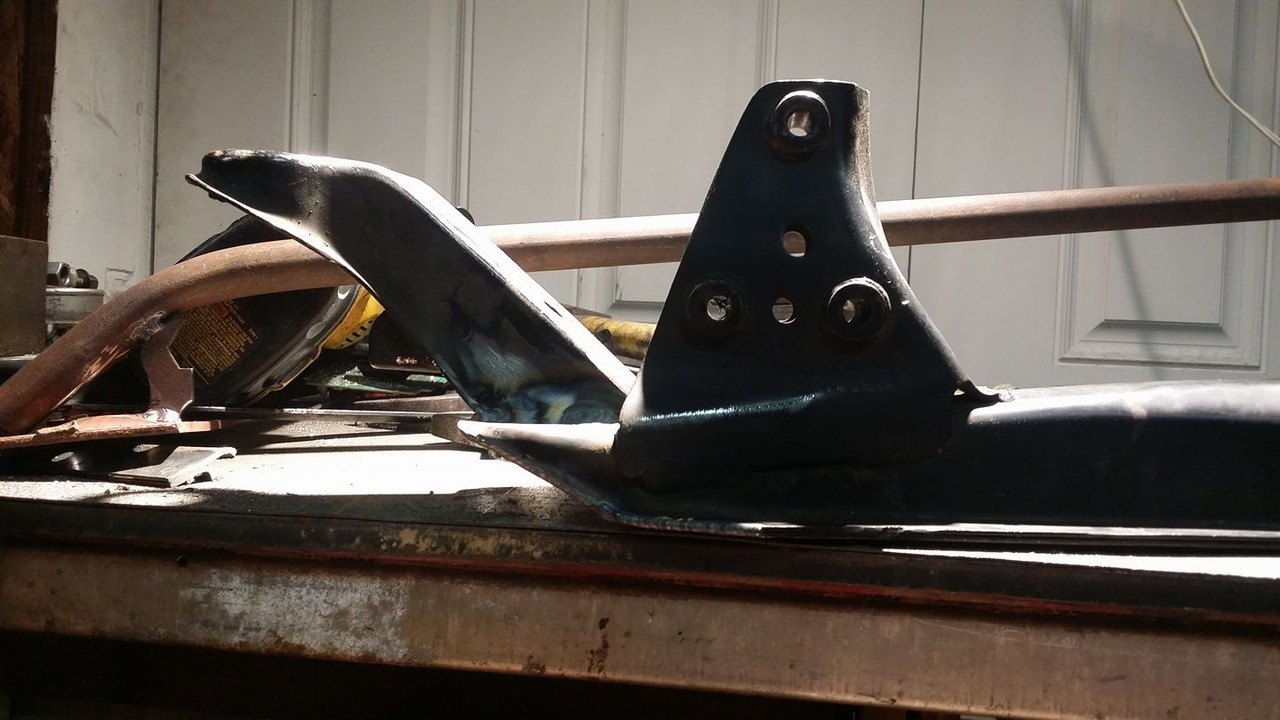
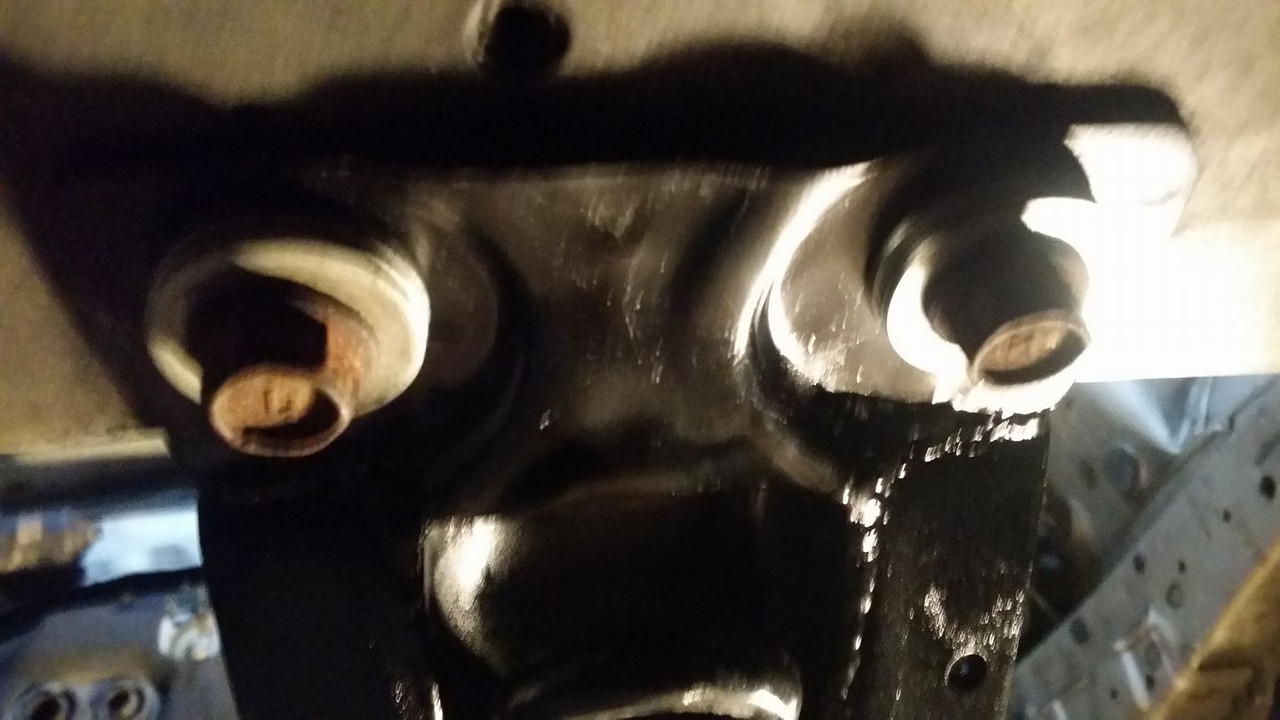
i also had a little war with this engine mounting bracket that was for the KA. this sombich was on there good. i had to drill through all the spot welds AND crack off the panel bonder holding it on, took me about an hour and a few of my vertebrae before it finally gave up the ghost and snapped all the way off.

AND DONT COME BACK!
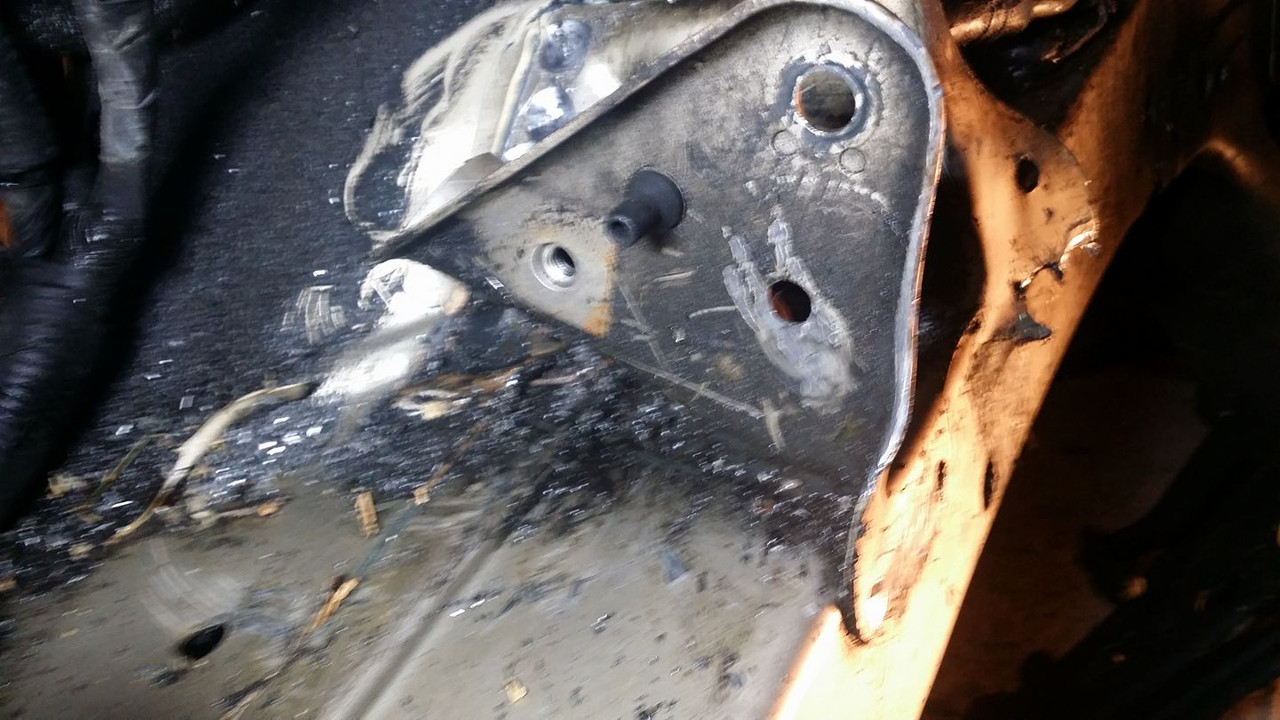
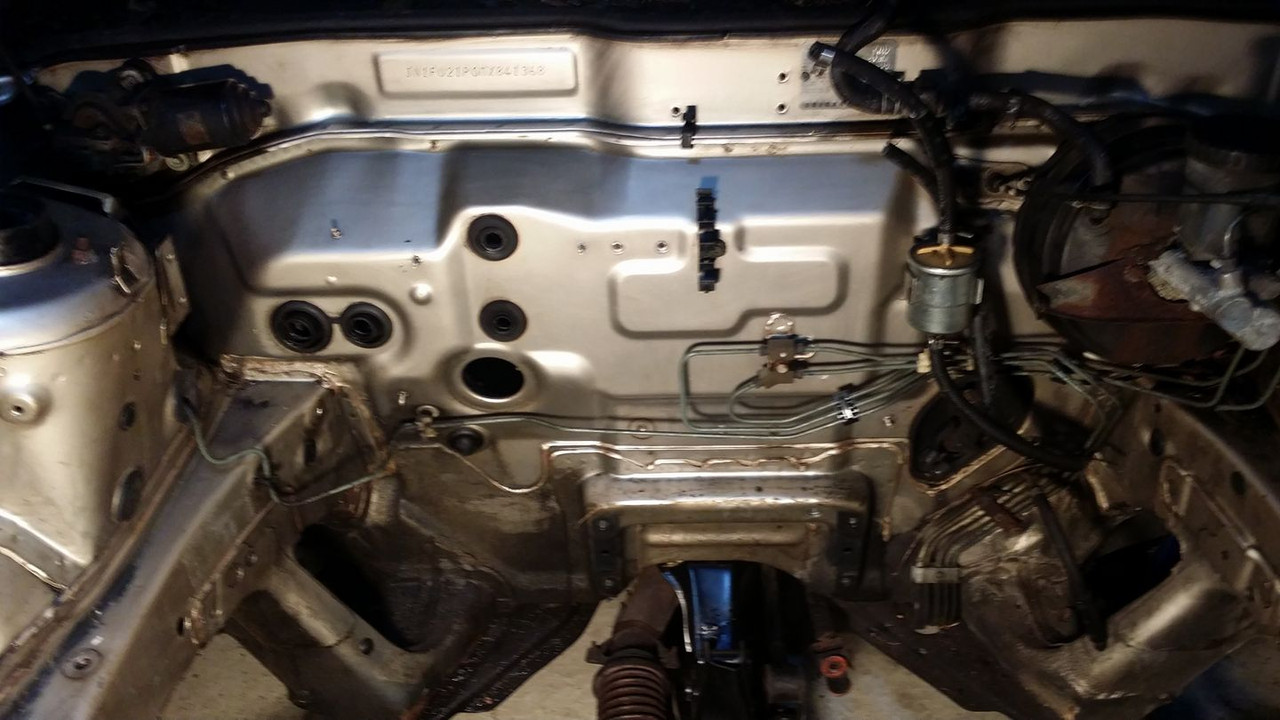
anyway so once that was done i sprayed some more purple power, scrubbed and rinsed then wiped everything down and ended up with this.
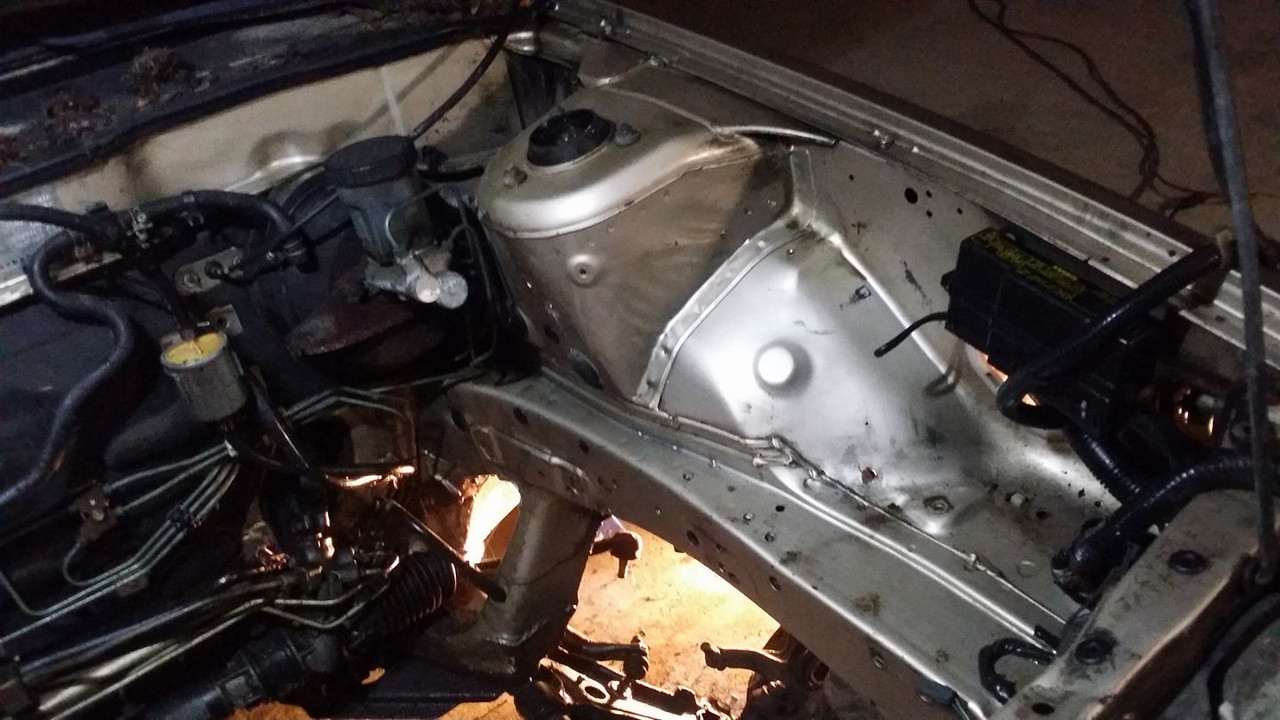
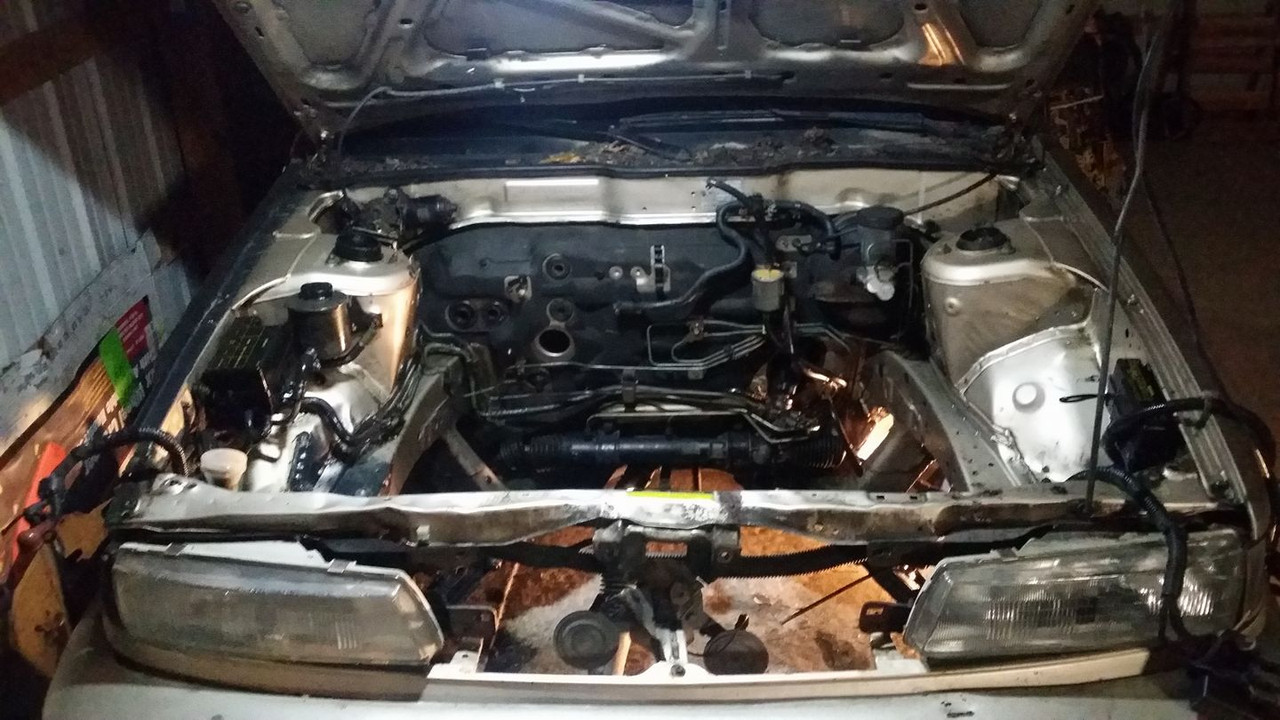
im debating on pulling off the rest of that insulating mat thats on the firewall. i dont particularly mind it or anything but if there is paint back there i think it might look better without it. im gonna sleep on it but im really happy with the way that paint looks all cleaned up.
i also had a little war with this engine mounting bracket that was for the KA. this sombich was on there good. i had to drill through all the spot welds AND crack off the panel bonder holding it on, took me about an hour and a few of my vertebrae before it finally gave up the ghost and snapped all the way off.
AND DONT COME BACK!
anyway so once that was done i sprayed some more purple power, scrubbed and rinsed then wiped everything down and ended up with this.
im debating on pulling off the rest of that insulating mat thats on the firewall. i dont particularly mind it or anything but if there is paint back there i think it might look better without it. im gonna sleep on it but im really happy with the way that paint looks all cleaned up.
Last edited by Nate Boslet; 05-14-2018 at 03:50 PM.


 11-29-2016, 05:31 PM
#20
Member
Thread Starter
Join Date: Oct 2016
Posts: 284
got my parts!!
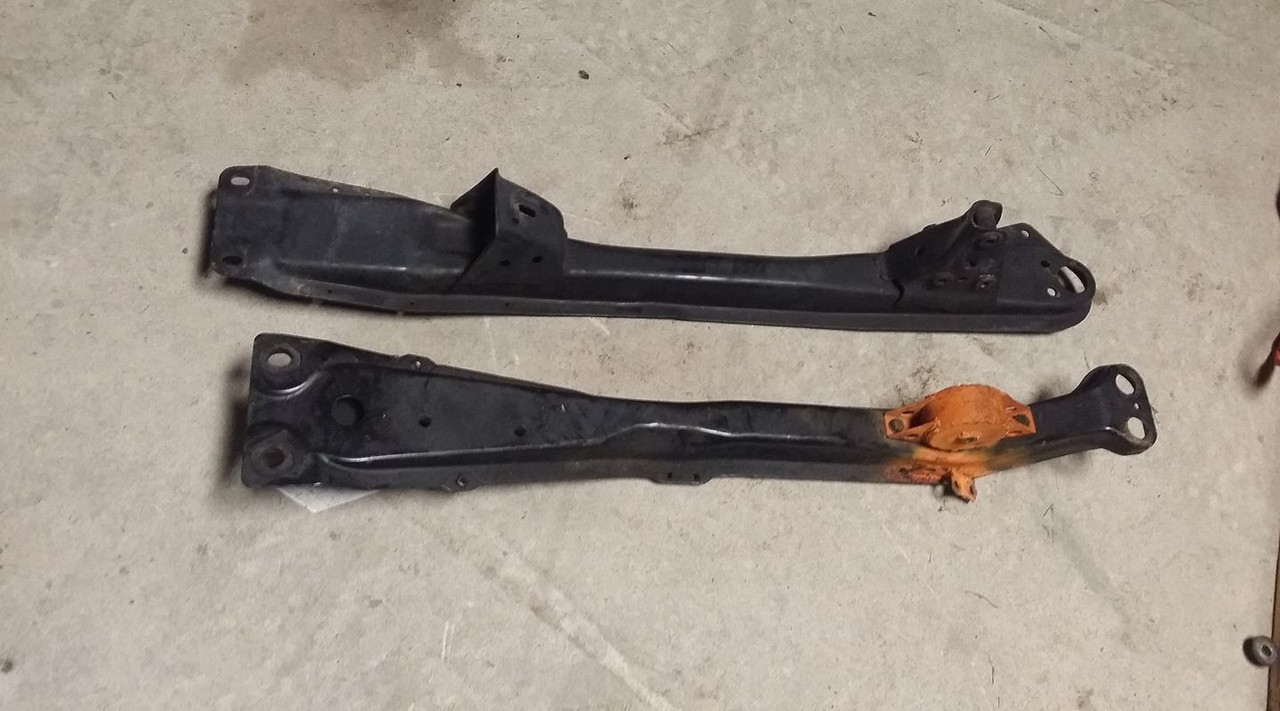
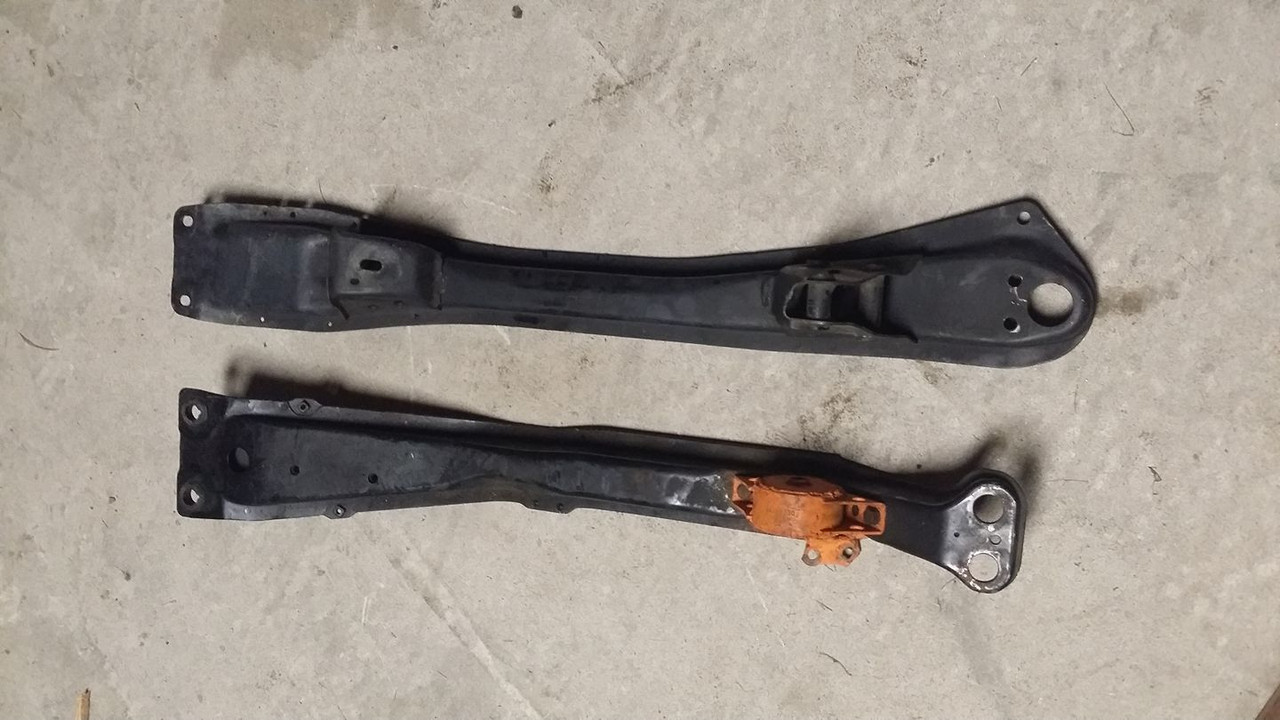
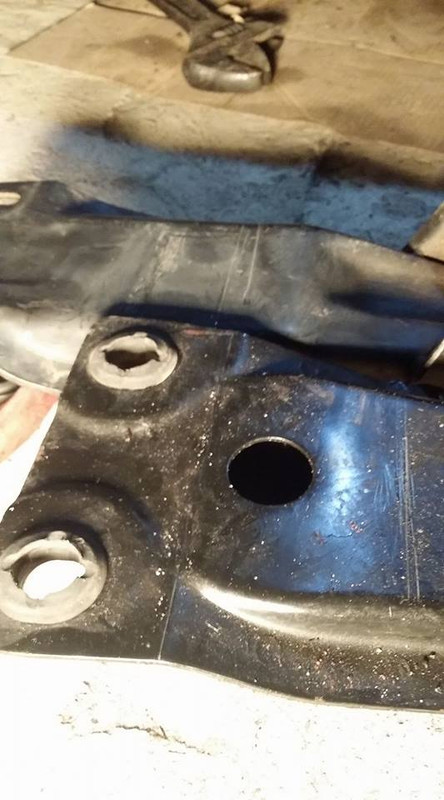
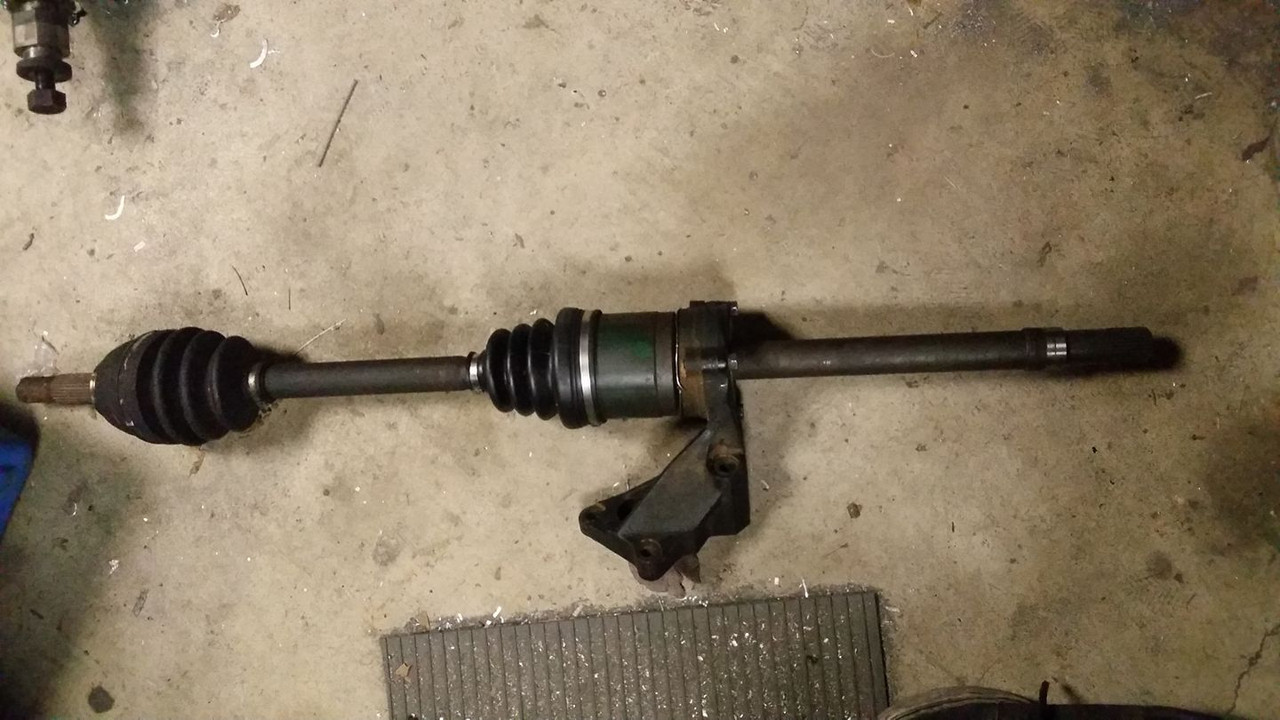
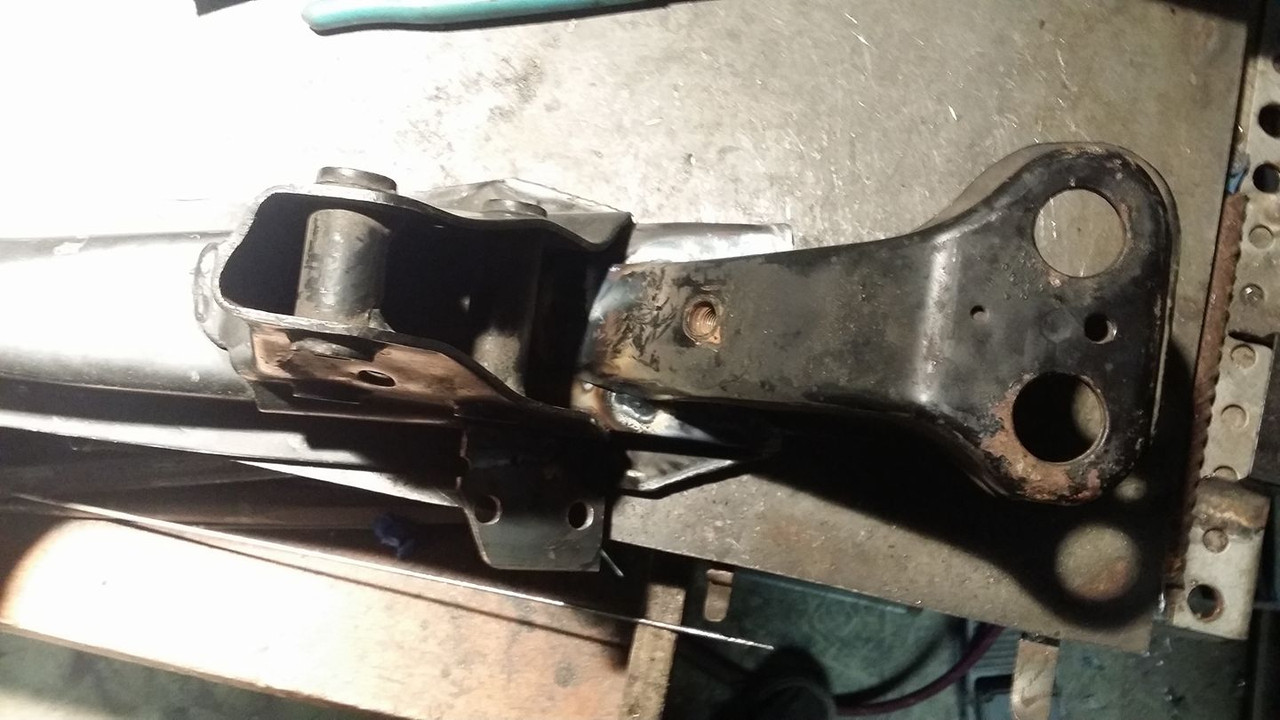
first thing i think i need to focus on is the crossmember. i was thinking i will cut the front and back off of the maxima one and weld on those parts from the stanza one while maintaining the length of the stanza one and moving the mounts forward since the rear mount on the maxima crossmember hits the steering rack before it reaches the mounting holes. some engine bay and crossmember location in relation to the engine bay measurements on a stock vg maxima would help me out a lot right now lol

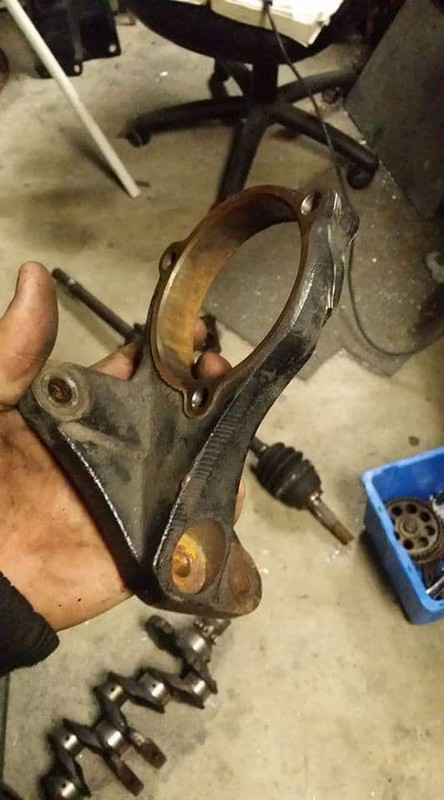
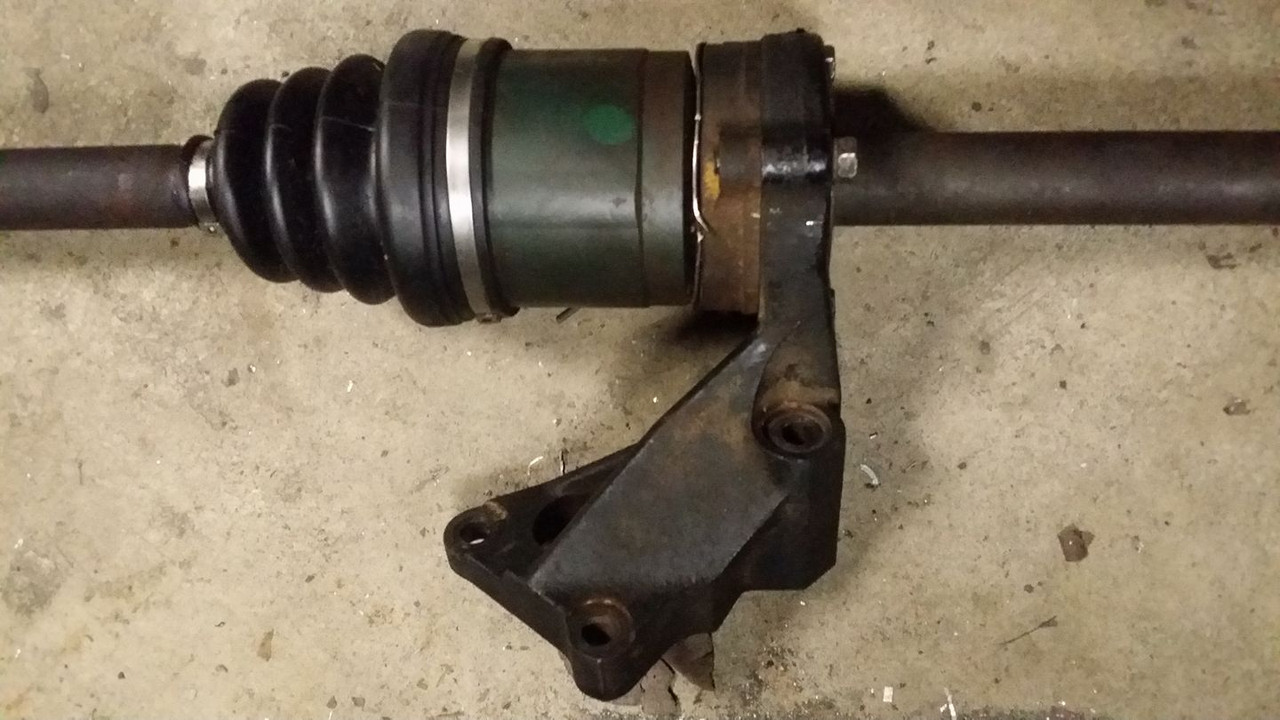
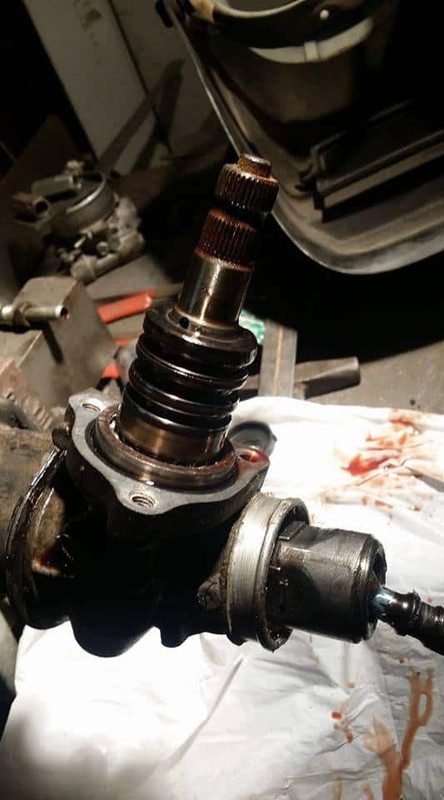
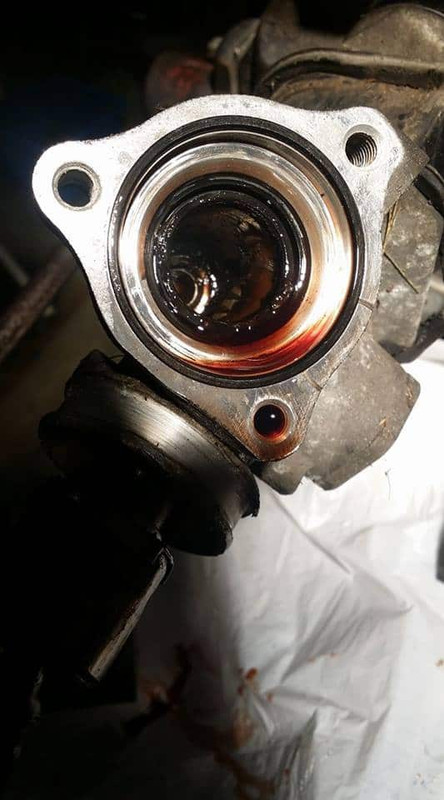
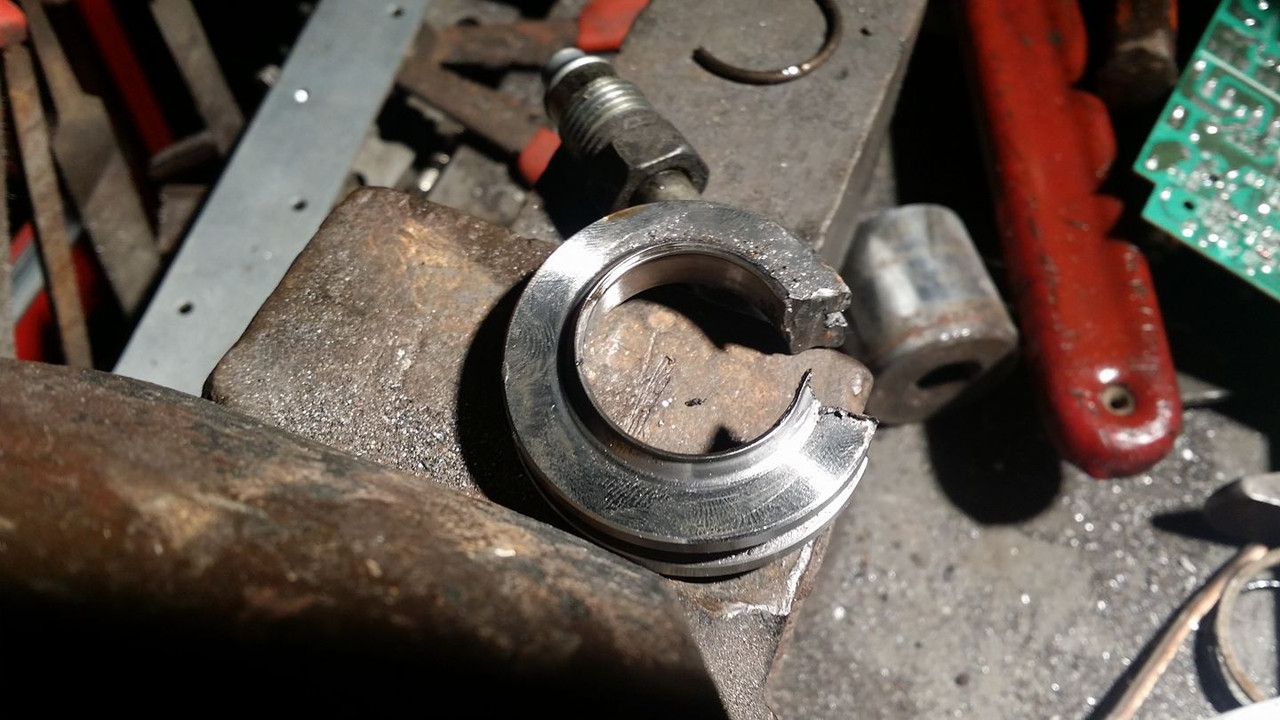
here is the passenger axle bracket that (i think) i can use to mount the stanza axle onto the vg and also plug into the maxima trans. we will see about that i guess once i press the stanza axle out of the stanza bracket....
first thing i think i need to focus on is the crossmember. i was thinking i will cut the front and back off of the maxima one and weld on those parts from the stanza one while maintaining the length of the stanza one and moving the mounts forward since the rear mount on the maxima crossmember hits the steering rack before it reaches the mounting holes. some engine bay and crossmember location in relation to the engine bay measurements on a stock vg maxima would help me out a lot right now lol
here is the passenger axle bracket that (i think) i can use to mount the stanza axle onto the vg and also plug into the maxima trans. we will see about that i guess once i press the stanza axle out of the stanza bracket....
Last edited by Nate Boslet; 05-14-2018 at 03:52 PM.
11-30-2016, 09:03 PM
#21
Member
Thread Starter
Join Date: Oct 2016
Posts: 284
measure once, **** everything up
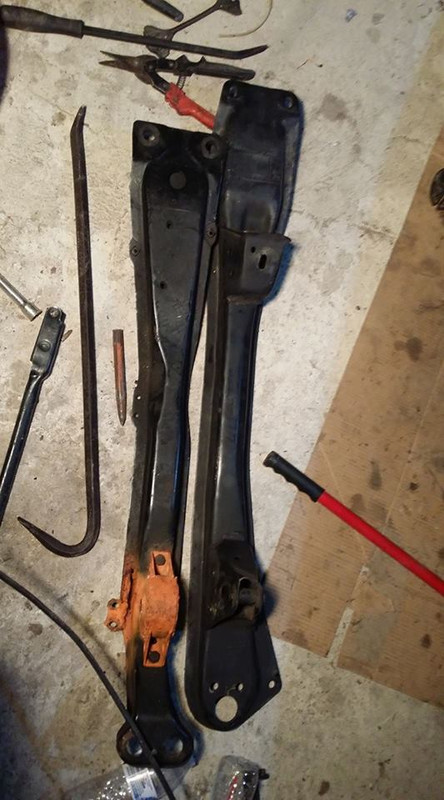
moving right along, my plan is to make the stanza and maxima crossmembers one frankenmember aka staxima member (manza?).....i will probably be making a jig for the stanza crossmember so when i chop everything up i will be able to make sure everything will fit back on the car once its all welded.
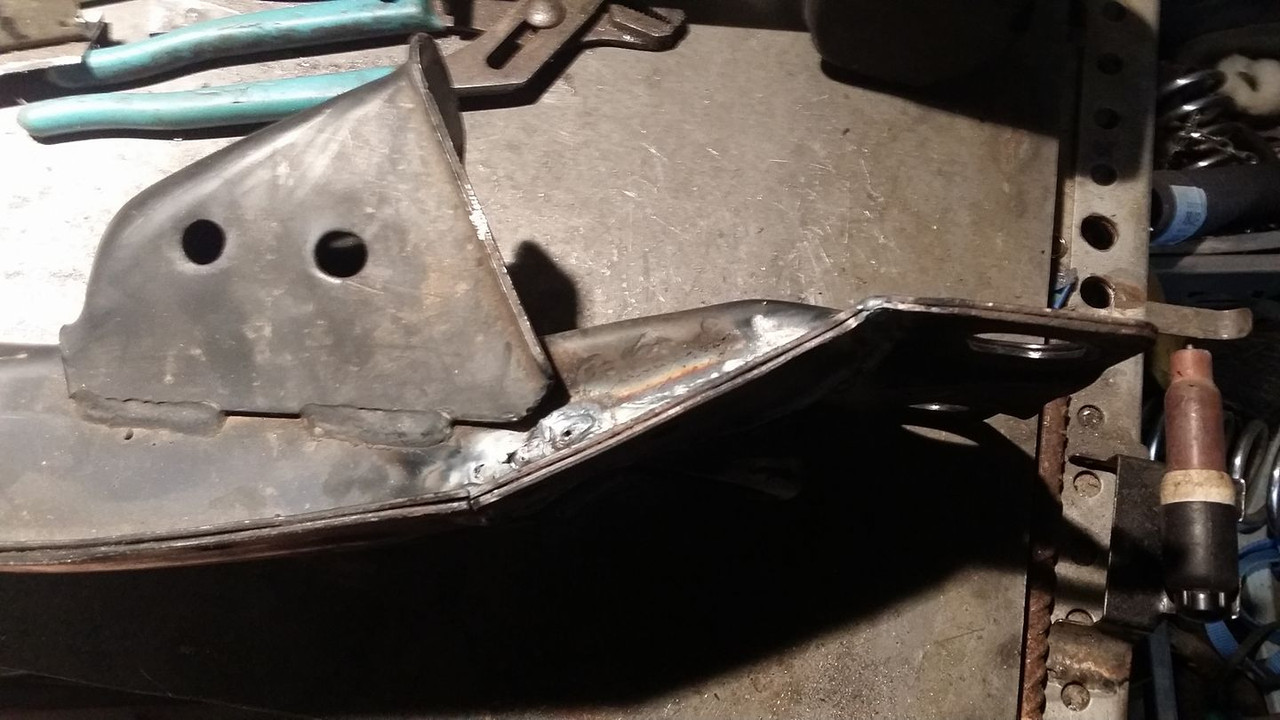
first thing i did was figure out the minimum amount i would need for the front of the stanza crossmember to fit underneath the front of the car (so i can use the stock mounting holes and make sure the mating surfaces fit together properly since the two members are completely different shapes) once i had that measurement i mocked up the max member to see where the center needed to be so the engine was *relatively* close to where i need it to be. then i will split those two measurements by lining them both up and cutting a straight line across wherever the two members differ in shape the least in front of the front engine mount on the maxima crossmember. after i do that i will do the same with the backs of the two crossmembers but this time keeping as much of the stanza member intact (so i can redo my shifter bracket without needing to do my fitting and welding under the car, i did that already when i 5 speed swapped the stanza the first time..) i figured there is really no reason to take any measurements in the rear because i dont have a choice to change anything at that point, the front of the crossmember dictates the length of the back of it since the middle has to stay the same length in order for the mounts to line up correctly.

the next 4 images are to illustrate where i took my measurements isnt necessarily where i need to make my cut since i can cut straight accross both members, as long as both members are held this way, the two pieces will line up where i need them to.
it probably seems like i am totally winging this and i have no idea what im doing, but there are two reasons for this.
1. i dont have much of a choice as to where a lot of stuff is mounted and i can make really close assumptions just by maintaining a center and staying square. also i will have some adjustability later if needed because i can make the front engine mount whatever hight i want it to be which will either tilt the engine forward or backward. my experience doing engine swaps is not limited to this car and i am employing my fabrication knowledge to complete each new task this build is giving me, i feel like it is fair to say that i am qualified to handle any problem this car will throw at me.
2. i am totally winging this and i have no idea what im doing.
first thing i did was figure out the minimum amount i would need for the front of the stanza crossmember to fit underneath the front of the car (so i can use the stock mounting holes and make sure the mating surfaces fit together properly since the two members are completely different shapes) once i had that measurement i mocked up the max member to see where the center needed to be so the engine was *relatively* close to where i need it to be. then i will split those two measurements by lining them both up and cutting a straight line across wherever the two members differ in shape the least in front of the front engine mount on the maxima crossmember. after i do that i will do the same with the backs of the two crossmembers but this time keeping as much of the stanza member intact (so i can redo my shifter bracket without needing to do my fitting and welding under the car, i did that already when i 5 speed swapped the stanza the first time..) i figured there is really no reason to take any measurements in the rear because i dont have a choice to change anything at that point, the front of the crossmember dictates the length of the back of it since the middle has to stay the same length in order for the mounts to line up correctly.
the next 4 images are to illustrate where i took my measurements isnt necessarily where i need to make my cut since i can cut straight accross both members, as long as both members are held this way, the two pieces will line up where i need them to.
it probably seems like i am totally winging this and i have no idea what im doing, but there are two reasons for this.
1. i dont have much of a choice as to where a lot of stuff is mounted and i can make really close assumptions just by maintaining a center and staying square. also i will have some adjustability later if needed because i can make the front engine mount whatever hight i want it to be which will either tilt the engine forward or backward. my experience doing engine swaps is not limited to this car and i am employing my fabrication knowledge to complete each new task this build is giving me, i feel like it is fair to say that i am qualified to handle any problem this car will throw at me.
2. i am totally winging this and i have no idea what im doing.
Last edited by Nate Boslet; 05-14-2018 at 03:54 PM.
12-01-2016, 09:33 PM
#23
Member
Thread Starter
Join Date: Oct 2016
Posts: 284
im no stranger to failure lol i am confident that what i end up with will be functional, to what degree is where my confidence turns to apprehension lol
12-01-2016, 10:09 PM
#24
Member
Thread Starter
Join Date: Oct 2016
Posts: 284
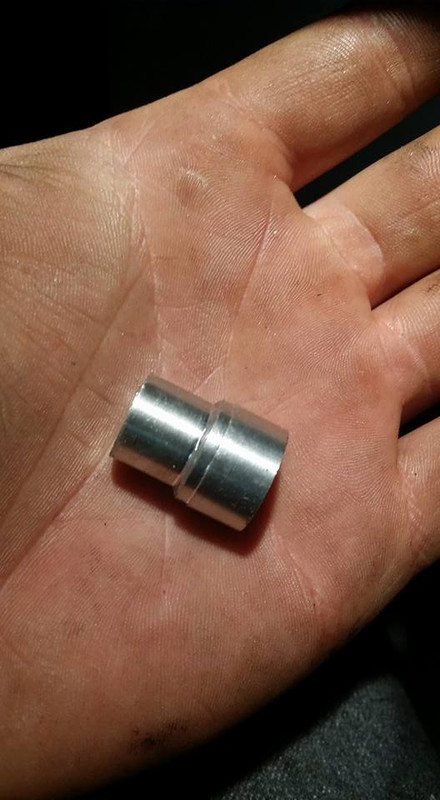
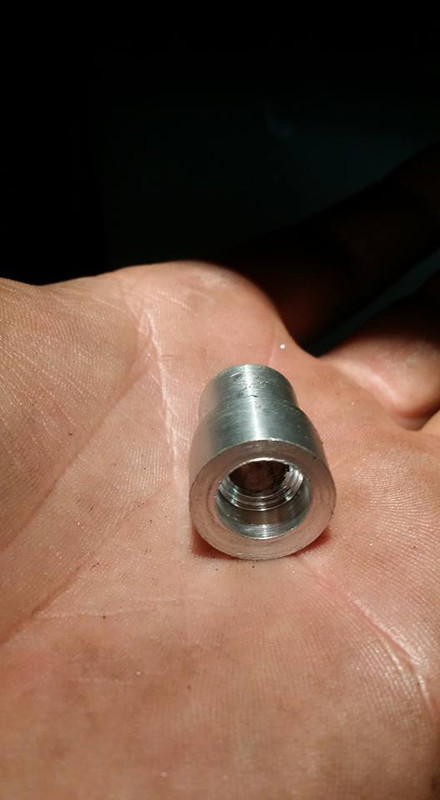
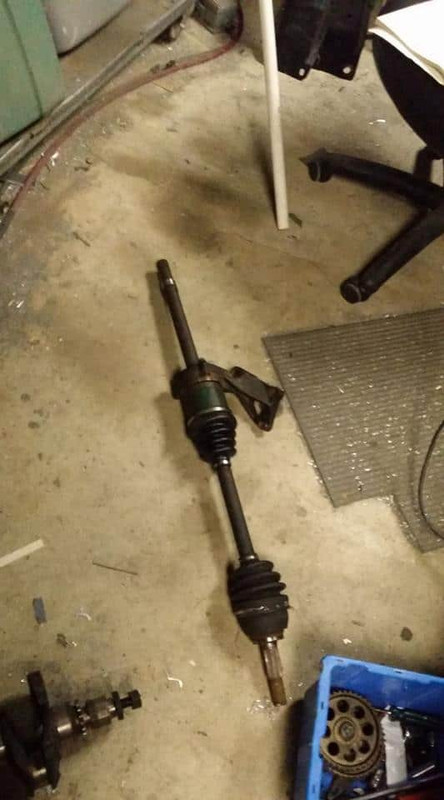
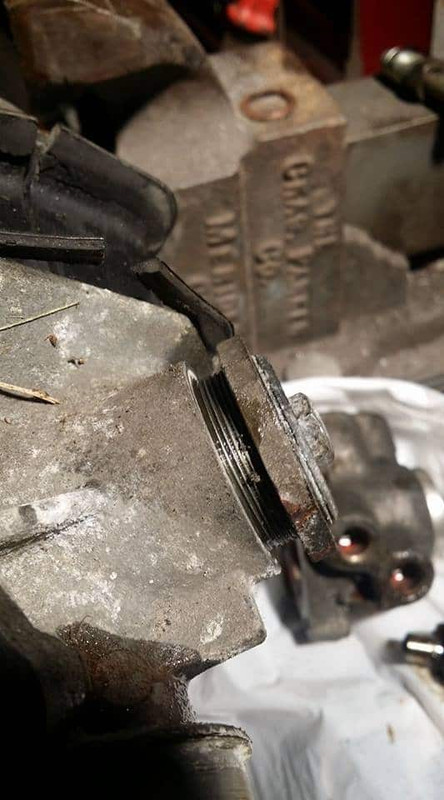
since i dont have a press and i dont need this old stanza axle bracket anymore (since the motor is still good ill probably swap that into a rwd car with the old transmission from my z31 when i put my z32 trans into that) i decided to break out the cutting disc and throw some sparks. i made it all the way through in spots but somehow that was barely even detectable on the carrier bearing race which had somehow begun to fall out on its own after i cut most of the way through... so i used a cold chisel to try and crack the bracket open a little wider and after a few more taps it slid right out. to get the stanza axle onto the maxima bracket was even easier than that, considering i expected to have to at the very least drill some new holes, they happened to have the same bolt pattern! so i just tapped the bracket onto the race and threaded each bolt in in series until all 3 were tight.


once i was done with that i decided to begin making the jig i will use to make sure my staxima crossmember bolts in without any trouble. nothing too crazy, just enough for the bolt holes to stay where they should be.
i wasnt in a picture taking mood for some reason tonight, just focusing on getting something done i guess but i turned some aluminum bushings on my lathe so i could take some of the slack out of the holes and keep everything as accurate as possible. once i did that for the rear of the stanza crossmember i went to the front which has some old rotting bushings barely still in there, so i left them in and put smaller bushings inside of those to get a center for each of those holes and then drill holes in my other plate and threw some bolts through it, welded a bar i had lying around to both plates and im all done. i realized later that i can build a jig for my shifter plate off of this one which i will probably do that way i can cut the rear of the crossmember wherever i want to without worrying about that bracket and just make a new one whenever i want.

P.S. i know my garage is absolutely filthy, i am a shameful human being that deserves only cruelty and suffering, yadda yadda i got it.
once i was done with that i decided to begin making the jig i will use to make sure my staxima crossmember bolts in without any trouble. nothing too crazy, just enough for the bolt holes to stay where they should be.
i wasnt in a picture taking mood for some reason tonight, just focusing on getting something done i guess but i turned some aluminum bushings on my lathe so i could take some of the slack out of the holes and keep everything as accurate as possible. once i did that for the rear of the stanza crossmember i went to the front which has some old rotting bushings barely still in there, so i left them in and put smaller bushings inside of those to get a center for each of those holes and then drill holes in my other plate and threw some bolts through it, welded a bar i had lying around to both plates and im all done. i realized later that i can build a jig for my shifter plate off of this one which i will probably do that way i can cut the rear of the crossmember wherever i want to without worrying about that bracket and just make a new one whenever i want.
P.S. i know my garage is absolutely filthy, i am a shameful human being that deserves only cruelty and suffering, yadda yadda i got it.
Last edited by Nate Boslet; 05-14-2018 at 03:55 PM.
12-02-2016, 10:01 AM
#26
Member
Thread Starter
Join Date: Oct 2016
Posts: 284
apparently it is a 2nd gen automatic crossmember, since i dont really know much about maximas and my main goal is just to put a VG into the stanza i didnt put much effort into finding one or the other i just happened to find someone who had basically everything i needed so i took what he had.
12-02-2016, 08:25 PM
#27
Member
Thread Starter
Join Date: Oct 2016
Posts: 284
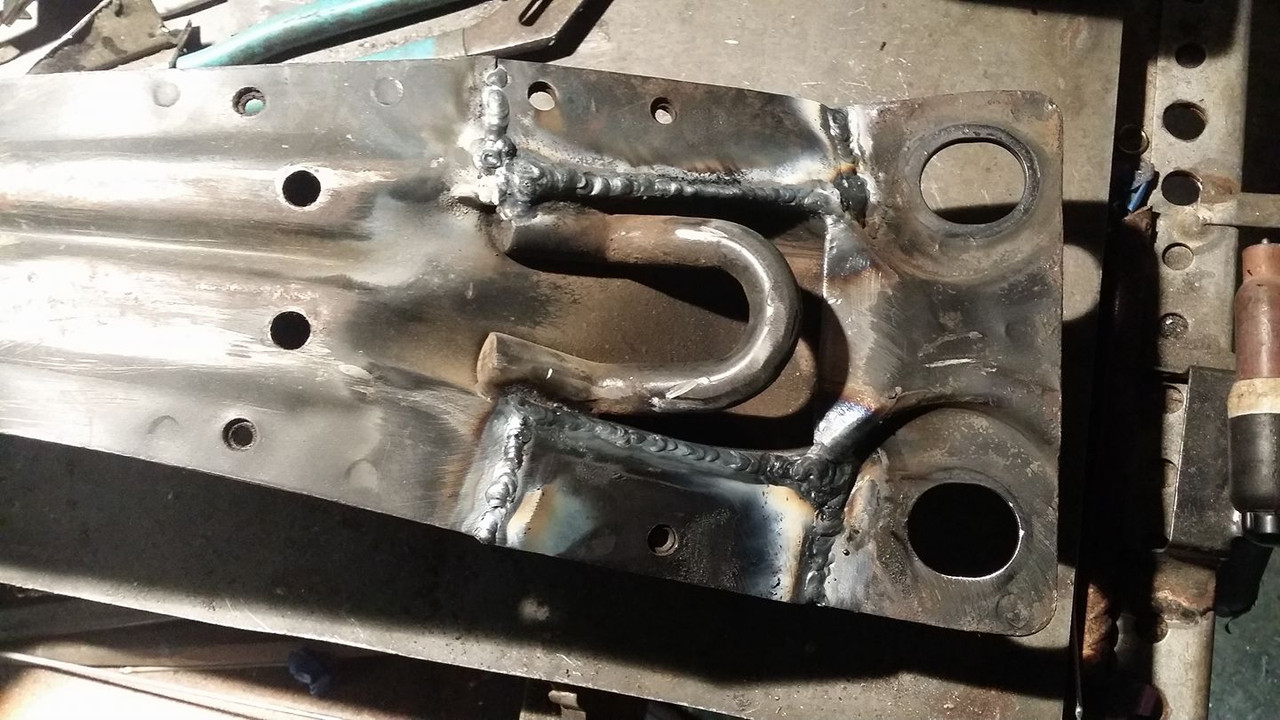
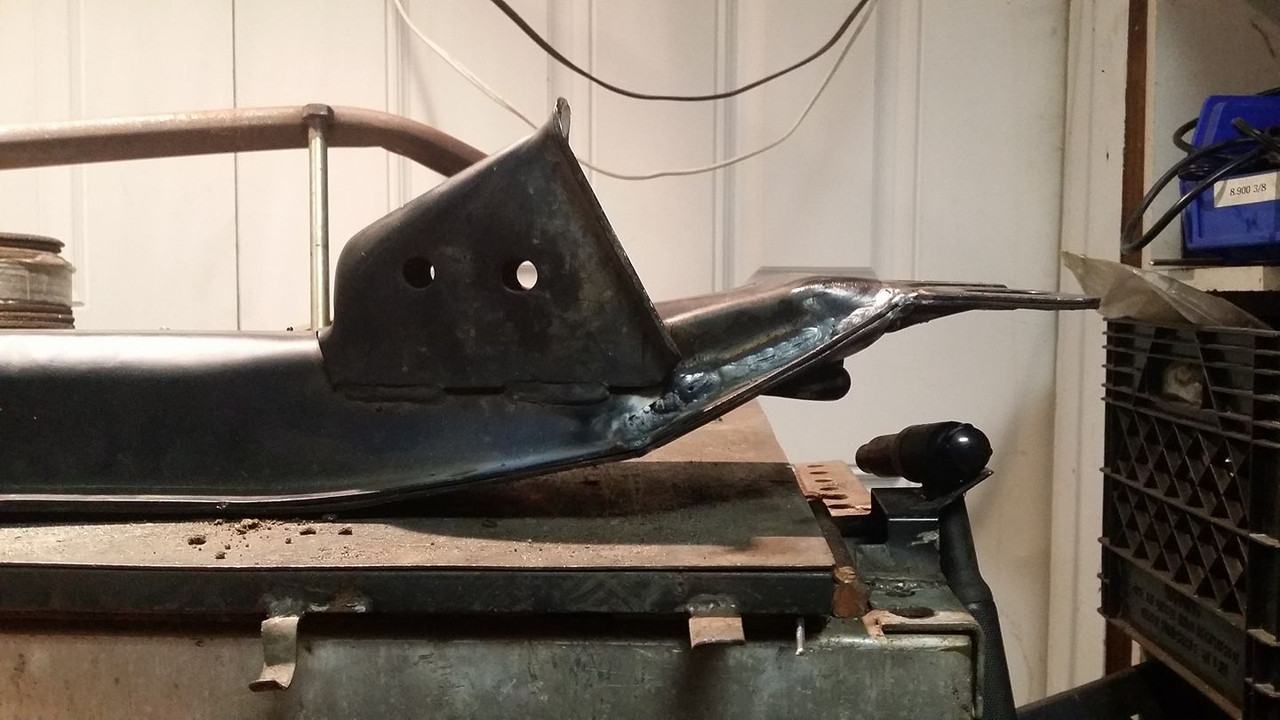
so first thing i notice as some of you may have, is that my jig will not work, the bar was going to get in the way of the mounts on the maxima crossmember. so i got strong real quick and bent the bar in my bench vice.
nice.
that bar (its a bolt) sticking down is for the shifter bracket plate.
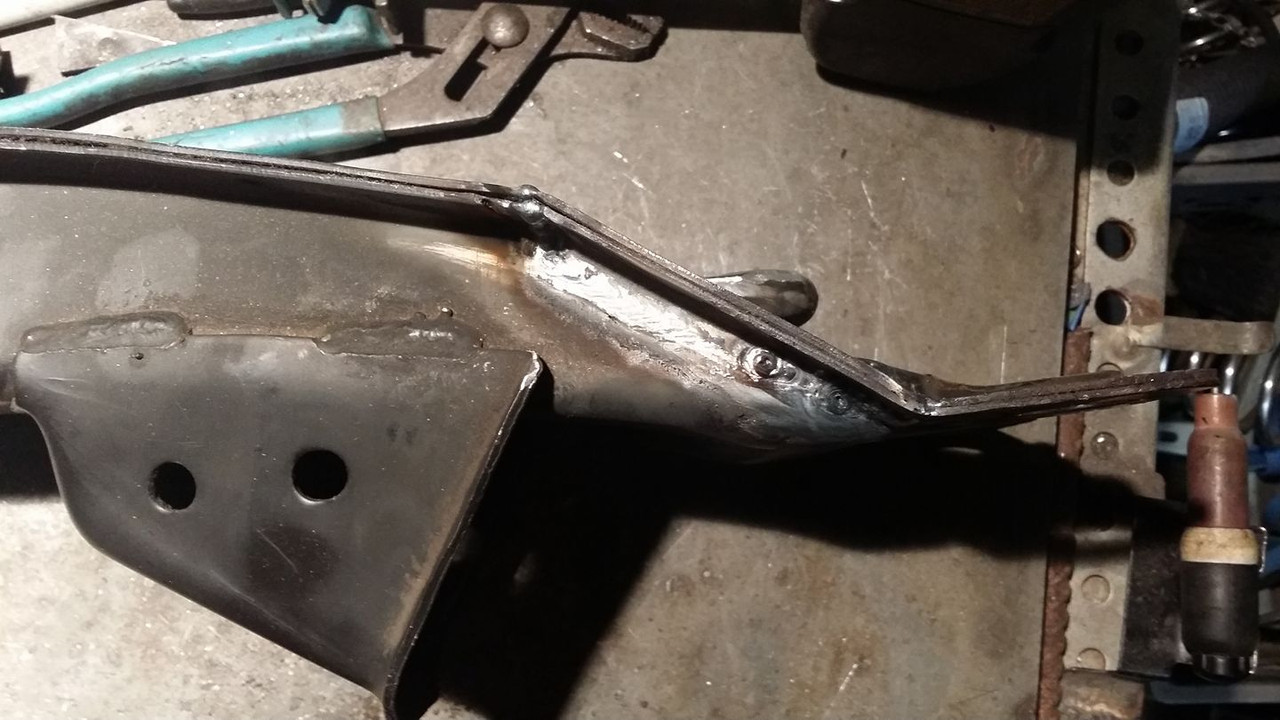
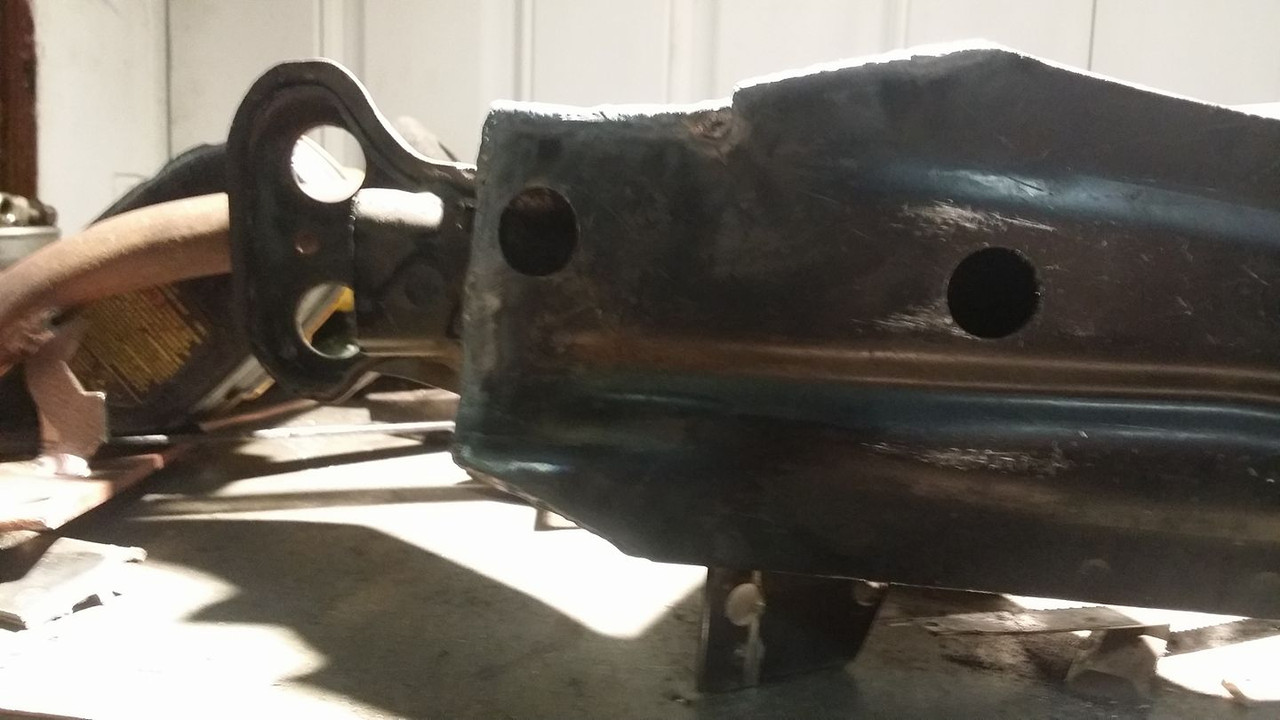
next i chopped off the front of the maxima crossmember, once again i wasnt given much of a choice in terms of where to cut stuff since i wanted to keep the tow loop.

it probably doesnt come across in these pictures but i put some effort into getting this right the first time.
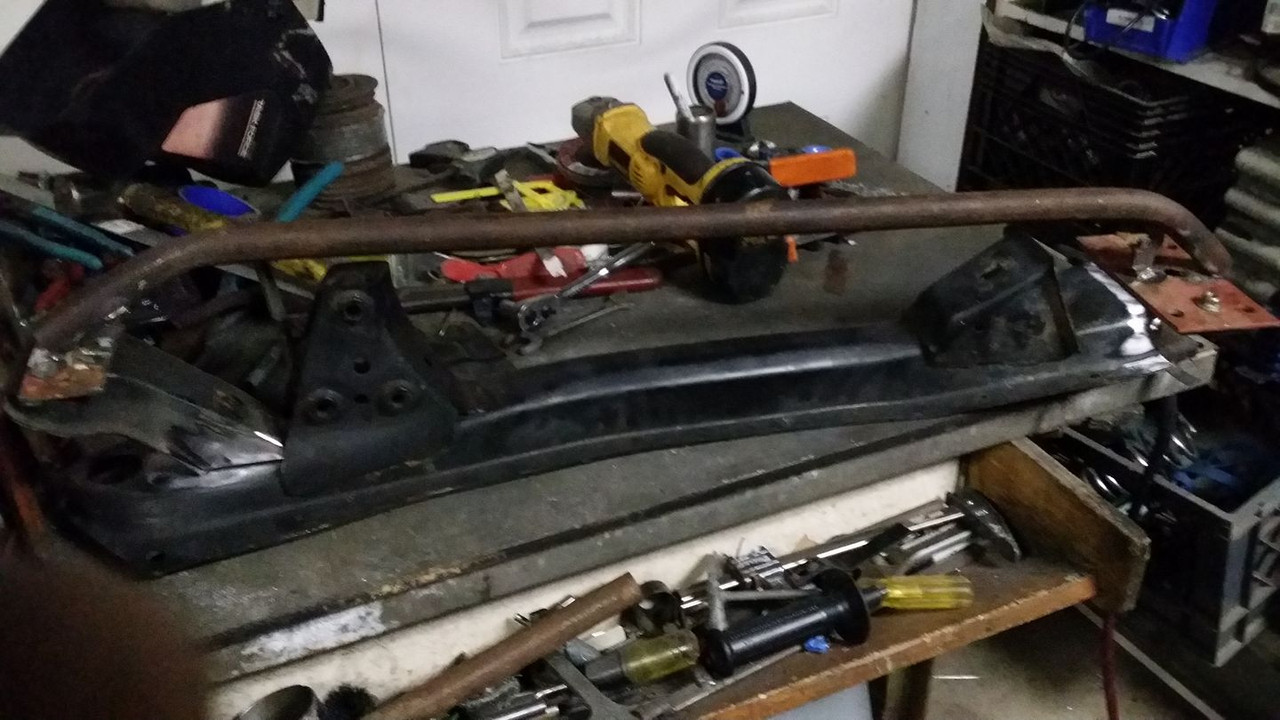
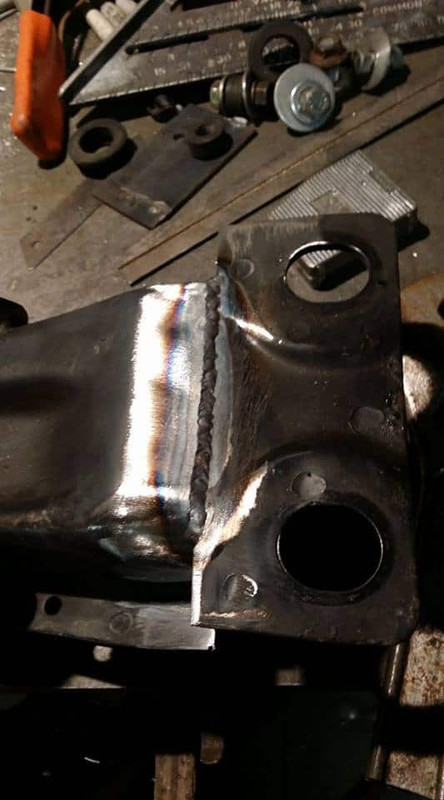
the shifter bracket got the only presentable weld i did so far, i dont particularly care what they look like because they will be covered in paint and eventually dirt but just for the record when i do more visable welds ill be putting more effort into them being pretty.
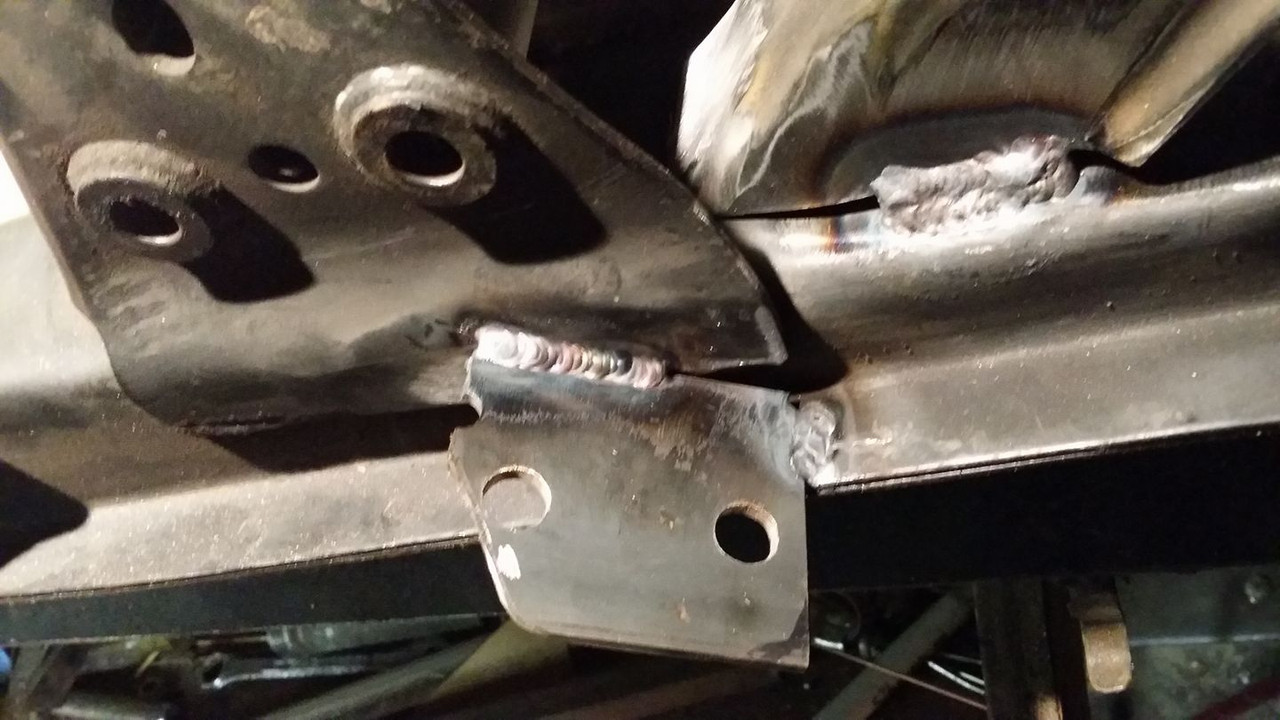
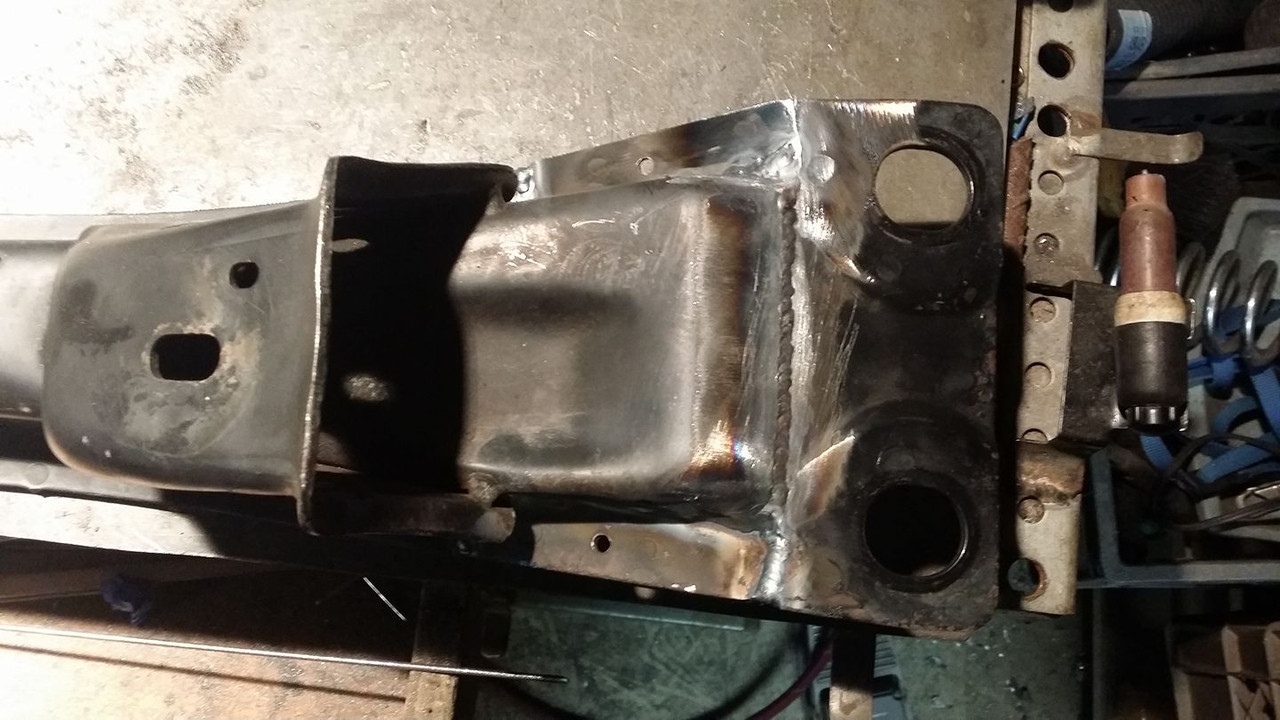
this is how the rear lines up (perfectly)

the front was bolted in so that also fits very well.
the shifter bracket is exactly where i want it.
so far everything looks pretty much like its where it should be. im gonna have to mock up the block and trans next week to find out if im ****ed or not but so far im feeling pretty good about it.
radiator clearance and fans look like they will have enough room maybe

nice.
that bar (its a bolt) sticking down is for the shifter bracket plate.
next i chopped off the front of the maxima crossmember, once again i wasnt given much of a choice in terms of where to cut stuff since i wanted to keep the tow loop.
it probably doesnt come across in these pictures but i put some effort into getting this right the first time.
the shifter bracket got the only presentable weld i did so far, i dont particularly care what they look like because they will be covered in paint and eventually dirt but just for the record when i do more visable welds ill be putting more effort into them being pretty.
this is how the rear lines up (perfectly)
the front was bolted in so that also fits very well.
the shifter bracket is exactly where i want it.
so far everything looks pretty much like its where it should be. im gonna have to mock up the block and trans next week to find out if im ****ed or not but so far im feeling pretty good about it.
radiator clearance and fans look like they will have enough room maybe
Last edited by Nate Boslet; 05-14-2018 at 03:56 PM.
12-03-2016, 05:17 PM
#28
Member
Thread Starter
Join Date: Oct 2016
Posts: 284
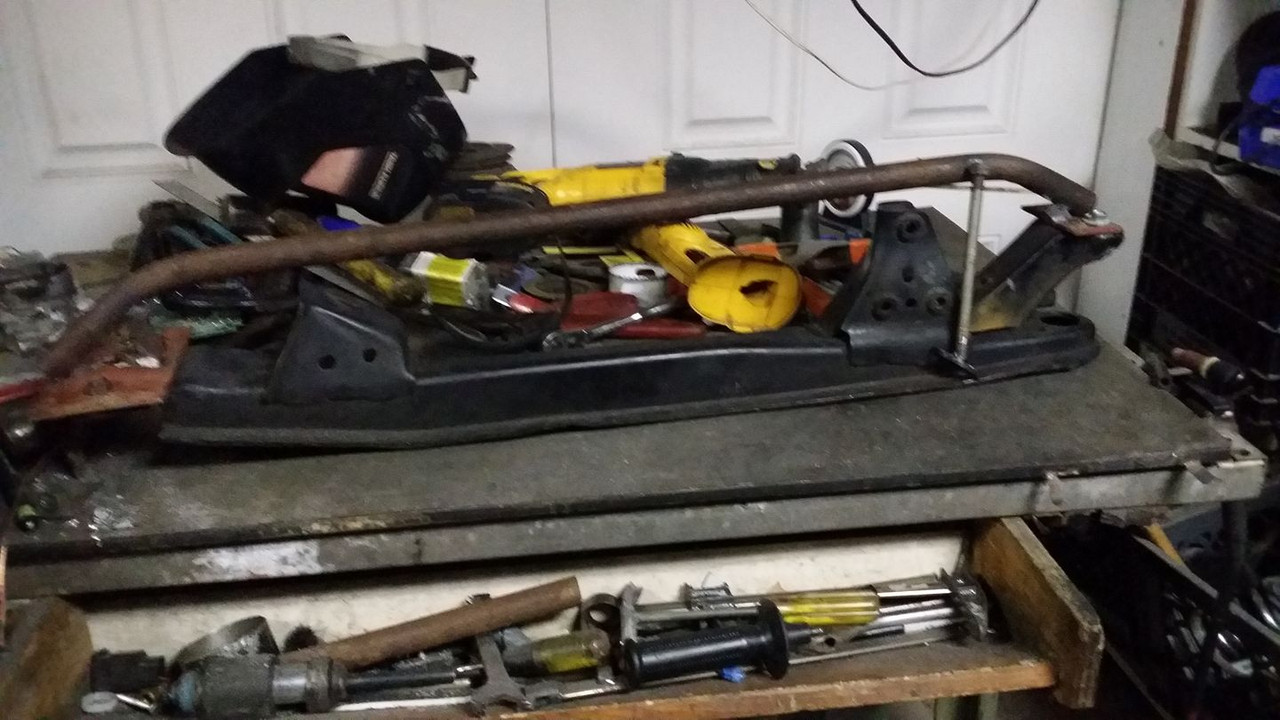
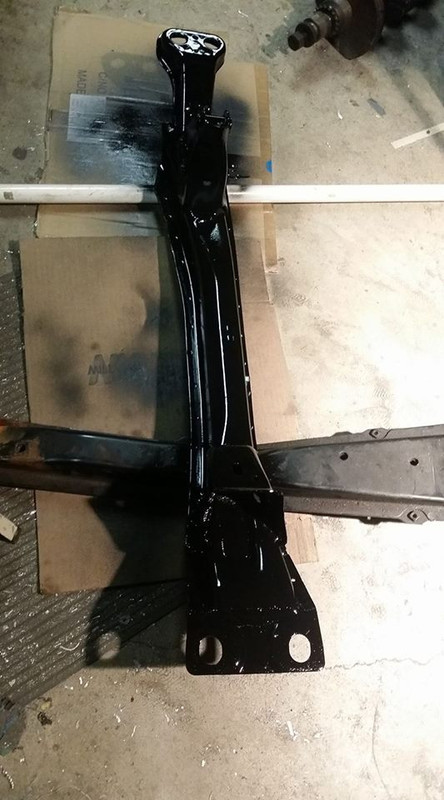
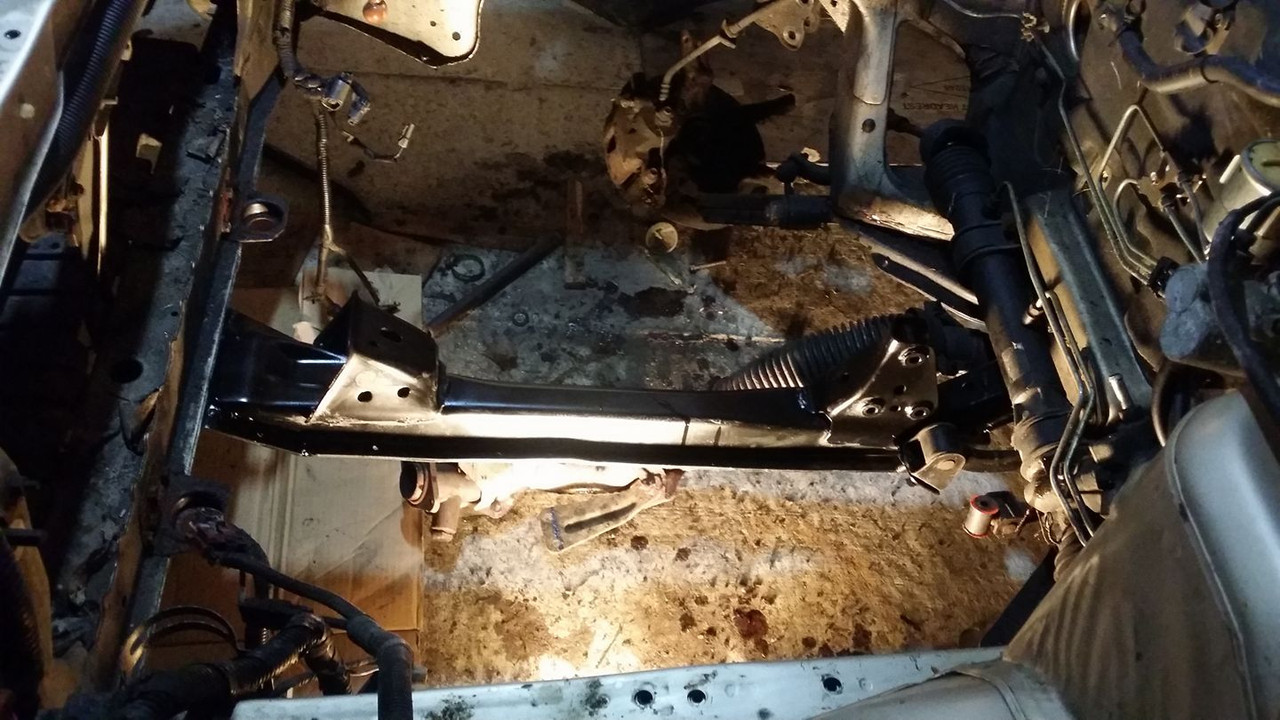
crossmember is finished and painted. tomorrow ill probably turn some solid bushings and get it installed in the car for mockup of the engine and trans which i probably wont be able to do until i get a hoist (lookin at you santa)
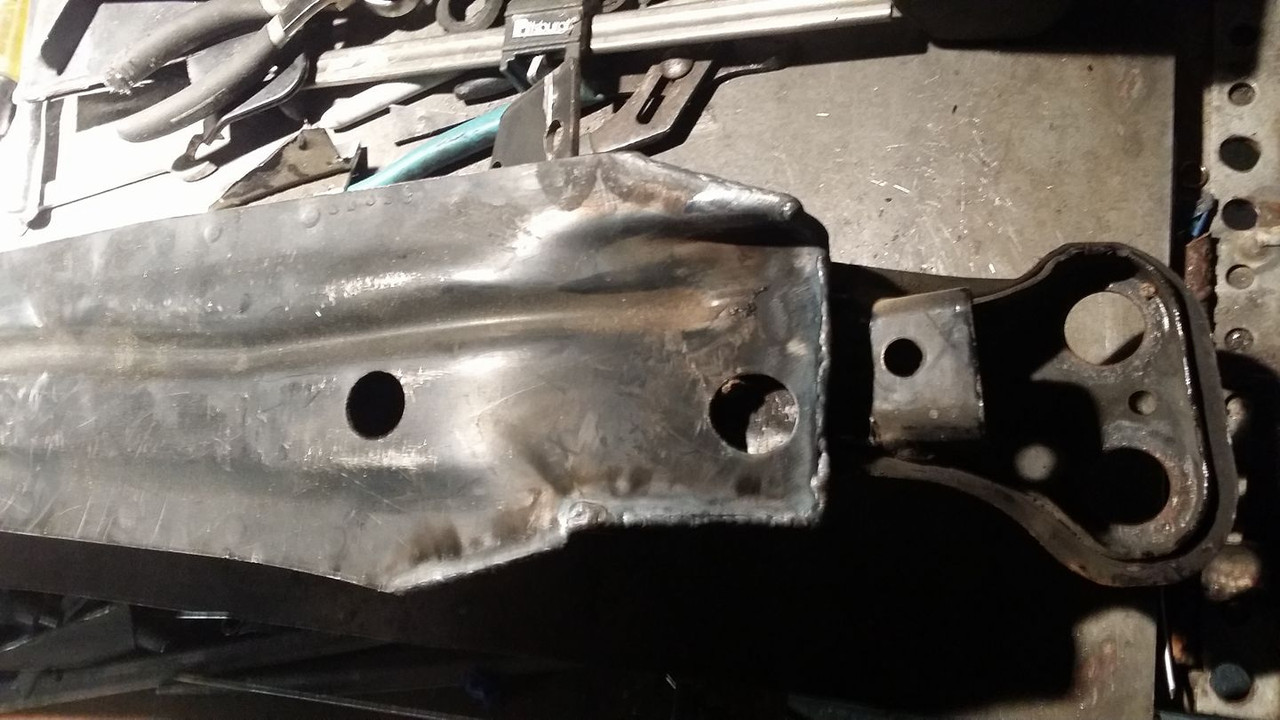


i had some satin black lying around and i want to keep this thing from rusting so ill probably give it a few more coats on it before i put it on the car for the last time.

i had some satin black lying around and i want to keep this thing from rusting so ill probably give it a few more coats on it before i put it on the car for the last time.
Last edited by Nate Boslet; 05-14-2018 at 03:57 PM.
12-04-2016, 04:21 PM
#30

Very nice job so far. Keep up the good work! Hopefully everything lines up well. I know for sure the rear subframe on the stanza and the 3rd gen max are the same. I wonder if they would have shared the same cross member too but probably not being they're different engines. You seem to be quite the McGyver with making things work to your advantage though.
12-04-2016, 05:26 PM
#31
Member
Thread Starter
Join Date: Oct 2016
Posts: 284
thanks man
sh*t really? i wonder.... one thing i noticed for sure was the maxima crossmember i have, which is apparently from a 2nd gen, was like 5 or 6 inches longer than the stanza one. i dont think ive ever even seen a 3rd gen in person, i definitely havent gotten to look underneath one so i wouldnt know about the crossmember lol
i found out the other day that the stock stanza alternator is allegedly 80 amps so if thats the case im gonna see if it will bolt up to the stock mounts and if it does im gonna run that. considering the stock 84 z31 used a 70 amp alt and the stanzas alternator seemed to work just fine before im happy to upgrade. it appears that all the brackets from the 84 z31 also put the alternator and power steering roughly (maybe exactly) where they are on the maxima so hopefully i wont have to do anything special to get those to line up with the crank pulley i end up using. i think im in pretty good shape moving forward. hopefully i can keep this pace up.
Very nice job so far. Keep up the good work! Hopefully everything lines up well. I know for sure the rear subframe on the stanza and the 3rd gen max are the same. I wonder if they would have shared the same cross member too but probably not being they're different engines. You seem to be quite the McGyver with making things work to your advantage though.
i found out the other day that the stock stanza alternator is allegedly 80 amps so if thats the case im gonna see if it will bolt up to the stock mounts and if it does im gonna run that. considering the stock 84 z31 used a 70 amp alt and the stanzas alternator seemed to work just fine before im happy to upgrade. it appears that all the brackets from the 84 z31 also put the alternator and power steering roughly (maybe exactly) where they are on the maxima so hopefully i wont have to do anything special to get those to line up with the crank pulley i end up using. i think im in pretty good shape moving forward. hopefully i can keep this pace up.
12-06-2016, 08:58 PM
#32
Member
Thread Starter
Join Date: Oct 2016
Posts: 284
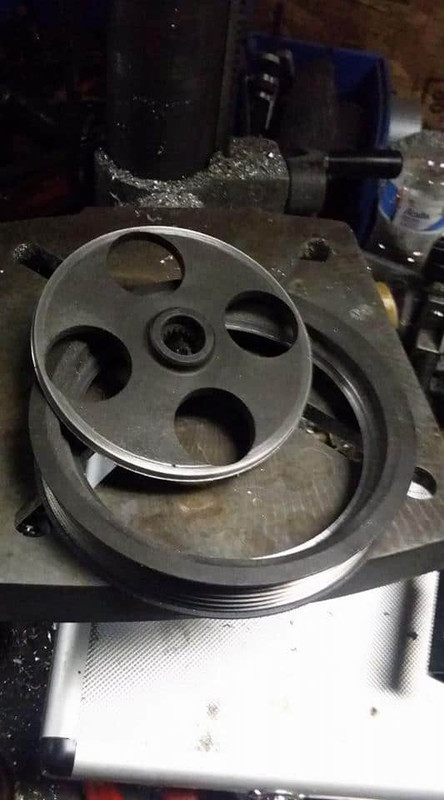
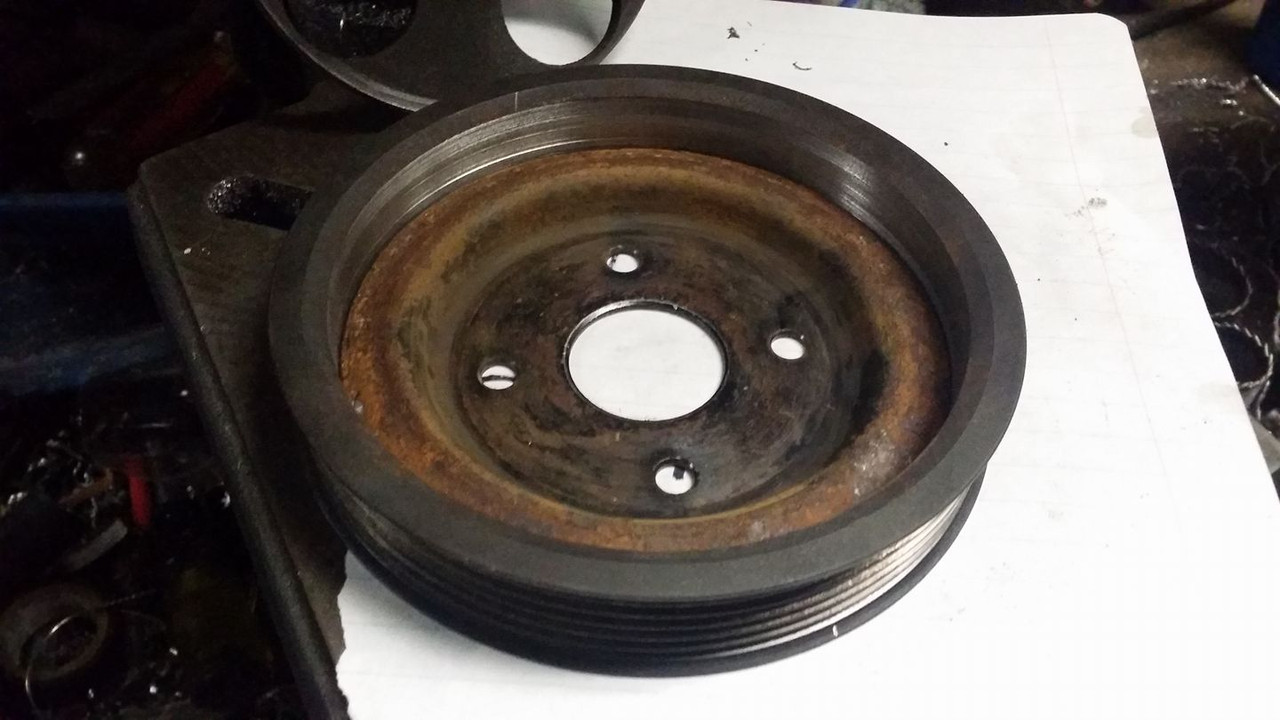
ok im honestly not sure im going to even use this crank pulley because im not sure its going to be safe, if anyone has any INFORMED insight they want to share im happy to hear it. if this turns out to be unsafe or just not work out i really dont have anything to lose since i have no other use for this pulley if i dont use it on this car. the first thing i realized was that the 84 non turbo z31 i got my engine from uses a crank that has a very short snout and the maxima pulley i have would not be a direct fit. since i have a lathe and lots of free time i figured i would at least see what i can do to make this work.
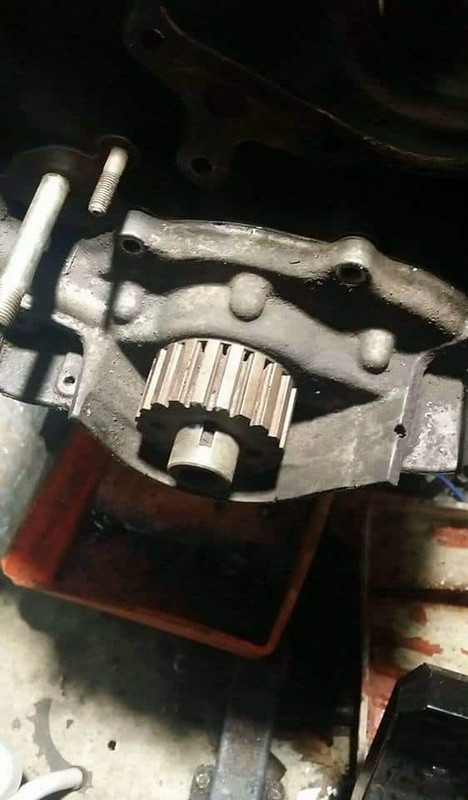
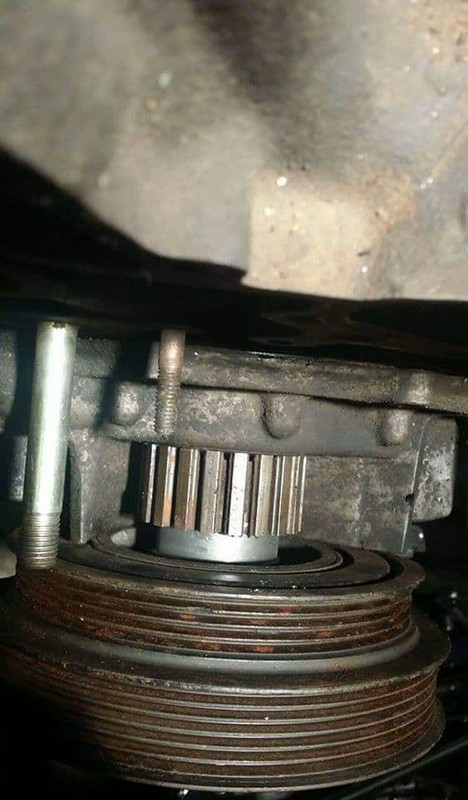


it looks like the pulley is too short but i dont have the timing belt shims in right now so it should be fine.
im probably gonna throw the heads onto the motor tomorrow and start lining up the accessories and seeing what else ill have to do in order for this pulley to work. if i do decide to use this pulley i will probably also remove a huge amount of material from it for weight reduction and then make some attempt to balance it to keep it from vibrating my engine apart and destroying my car.
Last edited by Nate Boslet; 05-14-2018 at 03:58 PM.
12-07-2016, 08:03 PM
#33
Member
Thread Starter
Join Date: Oct 2016
Posts: 284
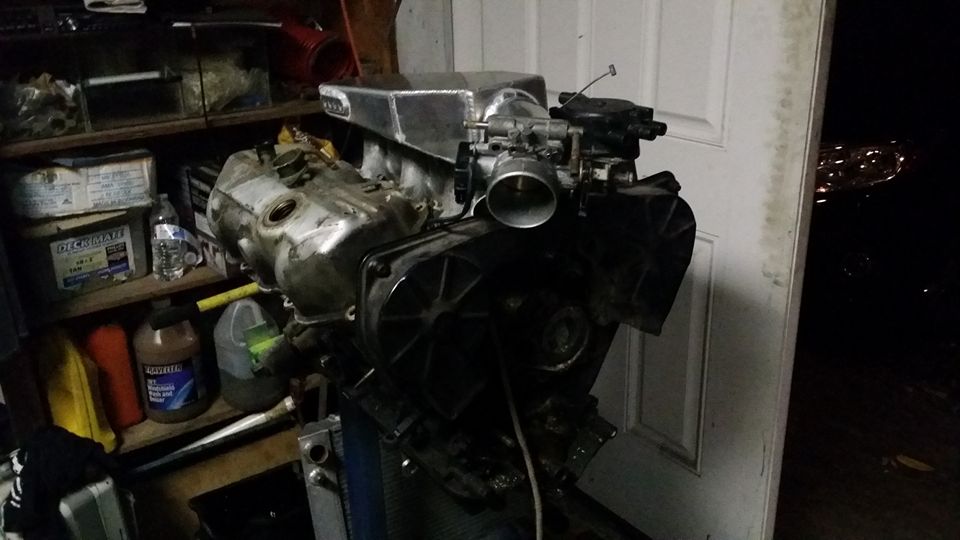
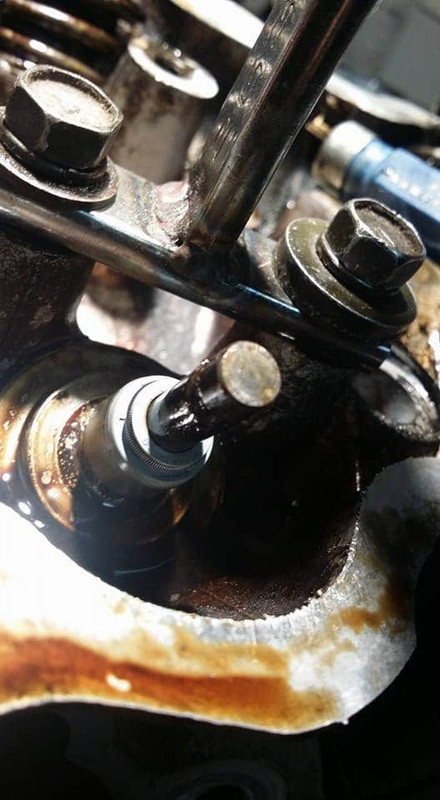
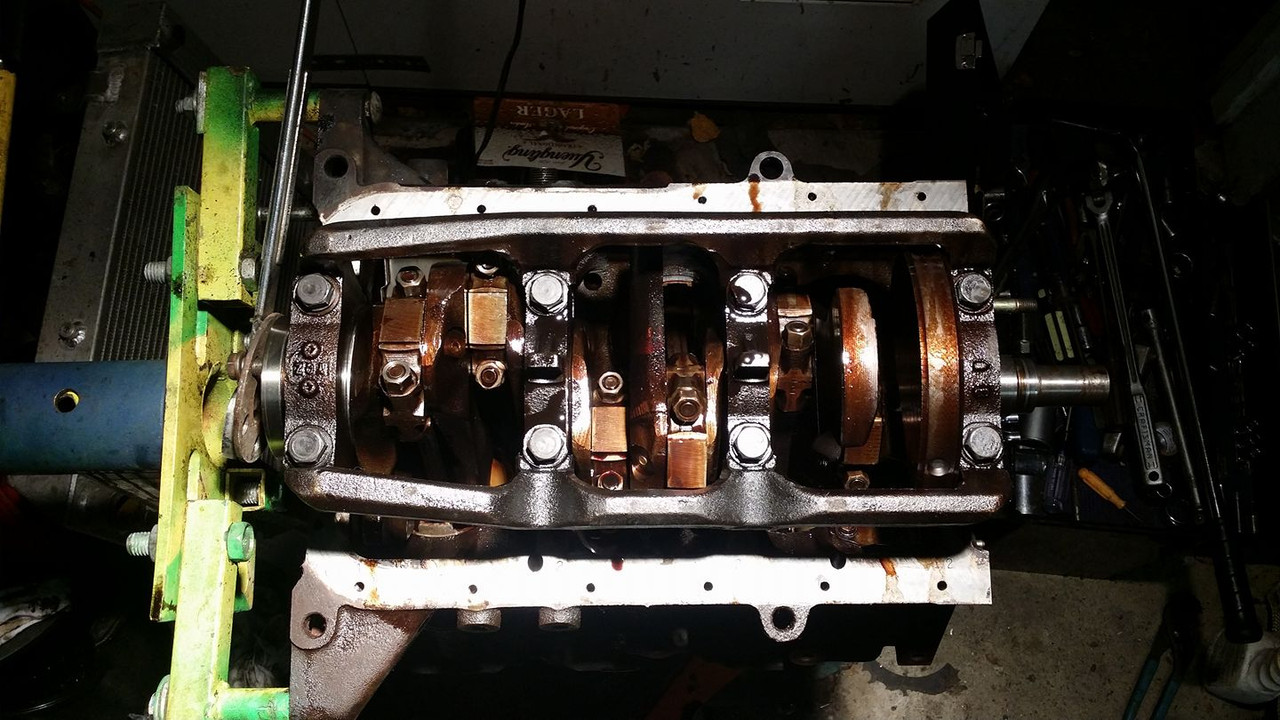
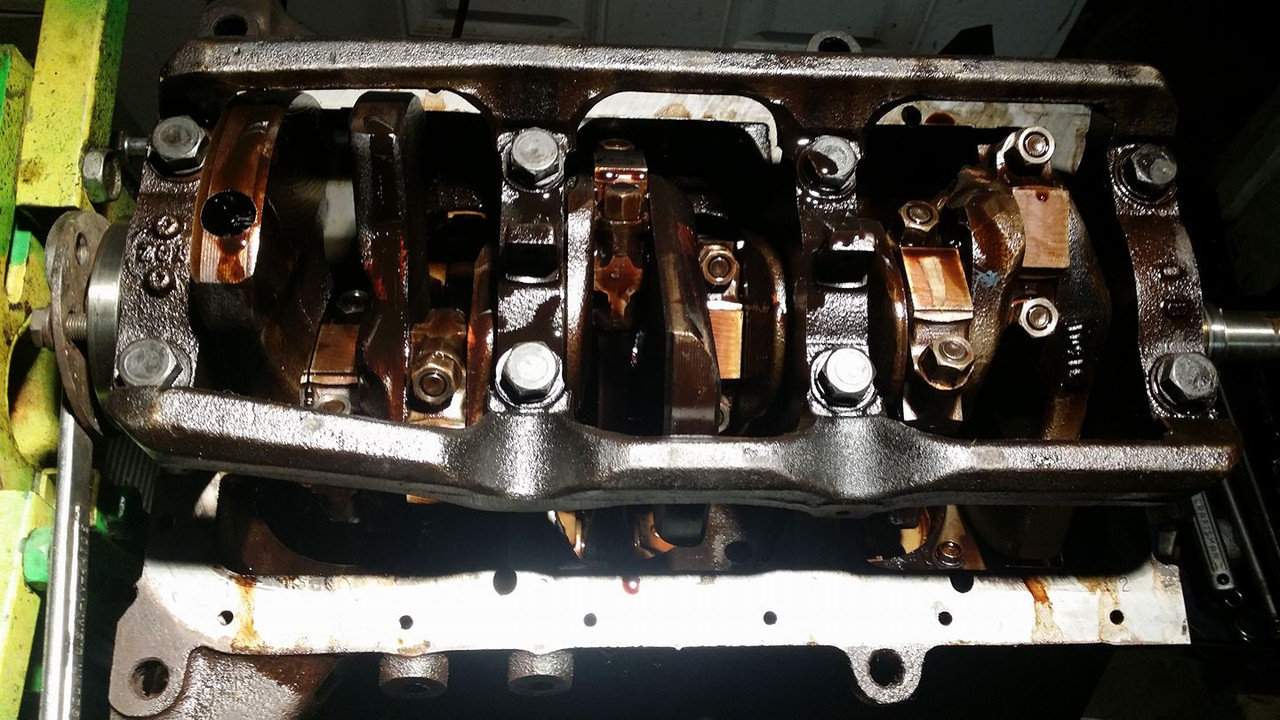
i got the heads torqued on using my z31 fsm.
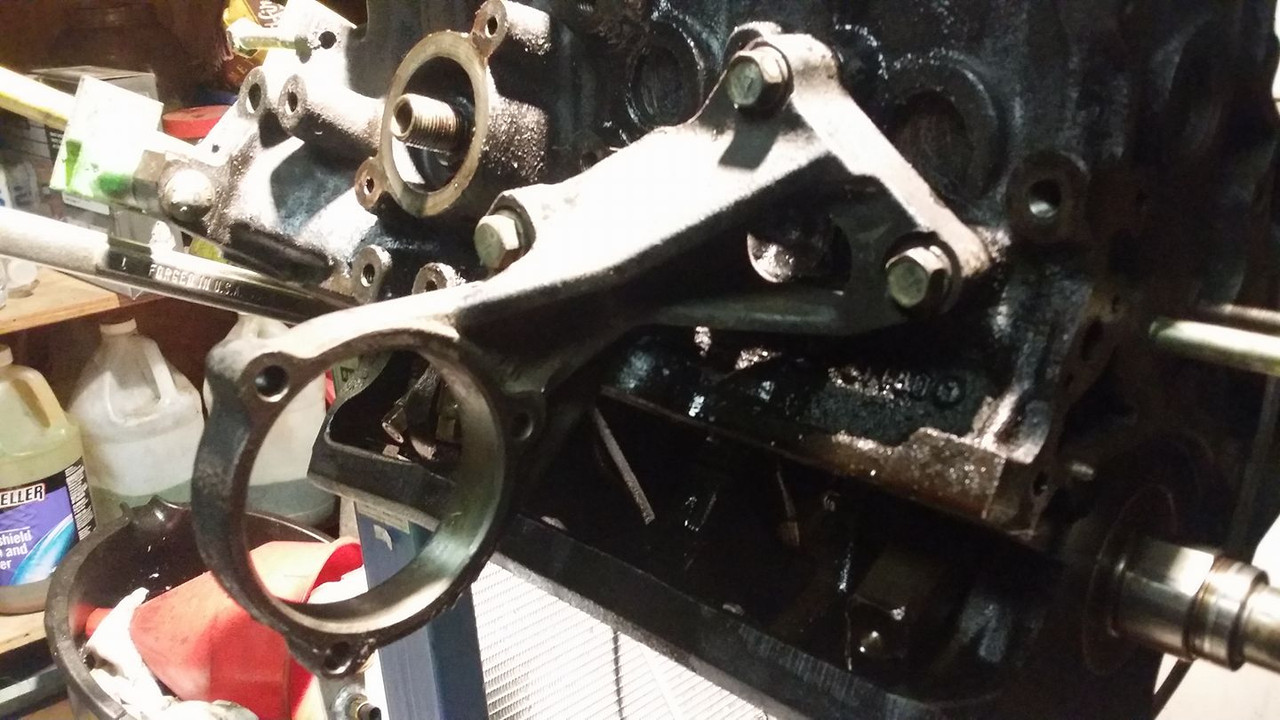
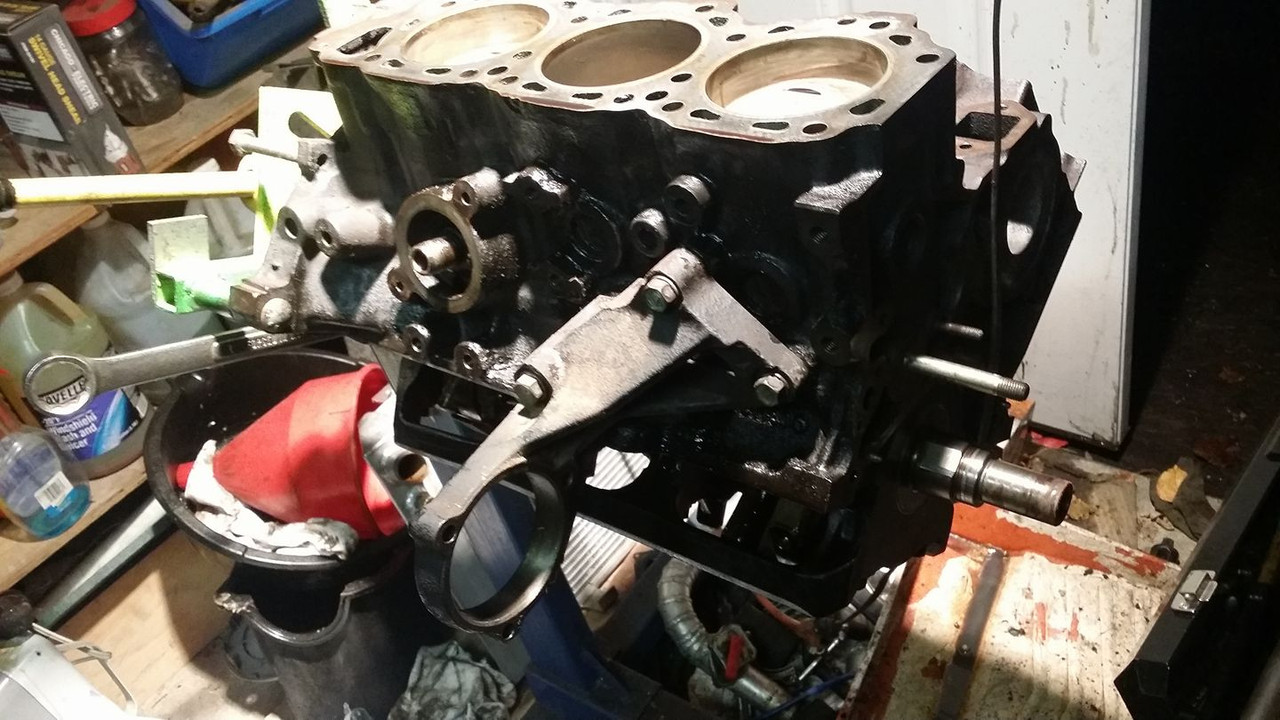
this is the intake ill be using, i threw the crank pulley and alternator bracket on to see where they line up and it looks like im in decent shape. i will probably be cutting off the ac compressor section of the bracket since i wont likely keep ac even though i would like to its probably going to be more trouble than its worth to me since here in pennsylvania summers aint all that hot.
this is the intake ill be using, i threw the crank pulley and alternator bracket on to see where they line up and it looks like im in decent shape. i will probably be cutting off the ac compressor section of the bracket since i wont likely keep ac even though i would like to its probably going to be more trouble than its worth to me since here in pennsylvania summers aint all that hot.
Last edited by Nate Boslet; 05-14-2018 at 03:58 PM.
12-09-2016, 06:05 PM
#34
Member
Thread Starter
Join Date: Oct 2016
Posts: 284
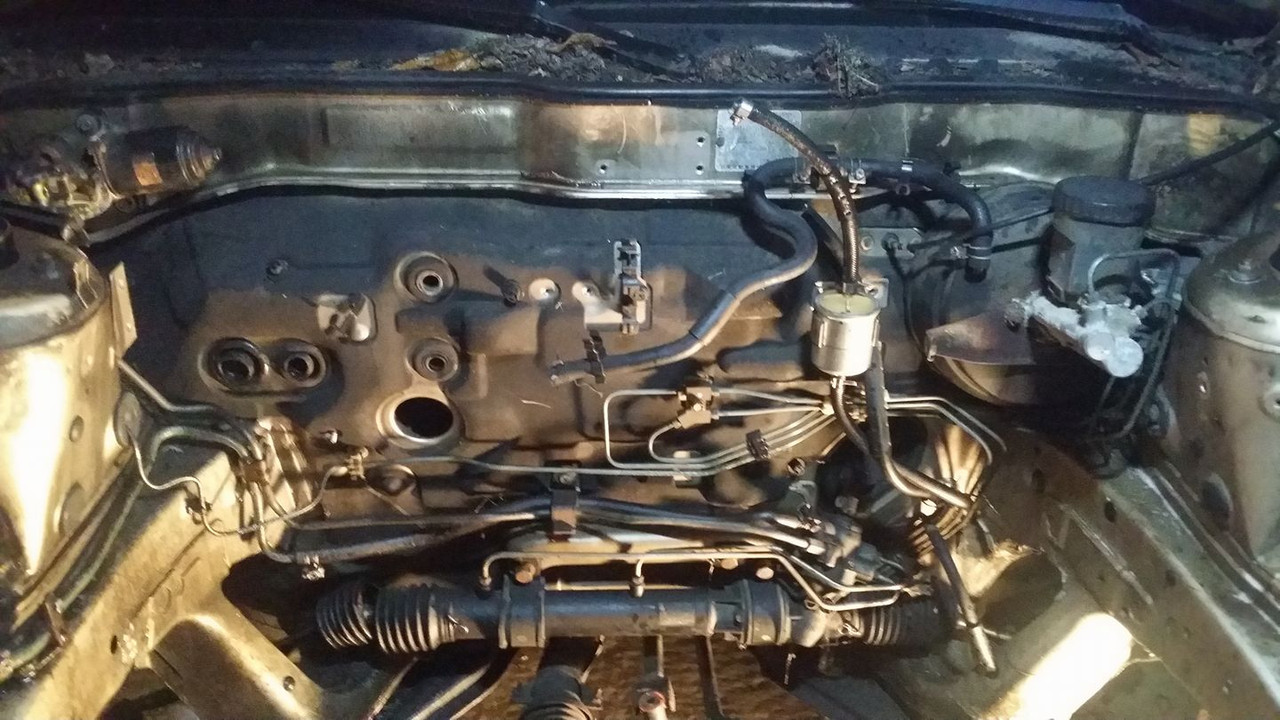
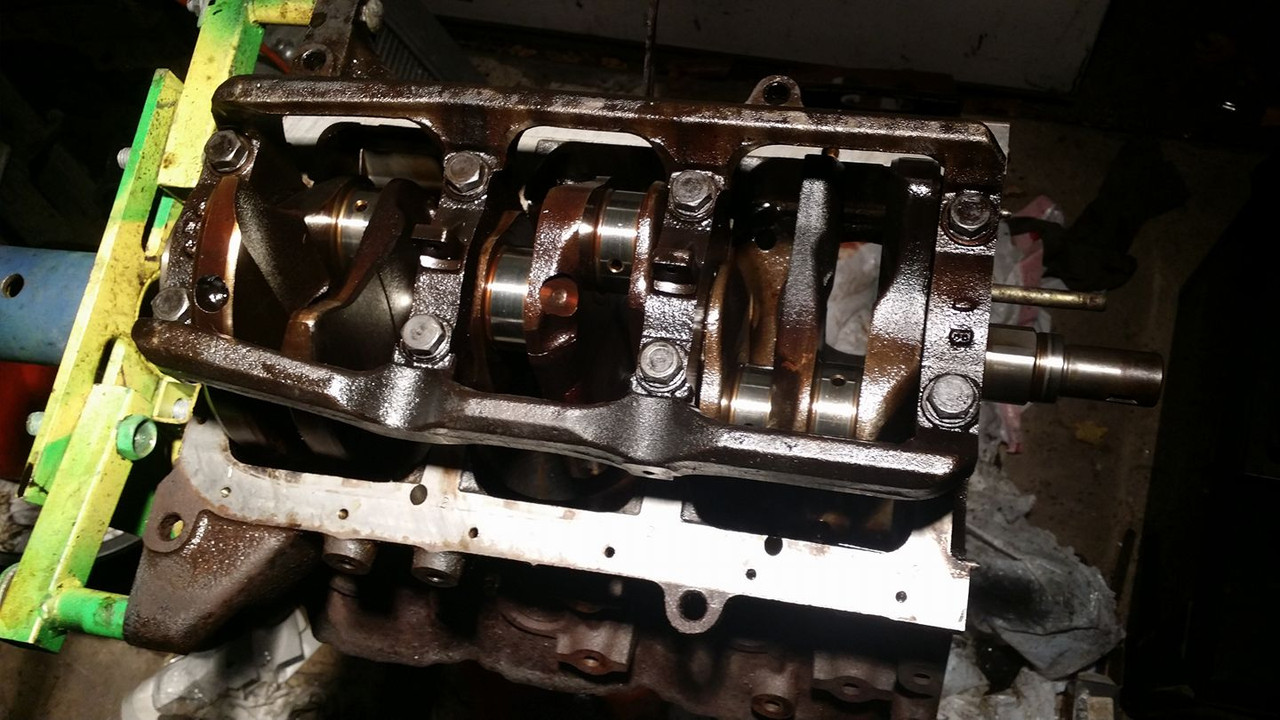
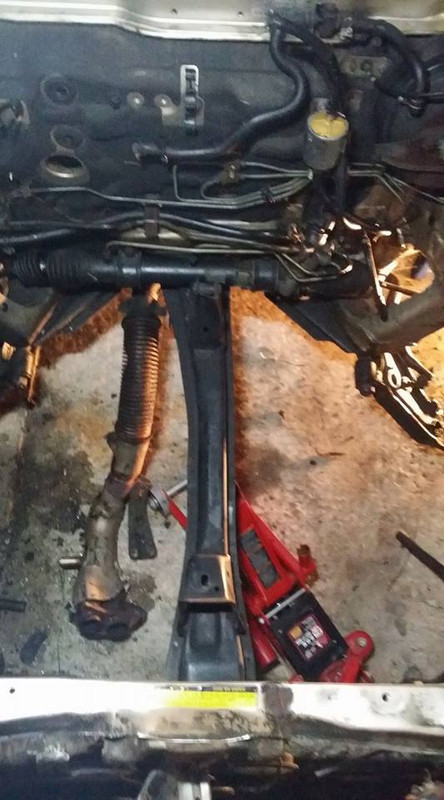
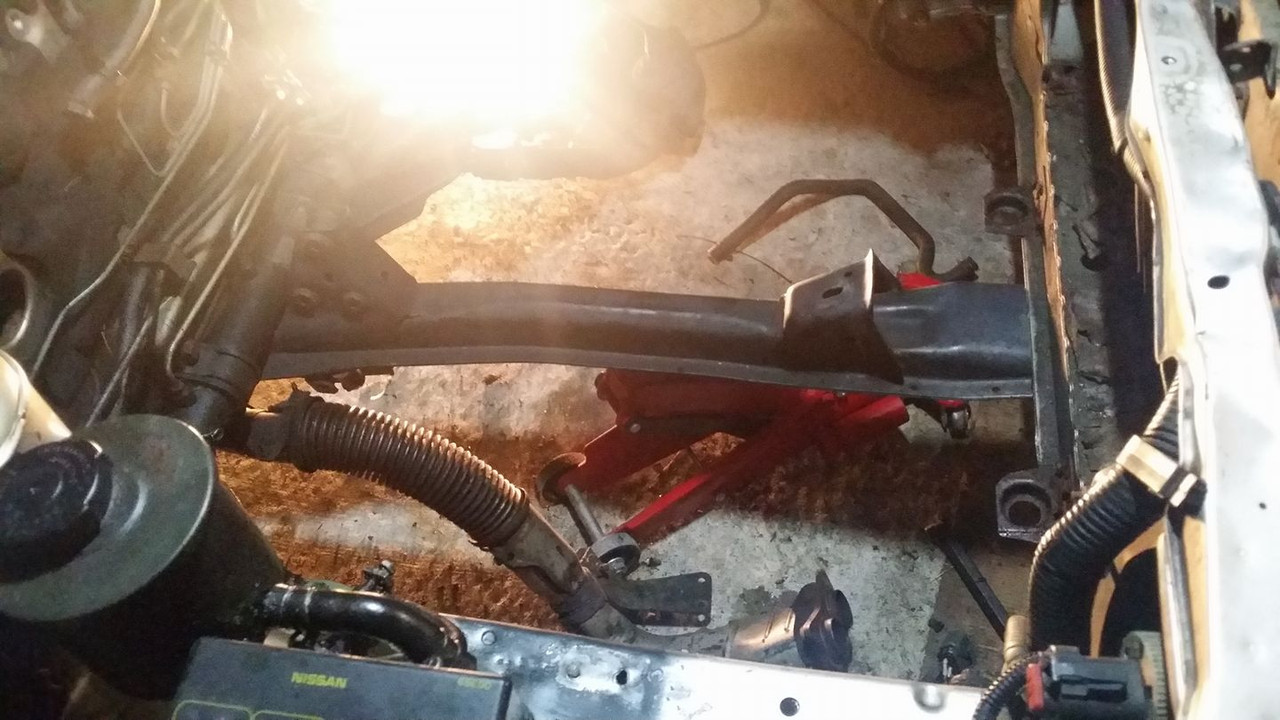
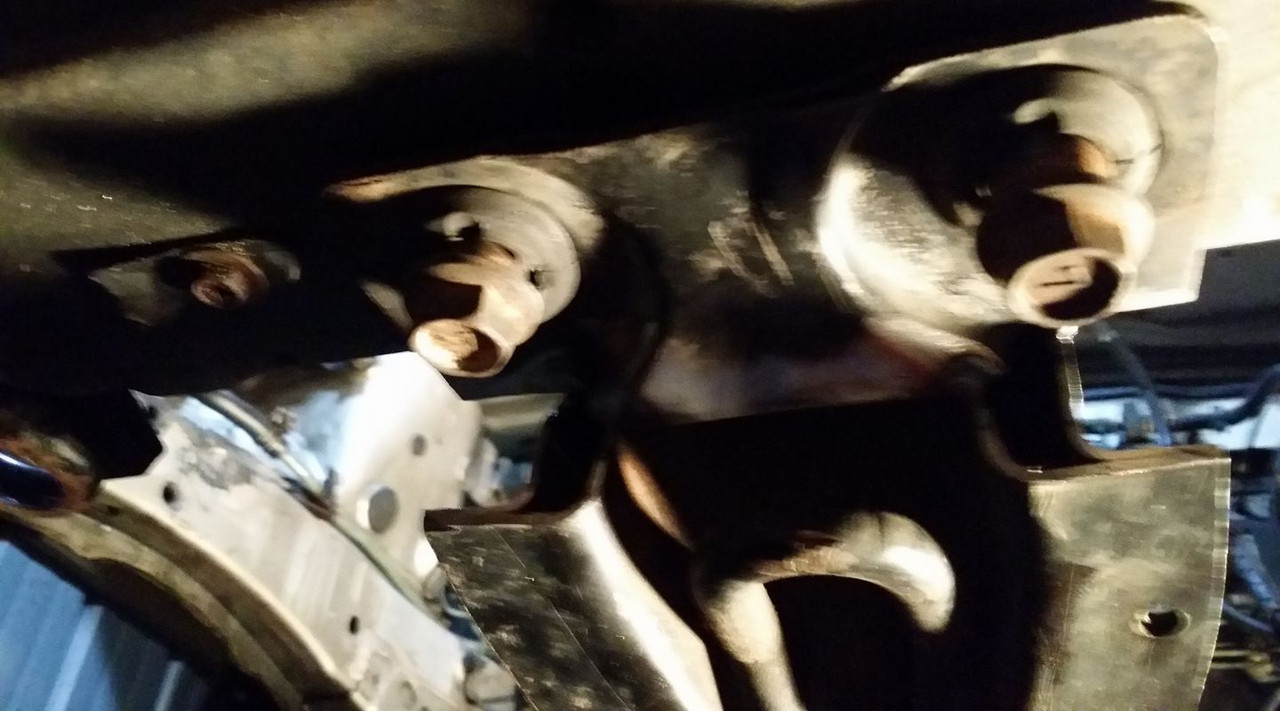
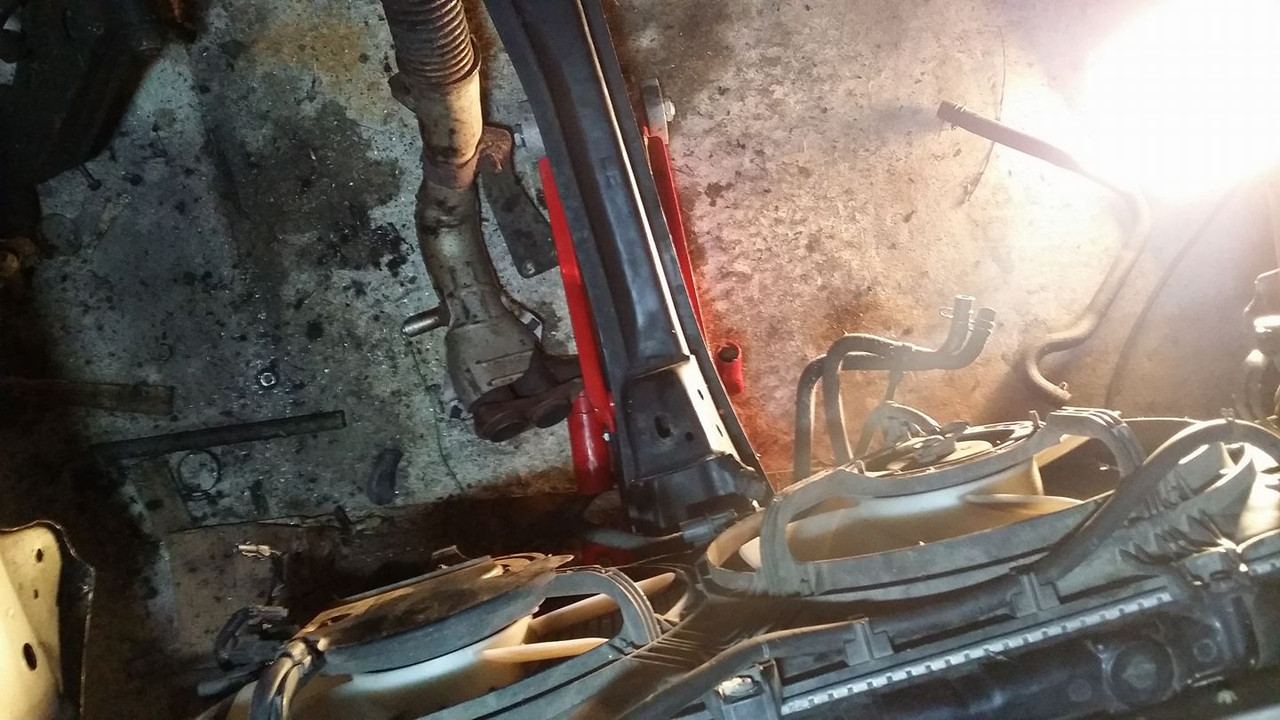
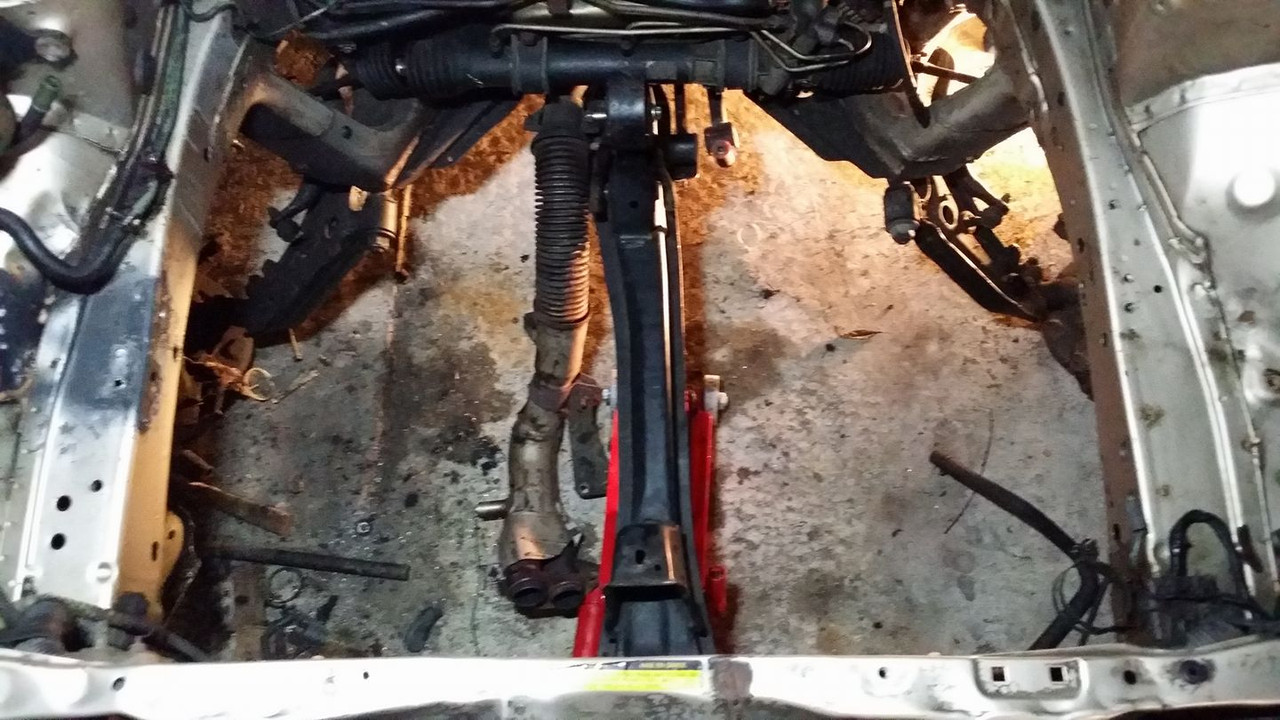
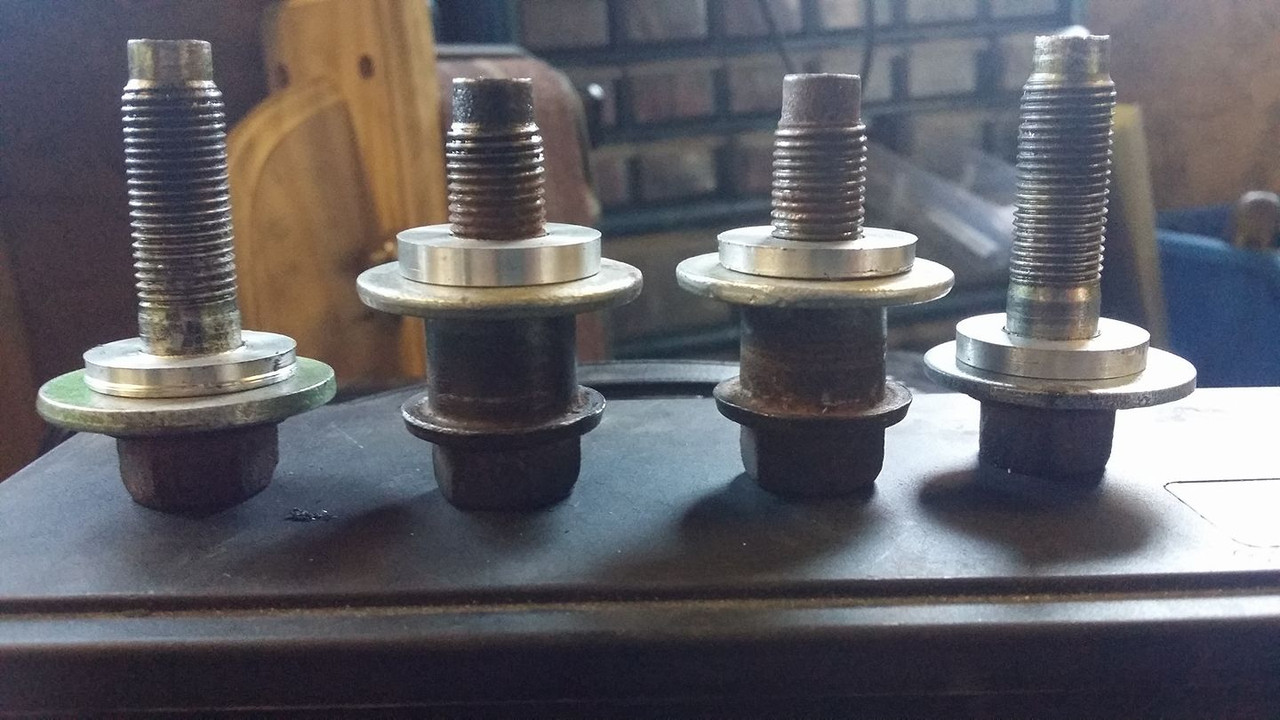
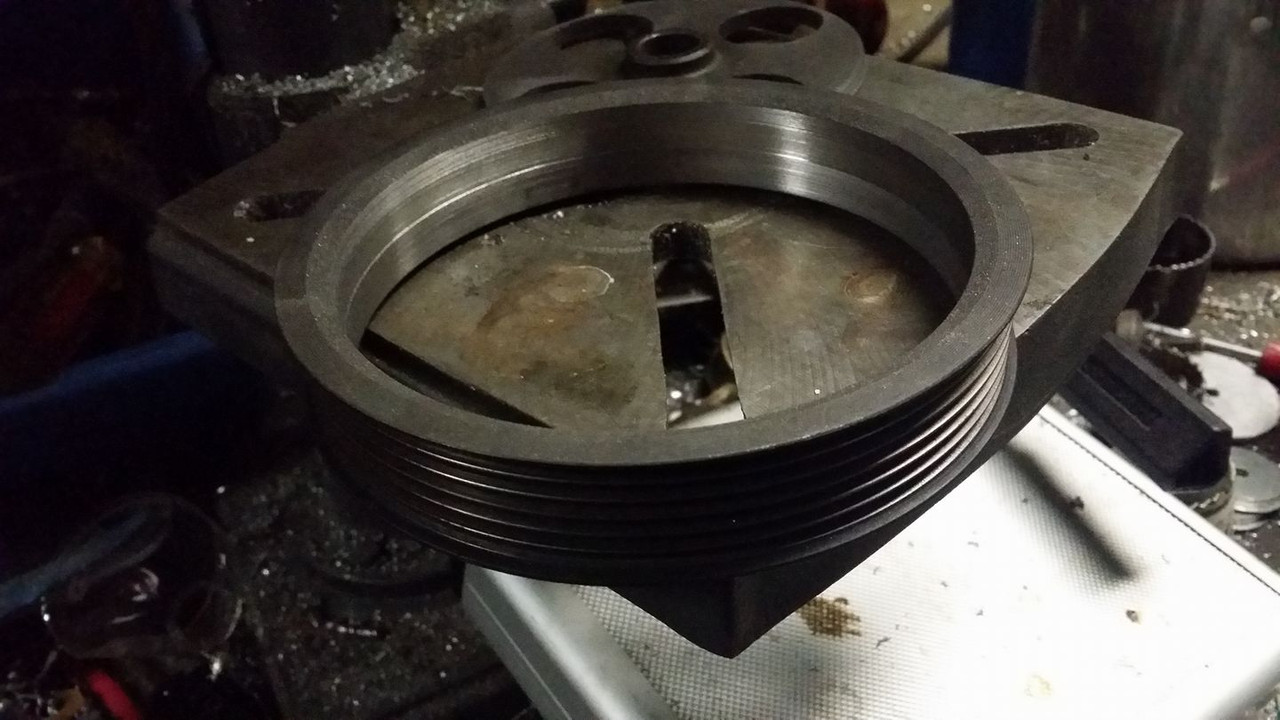
turned up some aluminum bushings to replace the blown out rubber ones. i will replace these specialty bolts with regular ones that dont need extra washers and stuff at some point but for now the crossmember is in and isnt going anywhere without a fight. the holes in the front part of the crossmember are ovular, i assume this is so the body of the car is able to flex without destroying the bushing but idk, i dont think the slack in there will create any problems but ill address them when they arise if it does.


sorry about the blurry pictures.
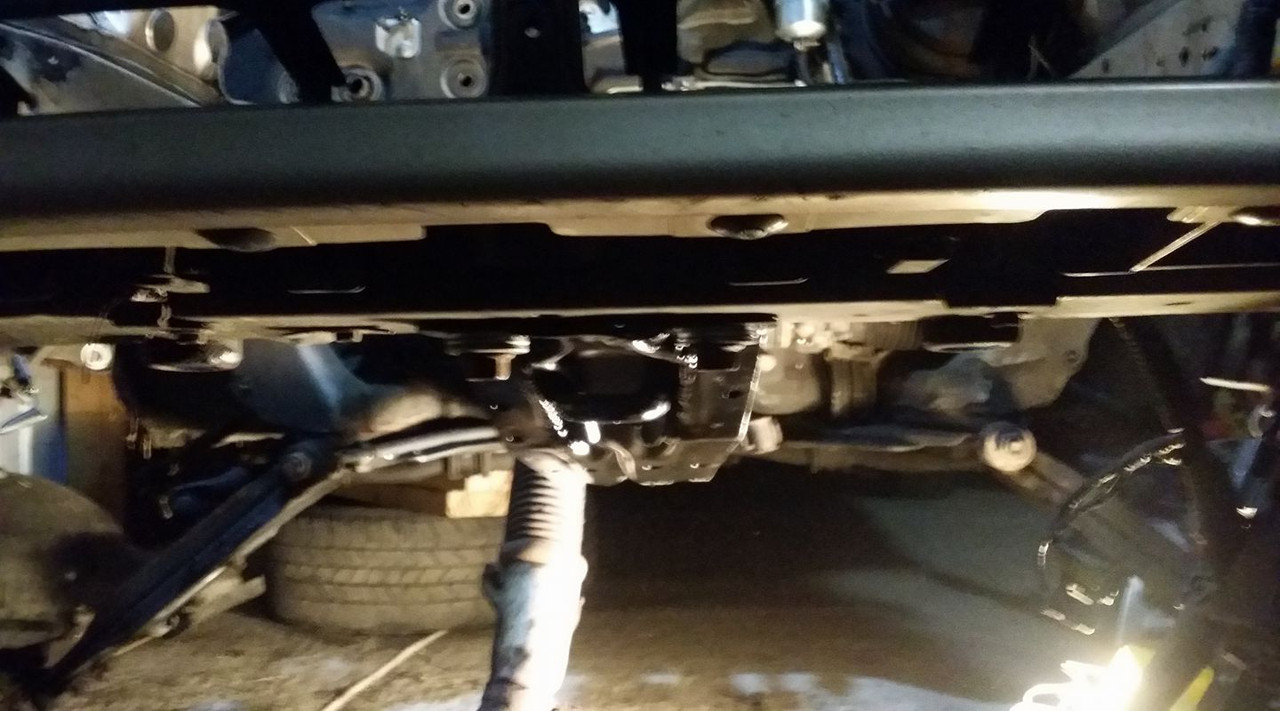
clearance from the crossmember to the inside of the hood is around 25 inches, this is slightly tighter than i initially expected but i think i can squeeze in there, i may end up with a hoist very soon so ill be able to find out then.
i decided to rip off that insulating panel on the firewall and deleted the power steering since i dont feel like doing the things i would need to do in order to retain it and grease packing the rack is gonna be easy as **** and free. i already did it on my z and it feels great, plus its one less thing to leak which is one of the main goals of this swap because this car used to hold fluids like a wasted white girl on friday night.
sorry about the blurry pictures.
clearance from the crossmember to the inside of the hood is around 25 inches, this is slightly tighter than i initially expected but i think i can squeeze in there, i may end up with a hoist very soon so ill be able to find out then.
i decided to rip off that insulating panel on the firewall and deleted the power steering since i dont feel like doing the things i would need to do in order to retain it and grease packing the rack is gonna be easy as **** and free. i already did it on my z and it feels great, plus its one less thing to leak which is one of the main goals of this swap because this car used to hold fluids like a wasted white girl on friday night.
Last edited by Nate Boslet; 05-14-2018 at 03:59 PM.
 12-11-2016, 12:19 AM
#36
Member
Thread Starter
Join Date: Oct 2016
Posts: 284
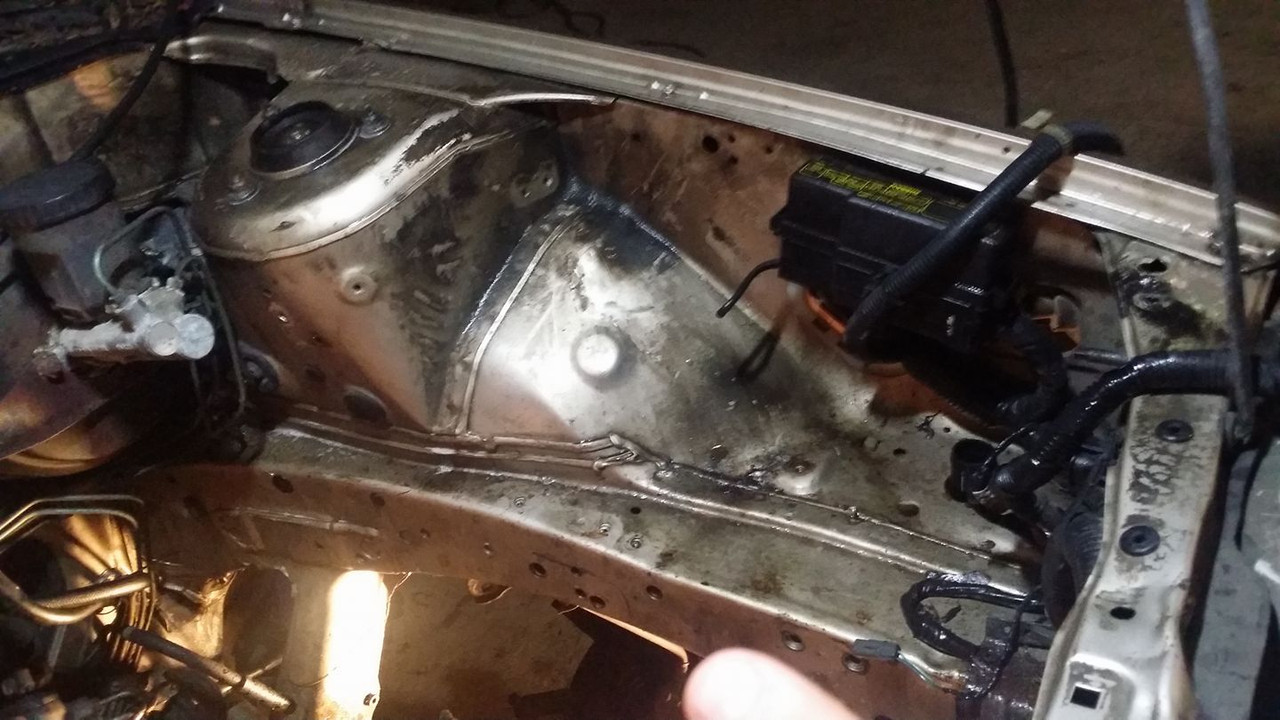
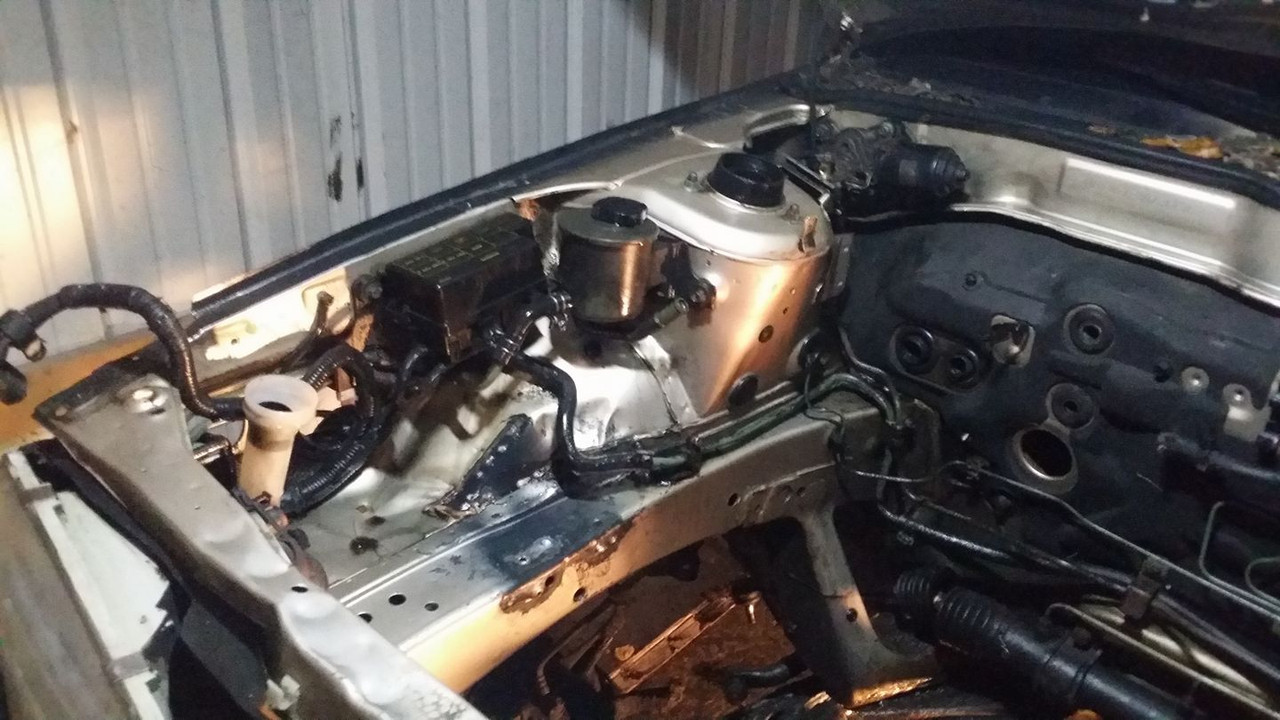
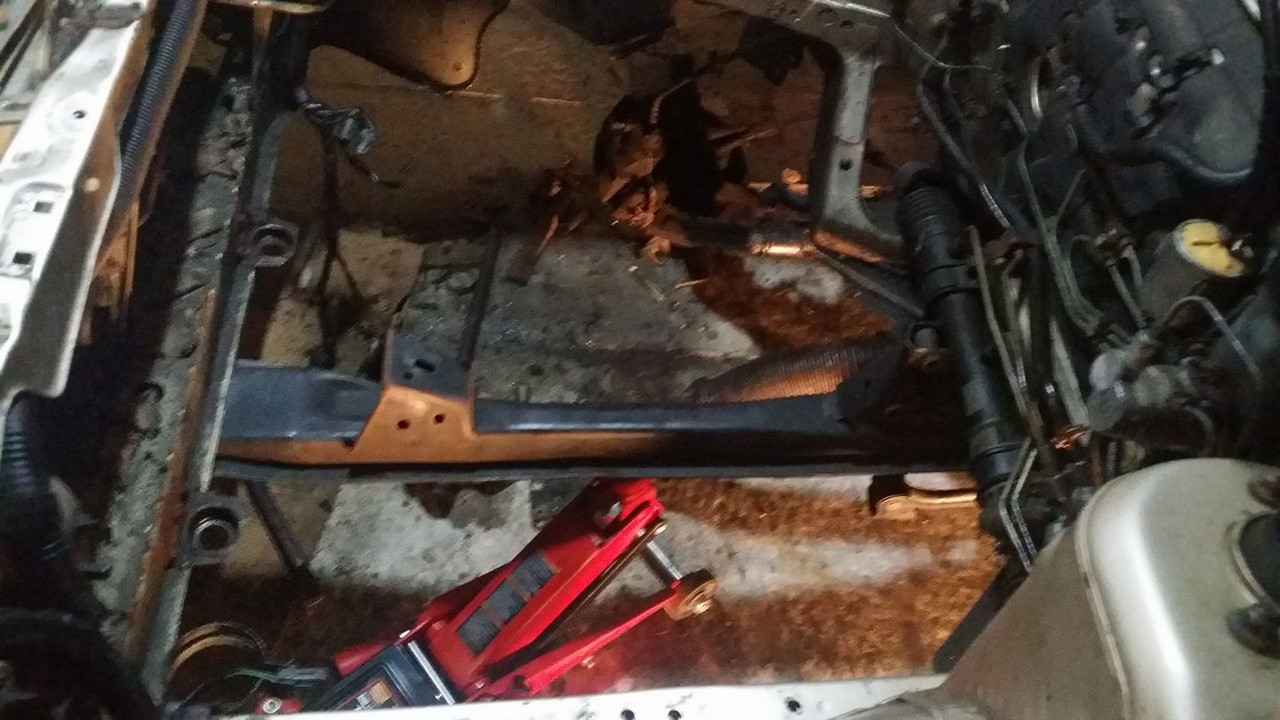
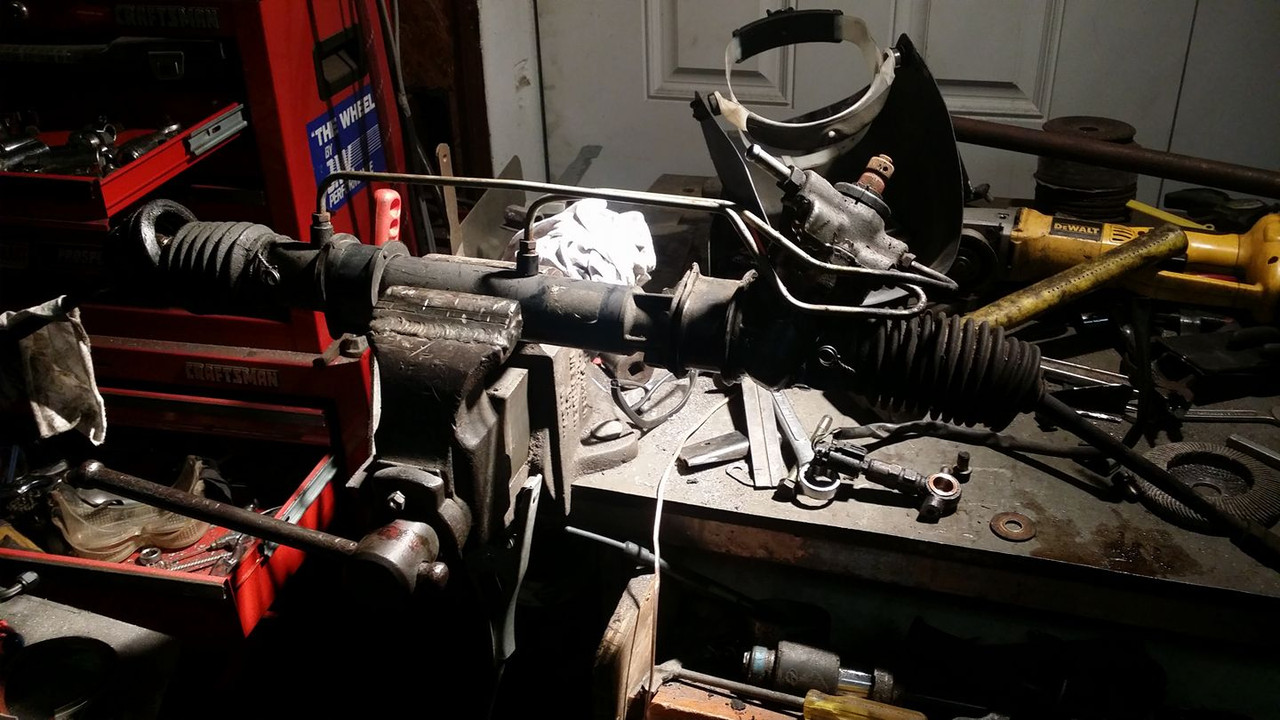
did some more cleaning on the firewall after i pulled the rack. i didnt go too crazy on the lower area of the bay because its probably not going to be all that visible anyway and its gonna get very dirty without getting cleaned again for a long time anyway unless i decide to make a splash guard or something (i wont)
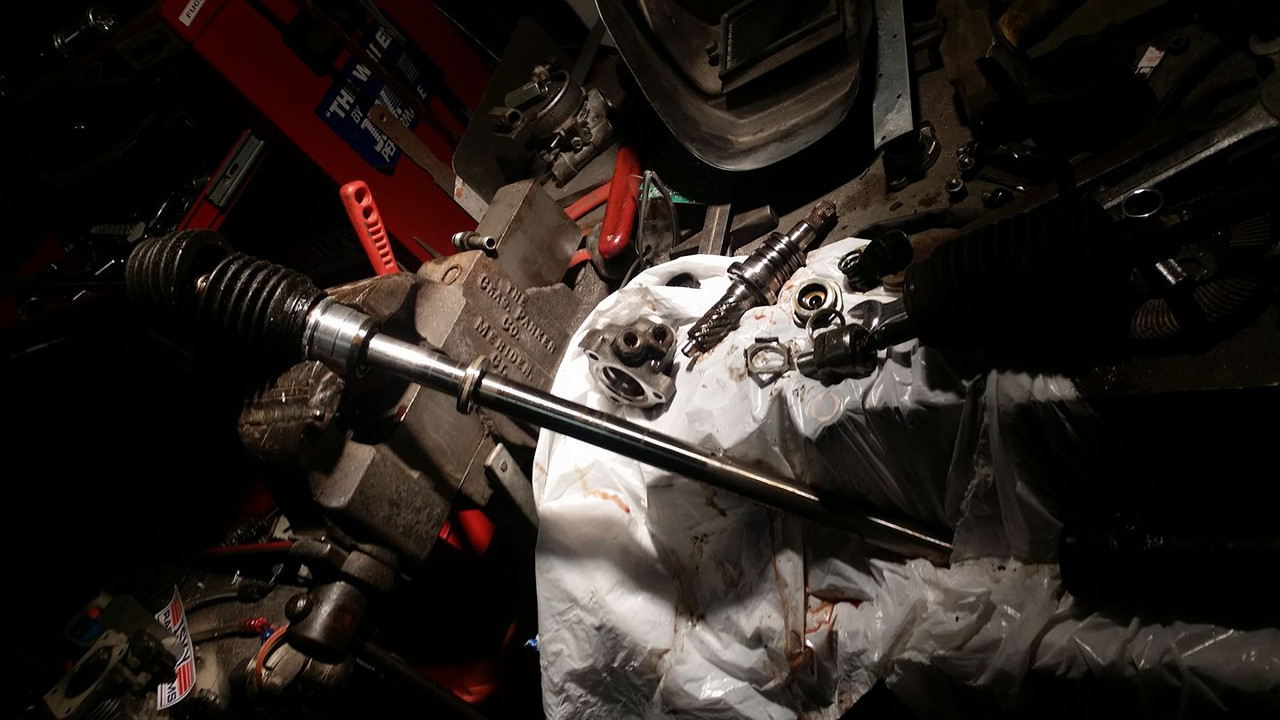
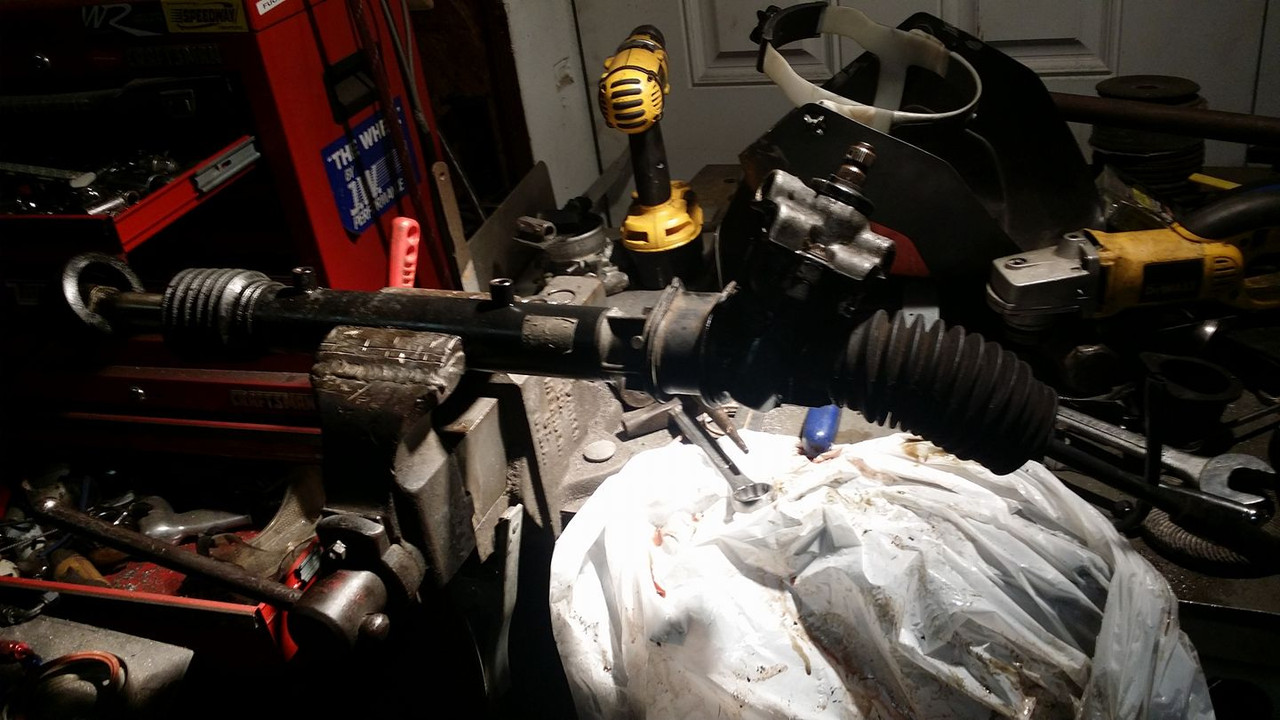
as i said earlier i decided i was going to delete my power steering, some people would just loop the lines, some people might just take the belt off of the pump (those people are heathens) but i want my steering to be good so i actually converted my rack to a manual one.
this is the writeup i followed: http://www.nicoclub.com/archives/how...eringrack.html
but just in case that link dies ill go through the steps anyway. ive done this on z31 steering racks as well and they are basically identical so i assume maxima racks are the same as well. i might have slightly high expectations but in my opinion just about anyone can do this.
first thing you want to do is pull all the lines and fittings out and get as much of the fluid out as you can (you will not get it all out yet)
next youre gonna pull off the rubber cap and the 3 bolts that hold the pinion shaft in, you do not need a special socket for these funny looking bolts.

the pinion shaft and bearings will just pull out once the cap is off. there is a super thin spring washer (at least mine was super thin) so be careful not to lose/damage it.
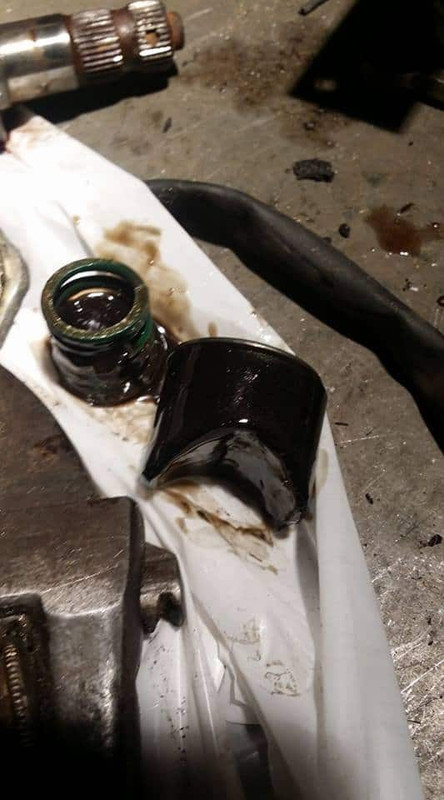
it looks like there is dirt or something in my rack but its actually grease and power steering fluid mixed together, the inside of the rack was surprisingly immaculate.
next youre going to take out the preload adjustment nut, make sure you loosen the huge lock nut first.
then remove the spring and pad.
under that there will be a washer and the preload bushing.
i didnt take pictures of what i had to do to take the inner tie rod off but basically all you have to do is pry back a retainer and use two wrenches to unscrew it.
once that is off you have to unscrew the end cap and the whole rack will slide out. the end cap is retained with an indent that ripped a bunch of threads off of mine and made pulling it of a full body workout, this may have been avoidable but i didnt notice until it was off. i dont think there is much you can do about it but consider this your opportunity to try i guess lol
an empty tube.
this seal is what you want to remove from the rack. both times ive done this i cut through it with an abrasive disc and chiseled it apart until it escapes the groove its in and can be slid off (i have no idea how they get this thing on here like that)
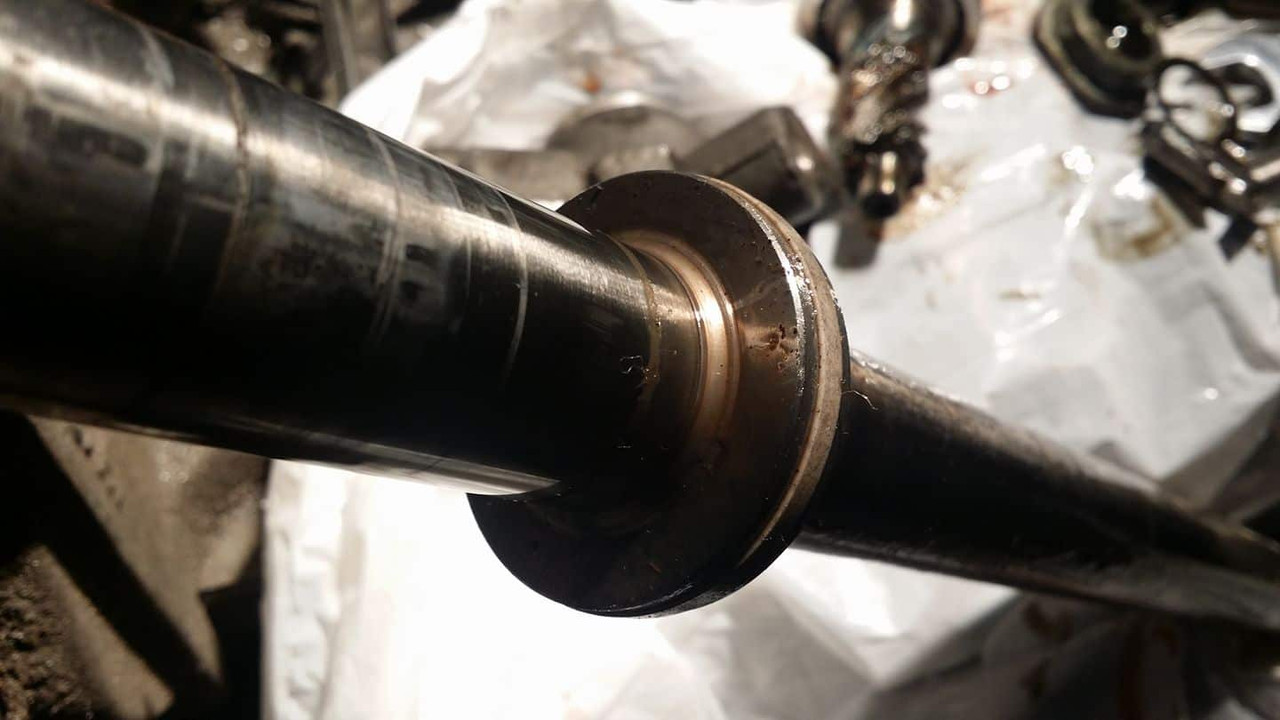
dont worry about scratching up the rack here, this area of the rack will never see a seal again, after the piston has been cut off of it it will just float inside the rack between the driver and passenger seals.
here is the piston after i got done with it. you can see the inner ring that sits in the left groove and there is another clip that sits in the right groove but i couldnt tell you how either of them get in there.
once the piston is off you can just throw everything back together the same way you took it apart and readjust your preload if you have to.
once the rack is back together you have to plug up all holes and pack it with grease. i didnt get to that tonight but i plan to weld up most of the holes and leave one or two i can use to add grease to the rack. ill probably do something about that torn boot at some point before reinstalling the rack as well.
as i said earlier i decided i was going to delete my power steering, some people would just loop the lines, some people might just take the belt off of the pump (those people are heathens) but i want my steering to be good so i actually converted my rack to a manual one.
this is the writeup i followed: http://www.nicoclub.com/archives/how...eringrack.html
but just in case that link dies ill go through the steps anyway. ive done this on z31 steering racks as well and they are basically identical so i assume maxima racks are the same as well. i might have slightly high expectations but in my opinion just about anyone can do this.
first thing you want to do is pull all the lines and fittings out and get as much of the fluid out as you can (you will not get it all out yet)
next youre gonna pull off the rubber cap and the 3 bolts that hold the pinion shaft in, you do not need a special socket for these funny looking bolts.
the pinion shaft and bearings will just pull out once the cap is off. there is a super thin spring washer (at least mine was super thin) so be careful not to lose/damage it.
it looks like there is dirt or something in my rack but its actually grease and power steering fluid mixed together, the inside of the rack was surprisingly immaculate.
next youre going to take out the preload adjustment nut, make sure you loosen the huge lock nut first.
then remove the spring and pad.
under that there will be a washer and the preload bushing.
i didnt take pictures of what i had to do to take the inner tie rod off but basically all you have to do is pry back a retainer and use two wrenches to unscrew it.
once that is off you have to unscrew the end cap and the whole rack will slide out. the end cap is retained with an indent that ripped a bunch of threads off of mine and made pulling it of a full body workout, this may have been avoidable but i didnt notice until it was off. i dont think there is much you can do about it but consider this your opportunity to try i guess lol
an empty tube.
this seal is what you want to remove from the rack. both times ive done this i cut through it with an abrasive disc and chiseled it apart until it escapes the groove its in and can be slid off (i have no idea how they get this thing on here like that)
dont worry about scratching up the rack here, this area of the rack will never see a seal again, after the piston has been cut off of it it will just float inside the rack between the driver and passenger seals.
here is the piston after i got done with it. you can see the inner ring that sits in the left groove and there is another clip that sits in the right groove but i couldnt tell you how either of them get in there.
once the piston is off you can just throw everything back together the same way you took it apart and readjust your preload if you have to.
once the rack is back together you have to plug up all holes and pack it with grease. i didnt get to that tonight but i plan to weld up most of the holes and leave one or two i can use to add grease to the rack. ill probably do something about that torn boot at some point before reinstalling the rack as well.
Last edited by Nate Boslet; 05-14-2018 at 04:00 PM.
12-13-2016, 07:20 PM
#37
Member
Thread Starter
Join Date: Oct 2016
Posts: 284
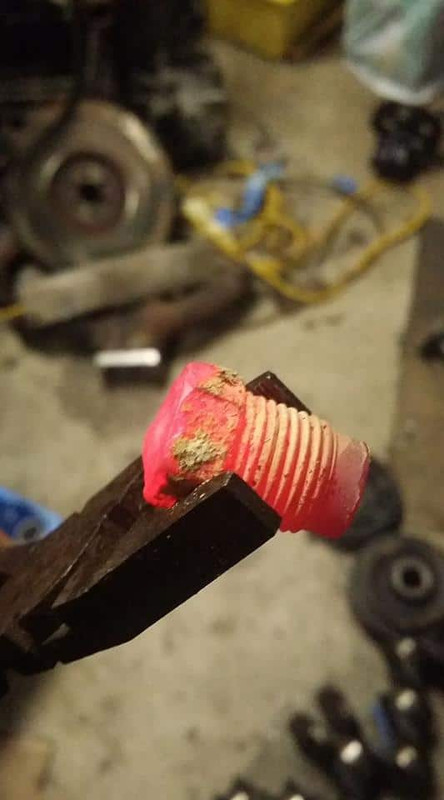
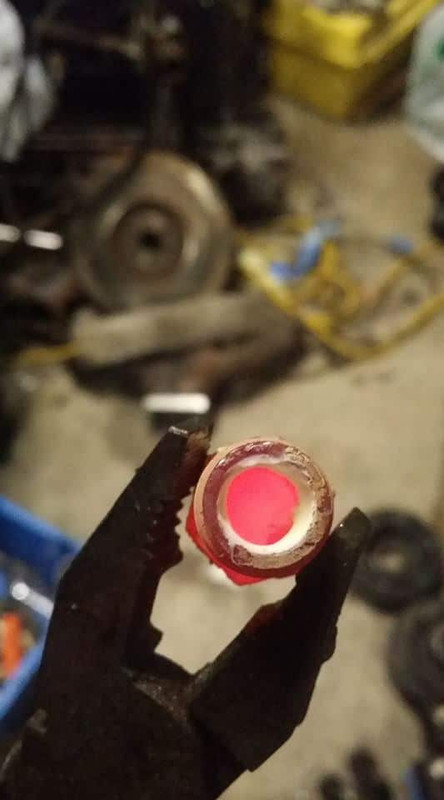
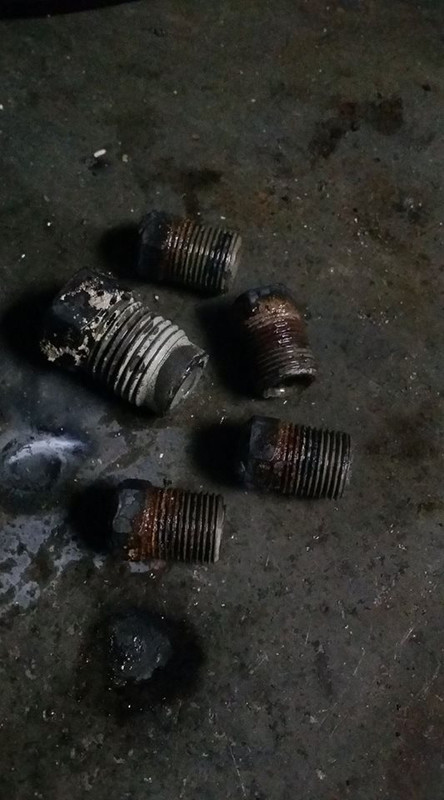
this is how i made the plugs for my steering rack. welded the tops of the pressure fittings closed, easy and free.
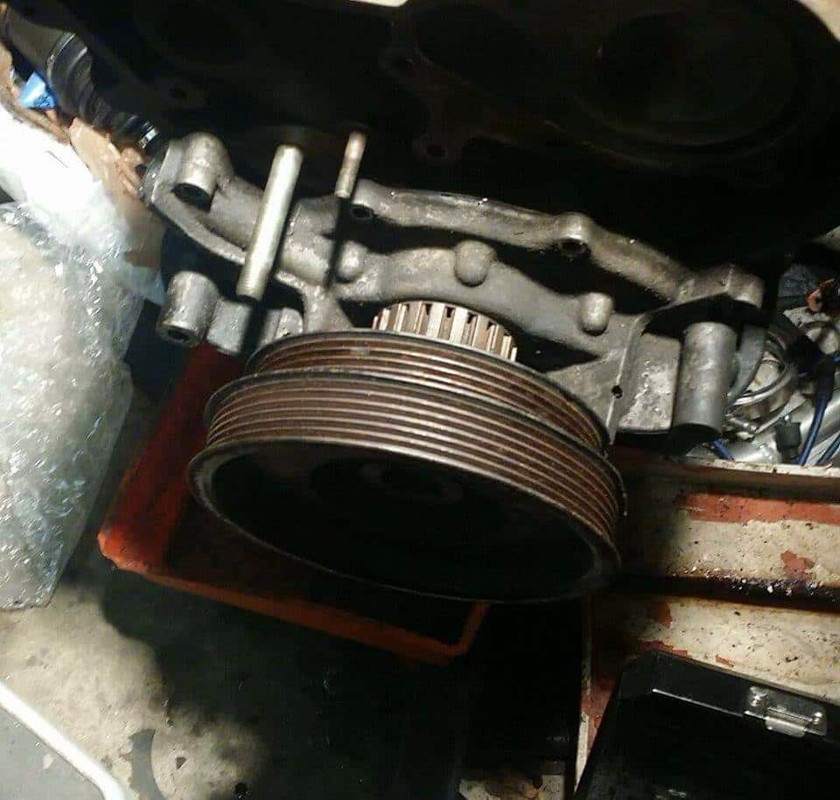
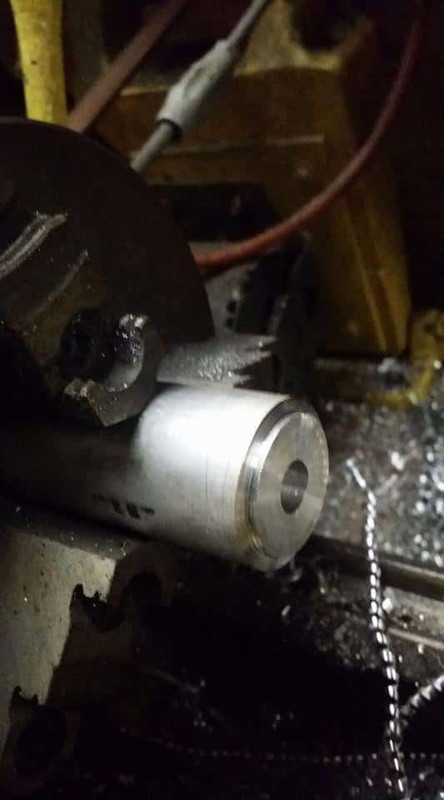
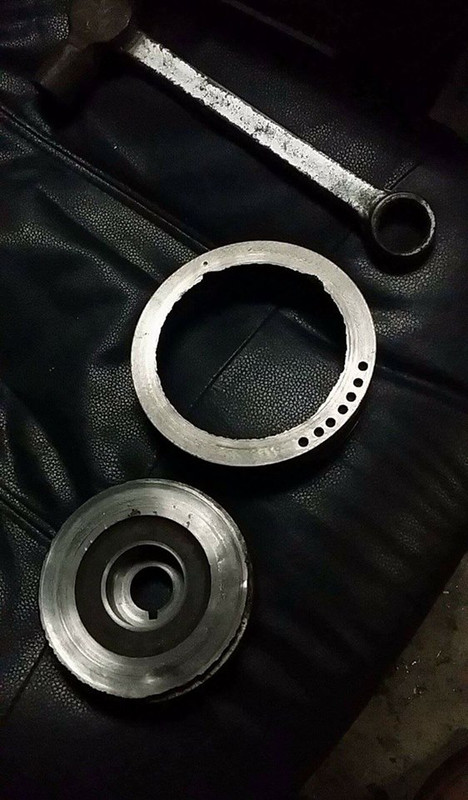
next i decided to begin the process of making a waterpump pulley. this might not turn out to work but i already had everything i needed to try and i had the time so why not.
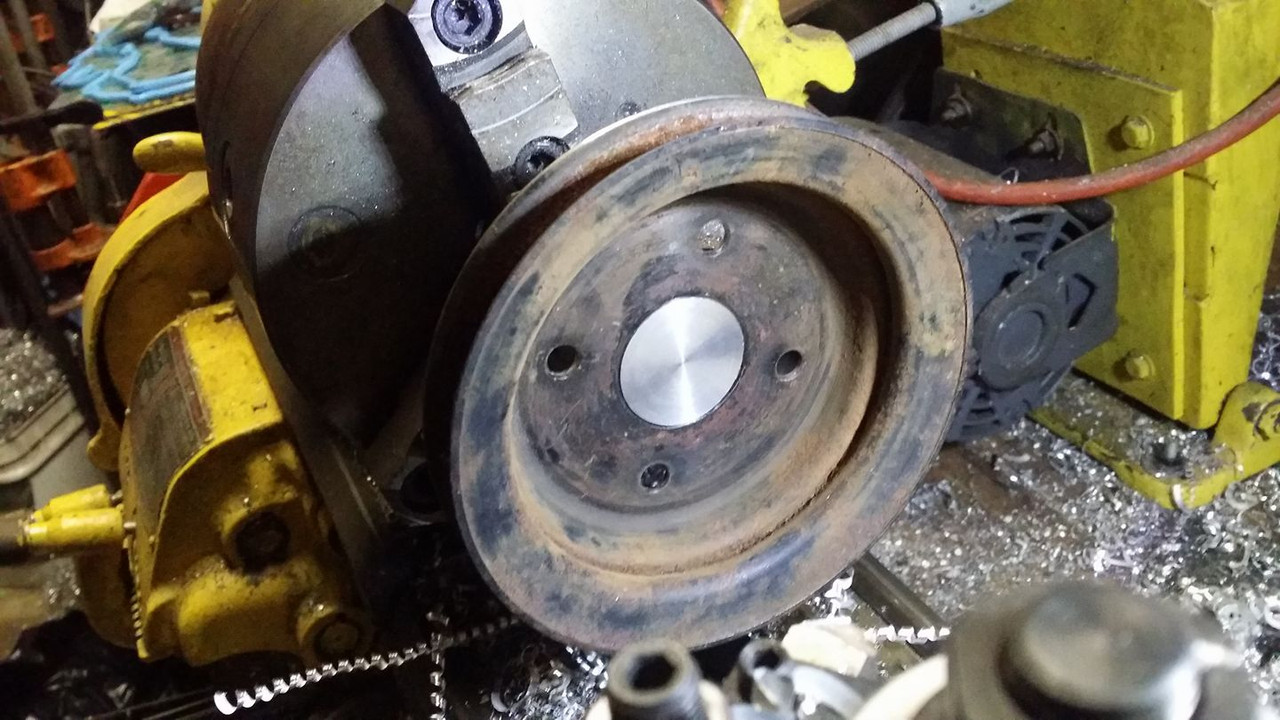
the 6 rib pulley came from the stanzas power steering pump.

the vbelt pulley from the z31.

it looked like the vbelt pulley was centric to its inner hole so i recreated it on some stock i had lying around to keep the pulley on center while i turned down the outer diameter.
then i drilled and tapped a hole for a retainer
next was the 6 rib, this thing was extremely hard, idk wtf its made of, cast iron or cast steel or what but it took me like an hour to turn it all out and i went through several high speed bits before i found some carbide i could use to finish it off. i expect it to weld like total **** too.. but i didnt get to that today.

once i could hear the material was thin enough i pulled it off the lathe and smacked it with a hammer to break it loose.
turned the inside to its final diameter.
then i turned the waterpump pulley from the z31 down to the same diameter with a few thousandths for a slip fit.
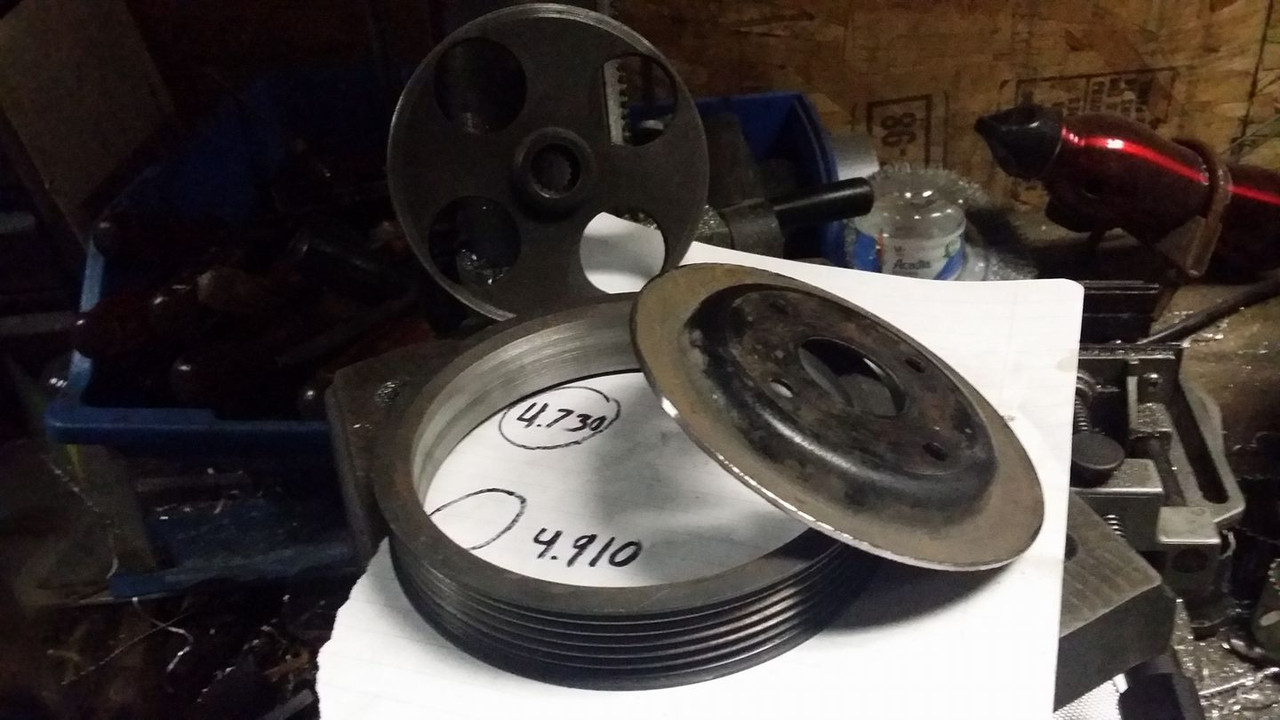
tomorrow i will get everything in place and start doing some lining up. i will also turn down my crank pulley until that is much lighter and also has a single 6 rib area. all im going to end up running on this car is the waterpump and alternator and once everything is complete ill take a belt measurement and get me a belt. i look forward to never hearing belt slip in this car ever even one time.
next i decided to begin the process of making a waterpump pulley. this might not turn out to work but i already had everything i needed to try and i had the time so why not.
the 6 rib pulley came from the stanzas power steering pump.
the vbelt pulley from the z31.
it looked like the vbelt pulley was centric to its inner hole so i recreated it on some stock i had lying around to keep the pulley on center while i turned down the outer diameter.
then i drilled and tapped a hole for a retainer
next was the 6 rib, this thing was extremely hard, idk wtf its made of, cast iron or cast steel or what but it took me like an hour to turn it all out and i went through several high speed bits before i found some carbide i could use to finish it off. i expect it to weld like total **** too.. but i didnt get to that today.
once i could hear the material was thin enough i pulled it off the lathe and smacked it with a hammer to break it loose.
turned the inside to its final diameter.
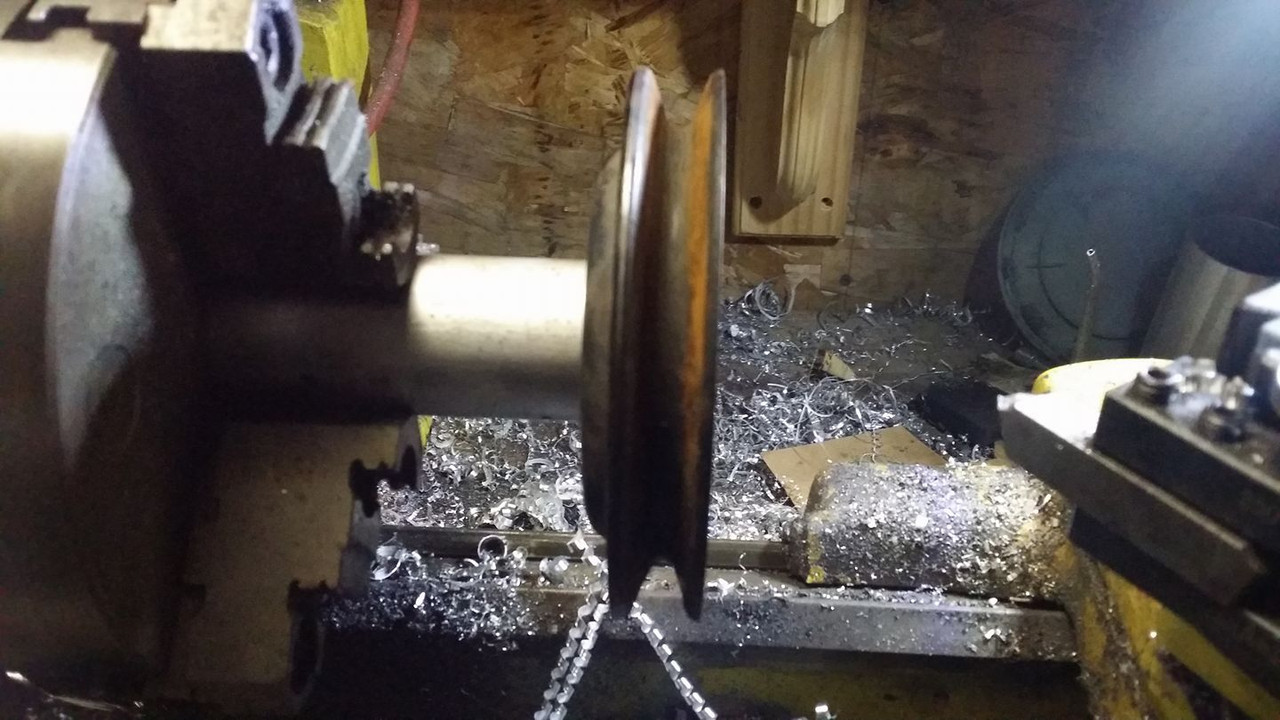
then i turned the waterpump pulley from the z31 down to the same diameter with a few thousandths for a slip fit.
tomorrow i will get everything in place and start doing some lining up. i will also turn down my crank pulley until that is much lighter and also has a single 6 rib area. all im going to end up running on this car is the waterpump and alternator and once everything is complete ill take a belt measurement and get me a belt. i look forward to never hearing belt slip in this car ever even one time.
Last edited by Nate Boslet; 05-14-2018 at 04:01 PM.
12-15-2016, 06:29 PM
#38
Member
Thread Starter
Join Date: Oct 2016
Posts: 284
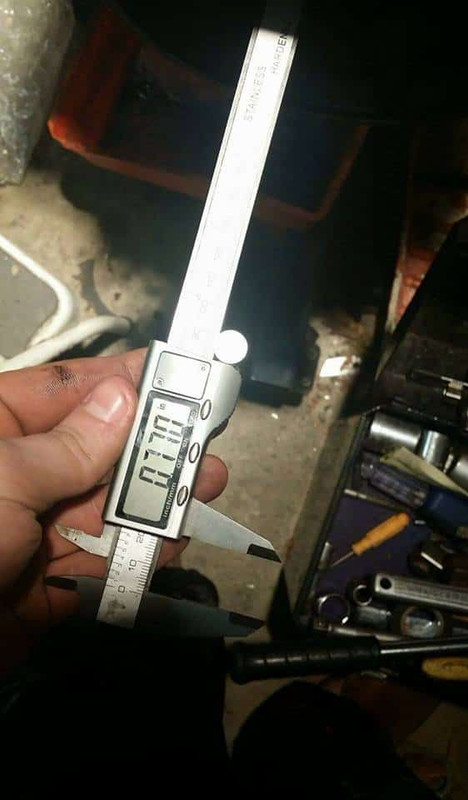
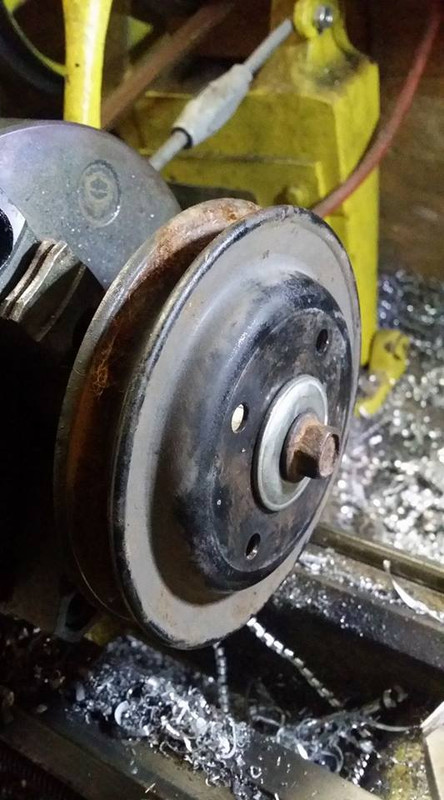
i welded up the pulley and as expected the PS pump pulley is cast iron and welded like **** but it should hold fine, i may make a completely new aluminum one at some point idk, i made sure to pre and post heat to give the welds the best chance of holding up but who knows.
the pulley does however line up perfectly, i took measurements with my calipers and turned down the shank on that piece of stock i used to cut the pulley down until it was exactly the correct length to hold the pulley at the height i wanted it and then tacked it up and chain welded it alternating sides to reduce warping. it still warped slightly but not enough to hurt anything (i hope)

next i threw the crank pulley on the lathe and started turning the fron pulley down. i the inside turned down so easy i really didnt expect much trouble but i could barely make more than a .010 cut per pass WITH CARBIDE. idk if its because its 10 degrees in my garage or if my hurt *** lathe just cant do it but this might take me a little (9999 times) longer than i thought...
so thats what ill be doing tomorrow and maybe the next day or week lol once i have my hoist ill bring everything to my garage anyway and get a few pics of the engine in the car.
the pulley does however line up perfectly, i took measurements with my calipers and turned down the shank on that piece of stock i used to cut the pulley down until it was exactly the correct length to hold the pulley at the height i wanted it and then tacked it up and chain welded it alternating sides to reduce warping. it still warped slightly but not enough to hurt anything (i hope)
next i threw the crank pulley on the lathe and started turning the fron pulley down. i the inside turned down so easy i really didnt expect much trouble but i could barely make more than a .010 cut per pass WITH CARBIDE. idk if its because its 10 degrees in my garage or if my hurt *** lathe just cant do it but this might take me a little (9999 times) longer than i thought...
so thats what ill be doing tomorrow and maybe the next day or week lol once i have my hoist ill bring everything to my garage anyway and get a few pics of the engine in the car.
Last edited by Nate Boslet; 05-14-2018 at 04:01 PM.
12-19-2016, 02:51 PM
#39
Member
Thread Starter
Join Date: Oct 2016
Posts: 284
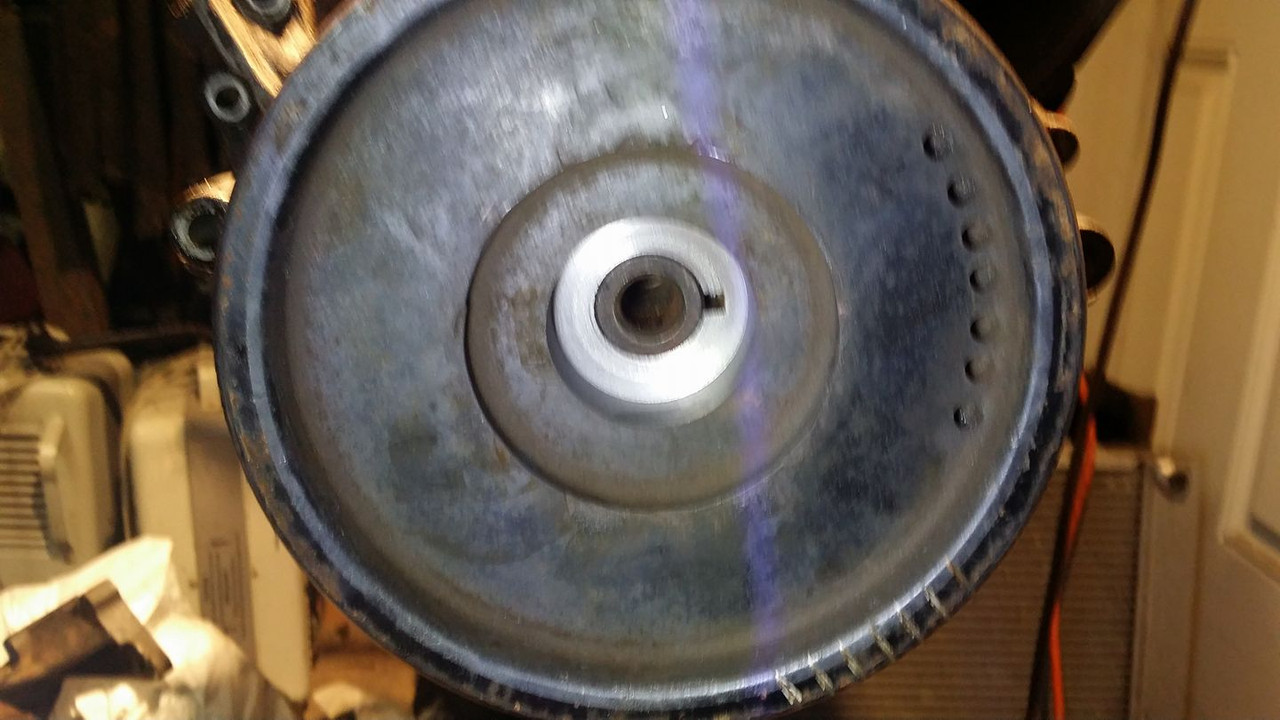
whelp...
things were going pretty good at first, i got my outer diameter turned down and began facing down the extra material thickness i didnt want.

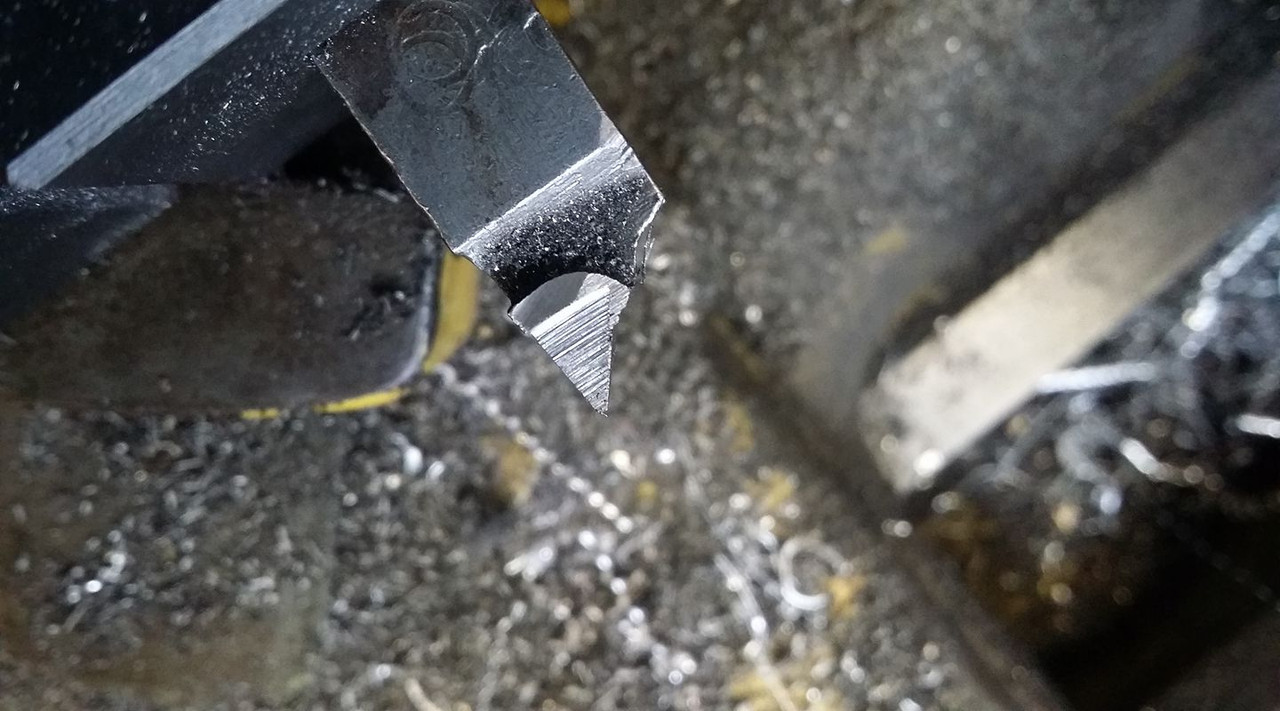
HSS was basically dulling the instant it touched this pulley so i knew i would have to use carbide tools but all the ones i have are basically scrap i got in a lot buy off of ebay so i had to come up with some way of sharpening them. i found this diamond wheel lying around and made up a little holder for it and used my lathe to basically grind whatever angles i wanted by holding the tool in my post holder and grinding the faces against the wheel.
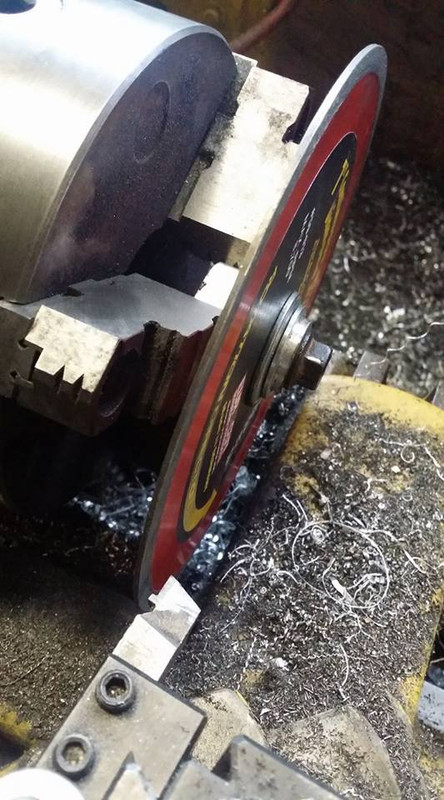
worked a champ. didnt leave the best surface finish but it ate through it faster than you would expect anything to eat through carbide.
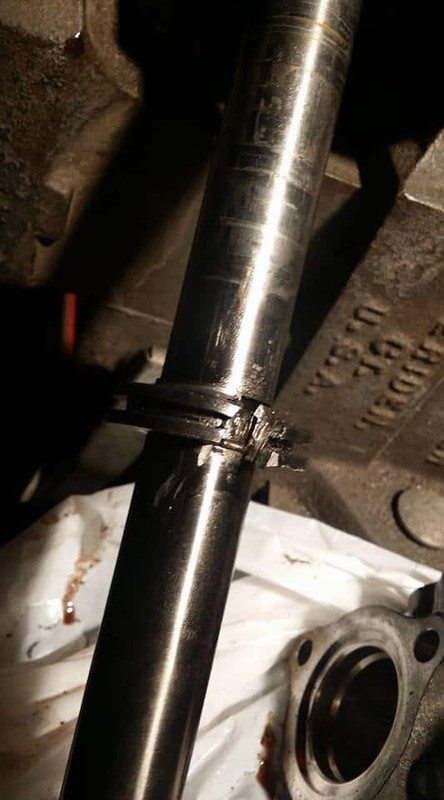
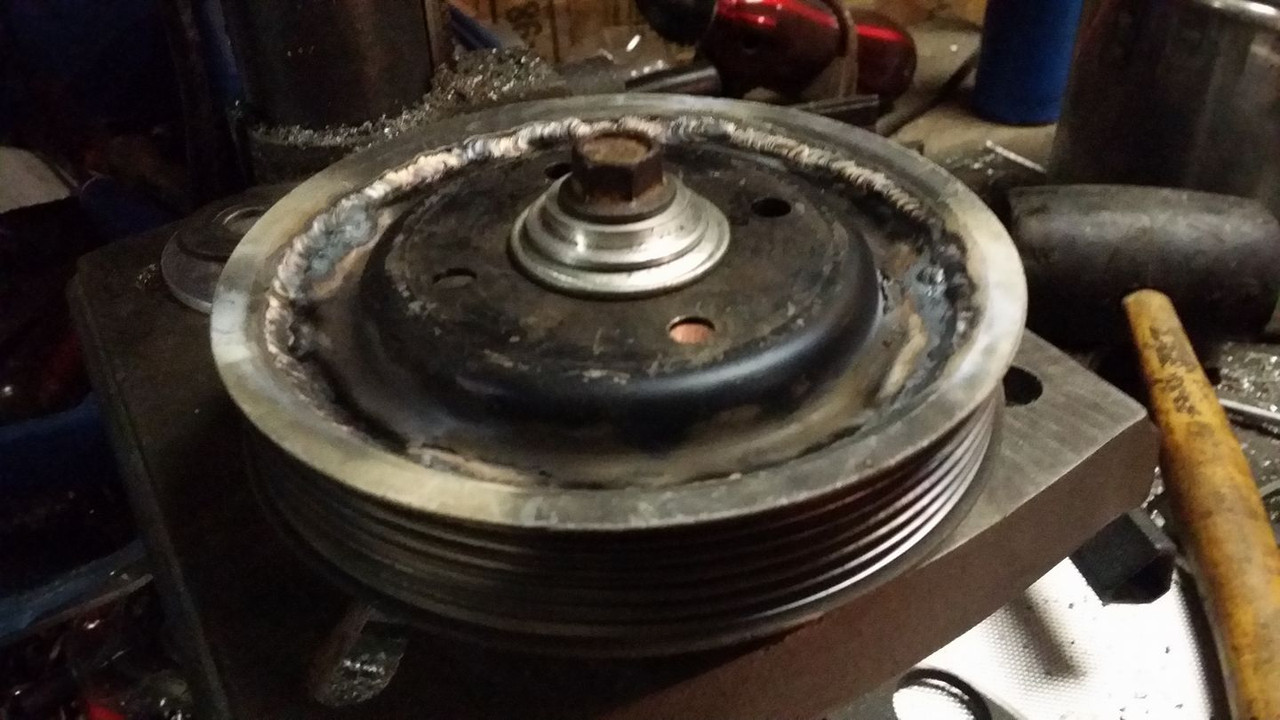
then this happened.
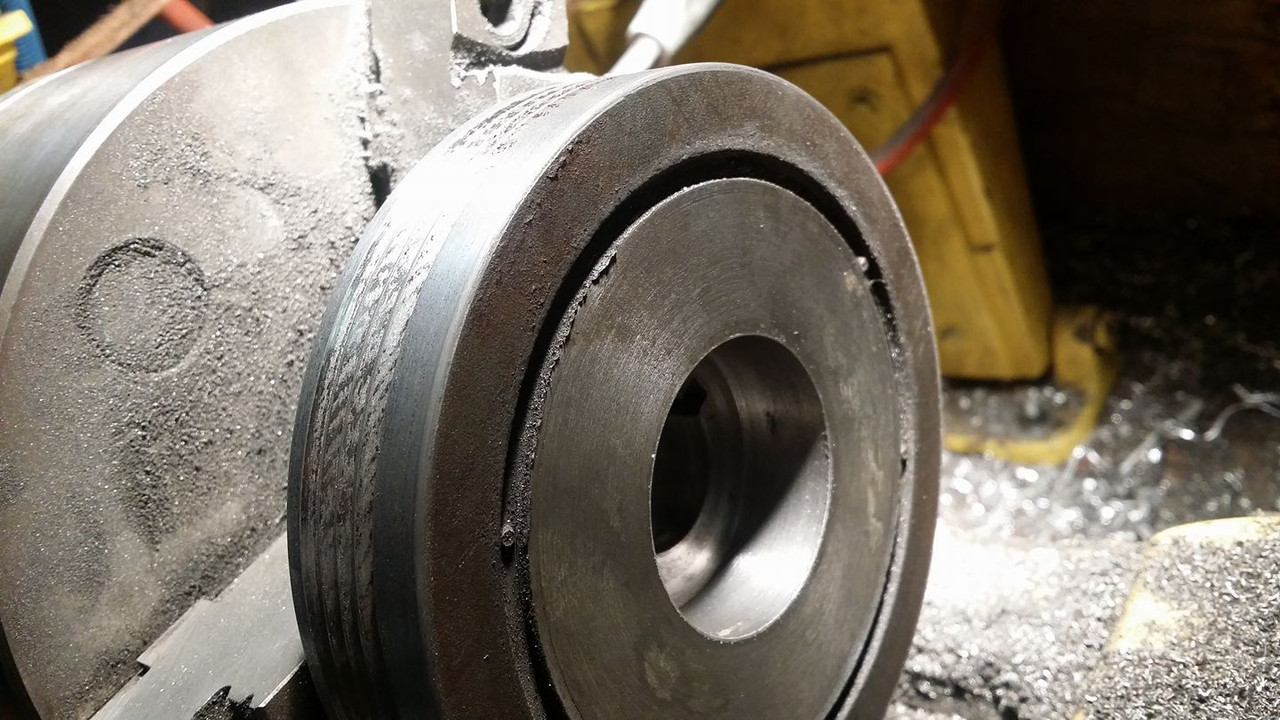
i didnt realize the damper being inside of the pulley meant that turning down the face of the pulley would result in a complete destruction of the part. some of you may have seen this coming, personally i had no idea there even was a damper on this pulley so you can imagine my surprise (to be read: intense rage) when i noticed a huge crack forming and the pulley wobbling like crazy even though i hadnt moved anything at all on my lathe.
so this is going to set me back for a little while until i can find a replacement or just buy some more round stock and turn a new pulley (i dont really want to do that anymore lol) but in the mean time i will still be taking the engine over to my garage and putting it into the car for mock up next week with or without a crank pulley.
HSS was basically dulling the instant it touched this pulley so i knew i would have to use carbide tools but all the ones i have are basically scrap i got in a lot buy off of ebay so i had to come up with some way of sharpening them. i found this diamond wheel lying around and made up a little holder for it and used my lathe to basically grind whatever angles i wanted by holding the tool in my post holder and grinding the faces against the wheel.
worked a champ. didnt leave the best surface finish but it ate through it faster than you would expect anything to eat through carbide.
then this happened.
i didnt realize the damper being inside of the pulley meant that turning down the face of the pulley would result in a complete destruction of the part. some of you may have seen this coming, personally i had no idea there even was a damper on this pulley so you can imagine my surprise (to be read: intense rage) when i noticed a huge crack forming and the pulley wobbling like crazy even though i hadnt moved anything at all on my lathe.
so this is going to set me back for a little while until i can find a replacement or just buy some more round stock and turn a new pulley (i dont really want to do that anymore lol) but in the mean time i will still be taking the engine over to my garage and putting it into the car for mock up next week with or without a crank pulley.
Last edited by Nate Boslet; 05-14-2018 at 04:02 PM.
12-22-2016, 05:30 PM
#40
Member
Thread Starter
Join Date: Oct 2016
Posts: 284
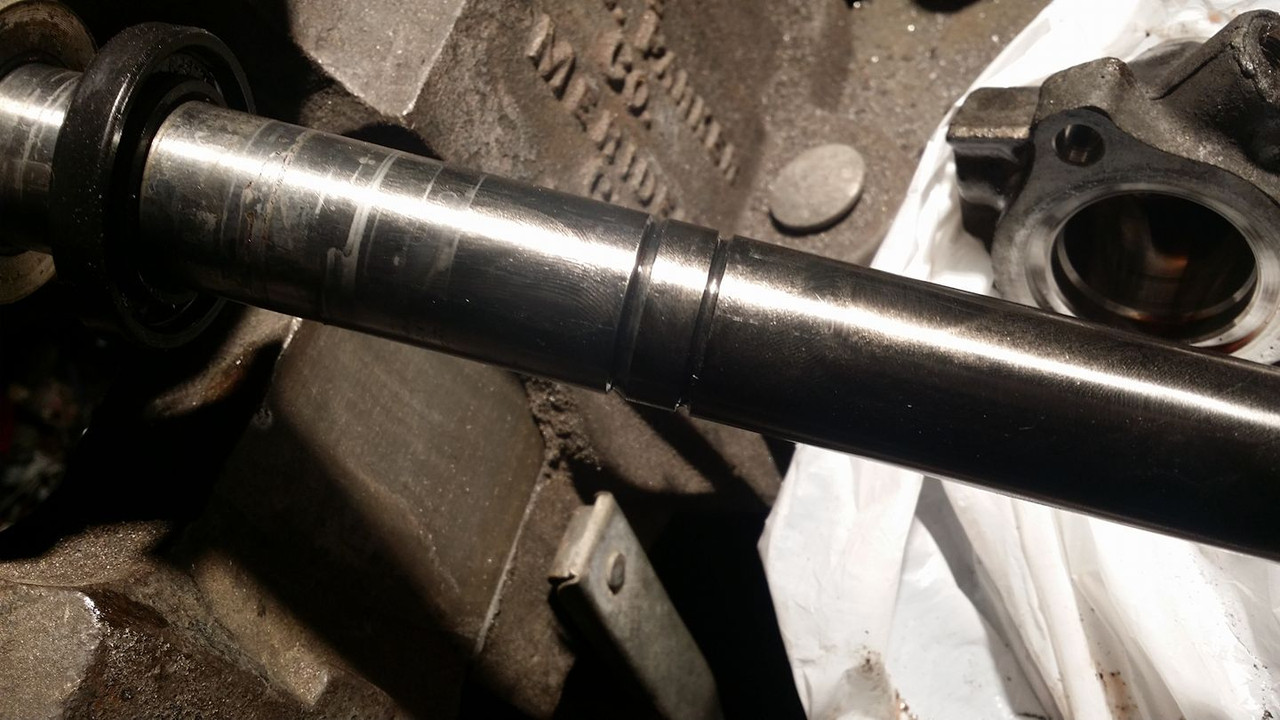
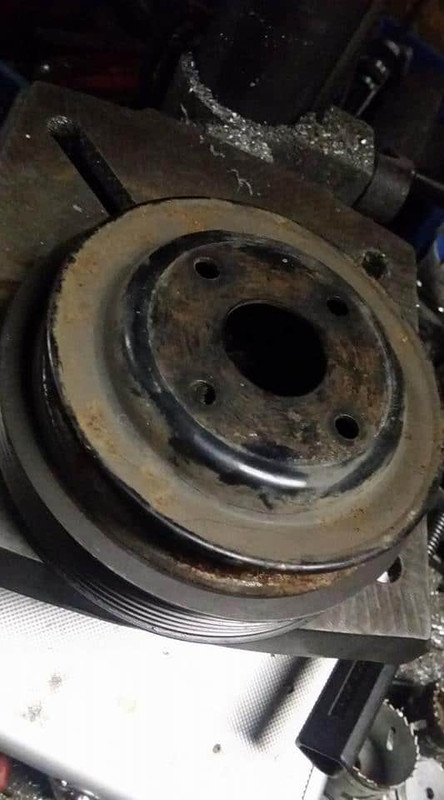
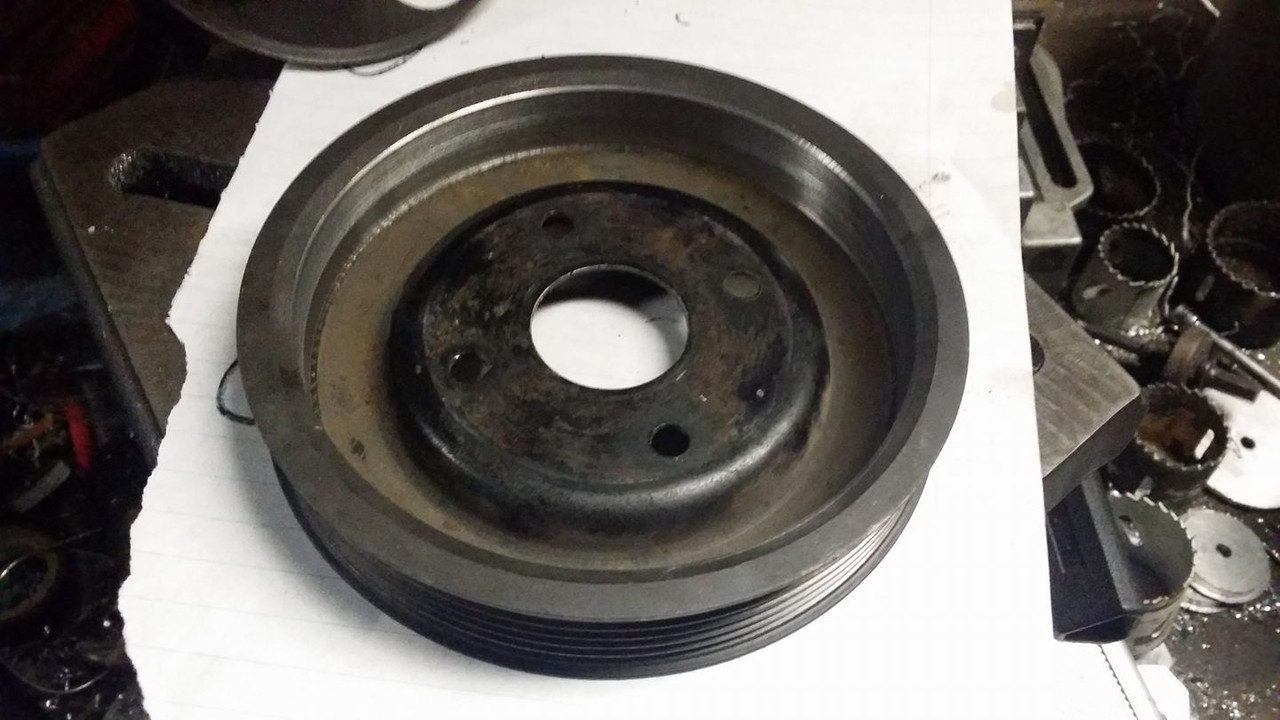
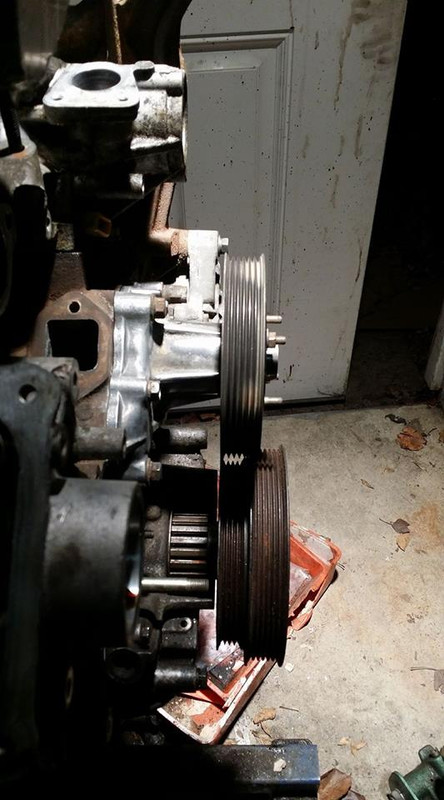
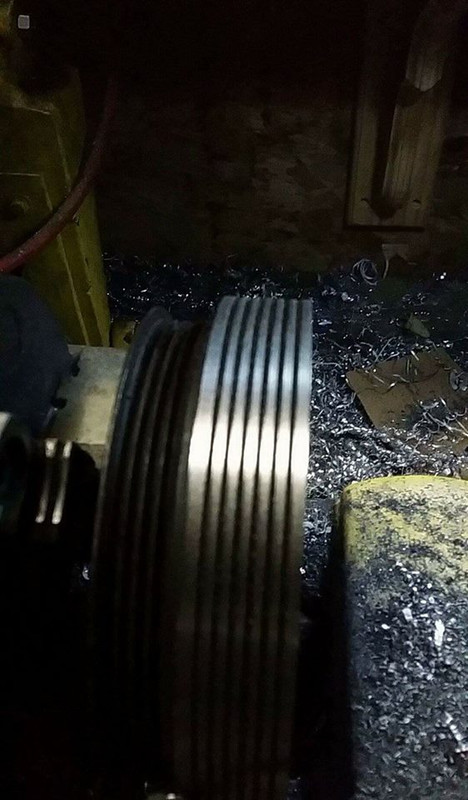
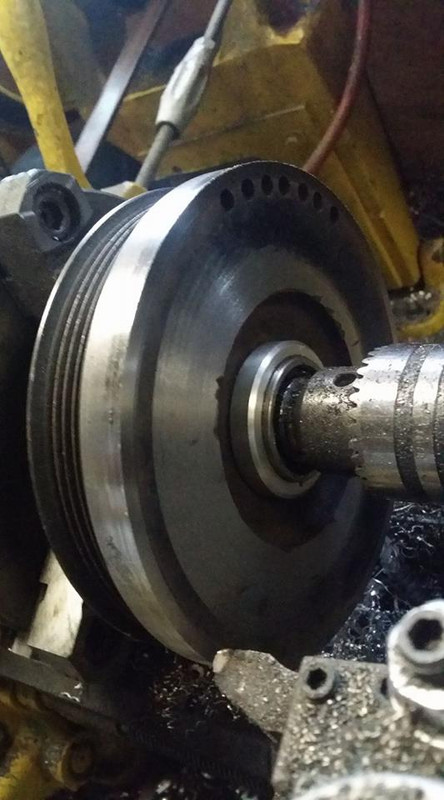
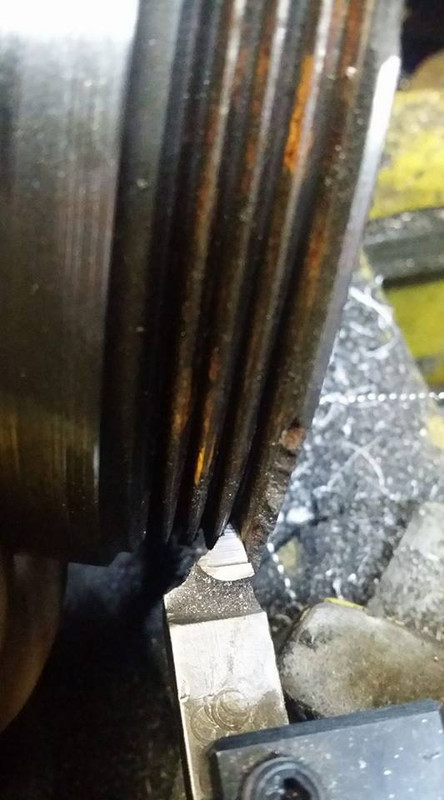
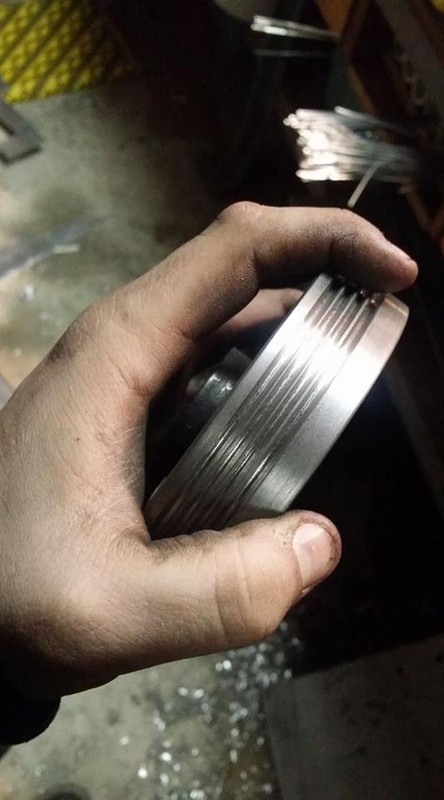
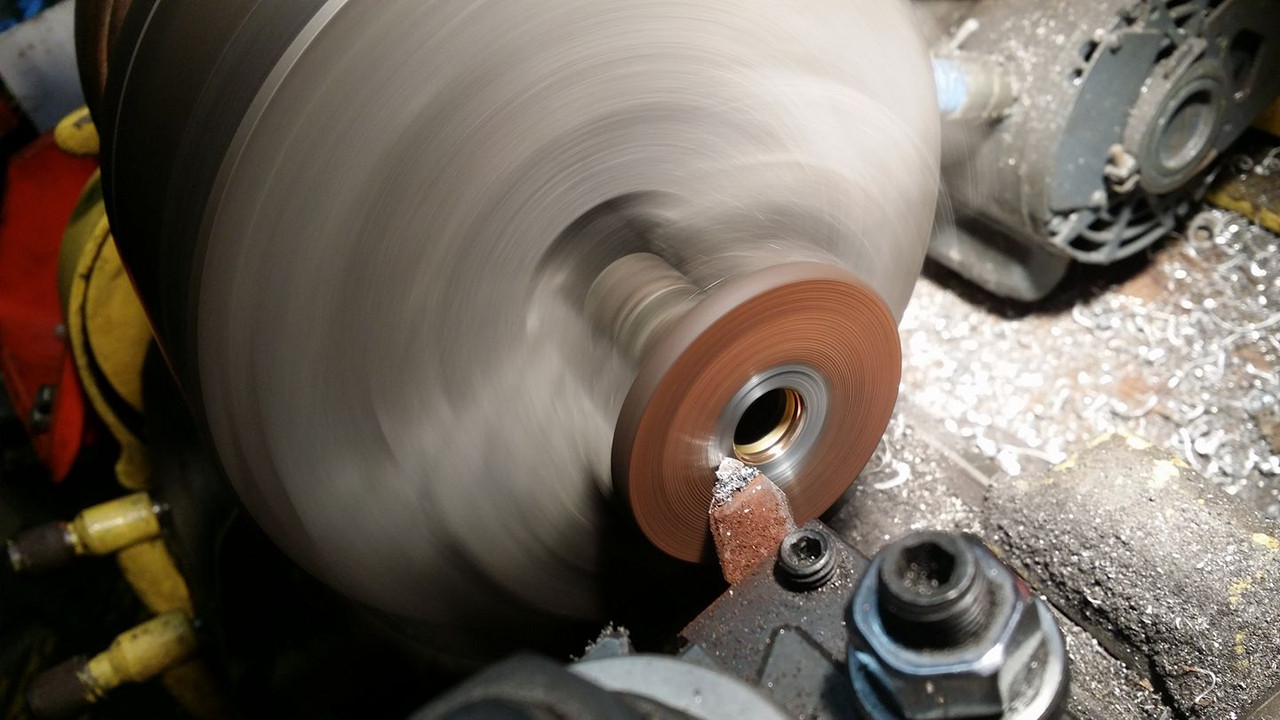
so i realized the outside of the pulley has plenty of material to turn ribs on. since its scrap anyway i figured i would see if i could make it into an underdrive pulley.

i could still do the 6 rib pulley i guess but i just wanna get it running so its 4 ribs for now.
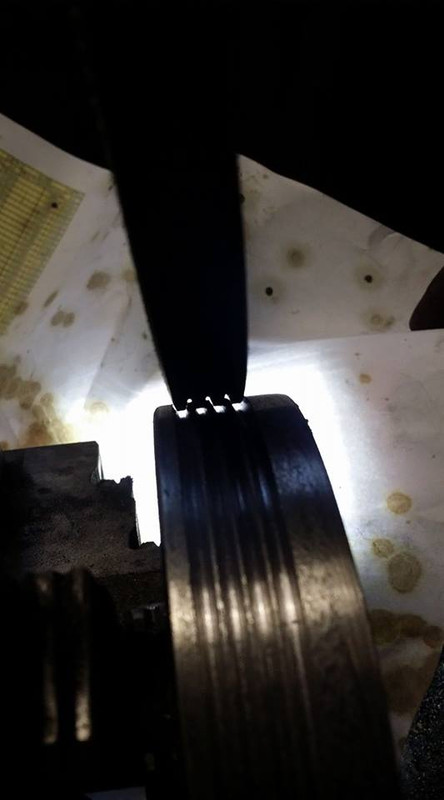
i used the 4 rib belt from my z to make sure the ribs were going to fit properly.
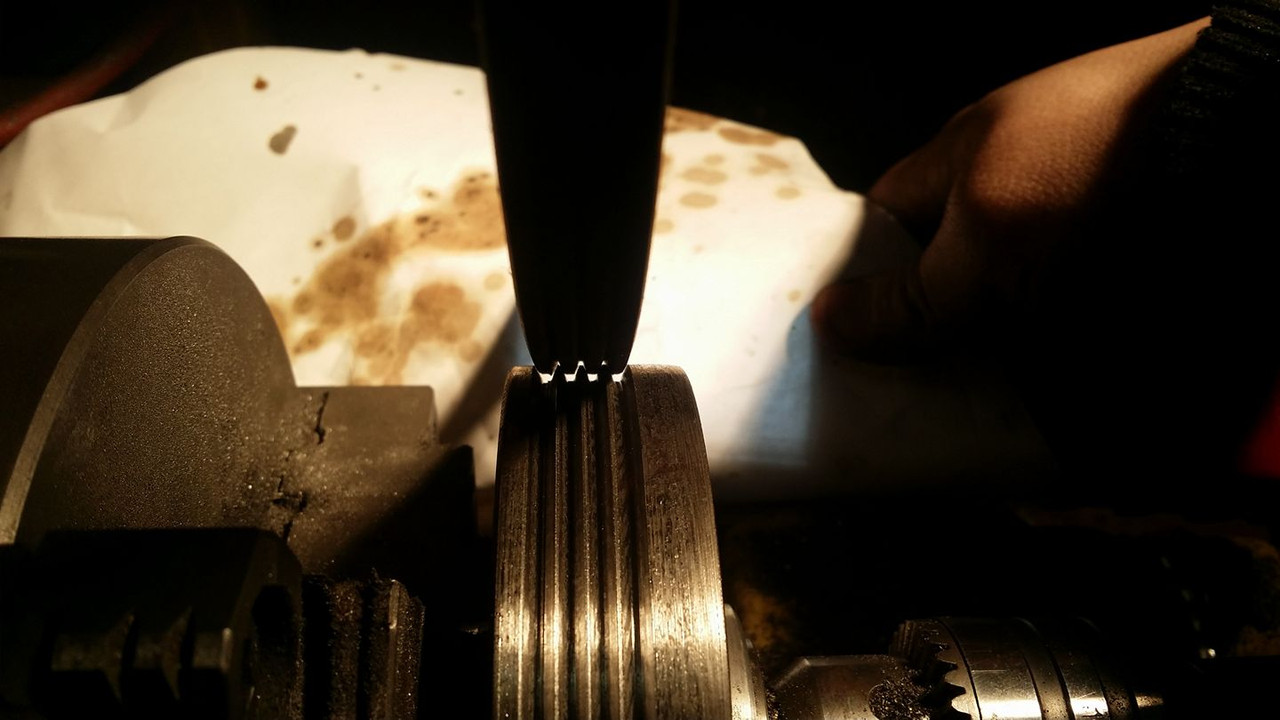
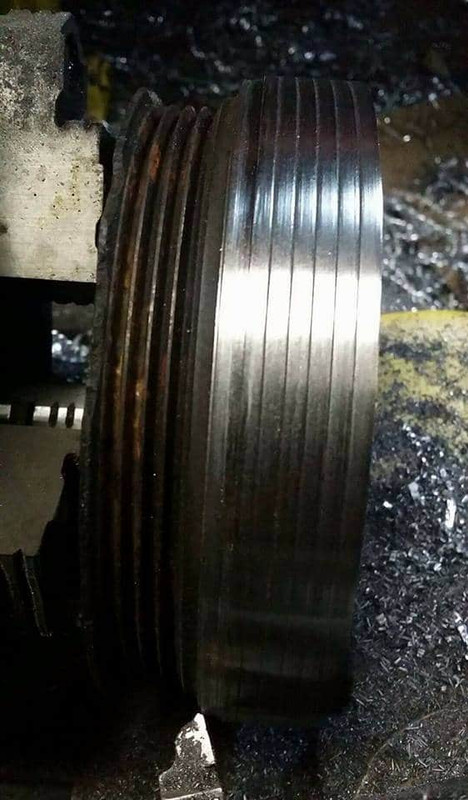
then i faced..

filed...
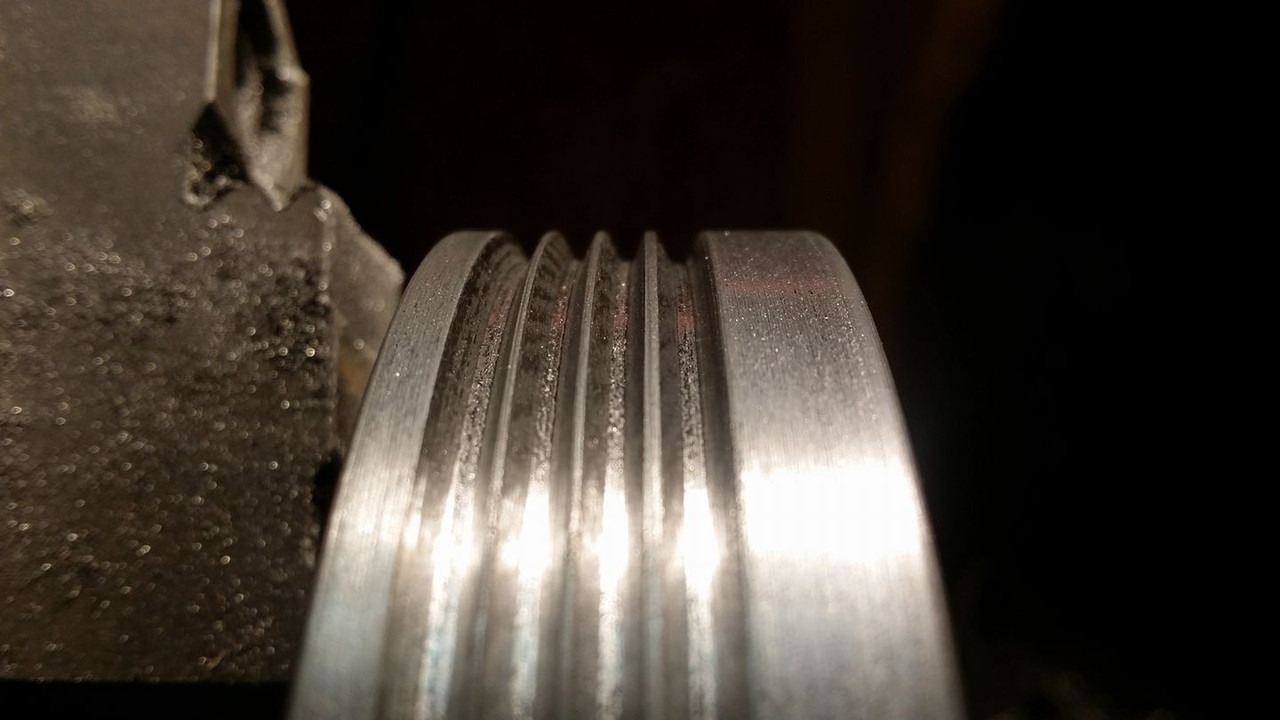
and sanded the outer diameter until everything was extremely smooth as to not tear the belt apart while its spinning around.
if its smooth enough for my immaculate, very sensitive, virgin baby hands then its gotta be smooth enough for a rubber belt.
here it is compared to the original pulley.


i didnt have a crank bolt and cant seem to source one so i found my bag of differential parts and this subframe bolt was in there that i think will work fine.
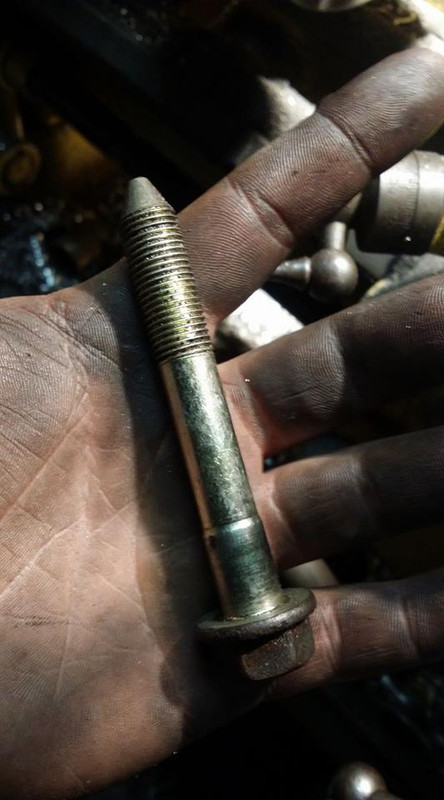
it would have probably fit fine with the point on the tip once the pulley is shimmed and everything but i dont want anything to be loose so just in case i turned that down too. this bolt is extremely hard and turning it almost snapped the tool post right off my little lathe lol

then i had to make a washer. i used the bushing the bolt came with and turned it down until it was the proper size, then i parted it off and faced the other side so the bolt would sit flush against it.
i didnt want to hit my chuck jaws so i only faced to the outer edge and stopped.
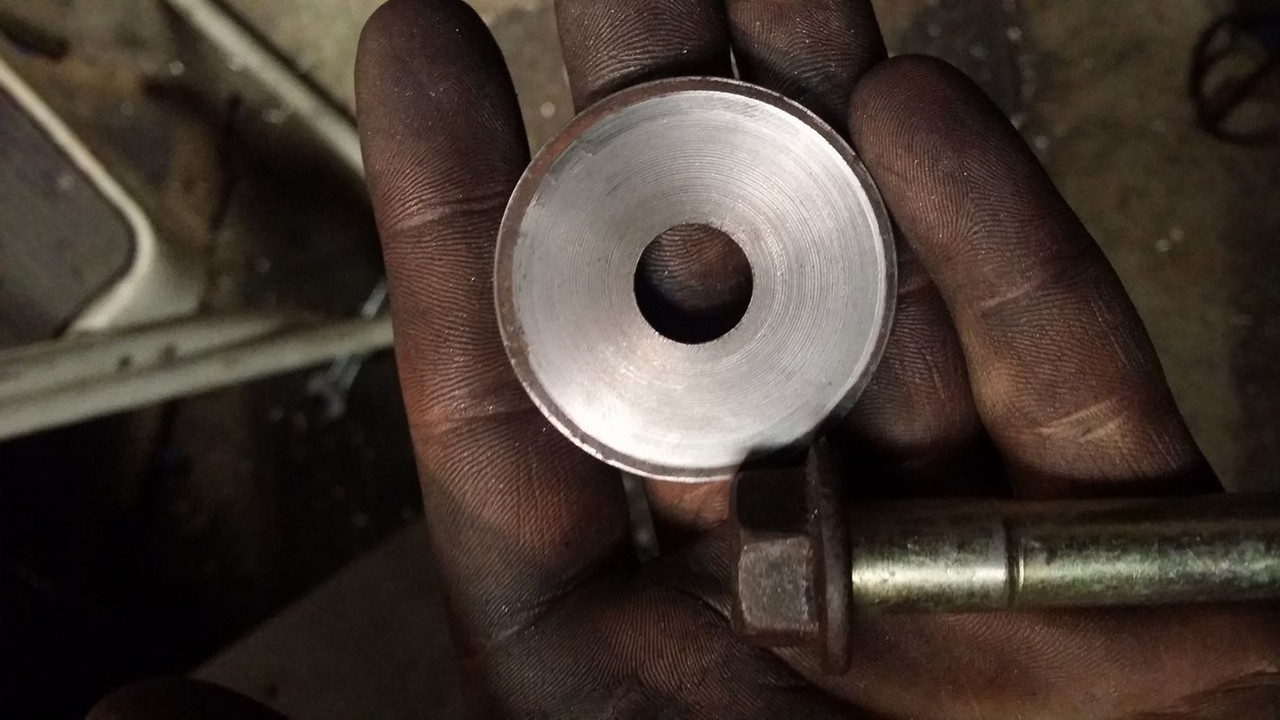
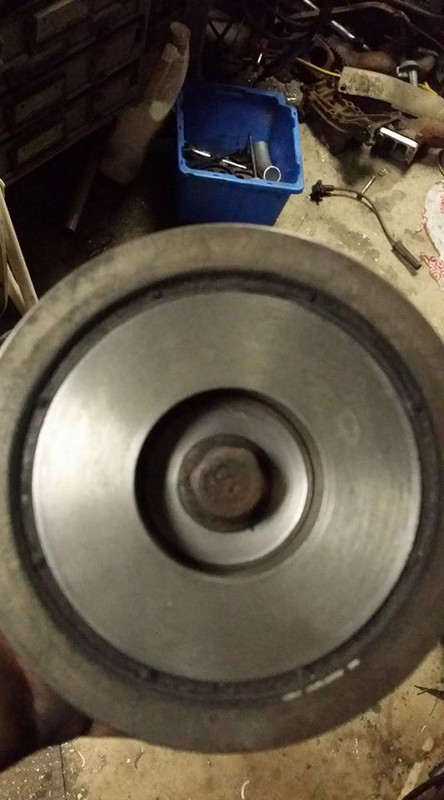
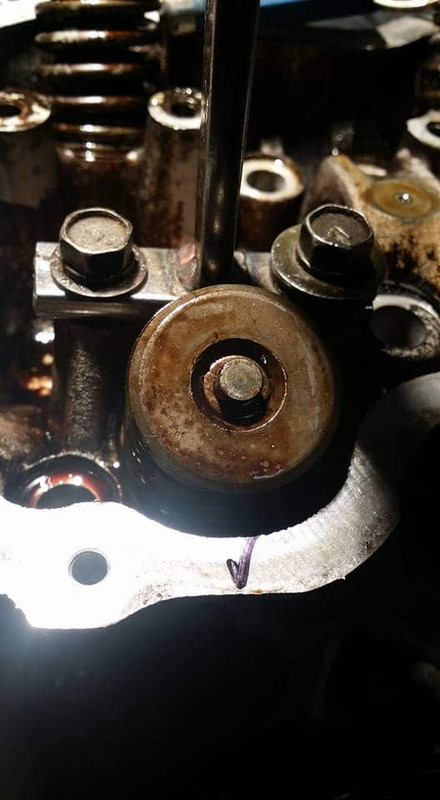
bolted on, still missing the front timing washer that im probably going to have to make.
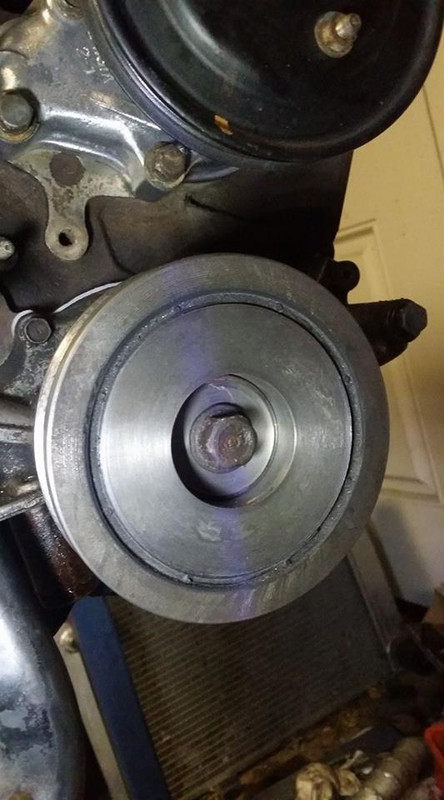
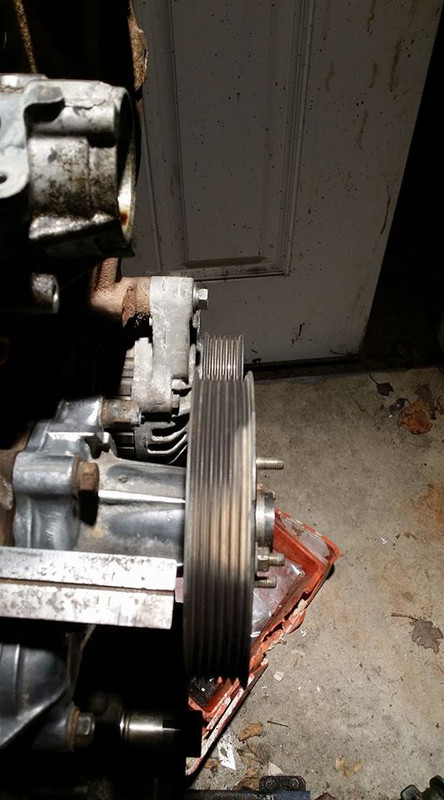
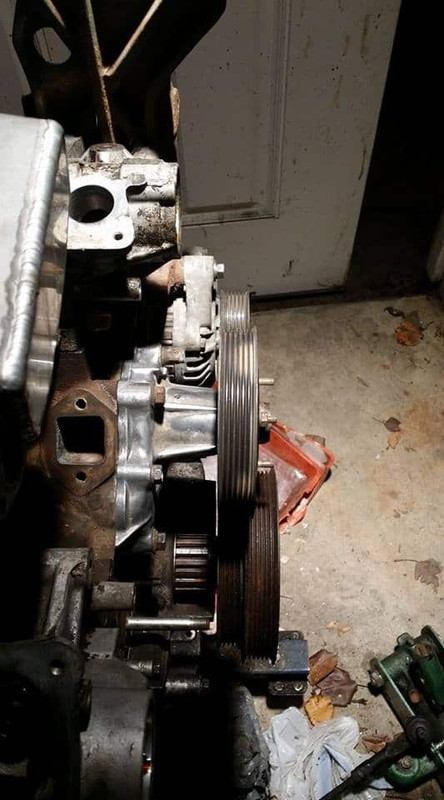
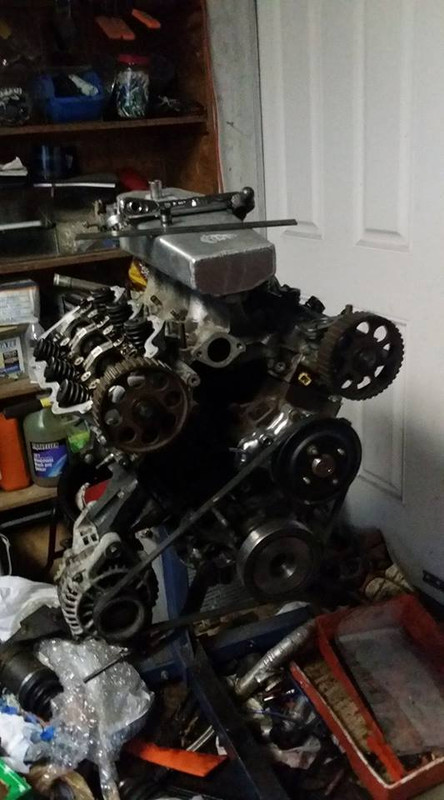
and on the motor. as you can see i relocated the alternator when i found my other pulley, the stanza alternator will work better on this side because of the tensioner bracket. i had to modify the tensioner because its normally on the other side of the motor. i would have taken more pics of that but i plan on modifying it again to pull the alternator closer to the motor to save space. i will need a smaller belt to do that as well so updates later. in the mean time like i said im bringing everything to the car for mockup this weekend and will hopefully have a hoist so i can get an idea of how ****ed i am.

my only concern is slip and having too low of an idle/rotation speed for the alternator to keep the car alive but that wasnt a problem before so im not too worried about it. i am interested in how much this pulley will **** with my water pump though. i probably wont run a thermostat anyway tho so im not really worried about that either.
i could still do the 6 rib pulley i guess but i just wanna get it running so its 4 ribs for now.
i used the 4 rib belt from my z to make sure the ribs were going to fit properly.
then i faced..
filed...
and sanded the outer diameter until everything was extremely smooth as to not tear the belt apart while its spinning around.
if its smooth enough for my immaculate, very sensitive, virgin baby hands then its gotta be smooth enough for a rubber belt.
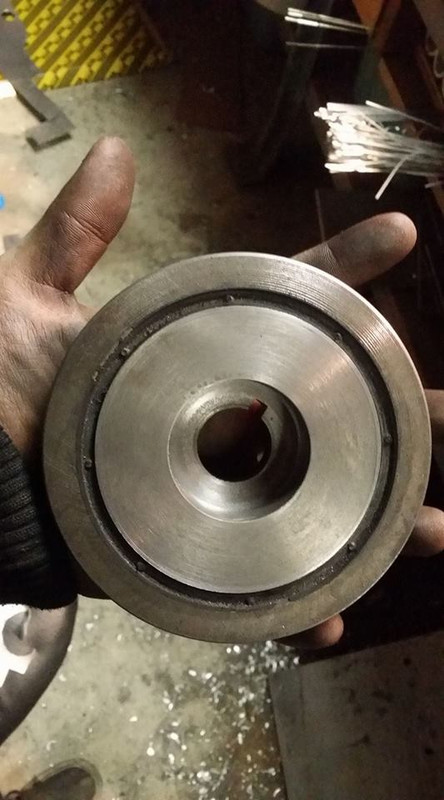
here it is compared to the original pulley.
i didnt have a crank bolt and cant seem to source one so i found my bag of differential parts and this subframe bolt was in there that i think will work fine.
it would have probably fit fine with the point on the tip once the pulley is shimmed and everything but i dont want anything to be loose so just in case i turned that down too. this bolt is extremely hard and turning it almost snapped the tool post right off my little lathe lol
then i had to make a washer. i used the bushing the bolt came with and turned it down until it was the proper size, then i parted it off and faced the other side so the bolt would sit flush against it.
i didnt want to hit my chuck jaws so i only faced to the outer edge and stopped.
bolted on, still missing the front timing washer that im probably going to have to make.
and on the motor. as you can see i relocated the alternator when i found my other pulley, the stanza alternator will work better on this side because of the tensioner bracket. i had to modify the tensioner because its normally on the other side of the motor. i would have taken more pics of that but i plan on modifying it again to pull the alternator closer to the motor to save space. i will need a smaller belt to do that as well so updates later. in the mean time like i said im bringing everything to the car for mockup this weekend and will hopefully have a hoist so i can get an idea of how ****ed i am.
my only concern is slip and having too low of an idle/rotation speed for the alternator to keep the car alive but that wasnt a problem before so im not too worried about it. i am interested in how much this pulley will **** with my water pump though. i probably wont run a thermostat anyway tho so im not really worried about that either.
Last edited by Nate Boslet; 05-14-2018 at 04:03 PM.