help w/phenolic spacers please!!!
 04-04-2009, 01:10 PM
#1

help w/phenolic spacers please!!!
I have a 99 se...As I am reading the supplied instructions that the spacers came with. Now on step #20, it says to remove the 2 lower EGR tube bolts...(I was only able to remove 1 NUT not BOLT) and the other nut is hard to get at because of a metal tube that almost completely blocks access...When I finally loosen a big nut that connects the metal tube to the engine so that I can move the tube just enough out of the way, I can finally remove this:
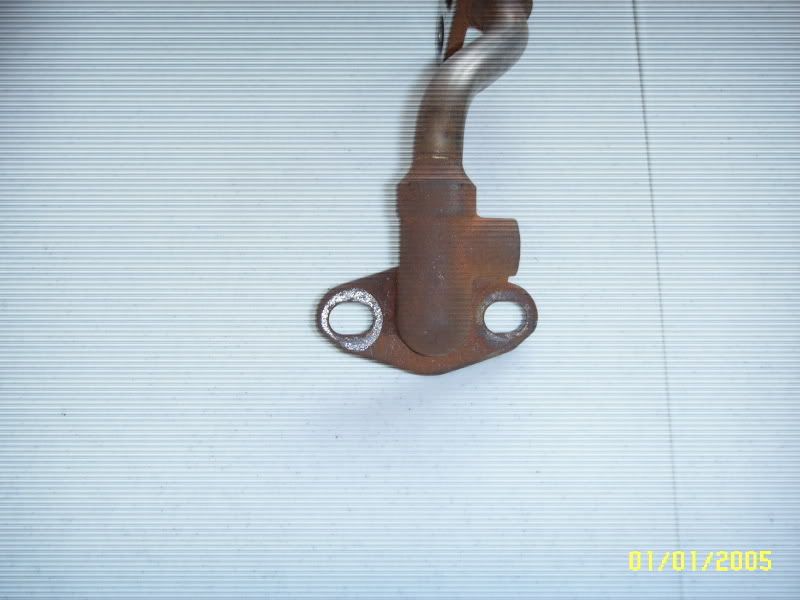
the top holes seem oblong and the bottom are bigger than 7/16"...am I reading these instructions correctly? I hate to find out that after all this work only to have read these the wrong way...
the top holes seem oblong and the bottom are bigger than 7/16"...am I reading these instructions correctly? I hate to find out that after all this work only to have read these the wrong way...
 04-04-2009, 05:43 PM
#2

By top and bottom are you referring to the picture (upside down) or to how it actually sits?
Note you don't have to actually remove the EGR guide tube from the engine to drill it out, you could do just the top bolts either 7/16" or 1/2". Are you saying the bolt holes at the top of the tube (by the temp sensor) are larger than 7/16"?
Have you tried contacting Aaron?
Note you don't have to actually remove the EGR guide tube from the engine to drill it out, you could do just the top bolts either 7/16" or 1/2". Are you saying the bolt holes at the top of the tube (by the temp sensor) are larger than 7/16"?
Have you tried contacting Aaron?
04-04-2009, 09:10 PM
#3
Hey Pmohr, thanks for actually responding I was starting to think that I was all alone on this one lol...
The bottom bolts I did not drill...they were already more than 1/2'' anyway...But I HAD to take the EGR tube off completely, because when I drilled out the top holes to make them bigger, even a drill press had a tough time answering the call; the motor actually seized on several attempts...now that's TOUGH steel...
I wonder how (and yes the instructions said the same thing that you just said,) one can actually leave the EGR tube on the engine and drill out the upper two holes with an ordinary hand drill...to me it seems impossible. I have not contacted Aaron, but the EGR is back on now, and I am just waiting to put back on the intake manifold after some RTV dries...Oh, and BTW, I hate the engine bay layout with all those tubes running everywhere that don't wanna come off, I had to cut hella tubes just to get to where I needed to be...lucky for me the fuel lines were good enough to bend the fuel rail outta the way lol.
04-05-2009, 02:19 PM
#5
The EGR tube can be bolted to the UIM if the upper bolt holes (the ones shown in your picture) are enlarged to 1/2".
What handheld drill are you using? My cordless Craftsman 18v didn't have enough juice to drill out those holes, but my corded Milwaukee one did. I drilled them out in the engine bay with the two lower bolts loosened, but still attached.
What handheld drill are you using? My cordless Craftsman 18v didn't have enough juice to drill out those holes, but my corded Milwaukee one did. I drilled them out in the engine bay with the two lower bolts loosened, but still attached.
Last edited by EnervinE; 04-05-2009 at 02:21 PM.
04-05-2009, 05:40 PM
#6
uh...craftsman cordless 19.6v. It's all back together now though and I am pleased with the performance. Even though it says only 10 hp gained, it really feels more powerful...And I was even able to retain use of the rear support brackets 
Now I'm Quaifing and Spacing G'YEA!
Now I'm Quaifing and Spacing G'YEA!
Last edited by Maximeltman; 04-05-2009 at 05:43 PM.


 I know exactly what you mean.
  04-08-2009, 07:50 PM
#9
Have you checked out the problem at all yet?
04-08-2009, 08:11 PM
#10
nope...I suspect one of the vac hoses may be misplaced, as I had to cut some just to get certain parts off. After that, I kinda just improvised and connected them back to what I think is correct but must not be. I'll get at it tomorrow when theres more light to see thanks.
 04-09-2009, 06:25 AM
#12
uh...craftsman cordless 19.6v. It's all back together now though and I am pleased with the performance. Even though it says only 10 hp gained, it really feels more powerful...And I was even able to retain use of the rear support brackets
Now I'm Quaifing and Spacing G'YEA!
Now I'm Quaifing and Spacing G'YEA!
 04-09-2009, 06:40 AM
#14
 04-13-2009, 06:23 AM
#16

Thread
Thread Starter
Forum
Replies
Last Post
Maxboy23
5th Generation Maxima (2000-2003)
7
08-11-2015 11:59 AM