When you click on links to various merchants on this site and make a purchase, this can result in this site earning a commission. Affiliate programs and affiliations include, but are not limited to, the eBay Partner Network.
I would like to start by thanking JNCoRacer for his motivational pep talk. He was smart enough to know that I could do it, even though I didn't think I could. Thanks man.
You will need various standard tools: screwdrivers (Phillips for screws & flat for prying), wire cutters and a ratchet, extensions (I found that my 24 inch was very useful), a U-joint, and a 10 & 12mm socket. I strongly recommend a 6 point socket for the 12mm.
You will need one special tool, a T50 Torx, 6 point security wrench. I didn't have a security Torx but got lucky and was able to modify my standard T50.
Cliff notes version -
1 - Remove the glove box.
2 - Remove the radio/heater control cluster.
3 - Remove the speedometer cluster.
4 - Remove the dash.
Easy smeezy, right?
Let's get started and find out.
Move the driver's & passenger's seats forward and remove the 2 screws that hold down the rear of the center console.
Move the driver's & passenger's seats all the way back.
Disconnect the battery. You will be messing with the passenger airbag and it is recommended to wait a half hour after disconnecting the battery.
Remove the glove box (6 Phillips head screws) and disconnect the 2 wires. You will also have to cut the zip tie that holds the wire harness to the glove box.
While you're down here, remove the kick panel in the foot well. There is a plastic nut on the top front corner that you can most likely remove by hand. Then there is a snap along the top edge just before the panel curves to meet the door. Pull the panel towards the driver's side to unsnap it.
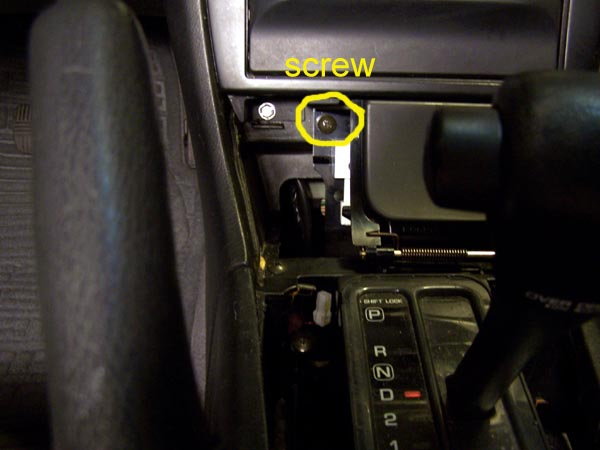
Remove the radio and heater controls. Start by removing the trim plate around the transmission shift lever. If you have an auto trans, you need to move the shift lever out of park. I'm guessing that you'll need to do the same with a standard trans. Pry up the 2 rear corners of the trim plate to pop the snaps free. Actually, pry on the sides by the corners, not the bottom edge. Lift up by hand to pop the forward snaps that are near the curve. When free, disconnect the wire for the cigarette lighter.
Remove the ash tray. Remove one screw at the top left corner. On the right side there are 2 snaps, one top and one bottom. Pry the ash tray straight back towards the rear. Did I mention that a 1 inch putty knife works better than a screwdriver for this? Disconnect the wire to the ash tray.
Now finish removing the center console. In the opening created by removing the ash tray, there are 2 screws in the corners where the center console meets the dash. Remove those screws, pull the parking brake handle up as far as you can, unsnap the boot around the parking brake handle and remove the center console by lifting up.
Remove the dash center vents. Pry up on the lower corners, the sides, not the bottom edge and pop the snaps free. There are 4 snaps across the top edge. Using moderate level swear words, free the top edge. While it is difficult to do, the vents need to come almost straight back with a little downward motion, not tilted up from the bottom. Once you have the vents free, disconnect the wires for the hazard flasher, clock and the rear window defroster switches.
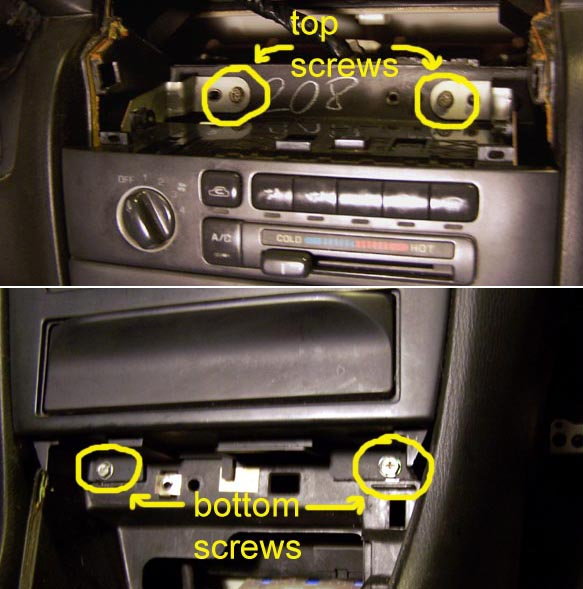
Now you can remove the radio and heater controls. This is one unit held in by 4 screws, one in each corner, 2 screws down where the ashtray was and 2 on top above the heater controls. Have your transmission shift lever towards the rear of the car and lift out the radio/heater controls. Disconnect the wires from the radio and heater controls.
Remove the speedometer cluster. Since the goal is to remove the dash, this procedure will do things not needed if all you wanted to do is remove the speedometer cluster.
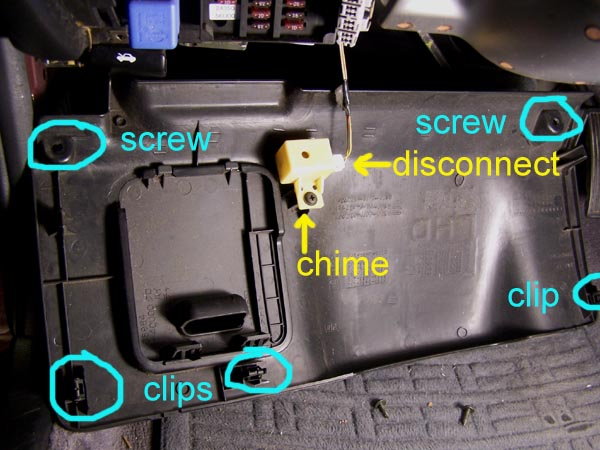
Start by dropping the steering column. Remove the lower dash trim panel that runs underneath the steering column. Remove the 2 screws in the bottom edge at the corners. There are 2 snaps on top edge, again at the corners. Pry the snaps free. *** Caution *** The chime that sounds when you open the door when you have the keys in the ignition is attached to the backside of this panel by the fuse panel. Disconnect this wire.
While you're down here, remove the kick panel in the foot well, just like on the passenger side.
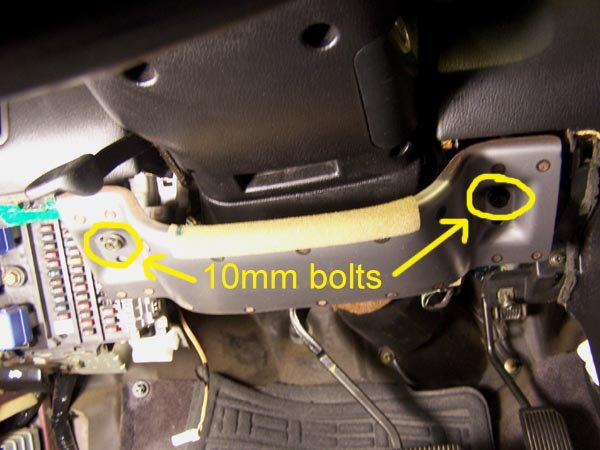
Remove the metal plate that runs underneath the steering column. There is a 10mm bolt on each end. The plate will stay in place after you remove the bolts. Slide the plate towards you about a quarter inch and it's off.
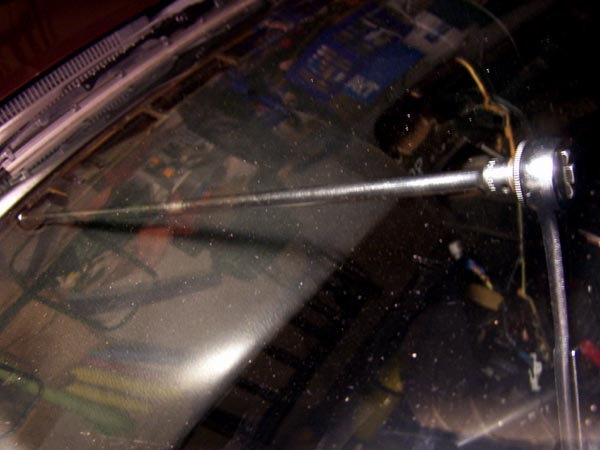
Now you can drop the steering column. Two 12mm nuts. Mine had Locktite on them and my 12 point socket was starting to strip the one nut, so I changed to a 6 point socket. The steering column is kind of heavy, so you are forewarned. I was concerned about the steering column hanging by itself, so I found a 10 inch length of 2 inch PVC pipe that I rested the steering wheel on.
Now for the speedometer cluster. There is a finishing bezel around the cluster that also has the cruise control on/off switch, the security led and the dash light dimmer switch. You have to disconnect the wires from these switches. You have 2 choices - before you remove the bezel or after. If you choose before, then you have to pry the switches out of their holes and then disconnect the wires. I chose the other option, after I had the bezel loose. This way I didn't have to pop the switches out.
Start removing the bezel by removing 2 screws in the top curve of the bezel. Then there are 4 snaps along the bottom edge. Pry/pull them free. If you hadn't done so earlier, disconnect the wires from the switches.
Finally, the speedometer cluster itself. 3 screws, 1 at the top and 2 along the bottom. There are 3 connectors on the back of the speedometer cluster that need to be disconnected. I would suggest you get something soft to lay the cluster face down on while you disconnect the wires so you don't scratch the face plastic. It costs about $35. You will also have to cut a zip tie that holds the wire harness onto the back of the cluster.
Now disconnect the wires from the side view mirror switch. Either pop the switch out or reach in from behind the dash.
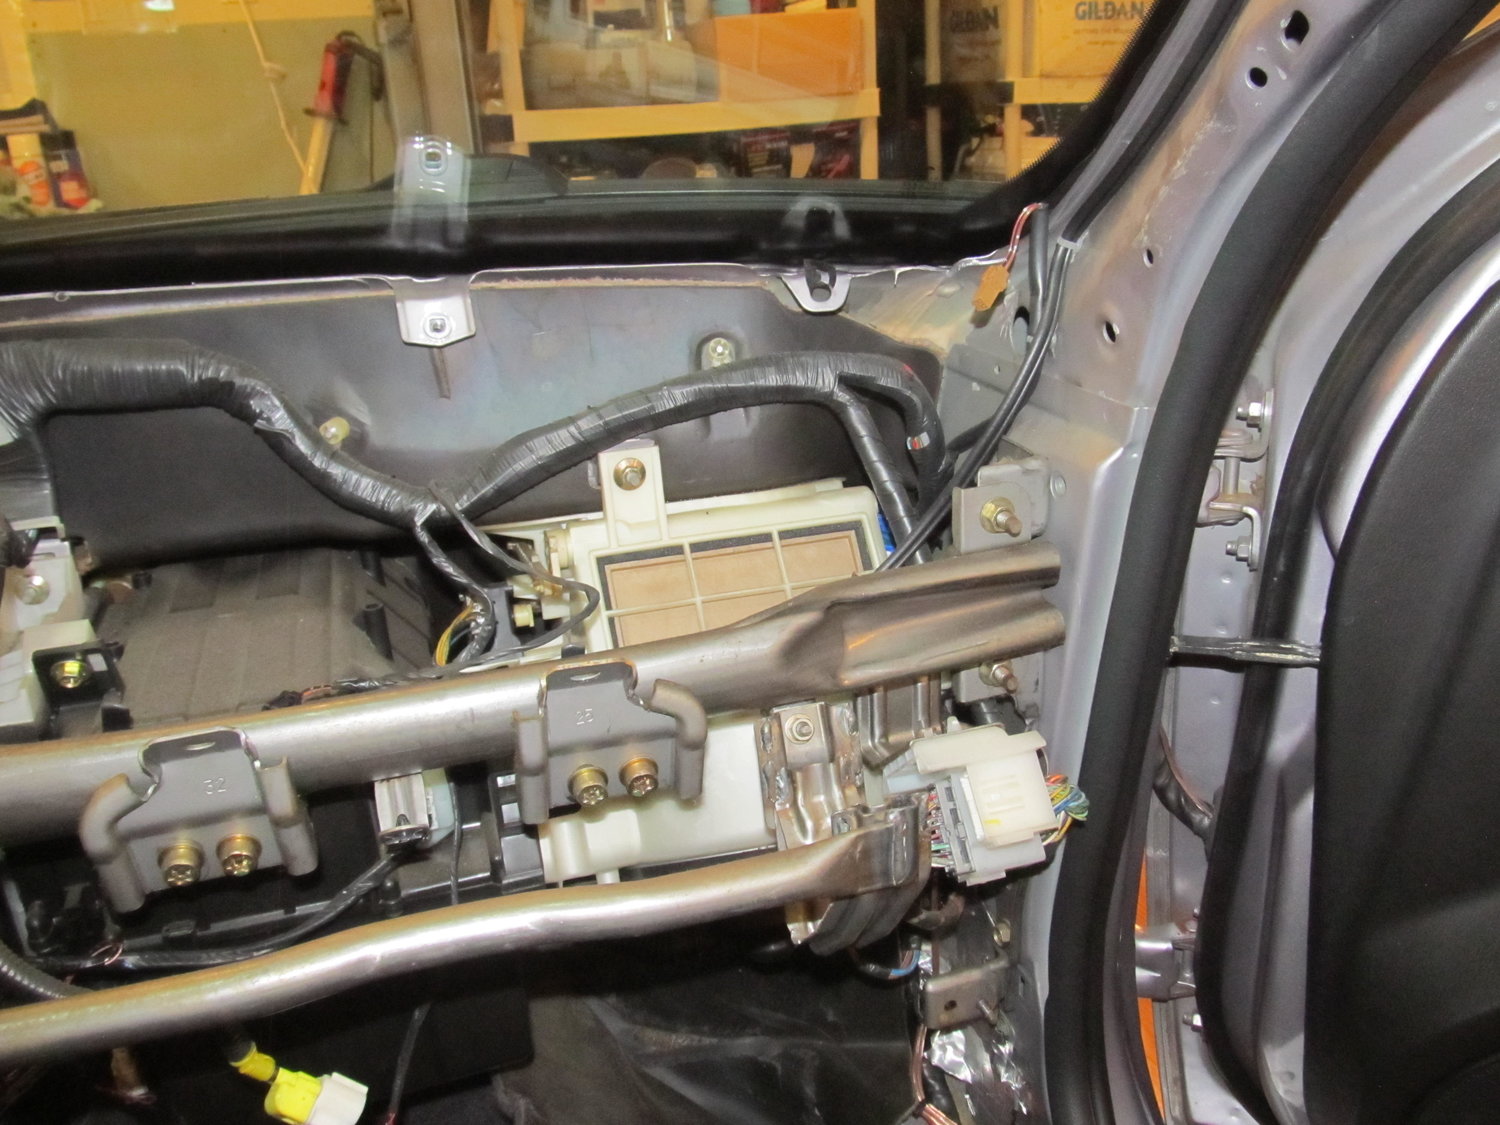
The final phase, remove the dash. There are 5 10mm nuts, 2 Torx head security bolts and a pair of screws to go.
Remove the trim pieces from the windshield pillars by grabbing the trim at the top edge and pulling the snap free. Then lift it off.
Pry off the defroster vent grill plates. There are 4 snaps spaced along the back edge. Pry the back edge of the grill up.
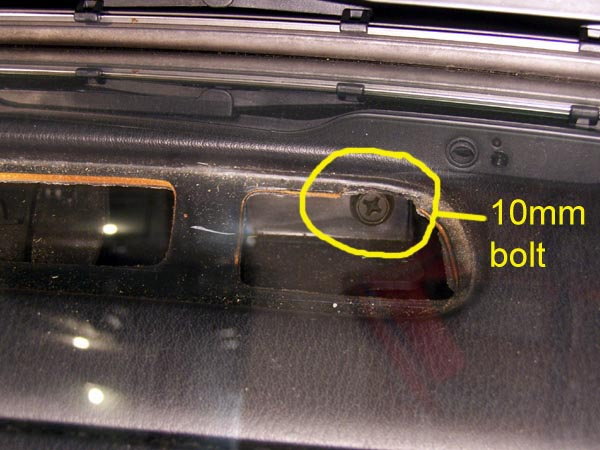
When the grill is removed, you can see a 10mm bolt at the end closest to the outside of the car. Remove this bolt. This is where my 24 inch extension was useful.
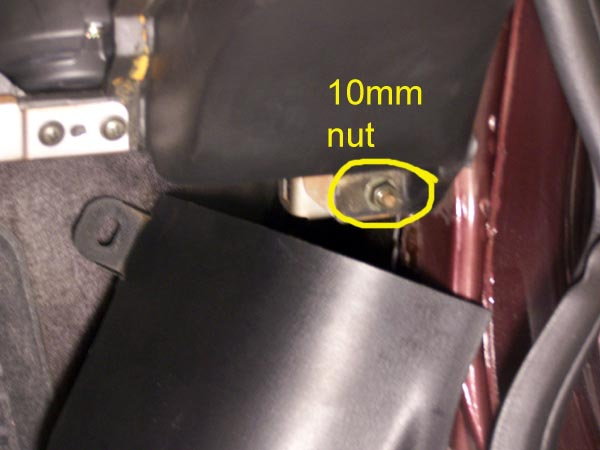
In the bottom left and right corners of the dash is a 10mm nut that was revealed when you removed the kick panels. Remove these 2 nuts.
In the opening where the speedometer is a 10mm nut.
In the opening where the radio was there is a screw.
In the opening where the glove box was is a screw.
OK, last 2 fasteners and one wire harness connector.
Looking in the glove box opening at the top, you will see a yellow wire harness connector. This is for the passenger air bag. It looks like you could pull either end out, but you have to pull the right side out to disconnect it.
Now for the Torx bolts. Look up through the glove box opening and you will see 6 Torx head bolts. You only need to remove the 2 that are by themselves, not the pairs.
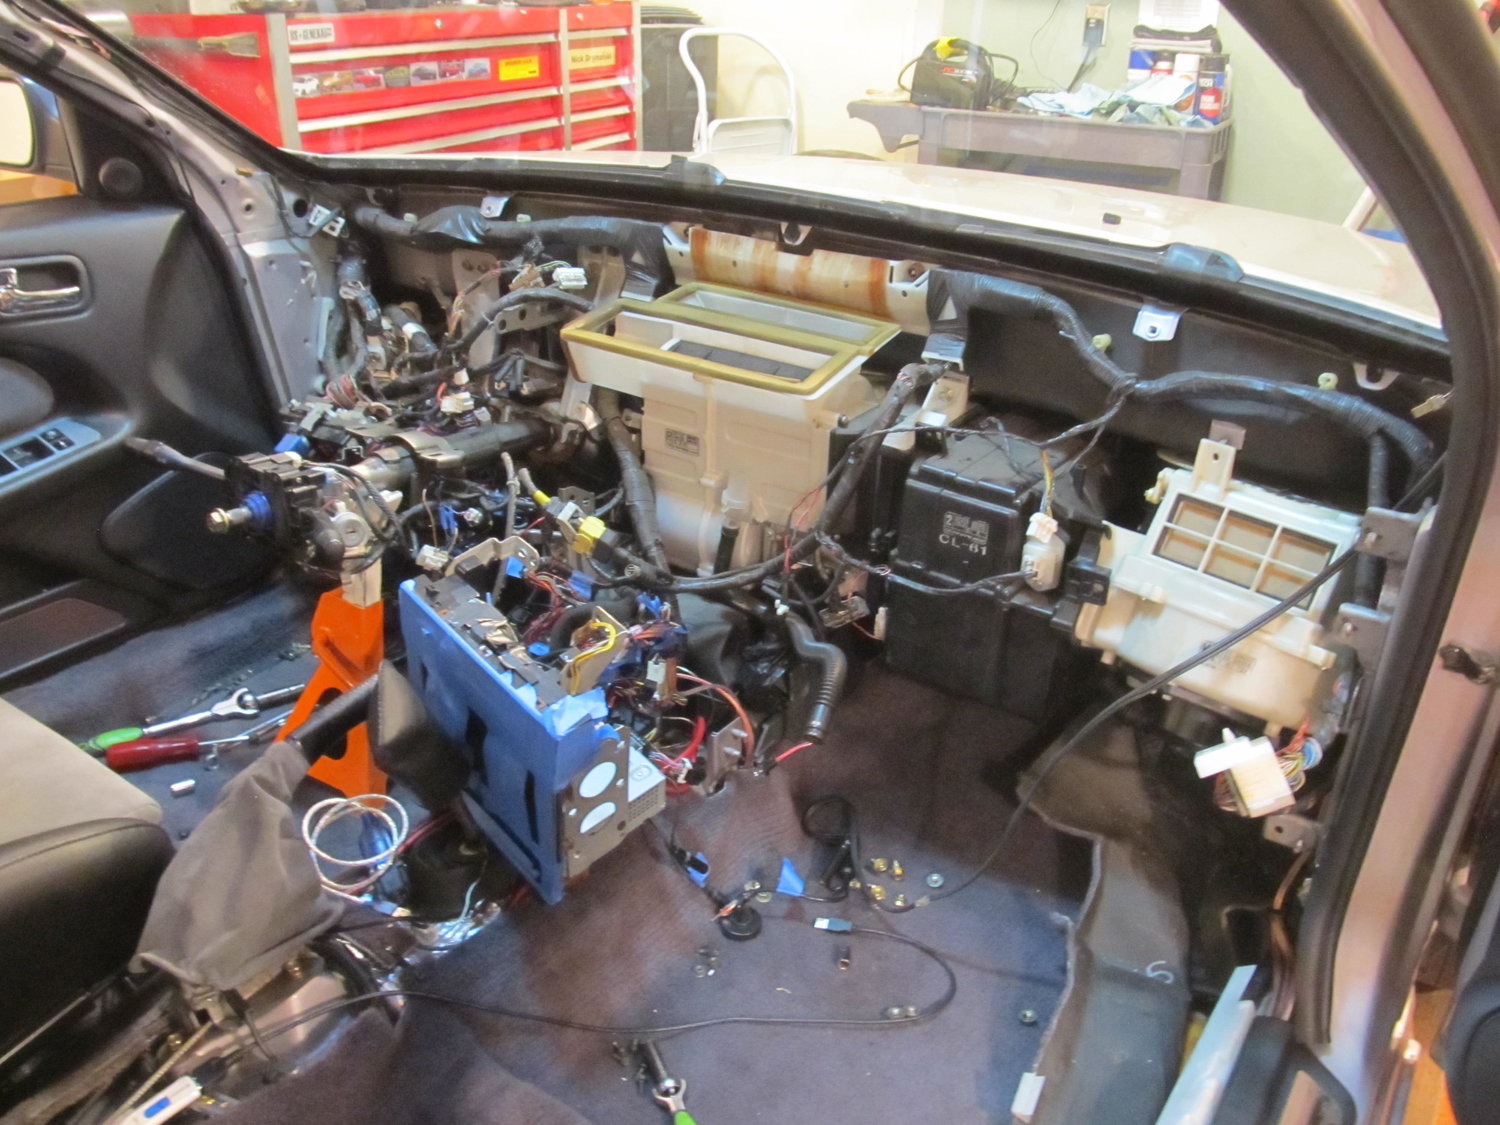
Once you have these 2 Torx bolts out, the dash is free and ready for removal. I did it by my self, but if you can get a helper, it is no doubt a lot easier. You have to pivot out the bottom edge a little bit and then pull back and up. There are guide pins built into the top front edge of the dash that require you to pull the entire dash back evenly. Because of the airbag, the right side has probably 75% of the weight.
For what ever it's worth (in the category of useless trivia), I weighed the dash on my bathroom scale. It was 25.5 pounds. Most of that is the airbag.
Awesome write-up, Dennis. I wish this was around when I was pulling mine out the first time.
Now after getting the dash out, were you able to get to the intermix motor/door like you needed to?
I got the motor changed, still probably not the way Nissan says. I think the entire duct system is supposed to come out (the white plastic thing in the center) as the motor is on the bottom of that. But after unbolting it, I came to the conclusion that the heater core hoses have to be disconnected and the a/c evaporator core has to be disconnected, I decided I needed a plan B.
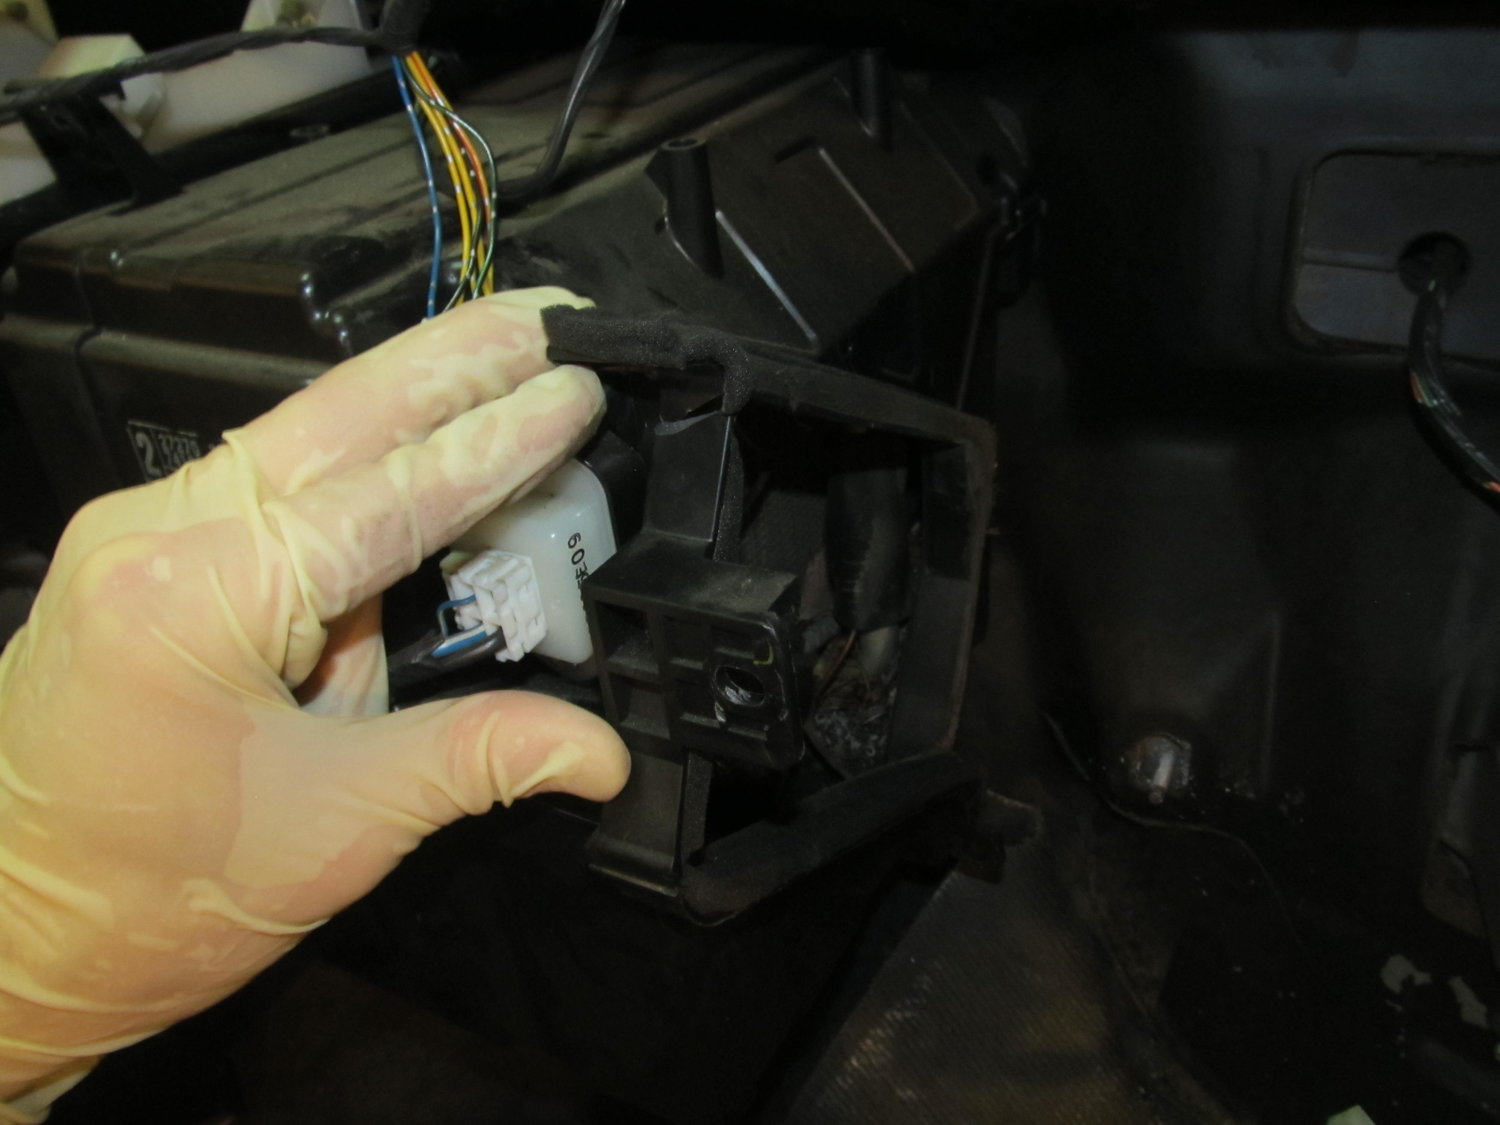
With the dashboard out, I was able to take a hacksaw blade and reach in to cut off the mounting arms that stick out from the motor. Then using a small vice grips, I got the mounting screws out. To re-install the motor, I used hex head screws and an open end wrench because there isn't enough room to use something bulky like the vice grips with the motor in position.
If the designers had put another 15 minutes into the designing of that motor location, I'm sure they could have made it absolutely impossible to change.
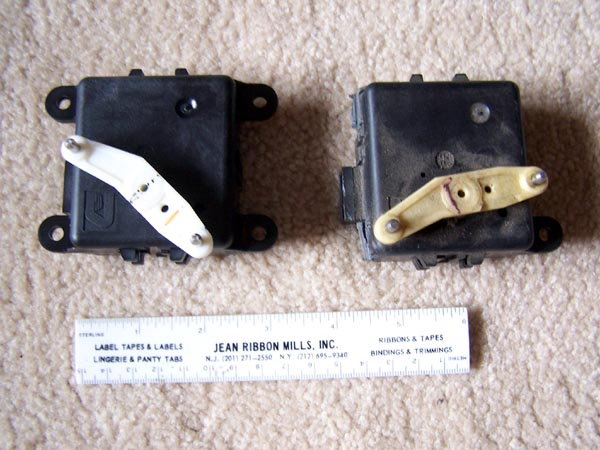
Thankfully it did. I had followed the diagnostic proceedure in the FSM and came up with bad control panel results. Bought a junkyard control panel, but that wasn't the problem.
That left 2 other possibilities; wire harness or motor. Wire harnesses rarely go bad, especially interior ones, unless humans have been involved. So that left the motor. But seeing how difficult the motor replacement was going to be, I checked the harness continuity.
Still, you may not be able to imagine the relief I felt when I turned the ignition switch on, slid the temperature control lever back and forth and saw the arm on the motor move. Damn near brought tears to my eyes.
nice write up. should help me out a great deal. only thing thats gonna kill me is the heat at the junk yard.. do you think those batteries have been disconnected long enough before messing with the air bag
Last edited by nismo maximus; 06-07-2011 at 10:51 PM.
nice write up. should help me out a great deal. only thing thats gonna kill me is the heat at the junk yard.. do you think those batteries have been disconnected long enough before messing with the air bag
I would sure think so. The batteries in those cars are usually taken out when the car arrives. If you don't have a heat stroke being out in the junkyard in this heat, I doubt if a lousy air bag going off would bother you.
Seriously, I doubt if you'll even find an air bag in any of those cars. They get stripped out and sold to body shops almost immediately.
actually one car has the passenger airbag still never used and in the car,
While I think that's kind of unusual, I guess it's called 'live and learn'.
I'm looking for a black center console for my 97 Max. I need one out of a 97 or 98. So if you see one while your out sweating in the 100 degree heat, could you let me know? Thanks.
I need help I have a 1999 Nissan Max I took the entire dash out to fix no air blowing through the heater ,A/C blower system. The air intake portion above the blower the arm that open and closes those doors were broken and Nissan don't service the little plastic piece that the motor arm pushes to open and close the door. I rig up a fix and have it working. The blend door motor at the bottom of the white cabinet in the middle was not working. I changed the motor and still did not work. I check the harness for continuity and power and had both. I finally place and external ground on the black wire with the yellow stripe and the motor work. I installed a new blower motor and a resistor for the blower. the blower is working on all four speeds. I even changed the master control unit. this system is electronic. After all of this I still can't get any air blowing through the system. All the doors are opening and closing. I get just a little blowing through but not enough to overcome the heat to push the A/C cold air out to cool the car off. Can anyone help or have experience this problem. Cpttrevor
I need help I have a 1999 Nissan Max I took the entire dash out to fix no air blowing through the heater ,A/C blower system. The air intake portion above the blower the arm that open and closes those doors were broken and Nissan don't service the little plastic piece that the motor arm pushes to open and close the door. I rig up a fix and have it working. The blend door motor at the bottom of the white cabinet in the middle was not working. I changed the motor and still did not work. I check the harness for continuity and power and had both. I finally place and external ground on the black wire with the yellow stripe and the motor work. I installed a new blower motor and a resistor for the blower. the blower is working on all four speeds. I even changed the master control unit. this system is electronic. After all of this I still can't get any air blowing through the system. All the doors are opening and closing. I get just a little blowing through but not enough to overcome the heat to push the A/C cold air out to cool the car off. Can anyone help or have experience this problem. Cpttrevor
Thank you for not only making this thread with excellent pictures and descriptions, but for also keeping the pictures alive for all to view! It helped me out a great deal today when I removed my dash. I now have some questions about the heater core and blower motor:
I'm trying to track down a water leak that's coming down the corner behind the blower motor on the firewall. I'm really hoping I can remove the blower motor (the white thing on the right) without removing the whole heater core (black part on the left). I'm really not trying to drain all my coolant and my AC lines. Does anyone know if it can be done? Without removing the blower motor, I can't get to any of the seams on the firewall. So close, but so far!
I would also like to remove the PS air bag, as I don't have one on the DS, which disables the PS one, so I might as well get rid of it. Except it seems to be "one piece" with the outer cover:
There are a bunch of bolts and four rivet things, but without the air bag's brackets, there's no way to properly reinstall just the cover. Does anyone know if this can be done, or if I just need to keep the air bag?
Well I got the blower motor out without removing the AC evaporator in the black box to its left! I was under the impression that the black box housed both AC and heater stuff, but upon looking at the lines from the engine bay, it became clear that the black box only held AC stuff. The main blower assembly in the center is what houses the heater stuff I guess. I do have the ability to recharge the AC, but it's not something I'm very good at, and I didn't feel great about venting my whole system to the atmosphere. So I hoped and prayed that I would find a quick and simple way to get out the blower by itself. I went back into the garage this morning pretty worried about what the day had in store. I had the idea that I might want to trim off some plastic from the black box to give me enough room to slide out the blower. I was in there looking at it, and noticed that one of the sides for the black AC box was pretty flimsy. With almost no effort, I was able to snap off a good piece of it. I then followed up with my snips, and with that little bit of plastic out of the way, I could get the blower out! It was a joyous moment to be sure. Here's what I did:
That little bit of plastic was all that was keeping me from getting the blower out!
As this out of focus picture shows, there was a good amount of debris in the evaporator housing:
So I spent some time with different picks and my shop vac and cleaned it all out:
The blower was actually very clean:
So I was then left with this:
But there was still the factory insulation in the way. I ended up just cutting off a piece so I could get easy access to where I thought the leak was (I'll reinstall properly when I'm all done). And with that, I was FINALLY able to see the source of my water leak:
It's not in the exact same spot as the pics from schmellyfart, but it's not far, maybe 2" away. It's clear that this area has a few body panels coming together, and it's also right next to the drain for the cowl, so being sealed properly is crucial. If you have a water leak in a 4th gen, I wouldn't be surprised to find it's in this area! You can see three water trails coming down from that area, so I'm very confident this was my problem.
I spent quite a bit of time with different wire wheels, both on my big gun and little ones on my dremel, trying to peel back the old seam sealer so I could get a better look at exactly where the water is coming in.
It doesn't really come through in the picture, but the horizontal area just right of center is actually completely open now. I had to scrape the old seam sealer out of it with a screwdriver, because I didn't want any of that old cracked stuff getting in the way of my fresh seam sealer. Now I'll be able to completely refill the gap with new sealer. Access into this area was pretty awkward, and my back was aching after a few hours in there, but I think I'm happy with how clean I was able to get it. When I finally couldn't get it any cleaner, it was time to prep the surface for the seam sealer:
This stuff is SUPER strong, and has tons of warnings all over it. I go full-hazmat when I use this stuff, but professional painters swear by it, so I grit my teeth and bear it. I was considering applying the seam sealer today, but then I thought about it more and realized I would feel much better about it if I bought a new tube of it. My current tube is a few years old, and since I couldn't get a firm answer on its shelf life, I decided I would rather spend another $20 on new sealer than to have my current sealer fail because it was too old and didn't adhere properly. It should be here on Tuesday, so I'll continue after that. But for now I'm feeling pretty damn good that I was able to get the blower out by itself without ruining anything!
I'm left with this to look at, and ponder how many things I'm going to forget to reinstall, or reinstall in the wrong order. I'm not out of the woods yet!
As old as this thread it I think you solved my years old pass water leak issue. I am ripping the dash out this summer and looking in that area. I am tired of lifting the carpet every heavy rain to put a towel in the corner to catch the water
 06-04-2011, 09:59 PM