KYB SB104 Boot Fitment Problems - What am I missing here?
 01-20-2017, 07:14 PM
#1
Senior Member
Thread Starter

Join Date: Jan 2011
Location: Central AR
Posts: 3,041
KYB SB104 Boot Fitment Problems - What am I missing here?
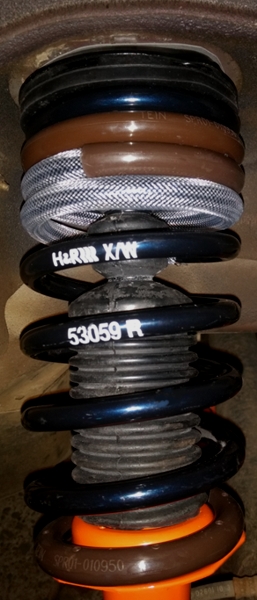
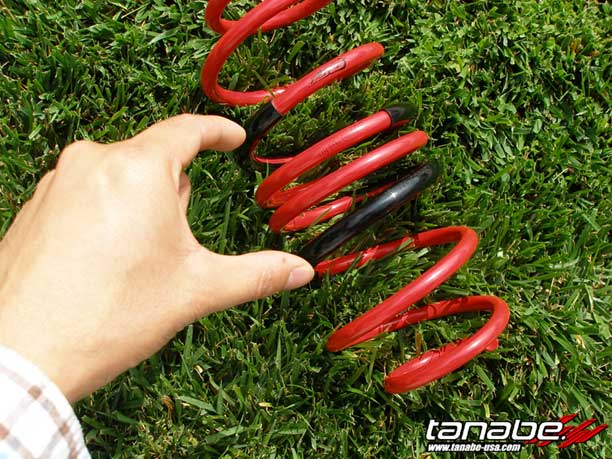
While the weather has been too bad to do anything outside, I've been preparing to start the 98 model's appearance and handling project by purchasing a set of H&R 53059 lowering springs, a set of entry level Koni STR.T (orange) struts, mounts, bearings, insulators, and all the trimmings. I have the parts and sources listed in the test thread below.
https://maxima.org/forums/test-posts...ade-notes.html
But I've hit a big snag with the KYB boots. Yea I know I should have gone with OEM boots like I did with the other H&R - AGX, and Tokico Blue installation on the Q45. But I was concerned about the bump stop length and read where the KYBs would work better with lowering springs. So I wanted to try KYB boots again. Note that all of my previous strut installation where I used OEM boots have lasted for years without issue. But I suspect using KYB SB104 boots with Tokico Blues on the 2nd 4th gen, resulted a shortened strut life.
So now I have a chance to avoid letting a poor boot selection cause an early strut failure on these new Koni struts.
Check out this thread below on KYB boots, water, and squeaking noises. I am having the problems reported in the thread with the Tokico Blues.
https://maxima.org/forums/4th-genera...na-shocks.html
I believe that water entered the strut shaft area from a poor boot fitment and caused the Blues to make squeaking noises -- especially when the temperature drops into the 20s.. Freezing water inside the strut has ruined them.
I really like what I see with these Koni STR.T orange struts with the H&R springs. So I don't want to make a mess by using incorrectly fitting boots.
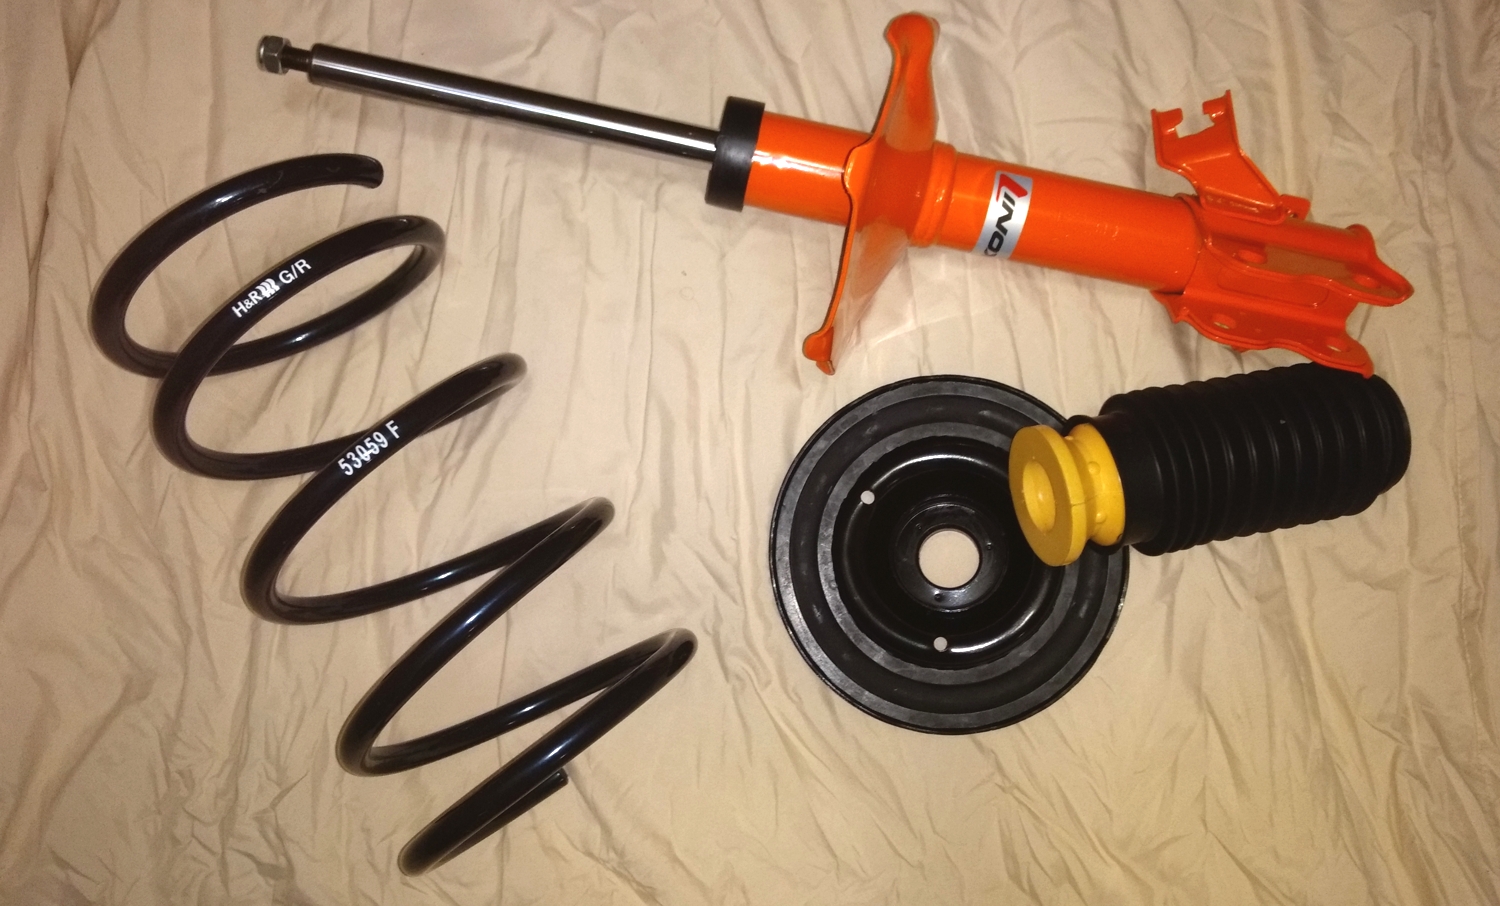
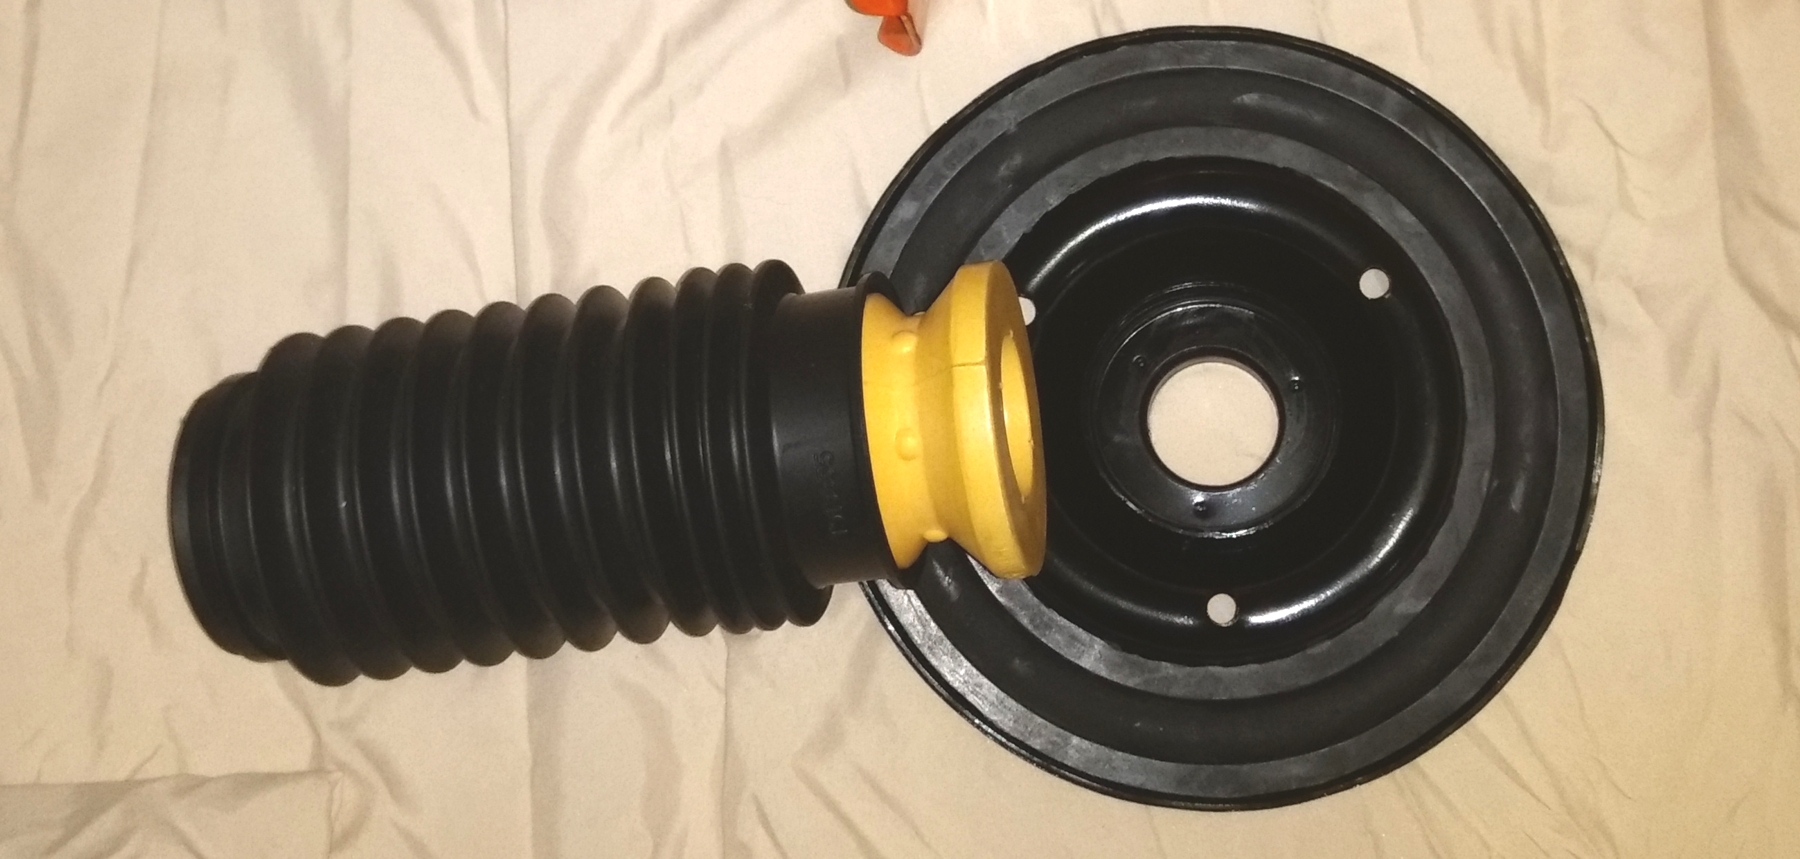
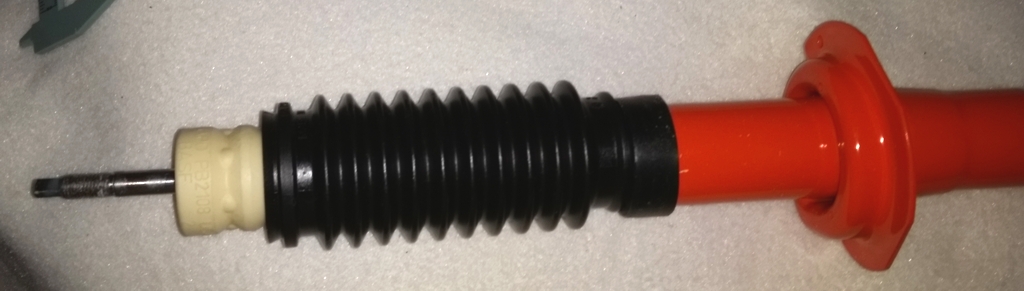
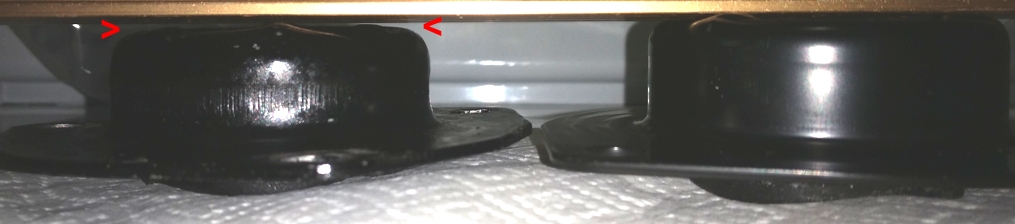
Maybe I'm totally missing something, but I can't see how this boot will work with the rest of the OEM spec insulators. It just looks wrong!
What am I missing here?
https://maxima.org/forums/test-posts...ade-notes.html
But I've hit a big snag with the KYB boots. Yea I know I should have gone with OEM boots like I did with the other H&R - AGX, and Tokico Blue installation on the Q45. But I was concerned about the bump stop length and read where the KYBs would work better with lowering springs. So I wanted to try KYB boots again. Note that all of my previous strut installation where I used OEM boots have lasted for years without issue. But I suspect using KYB SB104 boots with Tokico Blues on the 2nd 4th gen, resulted a shortened strut life.
So now I have a chance to avoid letting a poor boot selection cause an early strut failure on these new Koni struts.
Check out this thread below on KYB boots, water, and squeaking noises. I am having the problems reported in the thread with the Tokico Blues.
https://maxima.org/forums/4th-genera...na-shocks.html
I believe that water entered the strut shaft area from a poor boot fitment and caused the Blues to make squeaking noises -- especially when the temperature drops into the 20s.. Freezing water inside the strut has ruined them.
I really like what I see with these Koni STR.T orange struts with the H&R springs. So I don't want to make a mess by using incorrectly fitting boots.

Maybe I'm totally missing something, but I can't see how this boot will work with the rest of the OEM spec insulators. It just looks wrong!
What am I missing here?

Last edited by CS_AR; 01-20-2017 at 07:20 PM.
 01-21-2017, 10:11 AM
#2
Junior Member

Join Date: Sep 2014
Posts: 73
hey cs_ar, I think the bump stop is at the wrong end of the boot. It's been a while since I installed some KYB boots for my brothers struts, but I think the larger diameter part of the bump stop slips into one of the smaller extra ribs at the end and the narrower part of the bump stop sticks out not the big flat end. Well, at least that's how I remembered it.
01-21-2017, 10:58 AM
#3
Senior Member
Thread Starter
Join Date: Jan 2011
Location: Central AR
Posts: 3,041
hey cs_ar, I think the bump stop is at the wrong end of the boot. It's been a while since I installed some KYB boots for my brothers struts, but I think the larger diameter part of the bump stop slips into one of the smaller extra ribs at the end and the narrower part of the bump stop sticks out not the big flat end. Well, at least that's how I remembered it.
I think I will go get a MOOG just to see if it is different.
01-21-2017, 11:32 AM
#4
Senior Member

Join Date: May 2012
Location: Long Island
Posts: 1,565
I'm not so sure the bump stop has to be integrated/attached to the top spring insulator. I think they are very tight and are supposed to stay put where you push them to. Not 100% sure on this. Usually the tapered end of the bump stop goes up though, if yours has a tapered end. Boot will need to be positioned for proper fit (which end marries to the bump stop) as Maxinoob98 indicates..
Maybe some of these Strut part manufacturers use proprietary connections as well, to force customers to buy as much of what they manufacture as they can, for a seamless install . Gotta keep Wall Street happy.
Frustrating when you want to make something better than what everybody else settles for, ain't it? LOL I suffer from the same syndrome and ALWAYS get beat up for it.
I'll be watching. NAIL IT!
Maybe some of these Strut part manufacturers use proprietary connections as well, to force customers to buy as much of what they manufacture as they can, for a seamless install . Gotta keep Wall Street happy.
Frustrating when you want to make something better than what everybody else settles for, ain't it?
LOL I suffer from the same syndrome and ALWAYS get beat up for it. I'll be watching. NAIL IT!
Last edited by KP11520; 01-21-2017 at 11:34 AM.
01-21-2017, 04:49 PM
#5
Senior Member
Thread Starter
Join Date: Jan 2011
Location: Central AR
Posts: 3,041
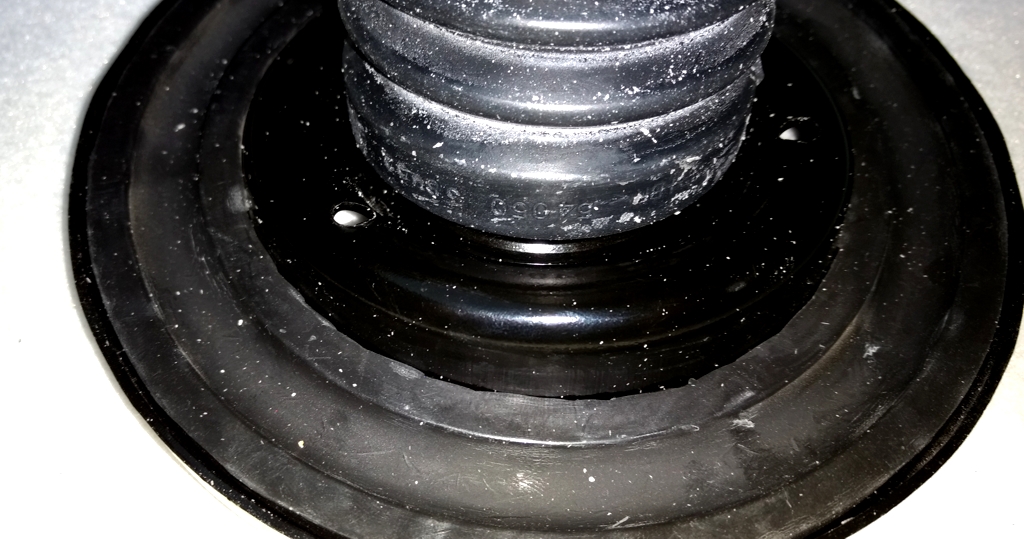
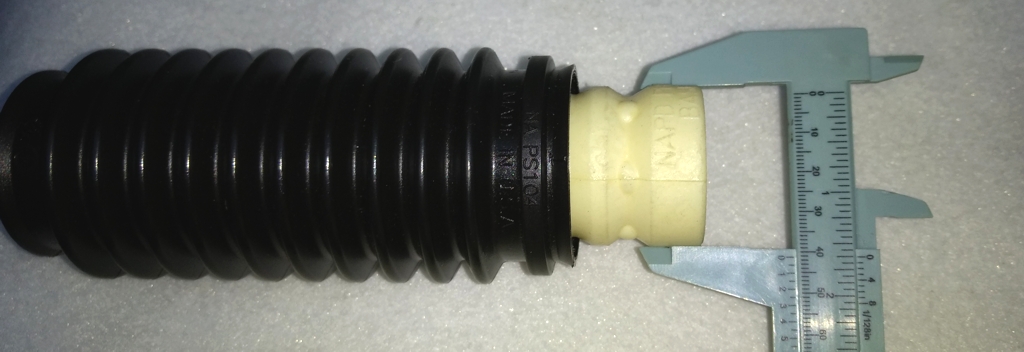
Ok.. Here are some pictures of the KYB SB104 and MOOG K90463 strut boots in a comparison with the MOOG K160064 "OEM specification" upper insulator.
Exhibit 1 - Strut Boot Mount Diameter - Note that OEM boots snap under the rim lip for a "tight fit" that holds the boots into place so that water cannot enter the upper shaft area of the strut. The outer diameter of the lip is 57 mm.
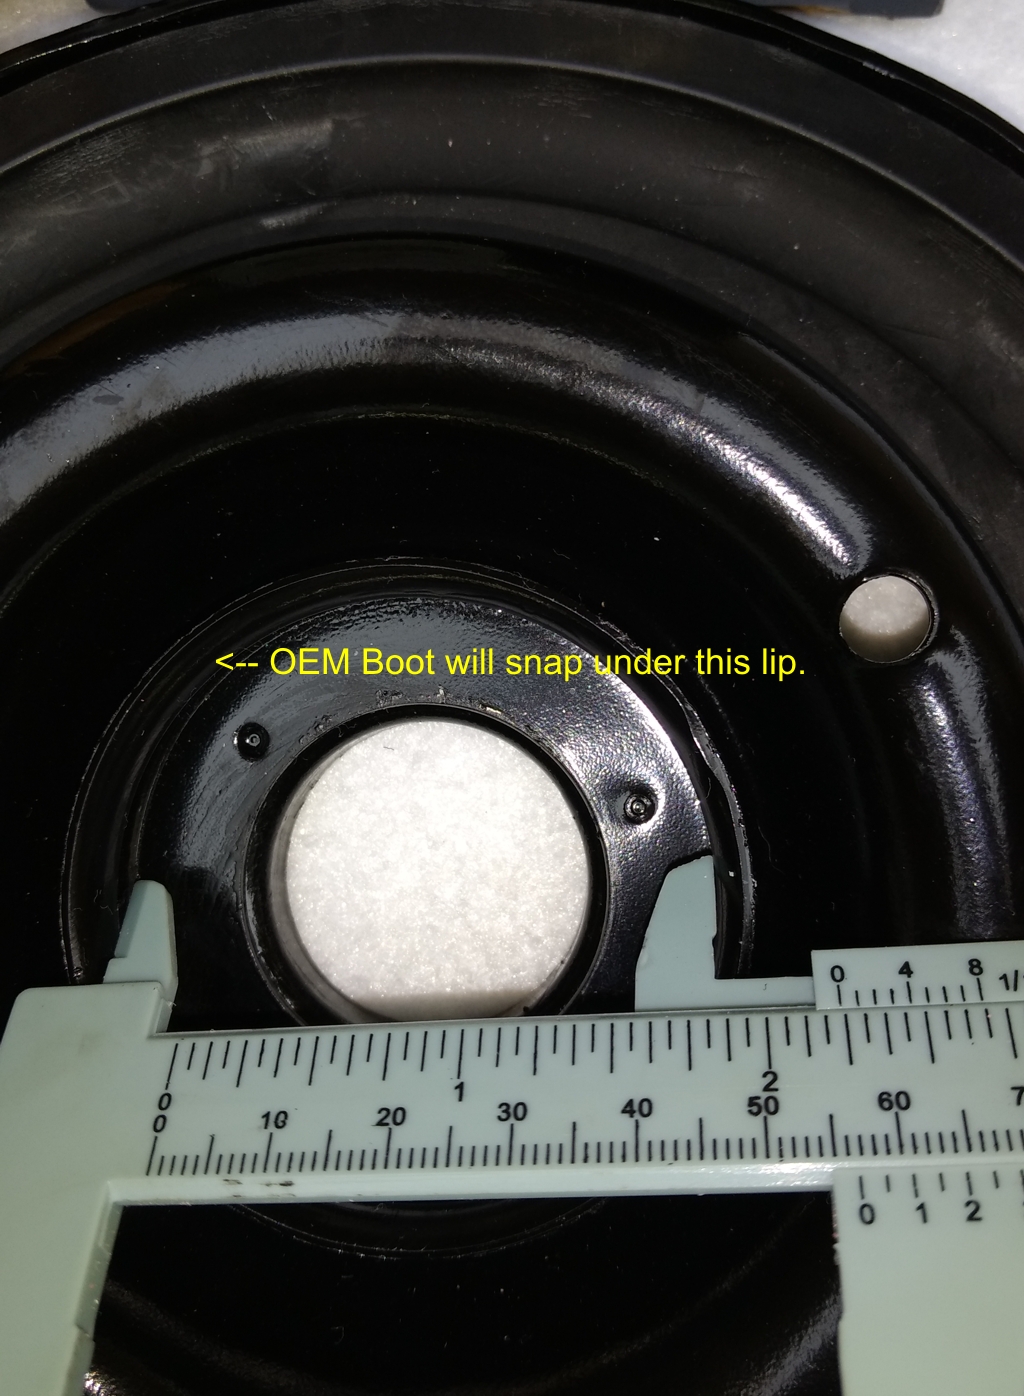
Exhibit 2 - The small part of the KYB boot bump stop is 67 mm. It is too large (by 10 mm) to snap under the insulator boot mount rim.
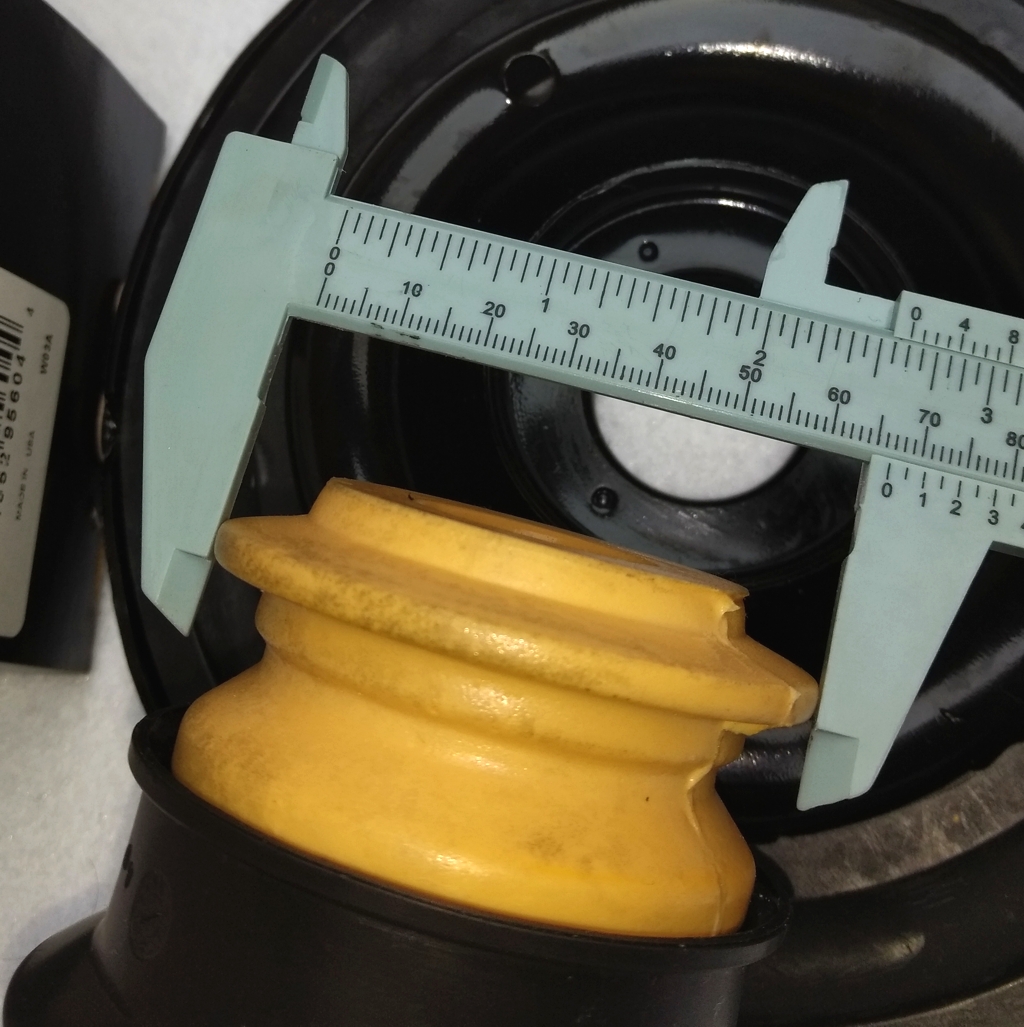
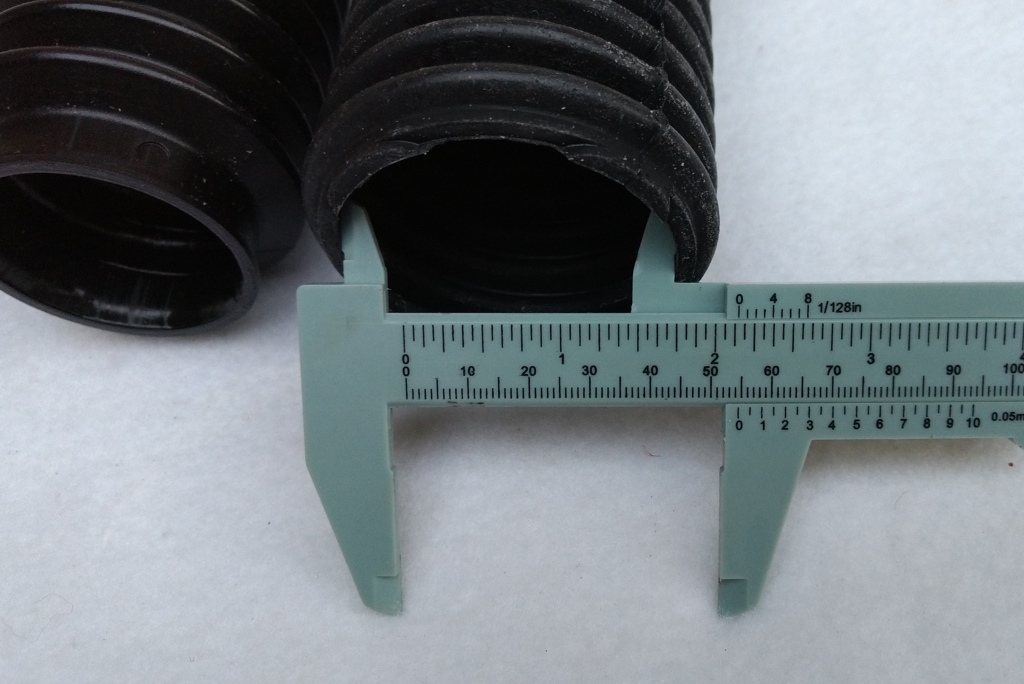
Exhibit 3 - The MOOG boot upper bump stop outer diameter area is 72 mm. It is too large to fit in the MOOG OEM spec boot mount location. It just won't fit the insulator like an OEM boot.
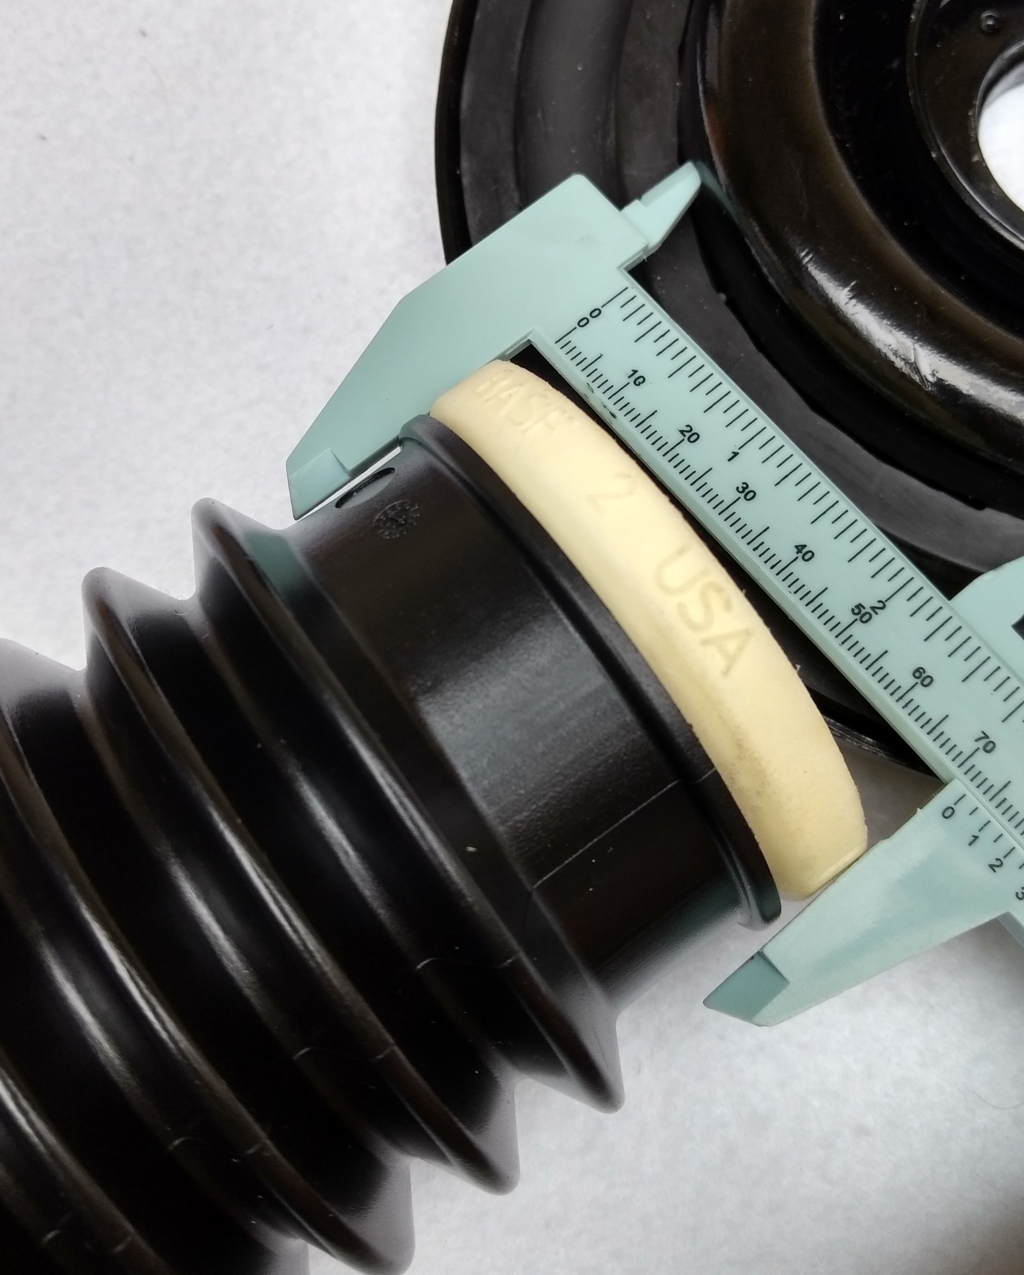
Exhibit 4 - The KYB boot is also 72 mm. Again this is too large to fit in the 57 mm space provided in the boot mount area.
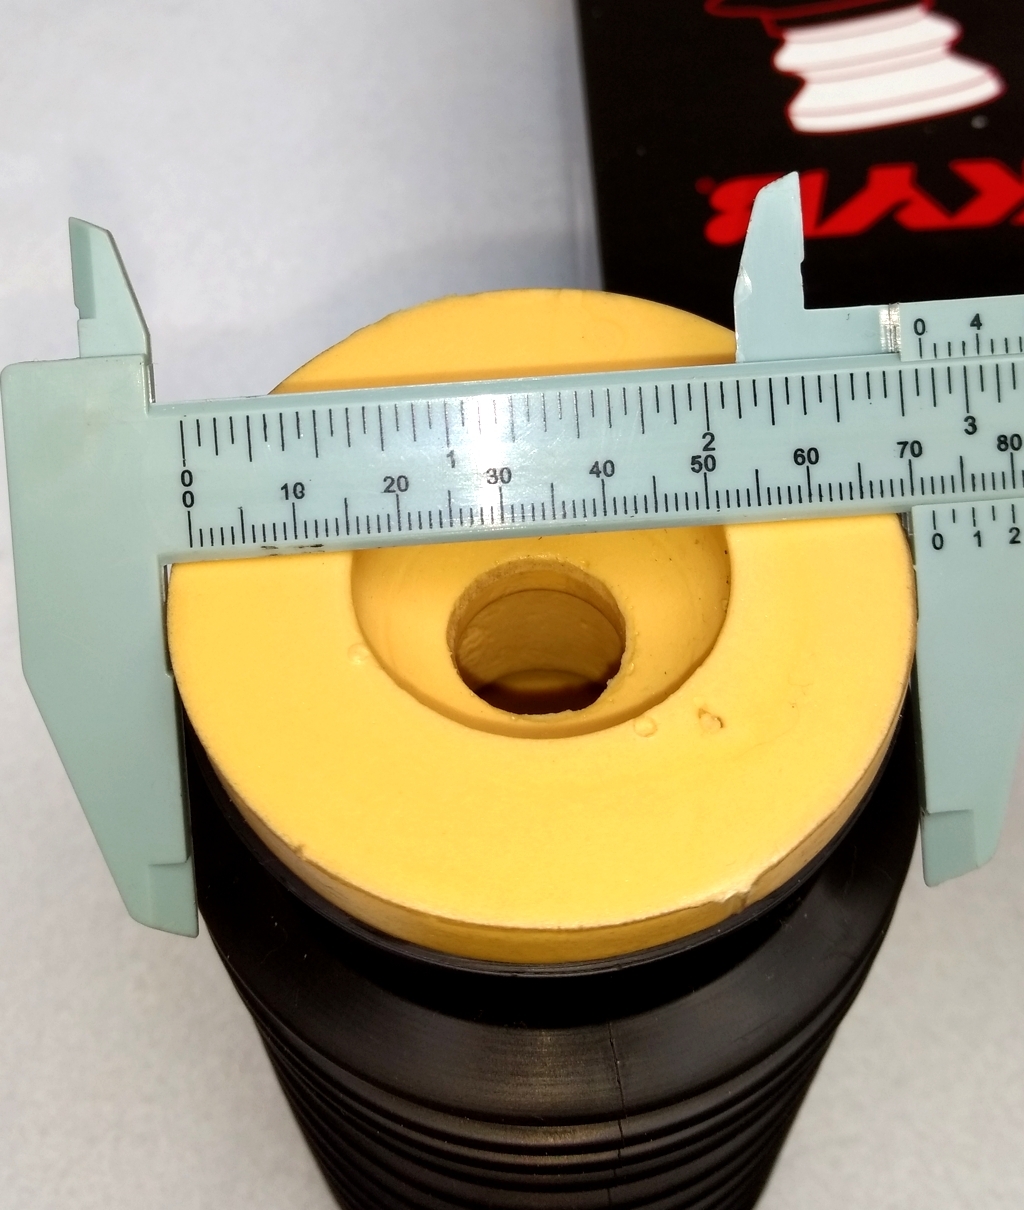
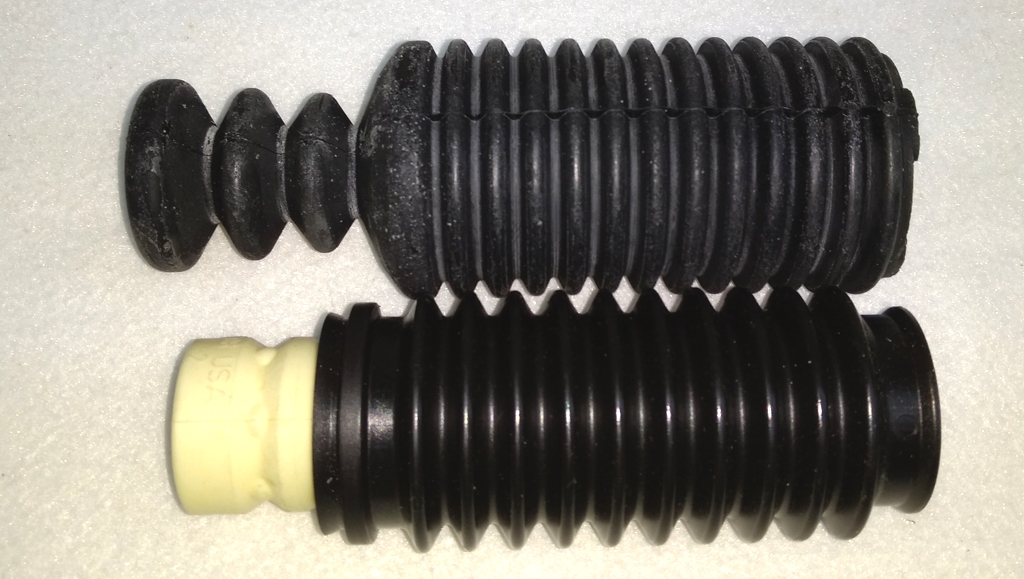
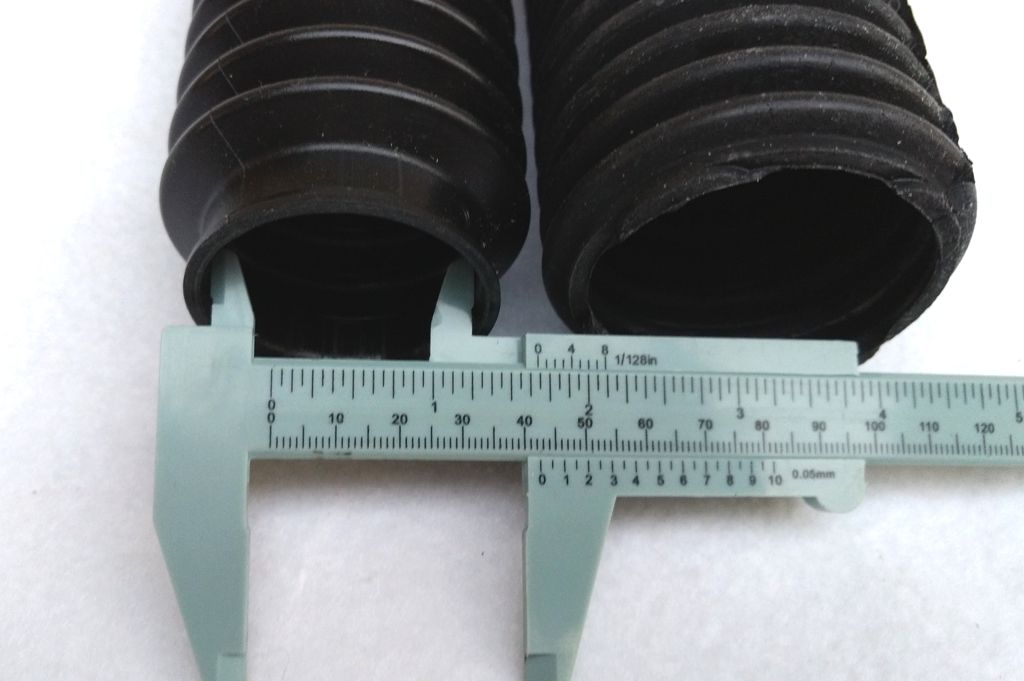
Exhibit 5 - MOOG and KYB boot side-by-side comparison. Note the MOOG boot is longer than the KYB.
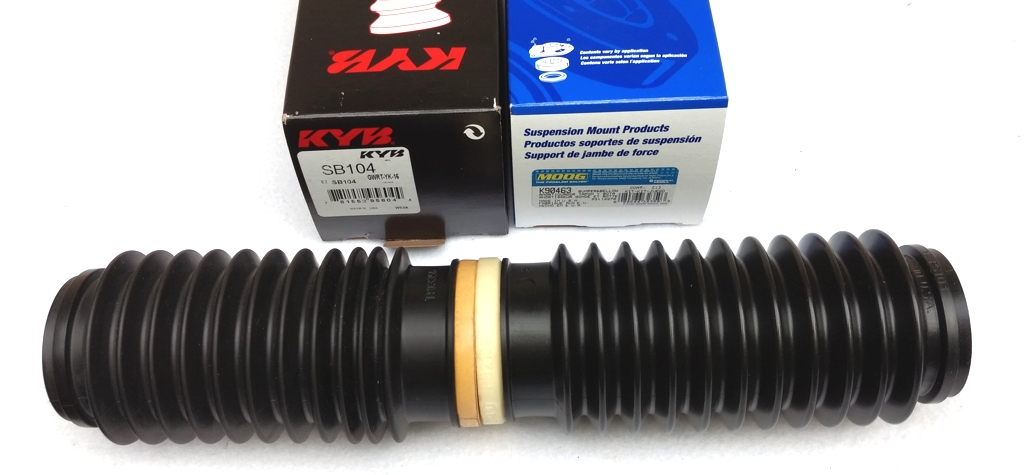
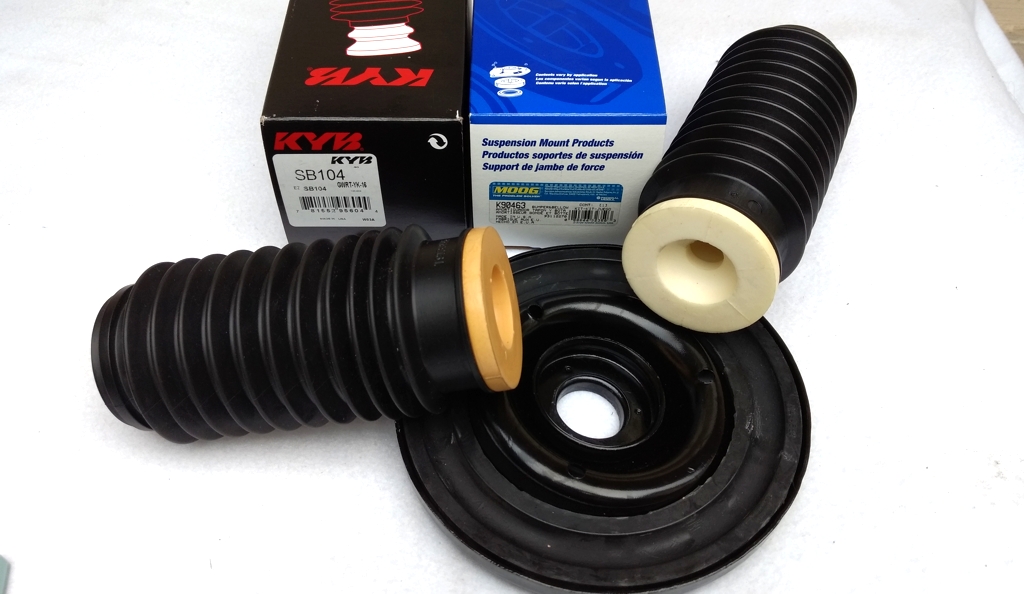
Exhibit 6 - You can see how both KYB and MOOG boots are too large to snap into the boot mounting rim.
Bottom Line - I just ordered a set of OEM boots. They should arrive in a few days. I will post pictures of how the OEM boots look when mounted into the MOOG OEM spec upper insulator.
In looking at MOOG fitment chart for the K90463 boot, I see cars like a Buick Electra, Cadillac Deville, Infiniti QX4, and others. This looks like a "one side fits all" strut boot that really doesn't fit anything correctly.
http://www.moog-suspension-parts.com...id=MOOG-K90463
The sad part is the OEM boots sell for $16.41 each at OIP which is a whopping $1.41 more than the generic "one size fits all" boots that sell for $15.00 each.
https://www.orderinfinitiparts.com/p...mponent=Bumper
::
Exhibit 1 - Strut Boot Mount Diameter - Note that OEM boots snap under the rim lip for a "tight fit" that holds the boots into place so that water cannot enter the upper shaft area of the strut. The outer diameter of the lip is 57 mm.

Exhibit 2 - The small part of the KYB boot bump stop is 67 mm. It is too large (by 10 mm) to snap under the insulator boot mount rim.

Exhibit 3 - The MOOG boot upper bump stop outer diameter area is 72 mm. It is too large to fit in the MOOG OEM spec boot mount location. It just won't fit the insulator like an OEM boot.

Exhibit 4 - The KYB boot is also 72 mm. Again this is too large to fit in the 57 mm space provided in the boot mount area.

Exhibit 5 - MOOG and KYB boot side-by-side comparison. Note the MOOG boot is longer than the KYB.

Exhibit 6 - You can see how both KYB and MOOG boots are too large to snap into the boot mounting rim.

Bottom Line - I just ordered a set of OEM boots. They should arrive in a few days. I will post pictures of how the OEM boots look when mounted into the MOOG OEM spec upper insulator.
In looking at MOOG fitment chart for the K90463 boot, I see cars like a Buick Electra, Cadillac Deville, Infiniti QX4, and others. This looks like a "one side fits all" strut boot that really doesn't fit anything correctly.
http://www.moog-suspension-parts.com...id=MOOG-K90463
The sad part is the OEM boots sell for $16.41 each at OIP which is a whopping $1.41 more than the generic "one size fits all" boots that sell for $15.00 each.
https://www.orderinfinitiparts.com/p...mponent=Bumper
::
Last edited by CS_AR; 01-21-2017 at 06:26 PM.
01-21-2017, 10:05 PM
#6
Senior Member
Join Date: May 2012
Location: Long Island
Posts: 1,565
What is interesting is the other end of the boot without the bumper stop looks like it would fit fine.
Just use some water based sex lube and slam that bumper in there. LOL Make it fit!!!!!
I commend your plan for the better parts for each position. Too bad the manufacturers aren't on board!
Just use some water based sex lube and slam that bumper in there. LOL Make it fit!!!!!
I commend your plan for the better parts for each position. Too bad the manufacturers aren't on board!

 01-23-2017, 07:40 AM
#8
Senior Member
Thread Starter
Join Date: Jan 2011
Location: Central AR
Posts: 3,041
I should have the OEM boots in a few days and will post pictures of how the boot compares and "correctly" fits the insulator.
01-23-2017, 09:50 AM
#9
Senior Member
Join Date: May 2012
Location: Long Island
Posts: 1,565
Hey CS,
Maybe it's not the boots and bump stop, but the upper spring seat that's different? It the one you are showing in the picture OEM?
I have high regards for Moog suspension products, but on my front strut assemblies, the Moog strut mounts and bearings gave up the ghost in a little more than a year (both). Hopefully you are using ones that are the overly reliable standard!
This car is going to be worth $20K when you are done! AND worth every penny!
01-23-2017, 04:58 PM
#10
Senior Member
Thread Starter
Join Date: Jan 2011
Location: Central AR
Posts: 3,041
Hey CS,
Maybe it's not the boots and bump stop, but the upper spring seat that's different? It the one you are showing in the picture OEM?
I have high regards for Moog suspension products, but on my front strut assemblies, the Moog strut mounts and bearings gave up the ghost in a little more than a year (both). Hopefully you are using ones that are the overly reliable standard!
This car is going to be worth $20K when you are done! AND worth every penny!
Maybe it's not the boots and bump stop, but the upper spring seat that's different? It the one you are showing in the picture OEM?
I have high regards for Moog suspension products, but on my front strut assemblies, the Moog strut mounts and bearings gave up the ghost in a little more than a year (both). Hopefully you are using ones that are the overly reliable standard!
This car is going to be worth $20K when you are done! AND worth every penny!
18 � FelPro Rubber-Fiber Sheet Part No 3157 - $5.99 Advance Auto. This is some tough material that will most likely outlast the car. It does take time and patience doing �arts and crafts� work to draw around the strut mount and to cut out the circles and shapes needed to make your own.
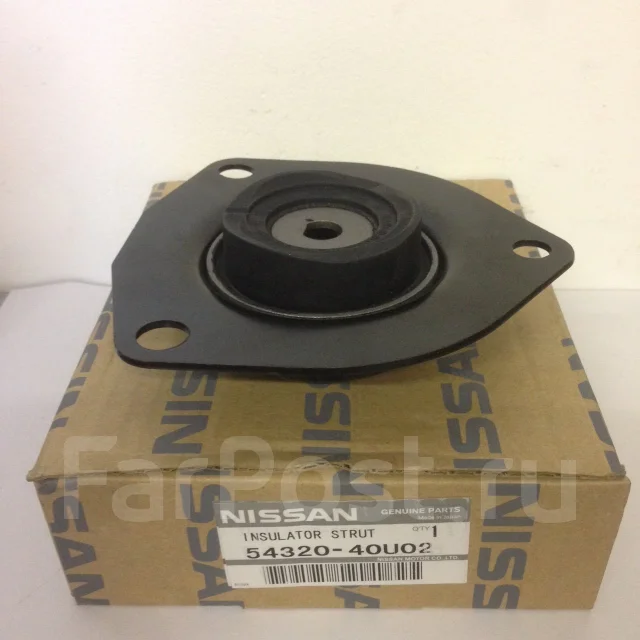
15 � Strut Mount � OEM Touring (SE) Model should be part 5432040U02 � The seller quickly issued a return order.
I should receive part number 5432040U02 OEM Touring (SE) model mounts in a few days. I can compare the new OEM to a "short lived" aftermarket that I replaced along with a strut bearing from the same kit a few years ago.
16 � Strut Mount � MOOG K160106 $14.12 � RockAuto.com
17 � Strut Bearing � OEM $18.32
13 & 14 Mount & Spring Seat Bushing � MOOG K160084 - $22.79 � RockAuto.com �
11 - Strut Boot OEM - $16.41
Spring Silencer � Tein SPR02-H2187 2 pack - $12.00 + $8.22 shipping - rallysportdirect
One item to note is the MOOG Spring Seat K160084 from rockauto.com comes with the rubber insulator. Here's a picture of that part below.

Last edited by CS_AR; 01-24-2017 at 05:30 PM.
01-23-2017, 05:08 PM
#11
Senior Member
Join Date: May 2012
Location: Long Island
Posts: 1,565
I'm glad you've done your homework! The mis fit is baffling though!
Different Strut mounts for a SE? Thank you for that! I had no idea!
I wish I lived next door! I'd love to help! But on a nice day if it gets done in the driveway! LOL Between my 99 SE and my 99 Durango, I'm spending way too much "time" in the driveway lately and addressing one thing for every two that arises! All expensive!
May the weather be forgiving and the lucky breaks fall in your lap! Then it's fun!
01-23-2017, 05:31 PM
#12
Senior Member
Thread Starter
Join Date: Jan 2011
Location: Central AR
Posts: 3,041
I'm glad you've done your homework! The mis fit is baffling though!
Different Strut mounts for a SE? Thank you for that! I had no idea!
I wish I lived next door! I'd love to help! But on a nice day if it gets done in the driveway! LOL Between my 99 SE and my 99 Durango, I'm spending way too much "time" in the driveway lately and addressing one thing for every two that arises! All expensive!
May the weather be forgiving and the lucky breaks fall in your lap! Then it's fun!
Different Strut mounts for a SE? Thank you for that! I had no idea!
I wish I lived next door! I'd love to help! But on a nice day if it gets done in the driveway! LOL Between my 99 SE and my 99 Durango, I'm spending way too much "time" in the driveway lately and addressing one thing for every two that arises! All expensive!
May the weather be forgiving and the lucky breaks fall in your lap! Then it's fun!
Though, these suspension projects are enough to push all the wrong buttons.
Now I need to find a buyer for the Buick Electra boots that I won't be using.
01-26-2017, 05:10 PM
#13
Senior Member
Thread Starter
Join Date: Jan 2011
Location: Central AR
Posts: 3,041
The OEM boots arrived today. Comparison pictures are posted below.
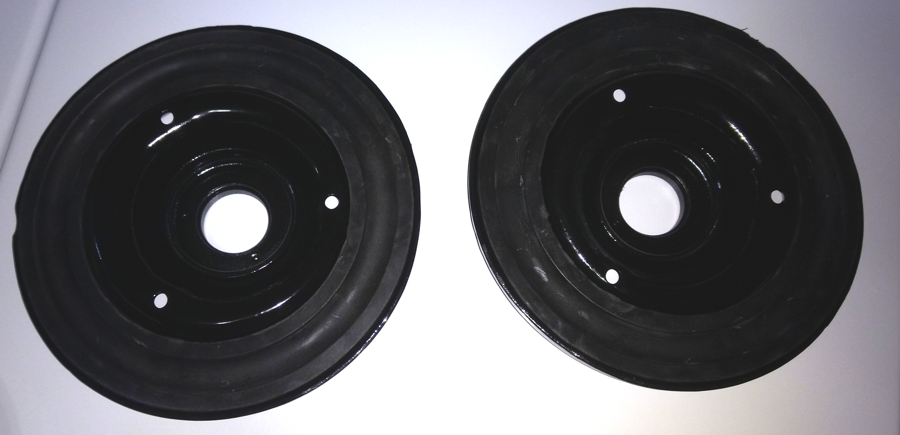
Picture of OEM 54050-38U02 mounted on MOOG K160084 OEM spec strut upper mount. The fit in the mounting is tight and the boot will hold up the mount when its laying on its side.

Close up of OEM 54050-38U02 after snapping it into MOOG K160084 OEM spec strut upper mount rim. This is how a boot should mate up inside the upper mount opening. Basically, the boot should "snap" inside the mounting rim. Once the boot has "snapped" inside the rim, it will be hard to remove. The boot should NOT drop out of the mounting rim and fall down on the strut body. Having the boot properly "snapped" into to the mount will keep the strut shaft clean and dry during normal use. Again, my past strut jobs that have lasted the longest (e.g. over 5+ years) are the ones where I used OEM boots.
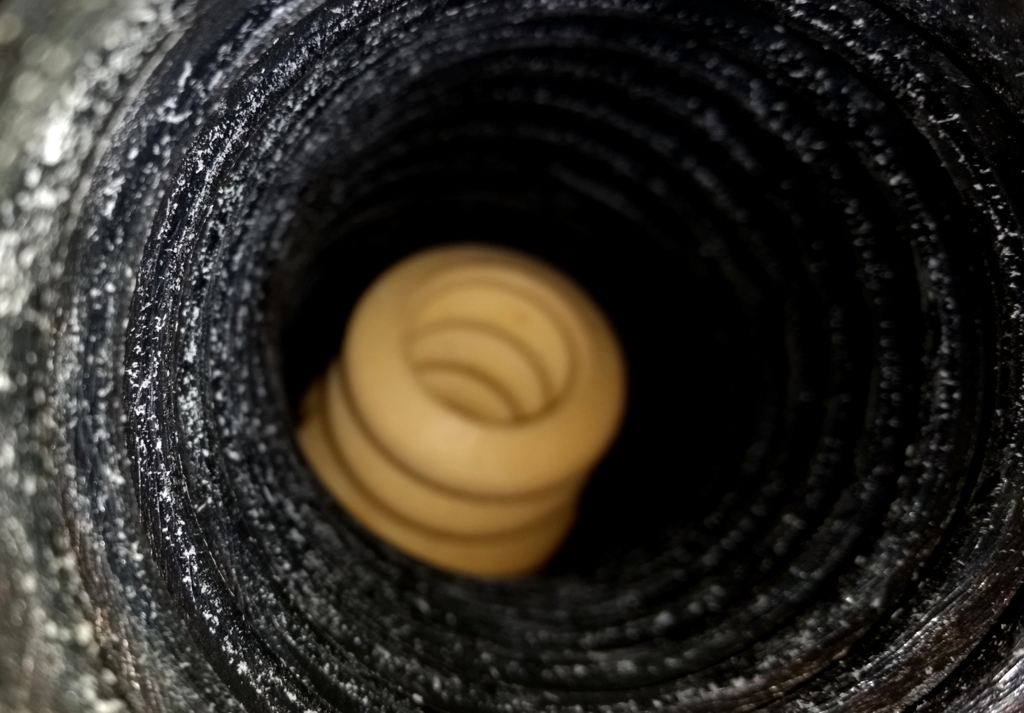
This is a picture looking down inside OEM part 54050-38U02 where the bump stop is located. The bump stop is soft and pliable. If the bump stop does come in contact with the strut top, I do not see how it could damage it.
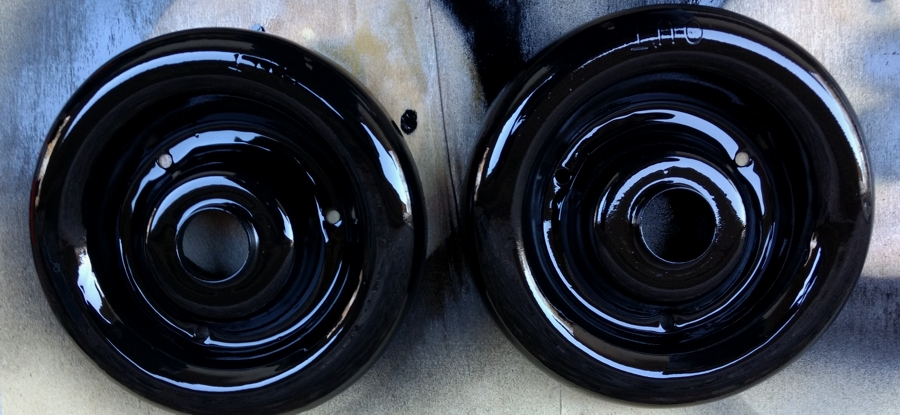
Here's a picture of KYB SB108 compared to OEM 55240-0M315. The OEM boot is a larger more robust part.
Another picture of KYB SB108 compared to OEM 55240-0M315.
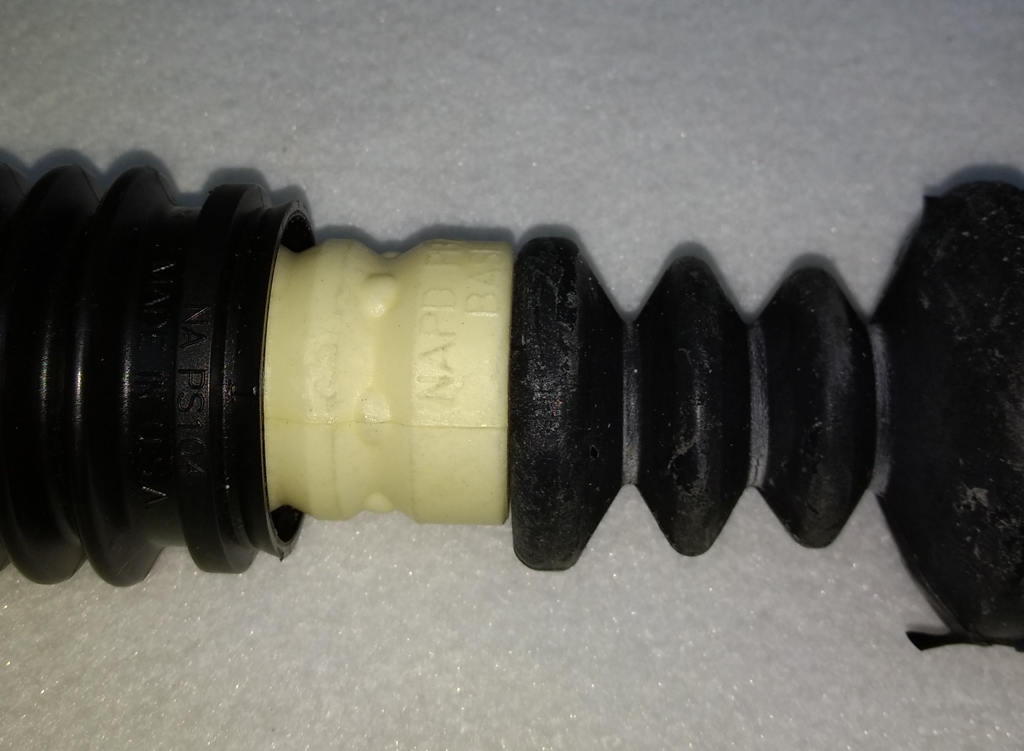
The KYB SB108 bump stop is ~41 mm wide.
The OEM 55240-0M315 boot is ~48 mm wide.

The KYB SB108 boot inner diameter is ~43 mm wide.
The OEM 55240-0M315 boot inner diameter is ~54 mm wide.
The OEM 55240-0M315 boot completely covers the strut shaft and body.
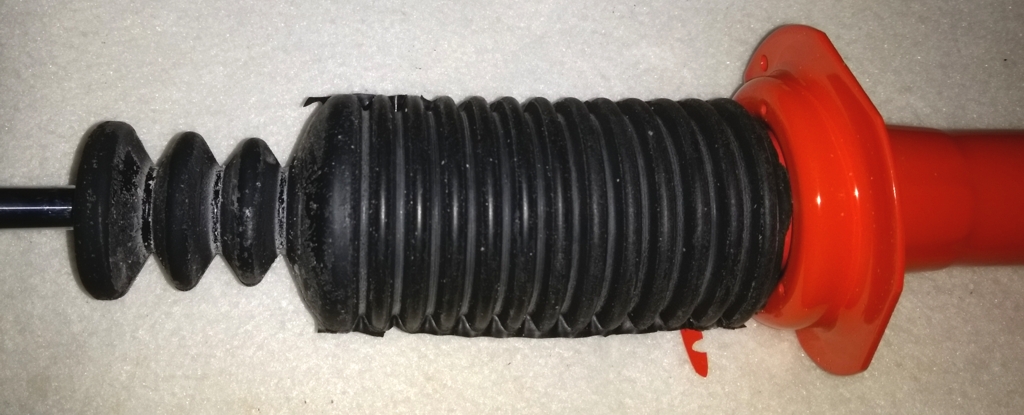
The KYB SB108 boot stops at the strut upper bump stop. This boot just does not cover the strut like an OEM.
Picture of OEM 54050-38U02 mounted on MOOG K160084 OEM spec strut upper mount. The fit in the mounting is tight and the boot will hold up the mount when its laying on its side.

Close up of OEM 54050-38U02 after snapping it into MOOG K160084 OEM spec strut upper mount rim. This is how a boot should mate up inside the upper mount opening. Basically, the boot should "snap" inside the mounting rim. Once the boot has "snapped" inside the rim, it will be hard to remove. The boot should NOT drop out of the mounting rim and fall down on the strut body. Having the boot properly "snapped" into to the mount will keep the strut shaft clean and dry during normal use. Again, my past strut jobs that have lasted the longest (e.g. over 5+ years) are the ones where I used OEM boots.

This is a picture looking down inside OEM part 54050-38U02 where the bump stop is located. The bump stop is soft and pliable. If the bump stop does come in contact with the strut top, I do not see how it could damage it.

Here's a picture of KYB SB108 compared to OEM 55240-0M315. The OEM boot is a larger more robust part.

Another picture of KYB SB108 compared to OEM 55240-0M315.

The KYB SB108 bump stop is ~41 mm wide.

The OEM 55240-0M315 boot is ~48 mm wide.

The KYB SB108 boot inner diameter is ~43 mm wide.

The OEM 55240-0M315 boot inner diameter is ~54 mm wide.

The OEM 55240-0M315 boot completely covers the strut shaft and body.

The KYB SB108 boot stops at the strut upper bump stop. This boot just does not cover the strut like an OEM.

Last edited by CS_AR; 01-27-2017 at 07:36 AM.
01-26-2017, 08:01 PM
#14
Senior Member
Join Date: May 2012
Location: Long Island
Posts: 1,565
Funny, I spoke this evening to a mechanic that has worked on MANY 4th Gens including his own (supercharged and more) and he said OEM is the only way to go. All the rest are Generic. Which explains exactly what you've shown!
I commend you for not settling! You'll bring this beast as close to perfaction as humanly possible... Or maybe beyond humanly... What planet are you from? They have cool UFO's?
I commend you for not settling! You'll bring this beast as close to perfaction as humanly possible... Or maybe beyond humanly... What planet are you from? They have cool UFO's?
01-27-2017, 05:45 AM
#16
Senior Member
Thread Starter
Join Date: Jan 2011
Location: Central AR
Posts: 3,041
Funny, I spoke this evening to a mechanic that has worked on MANY 4th Gens including his own (supercharged and more) and he said OEM is the only way to go. All the rest are Generic. Which explains exactly what you've shown!
I commend you for not settling! You'll bring this beast as close to perfection as humanly possible... Or maybe beyond humanly... What planet are you from? They have cool UFO's?
I commend you for not settling! You'll bring this beast as close to perfection as humanly possible... Or maybe beyond humanly... What planet are you from? They have cool UFO's?
If you can wait a few days until I receive and post pictures of the Touring/SE model upper mounts, then I think we will have a complete parts list. The Touring/SE model upper mounts cost roughly $9 more than the ones for a Base I30 or GLE/GXE model. There must be a reason for the additional cost. I suspect the higher end mount is better built. I have a lightly used aftermarket mount that looks just like the ones for the non-Touring/SE model to compare.
Stay tuned for pictures of that comparison. Hopefully, I can post that information in the next 7 to 10 days. It would be helpful if dealers stocked the Touring/SE mounts so we could see what we are buying before we make a purchase. There is always the shipment time delay associated with an online order. Waiting for ordered parts is my single largest encumbrance when preparing for a new build.
OEM Touring/SE Model mount should be part 5432040U02. I found a picture below. I think I see the difference that explains the $9 cost difference. The rubber part that sticks out from the metal housing explains the difference. The base model part does not have the extra rubber like the one in the picture below. This looks like it will better support a heavier spring rate, and in my case, a heavier VLSD transmission.
Here's a picture of a KYB mount below. Can you see the difference in material?

Last edited by CS_AR; 01-27-2017 at 06:17 AM.
01-27-2017, 09:30 AM
#17
Senior Member
Join Date: May 2012
Location: Long Island
Posts: 1,565
I bet the SE Strut Mounts are quieter too! More rubber might mean more sound deadening!
I look forward to hearing how these Konis ride, feel and handle.
Next time, I'm copying you! With your New and Updated, successful parts list!
It looks to be a winning combination!
I look forward to hearing how these Konis ride, feel and handle.
Next time, I'm copying you! With your New and Updated, successful parts list!
It looks to be a winning combination!
01-27-2017, 10:54 AM
#18
Senior Member
Thread Starter
Join Date: Jan 2011
Location: Central AR
Posts: 3,041
I can't wait. I see many good reviews on the Mustang and Honda forums. I need to stop looking at those Fox Body Mustang forums, though. The Fox people are having way too much fun. I could get Fox Body Fever and start a new project car..
01-27-2017, 11:22 AM
#19
Senior Member
Join Date: May 2012
Location: Long Island
Posts: 1,565
Some of that stuff is Dead Sexy! (can I say that here?) LOL Kinda gets you/us all excited and tingly.
 01-27-2017, 02:49 PM
#21
Senior Member
Thread Starter
Join Date: Jan 2011
Location: Central AR
Posts: 3,041
https://maxima.org/forums/4th-genera...ml#post7460322
Though, there are some differences in this area between the 99 and 98 model that I introduced in December. I want to try something new this weekend that's a mix of s-chassis and Carnal_c30 parts on the 99 model SE.
I'm not exactly crazy about this part of the suspension and will be looking for ways to tighten it up later in the year once the weather warms.

Last edited by CS_AR; 01-27-2017 at 04:57 PM.
01-28-2017, 07:19 AM
#22
Senior Member
Thread Starter
Join Date: Jan 2011
Location: Central AR
Posts: 3,041
Yep. I need that plate to complete the Touring/SE conversion. It takes two 14 mm and one 19 mm sockets to remove it. I can actually feel the difference in that area between the 99 and 98 model. That's the difference that I'm feel and dislike about the non-Touring/SE suspension.
Now off to the salvage yards to find one today. I vaguely remember an SE-L on one yard back in December. Though I think one side had been removed.
Finding an SE or T model in a yard may take a while.. I hope I get lucky today.
01-28-2017, 08:18 AM
#23
Senior Member
Join Date: May 2012
Location: Long Island
Posts: 1,565
Wiz - You nailed it.
Yep. I need that plate to complete the Touring/SE conversion. It takes two 14 mm and one 19 mm sockets to remove it. I can actually feel the difference in that area between the 99 and 98 model. That's the difference that I'm feel and dislike about the non-Touring/SE suspension.
Now off to the salvage yards to find one today. I vaguely remember an SE-L on one yard back in December. Though I think one side had been removed.
Finding an SE or T model in a yard may take a while.. I hope I get lucky today.
01-28-2017, 01:07 PM
#24
Senior Member
Thread Starter
Join Date: Jan 2011
Location: Central AR
Posts: 3,041
While I had no need for it, I got to see the difference between the SE upper mount. It appears to be taller and is just like the one in the picture above.
Here's a picture of the SE model triangular chassis braces that I picked up at the yard today. I had to give them a quick sanding, prime and paint. Really, they didn't look bad after I gave them a good cleaning.

Last edited by CS_AR; 01-28-2017 at 01:37 PM.
01-28-2017, 03:58 PM
#25
Senior Member
Thread Starter
Join Date: Jan 2011
Location: Central AR
Posts: 3,041
Ok - I've got it on. I does make it a little tighter. Its getting closer to the feel that I like. It does seem to work nicely with the s-chassis spacer and the big red Perrin bushing.
I've got to get the new struts on next weekend. I just need a couple of parts to arrive. The old struts are making so much noise that I can't stand it.
I've got to get the new struts on next weekend. I just need a couple of parts to arrive. The old struts are making so much noise that I can't stand it.
 01-31-2017, 05:17 PM
#26
Senior Member
Thread Starter
Join Date: Jan 2011
Location: Central AR
Posts: 3,041
Tonight I received the Touring/SE strut upper mount (a.k.a Top Hat) and compared it to an aftermarket (KYB most likely as it was installed along with some AGX) that I used for less than two months before the bearing failed and I had to replace it.
The OEM part 5432040U02 is on the right. There appears to be more rubber inside this part as compared to the mount on the left.
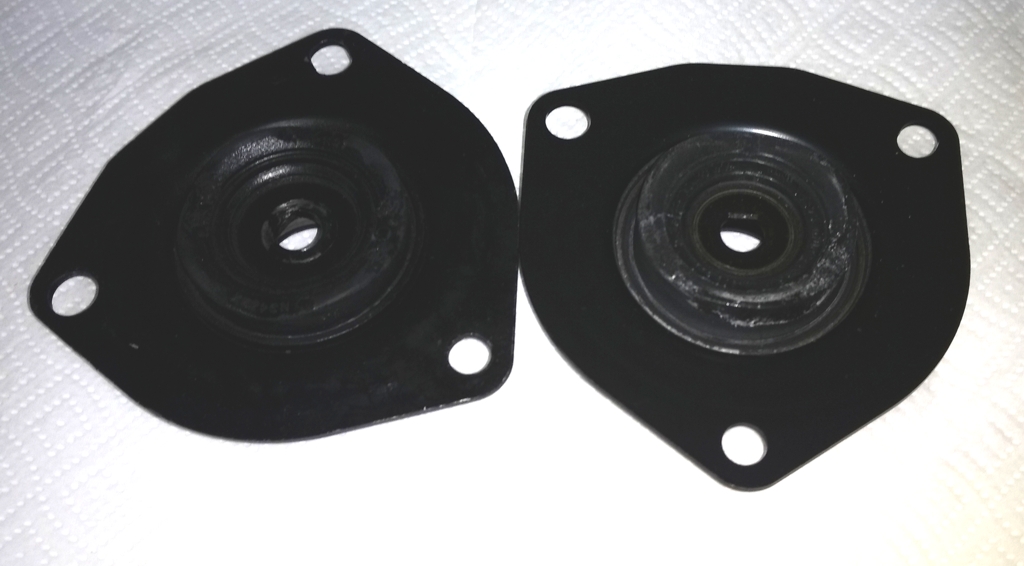
Then when I compare the top side, the OEM has a taller body to hold the larger bushing.
The OEM part 5432040U02 is on the right. There appears to be more rubber inside this part as compared to the mount on the left.

Then when I compare the top side, the OEM has a taller body to hold the larger bushing.
 02-03-2017, 06:19 AM
#27
Senior Member
Thread Starter
Join Date: Jan 2011
Location: Central AR
Posts: 3,041
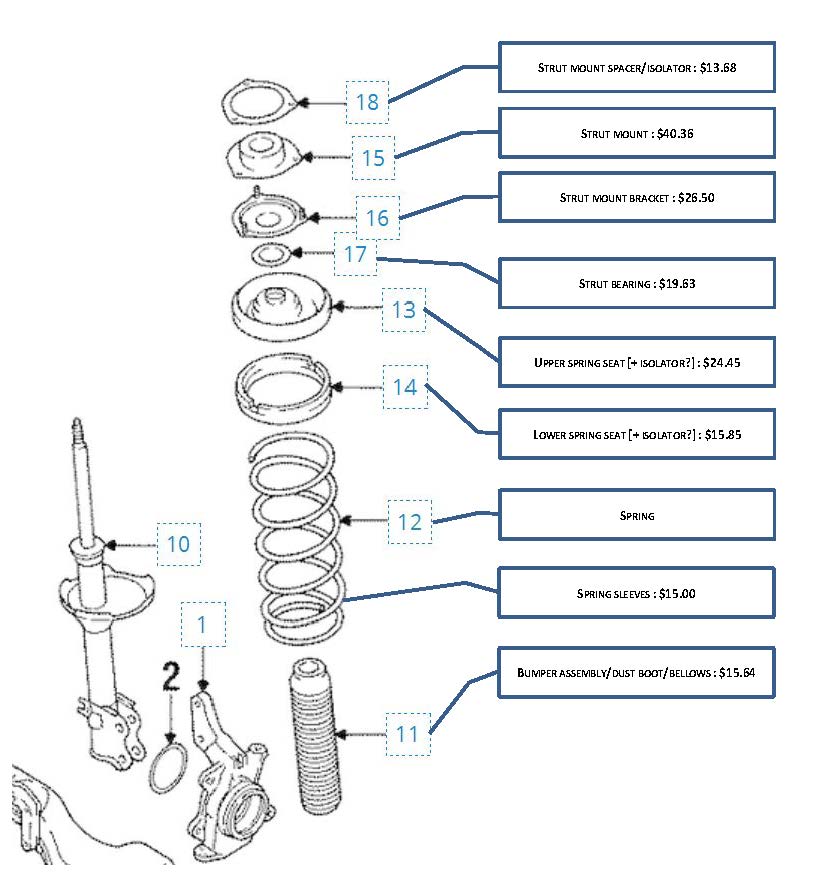
Just a quick note that I assembled the rear struts last night without an issue. However, I hit a problem with the fronts. From Turbobonk's diagram below, MOOG parts #13 and #16 (with the OEM bearing installed) have a metal-to-metal rub against the bolt bottoms from #16. It looks like the area on #13 where the bearing rides is recessed too far. I tried rotating #16 to different positions and I still get the rub. Am I seeing another issue where a MOOG part does't work with another MOOG part?
Last weekend I left behind a set of #13 from a local salvage yard SE where I got the triangular subframe braces. So I may stop by the yard today to see if I can snag those parts for comparison. Otherwise, I may end up using #13 from the existing struts with the new rubber insulator from the new MOOG part, providing it will fit.
I just don't remember having this many part fitment problems with the past three 4th gen suspension jobs. This 4th suspension upgrade has taken the ever loving CAKE on fitment issues! �Ay, caramba!
I'll figure it out today, maybe..
Thank you Turbobink for posting the diagram. Its a great sanity check..
::
Last edited by CS_AR; 02-03-2017 at 06:27 AM.
02-03-2017, 07:03 AM
#28
Thanks to you Craig for continuing to update everyone on the issues you're running into.
For me, this is just support for my intent to just spend the $$ on the OE parts and pieces.
I think at this point in your situation, I'd have been on the phone a couple of times with MOOG providing them with various pieces of my mind followed by exclamation points in bold font.
For me, this is just support for my intent to just spend the $$ on the OE parts and pieces.
I think at this point in your situation, I'd have been on the phone a couple of times with MOOG providing them with various pieces of my mind followed by exclamation points in bold font.
02-03-2017, 07:45 AM
#29
Senior Member
Thread Starter
Join Date: Jan 2011
Location: Central AR
Posts: 3,041
Thanks to you Craig for continuing to update everyone on the issues you're running into.
For me, this is just support for my intent to just spend the $$ on the OE parts and pieces.
I think at this point in your situation, I'd have been on the phone a couple of times with MOOG providing them with various pieces of my mind followed by exclamation points in bold font.
For me, this is just support for my intent to just spend the $$ on the OE parts and pieces.
I think at this point in your situation, I'd have been on the phone a couple of times with MOOG providing them with various pieces of my mind followed by exclamation points in bold font.
Some days I feel like Joe Dirt. Though my days of being able to sport a mullet belong to a decade somewhere in last century.. Yee haw..
https://www.youtube.com/watch?v=KLG2jaVdUMo
Now off to the salvage yard, again.
::
Last edited by CS_AR; 02-03-2017 at 07:48 AM.
02-03-2017, 12:11 PM
#30
Senior Member
Thread Starter
Join Date: Jan 2011
Location: Central AR
Posts: 3,041
Just a quick note that I assembled the rear struts last night without an issue. However, I hit a problem with the fronts. From Turbobonk's diagram below, MOOG parts #13 and #16 (with the OEM bearing installed) have a metal-to-metal rub against the bolt bottoms from #16. It looks like the area on #13 where the bearing rides is recessed too far. I tried rotating #16 to different positions and I still get the rub. Am I seeing another issue where a MOOG part does't work with another MOOG part?
Last weekend I left behind a set of #13 from a local salvage yard SE where I got the triangular subframe braces. So I may stop by the yard today to see if I can snag those parts for comparison. Otherwise, I may end up using #13 from the existing struts with the new rubber insulator from the new MOOG part, providing it will fit.
I just don't remember having this many part fitment problems with the past three 4th gen suspension jobs. This 4th suspension upgrade has taken the ever loving CAKE on fitment issues! �Ay, caramba!
I'll figure it out today, maybe..
Thank you Turbobink for posting the diagram. Its a great sanity check..

::
Last weekend I left behind a set of #13 from a local salvage yard SE where I got the triangular subframe braces. So I may stop by the yard today to see if I can snag those parts for comparison. Otherwise, I may end up using #13 from the existing struts with the new rubber insulator from the new MOOG part, providing it will fit.
I just don't remember having this many part fitment problems with the past three 4th gen suspension jobs. This 4th suspension upgrade has taken the ever loving CAKE on fitment issues! �Ay, caramba!
I'll figure it out today, maybe..
Thank you Turbobink for posting the diagram. Its a great sanity check..
::
Although they are used, I now have OEM diagram parts #13 and #16.
Here's the sad part. MOOG part #16 works perfectly with OEM part #13. Yet MOOG part #16 does not work with MOOG part #13. Again, we a another case of MOOG parts that do not work with other MOOG parts.
The rubber bushing part from MOOG part #13 works with OEM part #13. So I will use the MOOG rubber on the old OEM mounting body.
So I will clean up and refurbish (e.g prime and paint) junk yard parts #13 and #16 so I can complete the job. I wanted to just throw out any MOOG parts that I purchased for this job so I would have a MOOGless suspension. But I do need to use the rubber ring from MOOG part #13. The salvage yard rubber part of the upper mount is old and cracked.
I will post pictures tonight of this MOOG MESS that I've uncovered. It is really sad that two famous suspension parts manufacturers (KYB and MOOG) just can't build simple parts like boots and upper mounts that work.
No more MOOG for me. I'm done.
You can save yourself headaches, trips to salvage yards, and hassling with returns on parts that do not fit by sticking with OEM suspension components that work great with specialty struts and springs.
Last edited by CS_AR; 02-03-2017 at 12:13 PM.
02-03-2017, 04:36 PM
#32
Senior Member
Join Date: May 2012
Location: Long Island
Posts: 1,565
I am sorry this assembly is so disjointed. Here you are trying to piece together something that would hopefully perform and last better than the usual recommendations.
What you've uncovered with Moog certainly validates my experience. First, the same assembly for SE, GXE and GLE. And second, the strut bearings and mounts crushed and were grinding.
Their LCAs, Tie Rod ends, Ball Joints are and other front end stuff is fantastic. But their Strut assembly parts have some VERY weak links.
I'm with you... Pay the price and go OEM for everything but the struts and springs!
Meanwhile, I can't wait to hear how the Konis feel!
Hang in there... You're almost over the (suspension) finish line!
02-03-2017, 08:10 PM
#33
Senior Member
Thread Starter
Join Date: Jan 2011
Location: Central AR
Posts: 3,041
Ok.. Here's the Good, the Bad, and the Ugly with these MOOG suspension components.
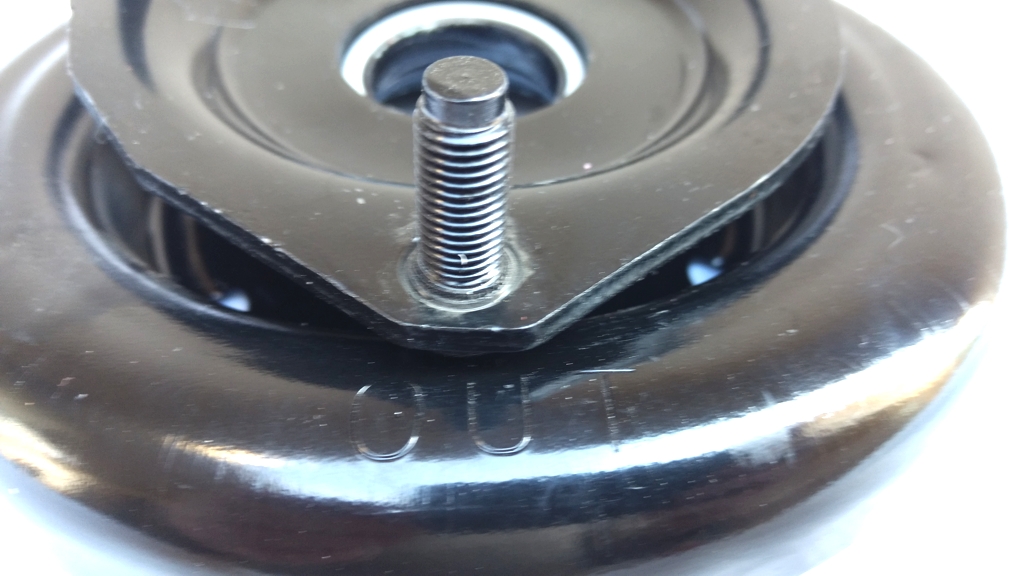
The problem.. The upper spring seat rubs against the strut mount bracket. You can see it rubbed off the paint with just a few turns.

Now's here's the MOOG strut mount bracket with the junk yard spring seat. You can see how the clearance is required for the spring seat to rotate on the bearing.
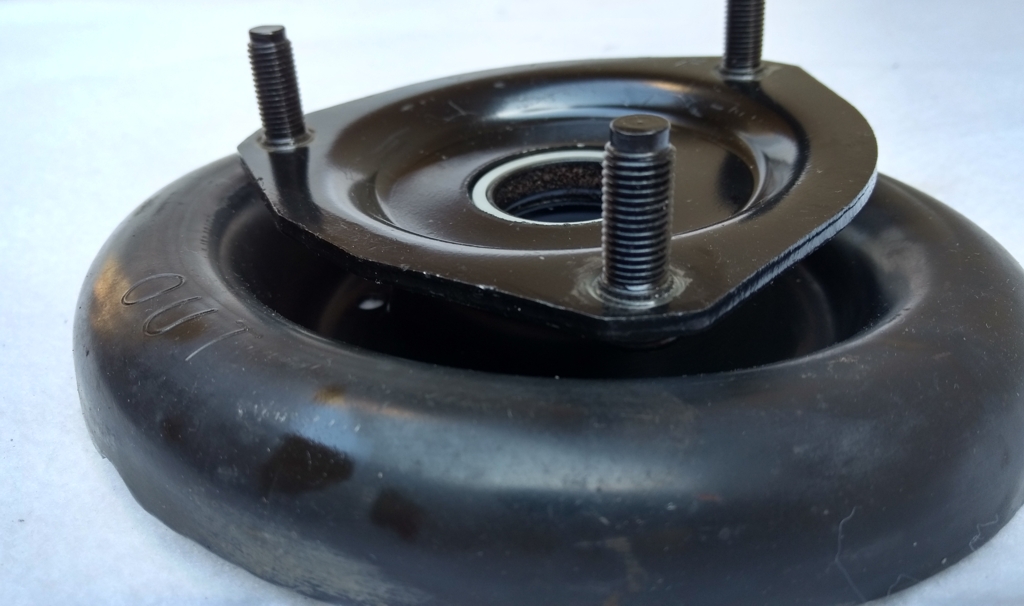
One more shot of how the MOOG spring seat does NOT work with the MOOG mount bracket.
I had to do a fast sand, prime, and paint on the junk yard spring seats. Look like new?
The spring mount back side.

I had some extra gold engine paint, so I used it on the junk yard mount brackets. The OEM mount brackets are plated so they have a gold/brass look. Anyway, this part cannot be seen. I just want the bearing surfaces to be smooth and protected for the long haul.

Here's a picture of the junk yard spring seats with the rubber insulators from the MOOG spring mounts. This will work.
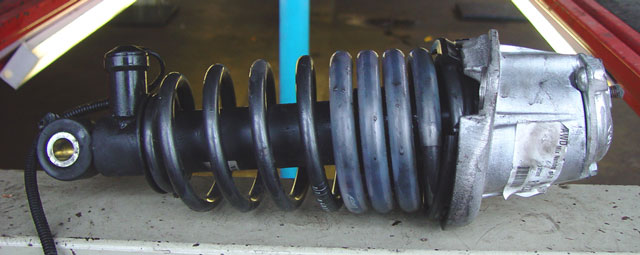
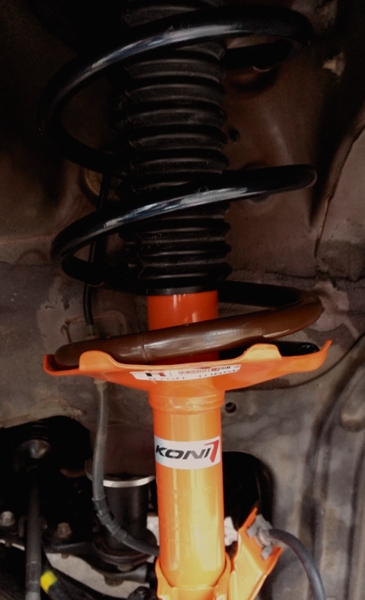
Here's a picture of the rear strut mounted with Tein spring silencers and some Snake Skin spring silencer material that I ordered from the U.K. The full weight of the car is on the struts at this point. You can tell that I don't like spring metal to touch without some silencer insulation in between.
I only have the rear struts installed at this point. Tomorrow I will install the front.
These struts are quiet and extremely responsive. It now has a nice tight feel. The Koni STR.T orange rear struts feel like the KYB AGX that I'm running on the 99 model on setting 5 or 6. Actually we like to run the rear KYB AGX turned all the way up on setting 8. The Koni struts feel a bit smoother, but just as tight and responsive. With just the rear Koni struts alone, it completely changed how the car drives and handles. When it is time to replace the 99 model's KYB AGX, I think we will go with Koni yellow on the front, and orange on the rear. Koni STR.T orange uses the same internals as the yellow, but on the lowest setting.
Now it feels like a true "Sports Sedan" instead of a little Buick Park Avenue. Because some people like to float along in a land yacht, these struts are not for everybody. Though, if you are looking for a crisp new sporty car feel, the STR.T orange may be worth considering.
You can see my gray homemade mounting gaskets up against the body that I cut from the FelPro gasket material. I started using that material seven years ago on the Q45. It doesn't shrink up like the orange paper type gaskets. It will definitely outlast the struts.
The problem.. The upper spring seat rubs against the strut mount bracket. You can see it rubbed off the paint with just a few turns.

Now's here's the MOOG strut mount bracket with the junk yard spring seat. You can see how the clearance is required for the spring seat to rotate on the bearing.

One more shot of how the MOOG spring seat does NOT work with the MOOG mount bracket.

I had to do a fast sand, prime, and paint on the junk yard spring seats. Look like new?

The spring mount back side.

I had some extra gold engine paint, so I used it on the junk yard mount brackets. The OEM mount brackets are plated so they have a gold/brass look. Anyway, this part cannot be seen. I just want the bearing surfaces to be smooth and protected for the long haul.

Here's a picture of the junk yard spring seats with the rubber insulators from the MOOG spring mounts. This will work.

Here's a picture of the rear strut mounted with Tein spring silencers and some Snake Skin spring silencer material that I ordered from the U.K. The full weight of the car is on the struts at this point. You can tell that I don't like spring metal to touch without some silencer insulation in between.
I only have the rear struts installed at this point. Tomorrow I will install the front.
These struts are quiet and extremely responsive. It now has a nice tight feel. The Koni STR.T orange rear struts feel like the KYB AGX that I'm running on the 99 model on setting 5 or 6. Actually we like to run the rear KYB AGX turned all the way up on setting 8. The Koni struts feel a bit smoother, but just as tight and responsive. With just the rear Koni struts alone, it completely changed how the car drives and handles. When it is time to replace the 99 model's KYB AGX, I think we will go with Koni yellow on the front, and orange on the rear. Koni STR.T orange uses the same internals as the yellow, but on the lowest setting.
Now it feels like a true "Sports Sedan" instead of a little Buick Park Avenue. Because some people like to float along in a land yacht, these struts are not for everybody. Though, if you are looking for a crisp new sporty car feel, the STR.T orange may be worth considering.
You can see my gray homemade mounting gaskets up against the body that I cut from the FelPro gasket material. I started using that material seven years ago on the Q45. It doesn't shrink up like the orange paper type gaskets. It will definitely outlast the struts.

Last edited by CS_AR; 02-04-2017 at 07:30 AM.
02-04-2017, 04:27 AM
#35
Senior Member
Thread Starter
Join Date: Jan 2011
Location: Central AR
Posts: 3,041
Actually, I did rub them down with RuGlyde. Then in about an hour, you couldn't tell that I had done anything. LOL
The dead spring insulator idea source: http://mbworld.org
http://mbworld.org/forums/e-class-w2...s-how-cut.html
The dead spring insulator idea source: http://mbworld.org
http://mbworld.org/forums/e-class-w2...s-how-cut.html
Last edited by CS_AR; 02-04-2017 at 03:55 PM.
02-04-2017, 05:38 PM
#36
Senior Member
Thread Starter
Join Date: Jan 2011
Location: Central AR
Posts: 3,041
This afternoon I finished the front installation. Here's a quick summary of the finished product test drive.
1) All of the creaking and squeaking noises that I had been hearing from the front suspension are now gone. The suspension is now so quiet that it feels like a new car.
2) The nosedive that I experienced during a hard breaking test over 60 MPH has now disappeared. I feel much more in control of the car during hard breaking.
3) The car is much more suitable and comfortable for a long interstate trip than the 99 model that is running KYB AGX on setting 3 (front) and 8 (rear). Though the AGX are now approaching 3 years old, I think the Koni STR.T handling is on par with AGX setting 2. The STR.T struts are the same physical unit as the Koni SS yellow struts on the lowest setting. So it feels like Koni's lowest setting is more on par with second notch on the AGX. Though, I feel it is unfair to compare Koni SS yellow, even on the lowest setting, to KYB AGX because the Koni's are in a whole different price class.
4) I have great control of the car while hitting ruff spots in the road while driving down a curvy mountain road with the STR.T compared to the AGX. The struts absorb the bumps on curves while proving a very tight and controlled steering feel. Taking the same road and bumps with the 99 model, I often feel the suspension is so tight that the wheels leave the pavement in a way that reminds me of driving a go kart or riding in some type of vehicle without springs. I think we need to turn down the settings on the 99 model's AGX.
5) The rear torsion beam really needs the new poly bushings, the new Scott-Russell, and lateral link bushing (already purchased) to be on par with the new front suspension. That is a project where I will need help from my youngest son over a weekend. Most likely we will do the rear overhaul when he comes back from school during spring break. I will be following J. Holley's instructions on the torsion beam overhaul in the following link. https://maxima.org/forums/4th-genera...sion-beam.html
6) There is a full sized spare tire in the trunk that should be changed to the original space-saver spare. Since the wheel is larger, the bolt that secures space-saver spare no longer works. Since the car handles so much better, I hit a speed bump this evening at a fairly decent clip and felt the spare bounce up and down in the compartment. Also, changing the spare will shed some unnecessary rear-end weight.
7) The wheel opening height is now 27" in the front with 26 and 5/8 at the rear. For the 99 model, with an earlier version of the H&R lowering springs, the height is 27" front with 26" in the rear. So the 5/8 inch difference isn't a big deal. Though, the 99 model's big tail pipe scrapes the street when pulling into or out of the driveway. We plan to change the 99 model's exhaust to a more normal setup that doesn't wake up the neighborhood when we take it out at night.
8) The 15" balloon tires need to be replaced with some 17" to use the new rims. It handles ok with the 15" tires. However, the 17" rims with some new Sumitomo tires will bring another handling improvement.
9) A Front Strut Tower Bar (FSTB) that I am moving over from the 99 model should tighten up the front end yet another notch. I don't see a need for a Rear Strut Tower Bar (RSTB) or Addco rear stabilizer bar for this car. The FSTB addition will be enough.
Otherwise, I'm glad this strut/spring upgrade project is finally over. Without a doubt, the 98 model has the most expensive and time consuming suspension that I've built thus far. I sure hope it lasts. My only regret at this point is for missing an opportunity to start using Koni struts seven years ago.

Last edited by CS_AR; 02-04-2017 at 09:33 PM.
02-05-2017, 06:50 AM
#37
Senior Member
Join Date: May 2012
Location: Long Island
Posts: 1,565
First of all..... CONGRATULATIONS!
Second....... The results are exactly what I expected from you. Always well thought out and then you take it to an ultra high level while implementing!
And Third...... When can I drop mine off for the same treatment? LOL
And most importantly...... Thank you for sharing ALL the details at such a high level. Right there with the best guys here!
02-05-2017, 08:44 AM
#38
Senior Member
Thread Starter
Join Date: Jan 2011
Location: Central AR
Posts: 3,041
Thanks Keith. I appreciate the sanity checks along the way. You are a great coach. It would be cool if you were closer. I think we could make short work of a suspension build project. Using pre-assembled units does make the installation part go faster. For lack of a better term, I've built some H&R+Koni+FelPro+OEM+Tein (HRKFOT) quick struts. We have the "HRKFOT Quick Struts". LOL
With no disrespect to SnakeSkin from the U.K., Tein silencers work just as well and they are much easier to find here in the U.S..
Seven years ago, I actually bought a set of spring compressors from Advance Auto for roughly $45 using one of the online discount codes. That turned out to be money well spent. Between my kids, my kids' friends, neighbors, and me, this kit helps out somebody's strut job at least two to three times a year.

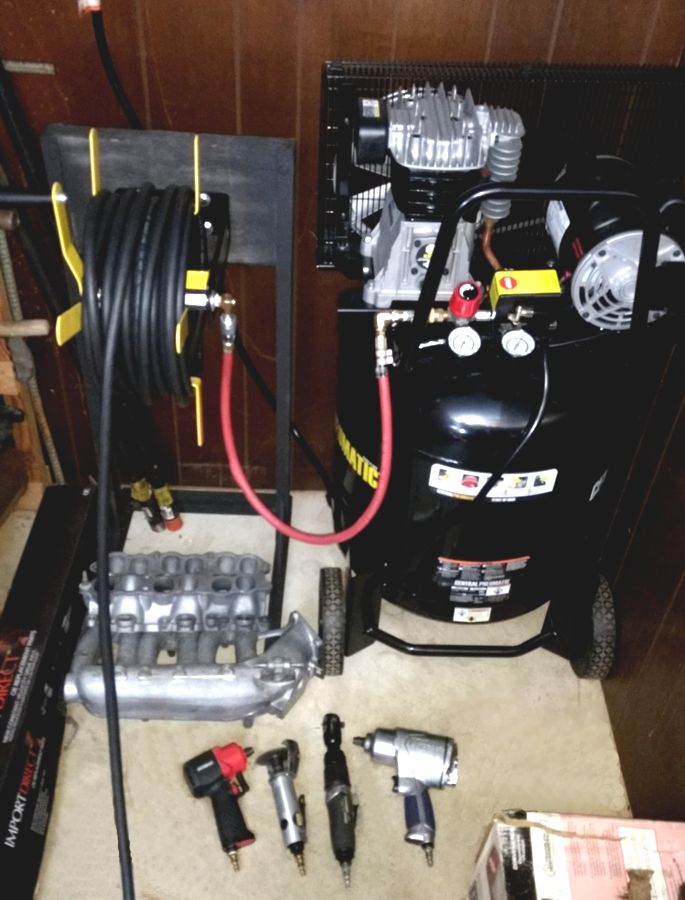
So if you were near, you could leverage my collection of air-powered tools. You can see my stash of cheater bar pipes standing on the left. The intake manifolds will go to another 4th gen project at some point in the future.
Most weekends, somebody has a project going in driveway that needs help from an air powered tool. I'm on good terms with my neighbor as I let him borrow anything he needs for yard or mechanical repair. Thankfully, they have not complained about the ratta-tat-tat sounds from air-impact tools that start running on a Saturday mornings.
It turns out when the neighbor needed a new car, he bought a new Nissan Murano. As well as my kids friends that have all bought various, new or nearly new, Nissan/Infiniti products ranging from a Nissan Juke, Altima, Infiniti G37S coupe, G37S sedan, G37X sedan, 370Z, with Titan and Frontier trucks. These are all people who would stop by to see the Q45 project when they were in high-school some six to seven years ago. So they all grew up and bought new Nissan/Infiniti products. Imagine that.
Actually my Q45 project was published in the March 2012 issue of Nissan Sport Mag. It was the first and only Q45 article to be published in that magazine.
It would be cool if you were closer. I think we could make short work of a suspension build project. Using pre-assembled units does make the installation part go faster. For lack of a better term, I've built some H&R+Koni+FelPro+OEM+Tein (HRKFOT) quick struts. We have the "HRKFOT Quick Struts". LOL With no disrespect to SnakeSkin from the U.K., Tein silencers work just as well and they are much easier to find here in the U.S..
Seven years ago, I actually bought a set of spring compressors from Advance Auto for roughly $45 using one of the online discount codes. That turned out to be money well spent. Between my kids, my kids' friends, neighbors, and me, this kit helps out somebody's strut job at least two to three times a year.
So if you were near, you could leverage my collection of air-powered tools. You can see my stash of cheater bar pipes standing on the left. The intake manifolds will go to another 4th gen project at some point in the future.

Most weekends, somebody has a project going in driveway that needs help from an air powered tool. I'm on good terms with my neighbor as I let him borrow anything he needs for yard or mechanical repair. Thankfully, they have not complained about the ratta-tat-tat sounds from air-impact tools that start running on a Saturday mornings.
It turns out when the neighbor needed a new car, he bought a new Nissan Murano. As well as my kids friends that have all bought various, new or nearly new, Nissan/Infiniti products ranging from a Nissan Juke, Altima, Infiniti G37S coupe, G37S sedan, G37X sedan, 370Z, with Titan and Frontier trucks. These are all people who would stop by to see the Q45 project when they were in high-school some six to seven years ago. So they all grew up and bought new Nissan/Infiniti products. Imagine that.
Actually my Q45 project was published in the March 2012 issue of Nissan Sport Mag. It was the first and only Q45 article to be published in that magazine.
Last edited by CS_AR; 02-05-2017 at 09:45 AM.