
New OBX Headers - some photos and measurements
 04-23-2007, 11:48 AM
#41
LandShark has Cosworth

Thread Starter
iTrader: (12)
Join Date: Jan 2004
Location: Topeka, KS
Posts: 4,327
Originally Posted by DandyMax
Not a lot of room is there! 
When I put my Cattmans on I did not remove the crossmember, but pulled the intake off the top and worked from below and above, but major pain to take the heat shield off that I recall (the rear one of course).
So maybe now with these headers you'll hit 12's...
When I put my Cattmans on I did not remove the crossmember, but pulled the intake off the top and worked from below and above, but major pain to take the heat shield off that I recall (the rear one of course).
So maybe now with these headers you'll hit 12's...
This OBX header set may need a new O2 bung for the rear - I bought four pairs of bung/plugs from Summit, so I can at least plug up the two extra openings. I'm also going to have to support the 3" cat when I drop the 3" Warpspeed Y-pipe out of there. The hanger is on the Y-pipe.
I'm going to grind out the MEVI for the Pathy TB/spacer. I probably won't mount the Pathy TB at this time - I don't like to make many changes at one time, so when the car won't start, I know where to look!
I think the car will be quicker this year. I have the nitrous "Alaskan pipeline" installed but not track-tested. Then with headers and Pathy TB and a real dyno tune, I might get lucky...

 04-23-2007, 12:27 PM
#42
Originally Posted by grey99max
Yep, it's tight in there... Did you have any problems pulling the motor mounts off the block -especially the rear mount?? I'm going to remove any EGR stuff while I'm in there, but leave the EGR connector in place to help support the MEVI.
This OBX header set may need a new O2 bung for the rear - I bought four pairs of bung/plugs from Summit, so I can at least plug up the two extra openings. I'm also going to have to support the 3" cat when I drop the 3" Warpspeed Y-pipe out of there. The hanger is on the Y-pipe.
I'm going to grind out the MEVI for the Pathy TB/spacer. I probably won't mount the Pathy TB at this time - I don't like to make many changes at one time, so when the car won't start, I know where to look!
I think the car will be quicker this year. I have the nitrous "Alaskan pipeline" installed but not track-tested. Then with headers and Pathy TB and a real dyno tune, I might get lucky...
My car should be quicker also, I am determined to hit 12's with the 3L N/A. Once I do, then a larger displacement engine will be the next step. For now I just picked up another DEK, it's going on the stand for some work first before it goes in the car.
Plus the old one has to come out, and I never got around to figuring out what went on it, but will soon.
04-23-2007, 12:42 PM
#43
LandShark has Cosworth
Thread Starter
iTrader: (12)
Join Date: Jan 2004
Location: Topeka, KS
Posts: 4,327
Originally Posted by DandyMax
I didn't pull the mounts off. Left them plus the crossmember in place. Took out the shields and what not from underneath, then lifted the header up into position. I had to remove the EGR tube and bend it a bit to line up with the port on the header. Overall the fitment with the Cattmans was very good though.
Interesting - so you were able to take off both OEM manifolds without removing the block mounts? Hmmmm....
I haven't gotten that far into this project yet, but from I was able to find here on the ORG, it seemed like the mounts had to come off so to get to the manifold nuts... I hope I get that lucky!
With a fresh engine, you'll be quicker.
 04-23-2007, 02:03 PM
#44
Originally Posted by grey99max
Interesting - so you were able to take off both OEM manifolds without removing the block mounts? Hmmmm....
I haven't gotten that far into this project yet, but from I was able to find here on the ORG, it seemed like the mounts had to come off so to get to the manifold nuts... I hope I get that lucky!
I haven't gotten that far into this project yet, but from I was able to find here on the ORG, it seemed like the mounts had to come off so to get to the manifold nuts... I hope I get that lucky!
Originally Posted by grey99max
With a fresh engine, you'll be quicker.
 04-26-2007, 08:41 AM
#45
LandShark has Cosworth
Thread Starter
iTrader: (12)
Join Date: Jan 2004
Location: Topeka, KS
Posts: 4,327
Front Manifold Nuts ?
I've got the Warpspeed Y-pipe off, and five of the six nuts off the front manifold are off.
I cannot get to the nut on the lower right side of the front manifold. There is an aluminum pipe coming out of the A/C that passes right across the nut. I've tried several different combinations of 14mm sockets and extensions, and nothing gives me a straight shot onto that nut. There's just no room to get to it - at least I don't see a way. Wrenches are impossible - a socket with shorty extension will almost get on it, but not straight on.
To anyone who has actually pulled their manifolds, how did you get this one off? This is a '99 GXE, FYI.
After looking at the Warpspeed Y-pipe and comparing to the OBX, I now wonder if this is even a good idea.
04-26-2007, 09:56 AM
#46

When I did mine I was redoing my whole front end by replacing the A/C condensor which required pulling the radiator. That last nut is hard to get to unless you have the room. Try to see if you can remove the radiator fan shrouds. If that doesn't work you might have to remove the whole radiator all together to get the clearance you need.
04-26-2007, 11:09 AM
#48
LandShark has Cosworth
Thread Starter
iTrader: (12)
Join Date: Jan 2004
Location: Topeka, KS
Posts: 4,327
Originally Posted by DandyMax
IIRC I pulled the fan shroud, but not the rad or compressor.
I just got it off ! (careful there..) Went to Sears for tools - then went in from underneath, used a 14mm 6-pt socket on a 3/8" flex, two 3/8" extensions onto a 3/8" flexible-head ratchet. Held everything in line, pulled the ratchet, and 'click' the nut came loose.
The old manifold came out, with the crossmember still in place, and I was able to get the new OBX header assembly back up in there and seat it to the head.
I'm going to weld a O2 sensor bung into the lower part of that header, I think. I have the extra bungs. Now on to the rear! (careful there...)

EDIT: I think I just got a new friend - that long-handled 3/8" flex-headed ratchet just helped me take off the three top bolts on the rear manifold. Two required a regular 14mm 6pt socket, and the one by the EGR tube needed a long 14mm 6pt socket to clear the EGR stuff, but they came loose and came right out ... Off to the welder now for a bung-job (careful there..) and a patch on the botched OBX EGR connector - they left a big gap that someone forgot to weld.
.
04-26-2007, 02:11 PM
#49
LandShark has Cosworth
Thread Starter
iTrader: (12)
Join Date: Jan 2004
Location: Topeka, KS
Posts: 4,327
Back from the welder - the muffler shop couldn't handle fixing the open space on the EGR tube - they sent me to a welder that does TIG welding, and he is going to close up the gap and install another O2 bung on the front header.
This guy is located in the basement of the local Harley dealer, right behind the antique bike collections. They have about 50 really old Harleys in the museum - pretty neat. Maybe I should get a V-Rod ????
I've got two of the three remaining nuts off the rear header, but the last one, right above the rear motor mount, might require taking out the crossmember after all. I can just catch a peek of the nut through the motor mount top-shield. Cr*p....
Incidentally, I've had two of the studs come out of the heads so far...
Repeat after me: "this is a good idea, this is a good idea....."
.
.
04-26-2007, 05:44 PM
#50

this is a good idea. lol. Hey so far so good, keep up the good work with it. Remember dont tighten the headers down yet. Just finger tighten the nuts. You're going to need that extra play until all the bolts on the headers and ypipe are hooked up (this is an issue we ran into installing cattman and hotshot headers).
Bottom line- finger tighten all nuts and bolts until everything is bolted up. Once thats done, torque down the headers to the heads, then headers to ypipe.
That will save you headaches
Bottom line- finger tighten all nuts and bolts until everything is bolted up. Once thats done, torque down the headers to the heads, then headers to ypipe.
That will save you headaches
04-26-2007, 06:24 PM
#51
LandShark has Cosworth
Thread Starter
iTrader: (12)
Join Date: Jan 2004
Location: Topeka, KS
Posts: 4,327
Originally Posted by 95BLKMAX
this is a good idea. lol. Hey so far so good, keep up the good work with it. Remember dont tighten the headers down yet. Just finger tighten the nuts. You're going to need that extra play until all the bolts on the headers and ypipe are hooked up (this is an issue we ran into installing cattman and hotshot headers).
Bottom line- finger tighten all nuts and bolts until everything is bolted up. Once thats done, torque down the headers to the heads, then headers to ypipe.
That will save you headaches
Bottom line- finger tighten all nuts and bolts until everything is bolted up. Once thats done, torque down the headers to the heads, then headers to ypipe.
That will save you headaches
So how did you get the EGR tube loosened and removed ? The final mainfold nut, the lower one closest to the center of the car, is accessible from the top, but I need that tube out of the way. I can't get the gland nut to free up with a wrench, so I'm gonna cut that sucka out - I REALLY wish I had a cutting torch again. Yes, I have EGR spares, but the EGR is history.
It's close to being done - or at least ready for the repaired OBX plumbing. After hanging all the parts and tightening up everything, and re-installing a ported MEVI, hopefully it will start so I can take it to the muffler shop for the final stage.
I'm getting close....
.
04-26-2007, 07:23 PM
#52
That EGR nut, if you mean the one on the manifold, IIRC I used slip-joint pliers, or maybe a wrench. Can't remember. But like I said when I did it I had limited tools. The other end of the pipe, going into the EGR valve, I loosened it using a 6" pipe wrench, then slip-joints after.
You can get to the rear manifold nuts, just get that heat shield out. Bend it if need be...
You can get to the rear manifold nuts, just get that heat shield out. Bend it if need be...
04-26-2007, 08:39 PM
#53
LandShark has Cosworth
Thread Starter
iTrader: (12)
Join Date: Jan 2004
Location: Topeka, KS
Posts: 4,327
Originally Posted by DandyMax
That EGR nut, if you mean the one on the manifold, IIRC I used slip-joint pliers, or maybe a wrench. Can't remember. But like I said when I did it I had limited tools. The other end of the pipe, going into the EGR valve, I loosened it using a 6" pipe wrench, then slip-joints after.
You can get to the rear manifold nuts, just get that heat shield out. Bend it if need be...
You can get to the rear manifold nuts, just get that heat shield out. Bend it if need be...
OK - a short pipe wrench -DUH !!. Thanks.... I couldn't break it with pliers.. Once I get that clear, I can pull the final nut!
When this is done, I gotta make a tool list.
04-27-2007, 12:08 PM
#54
LandShark has Cosworth
Thread Starter
iTrader: (12)
Join Date: Jan 2004
Location: Topeka, KS
Posts: 4,327
DandyMax was right - I went to Harbor Freight and picked up a set of pipe wrenches, and the 8" one worked like a champ to take off the EGR nut on the manifold. Then it was just a little more work to use "my new friend" and a long 6pt 14mm socket to take off the last top nut. They're all off now, and the manifold is hanging free on that D*mm*d heat shield. Time to go back under the car.
I picked up the OBX pipes this morning. The EGR gap was filled nicely and the new O2 bung is installed in a usable location. Getting closer...

I picked up the OBX pipes this morning. The EGR gap was filled nicely and the new O2 bung is installed in a usable location. Getting closer...
 04-27-2007, 04:13 PM
#57
LandShark has Cosworth
Thread Starter
iTrader: (12)
Join Date: Jan 2004
Location: Topeka, KS
Posts: 4,327
OBX Headers May Not Fit Maximas Unless Modified.
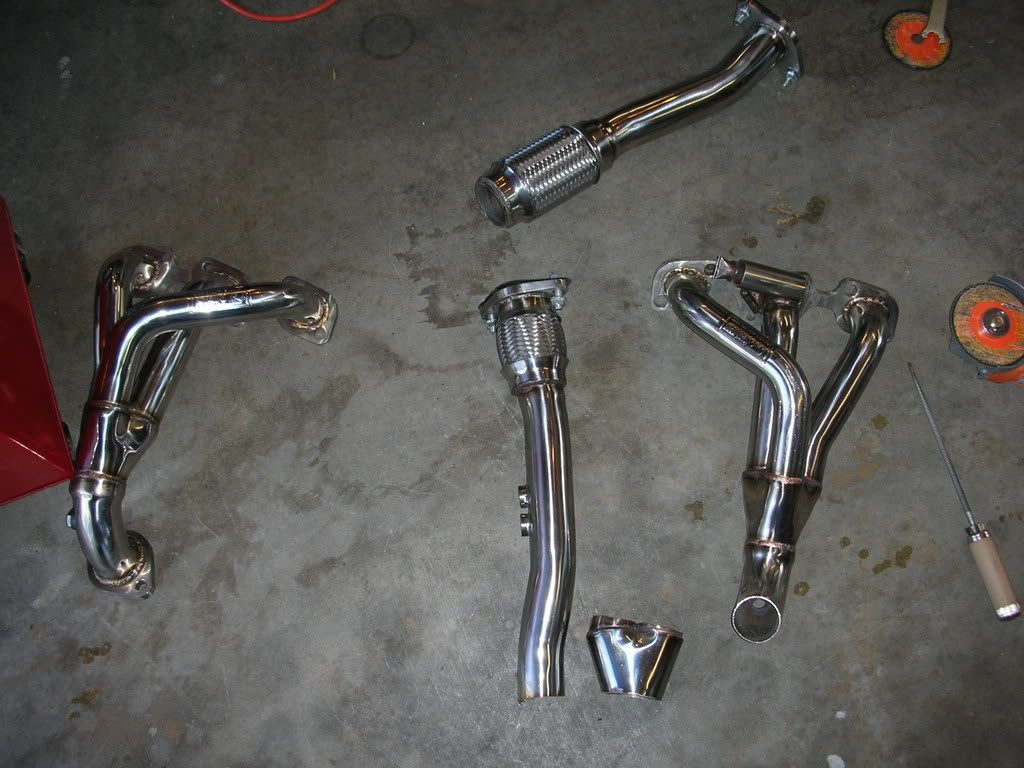
I have both the front and rear header section installed on the engine. That's the good news.
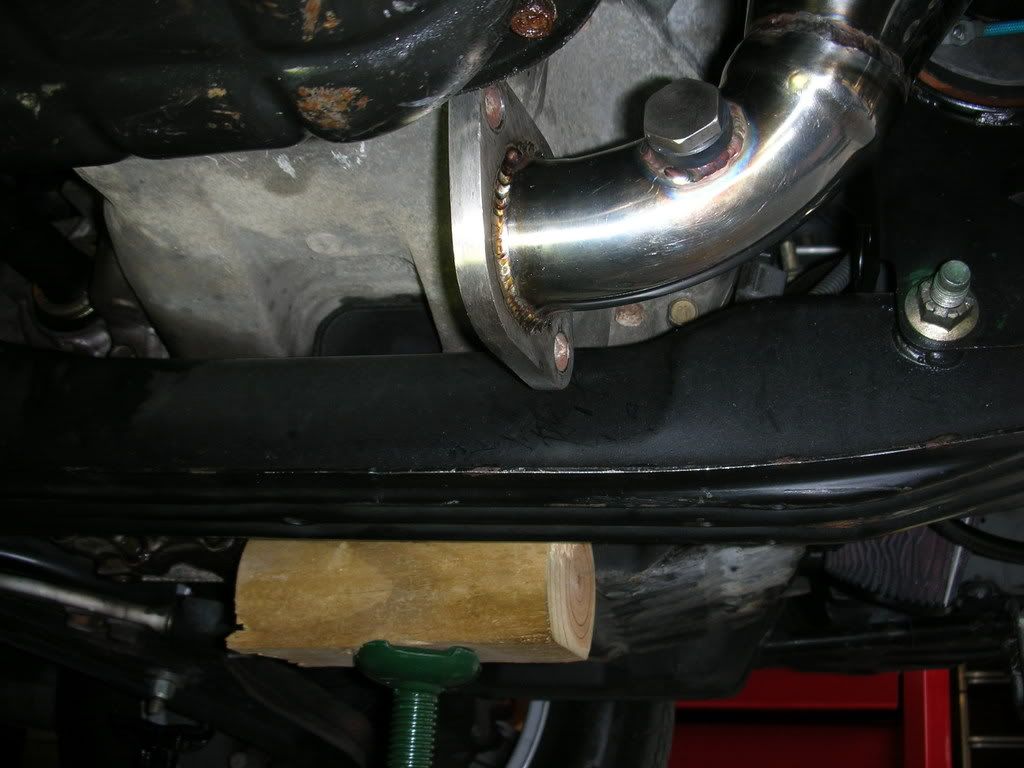
I qualify this by saying I may have overlooked something, but - I had to cut off the tailpipe from the rear header, then cut off the extension that was supposed to connect to the front header. Freeing up the extra pipes from the rear header allowed the header to fit right into place on the engine. The front header bolts up nicely,too. If you try to bolt on the extension pipe, with flanges as seen in pictures, you may find, as I did, that the flange has too much "upsweep" to let the extension bolt up - it's not even close. The upsweep goes up toward the oil pan - it clears it, but not by much.
Also, none of the stock O2 sensors will fit into any of the provided four bungs - the bungs are too far away. The wires must be extended.
I agree with Brian Cattman - these must have been made for another car besides the Maxima. Buy his stuff if you want a great fit.
Personally, these things don't bother me - as originally planned, I'll have the front header trimmed up a bit by cutting off the flange, have an extension swaged onto the header, and have both headers extended into a larger collector and into the 3" Warpspeed cat and exhaust system. I'll be sure to include slip joints on both headers, just in case. This way, I get what I want for headers.
I've got photos of all of this, up to this time, which I will post after I put them on the "bucket".
Be advised - these are NOT bolt-on headers for the Maxima. They possibly would fit if you mounted them on the engine when removed from the car - except for the upsweep on the front header flange. That won't clear the oil pan when the flange is tightened.
Be advised - and be advised I might be wrong, but after three days of work, I don't think so.
.
04-27-2007, 04:33 PM
#58
Originally Posted by grey99max
I have both the front and rear header section installed on the engine. That's the good news.
I qualify this by saying I may have overlooked something, but - I had to cut off the tailpipe from the rear header, then cut off the extension that was supposed to connect to the front header. Freeing up the extra pipes from the rear header allowed the header to fit right into place on the engine. The front header bolts up nicely,too. If you try to bolt on the extension pipe, with flanges as seen in pictures, you may find, as I did, that the flange has too much "upsweep" to let the extension bolt up - it's not even close. The upsweep goes up toward the oil pan - it clears it, but not by much.
Also, none of the stock O2 sensors will fit into any of the provided four bungs - the bungs are too far away. The wires must be extended.
I agree with Brian Cattman - these must have been made for another car besides the Maxima. Buy his stuff if you want a great fit.
Personally, these things don't bother me - as originally planned, I'll have the front header trimmed up a bit by cutting off the flange, have an extension swaged onto the header, and have both headers extended into a larger collector and into the 3" Warpspeed cat and exhaust system. I'll be sure to include slip joints on both headers, just in case. This way, I get what I want for headers.
I've got photos of all of this, up to this time, which I will post after I put them on the "bucket".
Be advised - these are NOT bolt-on headers for the Maxima. They possibly would fit if you mounted them on the engine when removed from the car - except for the upsweep on the front header flange. That won't clear the oil pan when the flange is tightened.
Be advised - and be advised I might be wrong, but after three days of work, I don't think so.
.
I need pictures ASAP before I go through the trouble of putting these on...por favor of course. I might just send them back all together.
04-27-2007, 07:12 PM
#59
LandShark has Cosworth
Thread Starter
iTrader: (12)
Join Date: Jan 2004
Location: Topeka, KS
Posts: 4,327
Originally Posted by GoalieKeg
I need pictures ASAP before I go through the trouble of putting these on...por favor of course. I might just send them back all toghther.
I was surprised.
04-27-2007, 09:13 PM
#61
Originally Posted by Kevlo911
So basically you need a custom ypipe with this?
Lets wait for the pictures and make that determination, but ^^ is what seems to be required as of now
04-27-2007, 09:23 PM
#63
LandShark has Cosworth
Thread Starter
iTrader: (12)
Join Date: Jan 2004
Location: Topeka, KS
Posts: 4,327
Originally Posted by Kevlo911
So basically you need a custom ypipe with this?
04-27-2007, 09:39 PM
#65
LandShark has Cosworth
Thread Starter
iTrader: (12)
Join Date: Jan 2004
Location: Topeka, KS
Posts: 4,327
Originally Posted by Kevlo911
Yeah, if I stay NA I might give these a shot, my custom y would have to be pressure bent but it can't be any worse than what I have right now.
What I did to the pipe:
I'll put all the links on another response page.
04-27-2007, 09:47 PM
#66
Originally Posted by grey99max
This is one bad problem:
What I did to the pipe:
I'll put all the links on another response page.
What I did to the pipe:
I'll put all the links on another response page.
Cut it off at the bend and extend it lower away from the motor.
04-27-2007, 09:50 PM
#67
LandShark has Cosworth
Thread Starter
iTrader: (12)
Join Date: Jan 2004
Location: Topeka, KS
Posts: 4,327
OBX links
repaired EGR:
http://i48.photobucket.com/albums/f2...s/Dscn1922.jpg
Warpspeed 3" cat view:
http://i48.photobucket.com/albums/f2...s/Dscn1927.jpg
http://i48.photobucket.com/albums/f2...s/Dscn1928.jpg
Some OBX hacking:
http://i48.photobucket.com/albums/f2...s/Dscn1931.jpg
http://i48.photobucket.com/albums/f2...s/Dscn1932.jpg
http://i48.photobucket.com/albums/f2...s/Dscn1935.jpg
Rear header:
http://i48.photobucket.com/albums/f2...s/Dscn1937.jpg
http://i48.photobucket.com/albums/f2...s/Dscn1940.jpg
Front header:
http://i48.photobucket.com/albums/f2...s/Dscn1938.jpg
Front installed:
http://i48.photobucket.com/albums/f2...s/Dscn1941.jpg
Rear hanging:
http://i48.photobucket.com/albums/f2...s/Dscn1943.jpg
Before hacking:
http://i48.photobucket.com/albums/f2...s/Dscn1915.jpg
Front of engine w/o manifold:
http://i48.photobucket.com/albums/f2...s/Dscn1923.jpg
04-27-2007, 09:53 PM
#68
LandShark has Cosworth
Thread Starter
iTrader: (12)
Join Date: Jan 2004
Location: Topeka, KS
Posts: 4,327
Originally Posted by Kevlo911
Cut it off at the bend and extend it lower away from the motor.
The headers look good - the rest can't be made for a Maxima !!
04-27-2007, 09:59 PM
#70
LandShark has Cosworth
Thread Starter
iTrader: (12)
Join Date: Jan 2004
Location: Topeka, KS
Posts: 4,327
Originally Posted by Kevlo911
Might be better to buy the Altima XS Headers and do the custom ypipe. Lemme know how your exhaust guy ends up doing these(drive there open header )
)Dang - maybe I can spray some on the way there.....
04-28-2007, 06:19 AM
#71

Thats too bad they do not fit right. They looked pretty good in person yesterday. I guess that old tag line "You get what you pay for" definetely applies to this.
I might have to come out again and see this, I mean hear this
Wait! Harry! I have an idea-
You should run it open header by those Westboro Baptist protesters. Make them go deaf so nobody has to hear them sing anymore???
I might have to come out again and see this, I mean hear this
Wait! Harry! I have an idea-
You should run it open header by those Westboro Baptist protesters. Make them go deaf so nobody has to hear them sing anymore???
04-28-2007, 07:31 AM
#72
Originally Posted by Stabone
Wait! Harry! I have an idea-
You should run it open header by those Westboro Baptist protesters. Make them go deaf so nobody has to hear them sing anymore???
Hey just for laughs and giggles, would it be possible or you to meet up with Grey and take a video of his driving to the exhaust shop with open headers?

Hey Harry since you're gonna redo the ypipe, any chance of going one extra step and making it an equal length? or you dont want to bother?
04-28-2007, 08:35 AM
#73
LandShark has Cosworth
Thread Starter
iTrader: (12)
Join Date: Jan 2004
Location: Topeka, KS
Posts: 4,327
Originally Posted by Stabone
Thats too bad they do not fit right. They looked pretty good in person yesterday. I guess that old tag line "You get what you pay for" definetely applies to this.
I might have to come out again and see this, I mean hear this
Wait! Harry! I have an idea-
You should run it open header by those Westboro Baptist protesters. Make them go deaf so nobody has to hear them sing anymore???
I might have to come out again and see this, I mean hear this
Wait! Harry! I have an idea-
You should run it open header by those Westboro Baptist protesters. Make them go deaf so nobody has to hear them sing anymore???
I got what I wanted - the front and rear headers are good - and better with the EGR welding finished.......... This was a custom project, remember?
I'm not harassing those Phelps cultists - they all have video cameras, and I'd be on the 6PM news for sure if I buzzed them. I guess I could do a quick movie with my Nikon, though.
04-28-2007, 08:39 AM
#74
LandShark has Cosworth
Thread Starter
iTrader: (12)
Join Date: Jan 2004
Location: Topeka, KS
Posts: 4,327
Originally Posted by 95BLKMAX
LMAO!!!!!! weeeeeeeeeeeeeerd!! LOL
Hey just for laughs and giggles, would it be possible or you to meet up with Grey and take a video of his driving to the exhaust shop with open headers?
Hey Harry since you're gonna redo the ypipe, any chance of going one extra step and making it an equal length? or you dont want to bother?
Hey just for laughs and giggles, would it be possible or you to meet up with Grey and take a video of his driving to the exhaust shop with open headers?
Hey Harry since you're gonna redo the ypipe, any chance of going one extra step and making it an equal length? or you dont want to bother?
04-28-2007, 08:46 AM
#75
Hey grey thanks for the pics...I'm going to get a hold of the seller and send mine back, I really have no need right now to get the custom pipe on there since I am selling my car anyways. Scooby here I come 
04-28-2007, 09:19 AM
#76
LandShark has Cosworth
Thread Starter
iTrader: (12)
Join Date: Jan 2004
Location: Topeka, KS
Posts: 4,327
Originally Posted by GoalieKeg
Hey grey thanks for the pics...I'm going to get a hold of the seller and send mine back, I really have no need right now to get the custom pipe on there since I am selling my car anyways. Scooby here I come
You would have been extremely "irritated" when you tried to install the rear header....
04-28-2007, 06:59 PM
#77
LandShark has Cosworth
Thread Starter
iTrader: (12)
Join Date: Jan 2004
Location: Topeka, KS
Posts: 4,327
It's ALIVE !!
I ported out the MEVI for the Pathy TB, and re-installed the intake system and finished up the wiring. Then I started it.
A picture of both exhaust stubs:
http://i48.photobucket.com/albums/f2...s/Dscn1945.jpg
And a short movie of starting it up:
http://s48.photobucket.com/albums/f2...t=Dscn1948.flv
It started right up, but it's really loud, and she screams when revved up. I like it.
Good thing I finished up today - my wife is back from a conference in Minneapolis this evenig, so tomorrow is yard work. So much for play time.
She's in charge, you know....
04-28-2007, 09:11 PM
#80
LandShark has Cosworth
Thread Starter
iTrader: (12)
Join Date: Jan 2004
Location: Topeka, KS
Posts: 4,327
Originally Posted by stephenlc
Maybe they were made for an altima or a 2002+ maxima?? Man your car is kinda raspy, is it the cat?