3rd gen VQ35DE Full ECU Swap Progress Thread
 04-06-2009, 11:17 AM
#441
You mean the M83 connector? The 8 pin white connector that plugs in the Intake Door Motor? I stuffed all the connectors in a box and it will take me a while to find it. But if you need, I'm happy to help you out. I just have to dig through it until I find the connector with the right colored wires hanging off it.
Why do you need that particular connector for a universal dash fan? I need one of those too since I don't have AC. Let me know what your idea is.
Why do you need that particular connector for a universal dash fan? I need one of those too since I don't have AC. Let me know what your idea is.
 04-06-2009, 11:30 AM
#442
Why do you need to have a dash fan in your car though?
As for my car, I removed the AC several years ago for weight reduction. I rarely used the AC anyway. The only time I wish I had it is when I am in really nice dress clothes on a hot and humid summer day. Plus, that racing seat with the vinyl cover really holds in a lot of heat on my back.

And no, I don't plan on doing anything about that. I may get a dash fan to help blow some cooler air though. I am trying to make the car as light as possible without sacrificing certain features that I can't live without, like music, cruise control, and heater.
04-06-2009, 03:44 PM
#443

necessary things like music? :LOL:
pick up a deck and some 6x9s. mount the 6x9s in those cheapie truck boxes and stick 'em where the dash used to be (you should be able to easily fab up some brackets to bolt them to.)
Put quick connects or banana plugs on the back of the box... hell, you might even use a 1/4" TRS (headphone) plug like they do with pro audio for a quick disconnect..
Grab you an old skool pull-out radio or figure out a way to mount the radio so it is easy to remove. (mount it on a small plate and tie a 12V battery to the batt power lead with a diode so that you keep the radio station memory when the radio is off.
Then when you get to the track, you can just unbolt the speaker boxes and yank the head unit out and you've saved 15 lb.
04-06-2009, 04:56 PM
#444
True. Duh! I knew that. As long as they are plugged in, it should work at WOT.
But would you happen to know if they still function properly at partial throttle or at idle with open headers? I've never tested this myself and want to get an idea if they may be a problem for me when I first crank up the car and let it idle.
Thanks.
But would you happen to know if they still function properly at partial throttle or at idle with open headers? I've never tested this myself and want to get an idea if they may be a problem for me when I first crank up the car and let it idle.
Thanks.
Where you have to be careful is at WOT with headers closed and open, the a/f ratio changes dramatically and I use a separate map for open headers.
04-06-2009, 06:00 PM
#445
necessary things like music? :LOL:
pick up a deck and some 6x9s. mount the 6x9s in those cheapie truck boxes and stick 'em where the dash used to be (you should be able to easily fab up some brackets to bolt them to.)
Put quick connects or banana plugs on the back of the box... hell, you might even use a 1/4" TRS (headphone) plug like they do with pro audio for a quick disconnect..
Grab you an old skool pull-out radio or figure out a way to mount the radio so it is easy to remove. (mount it on a small plate and tie a 12V battery to the batt power lead with a diode so that you keep the radio station memory when the radio is off.
Then when you get to the track, you can just unbolt the speaker boxes and yank the head unit out and you've saved 15 lb.
pick up a deck and some 6x9s. mount the 6x9s in those cheapie truck boxes and stick 'em where the dash used to be (you should be able to easily fab up some brackets to bolt them to.)
Put quick connects or banana plugs on the back of the box... hell, you might even use a 1/4" TRS (headphone) plug like they do with pro audio for a quick disconnect..
Grab you an old skool pull-out radio or figure out a way to mount the radio so it is easy to remove. (mount it on a small plate and tie a 12V battery to the batt power lead with a diode so that you keep the radio station memory when the radio is off.
Then when you get to the track, you can just unbolt the speaker boxes and yank the head unit out and you've saved 15 lb.
IIRC, I run a tad leaner with my cutout open. Is that what happened to you with open headers? Where did you have your wideband installed when you ran open headers?
I am thinking of installing mine at the end of my Ypipe, which won't be there for my short trip to the exhaust shop. I probably won't get on the gas until I have my Ypipe and wideband installed.
04-06-2009, 06:12 PM
#446
I just didn't know if the o2 sensors got such a bad reading with the open headers cause they are so close to the end of the exhaust flow.
IIRC, I run a tad leaner with my cutout open. Is that what happened to you with open headers? Where did you have your wideband installed when you ran open headers?
I am thinking of installing mine at the end of my Ypipe, which won't be there for my short trip to the exhaust shop. I probably won't get on the gas until I have my Ypipe and wideband installed.
Definately leaner with the exhaust open.
My wideband is in my cutout (testpipe). I spent almost a whole day trying to get it up as high as i could so it wouldn't be visible unless you get on your knees. Got a DMH electric cutout after chucking the McCord which is a POS in comparison.
04-06-2009, 06:24 PM
#447
Well they are a fair distance from the open exhaust ie over 24".
Definately leaner with the exhaust open.
My wideband is in my cutout (testpipe). I spent almost a whole day trying to get it up as high as i could so it wouldn't be visible unless you get on your knees. Got a DMH electric cutout after chucking the McCord which is a POS in comparison.
Definately leaner with the exhaust open.
My wideband is in my cutout (testpipe). I spent almost a whole day trying to get it up as high as i could so it wouldn't be visible unless you get on your knees. Got a DMH electric cutout after chucking the McCord which is a POS in comparison.
Have you ever ran open headers?

 04-06-2009, 06:41 PM
#450

Hey, I most likely have that connector, I have a complete 2004 maxima harness I am going to trash eventually (no one would probably buy that), I can cut it and give it to you.
04-06-2009, 07:58 PM
#451
04-07-2009, 08:47 AM
#454
I was originally going to remove the pins, but on this particular connector, it's nearly impossible to do it without busting it up. So I was thinking about just soldering the new connector on. It would be so much easier.
04-07-2009, 08:56 AM
#456
Oh yeah. I didn't even bother looking at the stranded wire material. Thanks.
I believe my o2 sensor is good from the salvage yard. I'll try butt splices and heat shrink first to see if that works. If it doesn't I'll just get another o2 sensor.
I believe my o2 sensor is good from the salvage yard. I'll try butt splices and heat shrink first to see if that works. If it doesn't I'll just get another o2 sensor.
04-07-2009, 09:17 AM
#457

I have 2 3.5 02's laying around but I dont know how to test them. If you tell me how and they come out bad you can have it.
04-07-2009, 09:27 AM
#458
But, just in case my o2 sensors are dead, can I buy yours? The salvage yard not only damaged a couple wires, they bent the sensor itself. I haven't tested it yet though. But it wouldn't hurt for me to go ahead and buy a couple used o2 sensors just in case. What do you want for them?
04-07-2009, 09:42 AM
#459
Supporting Maxima.org Member

iTrader: (3)
Join Date: Oct 2002
Location: Ontario, Canada
Posts: 1,204
I had to extend the wires on both my upstream sensors to reach the bungs in the headers.
The lead/tin will not bond with the ss but I used silver and cranked up the heat on my iron. They have been fine for more than three years now.
The lead/tin will not bond with the ss but I used silver and cranked up the heat on my iron. They have been fine for more than three years now.
04-08-2009, 04:18 PM
#462
Does anybody know where the ambient sensor is on the 5.5 gen? The FSM harness layout kind of looks like it may be in the fender well.
I wouldn't mind getting my hands on one of these sensors so I can wire up this to my cluster. I've never had an ambient temperature gauge before! lol I like all this new technology stuff.
I wouldn't mind getting my hands on one of these sensors so I can wire up this to my cluster.
I've never had an ambient temperature gauge before! lol I like all this new technology stuff.
04-08-2009, 04:24 PM
#463
Does anybody know where the ambient sensor is on the 5.5 gen? The FSM harness layout kind of looks like it may be in the fender well.
I wouldn't mind getting my hands on one of these sensors so I can wire up this to my cluster. I've never had an ambient temperature gauge before! lol I like all this new technology stuff.
I wouldn't mind getting my hands on one of these sensors so I can wire up this to my cluster.
I've never had an ambient temperature gauge before! lol I like all this new technology stuff. 04-09-2009, 08:46 PM
#467
Does anybody know about the height difference between the HR valve spring and the stock 02 VQ35DE?
The stock valve springs on my 02 Maxima engine are exactly .100" taller, almost an 1/8". Is this correct? I just want to make sure I'm not overlooking anything and that it won't be a problem.
The stock valve springs on my 02 Maxima engine are exactly .100" taller, almost an 1/8". Is this correct? I just want to make sure I'm not overlooking anything and that it won't be a problem.
04-09-2009, 11:07 PM
#468

Does anybody know about the height difference between the HR valve spring and the stock 02 VQ35DE?
The stock valve springs on my 02 Maxima engine are exactly .100" taller, almost an 1/8". Is this correct? I just want to make sure I'm not overlooking anything and that it won't be a problem.
The stock valve springs on my 02 Maxima engine are exactly .100" taller, almost an 1/8". Is this correct? I just want to make sure I'm not overlooking anything and that it won't be a problem.
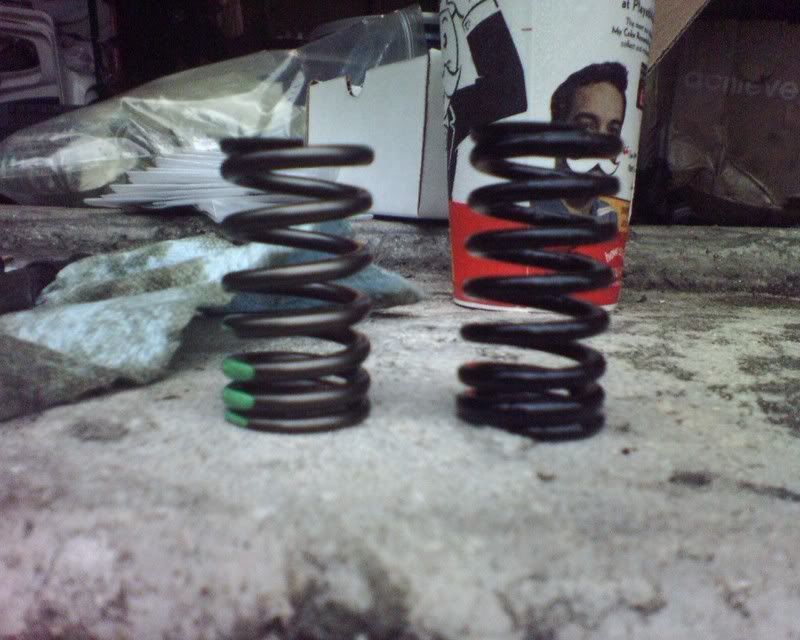
This is when I was in the build. Left is the HR, right is the DE
04-10-2009, 08:39 AM
#470
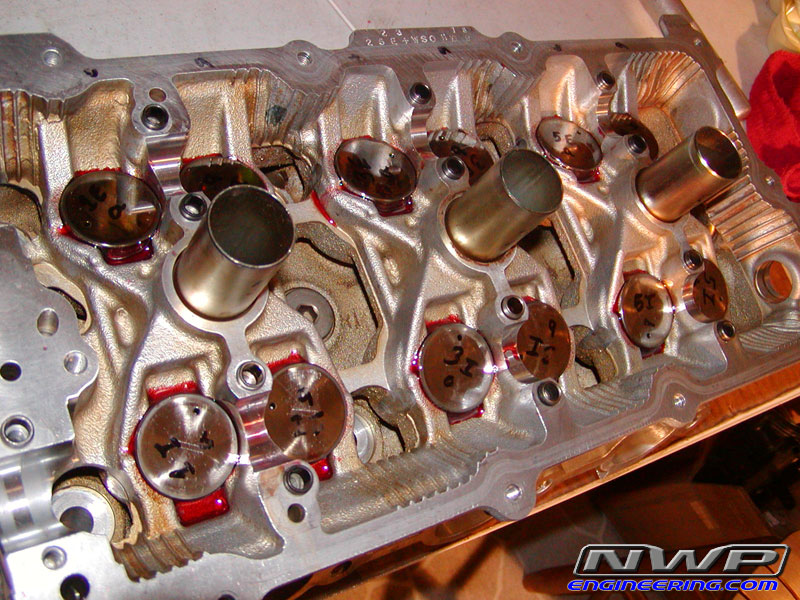
I just finished assembling one of the heads last night with the two seats, HR springs and retainers. I will check valve lash before I install the heads though.
How many people run into valve clearance issues with new cams? Those new lifters are expensive!! Has anybody tried putting the valve stem to a grinder in order to remove a tiny bit of material? And I know you can swap buckets around as well.
How many people run into valve clearance issues with new cams? Those new lifters are expensive!! Has anybody tried putting the valve stem to a grinder in order to remove a tiny bit of material? And I know you can swap buckets around as well.
Last edited by Aaron92SE; 04-10-2009 at 08:42 AM.
04-10-2009, 08:56 AM
#471
Does anybody know about the height difference between the HR valve spring and the stock 02 VQ35DE?
The stock valve springs on my 02 Maxima engine are exactly .100" taller, almost an 1/8". Is this correct? I just want to make sure I'm not overlooking anything and that it won't be a problem.
The stock valve springs on my 02 Maxima engine are exactly .100" taller, almost an 1/8". Is this correct? I just want to make sure I'm not overlooking anything and that it won't be a problem.
http://www.jimwolftechnology.com/cus...asp?PartID=448
I have not read through your setup so I am not sure how this affects you.
04-10-2009, 09:35 AM
#472
I just finished assembling one of the heads last night with the two seats, HR springs and retainers. I will check valve lash before I install the heads though.
How many people run into valve clearance issues with new cams? Those new lifters are expensive!! Has anybody tried putting the valve stem to a grinder in order to remove a tiny bit of material? And I know you can swap buckets around as well.
How many people run into valve clearance issues with new cams? Those new lifters are expensive!! Has anybody tried putting the valve stem to a grinder in order to remove a tiny bit of material? And I know you can swap buckets around as well.
However, this engine builder shop has a tool that they use that shaves the end of the valves if needed to fit the cams into the heads. They do this on all sorts of overhead cam motors, including Honduhs, so for them it's no big deal to get all the valve lashes set correctly.
Since you have a set of valve lifters, it would be mostly a labor charge if you can find a shop that does this.
 04-10-2009, 10:12 AM
#473
I believe is your purchase them from JWT they include shims to correct this.
http://www.jimwolftechnology.com/cus...asp?PartID=448
I have not read through your setup so I am not sure how this affects you.
http://www.jimwolftechnology.com/cus...asp?PartID=448
I have not read through your setup so I am not sure how this affects you.
Aaron, that's why my heads are at a machine shop - besides the fun part of having new heads and cams to fit together, I don't have any HR valve lifters for those heads/cams. Once they determine the needed sizes, I still have to order a pile of them
However, this engine builder shop has a tool that they use that shaves the end of the valves if needed to fit the cams into the heads. They do this on all sorts of overhead cam motors, including Honduhs, so for them it's no big deal to get all the valve lashes set correctly.
Since you have a set of valve lifters, it would be mostly a labor charge if you can find a shop that does this.
04-10-2009, 10:57 AM
#474
I can't use any old-style lifters with the Cosworth cams. Cosworth requires the "2007+ HR" valve lifters because of the high cam loading - that's in their literature and also a quote from the engineering group in California. Something about needing the special coating on the HR lifters....??? surprised me when I got the document with the cams, which verified what the SoCal group emailed me about.
04-10-2009, 11:20 AM
#475
I understand what you're doing - what I was trying to say is that if you run into problems, try a local shop.
I can't use any old-style lifters with the Cosworth cams. Cosworth requires the "2007+ HR" valve lifters because of the high cam loading - that's in their literature and also a quote from the engineering group in California. Something about needing the special coating on the HR lifters....??? surprised me when I got the document with the cams, which verified what the SoCal group emailed me about.
I can't use any old-style lifters with the Cosworth cams. Cosworth requires the "2007+ HR" valve lifters because of the high cam loading - that's in their literature and also a quote from the engineering group in California. Something about needing the special coating on the HR lifters....??? surprised me when I got the document with the cams, which verified what the SoCal group emailed me about.
04-10-2009, 12:28 PM
#476
???
04-10-2009, 04:53 PM
#478
Well guys, I think I got a big problem!
To anybody that has ever installed a set of deluboz cams. Did you have any issues installing the intake sprocket on it? There is a tiny little alignment pin on the stock intake sprocket. That does not lined up to the hole that's in the intake cam. Both of my intake cams have that tiny hole slightly off, by less than an a millimeter.
I could just not use these cams, order some high dollar ones, or try to drill out the holes a tad larger, but I don't know if the intake sprocket needs this to help make sure it's centered, for balancing reasons or if it's just strictly used as an alignment pin.
Please post or PM me if you have ANY ideas or have heard of this before.
04-12-2009, 06:33 AM
#479
hey you didnt tell me they were off by less than a MM! I thought it was on the other side or something by the way you told me lol.
Remember that these intake cams ARE retarded by 2* from the manufacturer for better power up top (that may just be crank degrees, which would imply 4* at the cam, which may just account for them being off by "less than a mm" at the cam snout)

Remember that these intake cams ARE retarded by 2* from the manufacturer for better power up top (that may just be crank degrees, which would imply 4* at the cam, which may just account for them being off by "less than a mm" at the cam snout)
04-12-2009, 09:33 AM
#480
hey you didnt tell me they were off by less than a MM! I thought it was on the other side or something by the way you told me lol.
Remember that these intake cams ARE retarded by 2* from the manufacturer for better power up top (that may just be crank degrees, which would imply 4* at the cam, which may just account for them being off by "less than a mm" at the cam snout)
Remember that these intake cams ARE retarded by 2* from the manufacturer for better power up top (that may just be crank degrees, which would imply 4* at the cam, which may just account for them being off by "less than a mm" at the cam snout)
Your are think it's a matter of degrees. It's not. If the sprocket would physically fit on the camshaft, then I wouldn't have much to worry about. It's just in the wrong spot.
So, I hope deluboz continues to show their top notch customer service and will help me come to a solution on Monday when they are back in the office. If not, I will have to return them as a defective set and get a different set of cams since they are no longer produced anymore.
More than likely, I will be able to modify the two intake camshafts. I have a local machinist that should be able to extend the hole by only 30 thousandths of an inch to allow the sprocket to fit on all the way. If I just enlarge the hole with a drill bit, that will cause a lot of slop and it may be possible for the sprocket to twist, even when it's torqued down properly. Regardless, it's going to cost at least $100 to have these cams modified properly.
It's just one thing after another with this build! It's just my luck that after a flawless success rate with these deluboz cams, that I get the only set in history that won't fit on the stock intake sprockets.