Newbie to Nissans but going to learn them
 02-07-2016, 12:57 AM
#1
Junior Member
Thread Starter

Join Date: Feb 2016
Location: Anderson Mo
Posts: 24
Newbie to Nissans but going to learn them
I just bought my 2000 Maxima on 2/5/2016. Has 170,000 miles on it. It had a check engine light and with the scanner it was the EGR. I know an EGR fix is common on modern cars so was not concerned about the code. After driving 150 miles I have a leak that can be the Rear Main Seal, Upper Oil Pan or a few other things that I may not know of yet.
Found this site looking for information and found out I have a 5th gen Maxima. Still don't know if it is a SE or some other model. I think it is a bottom line of the Maximas as I see there are several options not installed on mine. I test drove several makes and models and after driving several Maximas, I really like them. Really like the manual transmission in them as they will run but the ones I found have been ran into the ground so went with an automatic.
I am new to Nissan but not to mechanics. This is the first front wheel drive I have owned and the more I drive this car the more I am really liking it. I have threads on trucks I have done and threads are a great way of keeping track of what you have done, links to information that you may find and I am real good about posting pictures of how to do things as I learn them and pass on what I discover. It is a great journey when you get one completed and to go back and look at what you have started with and what you have learned.
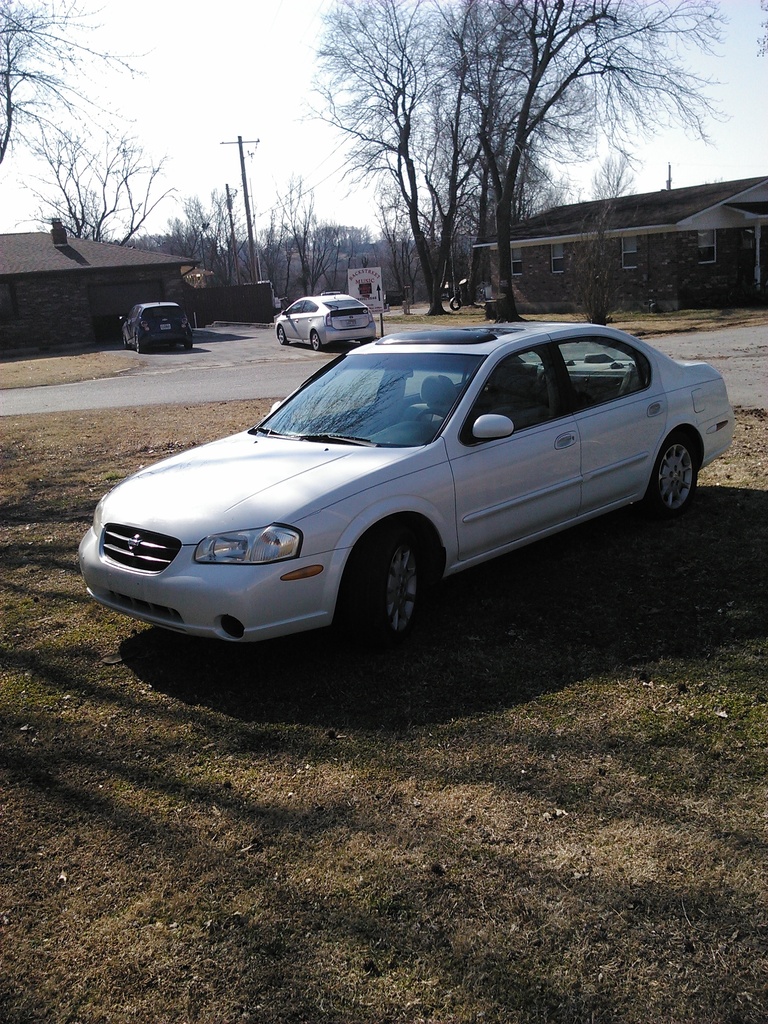
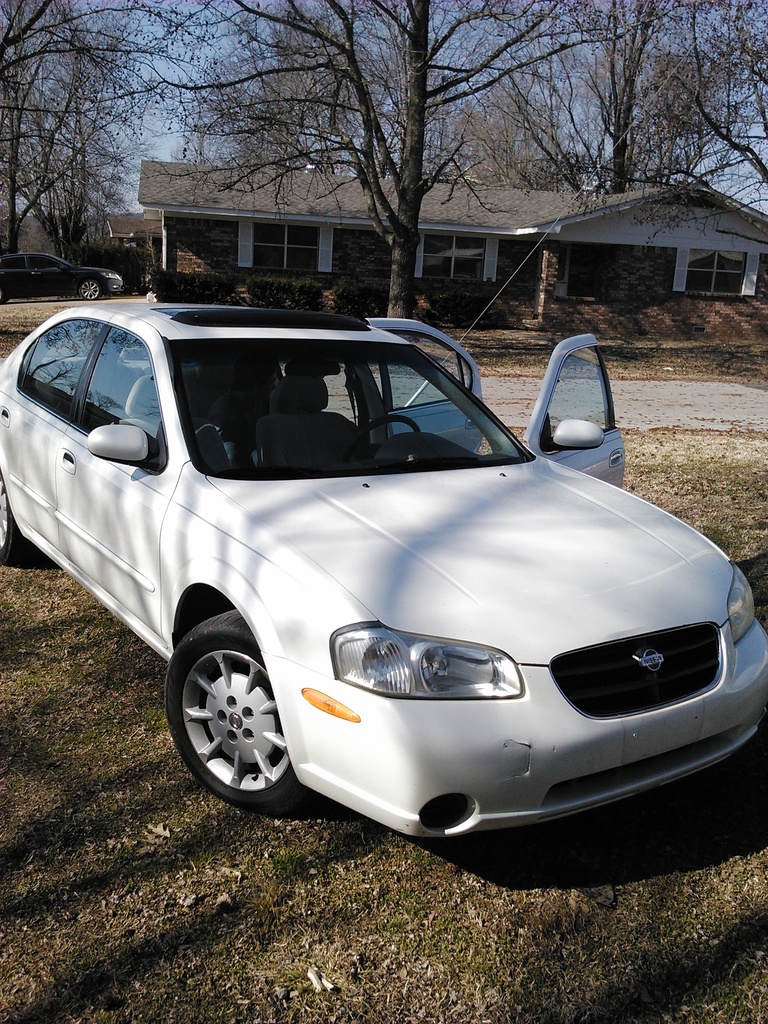
The day I brought it home 2/5/2016. I am going to tint the windows, do some body work on the front bumper and get oil leak fixed, EGR pipe cleaned out.
Interior is in excellent shape. I will replace a broken vent piece and get a different stereo system in it. I would like to find one out of a better equipped Maxima when I hit the bone yard.

Front bumper damage I will repair. I do body work as well.
Found this site looking for information and found out I have a 5th gen Maxima. Still don't know if it is a SE or some other model. I think it is a bottom line of the Maximas as I see there are several options not installed on mine. I test drove several makes and models and after driving several Maximas, I really like them. Really like the manual transmission in them as they will run but the ones I found have been ran into the ground so went with an automatic.
I am new to Nissan but not to mechanics. This is the first front wheel drive I have owned and the more I drive this car the more I am really liking it. I have threads on trucks I have done and threads are a great way of keeping track of what you have done, links to information that you may find and I am real good about posting pictures of how to do things as I learn them and pass on what I discover. It is a great journey when you get one completed and to go back and look at what you have started with and what you have learned.
The day I brought it home 2/5/2016. I am going to tint the windows, do some body work on the front bumper and get oil leak fixed, EGR pipe cleaned out.

Interior is in excellent shape. I will replace a broken vent piece and get a different stereo system in it. I would like to find one out of a better equipped Maxima when I hit the bone yard.

Front bumper damage I will repair. I do body work as well.

 02-07-2016, 01:01 AM
#2
Junior Member
Thread Starter
Join Date: Feb 2016
Location: Anderson Mo
Posts: 24
Some information I have already found. It is for a 4th gen but I am guessing this is quite similar. Information for leaks in between motor and transmission.
Upper Oil Pan Removal thread https://maxima.org/forums/4th-genera...n-removal.html
Upper Oil Pan Seal https://maxima.org/forums/4th-genera...seal-leak.html
How To's https://maxima.org/forums/4th-genera...them-here.html
More How To's http://www.shiftice.com/how_to.html
I think this is the motor I have. VQ30DE-(K?) Mine is a GXE, base model.
Letter Feature Feature type
D DOHC Camshaft
V Variable Valve Lift with Timing Camshaft
S Carburetor Fuel delivery
i Throttle Body Fuel Injection Fuel delivery
E Electronic Port Fuel Injection Fuel delivery
D Direct Cylinder Fuel Injection Fuel delivery
Rear Main Threads
https://maxima.org/forums/5th-genera...n-removal.html
Engine/Transmission Removal
http://apidaonline.com/index.php/gui...5-swap-writeup
Last edited by 2000whitemax; 02-08-2016 at 01:19 AM.
02-08-2016, 12:48 AM
#3
Junior Member
Thread Starter
Join Date: Feb 2016
Location: Anderson Mo
Posts: 24
Got my manual and just wanting to get as much video as possible so I can have something to reference to.
I need to buy a 36mm 21mm socket as I don't have one that large at this time. Looks like a tool I will need for the axle nut.
Another reference link https://maxima.org/forums/4th-genera...placement.html
Autozone did a video tutorial on how to remove the axle on a 95 Max, you can find that here:
At first I was really concerned about having to do a rear main seal on one of these and sure it is still a time consuming and a fairly tough job to do, but after going thru this site, videos that I have found and my repair manual, it is looking easier all the time. I do have a ton of research involved but I feel so much more confident then when I first found the problem. Some of the information I have found will kick in when I actually get into the job I am sure.
Last edited by 2000whitemax; 02-08-2016 at 01:10 AM.
02-11-2016, 06:41 AM
#4
Junior Member
Thread Starter
Join Date: Feb 2016
Location: Anderson Mo
Posts: 24
I went to the boneyard and was able to get a replacement upper vent cover just above the stereo as mine was broken. I will post pictures later when I install it. It came off of an 01-03 and looks to be an exact fit. The Bose AM/FM Cd, cassette I am not sure is going to work. It seems taller then what would came in mine. The reason I say that is the temperature control on mine seems taller and the car I got mine from the temperature control looks narrower.
I did order my rear main seals from Nissan and should be getting to that here shortly. I am preparing to get the information I need to get the front bumper off so I can do some body work on it and fix the big gash in it. Looks easy enough to get removed. I have a manual now but videos make it so much easier.
I did order my rear main seals from Nissan and should be getting to that here shortly. I am preparing to get the information I need to get the front bumper off so I can do some body work on it and fix the big gash in it. Looks easy enough to get removed. I have a manual now but videos make it so much easier.
02-20-2016, 02:00 AM
#5
Junior Member
Thread Starter
Join Date: Feb 2016
Location: Anderson Mo
Posts: 24
I have been working a lot of overtime and just was not going to be able to do the rear main seal so I had it done. While I had it done, I did have the mechanic to clean out the EGR system which is usually just build up in the pipe where the hot exhaust gas meets the cold air intake and will throw a code on most cars. While he was in there he also had to replace a power steering pulley and seems like I had him to fix something else while in there.
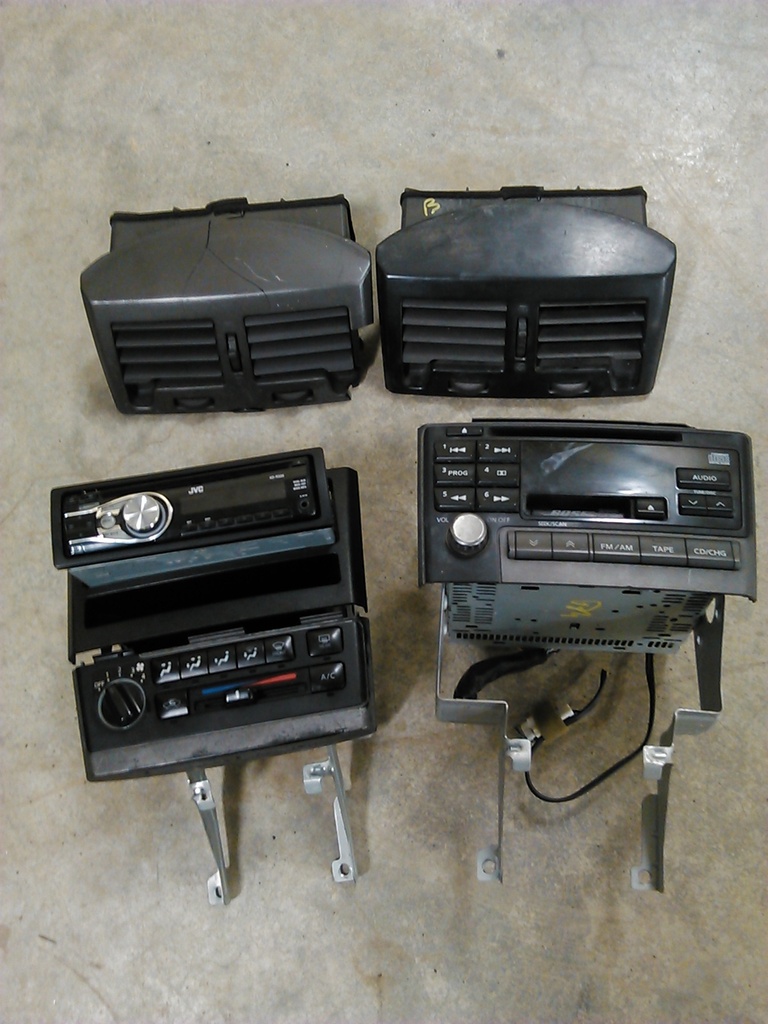
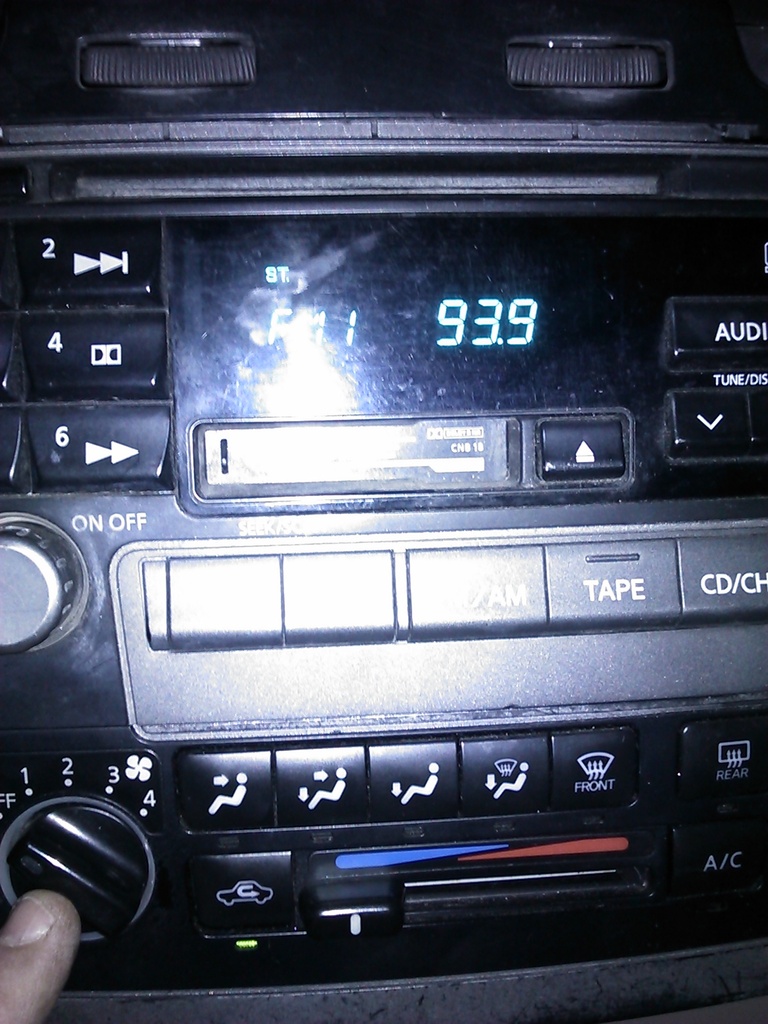
I did go to the bone yard and was able to find a vent and a factory stereo. My vent was cracked and the previous owner put in a JVC stereo that I never have liked. I got one in another truck of mine and just never cared for them.
Usually stereo wiring is all hacked up. Whoever had the stereo done in the past did it right as they bought the adapter plug and wired it all correctly. All I had to do was remove the adapter and plug in my replacement stereo. It was a break from not having to go back and undo someone else's hack job.
Here is the old and new vent and stereo.
The lower night lights are not working. I was thinking I could just replace a burnt out bulb but was unable to find the bulb. Something I will look into at a later time. I was also able to get the cigarette lighter working as they just did not hook it up when they did the stereo. Now I can use it as a phone charger. Got a few thing fixed on it.
I do have a minor power steering leak. What I have done in the past for minor power steering leaks is add a few ounces of brake fluid in the reservoir. What happens is the seals dry out and harden and cause leaks. Power Steering fluid will soften them up and get most minor leaks to seal up again. I did this on a Ford truck I had one time and it never leaked again in the 10 years I owned it. Just an old timers trick.
Thread I used for the stereo https://maxima.org/forums/5th-genera...n-how-diy.html
Spark Plugs https://video.search.yahoo.com/searc...65&action=view
Rear Door Cover Removal https://video.search.yahoo.com/searc...65&action=view
Need to find where the lower bulb is at. I am going to replace the speakers in the car. I think the originals are just to old and brittle.
I did go to the bone yard and was able to find a vent and a factory stereo. My vent was cracked and the previous owner put in a JVC stereo that I never have liked. I got one in another truck of mine and just never cared for them.
Usually stereo wiring is all hacked up. Whoever had the stereo done in the past did it right as they bought the adapter plug and wired it all correctly. All I had to do was remove the adapter and plug in my replacement stereo. It was a break from not having to go back and undo someone else's hack job.
Here is the old and new vent and stereo.

The lower night lights are not working. I was thinking I could just replace a burnt out bulb but was unable to find the bulb. Something I will look into at a later time. I was also able to get the cigarette lighter working as they just did not hook it up when they did the stereo. Now I can use it as a phone charger. Got a few thing fixed on it.
I do have a minor power steering leak. What I have done in the past for minor power steering leaks is add a few ounces of brake fluid in the reservoir. What happens is the seals dry out and harden and cause leaks. Power Steering fluid will soften them up and get most minor leaks to seal up again. I did this on a Ford truck I had one time and it never leaked again in the 10 years I owned it. Just an old timers trick.
Thread I used for the stereo https://maxima.org/forums/5th-genera...n-how-diy.html
Spark Plugs https://video.search.yahoo.com/searc...65&action=view
Rear Door Cover Removal https://video.search.yahoo.com/searc...65&action=view
Need to find where the lower bulb is at. I am going to replace the speakers in the car. I think the originals are just to old and brittle.

Last edited by 2000whitemax; 03-02-2016 at 06:08 PM.
03-16-2016, 05:32 PM
#6
Junior Member
Thread Starter
Join Date: Feb 2016
Location: Anderson Mo
Posts: 24
You can add another $1000 when buying a used car from my experience. This car was in great shape but like any truck or car I have dealt with always something that needs to be caught up on repairs. This car is no different.
Eventually I will need to get tires, go thru all the fluids, steering, brakes. suspension, get some sensors, cleaned or replaced. I have two engine codes which is the EGR and an O2 sensor which is common repair on todays newer cars that tend to get neglected. Other then that been minor repairs. One thing I do like about the newer cars is that you can find them in the boneyard and replace parts with better pieces such as trim or upgrades if it is a base model.
A trip to the boneyard and I got the interior looking like a new car except for the center console. Replaced some interior and exterior bulbs, changed oil and radiator fluid, got the drivers door sag fixed, an oil leak fixed.
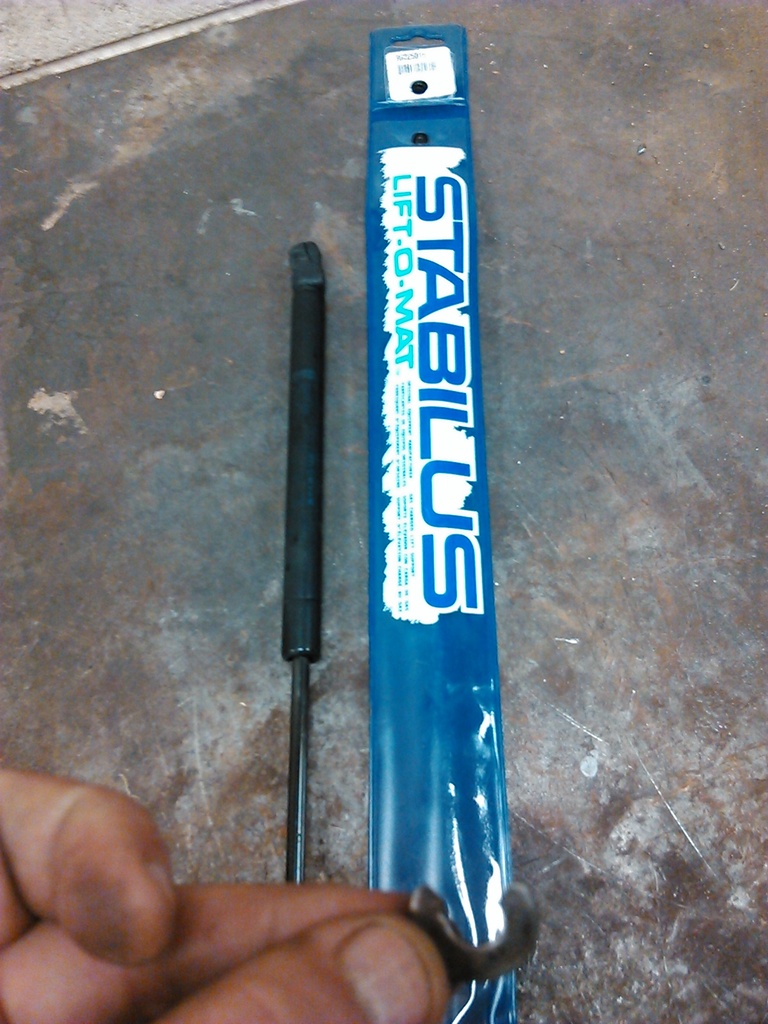
One thing that I see several times that is and easy fix is the hood struts do wear out and is and easy fix. The washer is for another fix I will show in the next picture.
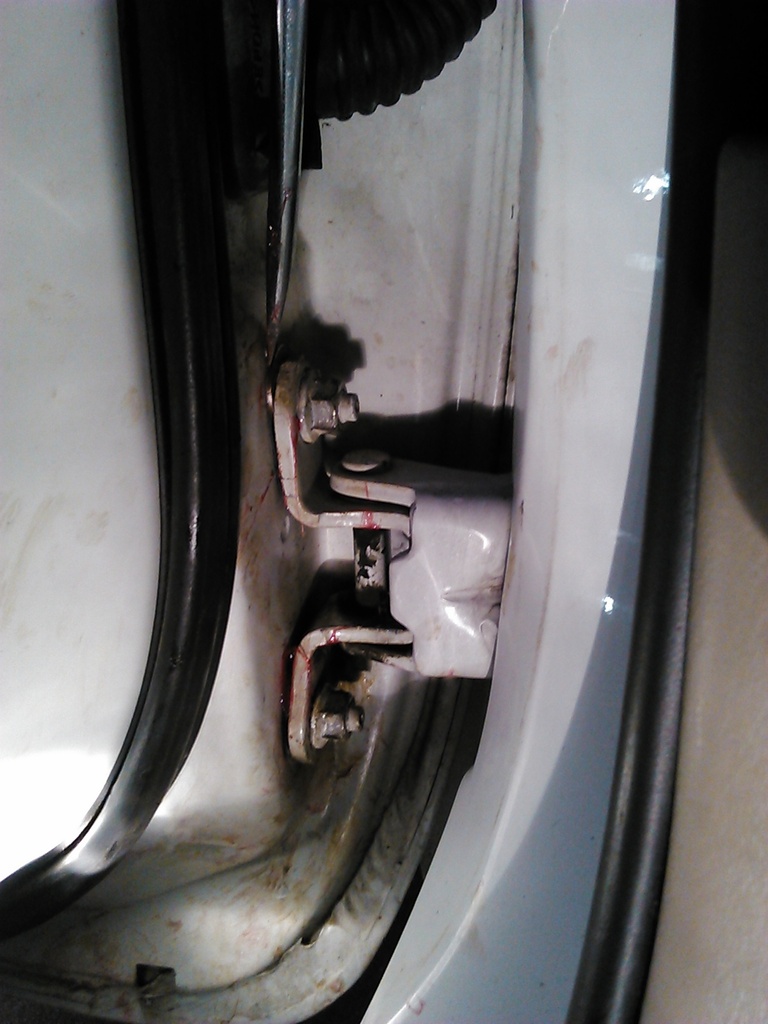
The drivers door had a sag and either from a heavy door or someone using the door to lift themselves out. I will eventually replace the top door hinge but am in no hurry for that. I put a washer in between the hinge and door. First I raise the door using a floor jack.

Loosen the nuts that hold the door to the studs and I slipped a washer in between the door and hinge. It is easier if the door uses bolts, so I had to notch the washers. I used two thin washers, one for the top and bottom studs on the lower hinge only. I use wheel bearing grease to help hold parts in when I need them to stay put in several cases so as I don't have to hold them.
I have a small power steering leak and that is from the seals just getting hard. Another easy fix that I have used numerous times thru the years is to add a tablespoon of brake fluid to a power steering unit. It will soften the seals up. Can take a while to seal the leak but will fix minor leaks. One truck I did this too lasted 7 years until I sold it.
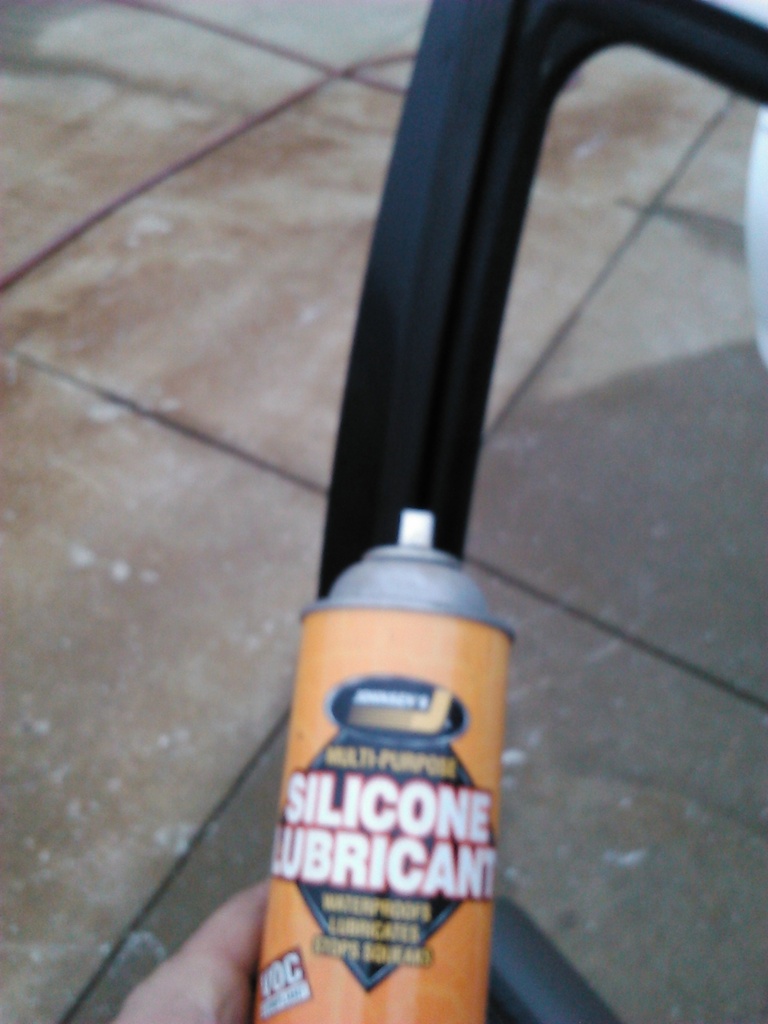
The window seals on cars and trucks do dry out and cause a lot of friction on manual or electric window motors. I just lube the seals up real well with silicon spray and can make a big difference on how easy it makes the window go up and down.
Got tired of the hood bopping me in the head and got new struts on. One way I learned Toyota trucks so well was I would go thru a Haynes Manual, Youtube videos, Yotatech, and then go to the boneyard and disassemble a truck without ripping things apart like it was my own. I still do that when I find a truck in the yards so someone can just get the part they need and to keep me refreshed on how these trucks assemble and disassemble.
No way am I going to try and figure out how to work on this motor without spending sometime in the boneyard on another car. I am figuring out real quick that I do not care to work on front wheel drive V6 motors but some repairs are not that bad once you figure out how to get them apart. This is the way I have learned the 79-95 trucks. A 79-83 and the 89-95 trucks if I am looking at one, I can still remember how to get them apart. The 84-88s I have stepped people over the phone on memory without looking at them. Just showing some ways of learning these trucks.
Eventually I will need to get tires, go thru all the fluids, steering, brakes. suspension, get some sensors, cleaned or replaced. I have two engine codes which is the EGR and an O2 sensor which is common repair on todays newer cars that tend to get neglected. Other then that been minor repairs. One thing I do like about the newer cars is that you can find them in the boneyard and replace parts with better pieces such as trim or upgrades if it is a base model.
A trip to the boneyard and I got the interior looking like a new car except for the center console. Replaced some interior and exterior bulbs, changed oil and radiator fluid, got the drivers door sag fixed, an oil leak fixed.
One thing that I see several times that is and easy fix is the hood struts do wear out and is and easy fix. The washer is for another fix I will show in the next picture.

The drivers door had a sag and either from a heavy door or someone using the door to lift themselves out. I will eventually replace the top door hinge but am in no hurry for that. I put a washer in between the hinge and door. First I raise the door using a floor jack.

Loosen the nuts that hold the door to the studs and I slipped a washer in between the door and hinge. It is easier if the door uses bolts, so I had to notch the washers. I used two thin washers, one for the top and bottom studs on the lower hinge only. I use wheel bearing grease to help hold parts in when I need them to stay put in several cases so as I don't have to hold them.

I have a small power steering leak and that is from the seals just getting hard. Another easy fix that I have used numerous times thru the years is to add a tablespoon of brake fluid to a power steering unit. It will soften the seals up. Can take a while to seal the leak but will fix minor leaks. One truck I did this too lasted 7 years until I sold it.
The window seals on cars and trucks do dry out and cause a lot of friction on manual or electric window motors. I just lube the seals up real well with silicon spray and can make a big difference on how easy it makes the window go up and down.

Got tired of the hood bopping me in the head and got new struts on. One way I learned Toyota trucks so well was I would go thru a Haynes Manual, Youtube videos, Yotatech, and then go to the boneyard and disassemble a truck without ripping things apart like it was my own. I still do that when I find a truck in the yards so someone can just get the part they need and to keep me refreshed on how these trucks assemble and disassemble.
No way am I going to try and figure out how to work on this motor without spending sometime in the boneyard on another car. I am figuring out real quick that I do not care to work on front wheel drive V6 motors but some repairs are not that bad once you figure out how to get them apart. This is the way I have learned the 79-95 trucks. A 79-83 and the 89-95 trucks if I am looking at one, I can still remember how to get them apart. The 84-88s I have stepped people over the phone on memory without looking at them. Just showing some ways of learning these trucks.
 03-16-2016, 05:47 PM
#7
Junior Member
Thread Starter
Join Date: Feb 2016
Location: Anderson Mo
Posts: 24
If all goes well I will be pulling the front bumper off and start getting it repaired for paint this weekend.
Got a quote to have all windows tinted for $185.
Will be getting to the EGR soon and am getting a 420 ( I think it is) the Bank 1 code fix soon.
Got a quote to have all windows tinted for $185.
Will be getting to the EGR soon and am getting a 420 ( I think it is) the Bank 1 code fix soon.
03-16-2016, 09:55 PM
#8
Senior Member

Join Date: Dec 2008
Location: BRONX
Posts: 720
Looks clean and nice enjoy, I got the same one practically. Disconnect those electric motor mounts and bypass the coolant going into the IACV.... no major headaches to worry about is better IMO......research these two things that can fry ECU and be safer.
03-17-2016, 07:29 PM
#9
Junior Member
Thread Starter
Join Date: Feb 2016
Location: Anderson Mo
Posts: 24
Thanks BronxSleeperMax187...I looked up that information and found out about the electric motor mounts. That is something I would of never have thought of. I have found the front one and still need to find the rear one but will get it done. Still need to look in to the coolant hose and will get that found. I really appreciate you bringing that to my attention.
We are really enjoying this car and have been gradually going thru it. I have been spending a lot of hours learning this car and it has all been thru this site.
We are really enjoying this car and have been gradually going thru it. I have been spending a lot of hours learning this car and it has all been thru this site.
 03-19-2016, 01:07 AM
#11
Junior Member
Thread Starter
Join Date: Feb 2016
Location: Anderson Mo
Posts: 24
I will check it out. I have been going thru the Stickys a little at a time and have found that one but will look it up here. I appreciate the information. Each car has it little tricks that makes them a little better. I really want to this one to be a great looking and dependable car for several years. It will get up and run for a stock set up. Really impressed with its power.
03-19-2016, 01:18 AM
#12
Junior Member
Thread Starter
Join Date: Feb 2016
Location: Anderson Mo
Posts: 24
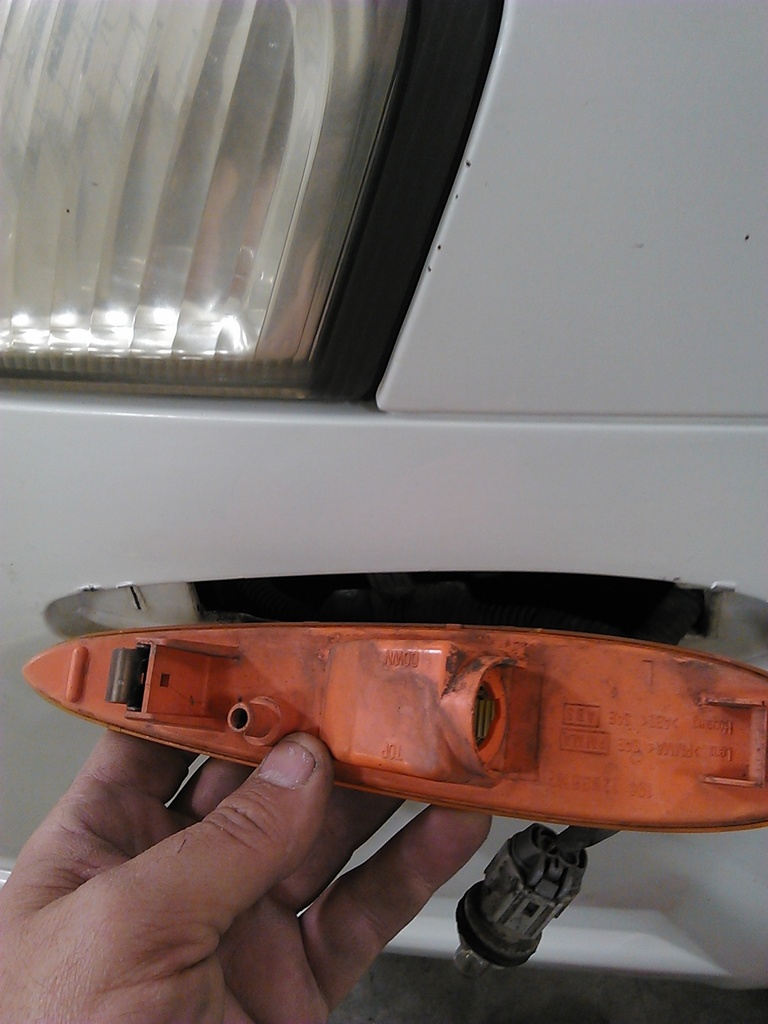
I have some damage on the front bumper cover. The video above is very useful. One thing I did find was to pry the light cover forward and it pops out real quick.
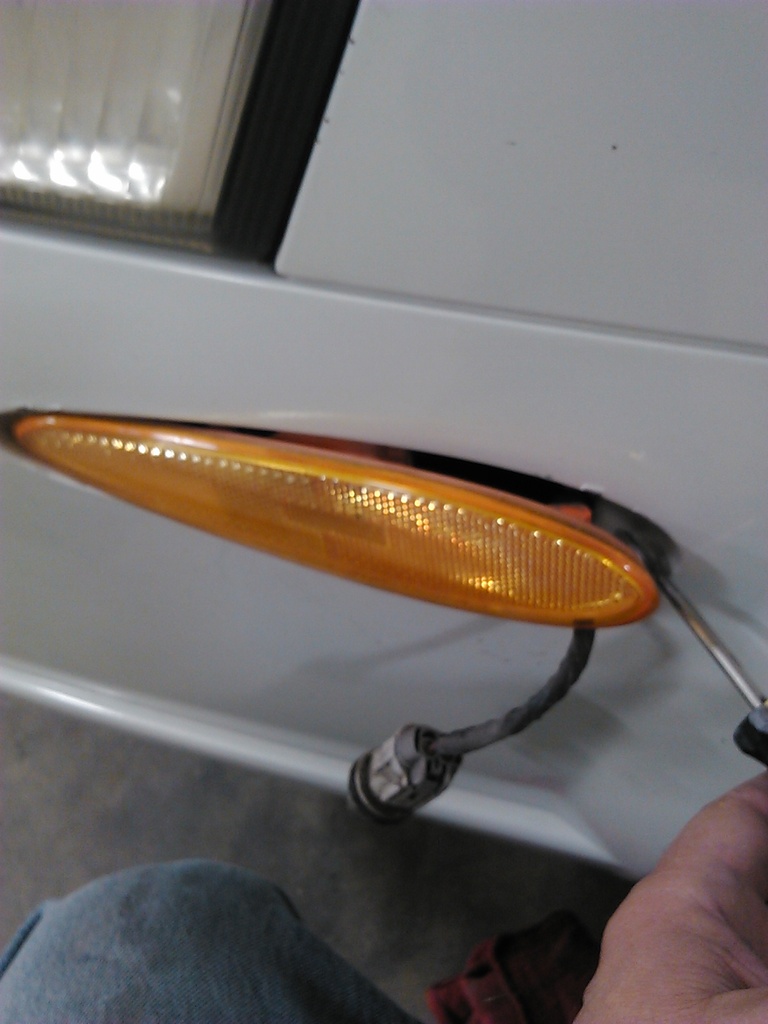
The metal tab is what applies pressure and holds it in place.
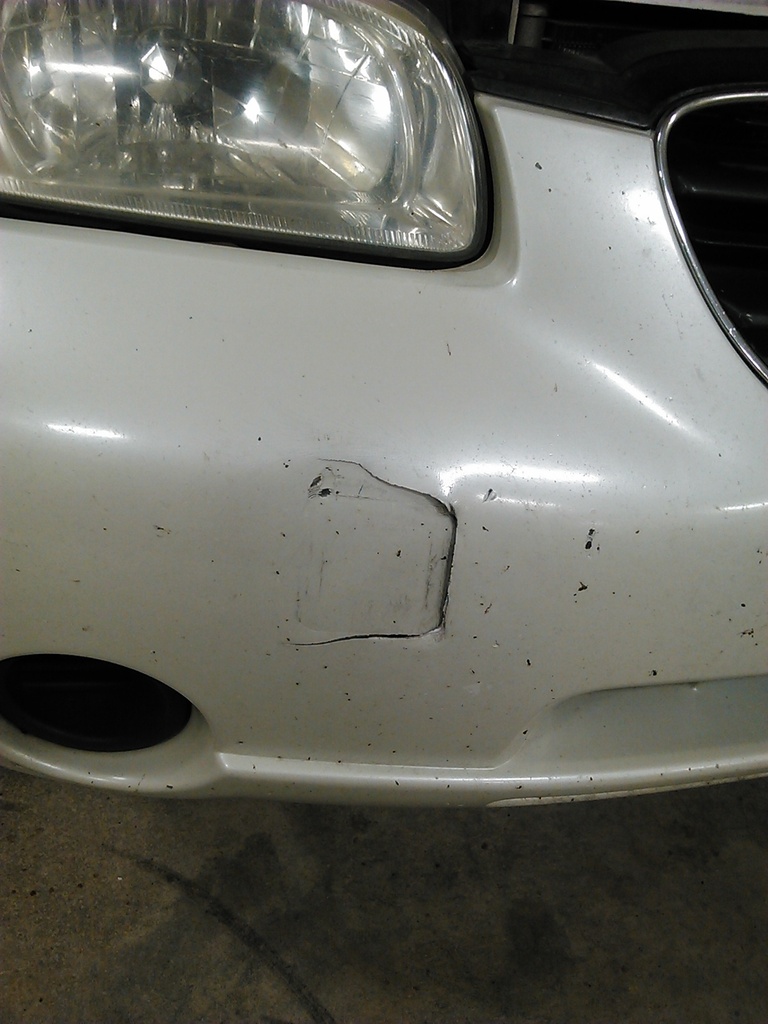
This is the damage I am wanting to fix. I want to push the plastic back out and put some support on the back side.
Bumper came off just liked the video said it would. I might of missed the part on this clip. It is brittle and will be ordering one from my local Nissan dealer Monday.
Wish I had a heat gun but with some careful work I was able to get it soft and back into place.
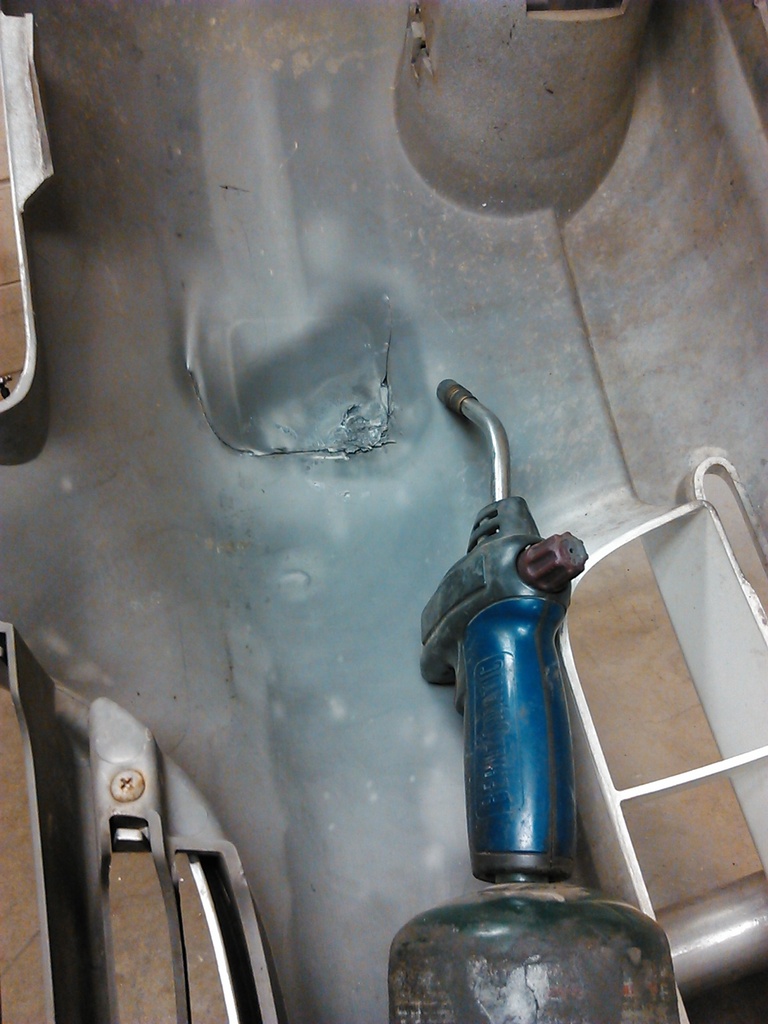
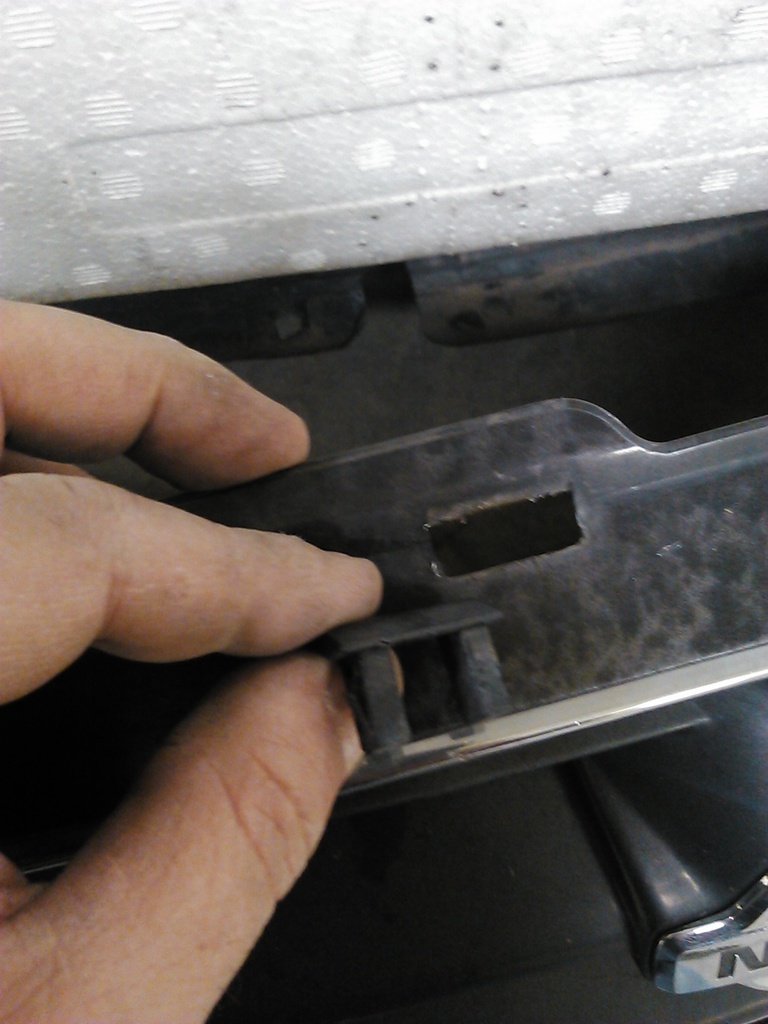
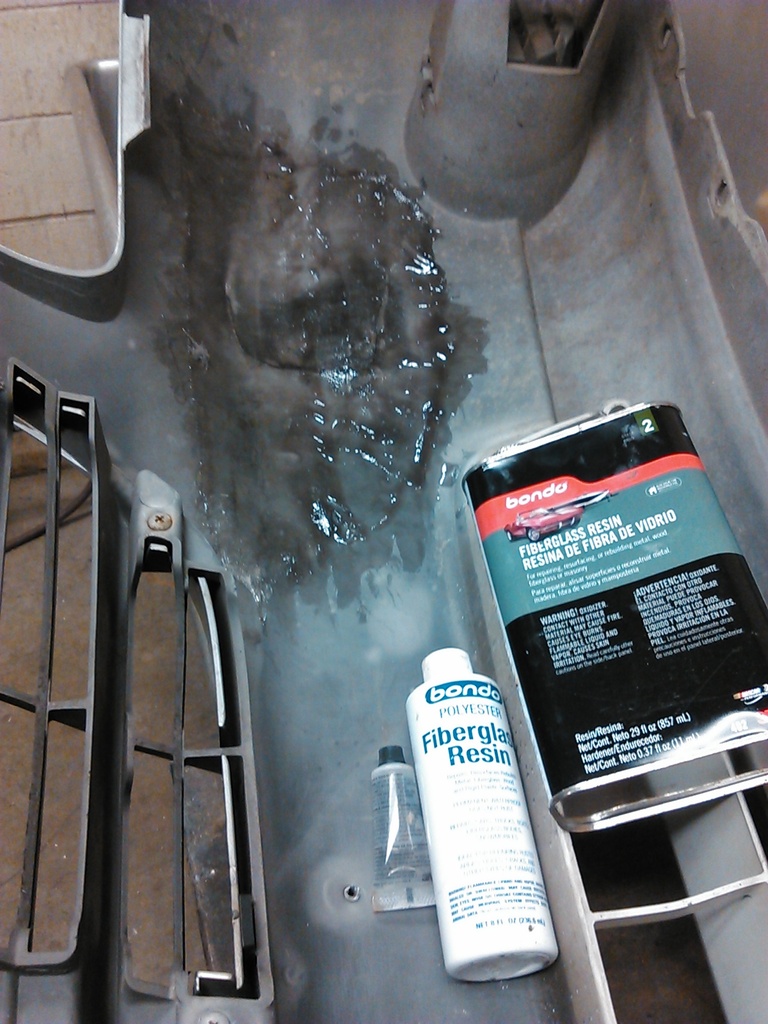
I used fiberglass on the back side and hope to get to the front side of it soon for the repair. I will install it back on the car for support for working on it but when I go to paint it, I will then again remove it for better coverage and to save having to mask off the whole car. I only intend to paint the front bumper and will have a small spot on the rear bumper that just needs prepped for paint. I will be looking up the paint code for this car and post it when I find it.

The metal tab is what applies pressure and holds it in place.

This is the damage I am wanting to fix. I want to push the plastic back out and put some support on the back side.

Bumper came off just liked the video said it would. I might of missed the part on this clip. It is brittle and will be ordering one from my local Nissan dealer Monday.

Wish I had a heat gun but with some careful work I was able to get it soft and back into place.

I used fiberglass on the back side and hope to get to the front side of it soon for the repair. I will install it back on the car for support for working on it but when I go to paint it, I will then again remove it for better coverage and to save having to mask off the whole car. I only intend to paint the front bumper and will have a small spot on the rear bumper that just needs prepped for paint. I will be looking up the paint code for this car and post it when I find it.
 03-19-2016, 03:22 AM
#13
Junior Member
Thread Starter
Join Date: Feb 2016
Location: Anderson Mo
Posts: 24
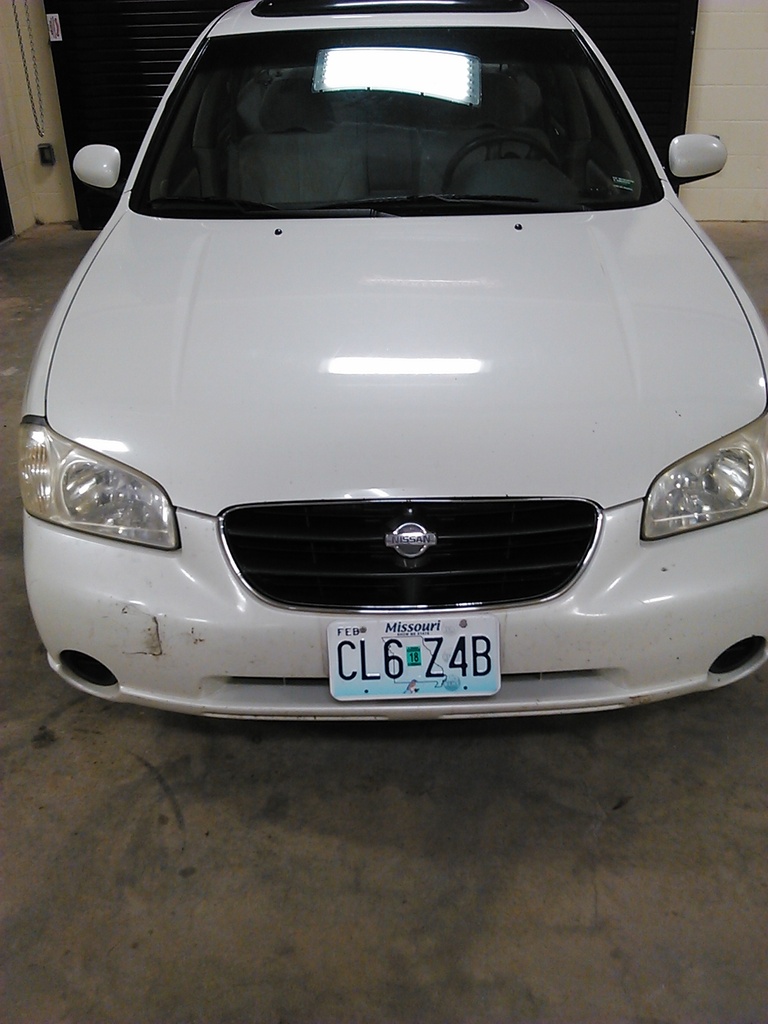
This car came from Arkansas and they do not have the front tag. Missouri has to have both front and rear tag. There are 4 Maximas in the yards and the bumpers are either wrecked or sold the front ends off of. I just had to bolt my tag thru the bumper until I get the correct tag mount. I will have it before I paint it.
I did get the back support. Doesn't look much different then when I started but will give support when I start on the body work. Also I am throwing a Code 420 which I know is in the catalytic converter and O2 sensors. As with previous other cars, O2 sensors are common maintenance and mostly neglected. It does have a bad smell from the converter probably being worn. I did get the front motor mount disconnected, still need to find the rear connector and will get it done.
I did get the back support. Doesn't look much different then when I started but will give support when I start on the body work. Also I am throwing a Code 420 which I know is in the catalytic converter and O2 sensors. As with previous other cars, O2 sensors are common maintenance and mostly neglected. It does have a bad smell from the converter probably being worn. I did get the front motor mount disconnected, still need to find the rear connector and will get it done.

 04-02-2016, 11:27 AM
#16
Junior Member
Thread Starter
Join Date: Feb 2016
Location: Anderson Mo
Posts: 24
When I bought my Maxima I knew it had an EGR problem. I know the problem is when hot gases hit the cold air and where it tends to harden at that point. I go to the bone yard to practice on a car I am not familiar with. Fixing an EGR on a Maxima is probably easy for some but for me this is baby steps. First front wheel drive I have owned.
I can do mechanics on several other cars and the EGR clogging is quite common on modern day cars.
Here is where the hot gases have come into contact with the cold air. May not be easily visible but the carbon is rock hard and quite common on what I typically find working on cars.
This car is in the boneyard. I let the owner know I was going to cut the metal pipe to the EGR as the nut to the pipe is usually a bear to seperate.
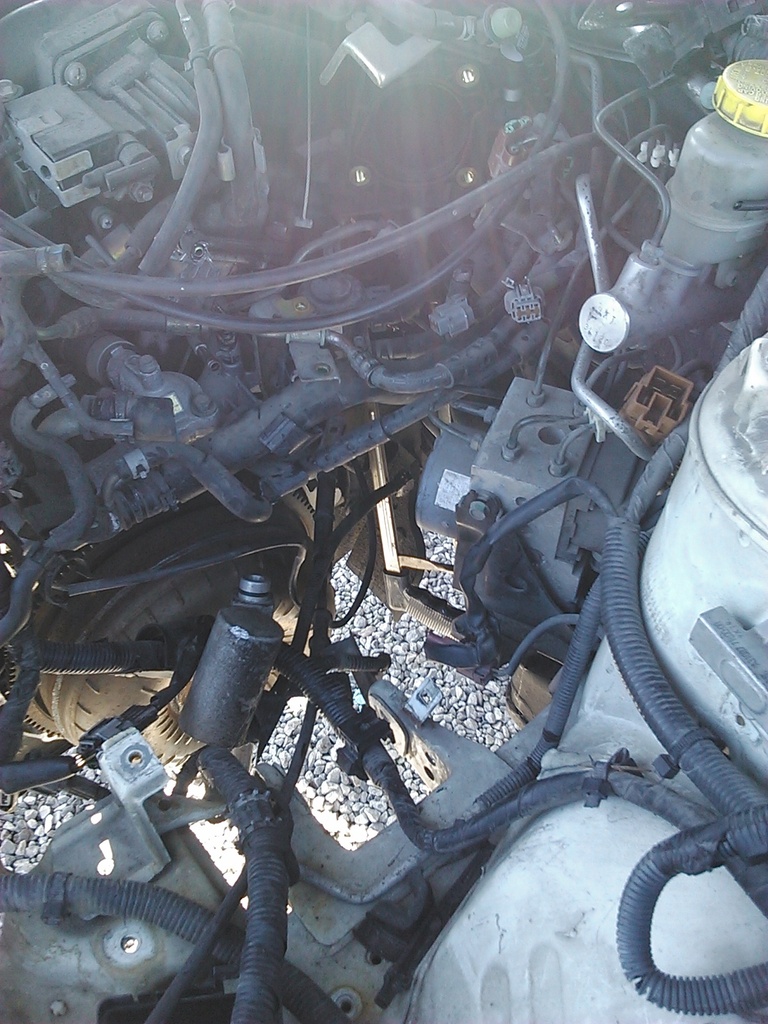
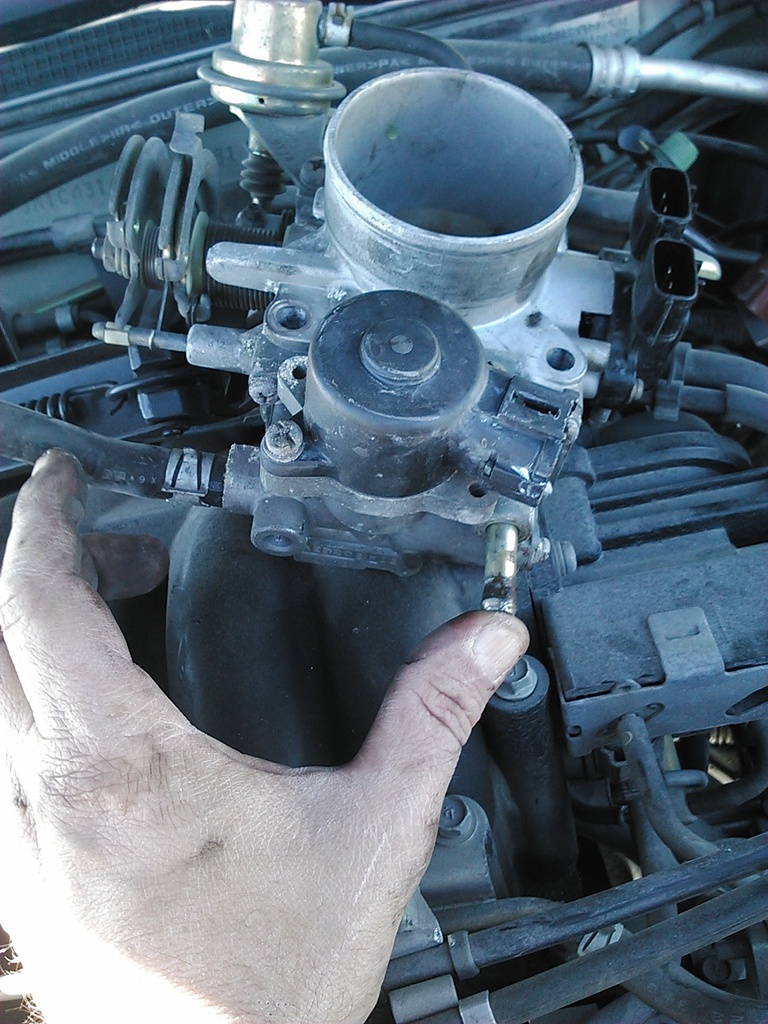
Here is the back side and quite common of what you will see and inside the intake. I take some oven cleaner inside an intake and take it to the carwash to get the carbon out. Not sure if I will do it on this one as I am not sure just yet on getting it off. Still learning these cars.
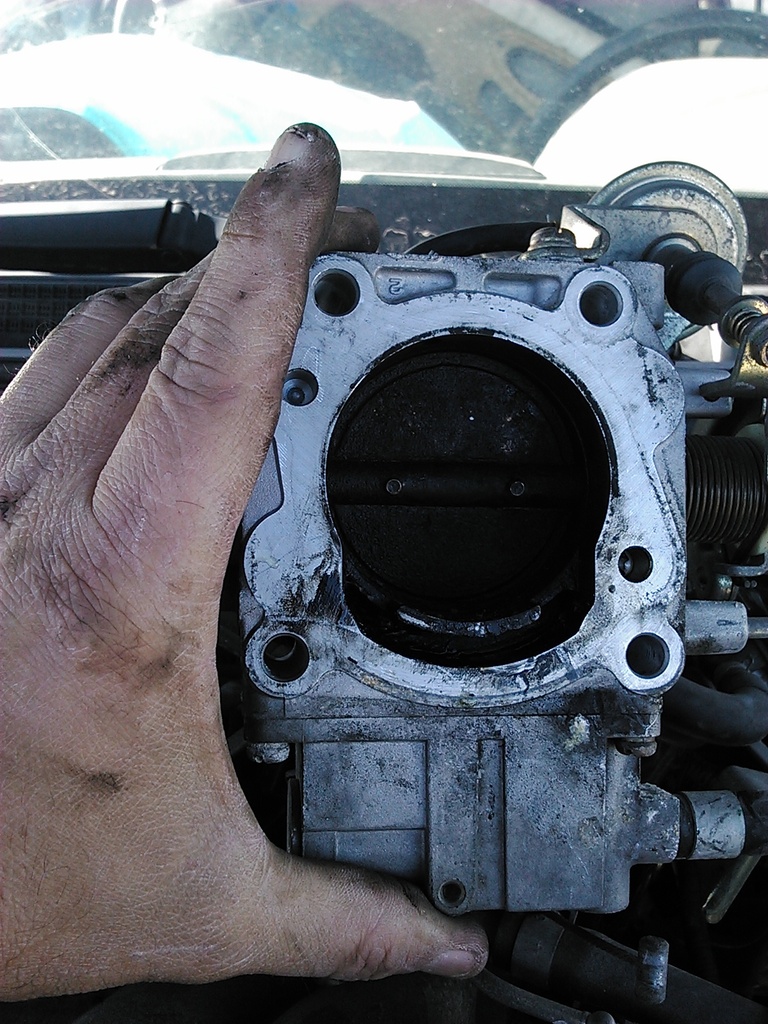
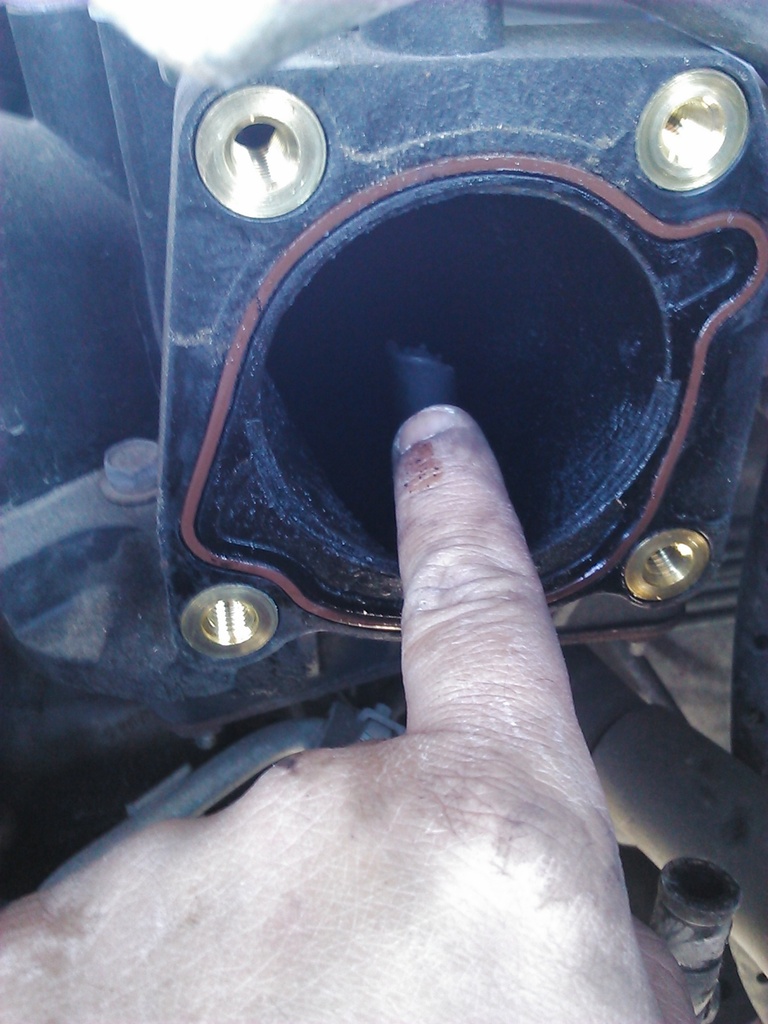
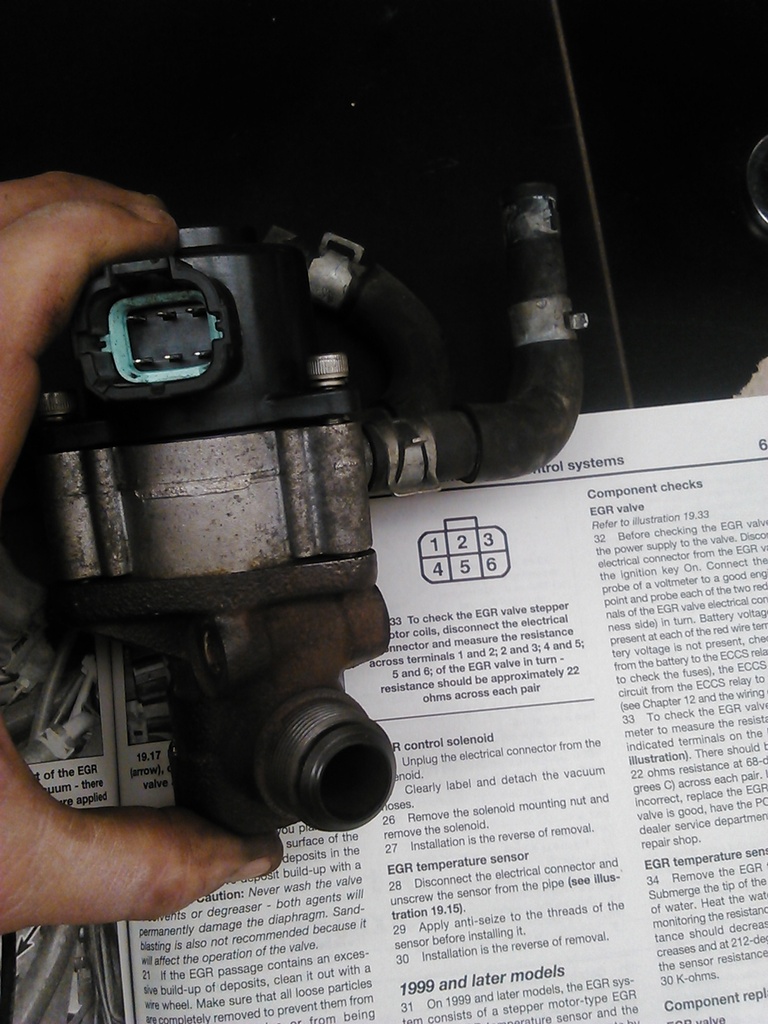
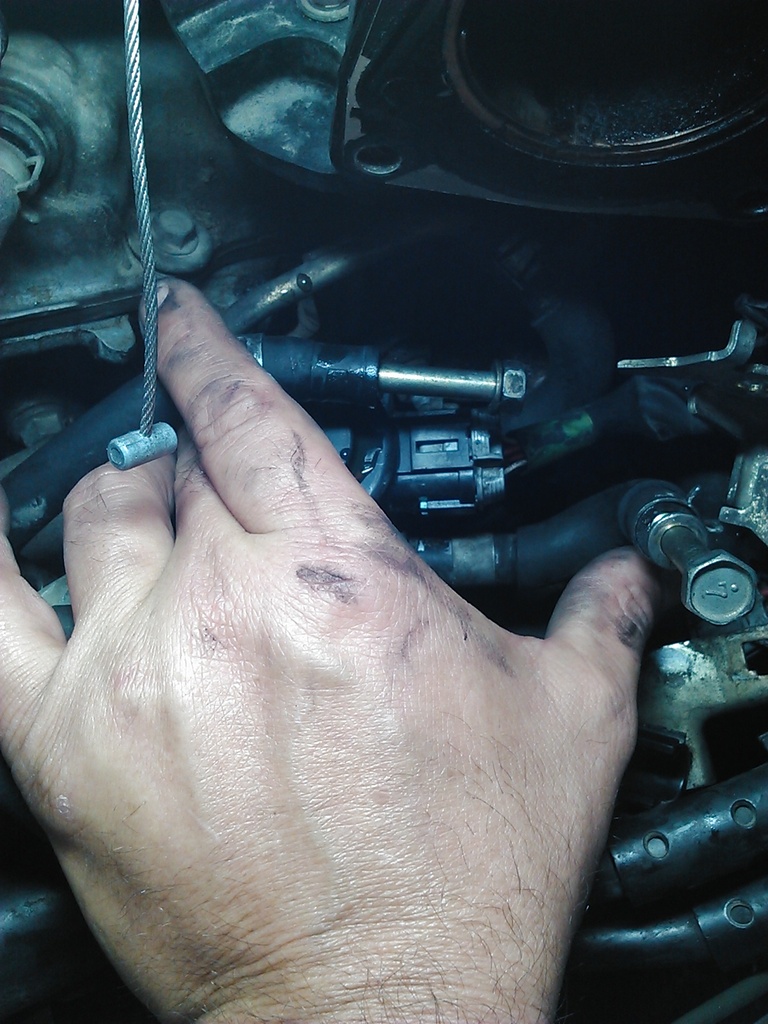
Is this the part that should be by pass the IACV where my fingers is at? I keep all nuts and bolts and hoses when I get parts from the boneyard. Never know if I break or loose one of mine if I am going to need a replacement. I also will study how this EGR operates just in case mine is bad. It cost $16 at the bone yard as was a valuable learning experience for me. Not all the pictures turned out. By not destroying a salvage yard car, several owners let in their yards where they wont let others. I explain any damage I may have done and why. He understood me cutting the pipe.
I can do mechanics on several other cars and the EGR clogging is quite common on modern day cars.
Here is where the hot gases have come into contact with the cold air. May not be easily visible but the carbon is rock hard and quite common on what I typically find working on cars.

This car is in the boneyard. I let the owner know I was going to cut the metal pipe to the EGR as the nut to the pipe is usually a bear to seperate.

Here is the back side and quite common of what you will see and inside the intake. I take some oven cleaner inside an intake and take it to the carwash to get the carbon out. Not sure if I will do it on this one as I am not sure just yet on getting it off. Still learning these cars.

Is this the part that should be by pass the IACV where my fingers is at? I keep all nuts and bolts and hoses when I get parts from the boneyard. Never know if I break or loose one of mine if I am going to need a replacement. I also will study how this EGR operates just in case mine is bad. It cost $16 at the bone yard as was a valuable learning experience for me. Not all the pictures turned out. By not destroying a salvage yard car, several owners let in their yards where they wont let others. I explain any damage I may have done and why. He understood me cutting the pipe.
 04-03-2016, 10:58 PM
#17
Junior Member
Thread Starter
Join Date: Feb 2016
Location: Anderson Mo
Posts: 24
I had a friend to help me get the EGR pipe cleaned out. It was packed rock solid as I expected. The car runs better when going down the road but can be hard to start and has a rough idle. I think the EGR valve is stuck open.
I tried to break the nut loose from the valve that I got from the salvage yard buy letting a wrench set on it and with weight on it hoping to break the nut loose. I let it sit over night and that did not work so I then took a heating torch to the nut.
I then removed the 3 allen screws holding it together and things went a little further then I wanted to but it will show how the Stepper Motor comes apart and goes together. I looked all over the net for this information and could not find it. The Haynes Manual does not go into depth either.
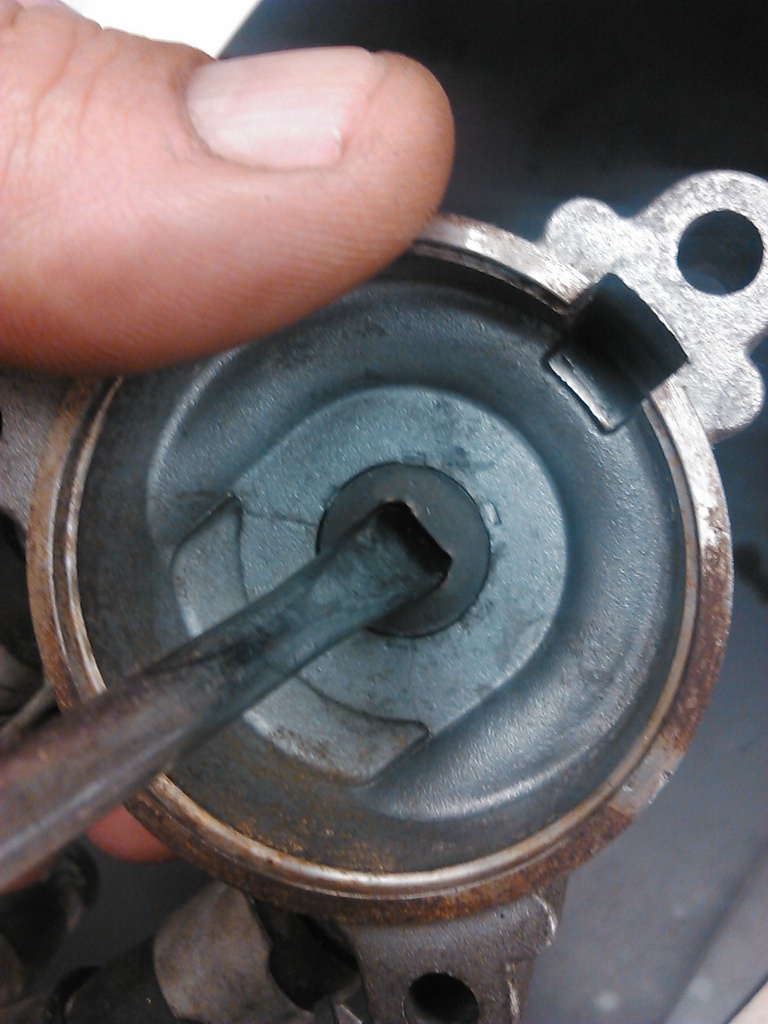
With my finger, I am able to push down on the spring and by blowing into the valve I am able to tell if it is open or closed. Down is open. Stepper motor pushes it down by using a screw and will show that in one of the next pictures.
While trying to separate the motor from the valve, I accidently pulled the motor in half. Looks like it will be okay but will show what all the motor looks like.
Inside the cylinder is the screw that spins up and down to operate the plunger to the EGR valve.
Pretty sure I got it reassemble correctly. The hoses go forward and the electrical connector and metal pipe connector go to the right. I made pencil marks but they got rubbed off when working on the assembly. I will use a scribe the next time. Haynes on page 6-23 has some resistance checks I will do later.
I tried to break the nut loose from the valve that I got from the salvage yard buy letting a wrench set on it and with weight on it hoping to break the nut loose. I let it sit over night and that did not work so I then took a heating torch to the nut.

I then removed the 3 allen screws holding it together and things went a little further then I wanted to but it will show how the Stepper Motor comes apart and goes together. I looked all over the net for this information and could not find it. The Haynes Manual does not go into depth either.

With my finger, I am able to push down on the spring and by blowing into the valve I am able to tell if it is open or closed. Down is open. Stepper motor pushes it down by using a screw and will show that in one of the next pictures.

While trying to separate the motor from the valve, I accidently pulled the motor in half. Looks like it will be okay but will show what all the motor looks like.

Inside the cylinder is the screw that spins up and down to operate the plunger to the EGR valve.

Pretty sure I got it reassemble correctly. The hoses go forward and the electrical connector and metal pipe connector go to the right. I made pencil marks but they got rubbed off when working on the assembly. I will use a scribe the next time. Haynes on page 6-23 has some resistance checks I will do later.
 04-04-2016, 12:00 AM
#18
Junior Member
Thread Starter
Join Date: Feb 2016
Location: Anderson Mo
Posts: 24
One thing I did find on this Stepper Motor Assembly that I think may be a problem and is what I am going to look at when I get back on to mine is the "D" shape support on this one is hard to turn. I think it is mostly a support for the screw that operates the valve. This motor I would think is not very strong so I took a flat blade screwdriver and worked it loose. It was tight. I used some WD-40 and got it working pretty smooth now. It is not as easy turning as I would like but far better then it was.
What I am planning on doing is to just replace the motor on my EGR if the plunger to the valve is moving freely. I wont know until I get back into it. The horse shoe in the metal casting that connects to the rubber hoses is just a place that coolant can flow to remove heat and keep it from the motor from what I can tell. While blowing thru the hoses and turning the "D" slot, I could not tell any difference in air flow so am sure it is just for coolant.
Moves more freely after working it with a flat blade. Could be another EGR issue that may just need to be serviced.
 04-06-2016, 01:49 AM
#19
Junior Member
Thread Starter
Join Date: Feb 2016
Location: Anderson Mo
Posts: 24
Getting thing fixed on this car is coming along slowly but surely. Been tied up with work and a few other things. When I bought the car, I knew it had an EGR problem. Actually I think I had two problems but one masked the other. I had a clogged pipe full of carbon. When I unclogged the pipe, the car ran better on the highway but not at idle and a warm start was difficult.
What I think happened is the EGR valve was stuck open but the clogged pipe hid that problem until I got the pipe cleared. I swapped out my Stepper motor ( Seems like that is what it is called). Swapping out the motor fixed it. From what I read 2000 and 2001 can swap these parts, the other 5th gens use a different motor. My car is an 11/99 and the parts car I got was a 9/99 with the same part number.
I am still getting a P0420 if I recall that correctly. From what I have read it is either the catalytic converter or the O2 sensor. I ordered some parts from my local Nissan dealer and asked which they thought it would be. They automatically said it was the catalytic converter and it would be around $1700. Freaking dealers, I have been looking at online part stores and not near that much.
Eventually I want to get to the body work. That is what I prefer to do. Just got to get some free time. Car is running great otherwise and been fun to drive. Been putting the miles on it.
04-22-2016, 01:38 PM
#20
Junior Member
Thread Starter
Join Date: Feb 2016
Location: Anderson Mo
Posts: 24
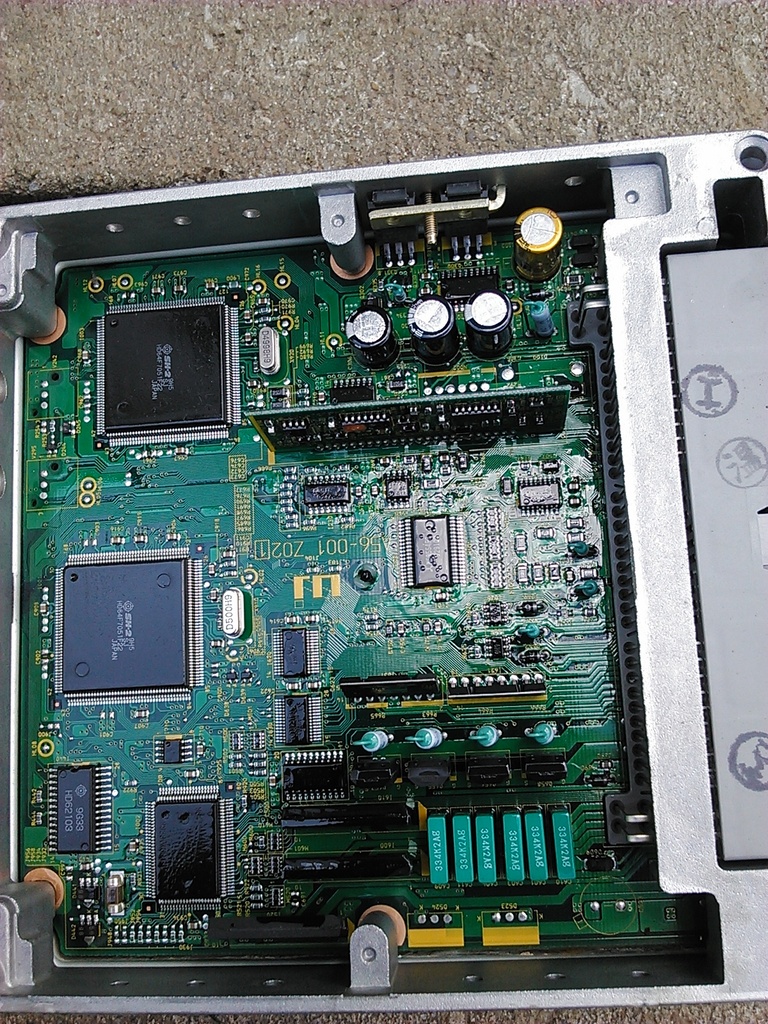
I got the P0505 code. I should of done the IACV bypass but was not quite sure which lines I need to connect to for bypassing the IACV. I think I know now. Studying the code, I seen the coils in the IACV gets wet from a broken seal. I think I broke the seal when replacing the EGR motor. I went to the boneyard and was able to get two more throttle bodies. I got a computer but my car does not have the traction control, the computer I have is for traction control and is not for my car.
I looked in the Haynes Manual and several sites for information for getting the computer out. What a royal pain in the rear. Manual and other information sites say just remove the cover panels and remove 4 bolts that hold the computer in the bracket. They are screws and not bolts. Getting the screws furthest from the firewall is not to bad. I had to use a small pair of pliers to get them loose and was able to thread them out with my fingers.
To get access to the screws closest to the firewall, I had to remove the two 10mm bolts that hold the bracket and move it around to get access to the front screws, still a pain to get to but I got it done. The engineers did not think of guys having to do repairs on these when they built them.
The coils in my IACV tested bad. Got two replacements just in case one is bad. Information I found says that the coils can short and ruin the computer. From the pictures I see, I do not see any burnt electronics.
Computer I will need to get if I have to replace mine. I know where two computers may be and might need to get one of them.
One problem I do see is it appears some water or condensation has gotten inside. Not bad and don't think it would be a problem.
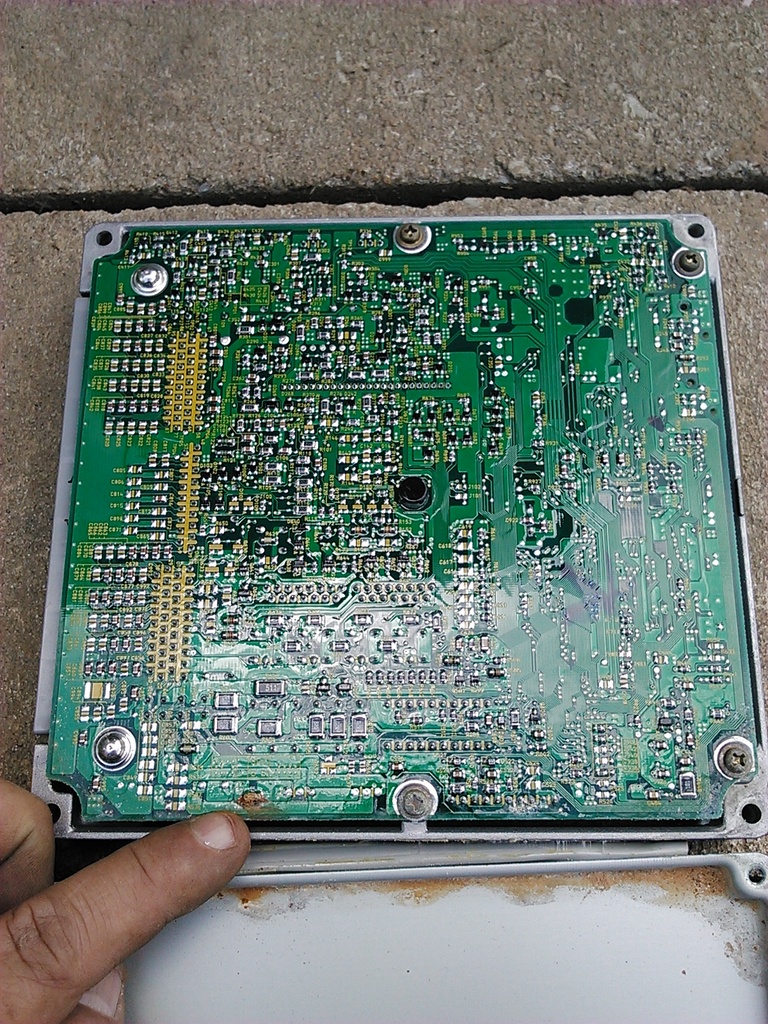
No burnt resistors here that I can see.
I looked in the Haynes Manual and several sites for information for getting the computer out. What a royal pain in the rear. Manual and other information sites say just remove the cover panels and remove 4 bolts that hold the computer in the bracket. They are screws and not bolts. Getting the screws furthest from the firewall is not to bad. I had to use a small pair of pliers to get them loose and was able to thread them out with my fingers.
To get access to the screws closest to the firewall, I had to remove the two 10mm bolts that hold the bracket and move it around to get access to the front screws, still a pain to get to but I got it done. The engineers did not think of guys having to do repairs on these when they built them.
The coils in my IACV tested bad. Got two replacements just in case one is bad. Information I found says that the coils can short and ruin the computer. From the pictures I see, I do not see any burnt electronics.
Computer I will need to get if I have to replace mine. I know where two computers may be and might need to get one of them.

One problem I do see is it appears some water or condensation has gotten inside. Not bad and don't think it would be a problem.

No burnt resistors here that I can see.
 04-22-2016, 01:39 PM
#21
Junior Member
Thread Starter
Join Date: Feb 2016
Location: Anderson Mo
Posts: 24
Anybody know if a bad IACV always ruin a computer? I could try one of my replacement throttle bodies and see what happens. I would save me getting a new computer and having the keys and computer re-flashed.
04-22-2016, 07:27 PM
#22

buy a small 90 degree screwdriver for reinstalling it, so much easier than what you went through. similar to this thing:
http://www.harborfreight.com/8-piece...ver-92630.html
04-25-2016, 01:31 PM
#23
Junior Member
Thread Starter
Join Date: Feb 2016
Location: Anderson Mo
Posts: 24
Thanks cornholio.. I am a huge HF fan and that would of come in hand. I think I lucked out and my computer did not get ruined. I got it all back together and took it for a test ride and so far so good with no check engine light.
04-25-2016, 01:40 PM
#24
Junior Member
Thread Starter
Join Date: Feb 2016
Location: Anderson Mo
Posts: 24
I got the Throttle Body back on and I do have another spare Throttle Body that has a good IACV if just by chance something goes wrong. I would still need to get another computer but I will drive it and see if I have any other problems.
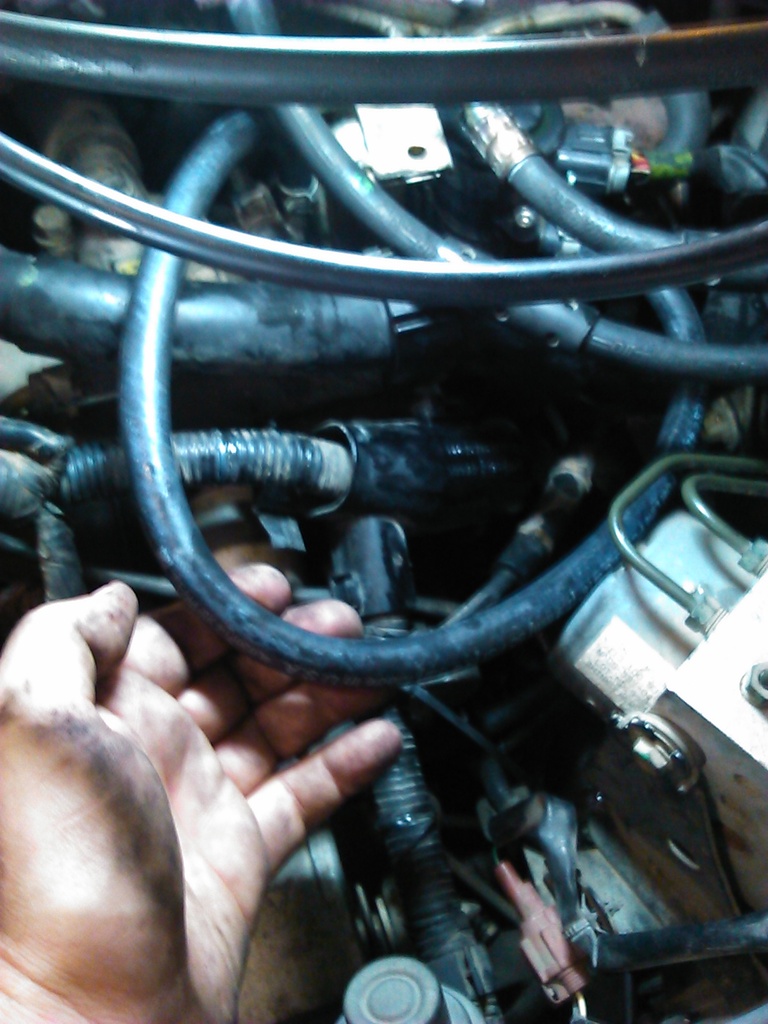
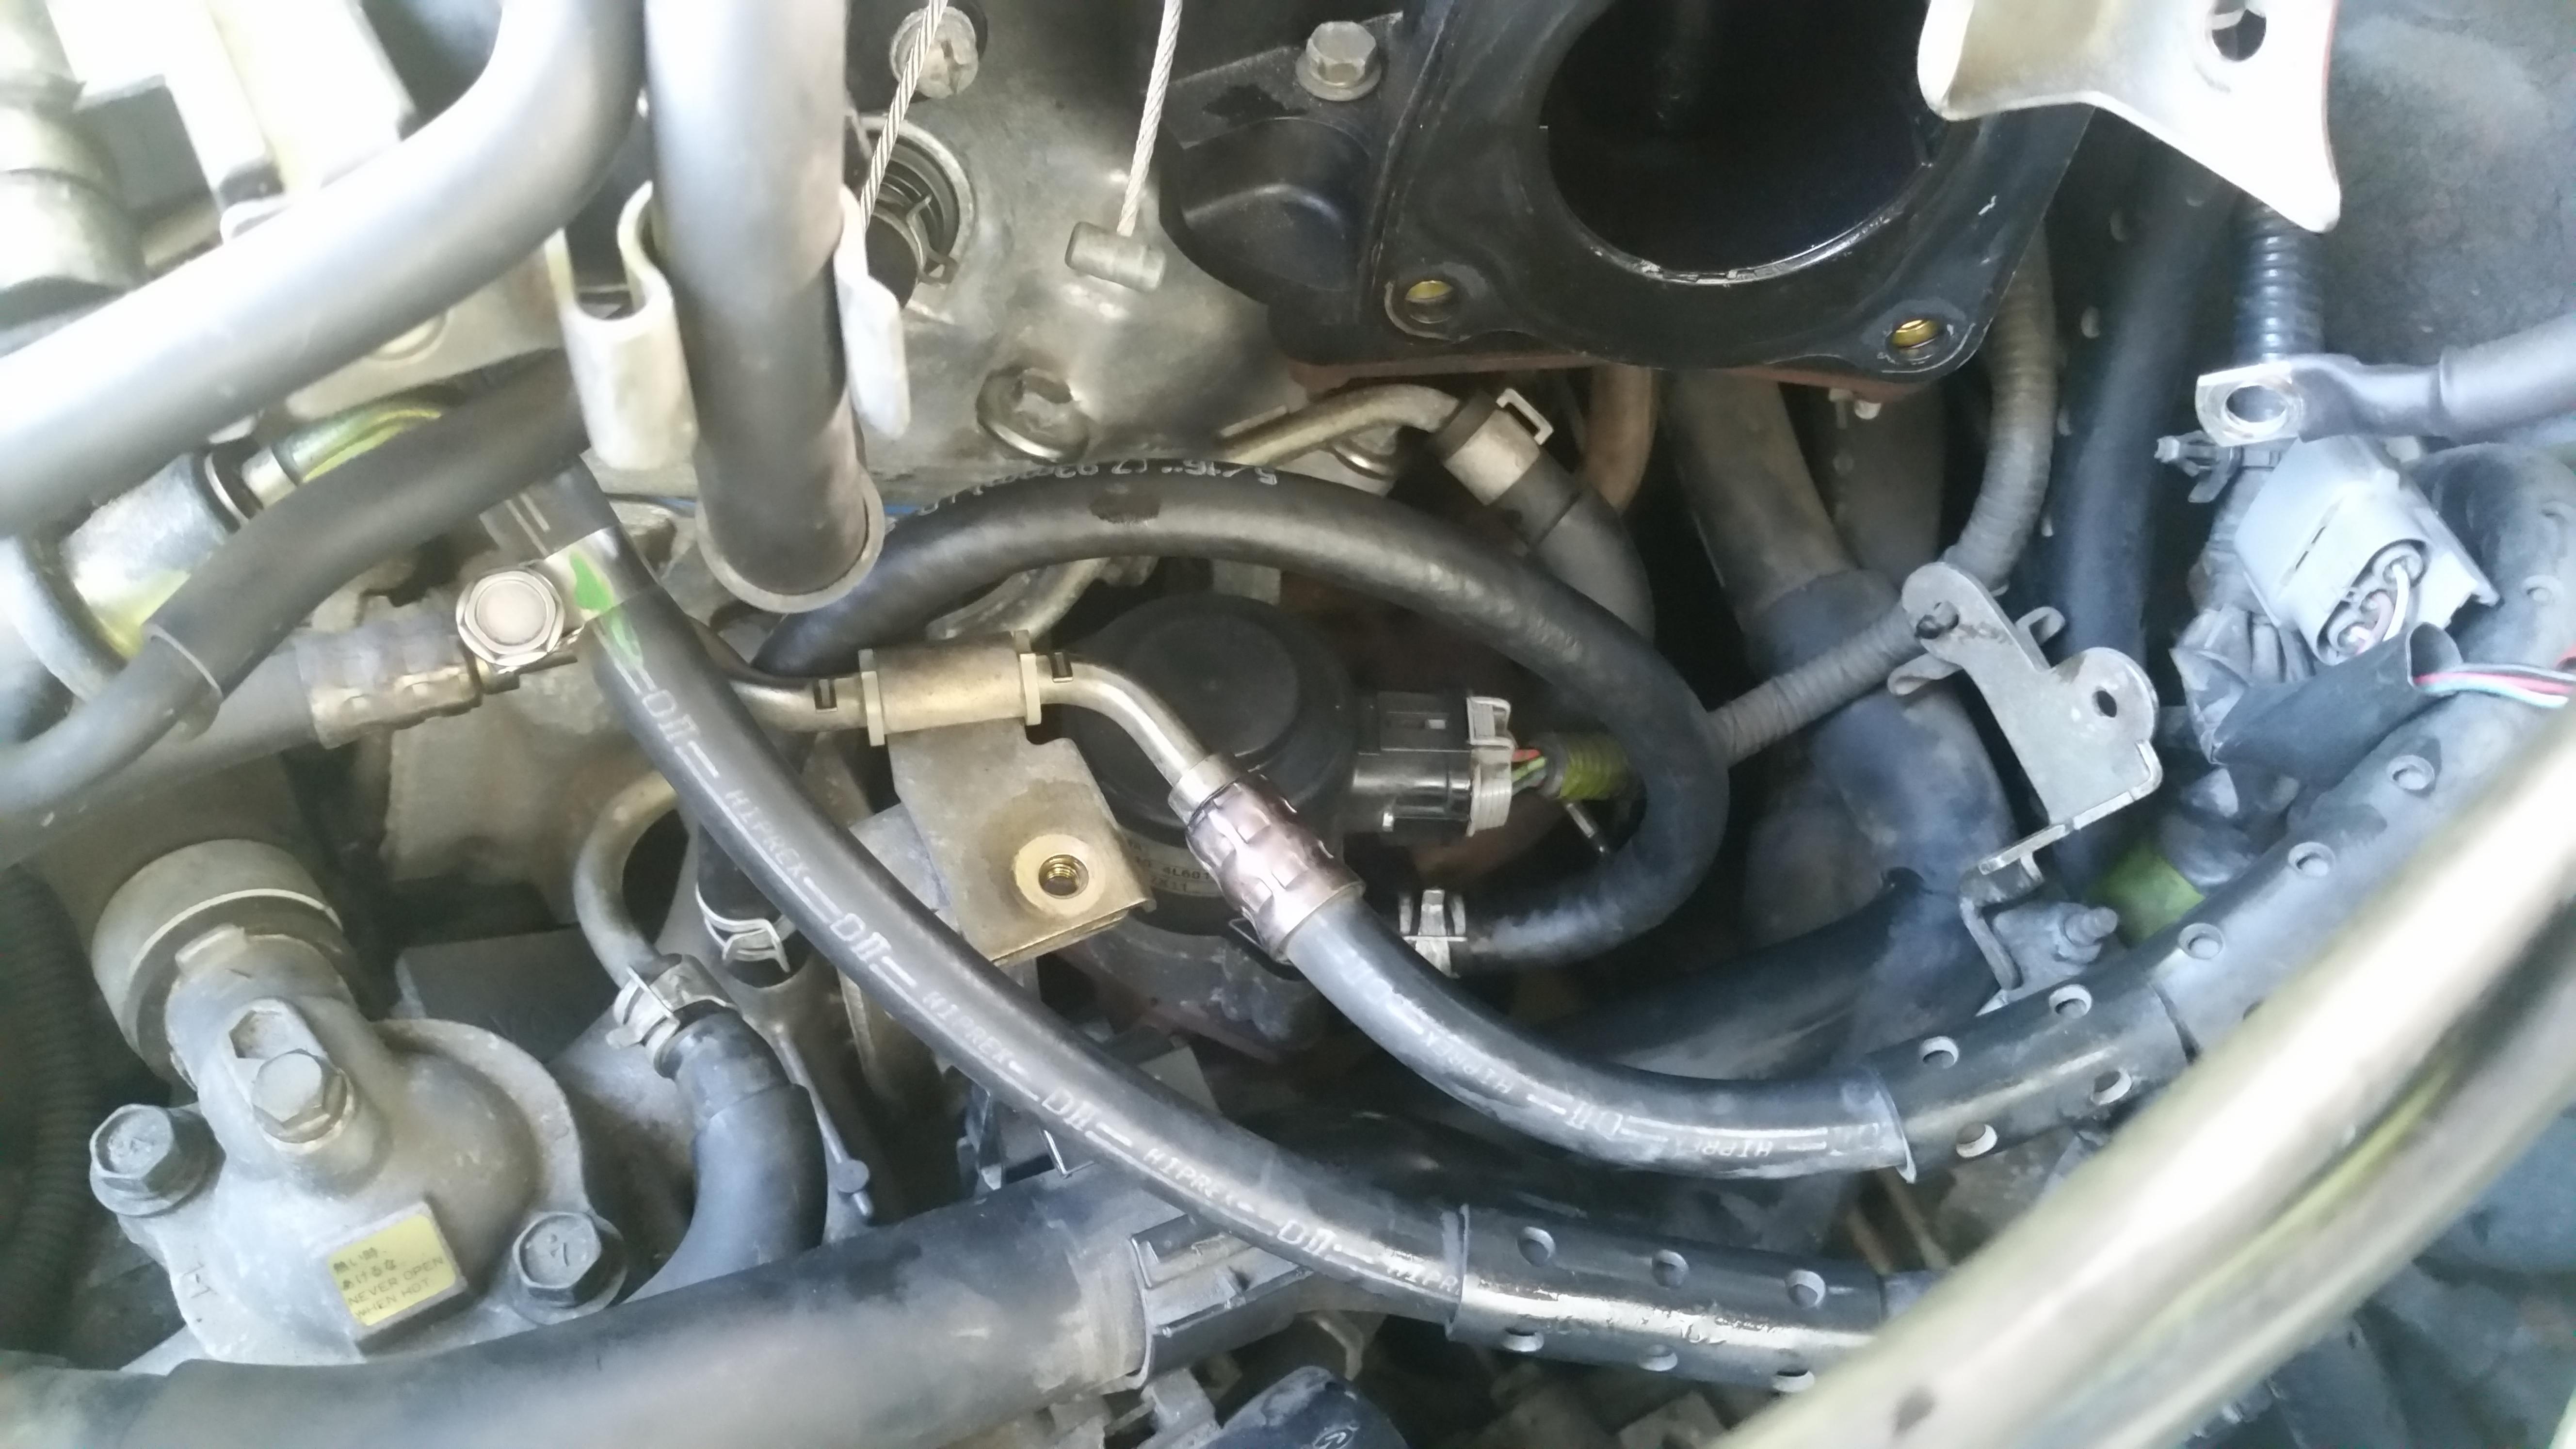
I am sure it is on this site somewhere but I was unable to find out exactly how to bypass the IACV and sure I have it done correctly. I tried to get some replacement water hose from my local part store and all they had was fuel line. I used about a foot and a half and routed it out of the way of things. You could probably use some shorter but I wanted to make sure I had enough length and feel it is easier to bypass the IACV with the length instead of trying to go shorter. Also I get it out of the way better.
Once you have the Throttle Body off, you will need to disconnect the hoses from the Throttle Body. I stuck two of the bolts that hold the Throttle Body in the hoses to mark the picture.

Here is the hose bypassing the IACV. Hope this helps a newbie and seeing how I did it. Nissan I think way over engineered this and sure it was a good idea but being a newbie, I should of and would strongly recommend bypassing the IACV. When I was working on the EGR, I think just my handling the Throttle Body and its age just broke the seal and let the water into the coils on the IACV. I lucked out that there was no computer damage.
 04-25-2016, 01:40 PM
#25
Junior Member
Thread Starter
Join Date: Feb 2016
Location: Anderson Mo
Posts: 24
I got the Throttle Body back on and I do have another spare Throttle Body that has a good IACV if just by chance something goes wrong. I would still need to get another computer but I will drive it and see if I have any other problems.
I am sure it is on this site somewhere but I was unable to find out exactly how to bypass the IACV and sure I have it done correctly. I tried to get some replacement water hose from my local part store and all they had was fuel line. I used about a foot and a half and routed it out of the way of things. You could probably use some shorter but I wanted to make sure I had enough length and feel it is easier to bypass the IACV with the length instead of trying to go shorter. Also I get it out of the way better.
Once you have the Throttle Body off, you will need to disconnect the hoses from the Throttle Body. I stuck two of the bolts that hold the Throttle Body in the hoses to mark the picture.
Here is the hose bypassing the IACV. Hope this helps a newbie and seeing how I did it. Nissan I think way over engineered this and sure it was a good idea but being a newbie, I should of and would strongly recommend bypassing the IACV. When I was working on the EGR, I think just my handling the Throttle Body and its age just broke the seal and let the water into the coils on the IACV. I lucked out that there was no computer damage.
04-25-2016, 01:46 PM
#26
Junior Member
Thread Starter
Join Date: Feb 2016
Location: Anderson Mo
Posts: 24
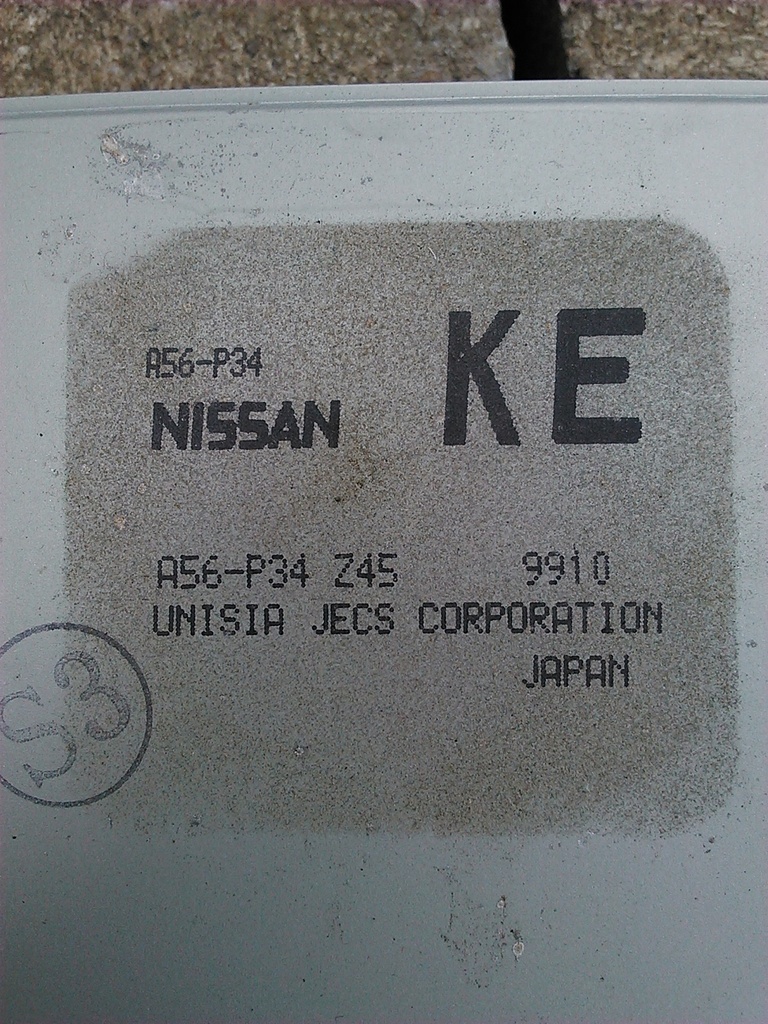
Just for some further information that I found out and hope to help someone is I called some salvage yards and told them I needed a computer without Traction Control with an automatic transmission. 2000-2001 was the only years that I could use. One salvage yard said they had one and read a bar code off of the side of the computer. The bar code that is on the side of mine is not even close. I am not sure why the numbers would differ but get the number from the top of the computer. Mine is A56-P34 Z45 from the picture above.
Pay attention to year, transmission, with or without Traction Control.
Pay attention to year, transmission, with or without Traction Control.
04-25-2016, 02:21 PM
#27
that's what i had to do, buy fuel line and loop it around. mine was about 1' total and routes slightly differently up under the iacv but same thing.
i've been told on here you can just loop the existing hose and make the connection, but i don't see how what would be possible. maybe i need to invest in a hose stretcher
i've been told on here you can just loop the existing hose and make the connection, but i don't see how what would be possible. maybe i need to invest in a hose stretcher

Thread
Thread Starter
Forum
Replies
Last Post
navtool.com
7th Generation Maxima (2009-2015)
9
08-18-2016 08:48 PM
max ride 41
4th Generation Maxima (1995-1999)
21
12-10-2015 07:33 AM
navtool.com
6th Generation Maxima (2004-2008)
0
12-01-2015 10:18 AM