My Massive I30 Revival and Build Thread


 01-04-2019, 01:56 PM
#522

Well, I had most of the carpet pulled up a month ago and didn't see anything wrong with the floor, certainly no rust holes for water to go up through. I was hoping to do some water leak testing today, but other things came up.
01-09-2019, 06:37 AM
#523
I had some more time to try and track down the source of the water leak, and I think I found it!
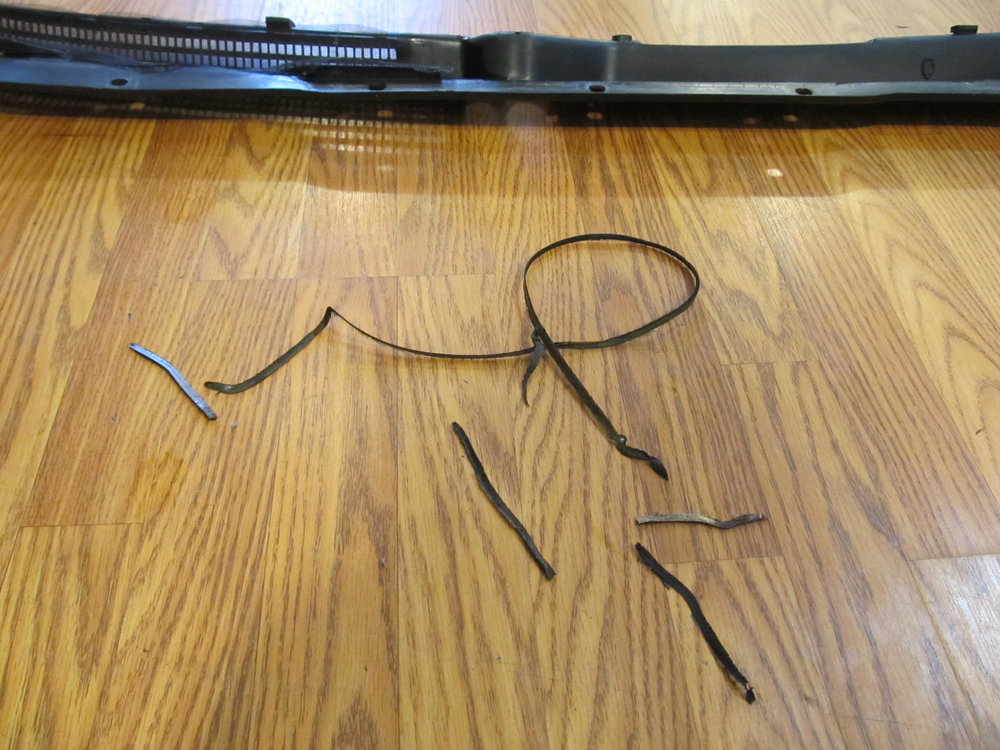
I started by removing the cowl cover. Or, more accurately, I struggled to remove the cowl cover.
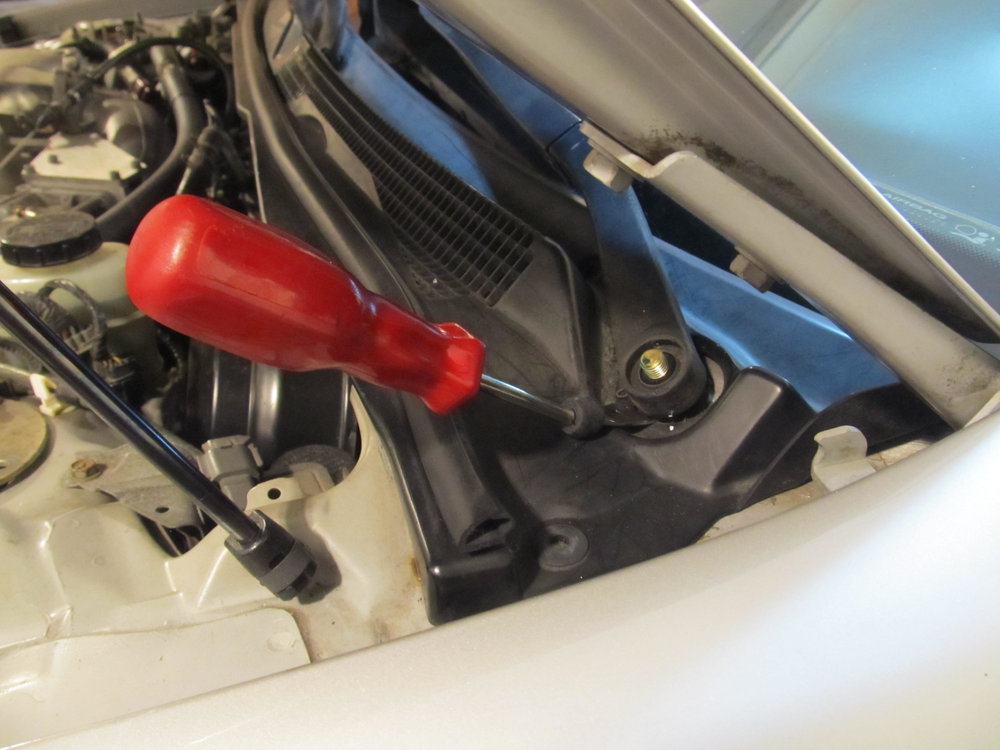
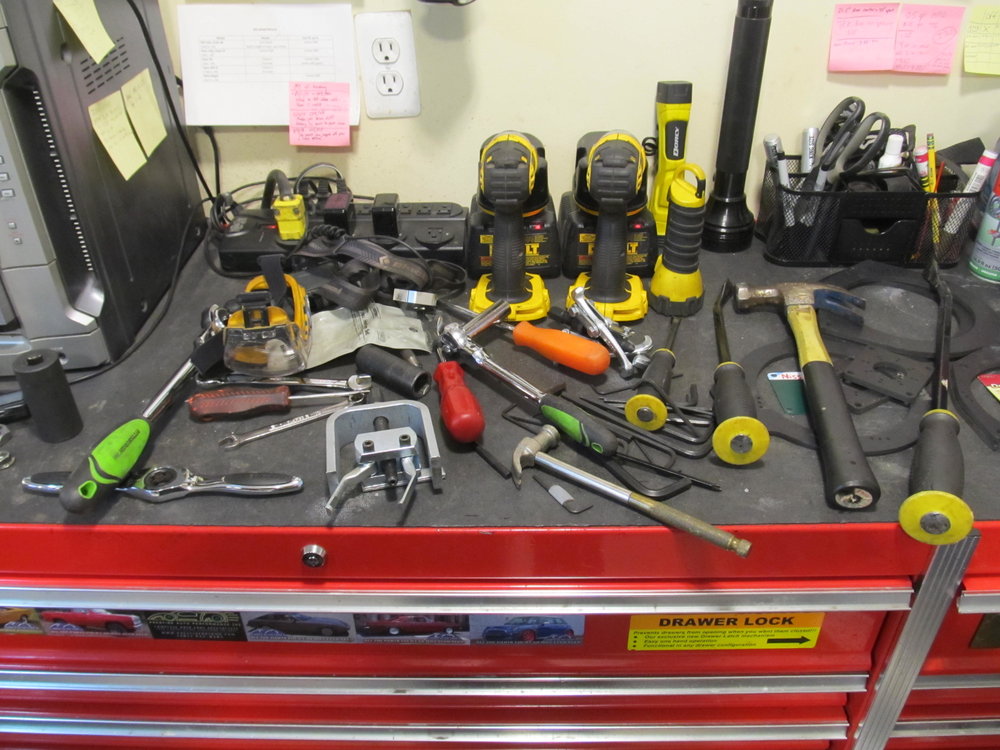
I tried all of these tools.....
The wiper arms were seized to the knurled shaft below, and I spent about two hours fighting to get them off. With enough penetrating oil, hammer blows, and prying from below, I was eventually able to remove them. Apparently there's a tool for this, but I don't own it (yet!).
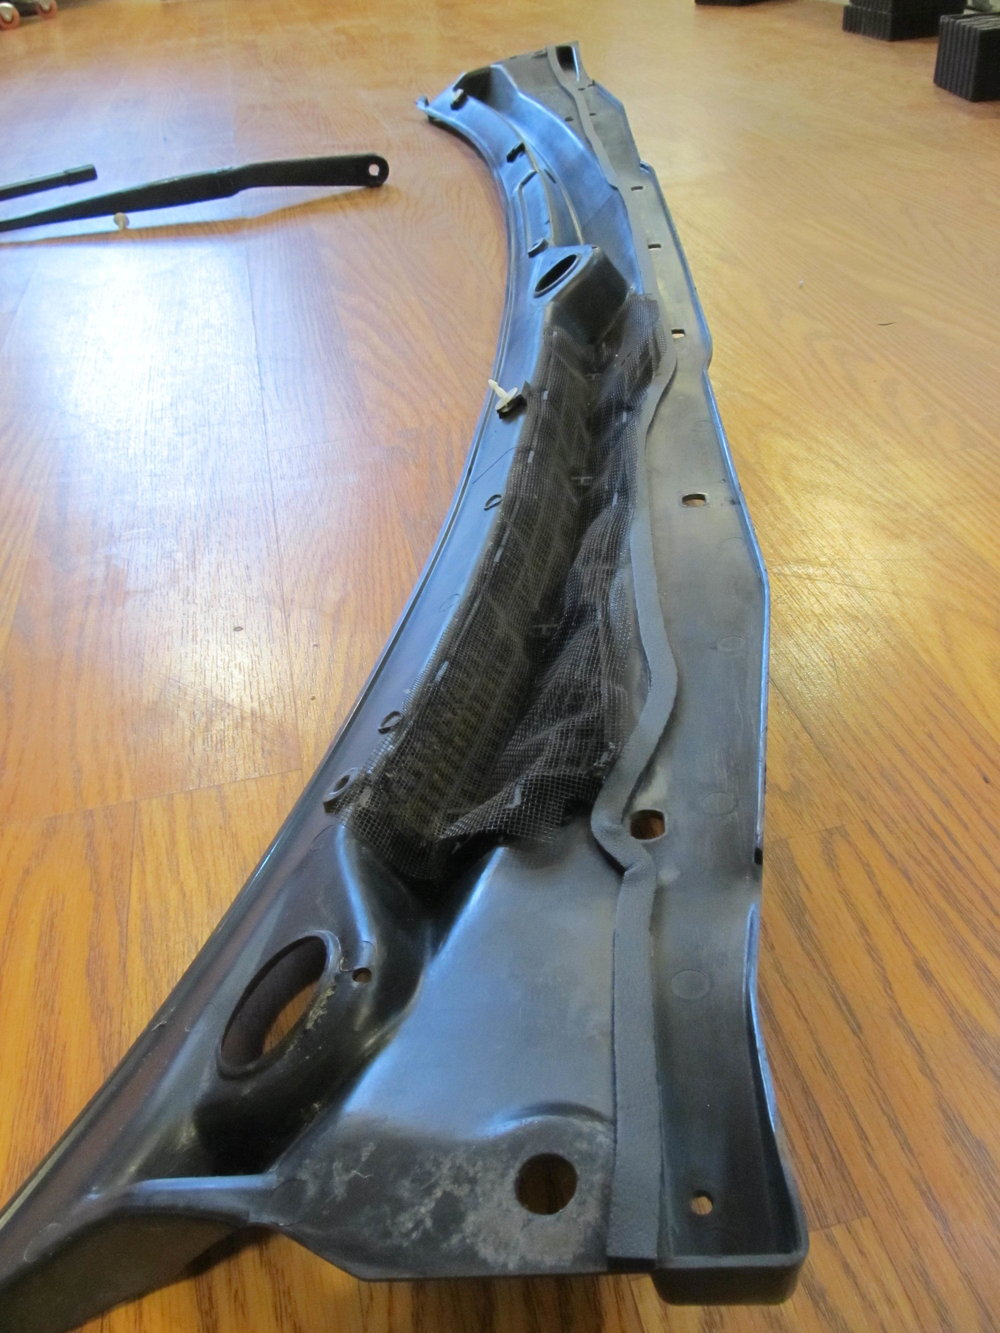
With the arms off, I could finally remove the cover and inspect the cowl area. I was concerned that the cowl area was full of debris and the drains were clogged up, but it seemed to be very clean inside:
This is the passenger side with the intake for the HVAC:

And driver's side:
The cowl cover's little gasket strip had disintegrated, so I put on a new one.
I then poured 250 mL of water down each side of the cowl and measured how much came out. Both sides were equal at just under 200 mL. I assume the residual was just stuck to the walls or something. Some dripped out afterwards too.

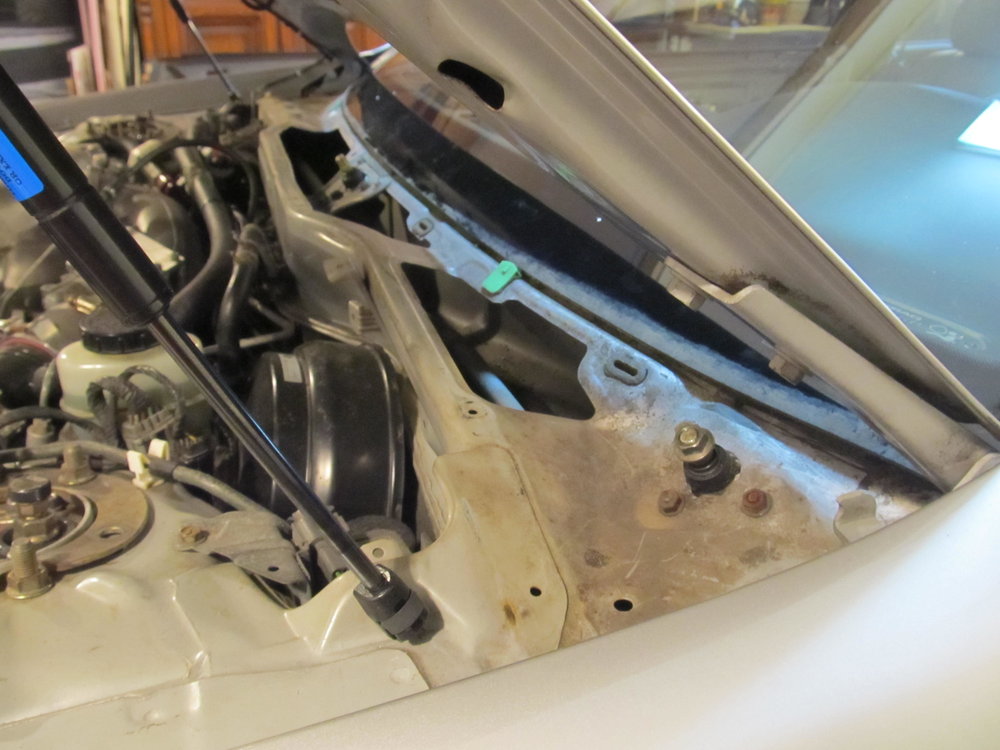
Since that didn't seem like the source of the leak, I took apart the trim around the windshield. It was very dirty in there...
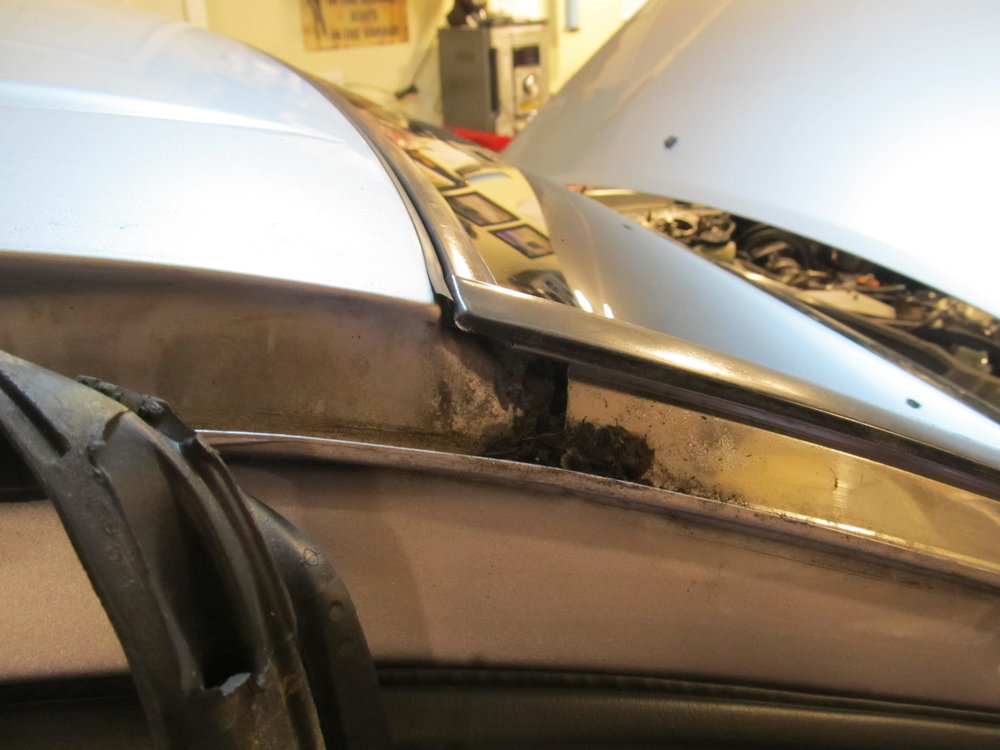
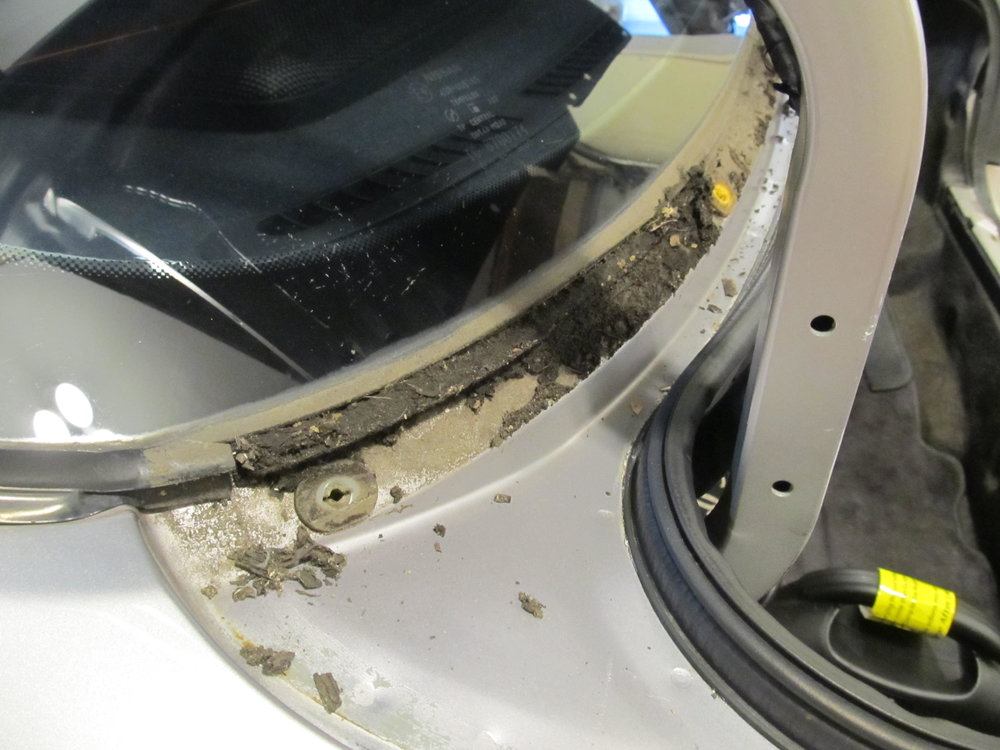
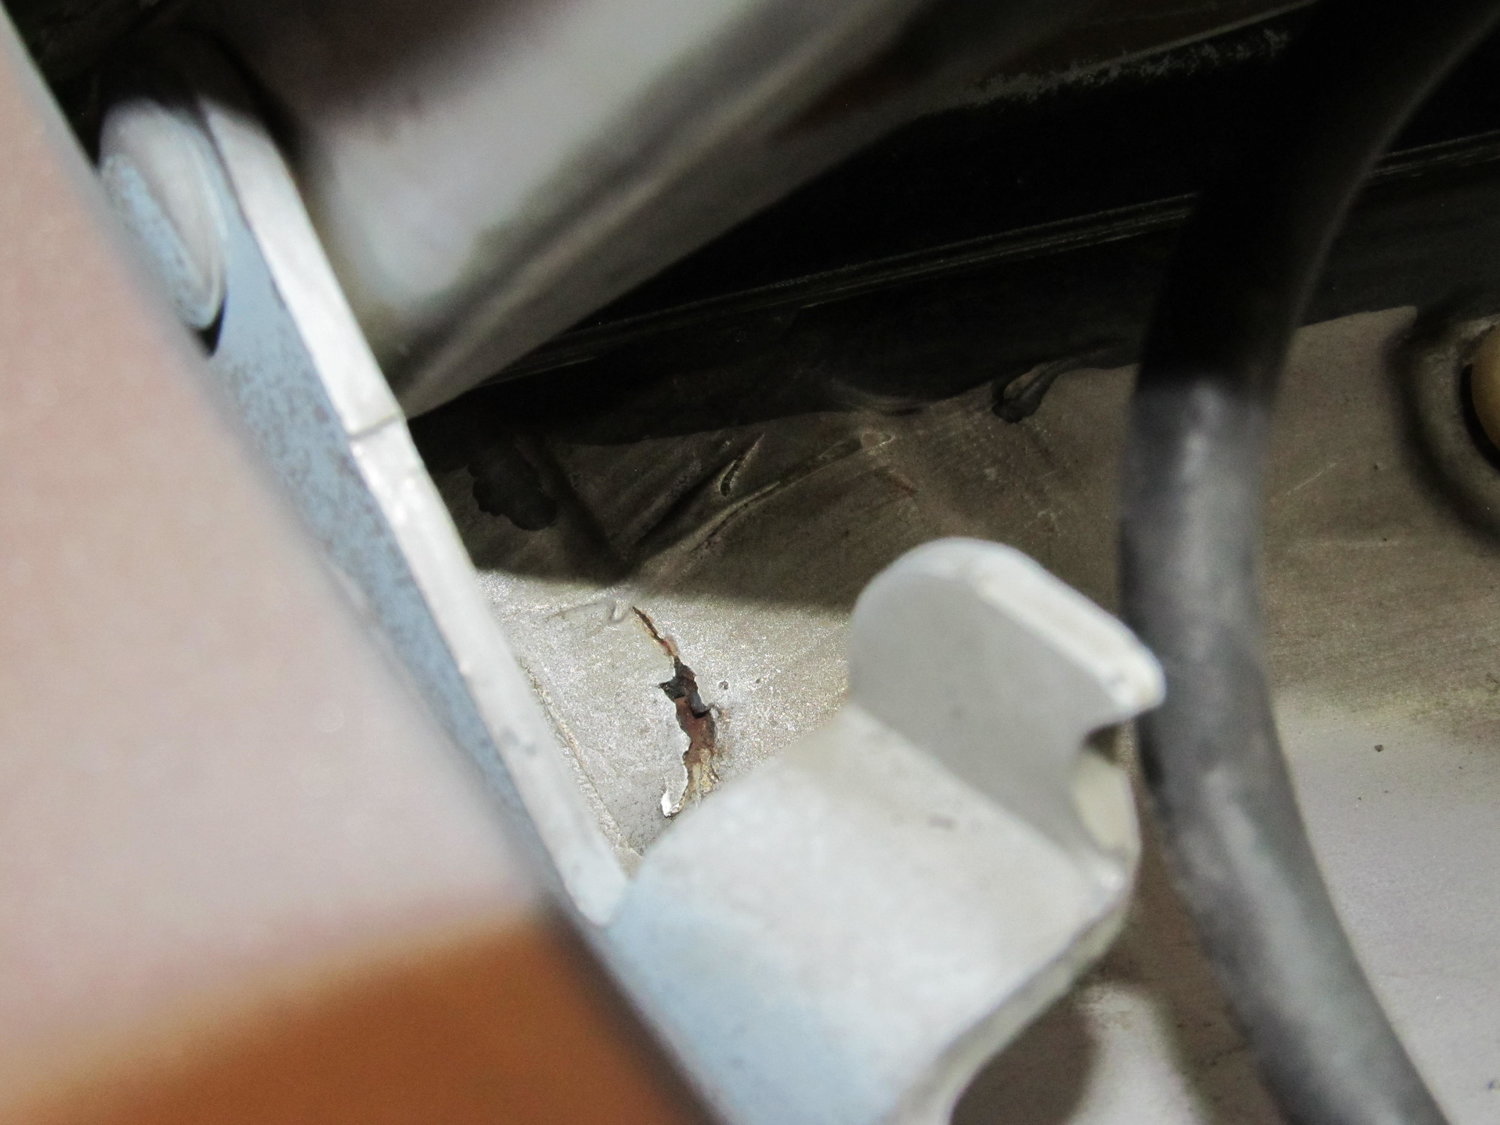
I pulled up the carpet to see if it would tell me anything. As mentioned earlier, the car is usually parked in my driveway, which is uphill. So it's possible that the water that was sitting behind the passenger seat actually came from the front of the car and flowed to the rear due to the slope. A month ago when I discovered the leak, the front was dry. But not this time! The foam under the carpet was wet up by the windshield! I pulled it back and was able to find a wet spot (at the center of the picture where the body adhesive is, behind the wires):

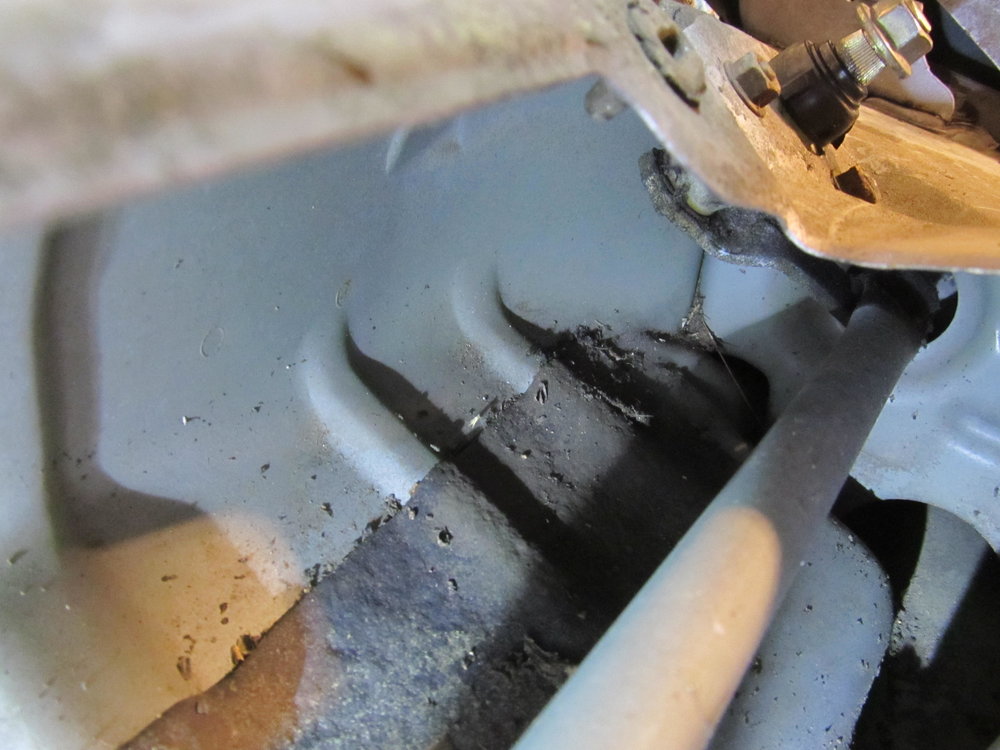
Aha, found it! Except I can't actually see where it's coming in due to all the stuff inside the dash. I had my wife pour a little water at the base of the windshield while I was inside the car, and sure enough, water started coming in. Now I must decide how to proceed. I could just smear some RTV silicone around the windshield and see if that fixes it, but I'm concerned that there could be rust around the windshield frame, and I don't want to mask the problem and let it grow. I'm considering paying the $200 to have the windshield replaced so I can inspect the frame for rust damage. What do you guys think I should do?
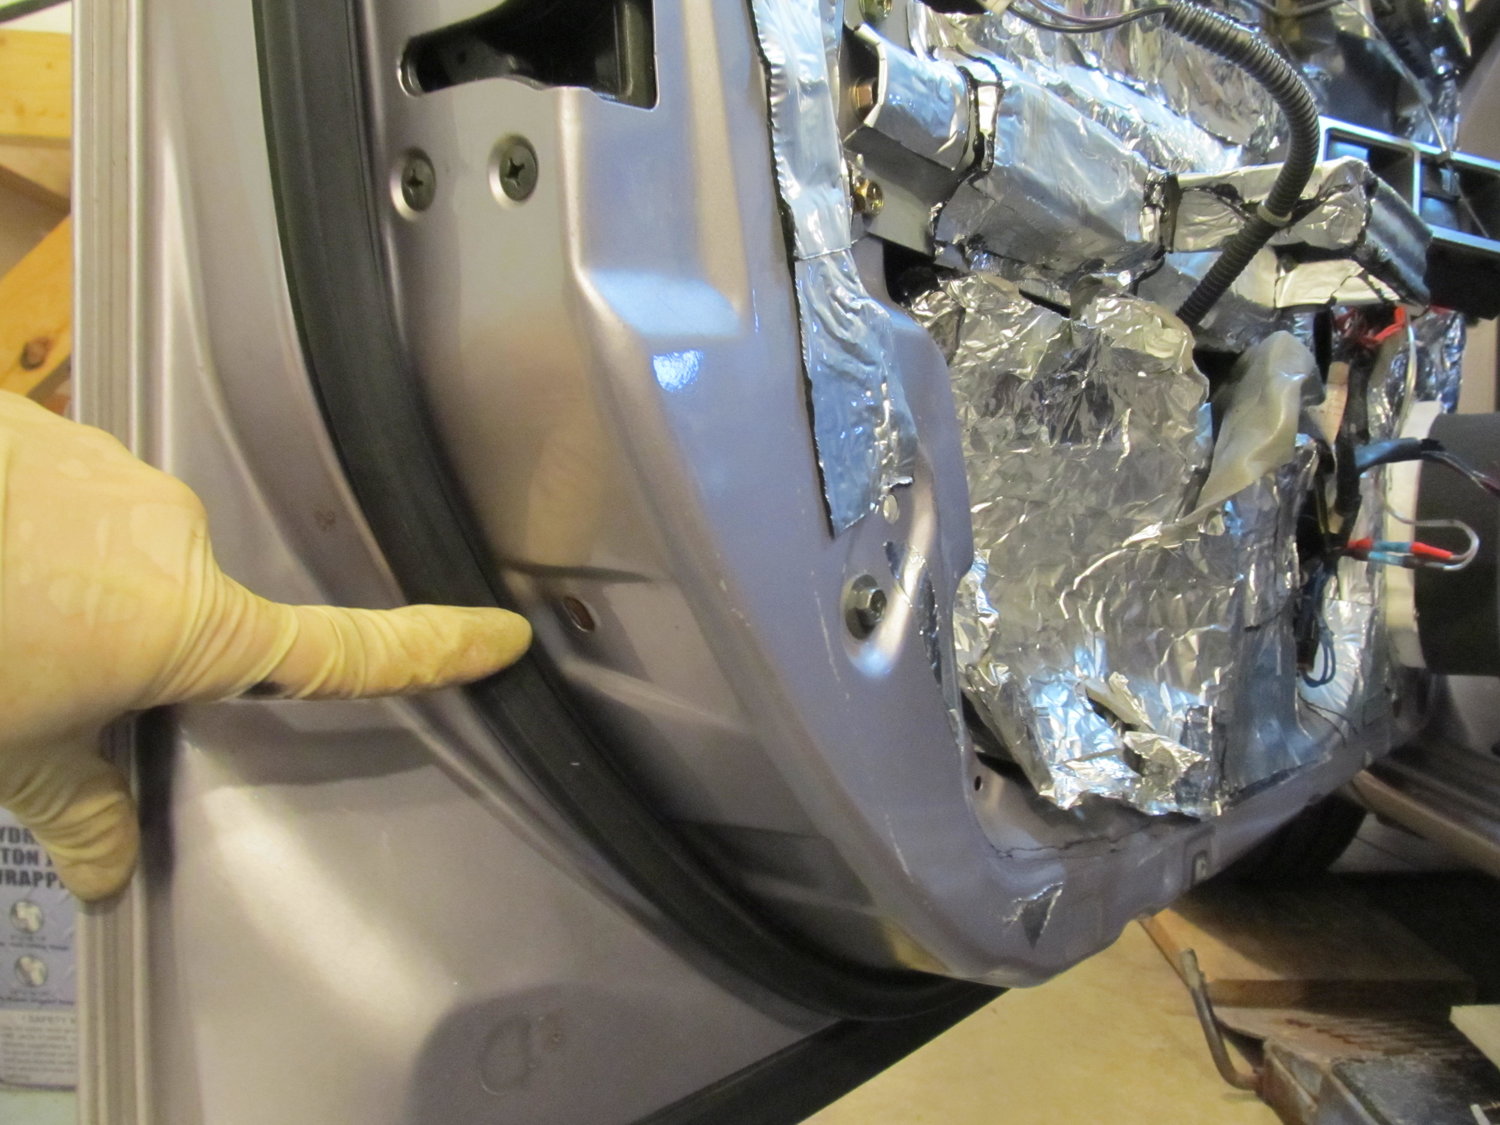
I had also pulled the rear molding to see what was going on back there, but didn't see anything worth investigating. So I just cleaned it up and put it back together:
I started by removing the cowl cover. Or, more accurately, I struggled to remove the cowl cover.
I tried all of these tools.....
The wiper arms were seized to the knurled shaft below, and I spent about two hours fighting to get them off. With enough penetrating oil, hammer blows, and prying from below, I was eventually able to remove them. Apparently there's a tool for this, but I don't own it (yet!).
With the arms off, I could finally remove the cover and inspect the cowl area. I was concerned that the cowl area was full of debris and the drains were clogged up, but it seemed to be very clean inside:
This is the passenger side with the intake for the HVAC:
And driver's side:
The cowl cover's little gasket strip had disintegrated, so I put on a new one.
I then poured 250 mL of water down each side of the cowl and measured how much came out. Both sides were equal at just under 200 mL. I assume the residual was just stuck to the walls or something. Some dripped out afterwards too.
Since that didn't seem like the source of the leak, I took apart the trim around the windshield. It was very dirty in there...
I pulled up the carpet to see if it would tell me anything. As mentioned earlier, the car is usually parked in my driveway, which is uphill. So it's possible that the water that was sitting behind the passenger seat actually came from the front of the car and flowed to the rear due to the slope. A month ago when I discovered the leak, the front was dry. But not this time! The foam under the carpet was wet up by the windshield! I pulled it back and was able to find a wet spot (at the center of the picture where the body adhesive is, behind the wires):
Aha, found it! Except I can't actually see where it's coming in due to all the stuff inside the dash. I had my wife pour a little water at the base of the windshield while I was inside the car, and sure enough, water started coming in. Now I must decide how to proceed. I could just smear some RTV silicone around the windshield and see if that fixes it, but I'm concerned that there could be rust around the windshield frame, and I don't want to mask the problem and let it grow. I'm considering paying the $200 to have the windshield replaced so I can inspect the frame for rust damage. What do you guys think I should do?
I had also pulled the rear molding to see what was going on back there, but didn't see anything worth investigating. So I just cleaned it up and put it back together:
01-09-2019, 11:56 AM
#524

Do you have glass coverage? if you do, I suggest a hammer. But pulling the windshield to inspect is probably the best bet, but if it has just been rain water and you properly dry it, then I don't see it just rusting away because some water went across it.
Also, I highly recommend this tool next time.
Also, I highly recommend this tool next time.
01-12-2019, 01:01 PM
#525
Drunkie- It was already in my cart!
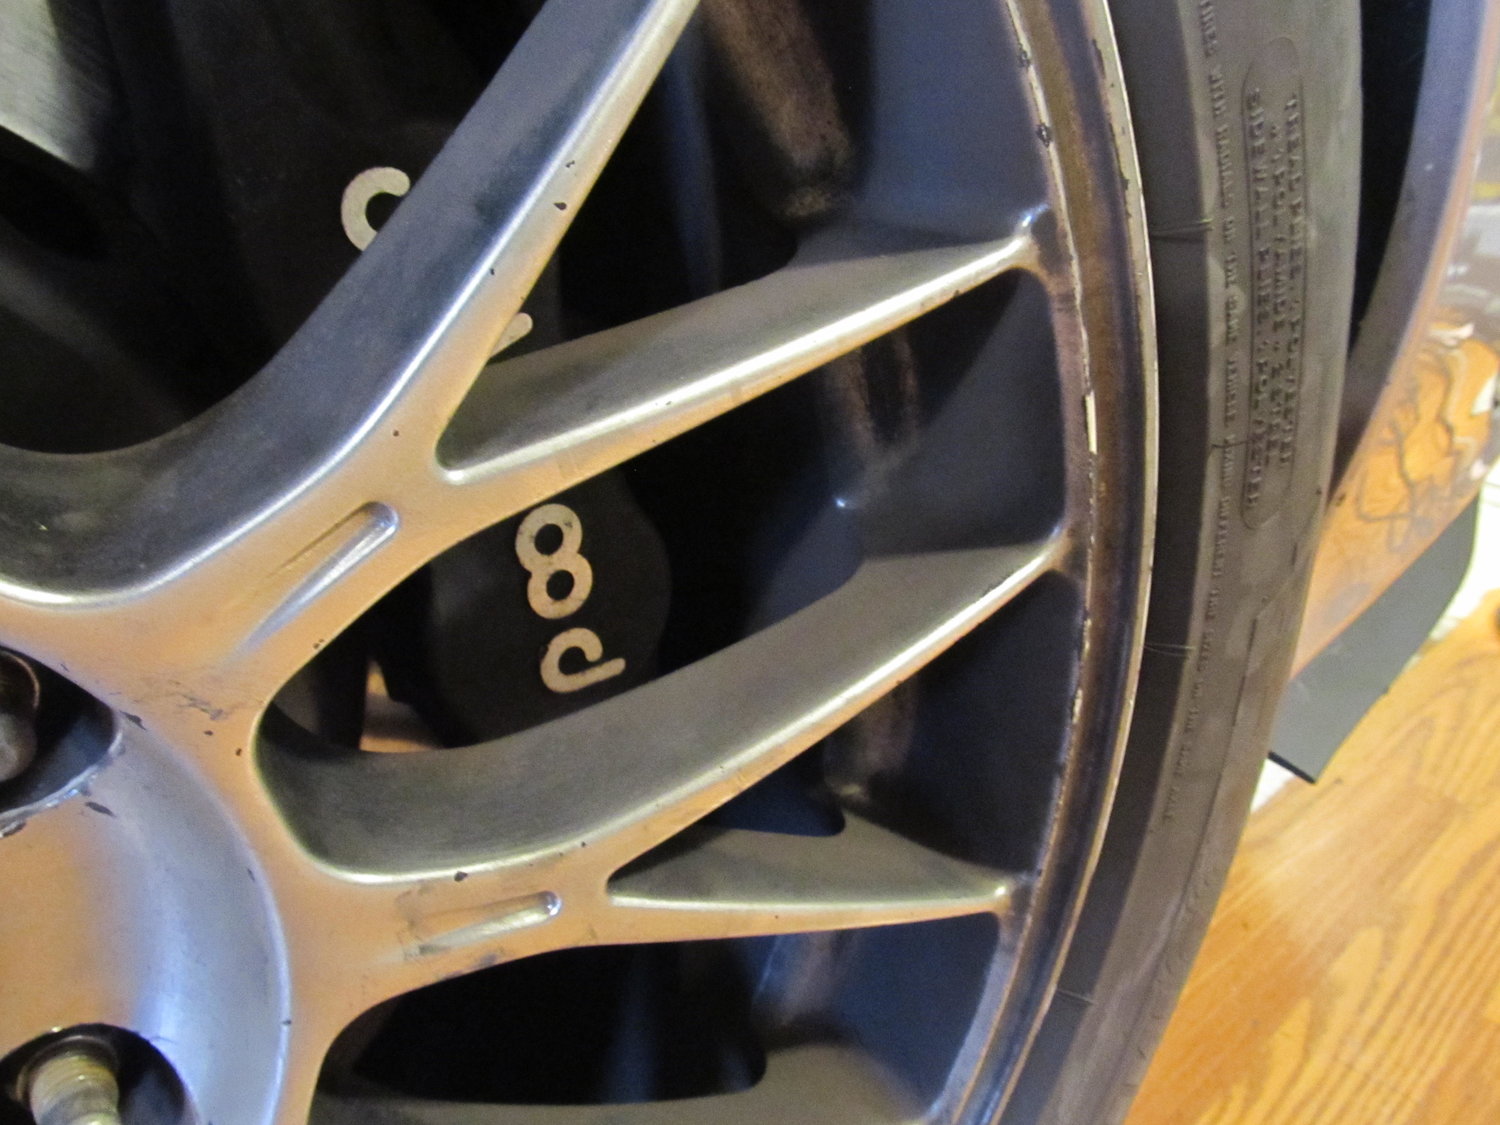
There was a warm day so I took advantage of it and did the first proper cleaning of my wheels in over three years! When I first installed my Wilwood front BBK (2012?), I ran some aggressive pads (Carbotech AX-6) that left awful deposits all over my wheels. I didn't clean it off quick enough, and it built up so thick that no chemical cleaner could make a dent in it. Seriously, I bought the two strongest wheel cleaners available, and they couldn't do anything. I'm guessing I didn't rotate my tires during this time, as the deposits are only really bad on what were the front two wheels. What were the rears are still in pretty good shape. I used to be pretty good about keeping my wheels clean, but these wheels are so damn intricate, and the build up was so thick, that I kind of stopped caring. Well, with the right tools, products, and time spent, good results were possible. It just took a long time!
I bought some plastic brushes for my drill a few years back (they offer different stiffness levels, sizes, and shapes) and they made cleaning up dirty wheels SO much easier. I had used them on pretty much all the other wheels we own for the various cars, but never on the RPM2s. This whole process took the better part of two days, but I finally have my wheels back (kind of)! Here's my process:
1. Power washed wheels
2. Soaked wheels in P21S Wheel Cleaning Gel, then used plastic drill brushes to get top layer off
3. Used red Scotch Brite pads with either Flash Brown Royal OR Meguiars Wheel Brightener by hand to scrub off heavy deposits (while trying not to take off too much finish)
4. Clay bar
5. Menzerna Final Finish polish with a red foam ball applicator on my drill gun
6. Big White High-Temp Paste Wax
With that, let's look at the pictures! I put the "good" wheels in the front, and the nasty ones in the rear.
Before:

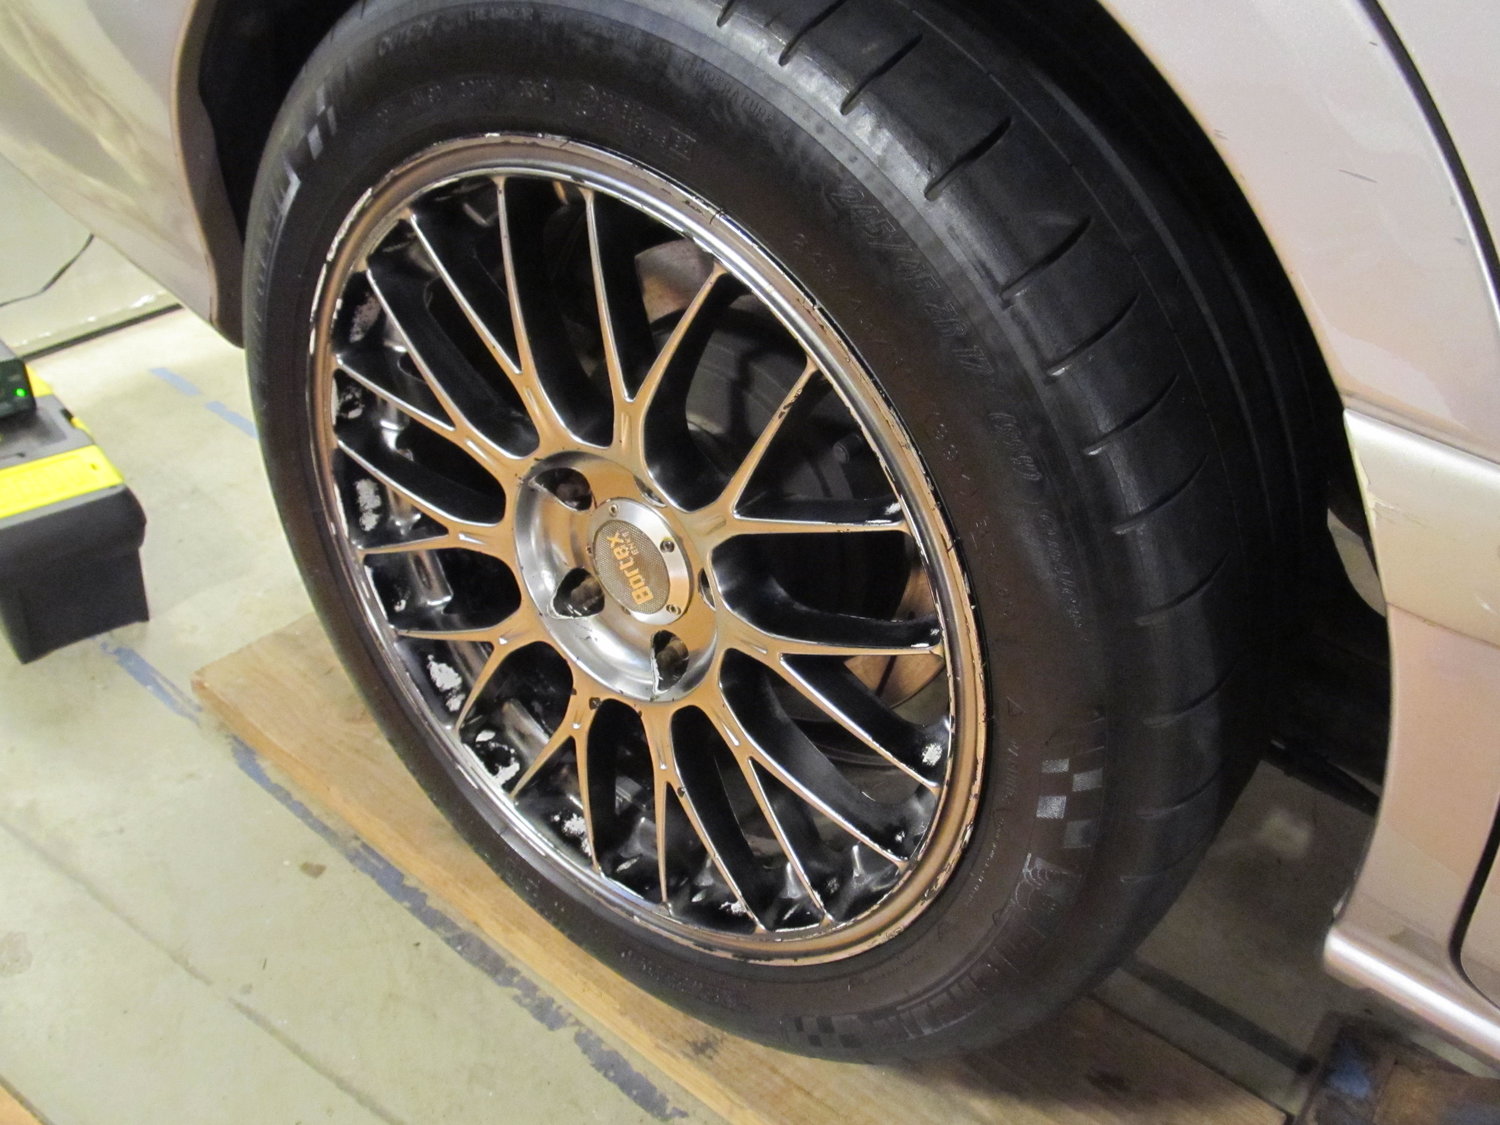
After!

Good wheels:

Bad wheels:
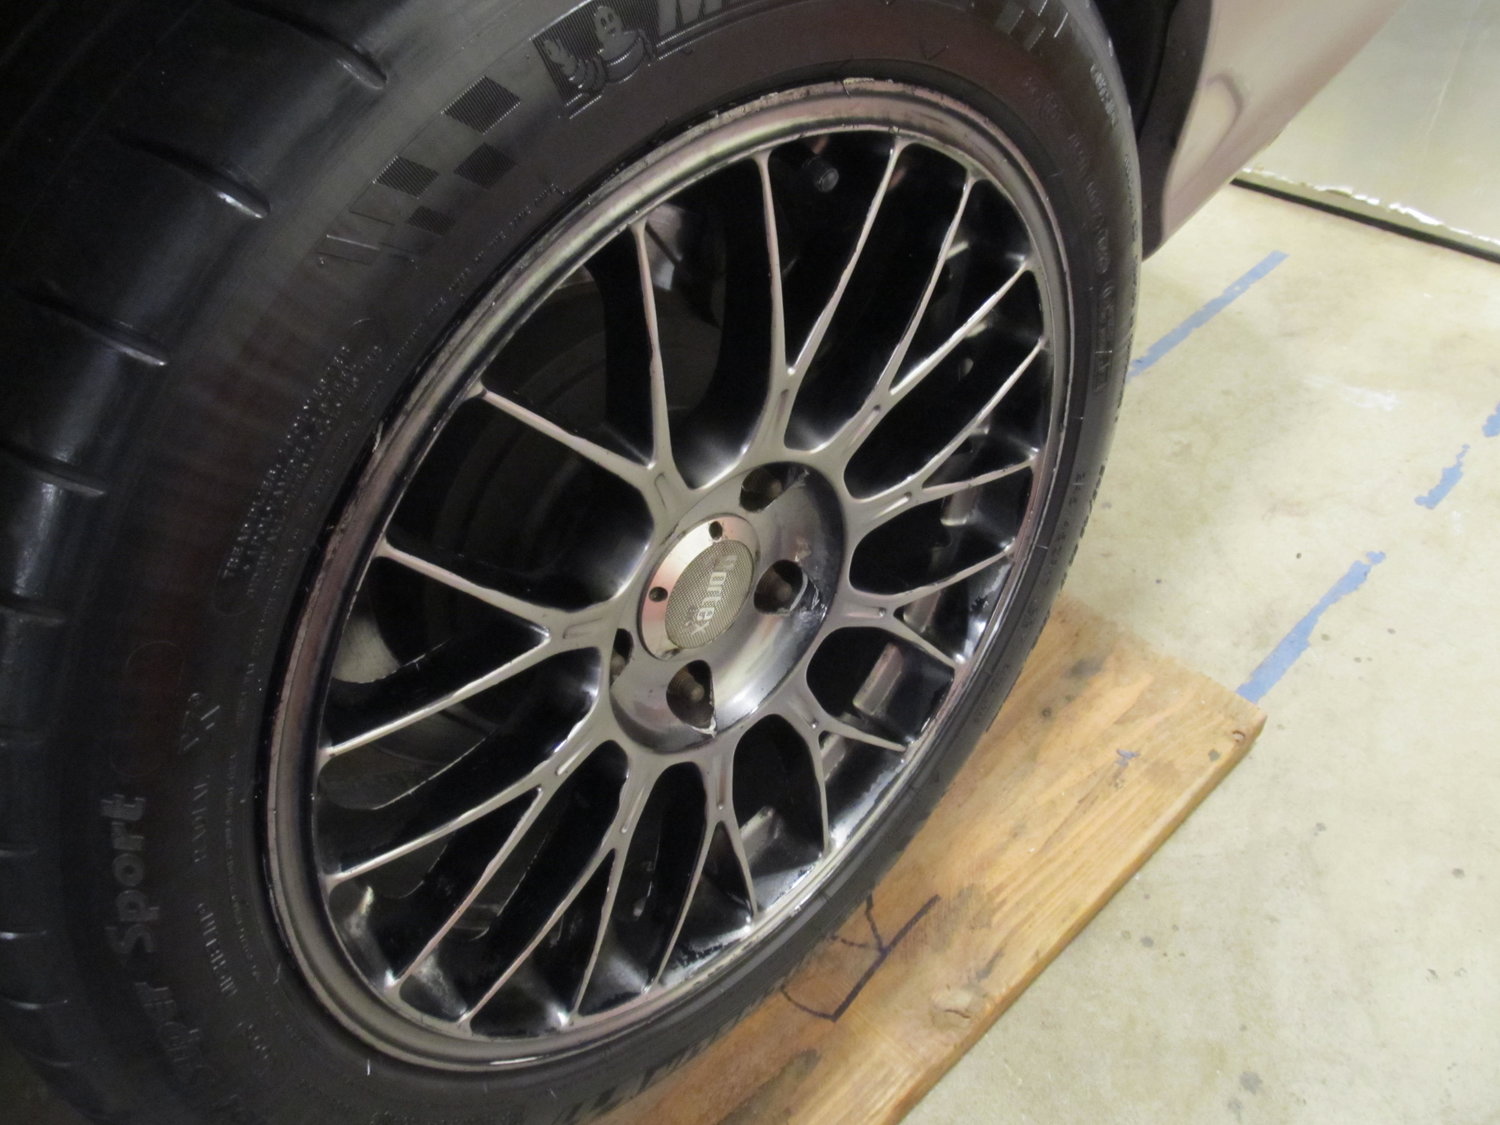
I went way too crazy with the Scotch Brite pads about three years ago when I learned that they were the only things that would touch the buildup, and ended up going through the paint in areas. I was much more careful this time!
The thing that surprised me the most was how effective my "fine" paint polish worked on these things with such a soft pad! That round red ball's foam is very soft compared to the foam of my real paint polishing pads, so I didn't think it would be strong enough to really make a difference, but I was wrong! Not only did it clean up all the residue leftover from the previous work, but it really did make them shiny. Awesome! Now, with the wheels being super smooth and covered in a layer of wax, I have high hopes for cleaning them in the spring. Ahh, to have clean wheels again!
There was a warm day so I took advantage of it and did the first proper cleaning of my wheels in over three years! When I first installed my Wilwood front BBK (2012?), I ran some aggressive pads (Carbotech AX-6) that left awful deposits all over my wheels. I didn't clean it off quick enough, and it built up so thick that no chemical cleaner could make a dent in it. Seriously, I bought the two strongest wheel cleaners available, and they couldn't do anything. I'm guessing I didn't rotate my tires during this time, as the deposits are only really bad on what were the front two wheels. What were the rears are still in pretty good shape. I used to be pretty good about keeping my wheels clean, but these wheels are so damn intricate, and the build up was so thick, that I kind of stopped caring. Well, with the right tools, products, and time spent, good results were possible. It just took a long time!
I bought some plastic brushes for my drill a few years back (they offer different stiffness levels, sizes, and shapes) and they made cleaning up dirty wheels SO much easier. I had used them on pretty much all the other wheels we own for the various cars, but never on the RPM2s. This whole process took the better part of two days, but I finally have my wheels back (kind of)! Here's my process:
1. Power washed wheels
2. Soaked wheels in P21S Wheel Cleaning Gel, then used plastic drill brushes to get top layer off
3. Used red Scotch Brite pads with either Flash Brown Royal OR Meguiars Wheel Brightener by hand to scrub off heavy deposits (while trying not to take off too much finish)
4. Clay bar
5. Menzerna Final Finish polish with a red foam ball applicator on my drill gun
6. Big White High-Temp Paste Wax
With that, let's look at the pictures! I put the "good" wheels in the front, and the nasty ones in the rear.
Before:
After!
Good wheels:
Bad wheels:
I went way too crazy with the Scotch Brite pads about three years ago when I learned that they were the only things that would touch the buildup, and ended up going through the paint in areas. I was much more careful this time!
The thing that surprised me the most was how effective my "fine" paint polish worked on these things with such a soft pad! That round red ball's foam is very soft compared to the foam of my real paint polishing pads, so I didn't think it would be strong enough to really make a difference, but I was wrong! Not only did it clean up all the residue leftover from the previous work, but it really did make them shiny. Awesome! Now, with the wheels being super smooth and covered in a layer of wax, I have high hopes for cleaning them in the spring. Ahh, to have clean wheels again!
01-22-2019, 10:55 AM
#528
Arg, not again! It's been very cold the last two days here in the DC area, and once again my rear calipers/e-brake is frozen! The e-brake handle in the car has no tension after I release it, so I assume the lever arm for the e-brake cable is stuck at the caliper. I just replaced these calipers last year due to the same issue....and 3 years before that, and 3 years before that......WTF is wrong with our rear brakes??? I greased everything properly when I did them last year, and yet the issue came right back. I replaced my e-brake cables about 10 years ago, and they're in decent enough shape and otherwise work very well. I have only installed aftermarket calipers since OEM are too expensive, but this is getting ridiculous! Is there anything I can do to prevent them from freezing up like this? I'm just going to have to leave the car in gear with the e-brake off if this is how it's going to be.....Oh, and the cold start issue is back too, where I have to feather the gas a bit when it's around or below freezing to get it started up without stalling. FML....
Last edited by 95maxrider; 01-22-2019 at 11:02 AM.
 01-23-2019, 06:54 AM
#530

Arg, not again! It's been very cold the last two days here in the DC area, and once again my rear calipers/e-brake is frozen! The e-brake handle in the car has no tension after I release it, so I assume the lever arm for the e-brake cable is stuck at the caliper. I just replaced these calipers last year due to the same issue....and 3 years before that, and 3 years before that......WTF is wrong with our rear brakes??? I greased everything properly when I did them last year, and yet the issue came right back. I replaced my e-brake cables about 10 years ago, and they're in decent enough shape and otherwise work very well. I have only installed aftermarket calipers since OEM are too expensive, but this is getting ridiculous! Is there anything I can do to prevent them from freezing up like this? I'm just going to have to leave the car in gear with the e-brake off if this is how it's going to be.....Oh, and the cold start issue is back too, where I have to feather the gas a bit when it's around or below freezing to get it started up without stalling. FML....
01-23-2019, 07:17 AM
#531
Senior Member

Join Date: Jul 2001
Location: state of confusion
Posts: 1,341
Those of us who started their driving up in New England in the 1960's learned pretty early why applying the P-brake when there was any danger of ice forming was a bad idea. Brake cables have gotten better since, but the possibility remains.
Norm
Last edited by Norm Peterson; 01-23-2019 at 07:21 AM.
01-23-2019, 07:24 AM
#532
Wow, I never knew that using the parking brake during the winter was not recommended! I figured having replaced my cables once, they would be good still, but maybe not. I found some on clearance at Rockauto (one for $8, the other for $45) so I bought them and will do a full tuneup of the system when they arrive next week. Until then, no e-brake! I'm going to spray one of my many lubricants/corrosion protectors all the way through the new cables before installing to hopefully help prevent issues down the road. I'll be very happy if the cables turn out to be the issue and not the calipers!
01-23-2019, 11:56 AM
#534
For the cold start issue, do you have a custom tune? Sounds like it could either be getting too little fuel at below said temps. My Grand prix once I cammed it was like that, my friend said he could tune it out (always took 2 starts anytime, cold or warm, had to give it a little throttle) by adding a touch more fuel, I said nah, it sounds cool because the 2nd start was always a super heavy cam lope and cough, made the car sound like serious business even though it was a slowpile.
02-05-2019, 10:23 PM
#535

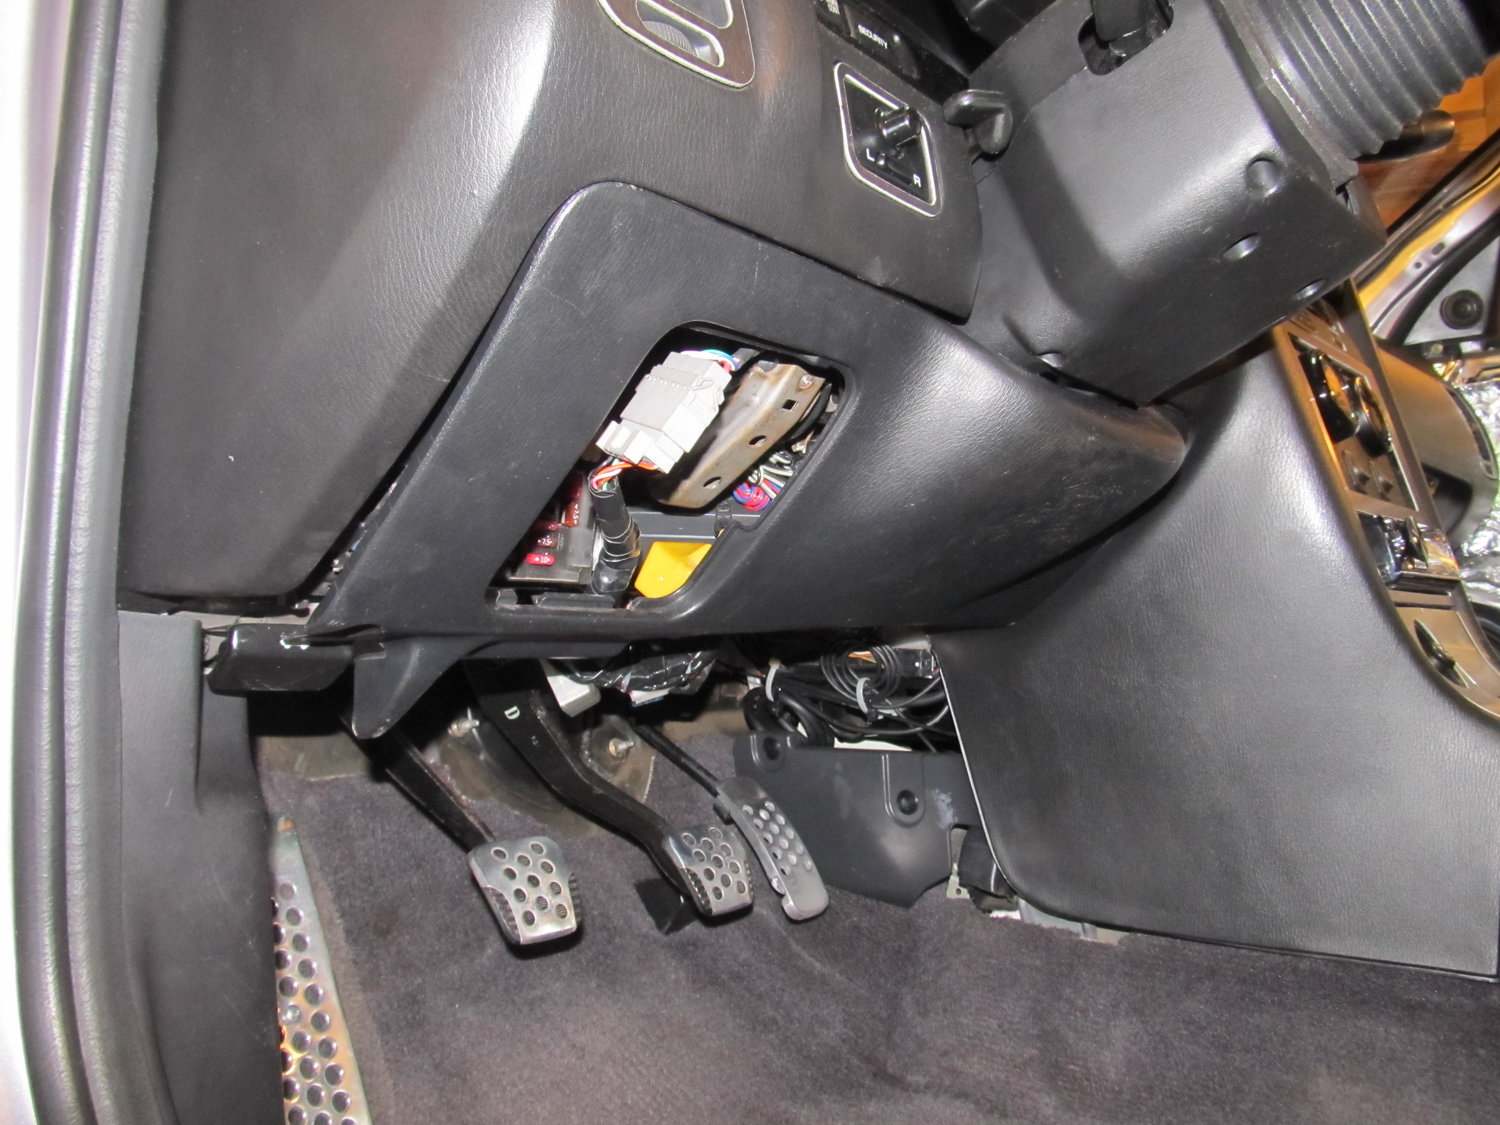
I need some help dealing with what should be a simple electrical issue!
I think my problems all started over a year ago when I tried installing LED interior lights that a guy here on the org was selling. None of the LEDs worked, and when I went to reinstall the stock bulbs, I had trouble getting them to work again. Since that time, the door light on my DS door hasn't worked, no matter how many new bulbs I try. Same thing with one of my front map lights. The main interior light has been weak and intermittent since I tried an LED in its place too.
Well today I decided I would dig into the problem and see if I could fix it. I popped off the cover for my dead DS door light and checked for continuity with my multimeter, and it had continuity. However when I checked to see if it had power, I got something like 0.03V. I had my MM set to DC10A. Pushing and releasing the door plunger didn't change the reading. I then went over to my working PS door light. I pressed the plunger down and removed the bulb. It had continuity, but when I released the plunger, it didn't have any power going to it. I then pressed the plunger back down and plugged the bulb back in. It no longer works, and it's not burnt out! I then went to check the front map lights. The one on the DS hasn't worked in a while, but the PS one has. I checked for continuity with the PS bulb lit up. The DS had continuity, but when I checked the lit up PS bulb, it went out and never came back on! The PS has continuity. It's almost like I'm blowing out fuses for the individual lights, but I know those don't exist. I went around and checked all my fuses with my MM and all have continuity. How in the world are the lights dying just by me removing them or touching them with my MM? Why are they not getting power?
Also, I re-tried the procedure to have the body module check for error codes associated with the door locks, since my door locks have a mind of their own, and I often have to unlock the car (with my alarm fob) five times before all the doors unlock. When I did this test a year ago, it said the PS front door lock actuator was bad. Today, with most of the interior lights burnt out, I was unable to get the car into diagnostic mode. I wonder if the diagnostic mode can only be accessed if all/most of the interior lights are working? IIRC it uses the interior lights to tell you what the code is by blinking.
My electrical troubleshooting skills are pretty weak, but I'm trying to learn. Does anyone have any ideas as to what I've done to my poor car?
EDIT: Welp, I'm an idiot. I went through my electrical books and some youtube videos this morning and realized I made a terrible mistake yesterday. When I was testing for voltage, I had the red lead plugged into the 10A hole on the MM instead of the voltage hole, and I'm pretty sure I made the problem worse. The reason I had it in there instead of the V hole was because I was previously testing for a parasitic drain, which I believe is tested using the amp setting. The only thing is I'm not sure how or where I made the problem worse, since I can't find a blown fuse anywhere. Is there a module that controls all the interior lights that I could have blown up?
Edit 2:
I learned my lesson about using the amp hole on the MM! I had it in there because I had just finished testing for a parasitic drain and I didn't think to switch it back to V/ohm. I clearly can't learn electrical stuff from a book, so I guess I'll just have to keep making mistakes until it sinks in! As far as I can tell the MM is still working, so I've got that going for me....
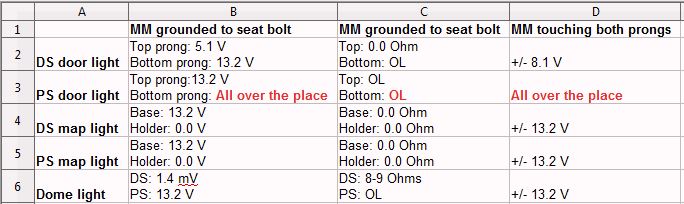
I re-did my tests using correct methodology that my friend walked me through over the phone. Thanks Brian, you're the best! Here are the results:
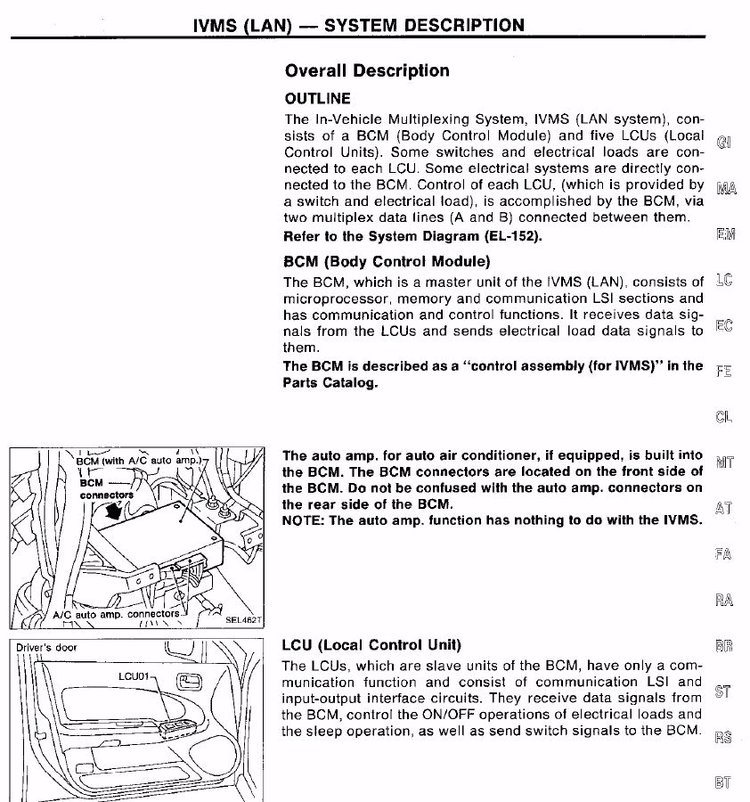
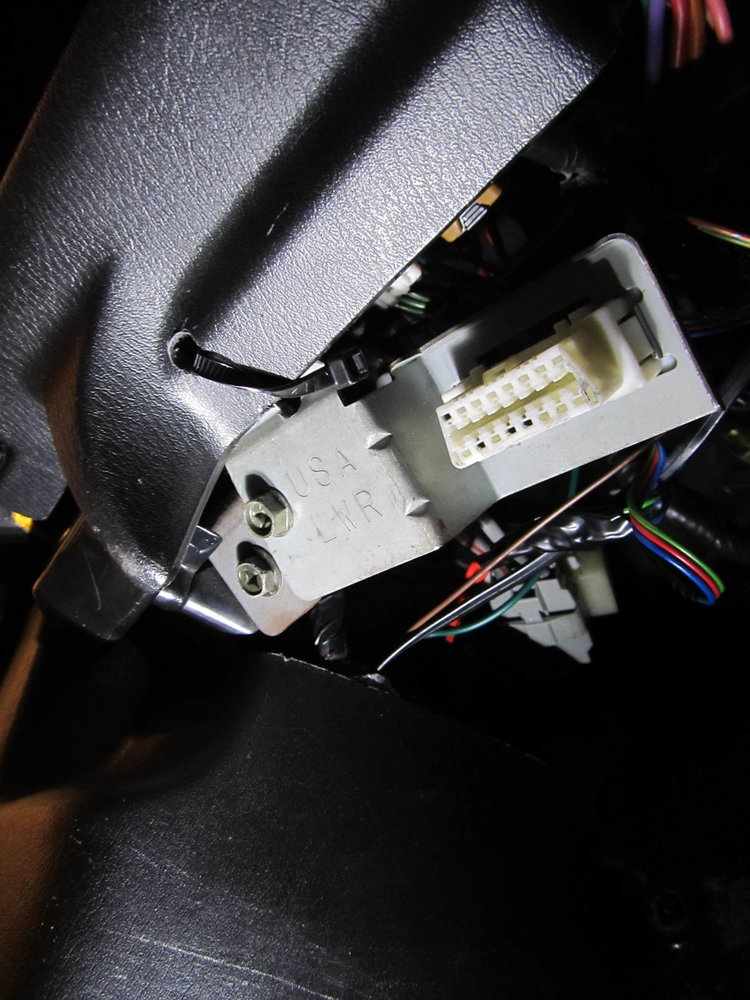
And here's some info about the body control module (BCM) from the FSM:


Brian seems to think I've got a bad ground somewhere related to the PS door light. He recommended I find trace it to the ground and/or the BCM. What I don't understand is how I had three working lights yesterday (out of five) if I have a bad ground. If there are no blown fuses right now, and lights still aren't working in any location, I can't help but think something fried inside the BCM. Brian also wondered if one of the door switches/plungers is going bad and not letting enough current get to the bulbs. We know everything is getting voltage, but we don't know what's going on with the current. Am I understanding this correctly?
The BCM controls my locks, interior lights, and the sleep mode for the car. I've got no interior lights, locks with a mind of their own, and a HUGE parasitic drain. If the BCM is faulty and not going into sleep mode, I believe that could cause a large drain, no? My lack of understanding is pushing me to believe the BCM is the cause of all my problems, but I know it's probably not that simple. Does anyone know what is typically involved with replacing a BCM on a 90s Japanese car? Does it need to be programed to match my car/key?
More to the point, since I'm unable to make sense of wiring diagrams, how can I figure out where the ground is for that PS door light? I'm pretty sure I should start there, but I'm not sure how.
Edit 3:
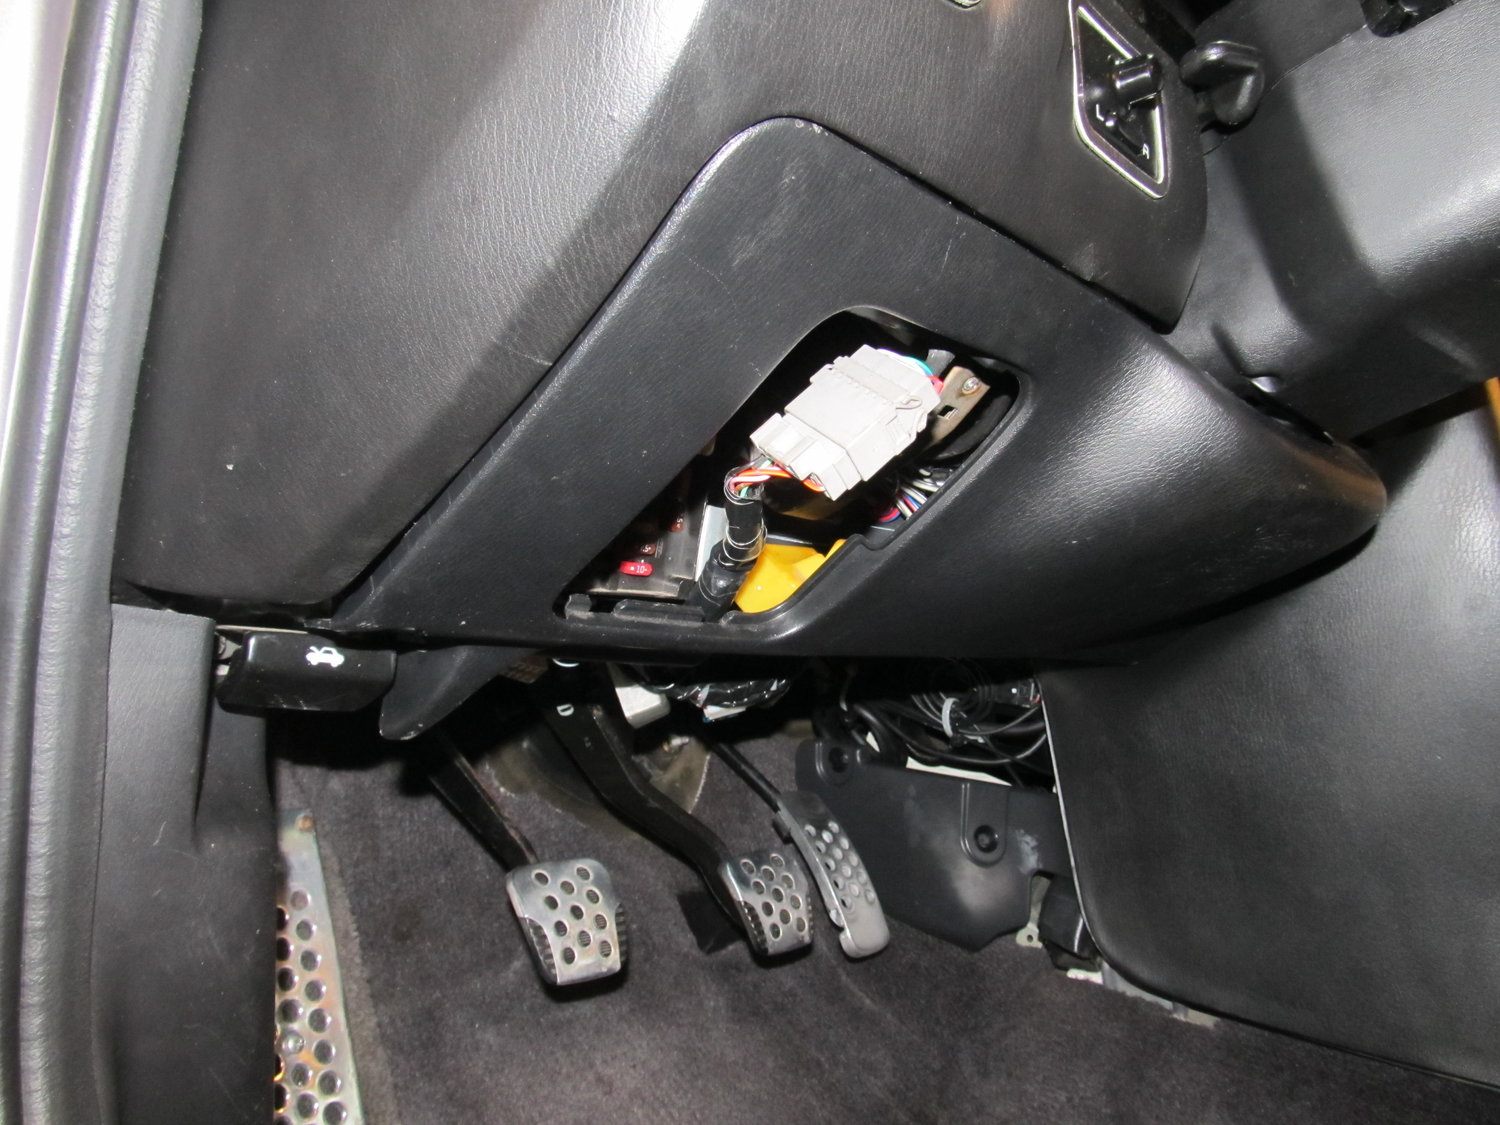
I went back for like the 4th time and did find fuse #26 to be blown. Maybe I missed it before since it's up so high in the box? Interestingly enough, I found a 10A fuse in there, even though it's supposed to be 7.5A. Hopefully that extra current that got through didn't mess up whatever that fuse is protecting I JUST went out and replaced all of the interior bulbs, and I now have map and overhead lights back!!!!!!!!!!!!!!!!!!!!!! But still, no door lights. Back to the drawing board....
I think my problems all started over a year ago when I tried installing LED interior lights that a guy here on the org was selling. None of the LEDs worked, and when I went to reinstall the stock bulbs, I had trouble getting them to work again. Since that time, the door light on my DS door hasn't worked, no matter how many new bulbs I try. Same thing with one of my front map lights. The main interior light has been weak and intermittent since I tried an LED in its place too.
Well today I decided I would dig into the problem and see if I could fix it. I popped off the cover for my dead DS door light and checked for continuity with my multimeter, and it had continuity. However when I checked to see if it had power, I got something like 0.03V. I had my MM set to DC10A. Pushing and releasing the door plunger didn't change the reading. I then went over to my working PS door light. I pressed the plunger down and removed the bulb. It had continuity, but when I released the plunger, it didn't have any power going to it. I then pressed the plunger back down and plugged the bulb back in. It no longer works, and it's not burnt out! I then went to check the front map lights. The one on the DS hasn't worked in a while, but the PS one has. I checked for continuity with the PS bulb lit up. The DS had continuity, but when I checked the lit up PS bulb, it went out and never came back on! The PS has continuity. It's almost like I'm blowing out fuses for the individual lights, but I know those don't exist. I went around and checked all my fuses with my MM and all have continuity. How in the world are the lights dying just by me removing them or touching them with my MM? Why are they not getting power?
Also, I re-tried the procedure to have the body module check for error codes associated with the door locks, since my door locks have a mind of their own, and I often have to unlock the car (with my alarm fob) five times before all the doors unlock. When I did this test a year ago, it said the PS front door lock actuator was bad. Today, with most of the interior lights burnt out, I was unable to get the car into diagnostic mode. I wonder if the diagnostic mode can only be accessed if all/most of the interior lights are working? IIRC it uses the interior lights to tell you what the code is by blinking.
My electrical troubleshooting skills are pretty weak, but I'm trying to learn. Does anyone have any ideas as to what I've done to my poor car?
EDIT: Welp, I'm an idiot. I went through my electrical books and some youtube videos this morning and realized I made a terrible mistake yesterday. When I was testing for voltage, I had the red lead plugged into the 10A hole on the MM instead of the voltage hole, and I'm pretty sure I made the problem worse. The reason I had it in there instead of the V hole was because I was previously testing for a parasitic drain, which I believe is tested using the amp setting. The only thing is I'm not sure how or where I made the problem worse, since I can't find a blown fuse anywhere. Is there a module that controls all the interior lights that I could have blown up?
Edit 2:
I learned my lesson about using the amp hole on the MM! I had it in there because I had just finished testing for a parasitic drain and I didn't think to switch it back to V/ohm. I clearly can't learn electrical stuff from a book, so I guess I'll just have to keep making mistakes until it sinks in!
As far as I can tell the MM is still working, so I've got that going for me....I re-did my tests using correct methodology that my friend walked me through over the phone. Thanks Brian, you're the best! Here are the results:
And here's some info about the body control module (BCM) from the FSM:
Brian seems to think I've got a bad ground somewhere related to the PS door light. He recommended I find trace it to the ground and/or the BCM. What I don't understand is how I had three working lights yesterday (out of five) if I have a bad ground. If there are no blown fuses right now, and lights still aren't working in any location, I can't help but think something fried inside the BCM. Brian also wondered if one of the door switches/plungers is going bad and not letting enough current get to the bulbs. We know everything is getting voltage, but we don't know what's going on with the current. Am I understanding this correctly?
The BCM controls my locks, interior lights, and the sleep mode for the car. I've got no interior lights, locks with a mind of their own, and a HUGE parasitic drain. If the BCM is faulty and not going into sleep mode, I believe that could cause a large drain, no? My lack of understanding is pushing me to believe the BCM is the cause of all my problems, but I know it's probably not that simple. Does anyone know what is typically involved with replacing a BCM on a 90s Japanese car? Does it need to be programed to match my car/key?
More to the point, since I'm unable to make sense of wiring diagrams, how can I figure out where the ground is for that PS door light? I'm pretty sure I should start there, but I'm not sure how.
Edit 3:
I went back for like the 4th time and did find fuse #26 to be blown. Maybe I missed it before since it's up so high in the box? Interestingly enough, I found a 10A fuse in there, even though it's supposed to be 7.5A. Hopefully that extra current that got through didn't mess up whatever that fuse is protecting
I JUST went out and replaced all of the interior bulbs, and I now have map and overhead lights back!!!!!!!!!!!!!!!!!!!!!! But still, no door lights. Back to the drawing board....Also if you might want to check the internal fuse on the DMM you have. When you measure voltage in the V/ohm point there is a very high internal resistance built into the DMM (1 Mohm or greater) circuit so that it doesn't interfere much with the circuit being measured. Measuring current on those meters uses a very low resistance path that is meant to work inline with the flow of current. By trying to measure voltage across this path there is very little resistance and the voltage causes a high current like short to occur. (Yeah I totally haven't done this in my long career of working in electronics.
 ) There should be a fuse inside the DMM that is serviceable. The meter will still work in V/ohm mode, but will have an open circuit in current measuring mode if the fuse is blown.
And I don't want to be the bearer of bad news. If the fuse is blown on the DMM that might have damaged the LCU circuit or BCM with that current surge.
Replacing the BCM isn't that hard, it is located underneath the center armrest/console mounted to the chassis. Though it uses security Torx bolts on my car, not sure with other Maximas/I30s. The fact that Nissan used Torx security bolts makes me think the BCM is swap-able between cars, as to prevent its theft and be used in another Maxima/I30.
Last edited by 98SEBlackMax; 02-05-2019 at 10:41 PM.
02-06-2019, 05:52 AM
#536
You may have messed up the LCU or BCM with those LED lights. If everything worked fine before the LED lights and then failed right after, highly unlikely a bad ground just showed up.
Also if you might want to check the internal fuse on the DMM you have. When you measure voltage in the V/ohm point there is a very high internal resistance built into the DMM (1 Mohm or greater) circuit so that it doesn't interfere much with the circuit being measured. Measuring current on those meters uses a very low resistance path that is meant to work inline with the flow of current. By trying to measure voltage across this path there is very little resistance and the voltage causes a high current like short to occur. (Yeah I totally haven't done this in my long career of working in electronics. ) There should be a fuse inside the DMM that is serviceable. The meter will still work in V/ohm mode, but will have an open circuit in current measuring mode if the fuse is blown.
And I don't want to be the bearer of bad news. If the fuse is blown on the DMM that might have damaged the LCU circuit or BCM with that current surge.
Replacing the BCM isn't that hard, it is located underneath the center armrest/console mounted to the chassis. Though it uses security Torx bolts on my car, not sure with other Maximas/I30s. The fact that Nissan used Torx security bolts makes me think the BCM is swap-able between cars, as to prevent its theft and be used in another Maxima/I30.
Also if you might want to check the internal fuse on the DMM you have. When you measure voltage in the V/ohm point there is a very high internal resistance built into the DMM (1 Mohm or greater) circuit so that it doesn't interfere much with the circuit being measured. Measuring current on those meters uses a very low resistance path that is meant to work inline with the flow of current. By trying to measure voltage across this path there is very little resistance and the voltage causes a high current like short to occur. (Yeah I totally haven't done this in my long career of working in electronics.
) There should be a fuse inside the DMM that is serviceable. The meter will still work in V/ohm mode, but will have an open circuit in current measuring mode if the fuse is blown.And I don't want to be the bearer of bad news. If the fuse is blown on the DMM that might have damaged the LCU circuit or BCM with that current surge.
Replacing the BCM isn't that hard, it is located underneath the center armrest/console mounted to the chassis. Though it uses security Torx bolts on my car, not sure with other Maximas/I30s. The fact that Nissan used Torx security bolts makes me think the BCM is swap-able between cars, as to prevent its theft and be used in another Maxima/I30.
Last edited by 95maxrider; 02-06-2019 at 05:55 AM.
02-09-2019, 08:15 AM
#537
For the cold start issue, do you have a custom tune? Sounds like it could either be getting too little fuel at below said temps. My Grand prix once I cammed it was like that, my friend said he could tune it out (always took 2 starts anytime, cold or warm, had to give it a little throttle) by adding a touch more fuel, I said nah, it sounds cool because the 2nd start was always a super heavy cam lope and cough, made the car sound like serious business even though it was a slowpile.
02-09-2019, 08:38 AM
#538
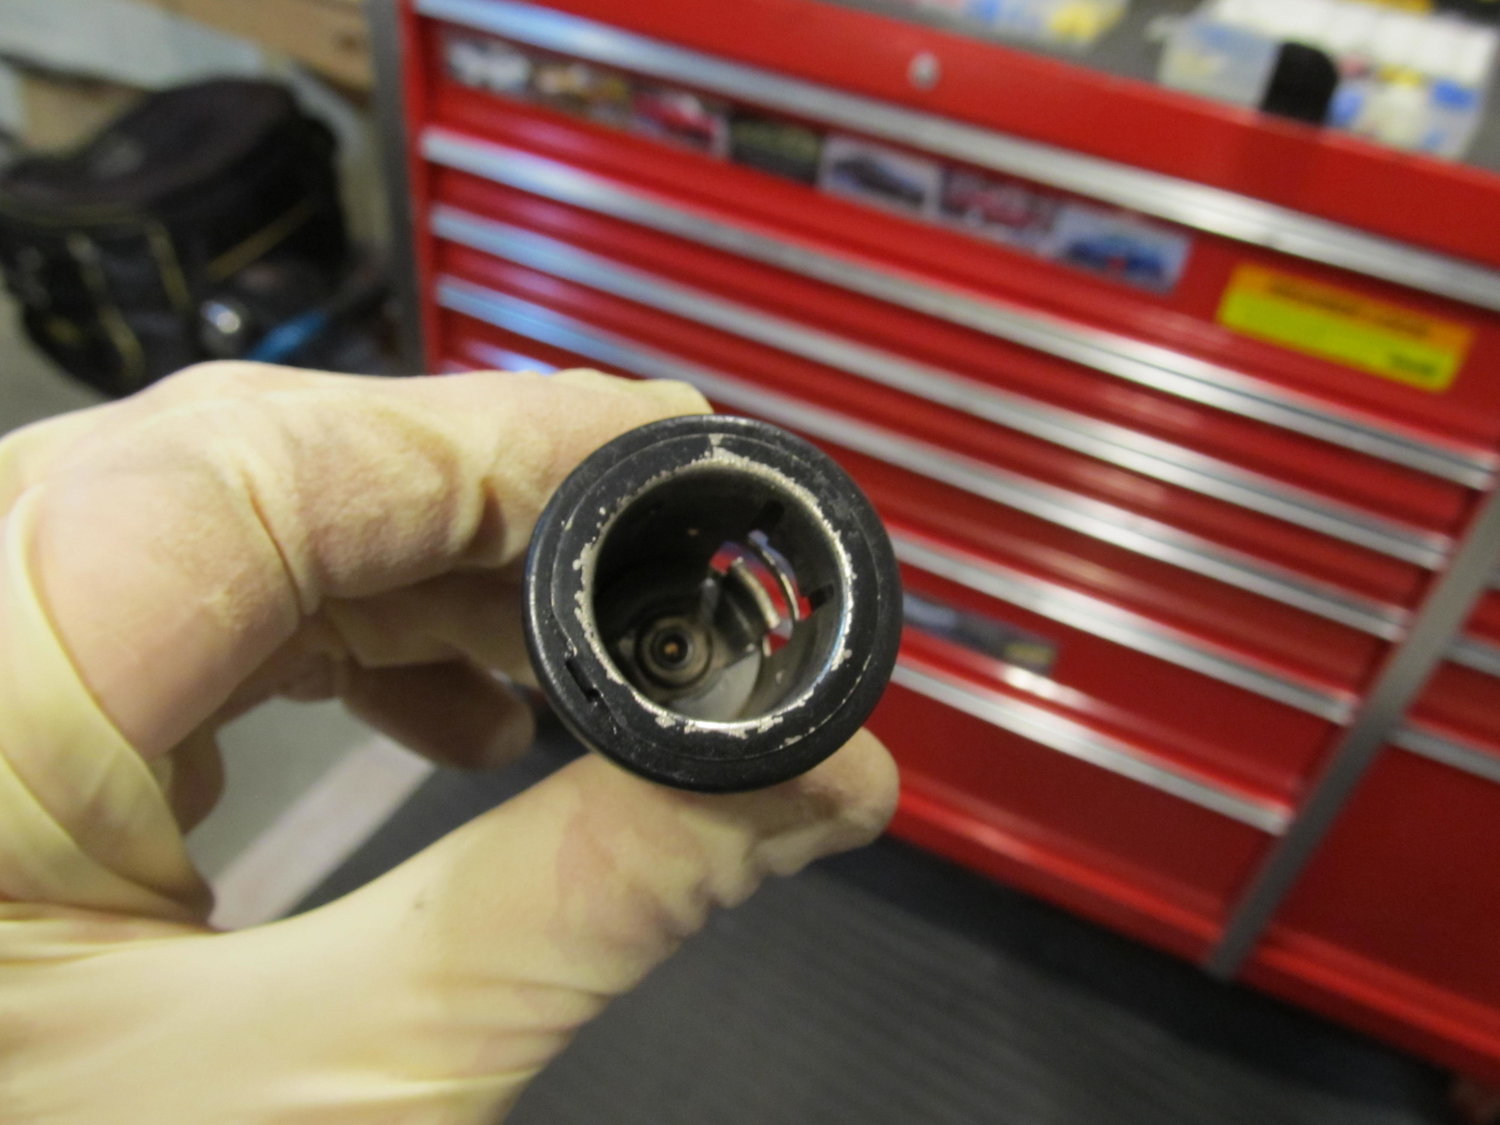
Well, you guys were right, I needed to replace my e-brake cables again!
I bought some cheap ones from RockAuto and hoped for the best. One was on clearance for $8, and the brands didn't match, but I figured they had to be better than what was in the car. The two brands certainly constructed them differently, but from what I can tell, it's an updated design over the ones I put in the car 10 years ago. This coincides with what I saw on the Nissan parts website, where it mentioned a new part had superseded the older one. It of course didn't mention what the change was, but I think I know what it is! Keep reading for details....
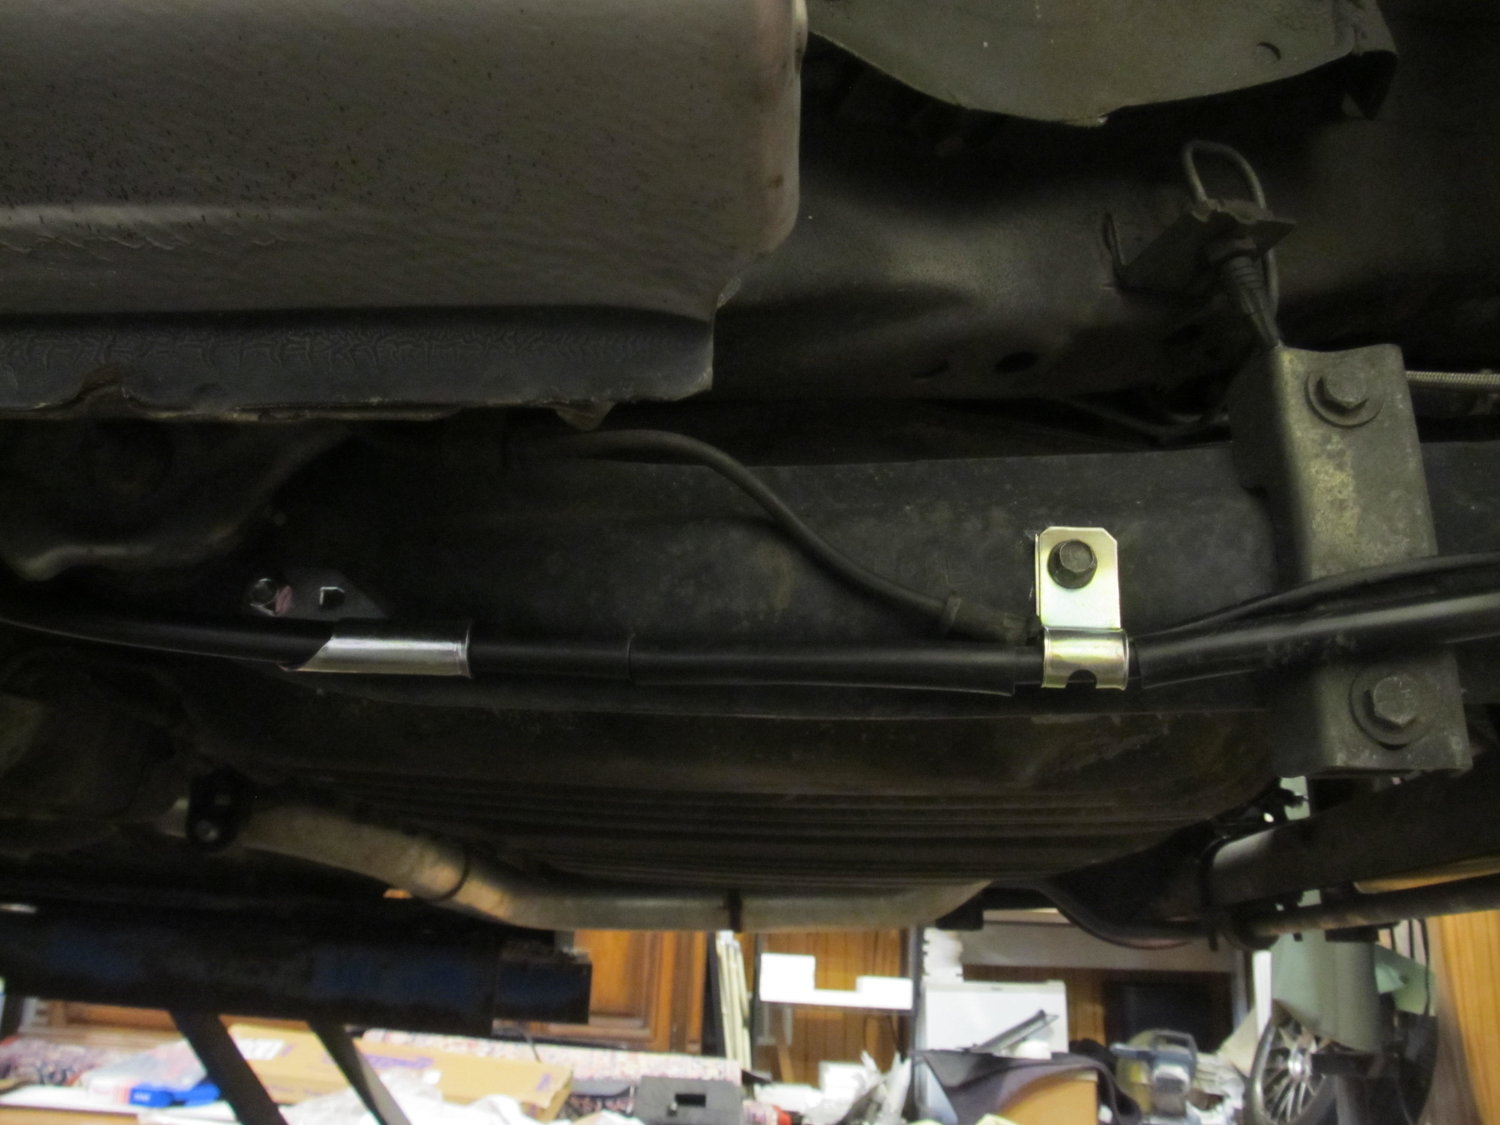
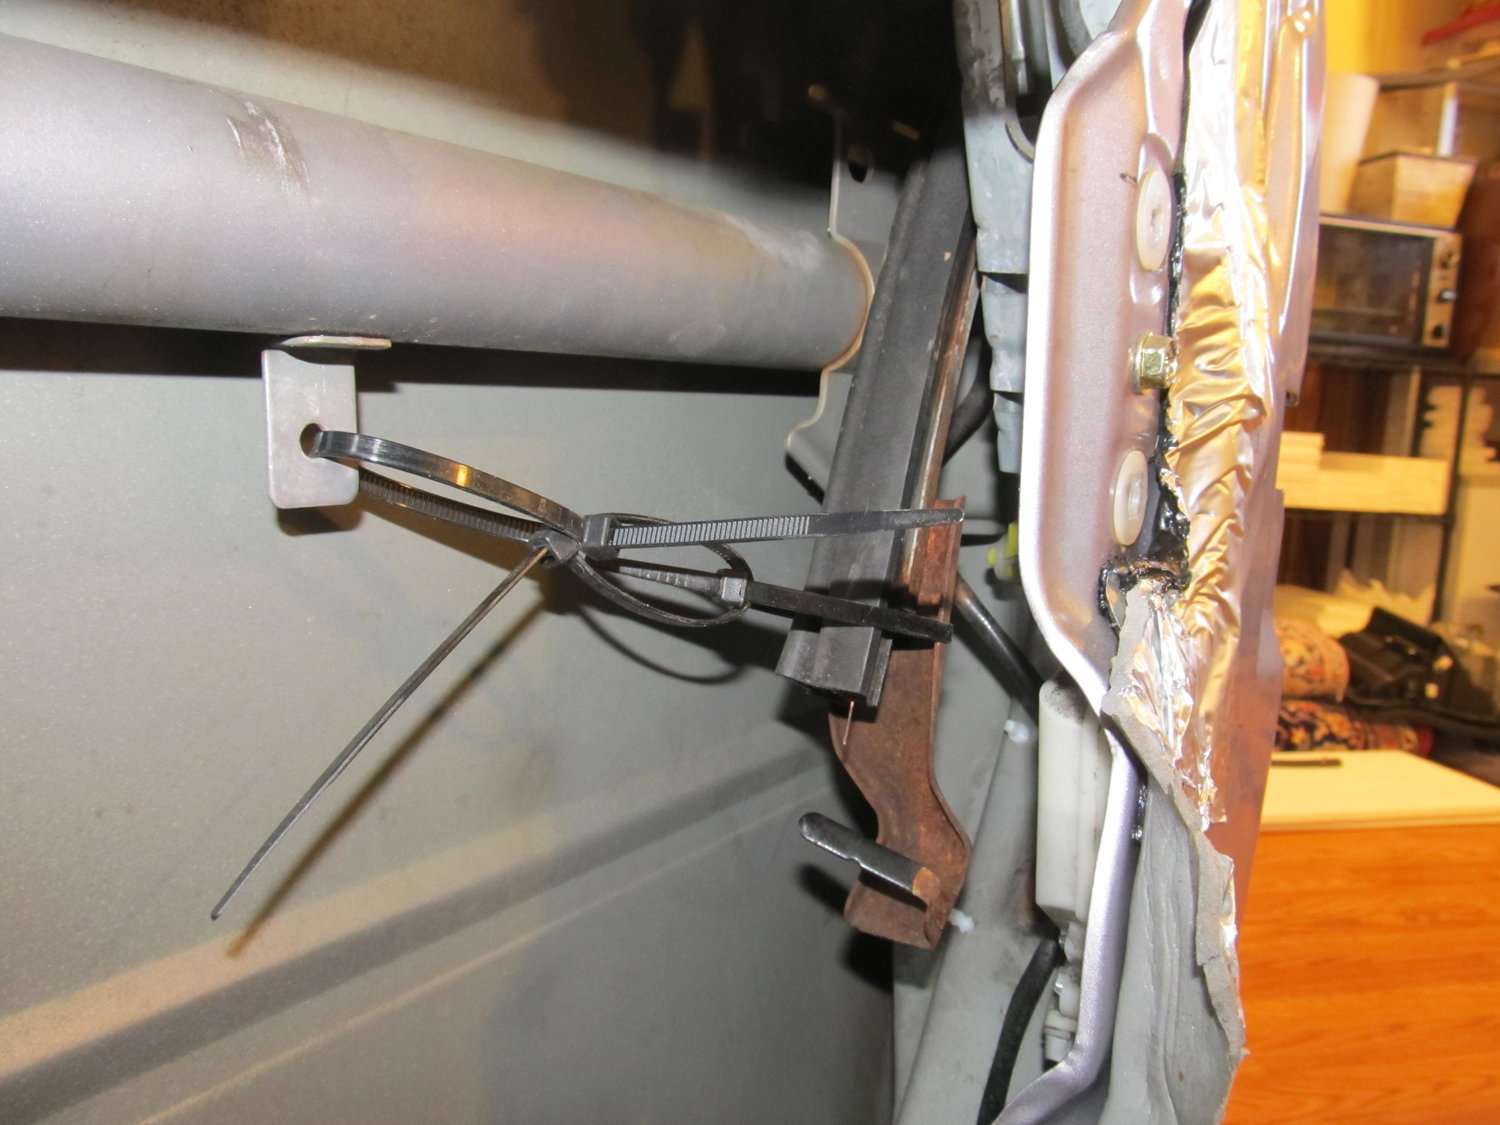
So the ones I installed 10 years ago didn't have much in the way of brackets attaching them to the car, so many zip ties were used:
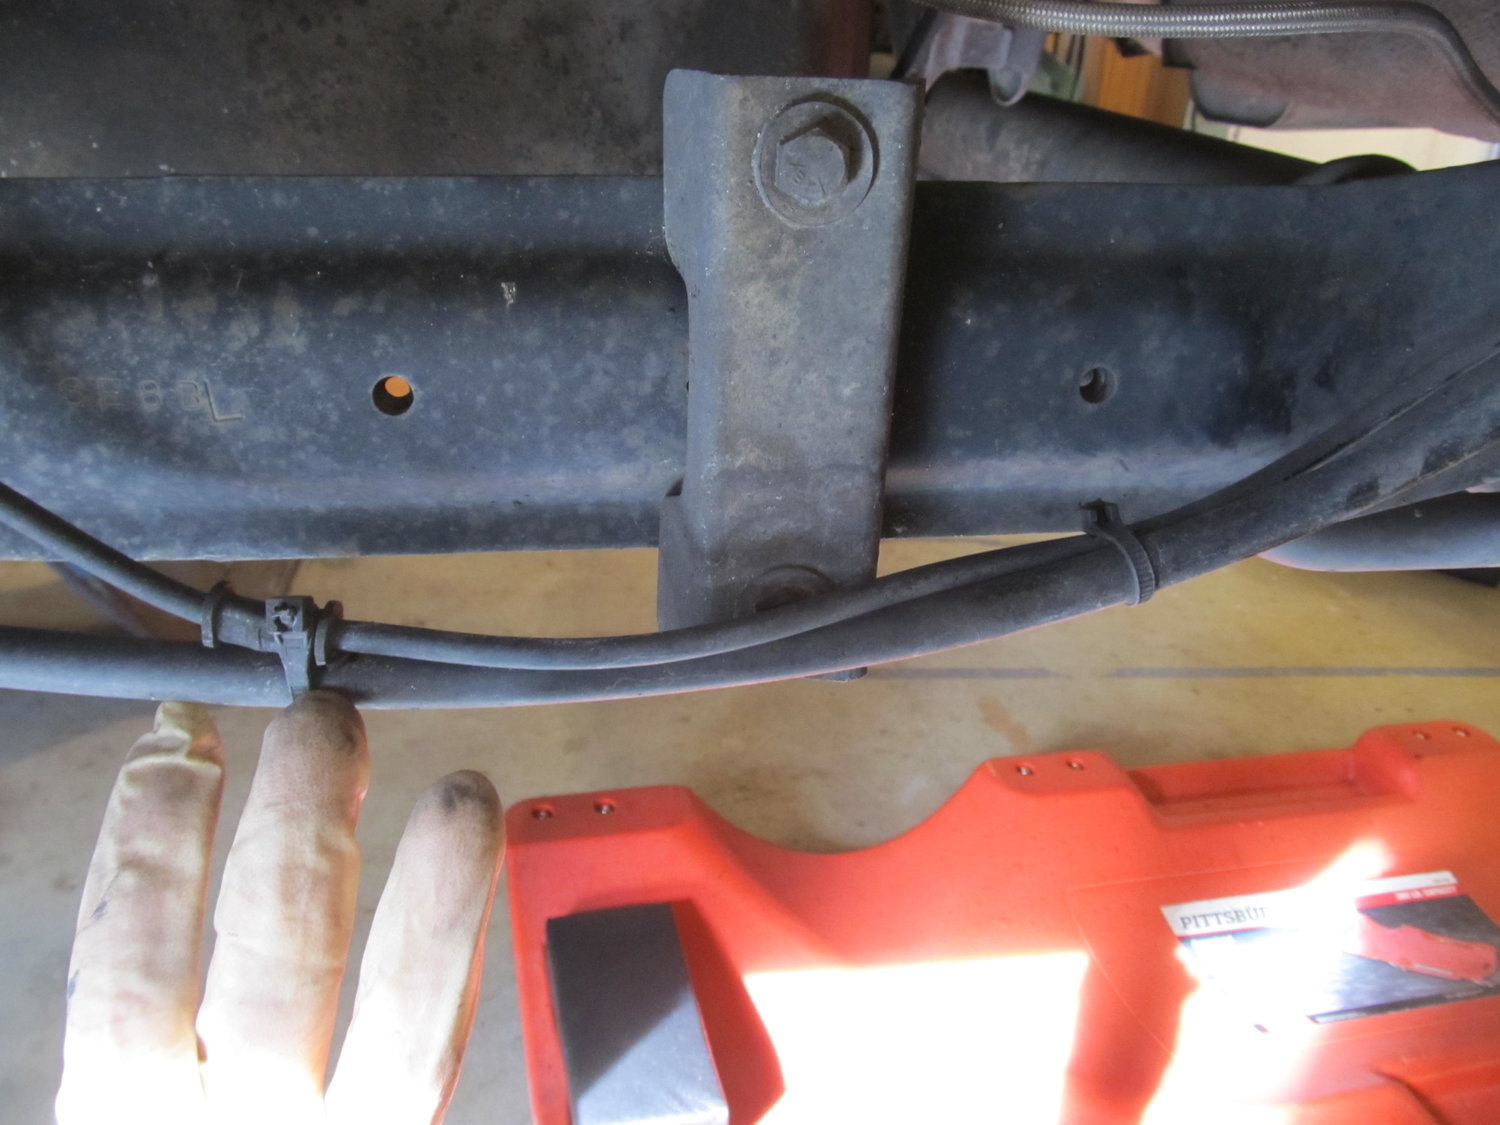
As soon as I detached them from the caliper, I knew they had failed by the amount of water that dripped out of them:
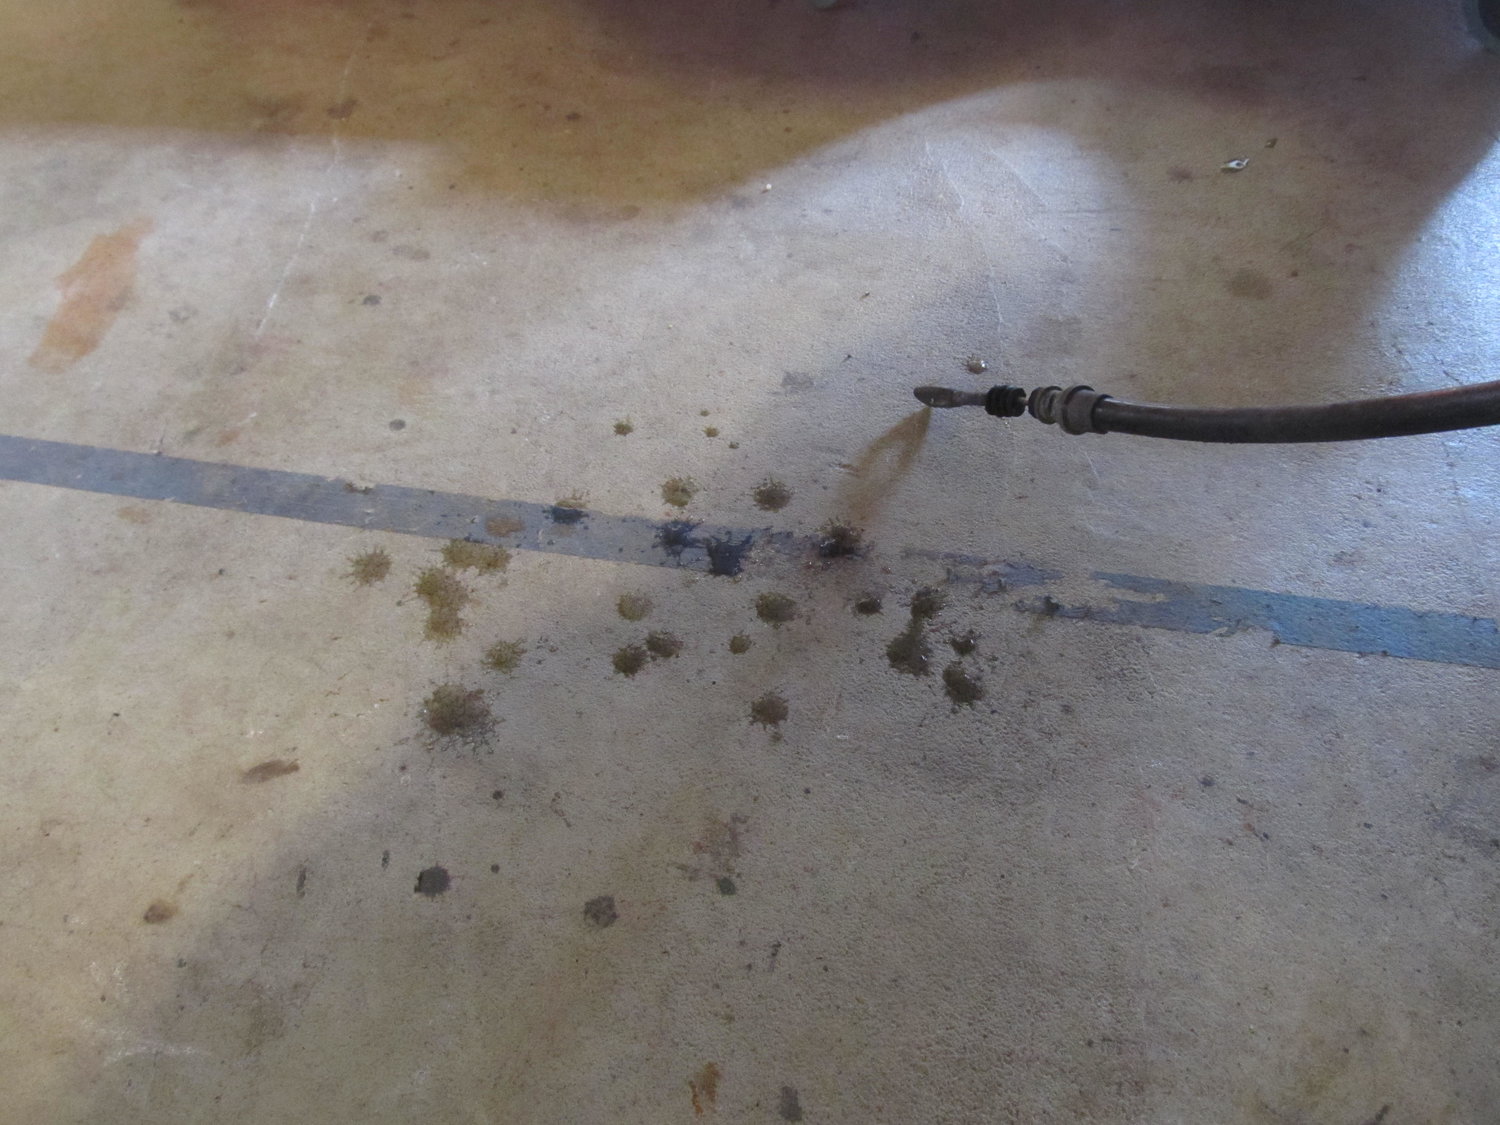
The outer covering had split in multiple locations:

Yeah, I can see how all that water in there would freeze up and keep the cable from retracting!
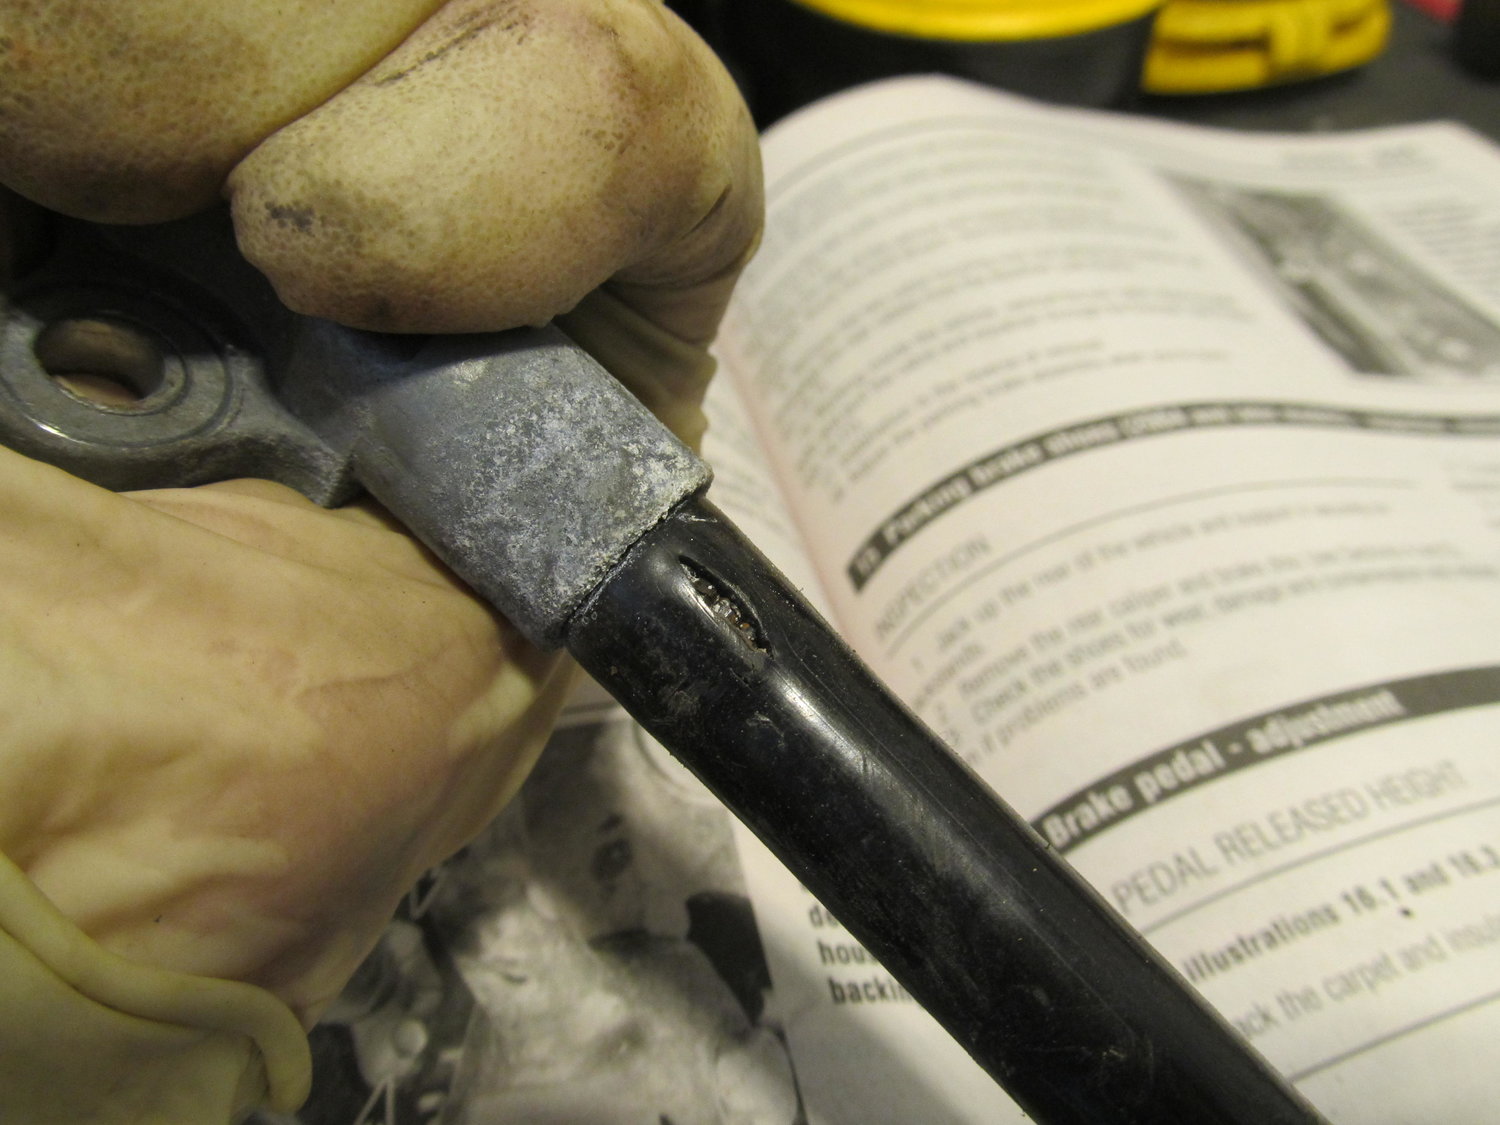
So, what is this revision to the cables? Well, it looks like Nissan (and the aftermarket) decided it would be smart to put a sheath around the cable to prevent it from coming in contact with water and rusting up!
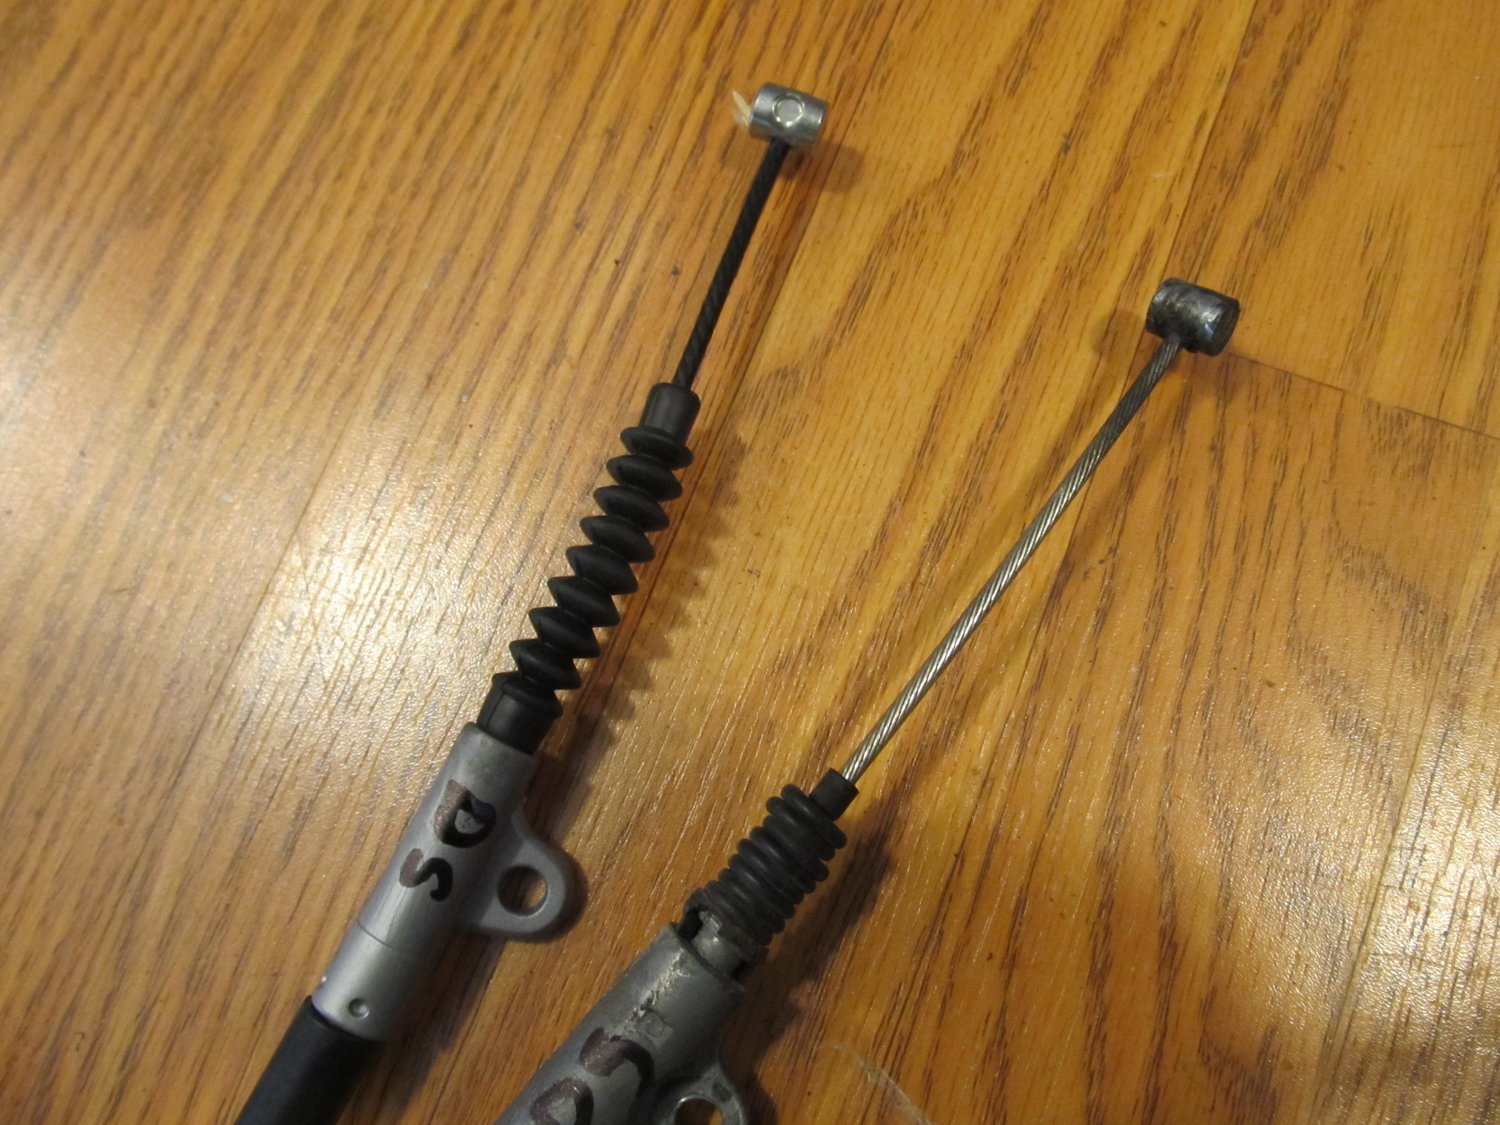
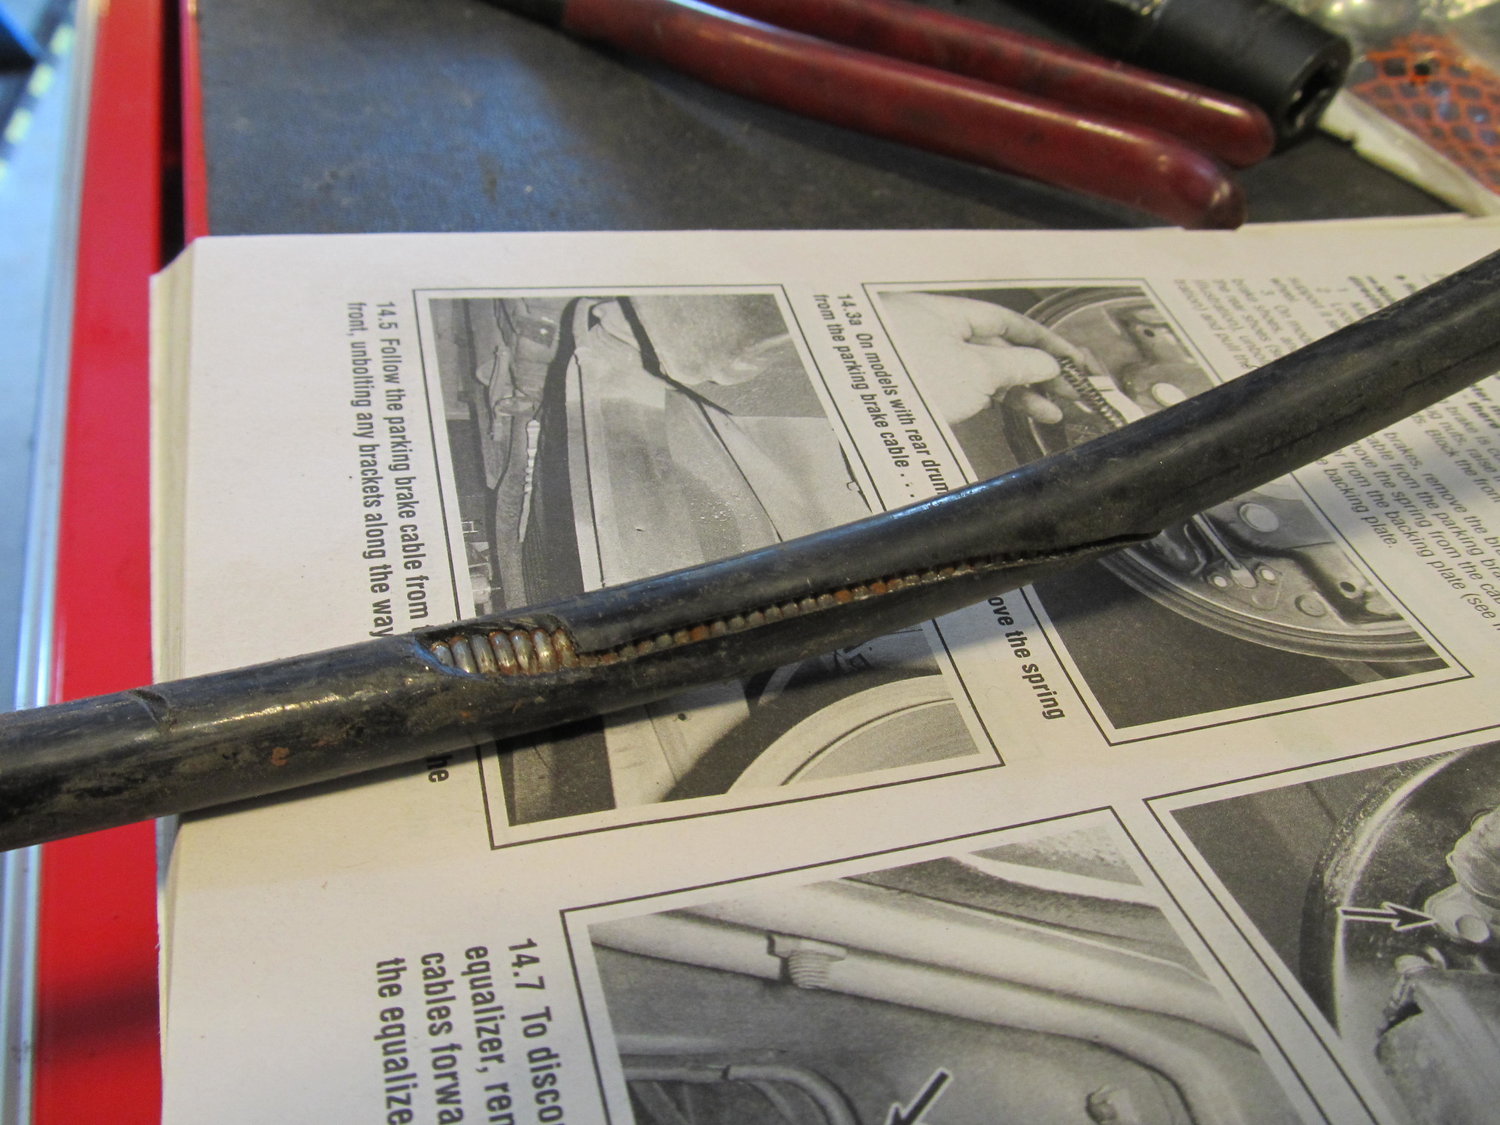
What a fine idea! As I mentioned, I bought two different brands of cables. One brand obviously wasn't as precise about putting the sheathing all the way to the end of the cable....
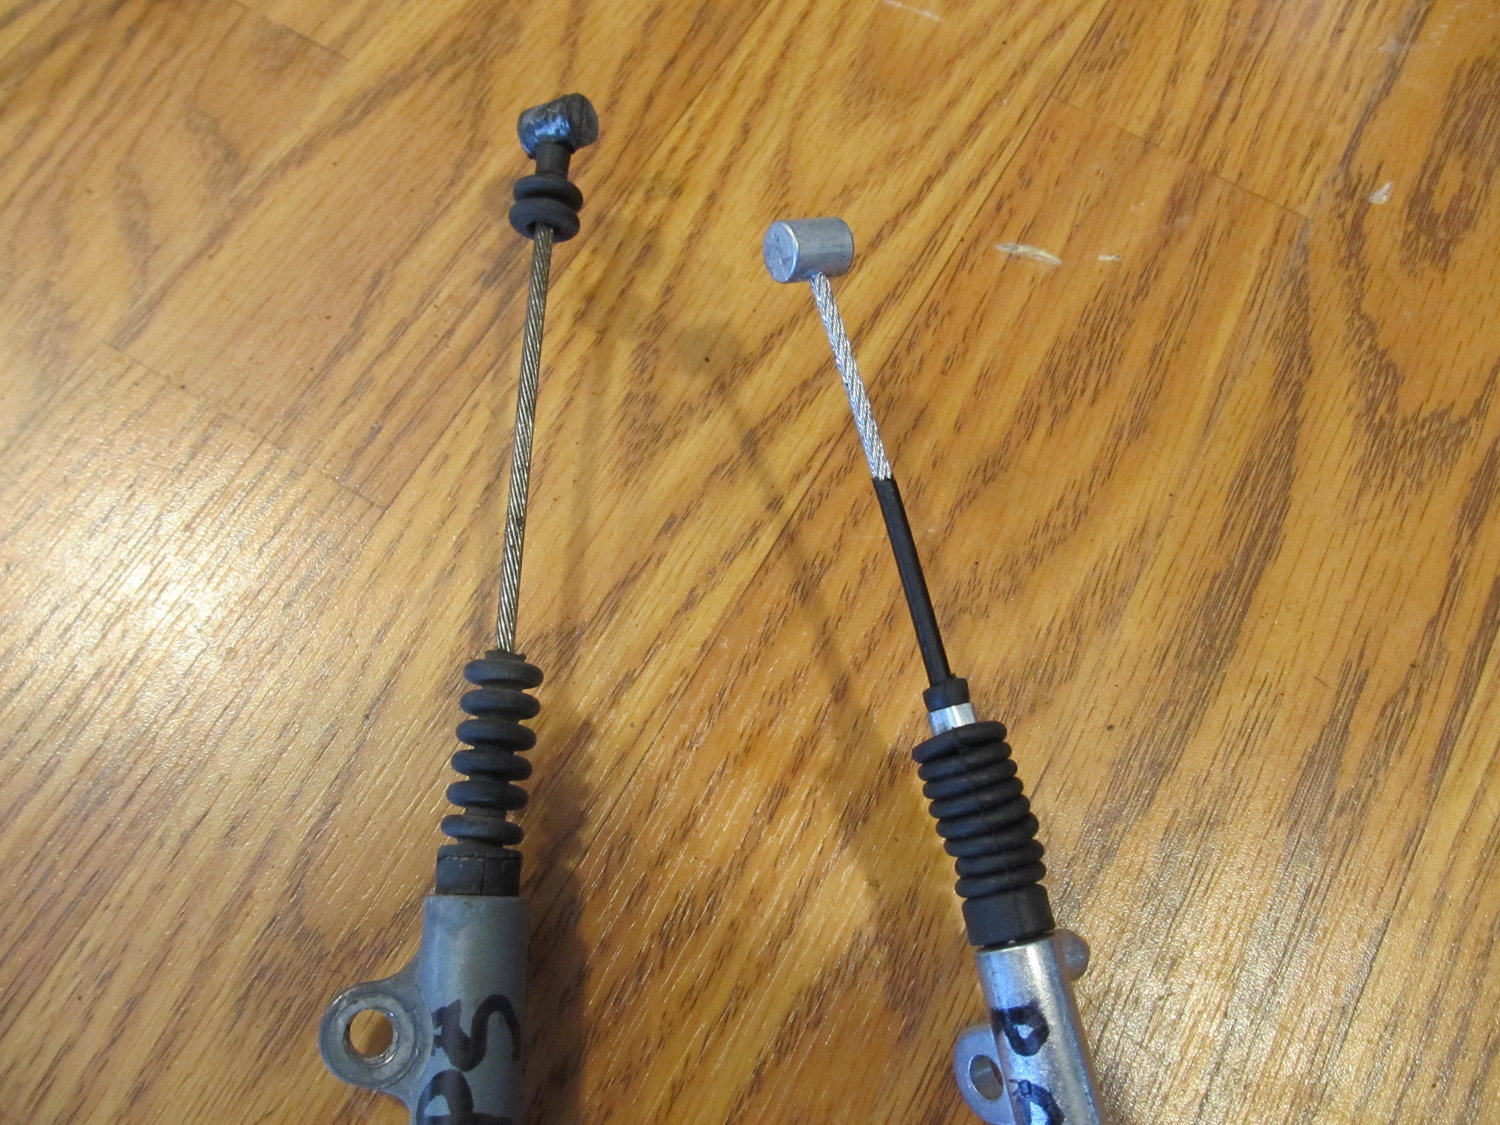
Still, that's a hell of a lot better than no sheathing at all!
The new cables came with actual brackets too, hooray! However, one of the brands had breaks in the outer covering, while the other had it fully sealed up for the length of the cable. That kind of bugs me, but what can I do about it now?
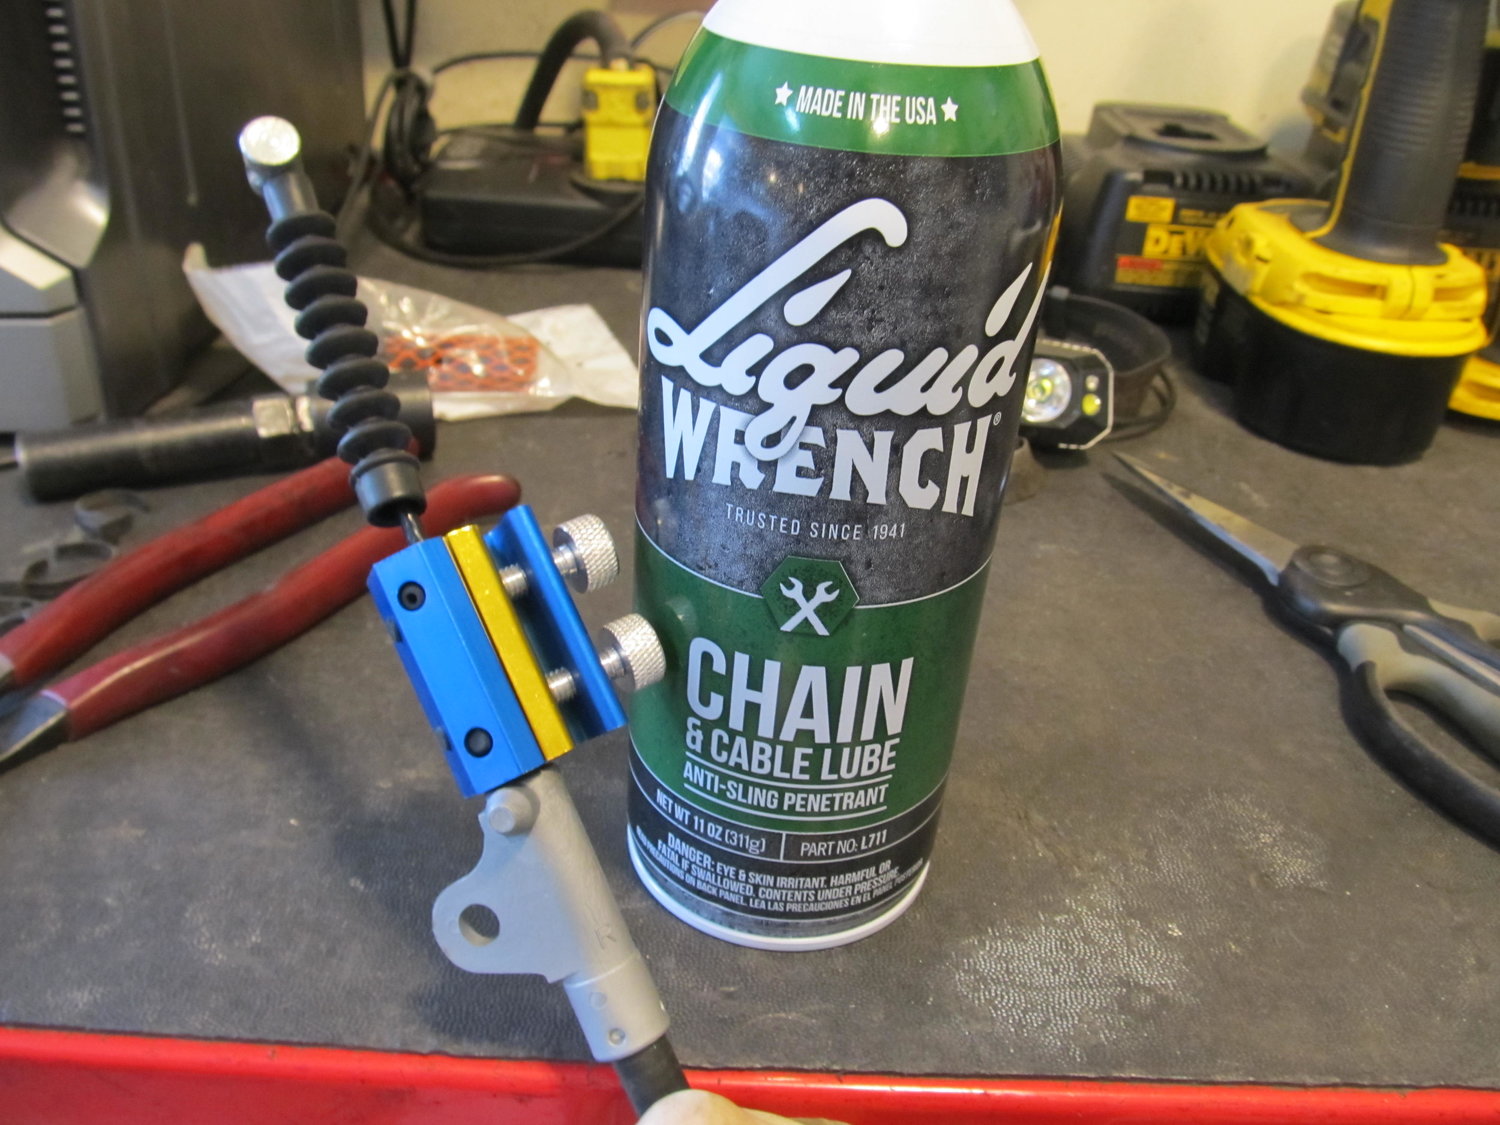
I sprayed a bunch of cable lube down either end to hopefully prevent it from locking up if and when it gets water inside it.
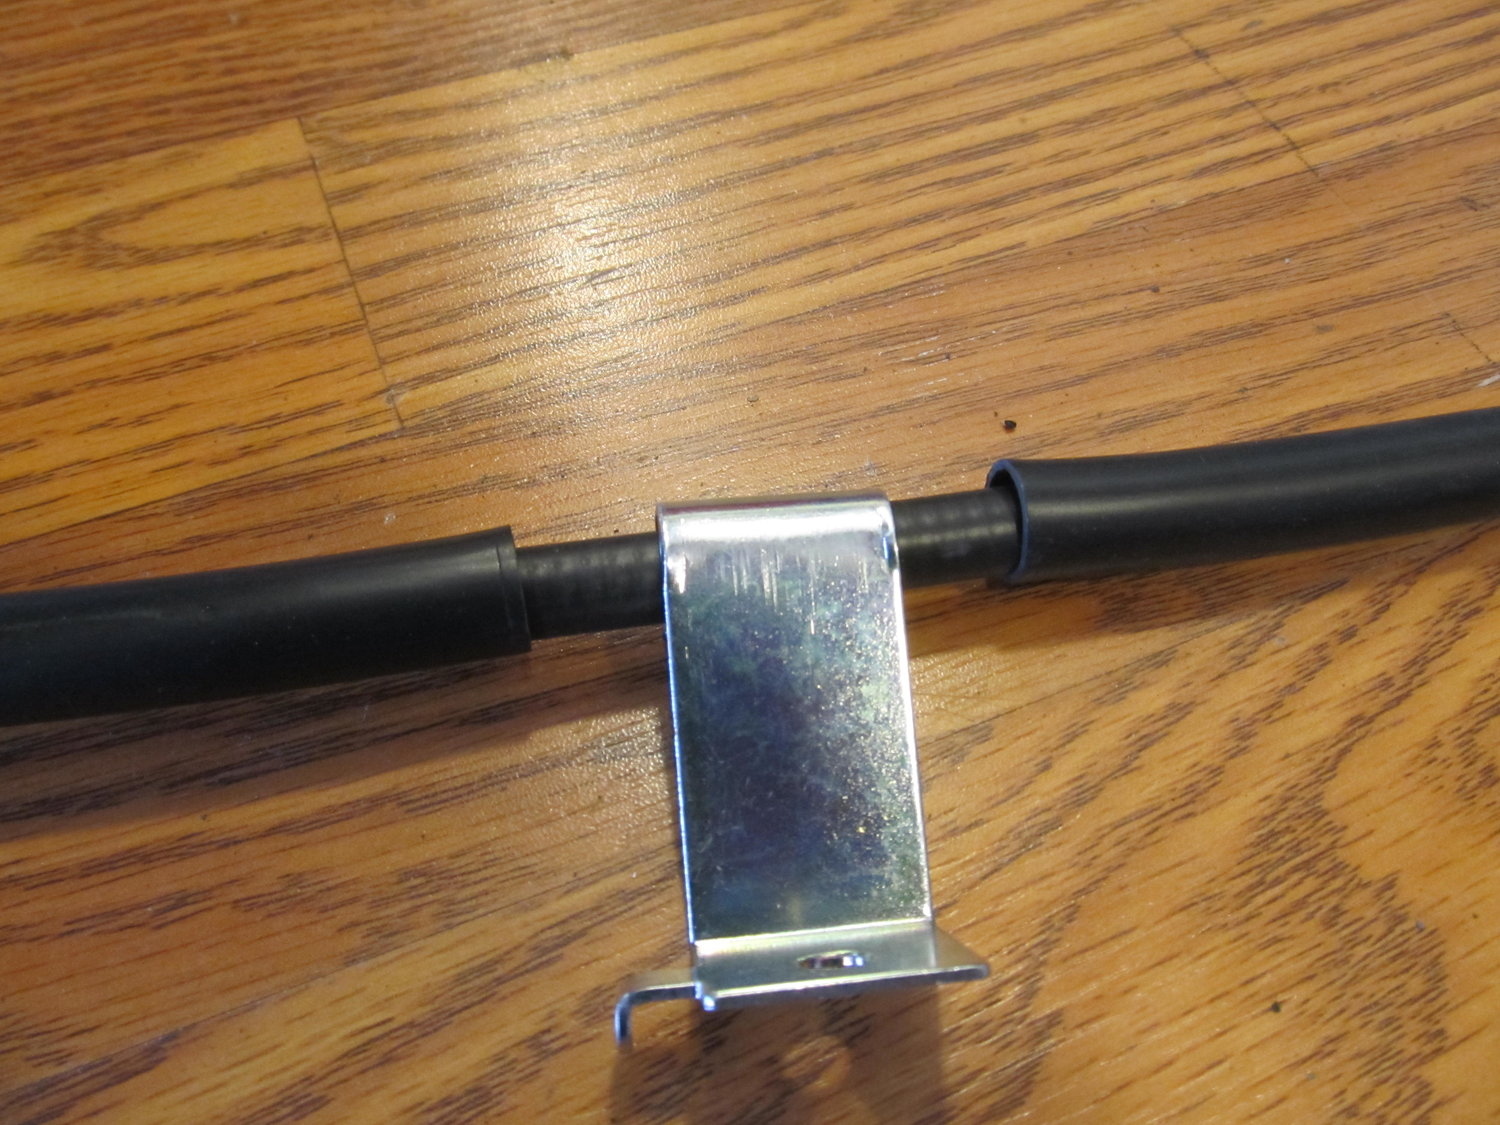
I then zip tied the rubber accordion to end of the cable to keep it from coming loose:
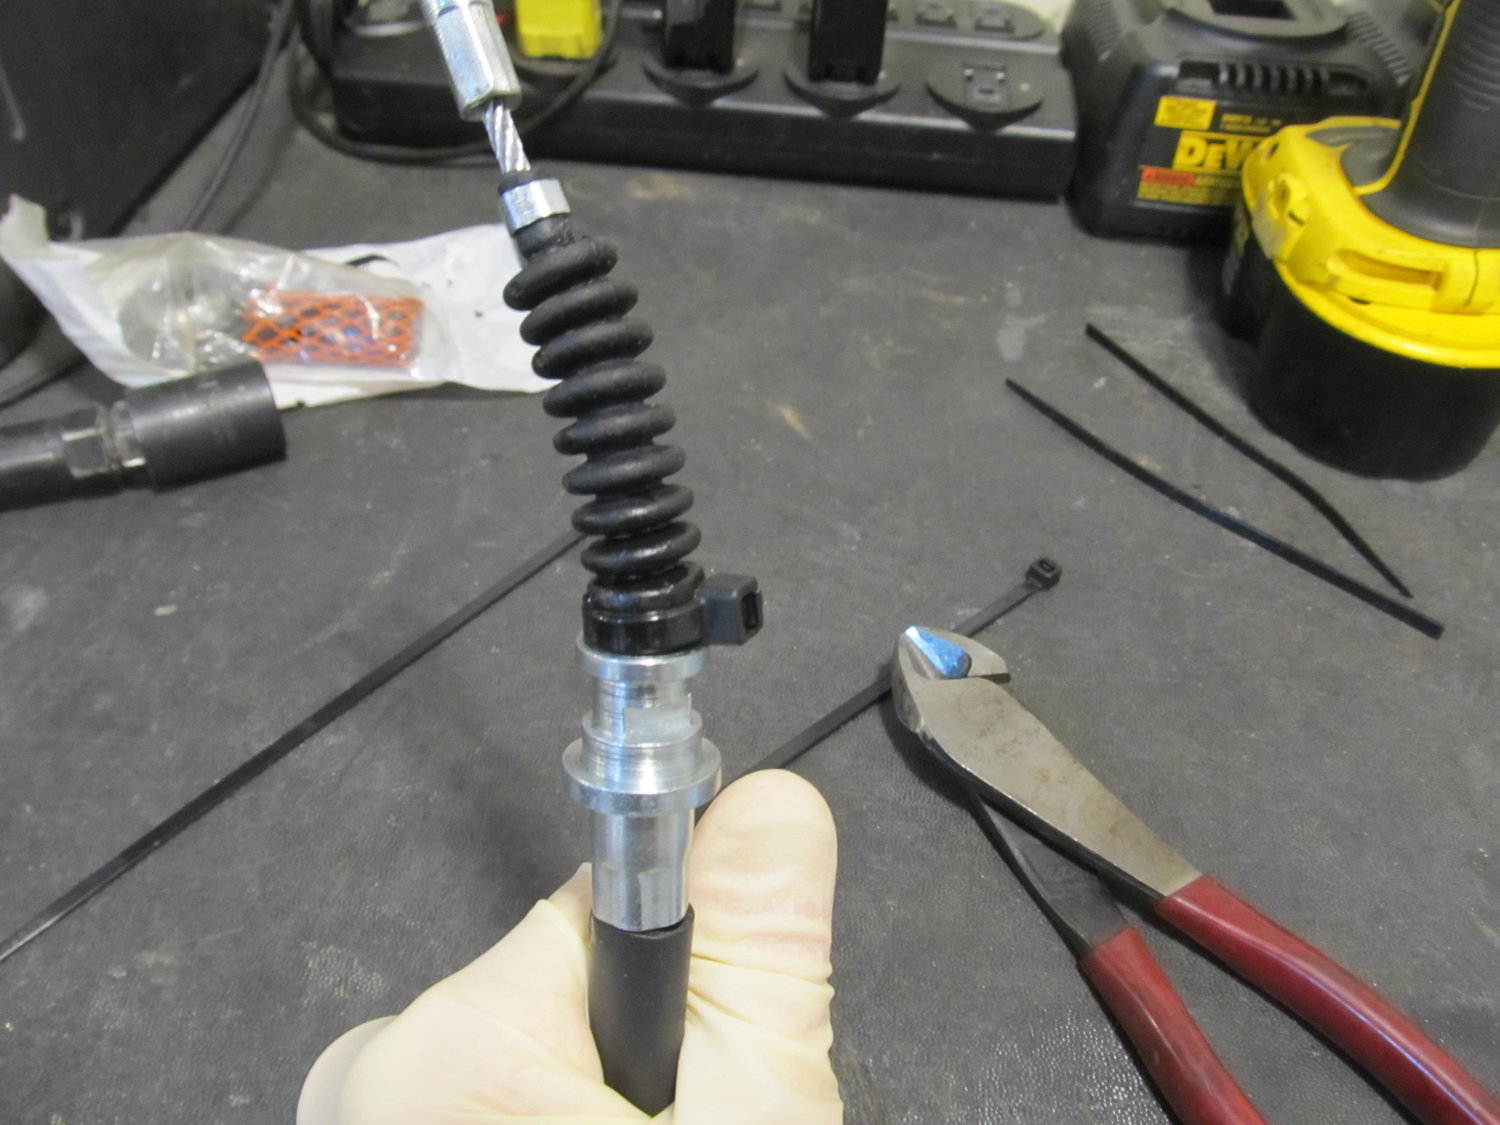
And with that, I put it all back together, and marveled at my cables being properly attached to the car once more:
I adjusted the handle so it clicks the recommended 10-11 times, and could immediately tell that the cables moved much more smoothly than the old ones. I'm pretty confident that this will solve my frozen e-brake problem, but I won't know for sure until another month or two goes by. Thanks for all of the help with this one, I can't believe I overlooked my cables for so long. Lesson learned: if you have problems with a frozen e-brake in the winter, detach the cables from the calipers and let them hang down. If water comes out, it's time to replace your cables!
I bought some cheap ones from RockAuto and hoped for the best. One was on clearance for $8, and the brands didn't match, but I figured they had to be better than what was in the car. The two brands certainly constructed them differently, but from what I can tell, it's an updated design over the ones I put in the car 10 years ago. This coincides with what I saw on the Nissan parts website, where it mentioned a new part had superseded the older one. It of course didn't mention what the change was, but I think I know what it is! Keep reading for details....
So the ones I installed 10 years ago didn't have much in the way of brackets attaching them to the car, so many zip ties were used:
As soon as I detached them from the caliper, I knew they had failed by the amount of water that dripped out of them:
The outer covering had split in multiple locations:
Yeah, I can see how all that water in there would freeze up and keep the cable from retracting!
So, what is this revision to the cables? Well, it looks like Nissan (and the aftermarket) decided it would be smart to put a sheath around the cable to prevent it from coming in contact with water and rusting up!
What a fine idea! As I mentioned, I bought two different brands of cables. One brand obviously wasn't as precise about putting the sheathing all the way to the end of the cable....
Still, that's a hell of a lot better than no sheathing at all!
The new cables came with actual brackets too, hooray! However, one of the brands had breaks in the outer covering, while the other had it fully sealed up for the length of the cable. That kind of bugs me, but what can I do about it now?
I sprayed a bunch of cable lube down either end to hopefully prevent it from locking up if and when it gets water inside it.
I then zip tied the rubber accordion to end of the cable to keep it from coming loose:
And with that, I put it all back together, and marveled at my cables being properly attached to the car once more:
I adjusted the handle so it clicks the recommended 10-11 times, and could immediately tell that the cables moved much more smoothly than the old ones. I'm pretty confident that this will solve my frozen e-brake problem, but I won't know for sure until another month or two goes by. Thanks for all of the help with this one, I can't believe I overlooked my cables for so long. Lesson learned: if you have problems with a frozen e-brake in the winter, detach the cables from the calipers and let them hang down. If water comes out, it's time to replace your cables!
02-09-2019, 09:24 AM
#539
I have been dealing with an annoying issue on my car for years now, but never was able to make much progress in diagnosing or fixing the issue. My car has had problems unlocking, where I would unlock the car with my alarm remote, the car would unlock, and then immediately re-lock three or all doors. I would often have to unlock the car five times for all doors to unlock and stay unlocked. Obviously, this was pretty annoying. I searched for solutions over the years, and all I seemed to find were recommendations to lube the hinge points for the lock rods inside the doors. The theory was that the hinges were getting sticky, preventing the door lock actuator from unlocking all the way, and if one of the front doors doesn't unlock all the way, the body control module (BCM) would then lock all the doors again. Well, I lubed my hinge points many times, and while it would sometimes seem to make the interior door lock move more smoothly, it never solved the problem.
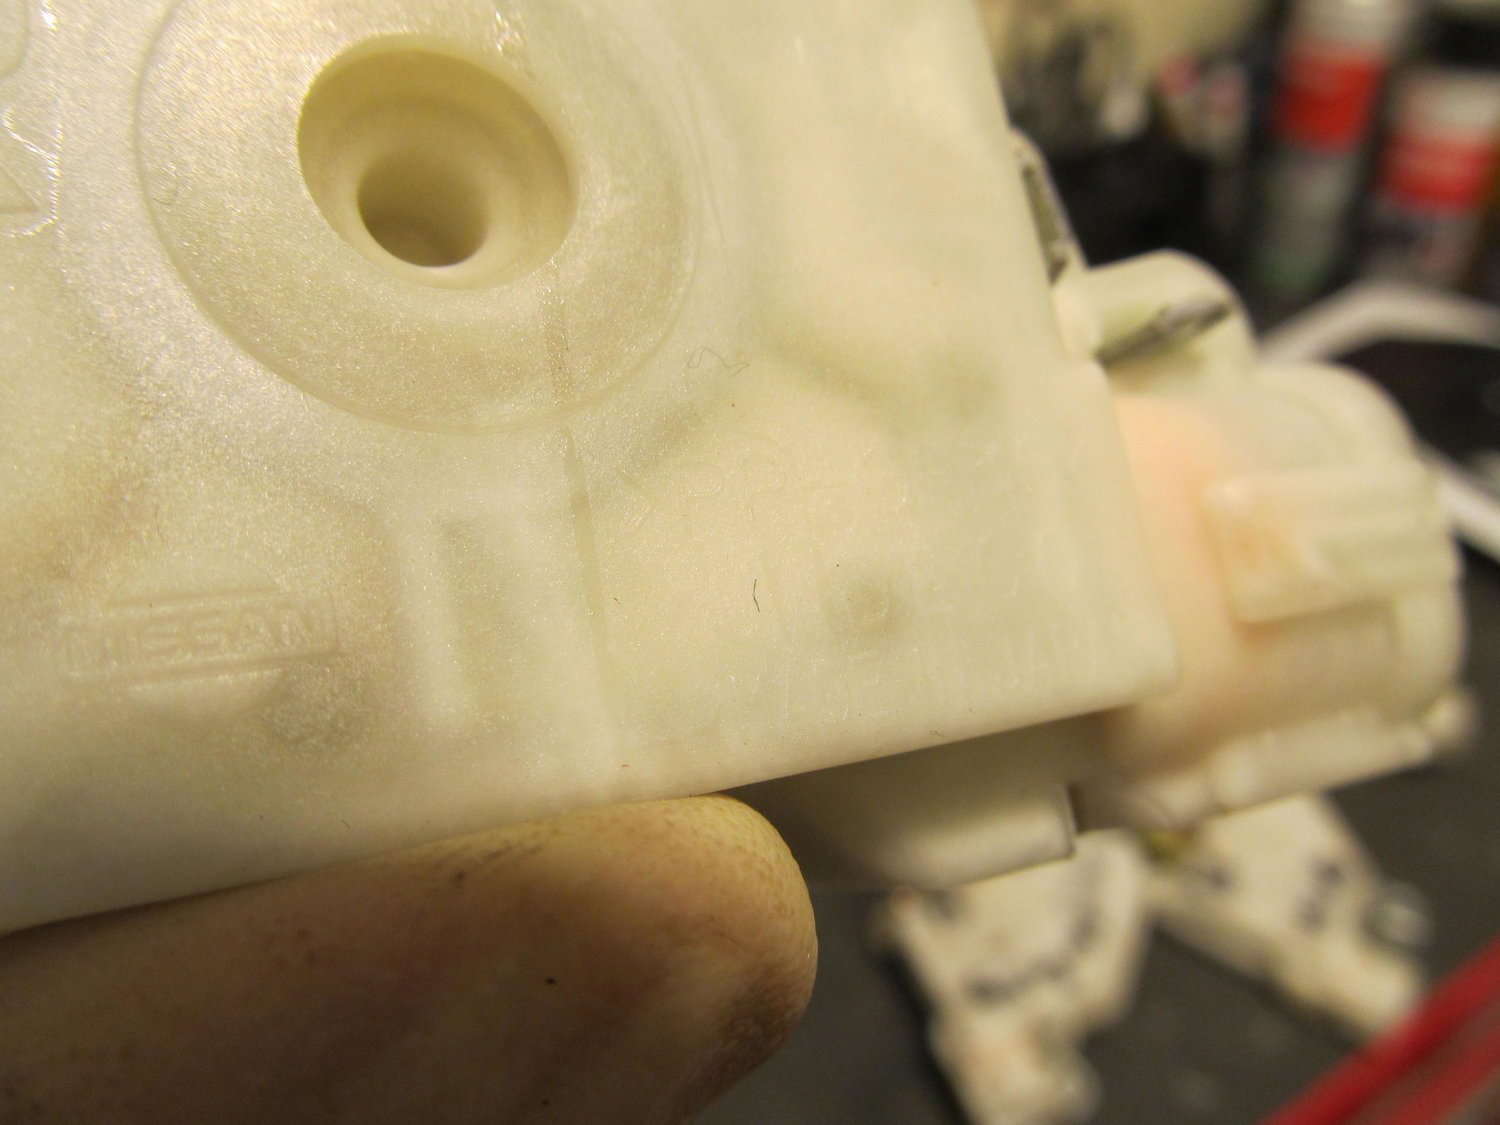
I was talking with a buddy who is a real mechanic, and he said when door lock issues like that come up, it's almost always bad door lock actuators. The motors get worn out and have trouble pushing to fully unlock the rest of the system, so when the door only partially unlocks, the BCM freaks out and re-locks the door. Well, I had enough mucking around and decided to just buy new actuators for the front doors. They were about $75 each on RockAuto, and much to my surprise, they appear to be an OEM product in an aftermarket box! I bought the WVE brand, and they were made in Japan and even had a Nissan logo on them!
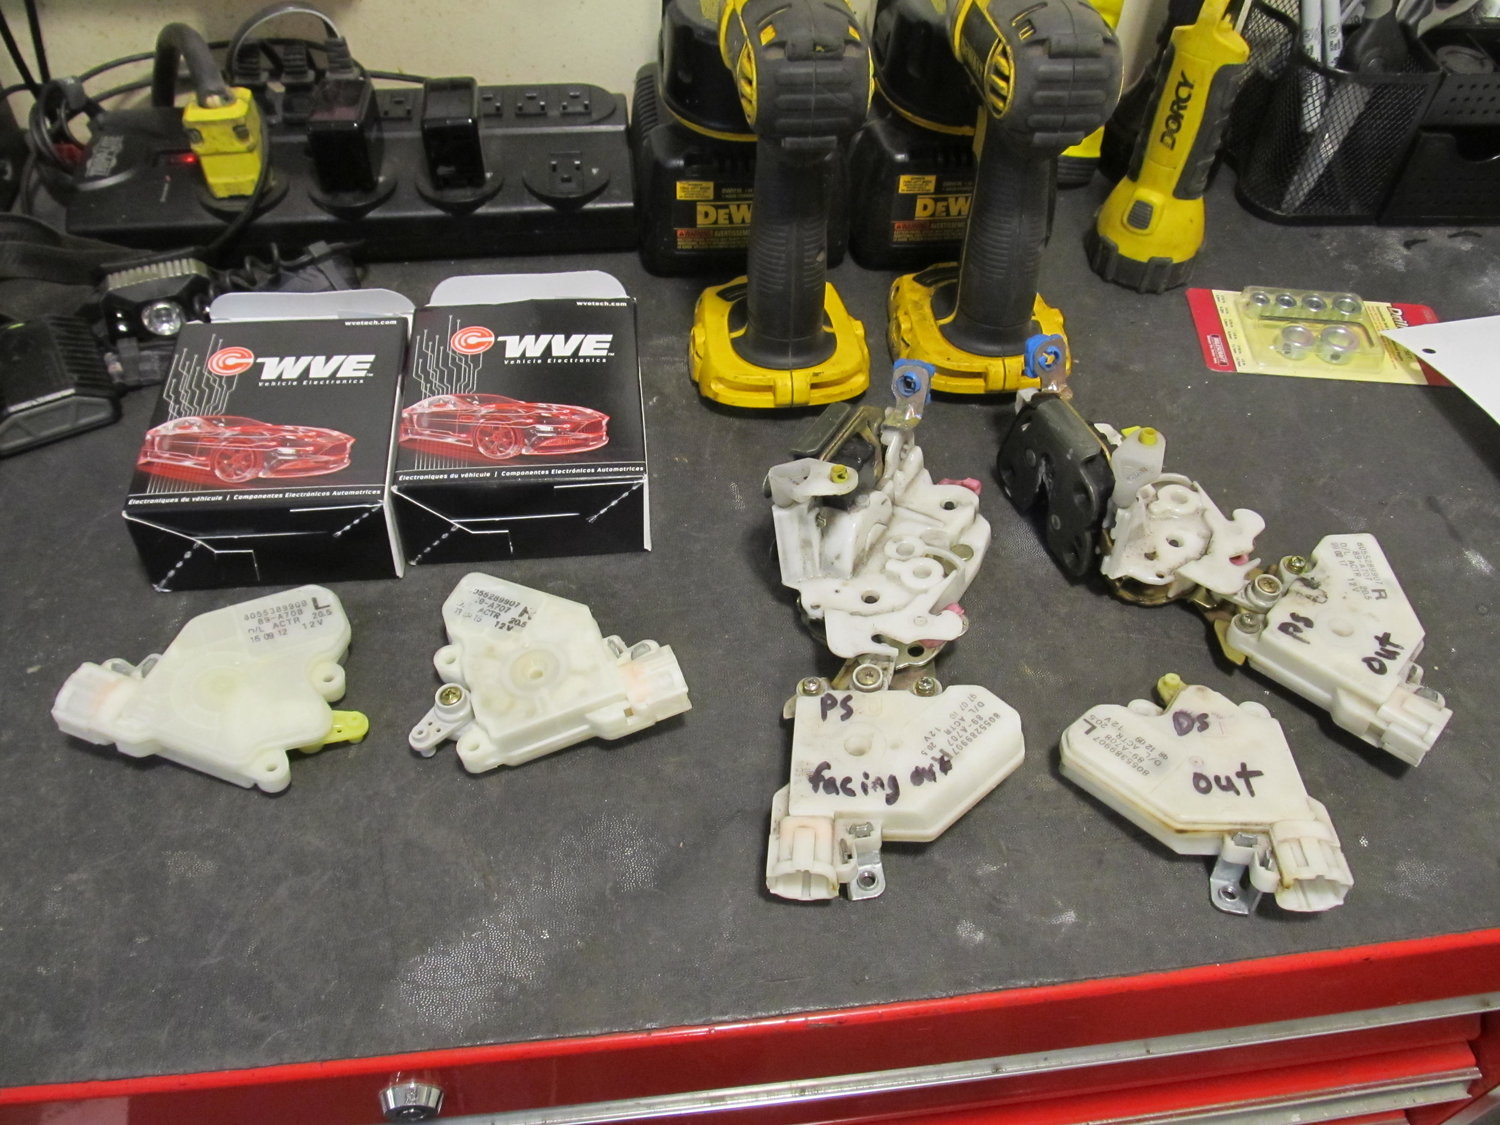
As you can see, I snagged a bunch of actuators from cars at the junkyards in an attempt to narrow down the problem to one door or the other. If you look closer, two of the actuators are still attached to the rest of the lock mechanism, like they would be in the car. The actuator attaches to this with two screws to hold it in place, and the lever/arm (in the center) that moves the rest of the linkages just kind of slides in place. But when the junkyard parts didn't seem to help, I figured it was time for new parts. The problem with this repair is ease of access. My Haynes manual doesn't cover replacing the door lock actuators, and from my experience at the junkyard, I knew how hard they were to remove from the doors. The only reason I could remove them at the junkyard was because I took the whole lever/arms assembly out with the actuator. But I knew that reinstalling all of that was going to be damn near impossible since it's all tucked up way back in the door where you can't see or get to. My goal was to somehow remove the old actuator without the whole lever/rod assembly. The actuator is attached to the door with one bolt, and then to the lever/rod assembly with two smaller screws. You can access the screw towards the front of the car rather easily, but the rear screw is way back in the door where you can't see or reach. Certainly no tool can reach it either. So here's what I did to replace the door lock actuators without removing anything else from the car. It took a good deal of patience, which I'm not known for, small screw drivers, and a mirror.
First, I unbolted the window guide from the door by removing this bolt:
Then I unbolted the actuator from the door with this bolt:

Unscrewing the screw towards the front of the car was easy enough, but I still needed access to get to the rear screw. I achieved this by using zip ties to hold the window guide forward and out of the way of the rear screw:
After some creative use of my mirror and flash light, I was finally able to get my screwdriver on the rear screw and get it out. Holy crap, it worked!!! I installed the new actuator, the bolt holding it to the door, and the front screw to the lever/arm assembly. I was unable to hold the second screw and reinstall it into the rear hole, but the actuator is secure enough without it.
There are the tools I used, nothing fancy:
To be honest, I wasn't expecting much. Once I had my original actuators loose and free from the rest of the assembly, I tested them out by locking/unlocking the car to see if the lever went through its full range of motion. Most of the ones I pulled from the junkyard weren't moving all the way when I unlocked them, telling me they were worn out. Well, to my surprise and dismay, the ones that had been in my car appeared to go through their full range of motion, so I didn't have high hopes for the new ones fixing anything. Still, I installed the new ones and crossed my fingers. It's been over a week now, and so far (knock on wood) I haven't had s single problem. It's a miracle!!! I can't tell you how nice it is to come up to my car, press unlock, and it actually does what I told it to do!
Now, with that said, it's still a good idea to inspect all of your lock rods in your doors. I knew my front ones were well lubed and clean, but I rarely have the rear door panels off to inspect them. One day I happened to manually unlock my PS rear door, and I noticed it was harder than normal to manually unlock it on the door. Once I had the panel off, I spotted a potential problem:
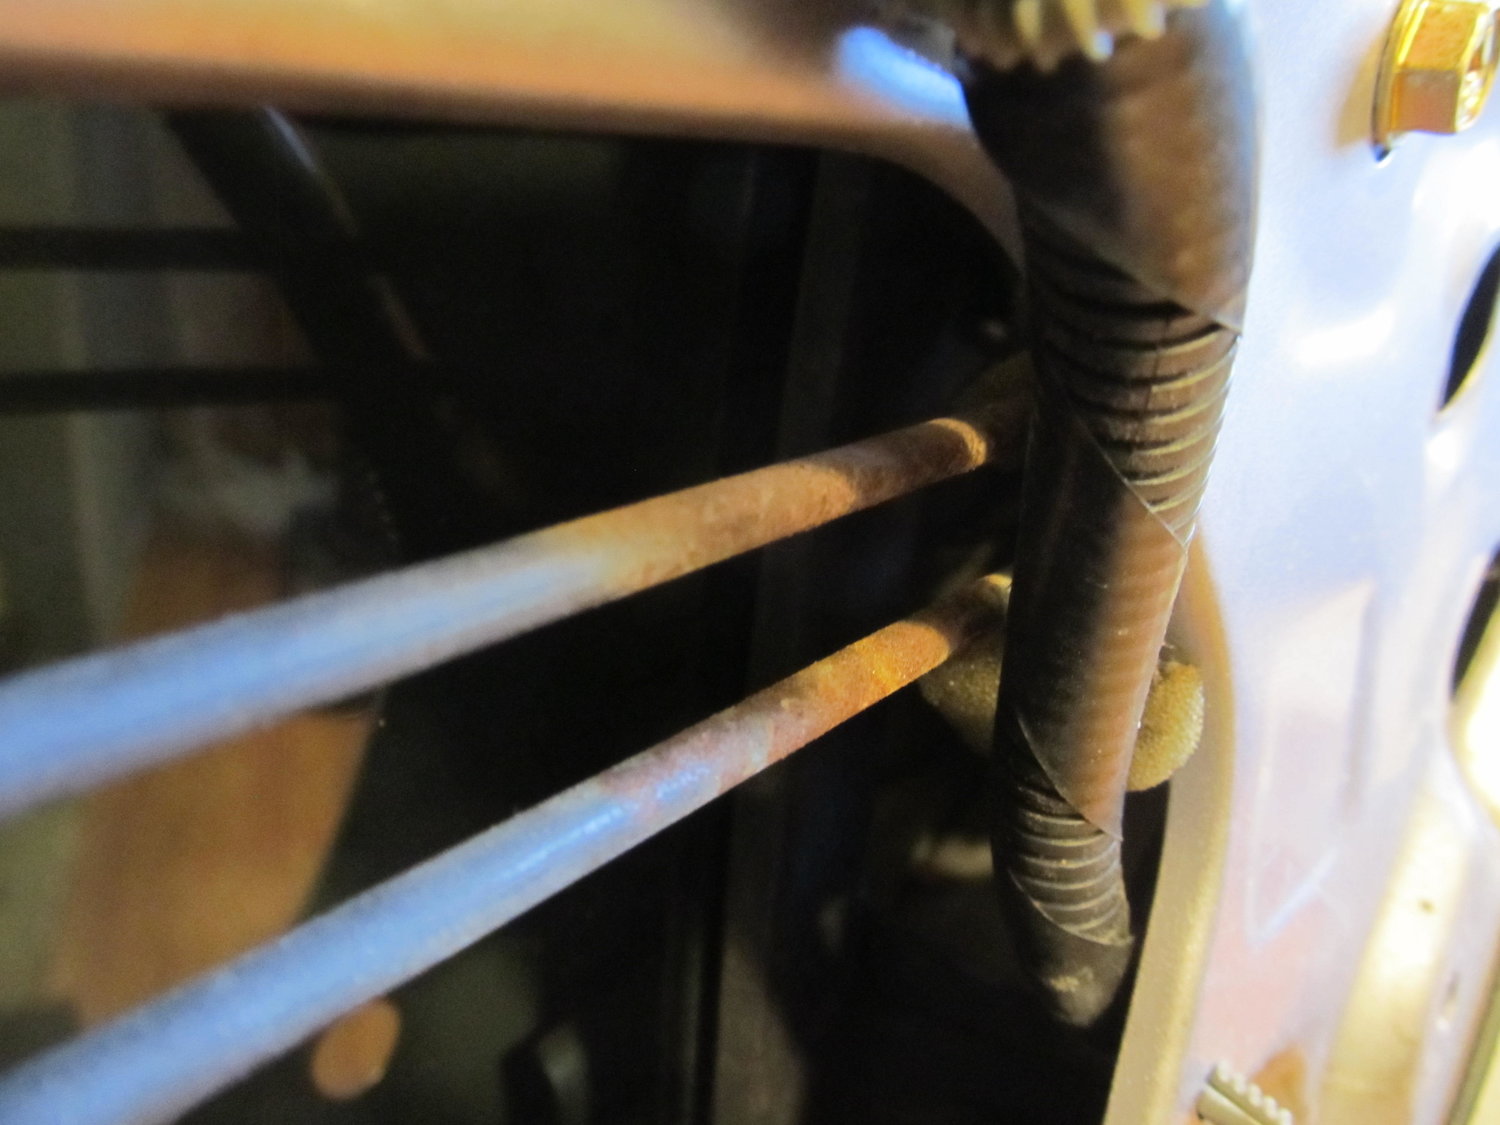
My rods were rusty! By itself this isn't much of a problem, however, when a rusty rod has to pass over another object, that rust causes friction, keeping it from moving freely. Well, as the rod goes back further into the door, it passes over a foam block with a paper/plastic covering. The rod is supposed to pass over the smooth paper/plastic over the foam, but my foam had gotten messed up, so my rods were rubbing against the foam, which had much more friction than the smooth cover it's supposed to be up against. I couldn't really salvage the foam piece, so I came up with a plan to minimize friction. I installed some split look tubing for wires around the problem rod where it passes over the foam block, so instead of rubbing up against the foam, it's rubbing against some nice smooth plastic!
I lubed up the hinge points with some white lithium grease and the action of the lock was much smoother! I did all of this before installing the new actuators, so while it didn't solve my problem, I'm sure what I did will help it work smoothly for years to come.
I hope someone finds this helpful! Let me know if you have any questions.
I was talking with a buddy who is a real mechanic, and he said when door lock issues like that come up, it's almost always bad door lock actuators. The motors get worn out and have trouble pushing to fully unlock the rest of the system, so when the door only partially unlocks, the BCM freaks out and re-locks the door. Well, I had enough mucking around and decided to just buy new actuators for the front doors. They were about $75 each on RockAuto, and much to my surprise, they appear to be an OEM product in an aftermarket box! I bought the WVE brand, and they were made in Japan and even had a Nissan logo on them!
As you can see, I snagged a bunch of actuators from cars at the junkyards in an attempt to narrow down the problem to one door or the other. If you look closer, two of the actuators are still attached to the rest of the lock mechanism, like they would be in the car. The actuator attaches to this with two screws to hold it in place, and the lever/arm (in the center) that moves the rest of the linkages just kind of slides in place. But when the junkyard parts didn't seem to help, I figured it was time for new parts. The problem with this repair is ease of access. My Haynes manual doesn't cover replacing the door lock actuators, and from my experience at the junkyard, I knew how hard they were to remove from the doors. The only reason I could remove them at the junkyard was because I took the whole lever/arms assembly out with the actuator. But I knew that reinstalling all of that was going to be damn near impossible since it's all tucked up way back in the door where you can't see or get to. My goal was to somehow remove the old actuator without the whole lever/rod assembly. The actuator is attached to the door with one bolt, and then to the lever/rod assembly with two smaller screws. You can access the screw towards the front of the car rather easily, but the rear screw is way back in the door where you can't see or reach. Certainly no tool can reach it either. So here's what I did to replace the door lock actuators without removing anything else from the car. It took a good deal of patience, which I'm not known for, small screw drivers, and a mirror.
First, I unbolted the window guide from the door by removing this bolt:
Then I unbolted the actuator from the door with this bolt:
Unscrewing the screw towards the front of the car was easy enough, but I still needed access to get to the rear screw. I achieved this by using zip ties to hold the window guide forward and out of the way of the rear screw:
After some creative use of my mirror and flash light, I was finally able to get my screwdriver on the rear screw and get it out. Holy crap, it worked!!! I installed the new actuator, the bolt holding it to the door, and the front screw to the lever/arm assembly. I was unable to hold the second screw and reinstall it into the rear hole, but the actuator is secure enough without it.
There are the tools I used, nothing fancy:
To be honest, I wasn't expecting much. Once I had my original actuators loose and free from the rest of the assembly, I tested them out by locking/unlocking the car to see if the lever went through its full range of motion. Most of the ones I pulled from the junkyard weren't moving all the way when I unlocked them, telling me they were worn out. Well, to my surprise and dismay, the ones that had been in my car appeared to go through their full range of motion, so I didn't have high hopes for the new ones fixing anything. Still, I installed the new ones and crossed my fingers. It's been over a week now, and so far (knock on wood) I haven't had s single problem. It's a miracle!!! I can't tell you how nice it is to come up to my car, press unlock, and it actually does what I told it to do!
Now, with that said, it's still a good idea to inspect all of your lock rods in your doors. I knew my front ones were well lubed and clean, but I rarely have the rear door panels off to inspect them. One day I happened to manually unlock my PS rear door, and I noticed it was harder than normal to manually unlock it on the door. Once I had the panel off, I spotted a potential problem:
My rods were rusty! By itself this isn't much of a problem, however, when a rusty rod has to pass over another object, that rust causes friction, keeping it from moving freely. Well, as the rod goes back further into the door, it passes over a foam block with a paper/plastic covering. The rod is supposed to pass over the smooth paper/plastic over the foam, but my foam had gotten messed up, so my rods were rubbing against the foam, which had much more friction than the smooth cover it's supposed to be up against. I couldn't really salvage the foam piece, so I came up with a plan to minimize friction. I installed some split look tubing for wires around the problem rod where it passes over the foam block, so instead of rubbing up against the foam, it's rubbing against some nice smooth plastic!
I lubed up the hinge points with some white lithium grease and the action of the lock was much smoother! I did all of this before installing the new actuators, so while it didn't solve my problem, I'm sure what I did will help it work smoothly for years to come.
I hope someone finds this helpful! Let me know if you have any questions.
Last edited by 95maxrider; 02-09-2019 at 02:02 PM.
02-09-2019, 10:14 AM
#540
More overdue updates!
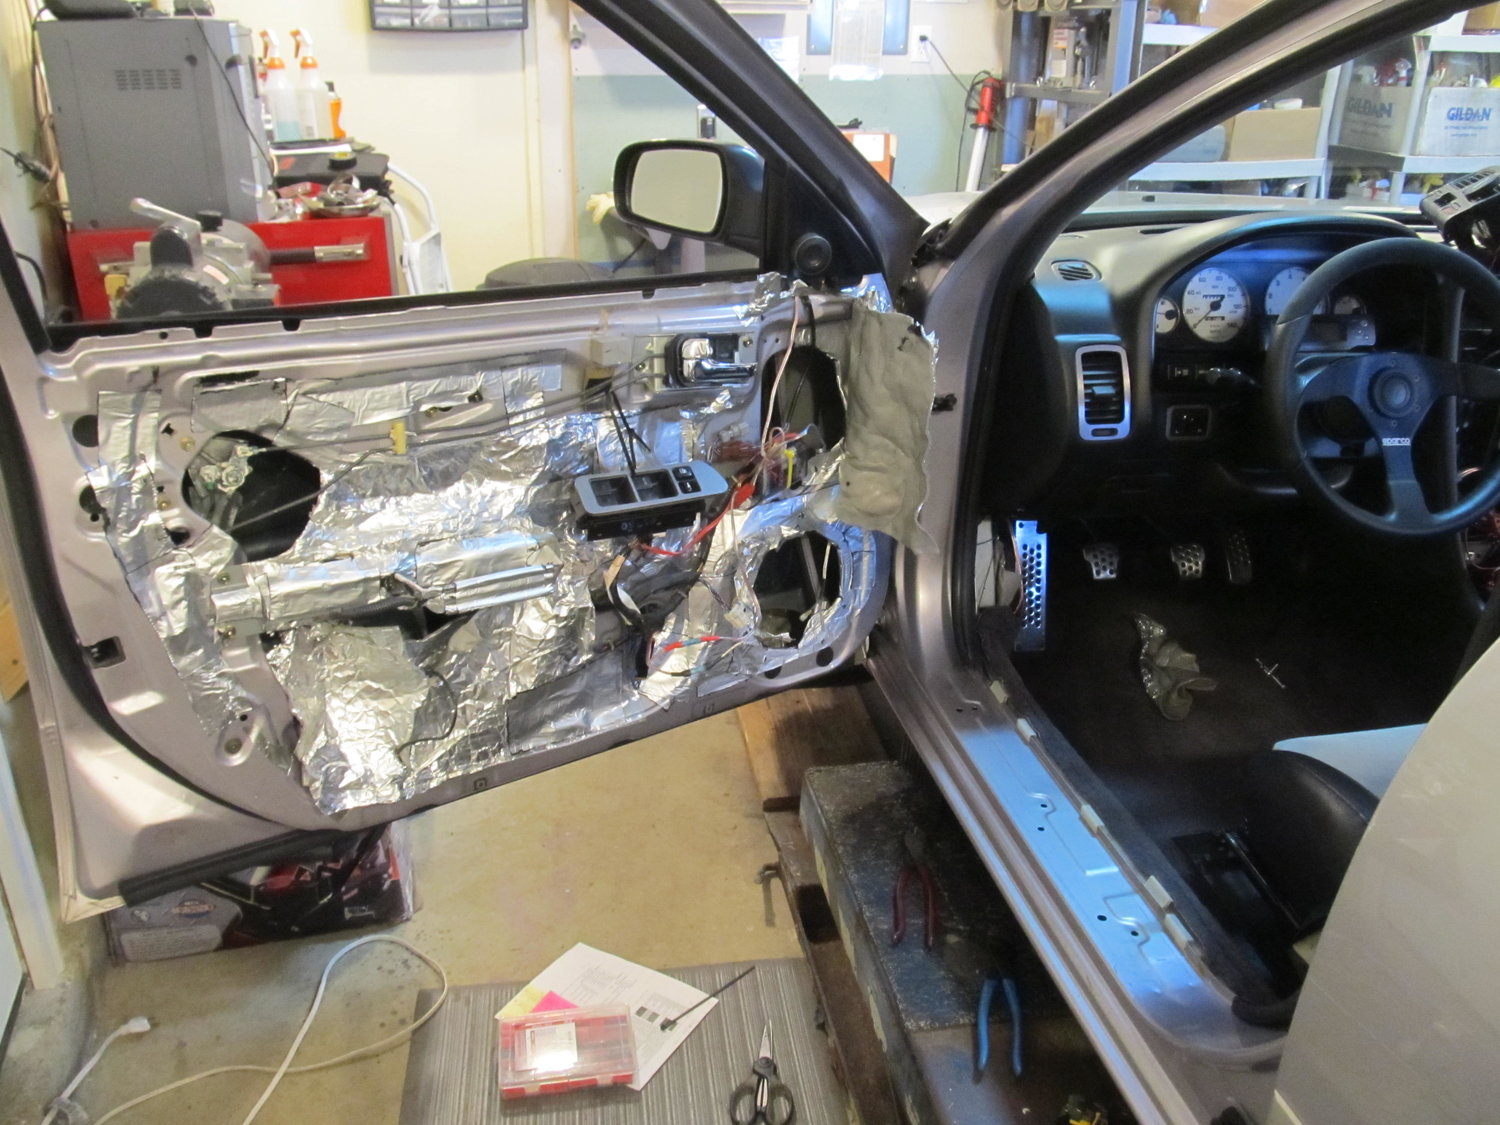
Over the summer I took the CD player from my I30 and put it into my M3, which meant I needed a new HU for the I30. I went with the "audiophile" Pioneer DEH-80PRS, with features like 5V pre-outs, 3 Burr-Brown DACs, and auto time alignment and auto EQ. Since it's an older unit with a cheap screen display, I was able to snag one for only $250! However, after I installed it, it seemed like I lost almost all power to my rear speakers. Some sound came out, but it was nothing compared to the fronts. My front speakers are run off an external amp, but the rears are just powered by the HU. I hadn't touched the levels on the amp, so I thought there was something wrong with the new HU. I put up with the issue for months, not knowing what to do next. I decided to tackle a project I had on my mind for years, which was bypassing all of the stock stereo wiring and running my own new 14 AWG OFC cable to all speakers. I started by rewiring the rear speakers directly to the HU.
Testing...
I tried to run the new wires along with the factory wires:
All the way up to the harness for the HU:

This allowed me to remove a wiring harness from back there, and tie up some unused wires on another harness, making things much neater and easier to follow behind my HU. It's still a bit full with all the wires for my WBO2 and oil gauge, but it's a huge improvement! However, much to my disappointment, it didn't change how loud they were. Crap! Oh well, might as well rewire the front speakers...
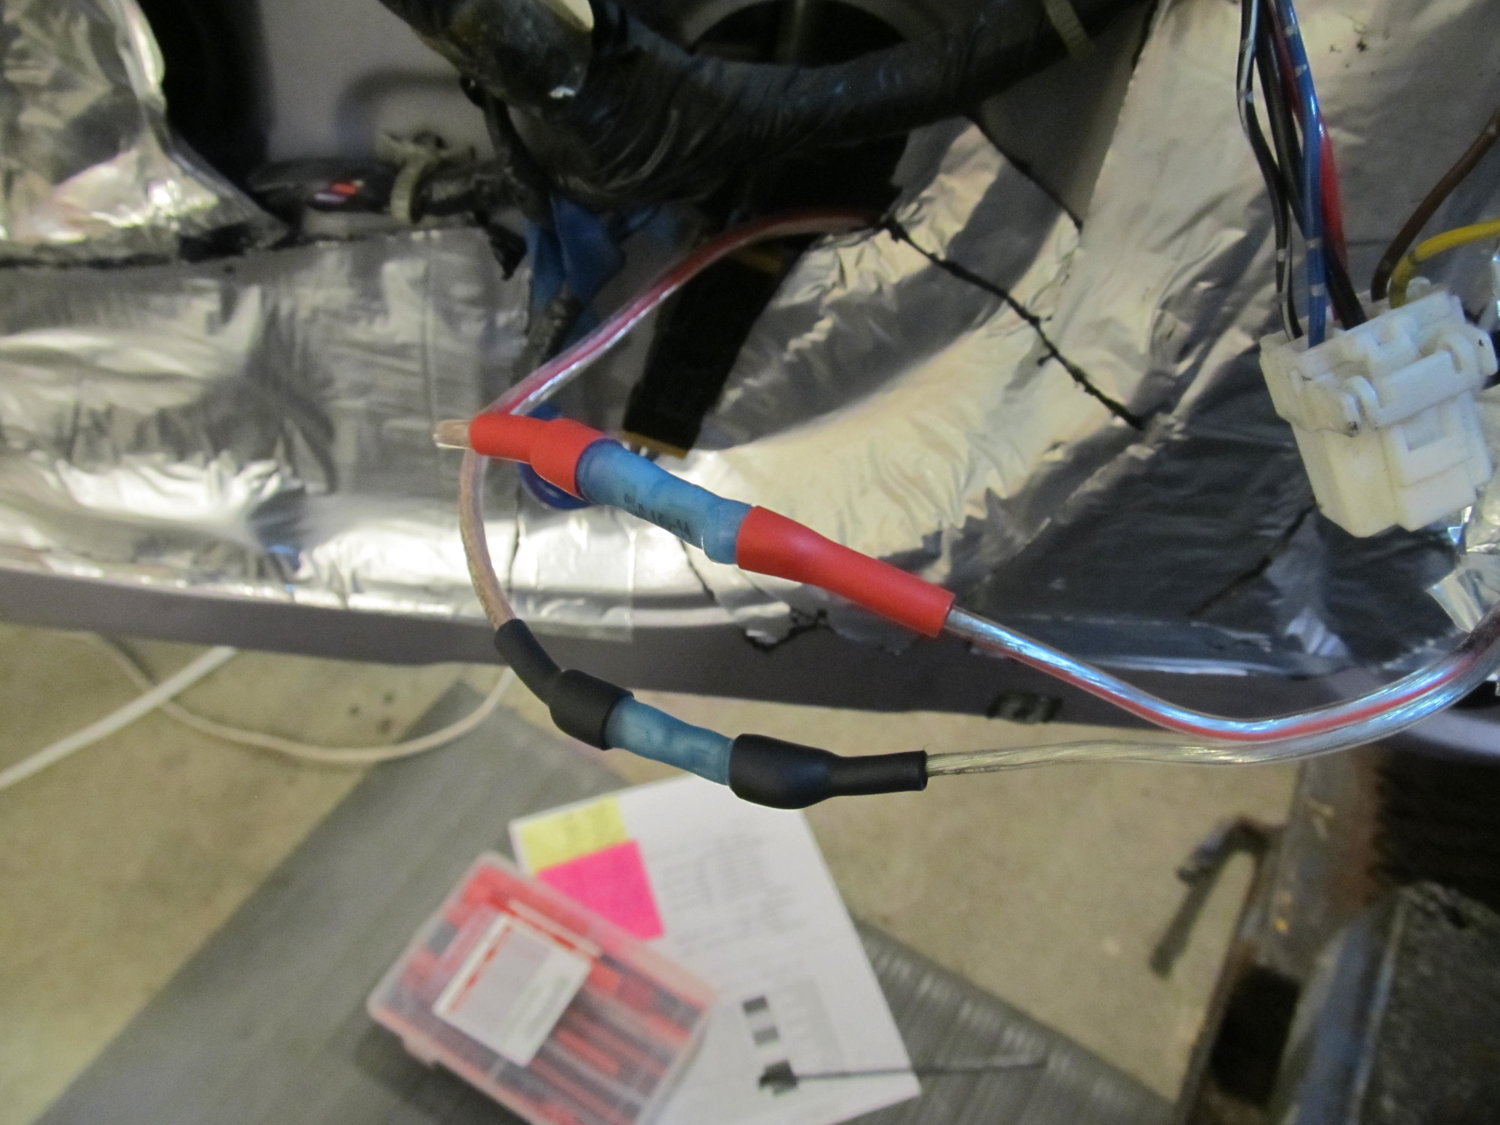
I had to do this, which I tried to avoid. I tried to patch up the holes with some silicone to prevent water from getting in.
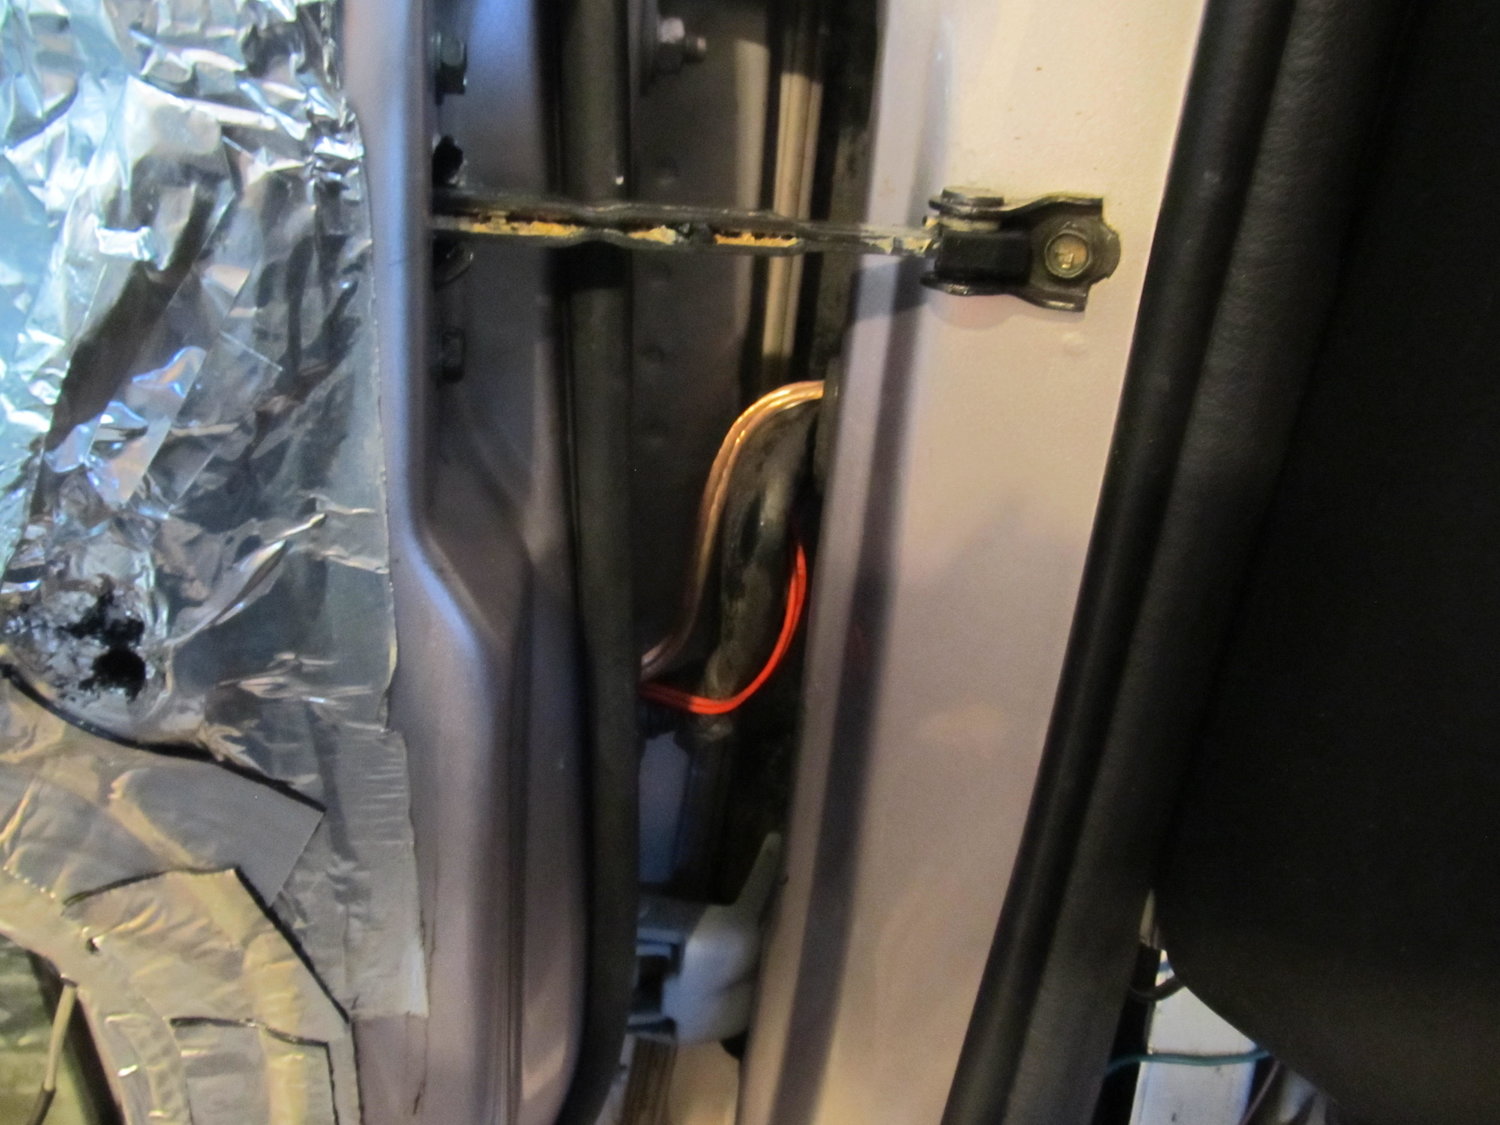
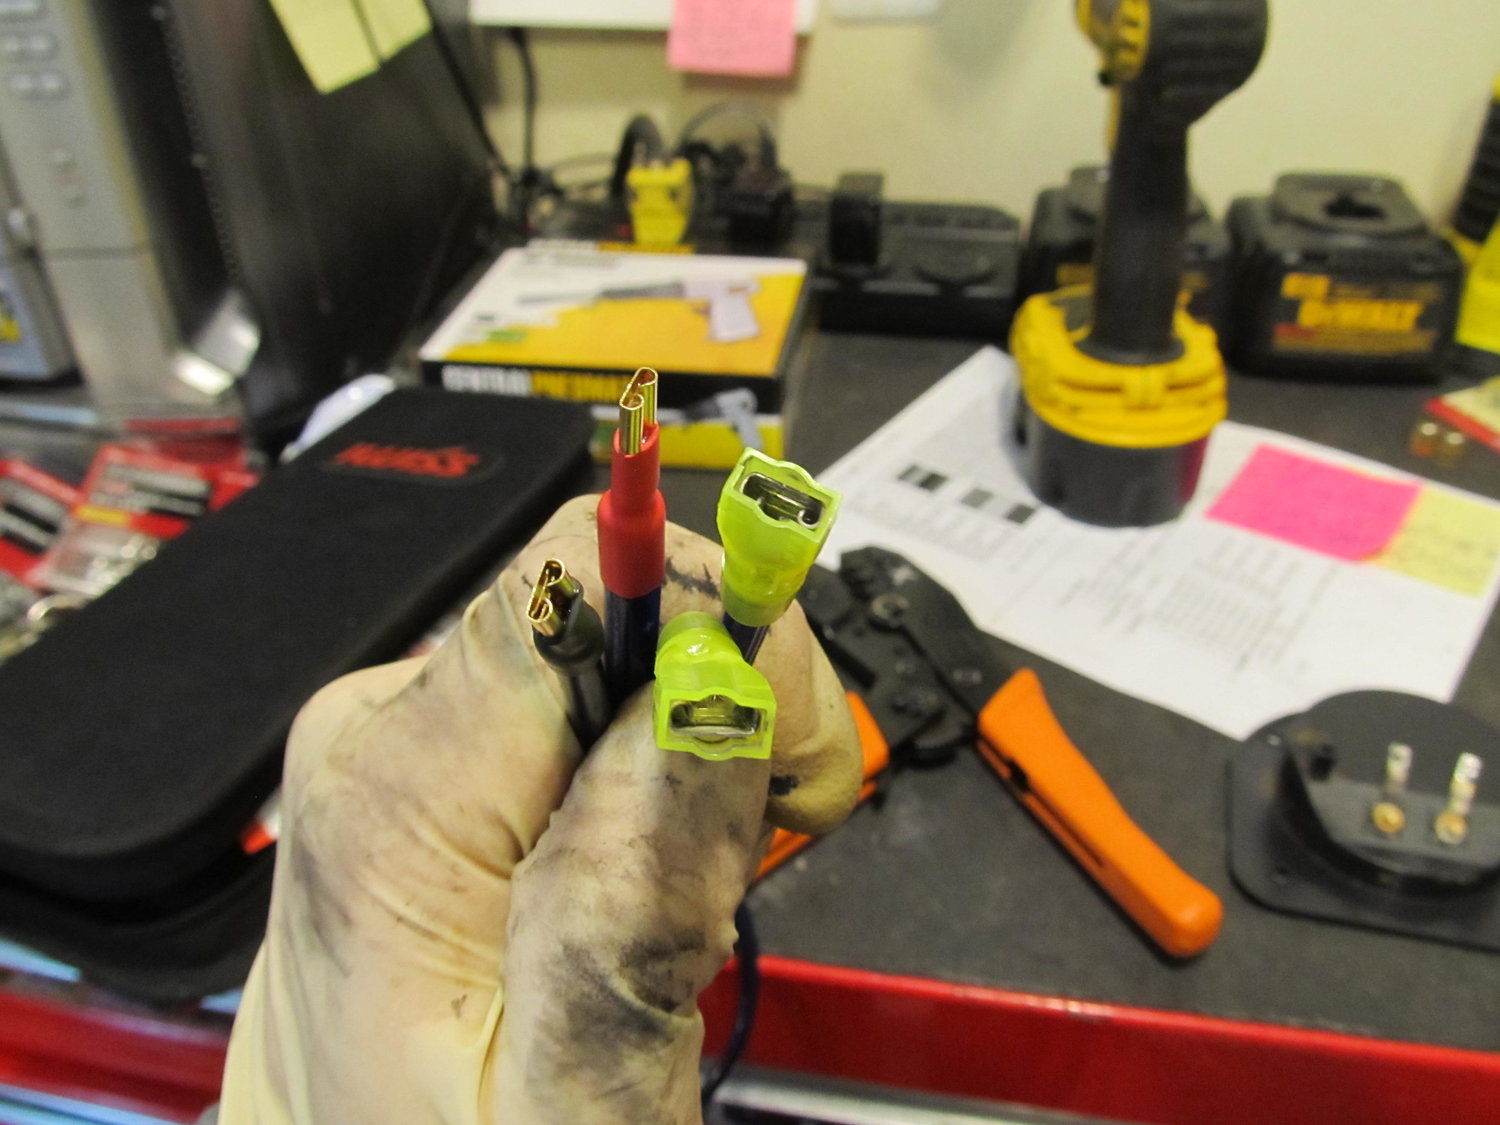
Crimped and heat shrink applied:
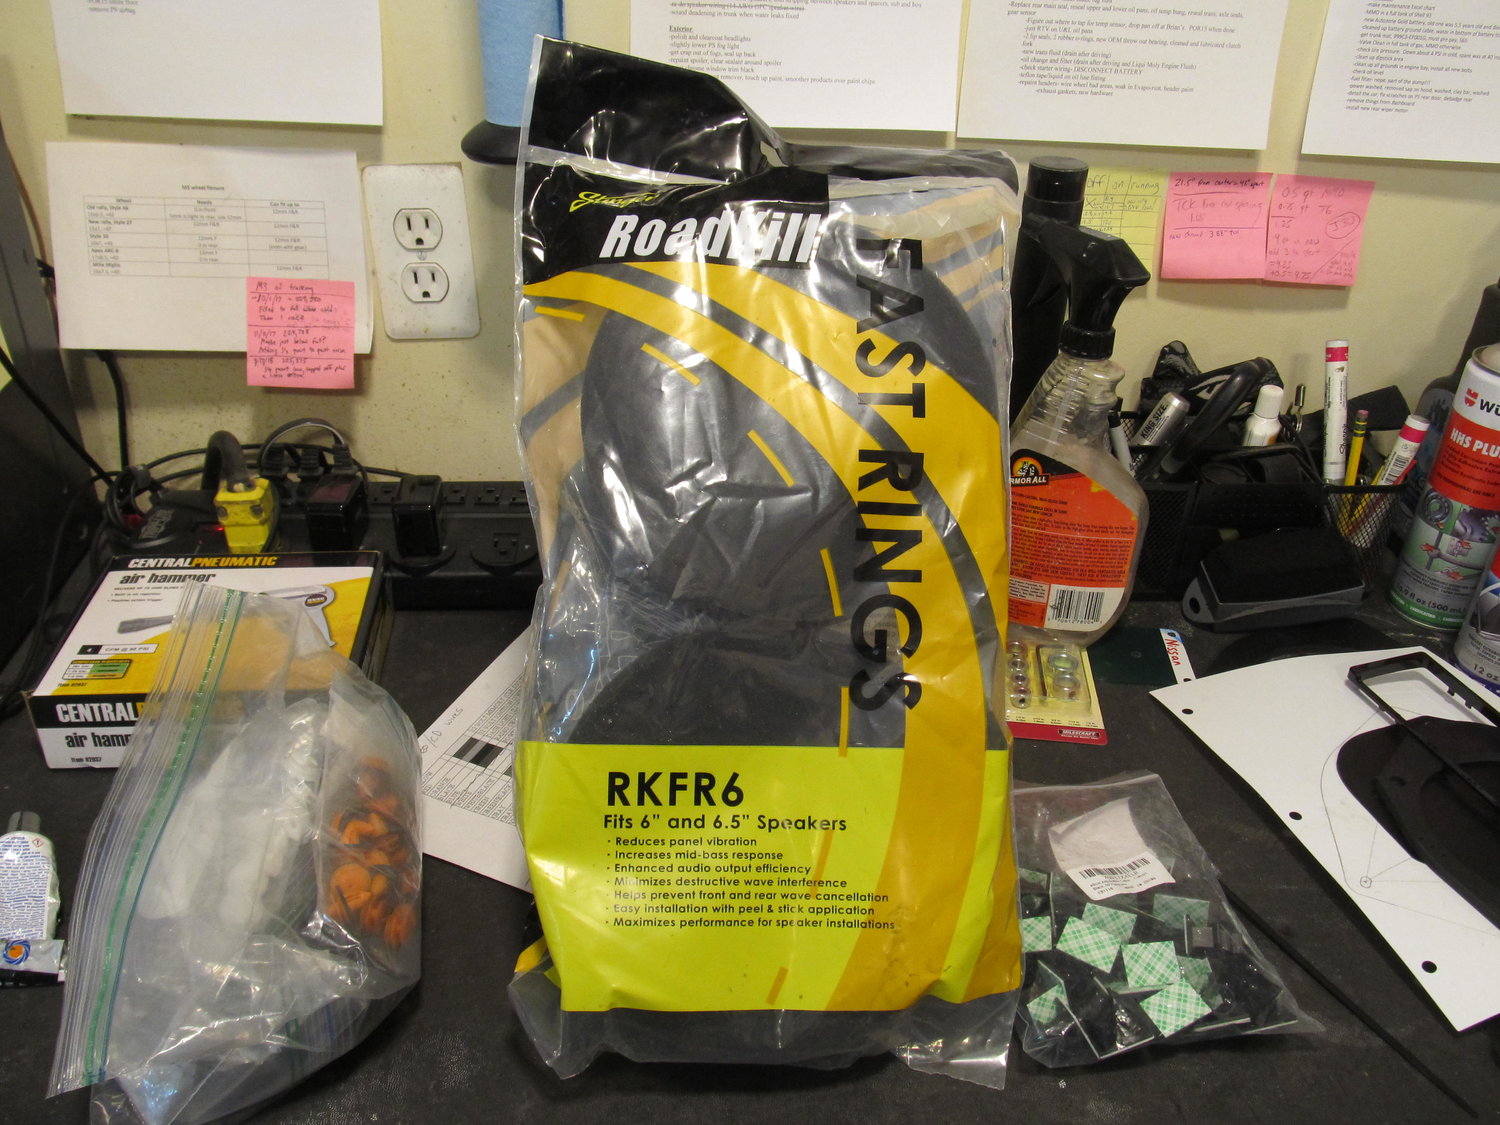
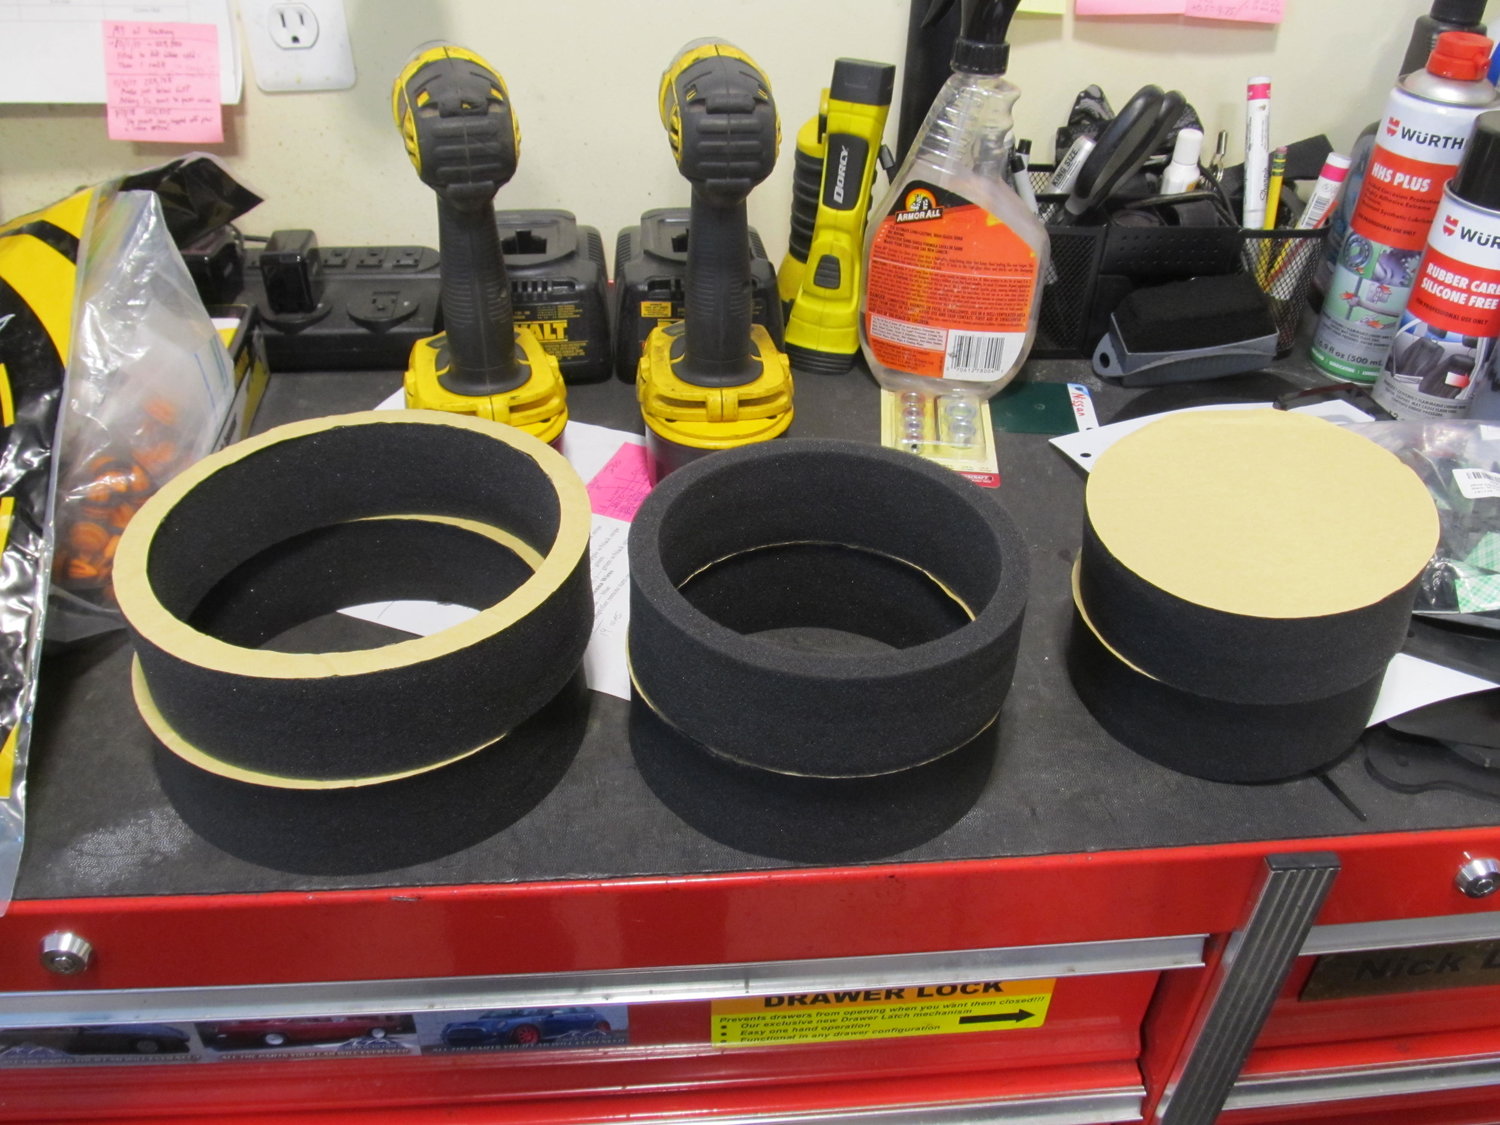
I finally installed these foam rings around the outside of the front speakers to try and prevent bass frequencies from bouncing around the door panel and causing rattles. These are supposed to direct the sound straight into the cabin. They came with two other foam pieces, one of which goes behind the speaker inside the door, but I was concerned it would get wet and get moldy, so I didn't install it.

I then decided to pop open my sub box and see if there was anything I could improve upon in there. There was!
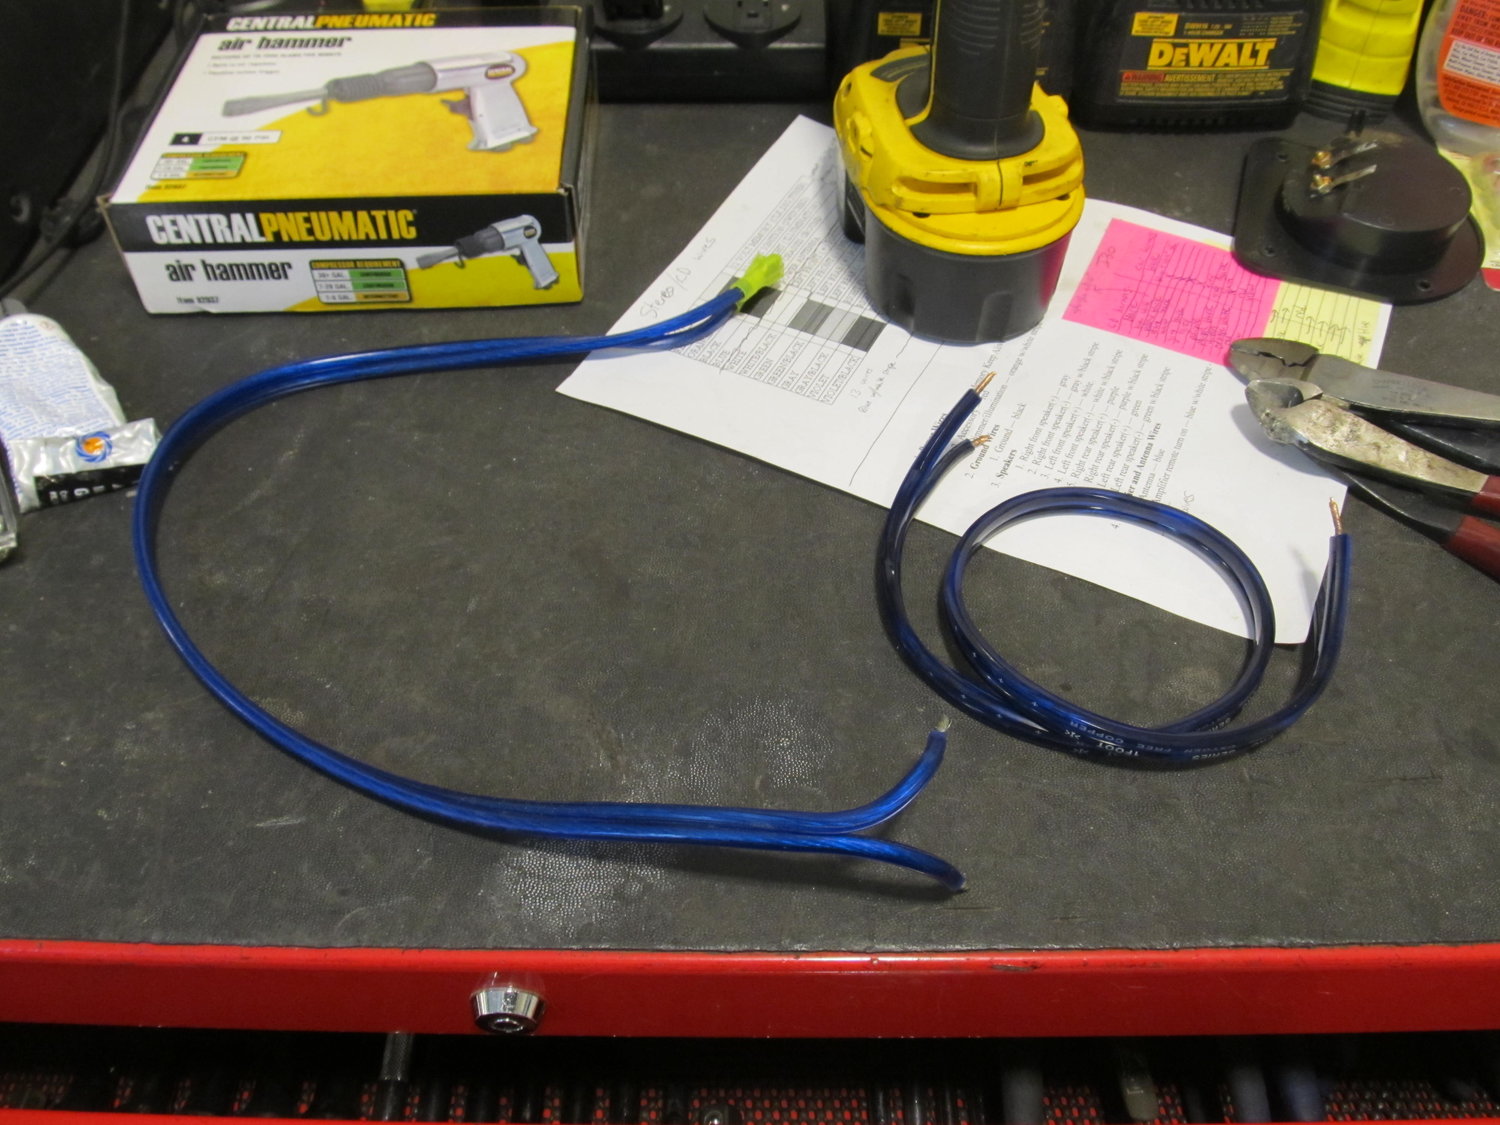
I replaced the wire inside the box with a new one and new terminals. The old wire appeared to be about 14 AWG, but it was aluminum and not copper, so I installed some of my old 12 AWG OFC copper speaker wire in its place. New on the left, old on the right:
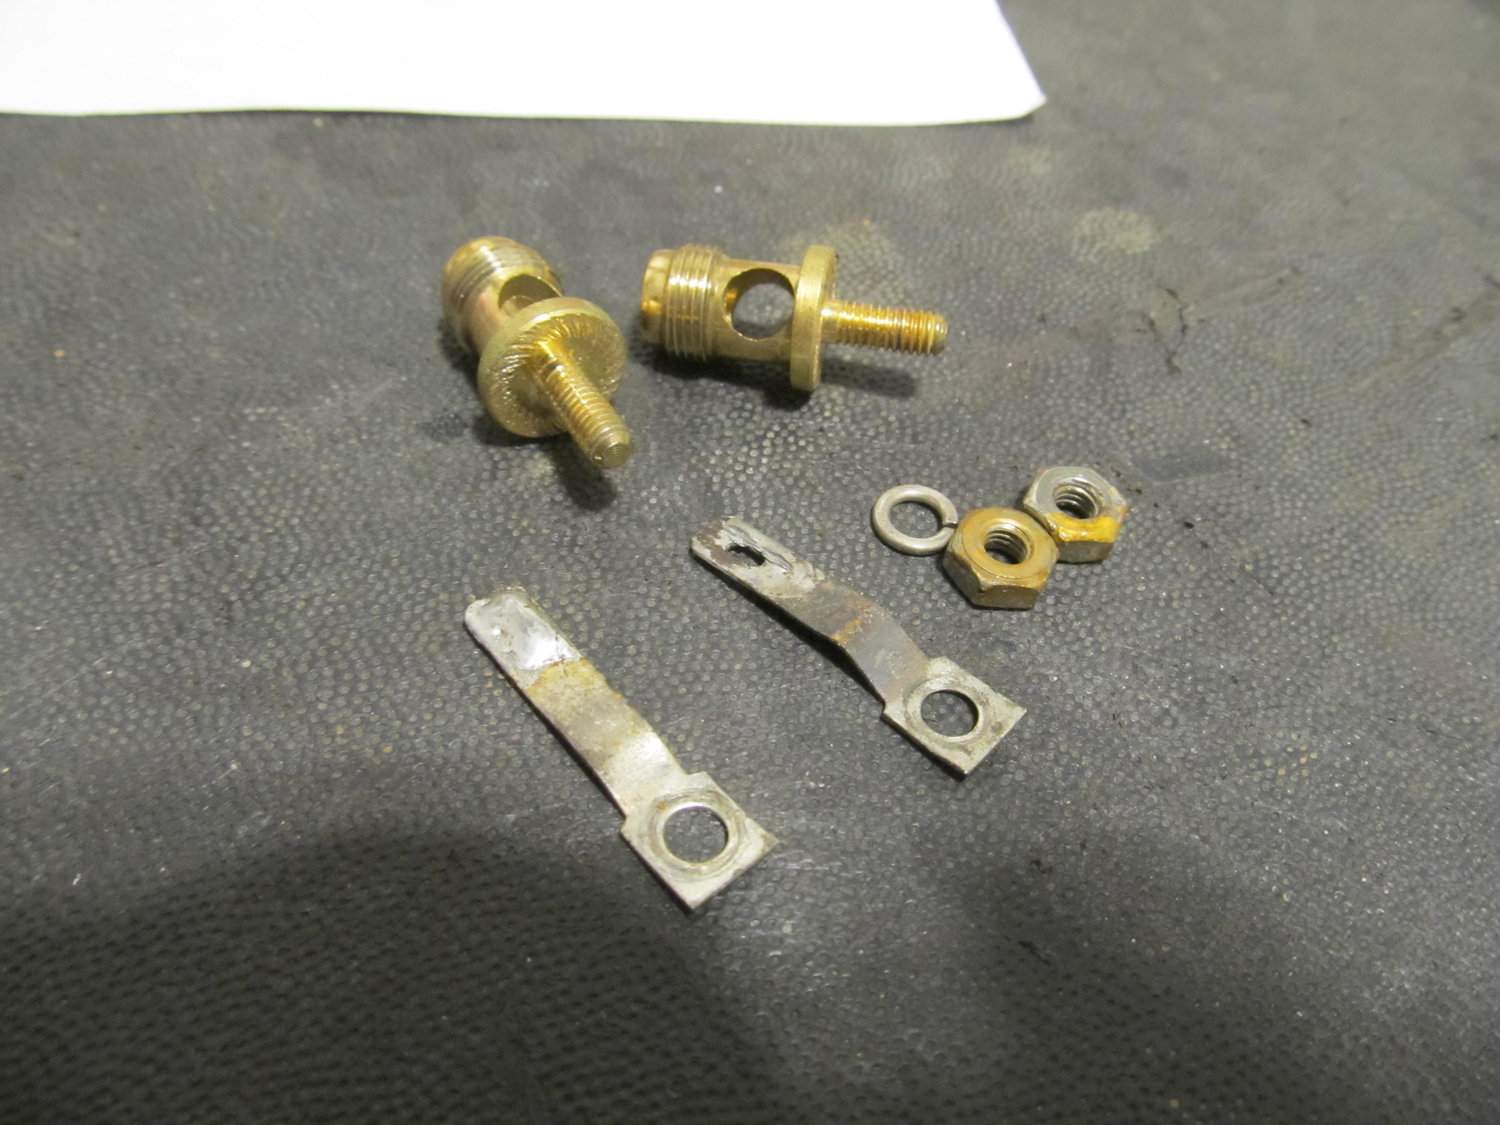
The terminals inside the box were pretty grody:
So I cleaned them up with a wire brush and applied my new favorite product: NO-OX-ID! It's a electrically conductive grease used by telecom companies for decades that prevents corrosion and improves electrical flow. I use it on all of my grounds now that are bare metal to improve contact and prevent rust.

And I cleaned up the inside of the outer terminals with a little honing tool:
I added some foam strips around the sub to make sure it's air tight:
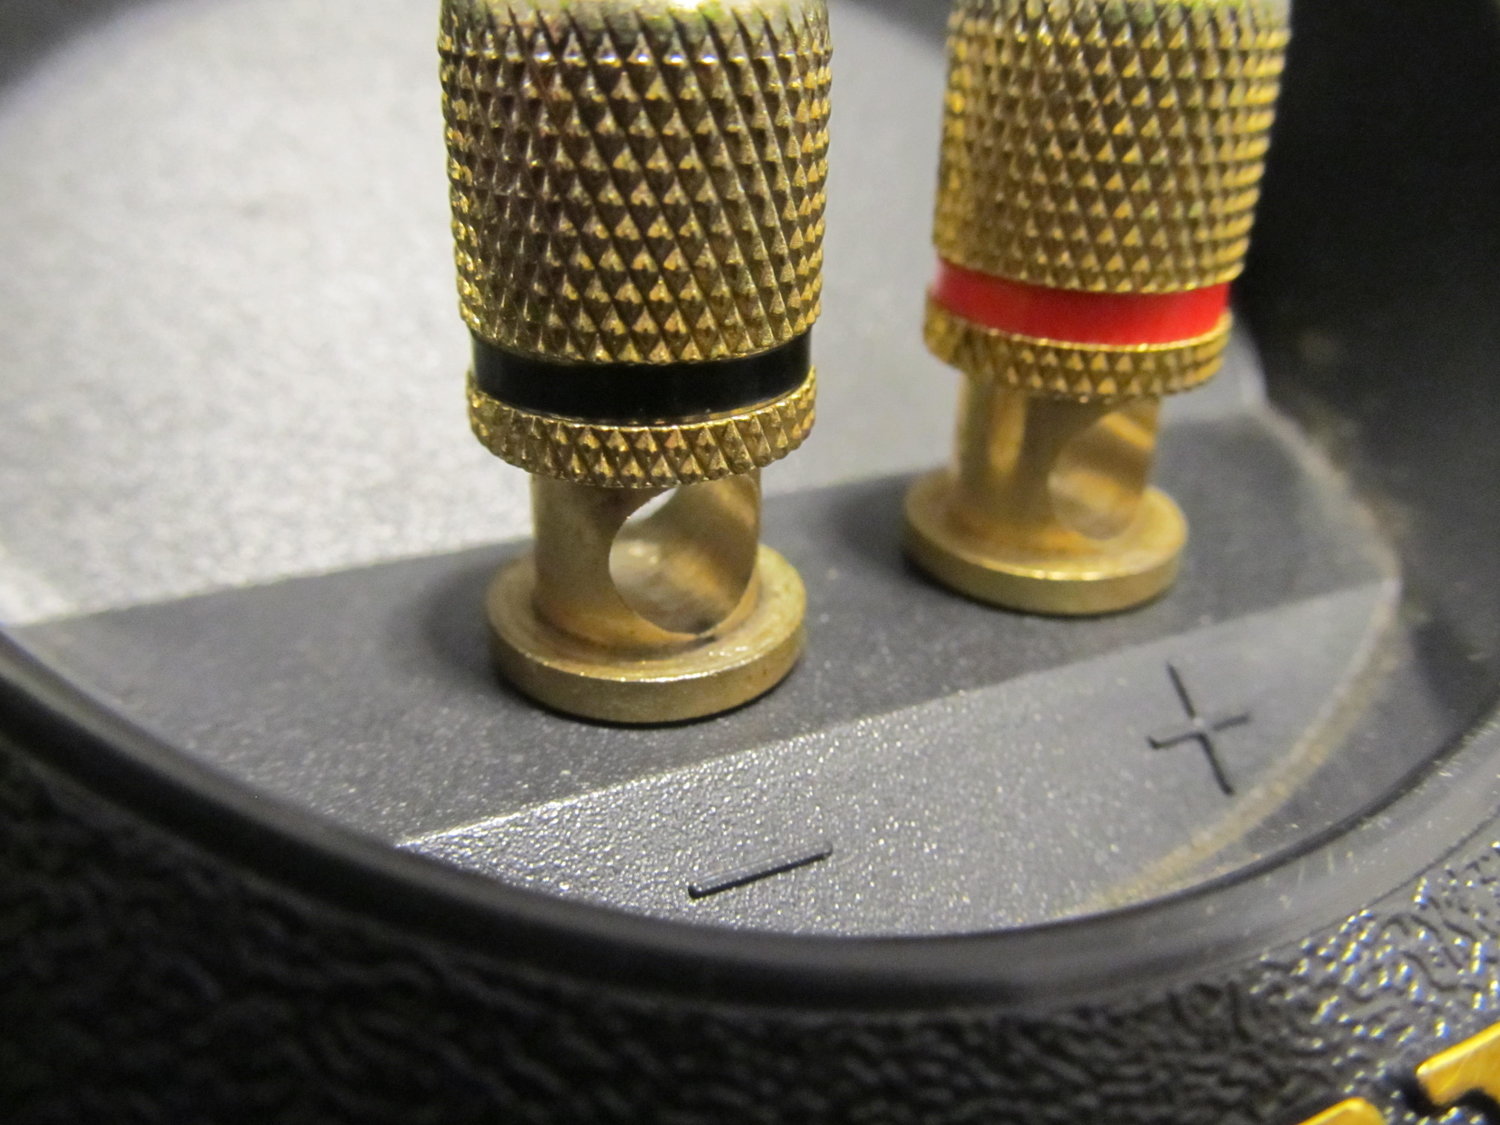
And on the terminal thingy:

So all the speakers and amps in the car had fresh, high quality copper wire going to them, and should have been sealed up nice and tight. So what was going on with my rear speakers? I decided to re-tune both the amp for my front speakers, and the amp for my sub. Turns out I had the input sensitivity set way too high for the front speakers, and the gain up way too high for the sub. After I put them back down to reasonable levels, all of a sudden the rear speakers started to sound much better. Aha! I can't exactly explain how, but somehow installing the new HU with higher powered pre-outs threw off the balance of the whole system. My old HU still had pretty good 4V pre-outs (most are 2V), so I didn't think the new HU would really require me to re-tune everything, but apparently the new HU just does things a little differently. With everything re-tuned, I can safely say that this is the best sounding stereo I've ever heard in a car. It gets astonishingly loud while remaining crisp and clear, and the bass is simply absurd. I was listening to it one night in the garage and was literally giggling and how amazing it sounded. I still haven't reinstalled the door panels, since I'm still chasing a problem with my door lights, so I can't say yet if the foam rings helped with door rattle. But it feels so good to have my stereo working again, and sounding better than ever!
Over the summer I took the CD player from my I30 and put it into my M3, which meant I needed a new HU for the I30. I went with the "audiophile" Pioneer DEH-80PRS, with features like 5V pre-outs, 3 Burr-Brown DACs, and auto time alignment and auto EQ. Since it's an older unit with a cheap screen display, I was able to snag one for only $250! However, after I installed it, it seemed like I lost almost all power to my rear speakers. Some sound came out, but it was nothing compared to the fronts. My front speakers are run off an external amp, but the rears are just powered by the HU. I hadn't touched the levels on the amp, so I thought there was something wrong with the new HU. I put up with the issue for months, not knowing what to do next. I decided to tackle a project I had on my mind for years, which was bypassing all of the stock stereo wiring and running my own new 14 AWG OFC cable to all speakers. I started by rewiring the rear speakers directly to the HU.
Testing...
I tried to run the new wires along with the factory wires:
All the way up to the harness for the HU:
This allowed me to remove a wiring harness from back there, and tie up some unused wires on another harness, making things much neater and easier to follow behind my HU. It's still a bit full with all the wires for my WBO2 and oil gauge, but it's a huge improvement! However, much to my disappointment, it didn't change how loud they were. Crap! Oh well, might as well rewire the front speakers...
I had to do this, which I tried to avoid. I tried to patch up the holes with some silicone to prevent water from getting in.
Crimped and heat shrink applied:
I finally installed these foam rings around the outside of the front speakers to try and prevent bass frequencies from bouncing around the door panel and causing rattles. These are supposed to direct the sound straight into the cabin. They came with two other foam pieces, one of which goes behind the speaker inside the door, but I was concerned it would get wet and get moldy, so I didn't install it.
I then decided to pop open my sub box and see if there was anything I could improve upon in there. There was!
I replaced the wire inside the box with a new one and new terminals. The old wire appeared to be about 14 AWG, but it was aluminum and not copper, so I installed some of my old 12 AWG OFC copper speaker wire in its place. New on the left, old on the right:
The terminals inside the box were pretty grody:
So I cleaned them up with a wire brush and applied my new favorite product: NO-OX-ID! It's a electrically conductive grease used by telecom companies for decades that prevents corrosion and improves electrical flow. I use it on all of my grounds now that are bare metal to improve contact and prevent rust.
And I cleaned up the inside of the outer terminals with a little honing tool:
I added some foam strips around the sub to make sure it's air tight:
And on the terminal thingy:
So all the speakers and amps in the car had fresh, high quality copper wire going to them, and should have been sealed up nice and tight. So what was going on with my rear speakers? I decided to re-tune both the amp for my front speakers, and the amp for my sub. Turns out I had the input sensitivity set way too high for the front speakers, and the gain up way too high for the sub. After I put them back down to reasonable levels, all of a sudden the rear speakers started to sound much better. Aha! I can't exactly explain how, but somehow installing the new HU with higher powered pre-outs threw off the balance of the whole system. My old HU still had pretty good 4V pre-outs (most are 2V), so I didn't think the new HU would really require me to re-tune everything, but apparently the new HU just does things a little differently. With everything re-tuned, I can safely say that this is the best sounding stereo I've ever heard in a car. It gets astonishingly loud while remaining crisp and clear, and the bass is simply absurd. I was listening to it one night in the garage and was literally giggling and how amazing it sounded. I still haven't reinstalled the door panels, since I'm still chasing a problem with my door lights, so I can't say yet if the foam rings helped with door rattle. But it feels so good to have my stereo working again, and sounding better than ever!
Last edited by 95maxrider; 02-09-2019 at 10:23 AM.
02-09-2019, 10:40 AM
#541
Oh look, more things!
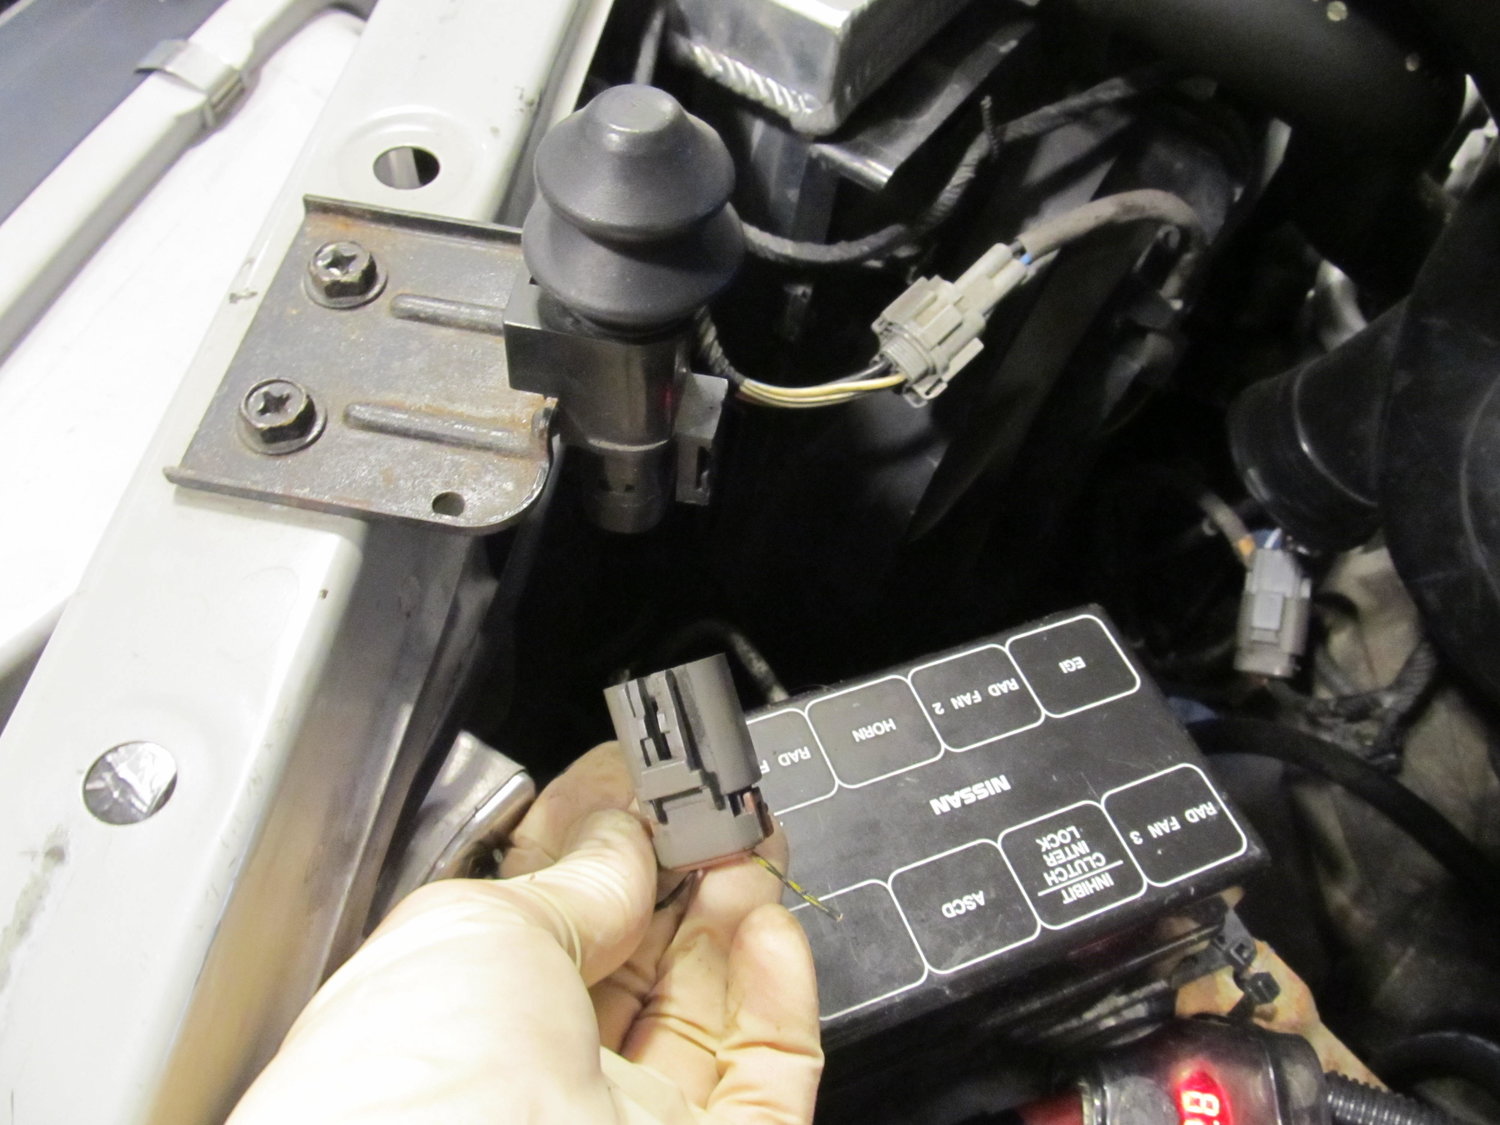
I can't even remember why now, but at some point one of my previous "mechanics" recommended I cut one of the wires going to my hood switch, so for the past 15 years or something, the hood switch hasn't worked. In an effort to track down a parasitic drain, I figured I would hook it back up. As far as I can tell, nothing changed. This is a big deal people!
I used my new leak detector smoke machine on the I30 to see if I had any vacuum leaks. It looked like there was a small one around my intake air temp sensor in my midpipe, so I got to work resealing it. The old one had been installed with some red silicone, but apparently not enough:
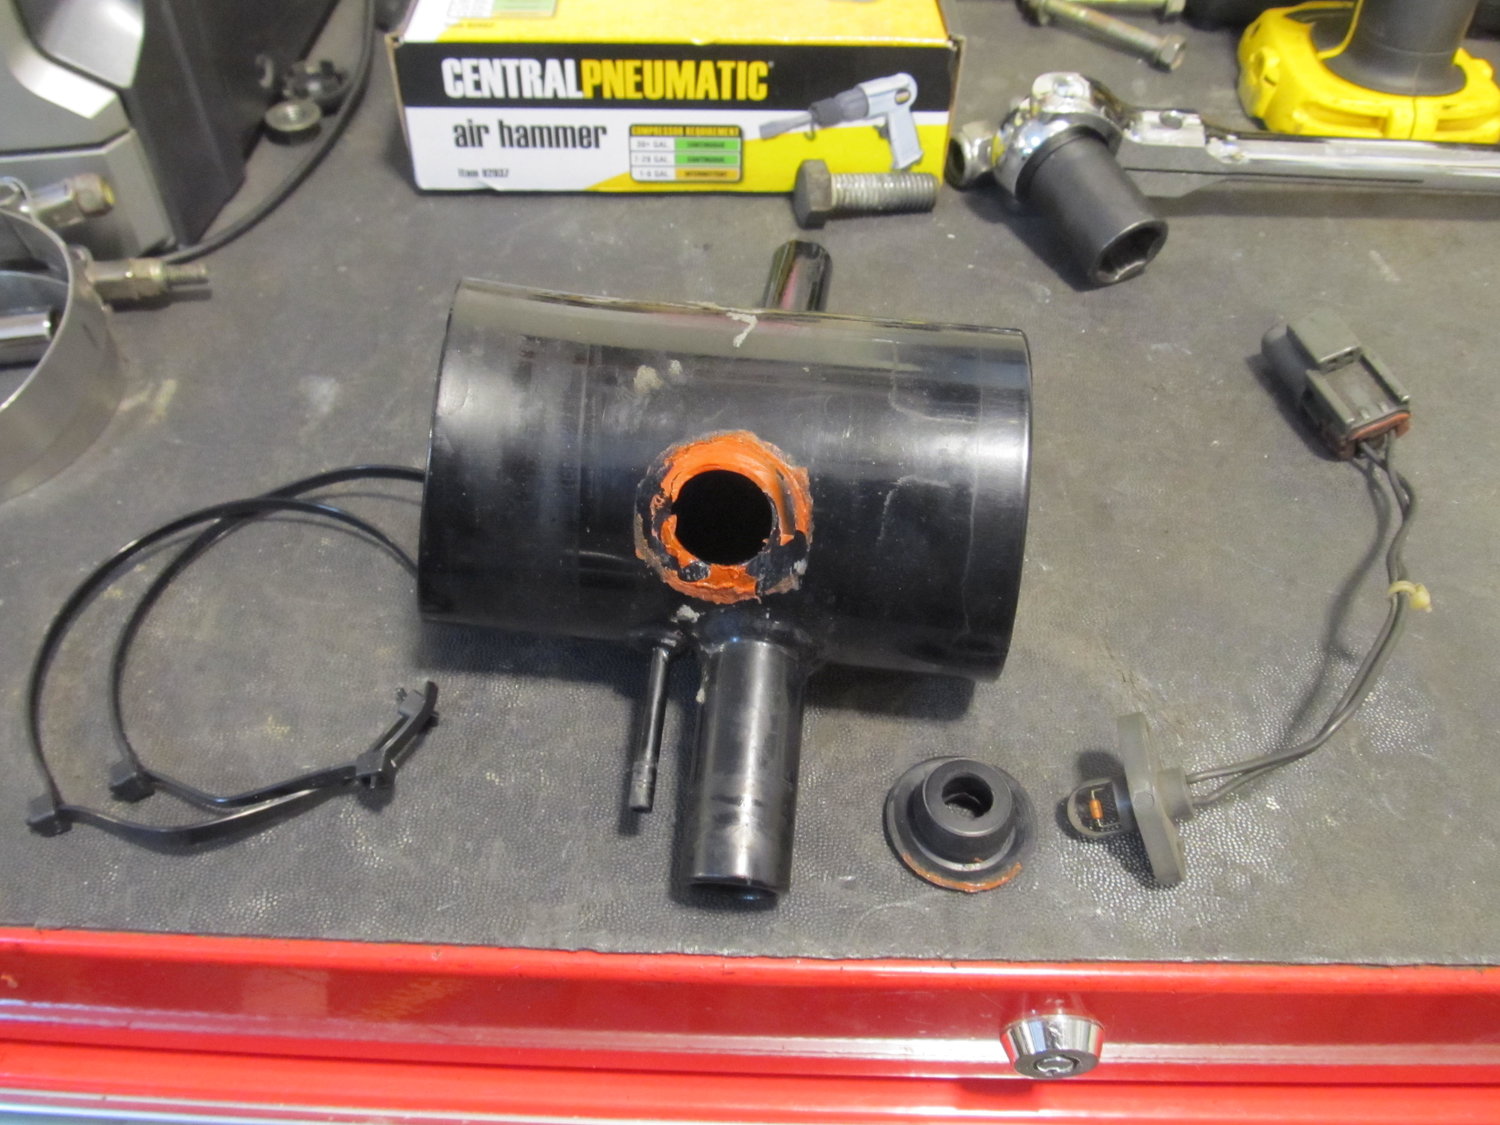
So I cleaned it up, and then applied quite a bit of the black silicone, from both the outside and the inside of the pipe to ensure it's sealed up real good. I'm curious, how are other guys running their IATs?
That seemed like a good time to clean my K&N air filter, since I hadn't done it in something like 6-7 years. Before:

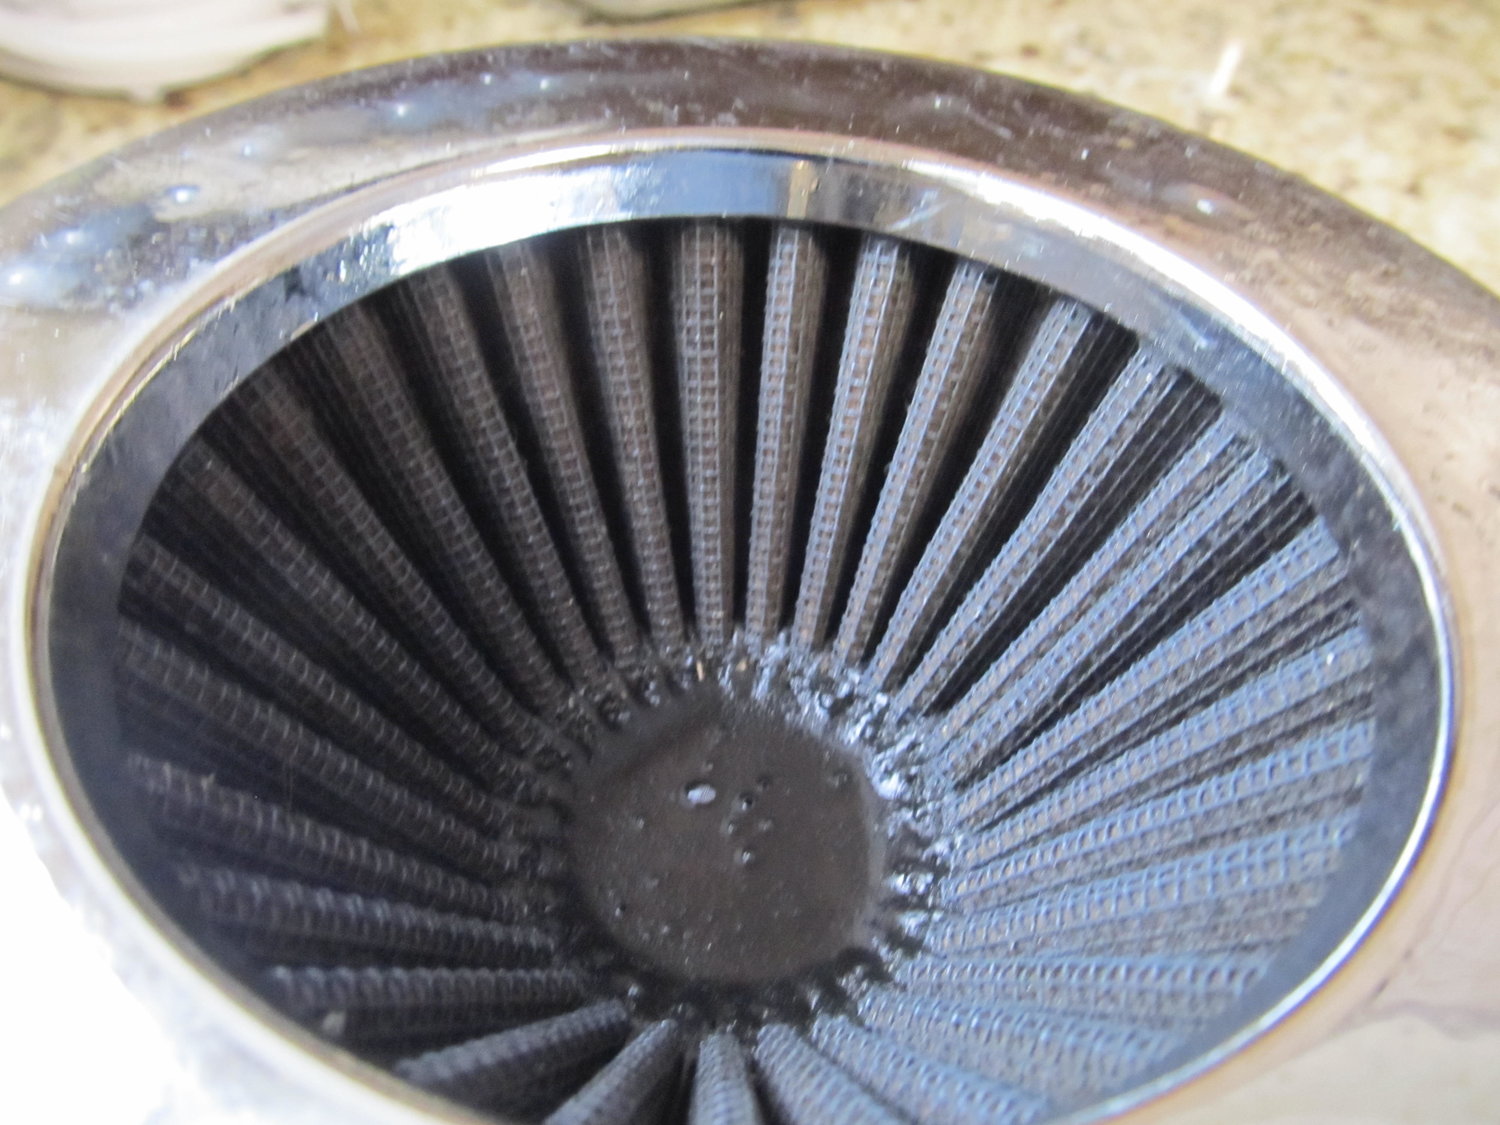
After:

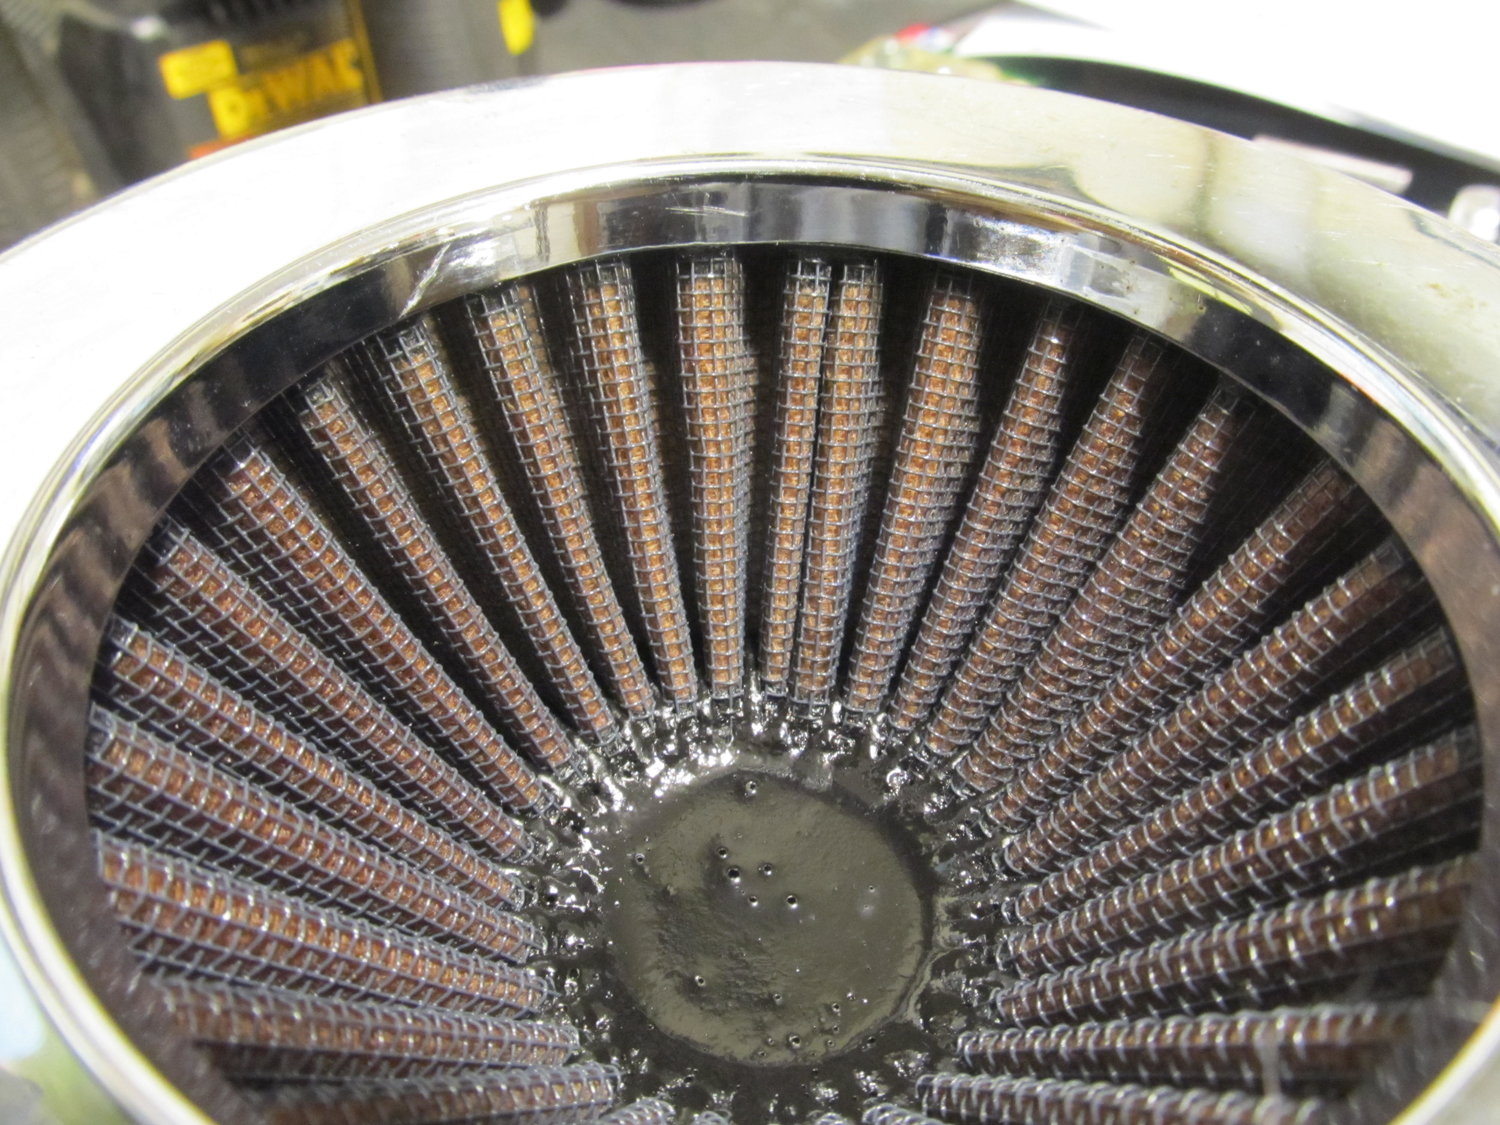

MUCH better! I had to wash it three times with their soap to get it clean, so I guess it was pretty dirty.
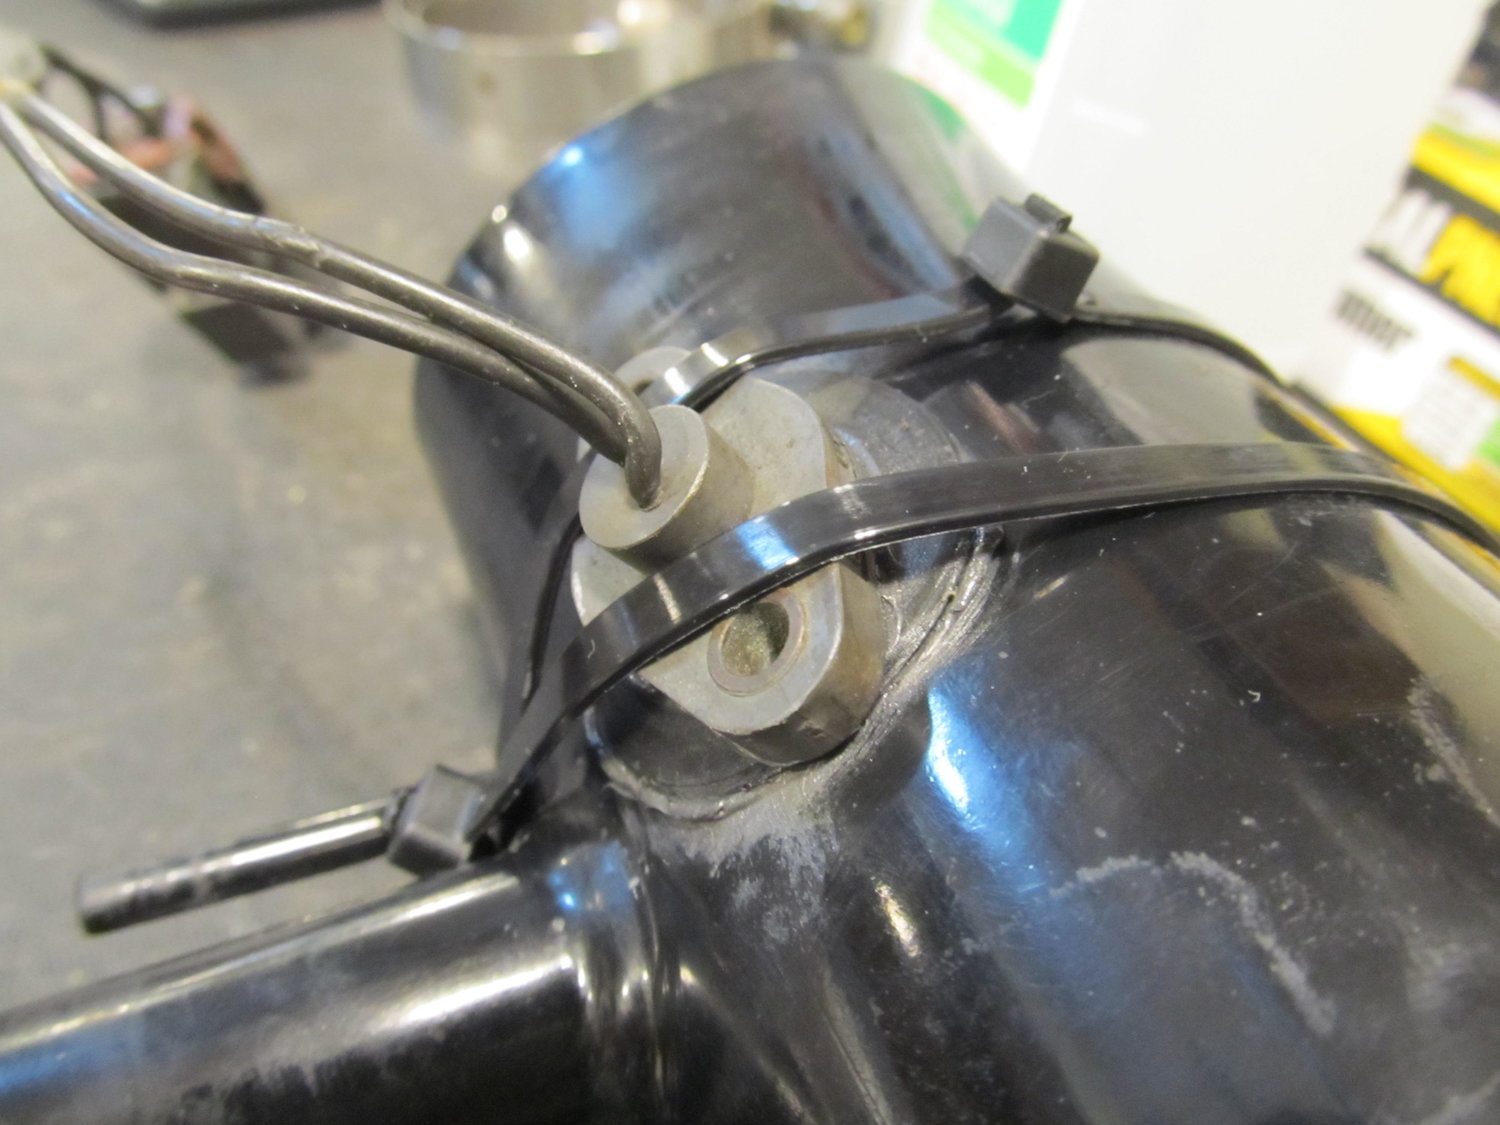
I then wanted to tackle adjusting my panhard rod that 2JRacing installed back in 2011 or 2012. I had recently read an article at MotoIQ by Mike Kojima about installing and adjusting a panhard rod on a B13 Sentra, and he mentioned how the PHR should be level with the car at ride height. Well, with my car on the ground, my PHR was cocked at an angle, so I needed to adjust it longer so I could move the PS bolt up one hole on the bracket. Unfortunately, the rod itself is aluminum and the ends are steel, and I'm guessing 2JR didn't apply any anti-seize on them, because they just wouldn't come loose. After trying on and off for a few days, I was eventually able to get one side a little loose after using a lot of Kroil and my MAP touch, and was able to install it correctly:
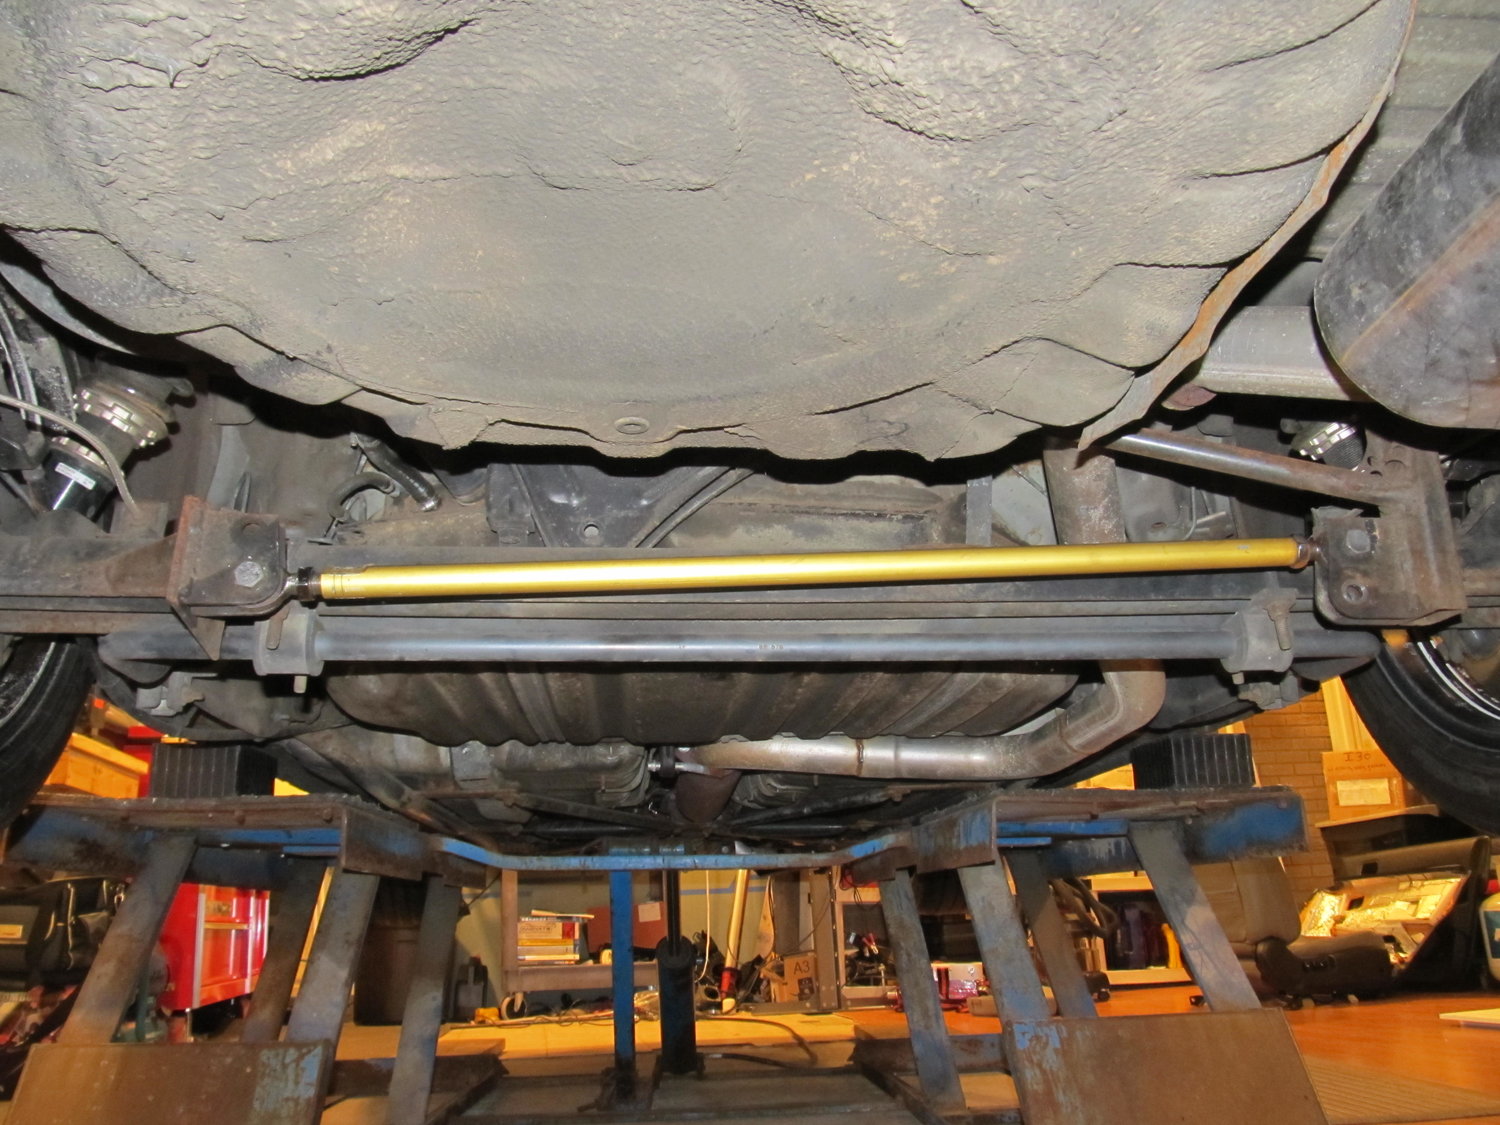
However, it wasn't a permanent install, as I couldn't get one of the jam nuts to move, so it's not really locked in place. I knew I wanted all new end pieces, since mine were making noise, so I had to figure out how to get them. Apparently 2JR is still in business, but you wouldn't know it if you tried to contact them. I've left many messages and never got a return call, so I had to look elsewhere for replacement parts. I ended up at Speedway Motors, which has a huge selection of panhard rod parts. More on that to come!
I've noticed that I have to jiggle my cigarette power adapter thingy to get it to power my phone, so I decided to clean up the surface rust in it with my Dremel. The pics don't really do it justice, but it's a lot cleaner now!

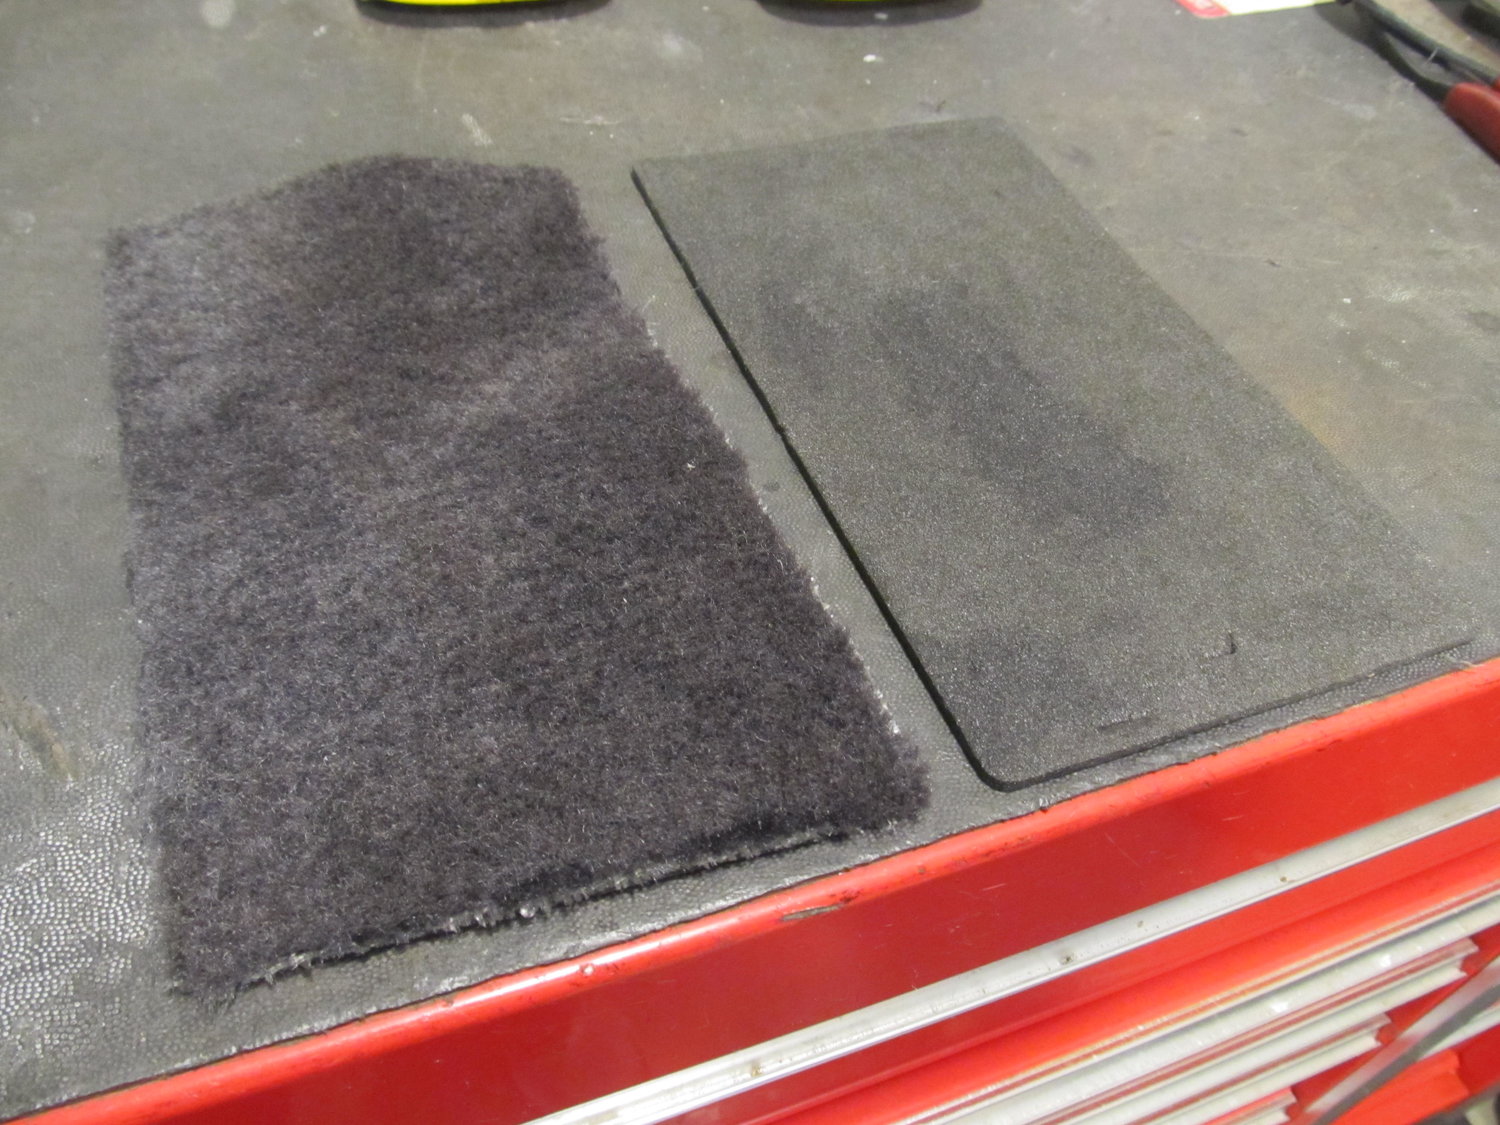
I also had some spare carpet lying around from my I35 trunk mat, so I cut a piece to fit in my center arm rest. Because nothing says fancy like a carpet-lined center arm rest! Foam is just so uncouth...
Oh, and why don't I try and "fix" my dashboard? Many years ago one of the lower tabs broke and I was unable to make the lower panel sit flush against the upper dash. Sometimes it would be hanging down so low as to prevent the hood release from coming back into position, which would prevent the hood from closing. Since the part that broke is part of the whole dashboard, and I wasn't about to replace that, I had to get creative. Zip ties to the rescue!
Before:
Zip tied to a new hole in the OBD2 port bracket:
It's not perfect, but believe it or not, it's much better!
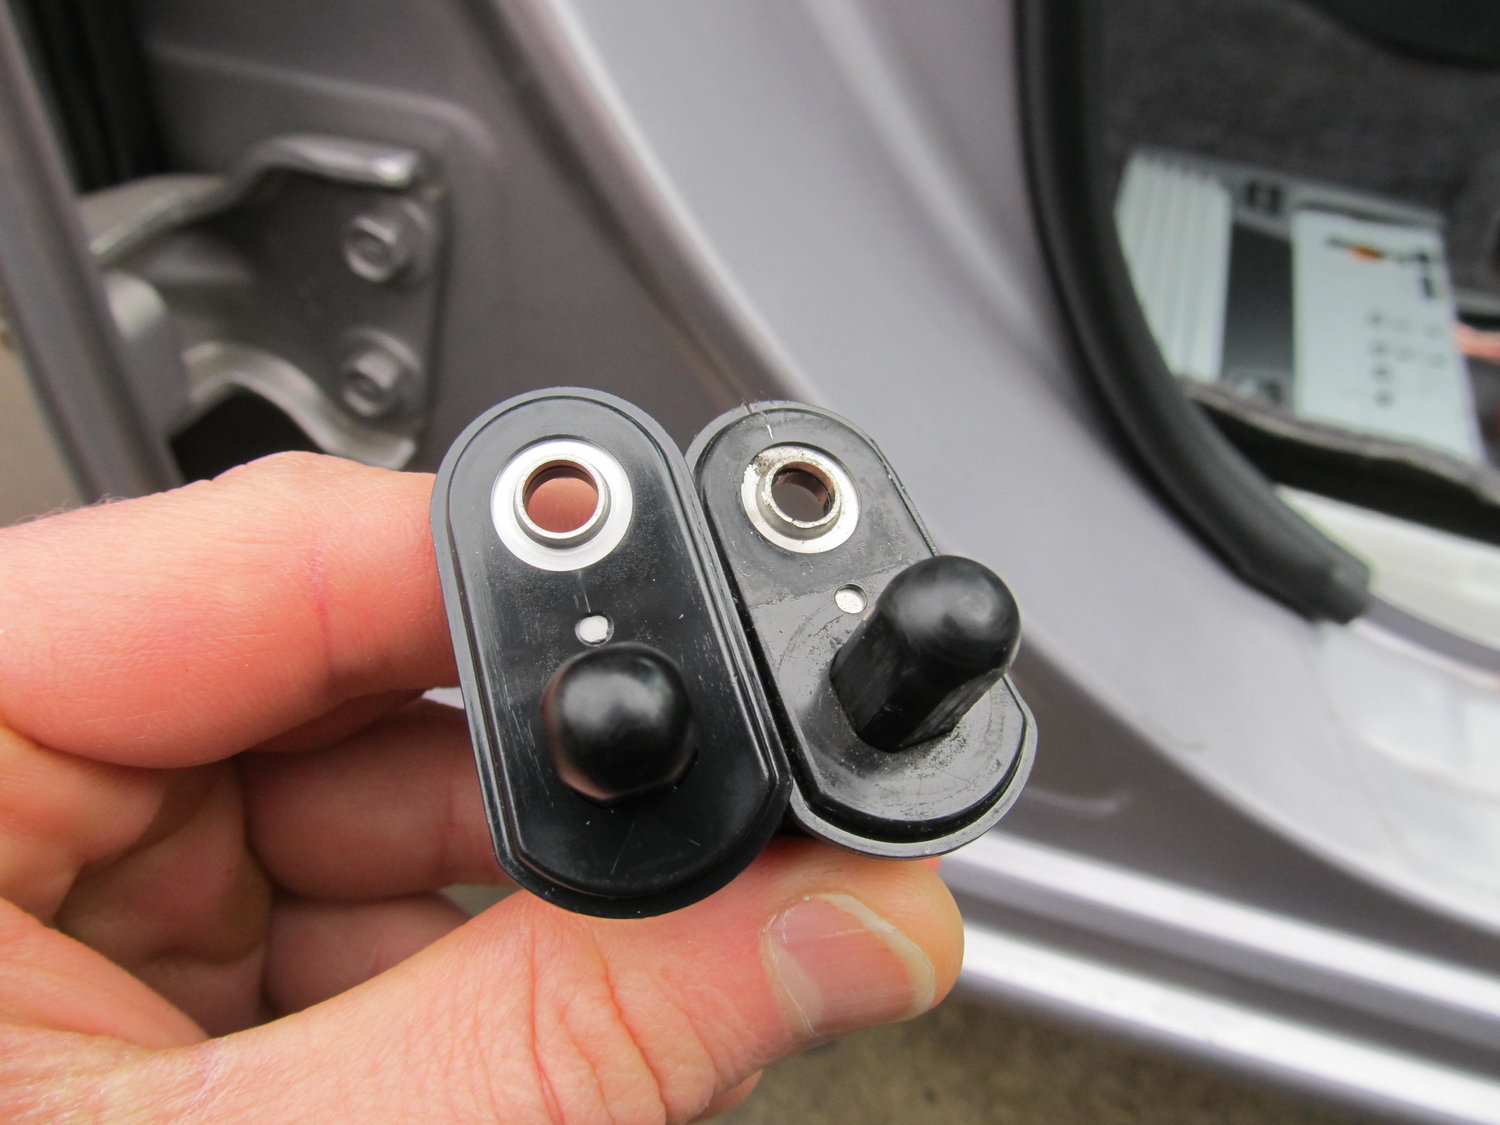
As mentioned before, I'm still trying to figure out why my door lights aren't working. My front door plunger switches seemed to be questionable, so I got new ones from the dealer. Sadly, they didn't magically solve my problem.
I also did an oil change with my fancy new oil- Motul 5w-40 true synthetic!
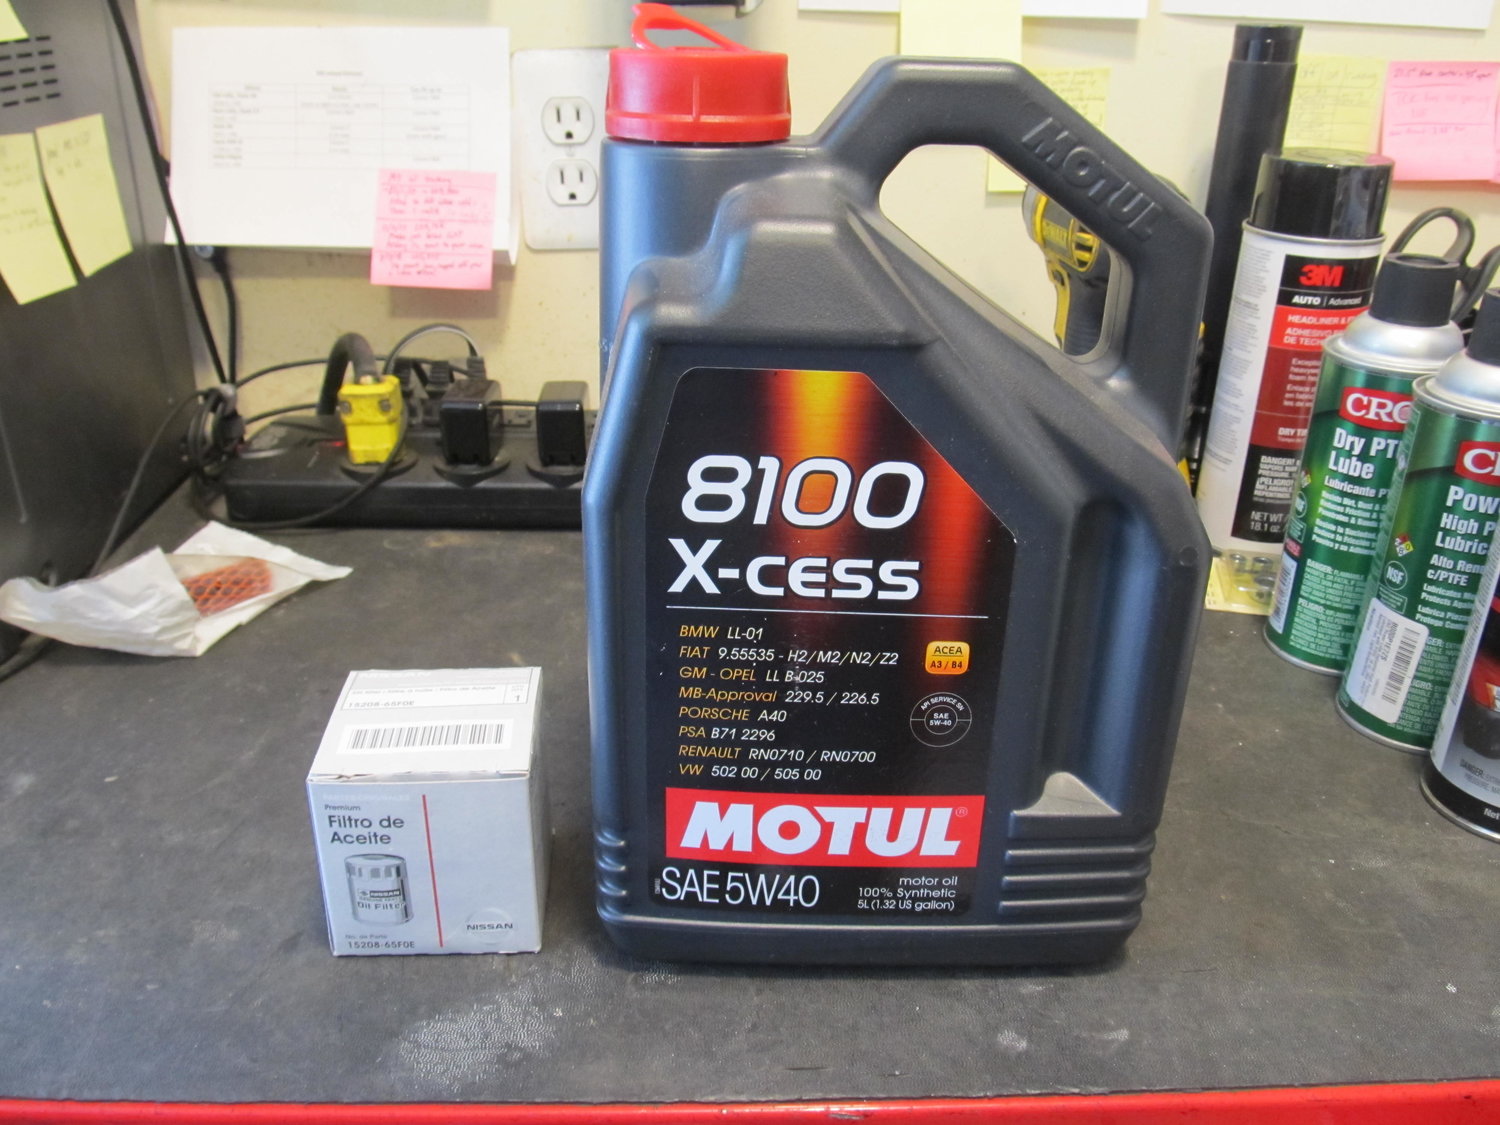
I can honestly say that I immediately noticed the car started and ran much smoother with this oil than the Rotella that was in there. It had only been about 2,000 miles since my last change, but it was about a year ago, so it was due. All hail Motul!
I can't even remember why now, but at some point one of my previous "mechanics" recommended I cut one of the wires going to my hood switch, so for the past 15 years or something, the hood switch hasn't worked. In an effort to track down a parasitic drain, I figured I would hook it back up. As far as I can tell, nothing changed. This is a big deal people!
I used my new leak detector smoke machine on the I30 to see if I had any vacuum leaks. It looked like there was a small one around my intake air temp sensor in my midpipe, so I got to work resealing it. The old one had been installed with some red silicone, but apparently not enough:
So I cleaned it up, and then applied quite a bit of the black silicone, from both the outside and the inside of the pipe to ensure it's sealed up real good. I'm curious, how are other guys running their IATs?
That seemed like a good time to clean my K&N air filter, since I hadn't done it in something like 6-7 years. Before:
After:
MUCH better! I had to wash it three times with their soap to get it clean, so I guess it was pretty dirty.
I then wanted to tackle adjusting my panhard rod that 2JRacing installed back in 2011 or 2012. I had recently read an article at MotoIQ by Mike Kojima about installing and adjusting a panhard rod on a B13 Sentra, and he mentioned how the PHR should be level with the car at ride height. Well, with my car on the ground, my PHR was cocked at an angle, so I needed to adjust it longer so I could move the PS bolt up one hole on the bracket. Unfortunately, the rod itself is aluminum and the ends are steel, and I'm guessing 2JR didn't apply any anti-seize on them, because they just wouldn't come loose. After trying on and off for a few days, I was eventually able to get one side a little loose after using a lot of Kroil and my MAP touch, and was able to install it correctly:
However, it wasn't a permanent install, as I couldn't get one of the jam nuts to move, so it's not really locked in place. I knew I wanted all new end pieces, since mine were making noise, so I had to figure out how to get them. Apparently 2JR is still in business, but you wouldn't know it if you tried to contact them. I've left many messages and never got a return call, so I had to look elsewhere for replacement parts. I ended up at Speedway Motors, which has a huge selection of panhard rod parts. More on that to come!
I've noticed that I have to jiggle my cigarette power adapter thingy to get it to power my phone, so I decided to clean up the surface rust in it with my Dremel. The pics don't really do it justice, but it's a lot cleaner now!
I also had some spare carpet lying around from my I35 trunk mat, so I cut a piece to fit in my center arm rest. Because nothing says fancy like a carpet-lined center arm rest! Foam is just so uncouth...
Oh, and why don't I try and "fix" my dashboard? Many years ago one of the lower tabs broke and I was unable to make the lower panel sit flush against the upper dash. Sometimes it would be hanging down so low as to prevent the hood release from coming back into position, which would prevent the hood from closing. Since the part that broke is part of the whole dashboard, and I wasn't about to replace that, I had to get creative. Zip ties to the rescue!
Before:
Zip tied to a new hole in the OBD2 port bracket:
It's not perfect, but believe it or not, it's much better!
As mentioned before, I'm still trying to figure out why my door lights aren't working. My front door plunger switches seemed to be questionable, so I got new ones from the dealer. Sadly, they didn't magically solve my problem.
I also did an oil change with my fancy new oil- Motul 5w-40 true synthetic!
I can honestly say that I immediately noticed the car started and ran much smoother with this oil than the Rotella that was in there. It had only been about 2,000 miles since my last change, but it was about a year ago, so it was due. All hail Motul!
Last edited by 95maxrider; 02-09-2019 at 10:51 AM.
02-18-2019, 09:37 AM
#542
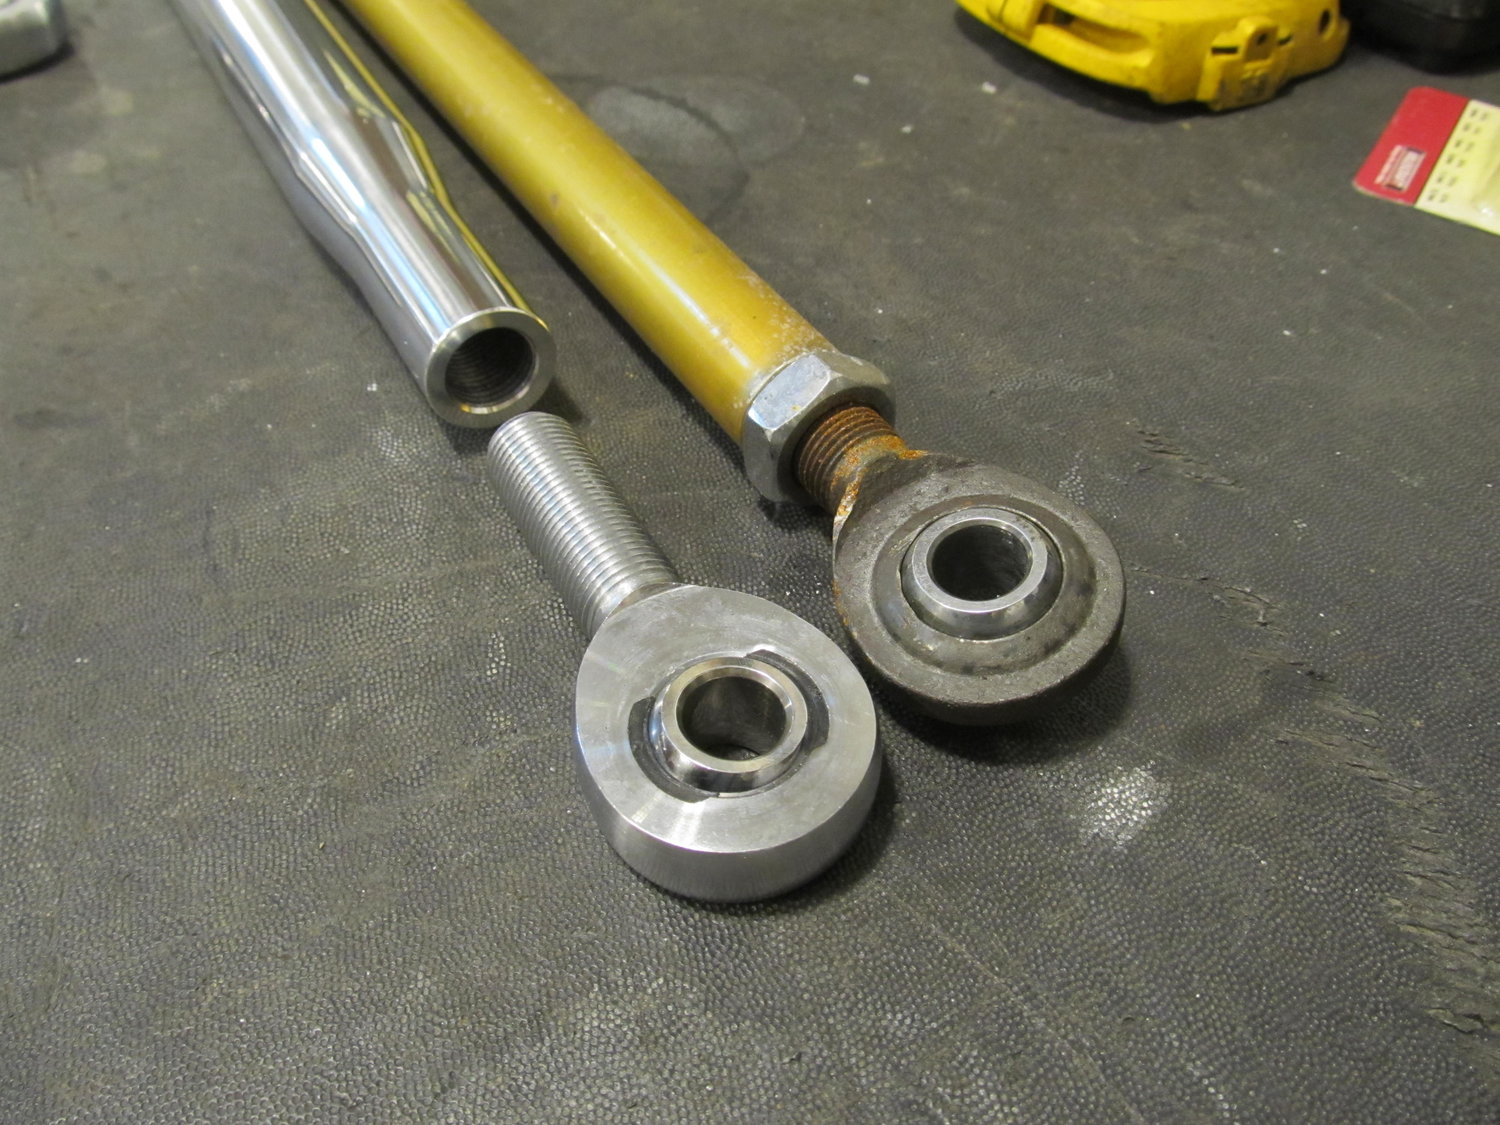
After about eight years with the original panhard rod that 2J Racing installed, I thought it was time for new spherical rod ends. Unfortunately, when I tried to get the old ones off, they were totally seized in place, thanks to 2JR using an aluminum tube instead of steel. 2JR is apparently still in business, but you wouldn't know if it you called them and tried to get anything resembling service. I've left many messages over the last year and never received a call back, so I decided to take matters into my own hands. I ended up getting all of my new parts from Speedway Motors. I didn't know exactly what to order, but I received excellent technical help and was able to get just what I needed for not a whole lot of money.
If you have a 2JR panhard rod and want all new parts, here's what you'll need.
28" aluminum tube, $22
https://www.speedwaymotors.com/6061-...?sku=910355-28
Rod ends with PTFE lining, $20 each (one left hand thread, one right hand thread)
https://www.speedwaymotors.com/QA1-X...ch,265276.html
https://www.speedwaymotors.com/QA1-X...ch,265273.html
Jam nuts, $1 each (again, one for left hand, one for hand hand)
https://www.speedwaymotors.com/Steel...Query=175-0446
https://www.speedwaymotors.com/Steel-Jam-Nut-5-8-18-RH,34356.html?OriginalQuery=1750246
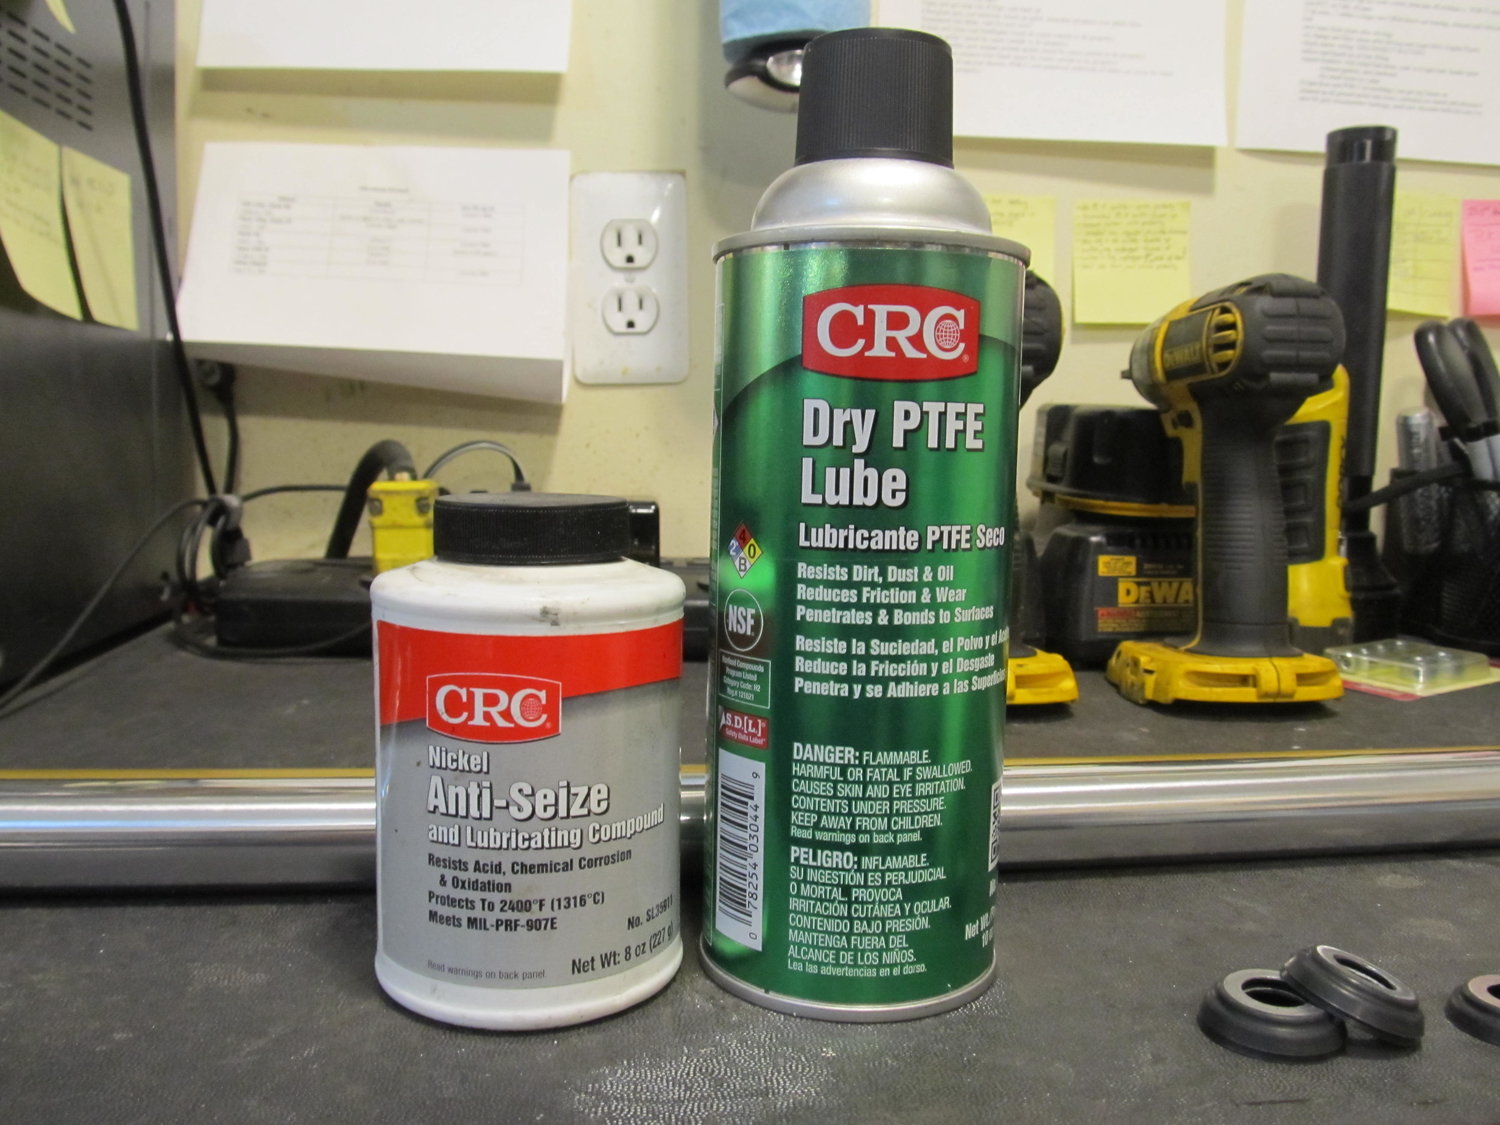
I wanted to get a steel tube, but there were none small enough to work with the rod ends I needed, so I had to go aluminum again. To ensure I can get it apart in the future, I coated everything liberally with anti-seize.
New vs. old:
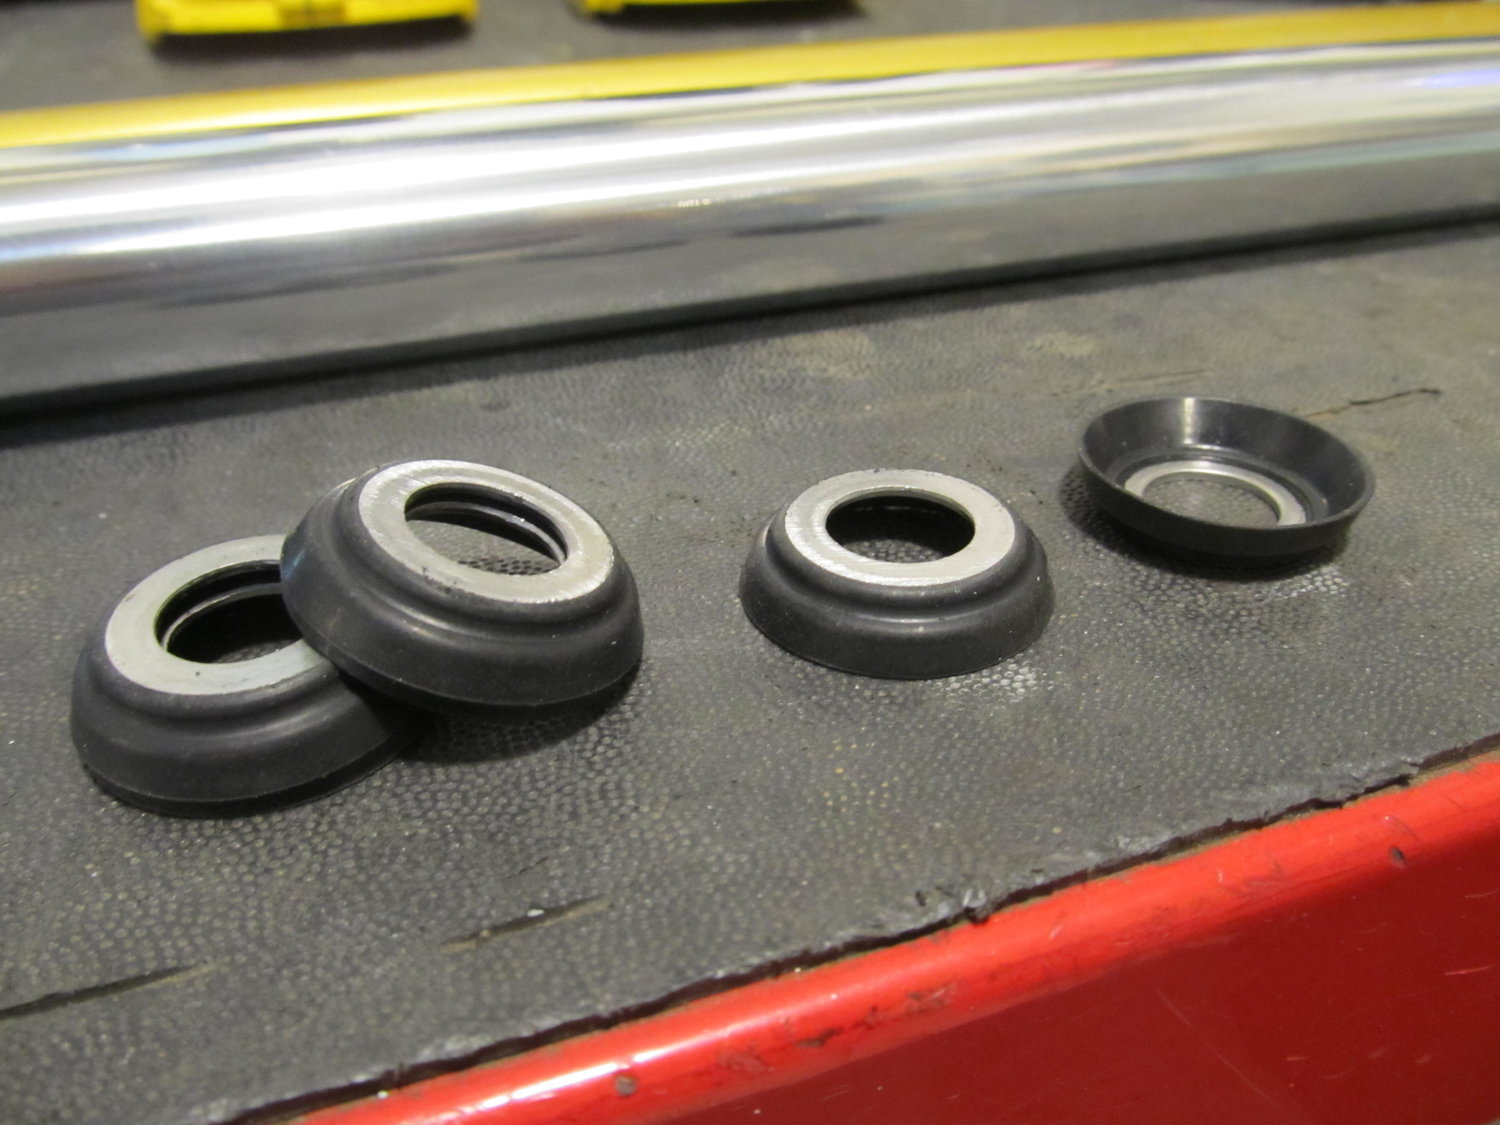
There's the PTFE lining to keep noise levels down:
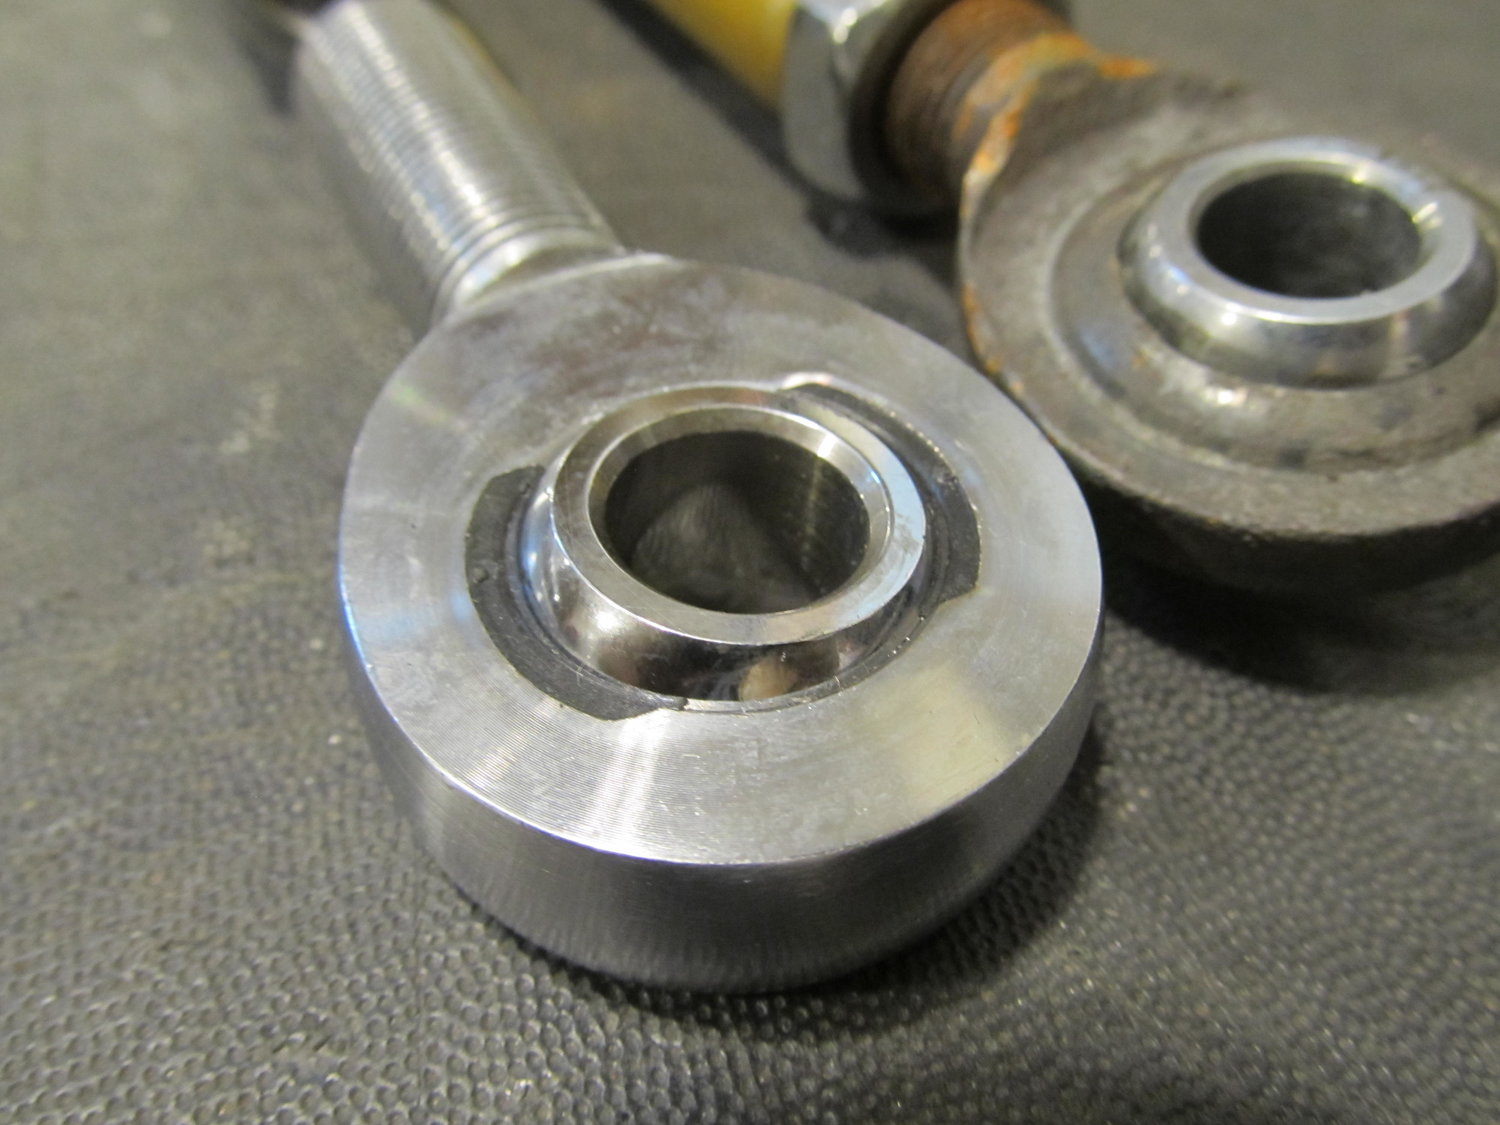
Not that it matters in this application, but the new rod ends are a lot stronger than the originals:

I also bought these dust caps, but unfortunately was unable to use them because the brackets for the rod ends on the car are just too narrow.
I used the dry PTFE lube for the rod ends and the anti-seize for the threads. I put a LOT on the threads and inside the rod.
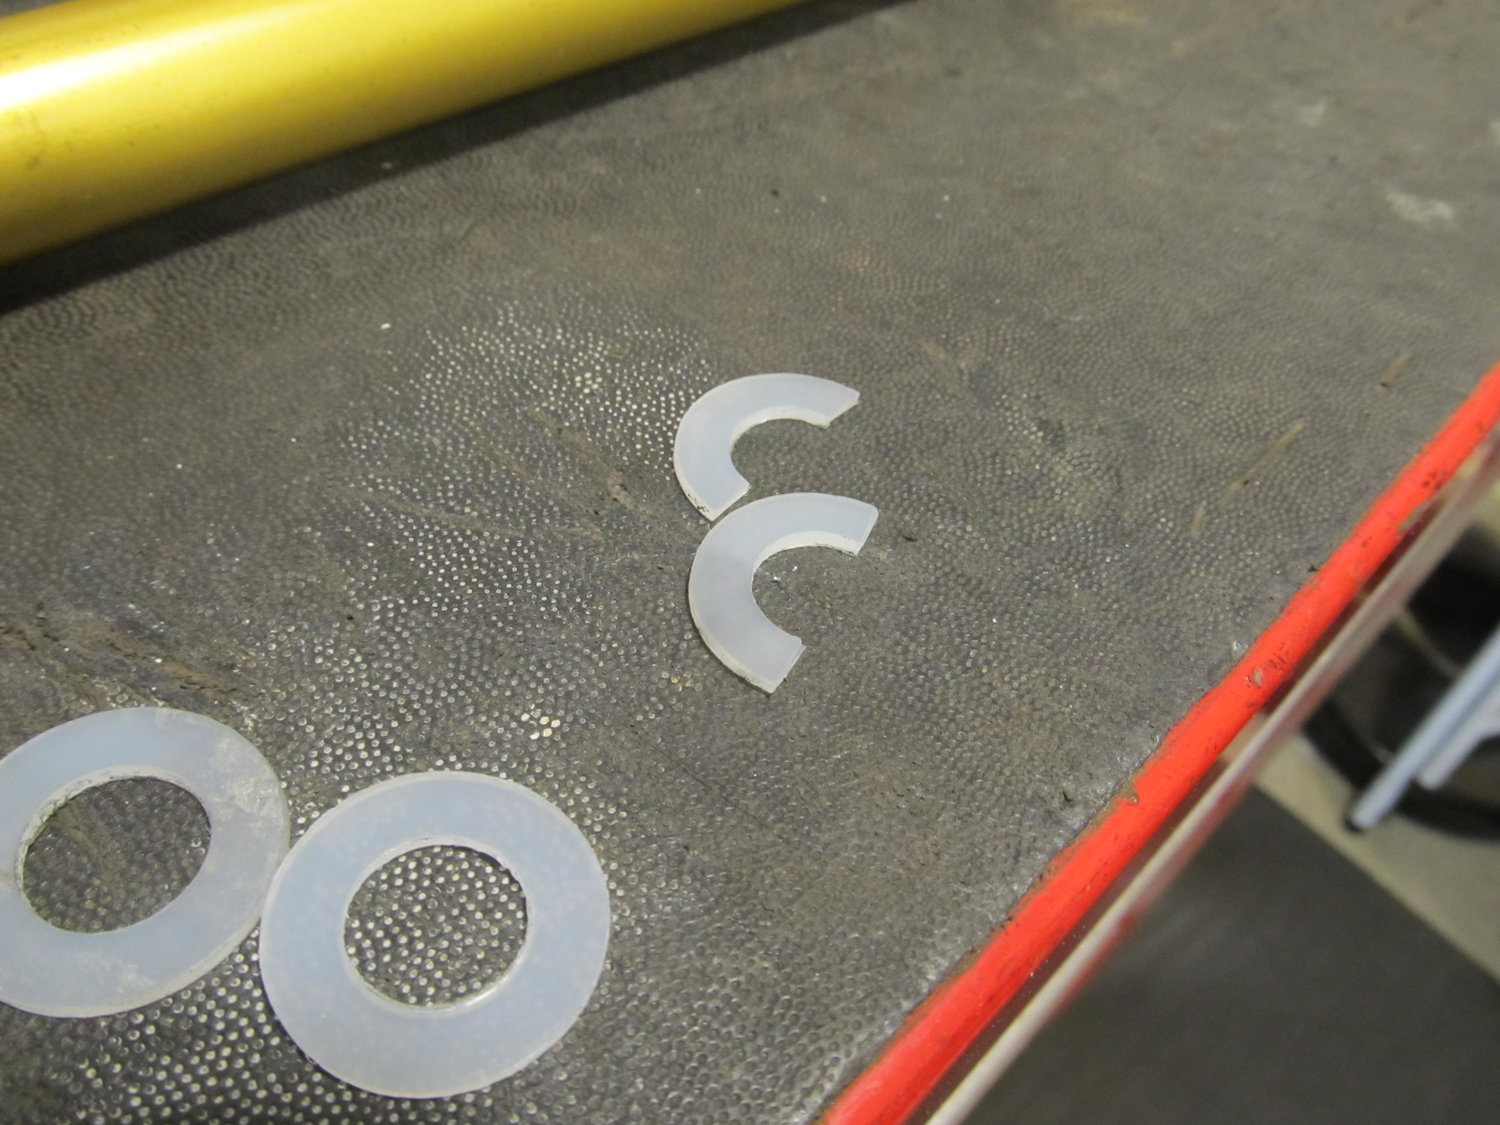
I then cut some nylon washers in half to slip over top of the bolt on each end to keep the rod ends from clanging around on the brackets:
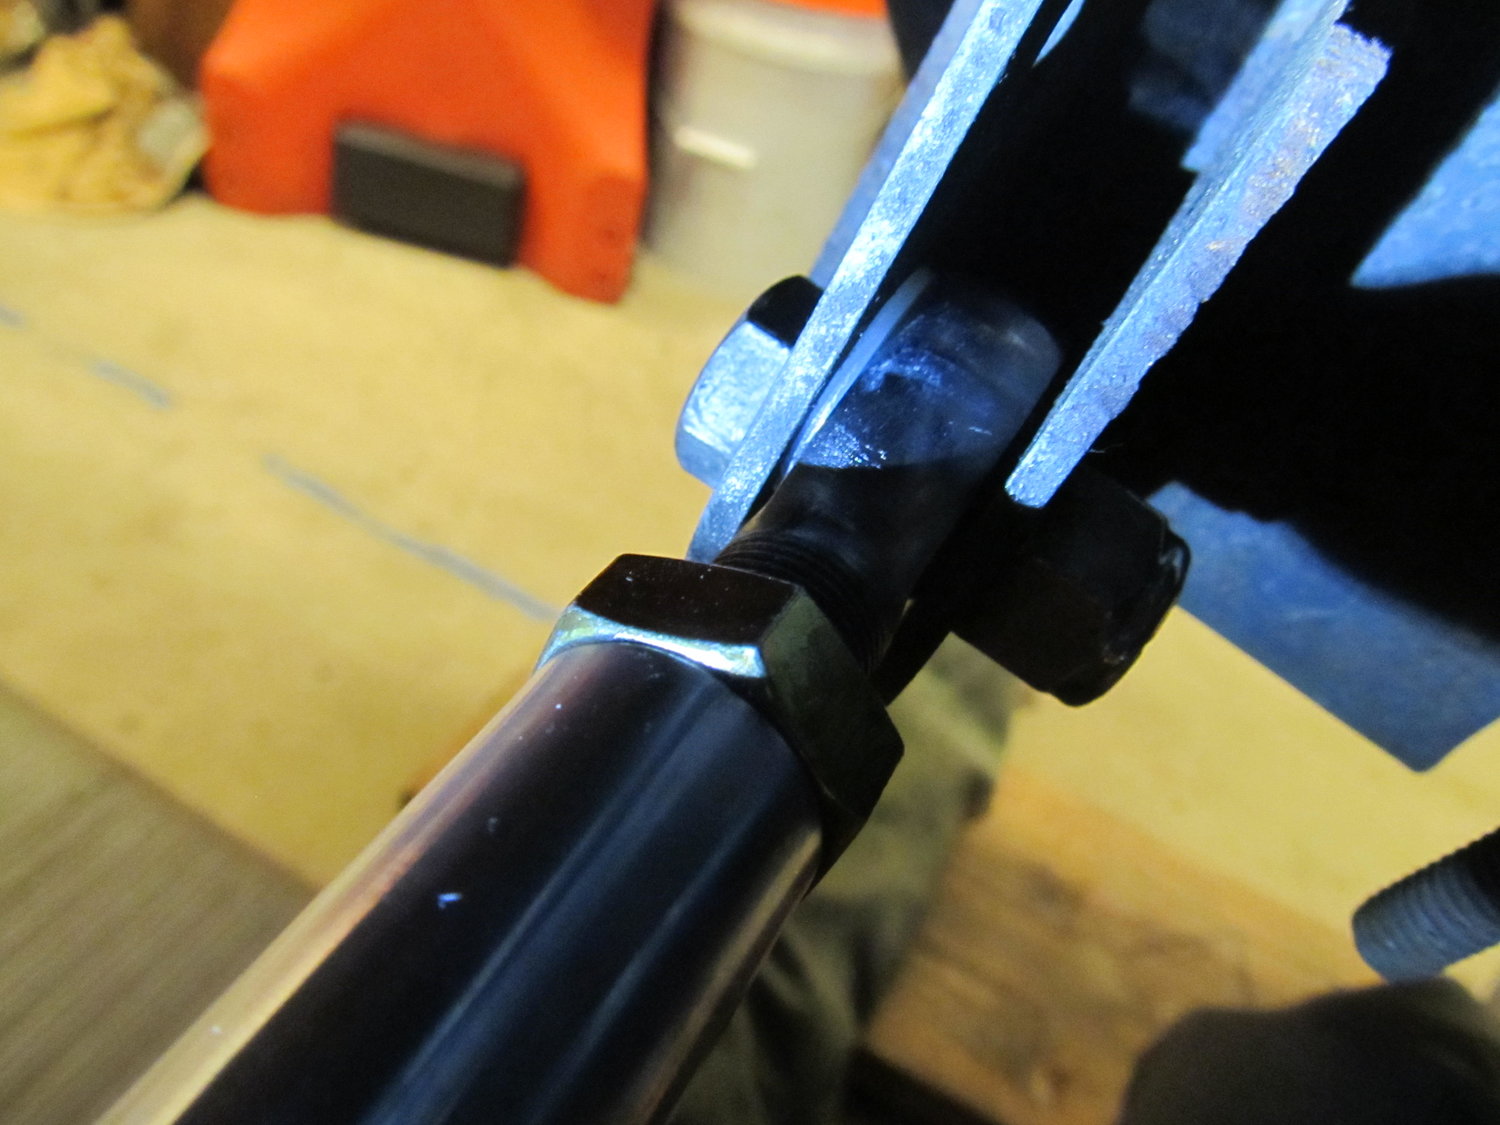
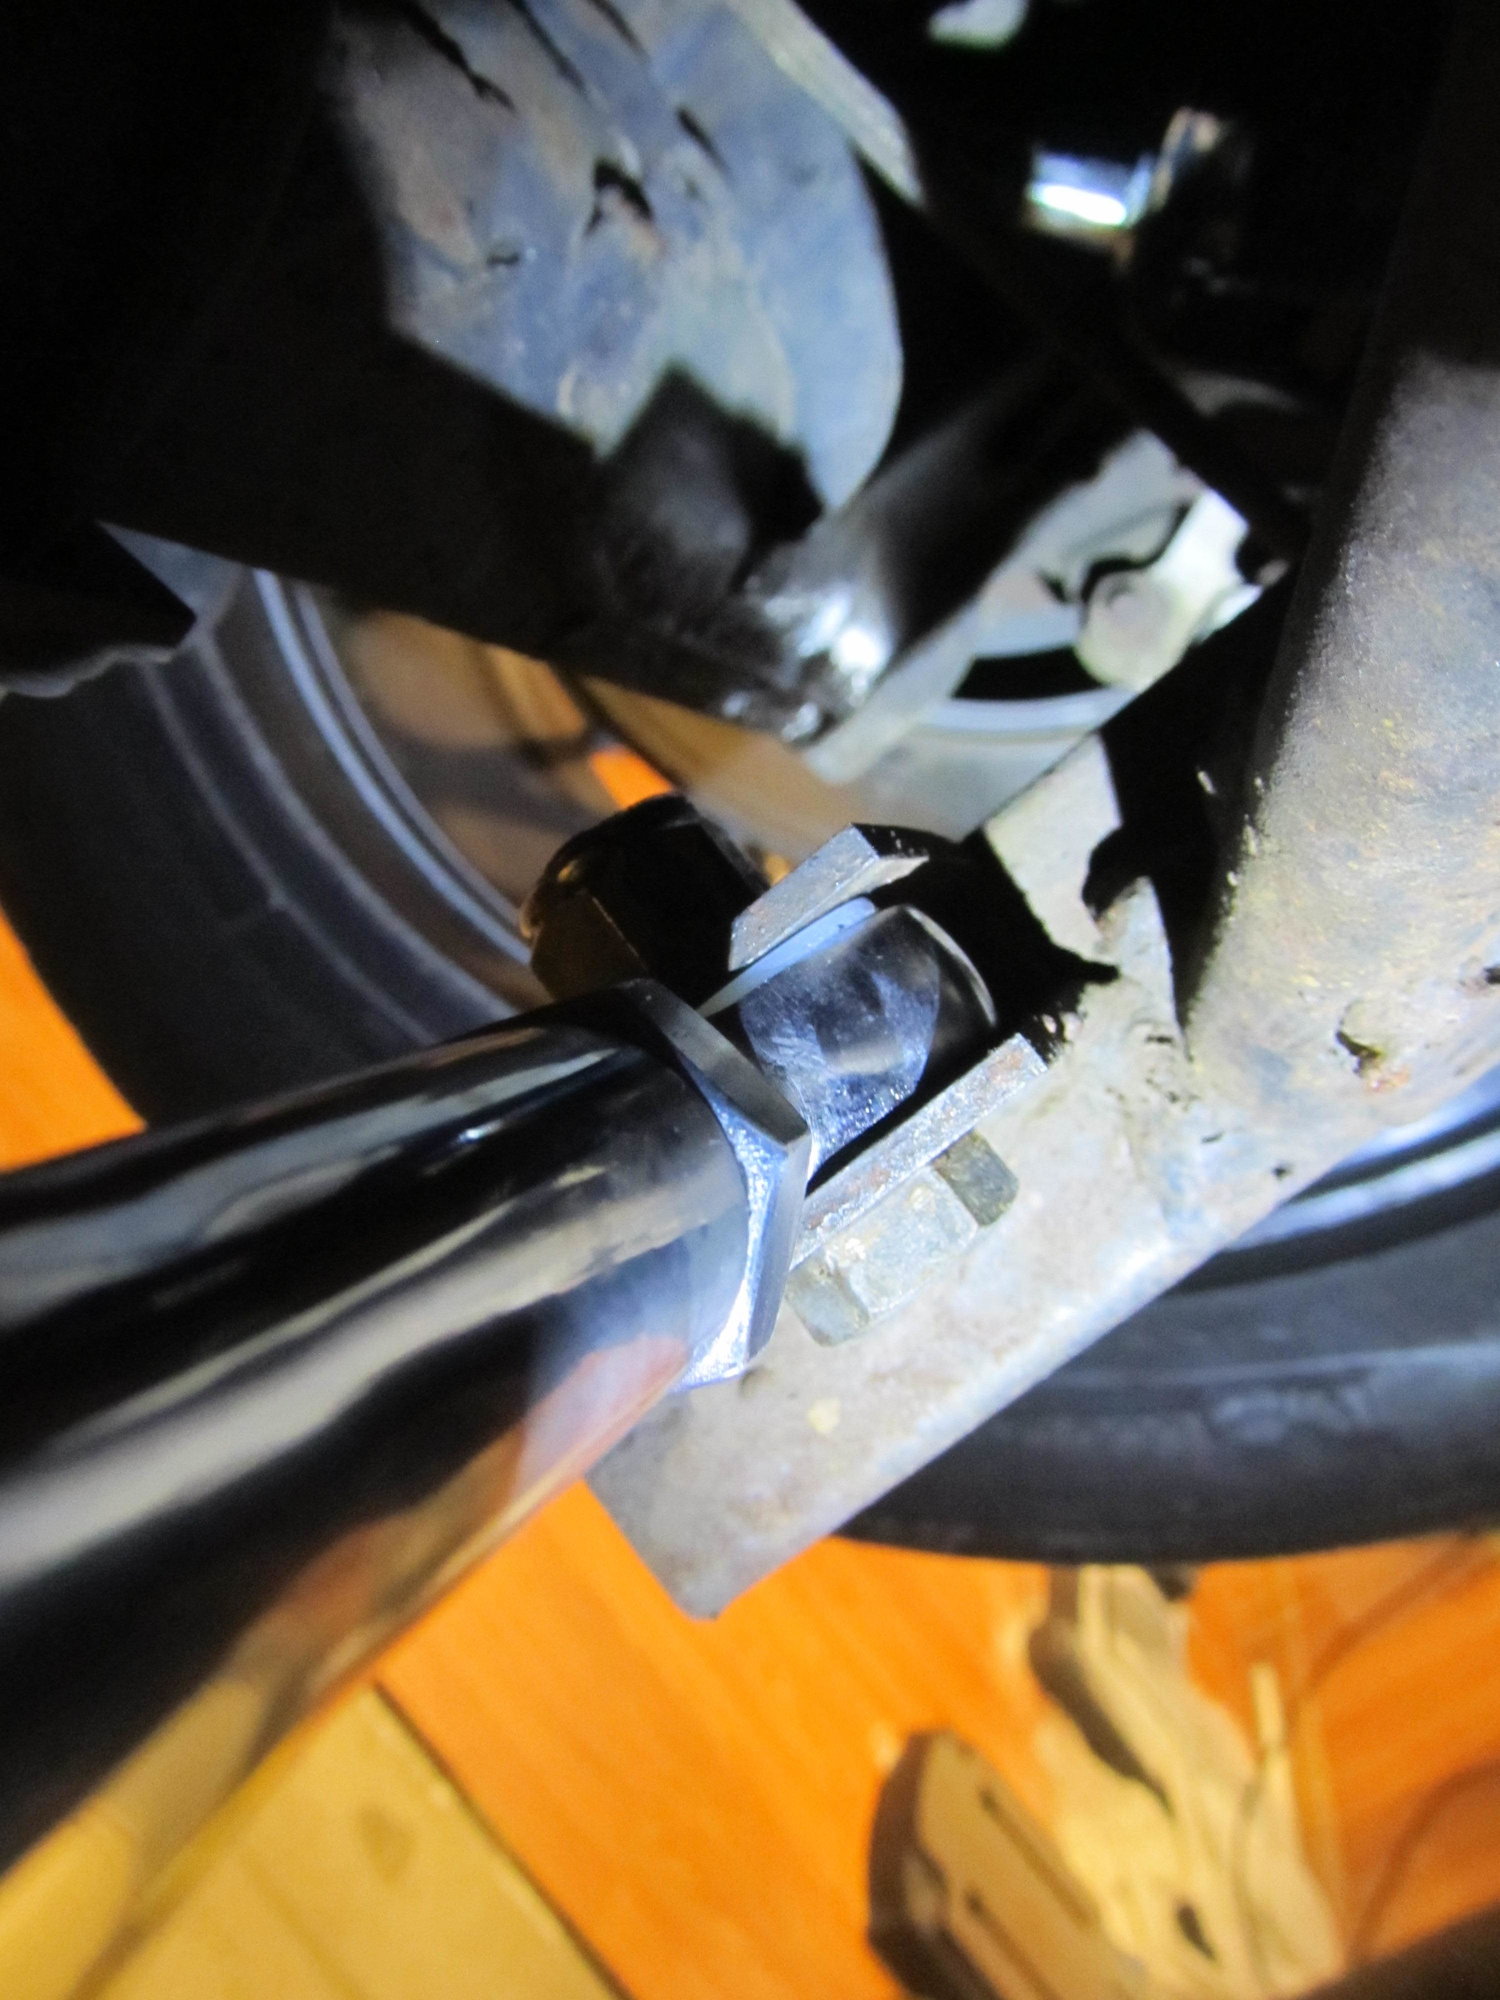
Ever since 2JR did the initial install, the bar ran between the two lower holes on the brackets. Well, with the car at ride height, the bar was very uneven, which according to Mike Kojima, isn't ideal. With the bar at the higher hole on the PS, it's now much closer to being level.
I haven't driven the car around a whole lot yet, but so far all of my rattling seems to be gone! I'm just not entirely sure if I'm limiting it's movement too much by having those nylon washers in there. When doing the install, I initially set the length of the bar to be perfectly matched up with the bolt holes on the brackets, but I found that allowed too much movement with the bar, and thus rattles. After I made the bar a touch longer, it seemed to keep tension on it, and the rattle was gone. I'm not sure this is the correct way to set one of these up, so any feedback would be appreciated. Anyways, I know this will only be of interest to like one other guy on here who has a panhard rod (Joe!), but I figured I should post up in case he wants some new parts!
If you have a 2JR panhard rod and want all new parts, here's what you'll need.
28" aluminum tube, $22
https://www.speedwaymotors.com/6061-...?sku=910355-28
Rod ends with PTFE lining, $20 each (one left hand thread, one right hand thread)
https://www.speedwaymotors.com/QA1-X...ch,265276.html
https://www.speedwaymotors.com/QA1-X...ch,265273.html
Jam nuts, $1 each (again, one for left hand, one for hand hand)
https://www.speedwaymotors.com/Steel...Query=175-0446
https://www.speedwaymotors.com/Steel-Jam-Nut-5-8-18-RH,34356.html?OriginalQuery=1750246
I wanted to get a steel tube, but there were none small enough to work with the rod ends I needed, so I had to go aluminum again. To ensure I can get it apart in the future, I coated everything liberally with anti-seize.
New vs. old:
There's the PTFE lining to keep noise levels down:
Not that it matters in this application, but the new rod ends are a lot stronger than the originals:
I also bought these dust caps, but unfortunately was unable to use them because the brackets for the rod ends on the car are just too narrow.
I used the dry PTFE lube for the rod ends and the anti-seize for the threads. I put a LOT on the threads and inside the rod.
I then cut some nylon washers in half to slip over top of the bolt on each end to keep the rod ends from clanging around on the brackets:
Ever since 2JR did the initial install, the bar ran between the two lower holes on the brackets. Well, with the car at ride height, the bar was very uneven, which according to Mike Kojima, isn't ideal. With the bar at the higher hole on the PS, it's now much closer to being level.
I haven't driven the car around a whole lot yet, but so far all of my rattling seems to be gone! I'm just not entirely sure if I'm limiting it's movement too much by having those nylon washers in there. When doing the install, I initially set the length of the bar to be perfectly matched up with the bolt holes on the brackets, but I found that allowed too much movement with the bar, and thus rattles. After I made the bar a touch longer, it seemed to keep tension on it, and the rattle was gone. I'm not sure this is the correct way to set one of these up, so any feedback would be appreciated. Anyways, I know this will only be of interest to like one other guy on here who has a panhard rod (Joe!), but I figured I should post up in case he wants some new parts!
02-18-2019, 11:00 AM
#543
Senior Member
Join Date: Jul 2001
Location: state of confusion
Posts: 1,341
I suspect that the ideal setup for a panhard bar has the bar horizontal with the car loaded in some specific condition that depends on the intended use. For road course use this might be with the driver, car emptied of loose things and trunk junk, and maybe half a tank of gas. For the street - somewhere between driver plus passenger and driver plus half a passenger, plus any constant trunk junk load (plus the half tank of fuel). What you're shooting for is the PHB to deviate as little as possible from the horizontal during the designed-for use.
You're probably on the right track with the rattling and the washers. A twist-beam axle wants to rotate (think side view) relative to the body, about the chassis-side trailing arm pivot point. Taking the axle-side PHB bracket with it in this rotation. The chassis-side PHB bracket of course does not rotate, and the rotation comes out with the PHB rotating, possibly to the point of banging against the inside faces of the brackets.
Something to keep in mind here is that with some or most of the PHB's ability to twist inside the brackets taken away, there could be an increased tendency for the jam nuts or any other length adjustment feature to loosen. Keep an eye on them, especially since you lubed them up with anti-sieze. If they loosen, disassemble, clean, and Locktite blue would be my first suggestion.
PHB topics have been pretty common on 5th gen Mustang and 3rd gen Camaro/Firebird forums over the years.
Norm
Last edited by Norm Peterson; 02-18-2019 at 11:04 AM.
02-20-2019, 08:51 AM
#544
I suspect that the ideal setup for a panhard bar has the bar horizontal with the car loaded in some specific condition that depends on the intended use. For road course use this might be with the driver, car emptied of loose things and trunk junk, and maybe half a tank of gas. For the street - somewhere between driver plus passenger and driver plus half a passenger, plus any constant trunk junk load (plus the half tank of fuel). What you're shooting for is the PHB to deviate as little as possible from the horizontal during the designed-for use.
You're probably on the right track with the rattling and the washers. A twist-beam axle wants to rotate (think side view) relative to the body, about the chassis-side trailing arm pivot point. Taking the axle-side PHB bracket with it in this rotation. The chassis-side PHB bracket of course does not rotate, and the rotation comes out with the PHB rotating, possibly to the point of banging against the inside faces of the brackets.
Something to keep in mind here is that with some or most of the PHB's ability to twist inside the brackets taken away, there could be an increased tendency for the jam nuts or any other length adjustment feature to loosen. Keep an eye on them, especially since you lubed them up with anti-sieze. If they loosen, disassemble, clean, and Locktite blue would be my first suggestion.
PHB topics have been pretty common on 5th gen Mustang and 3rd gen Camaro/Firebird forums over the years.
Norm
You're probably on the right track with the rattling and the washers. A twist-beam axle wants to rotate (think side view) relative to the body, about the chassis-side trailing arm pivot point. Taking the axle-side PHB bracket with it in this rotation. The chassis-side PHB bracket of course does not rotate, and the rotation comes out with the PHB rotating, possibly to the point of banging against the inside faces of the brackets.
Something to keep in mind here is that with some or most of the PHB's ability to twist inside the brackets taken away, there could be an increased tendency for the jam nuts or any other length adjustment feature to loosen. Keep an eye on them, especially since you lubed them up with anti-sieze. If they loosen, disassemble, clean, and Locktite blue would be my first suggestion.
PHB topics have been pretty common on 5th gen Mustang and 3rd gen Camaro/Firebird forums over the years.
Norm
02-20-2019, 11:25 AM
#545

Keep up the good work!
My cars front doors don't always lock, and have recently started doing the unlock-lock deal. Just haven't had the motivation to dig into the doors and replace the little buggers.
My cars front doors don't always lock, and have recently started doing the unlock-lock deal. Just haven't had the motivation to dig into the doors and replace the little buggers.
03-24-2019, 06:53 AM
#546
Time to tackle another overdue project- installing an oil catch can! I had one of the old Home Depot-style cheap-o catch cans when I had the DE-K in my car, but never got around to installing one for the 3.5. I bought a much better, but still very cheap can for $30 and got to work. I threw out the cheap hoses it came with and used my high pressure fuel lines instead. I played around with where to place the can, but couldn't find a good location that didn't require long runs of hose. Then I tried out a location by the throttle body, right where the older, and much smaller can used to live. It's a tight squeeze, but it works and it's out of the way, so in the end I'm pretty happy with it. It's easily accessible for easy cleaning too!
$30!

It didn't come with any instructions, does this look right?

The main o-ring came with a tear in it, I'm trying to get a replacement.

In and out locations:

The can is in a very tight area, and didn't actually require any zip ties to secure it, but I added them anyways.


Clearance is tight with the throttle cable!

But in the end it fits, and it's easily accessible, so I'm happy.


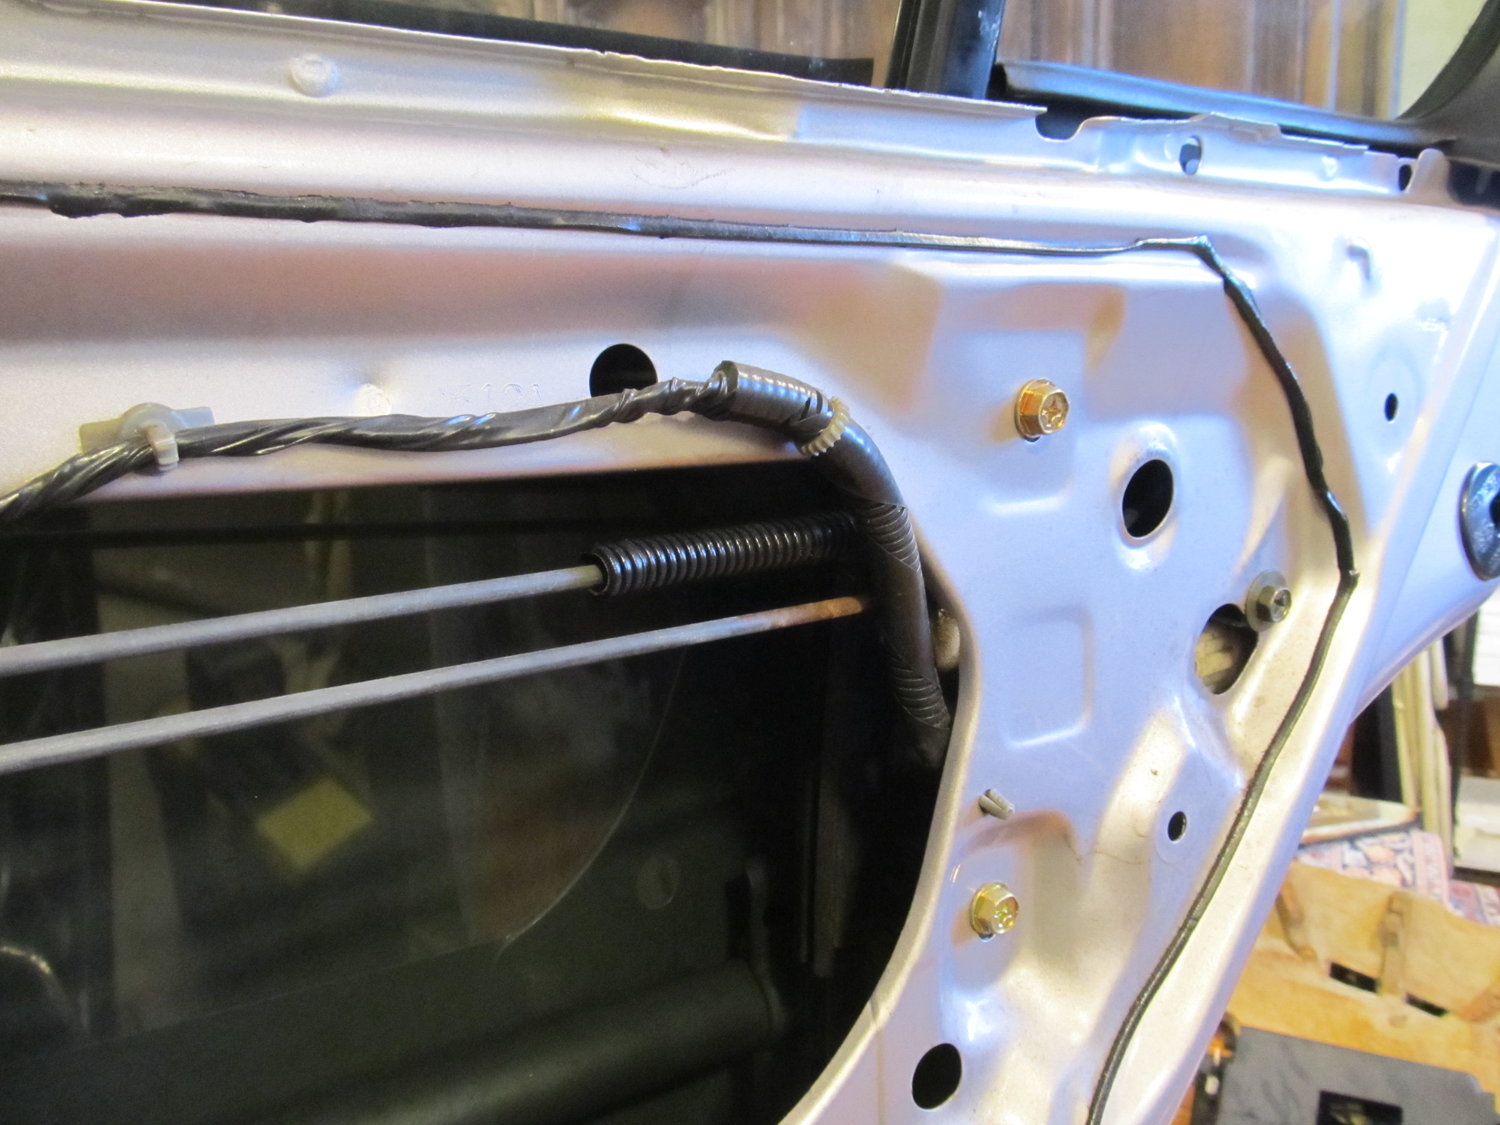
I then tried to do more troubleshooting for my water leak. It's coming in somewhere around the base of the windshield on the PS, but I still don't know where. I noticed some of the factory seam sealer was starting to crack in two areas at the base of the windshield, so I decided to apply some fresh sealer in the hopes it would stop the leak.

From above:


PS:

DS:

Unfortunately, this did nothing to stop the leak. The water is coming down somewhere below the base of the A pillar, but I don't know where. I can just barely see the base of the windshield from the inside with the A pillar cover removed, and I don't see any water there. I'm now thinking I need to remove my PS fender and inspect the area under there for cracks or something. With the HVAC stuff in the way, it's impossible to see where the water is entering the car. If this white thing wasn't there, I would be able to find it much better. Does anyone know if removing the white box means I need to drain the heater core?
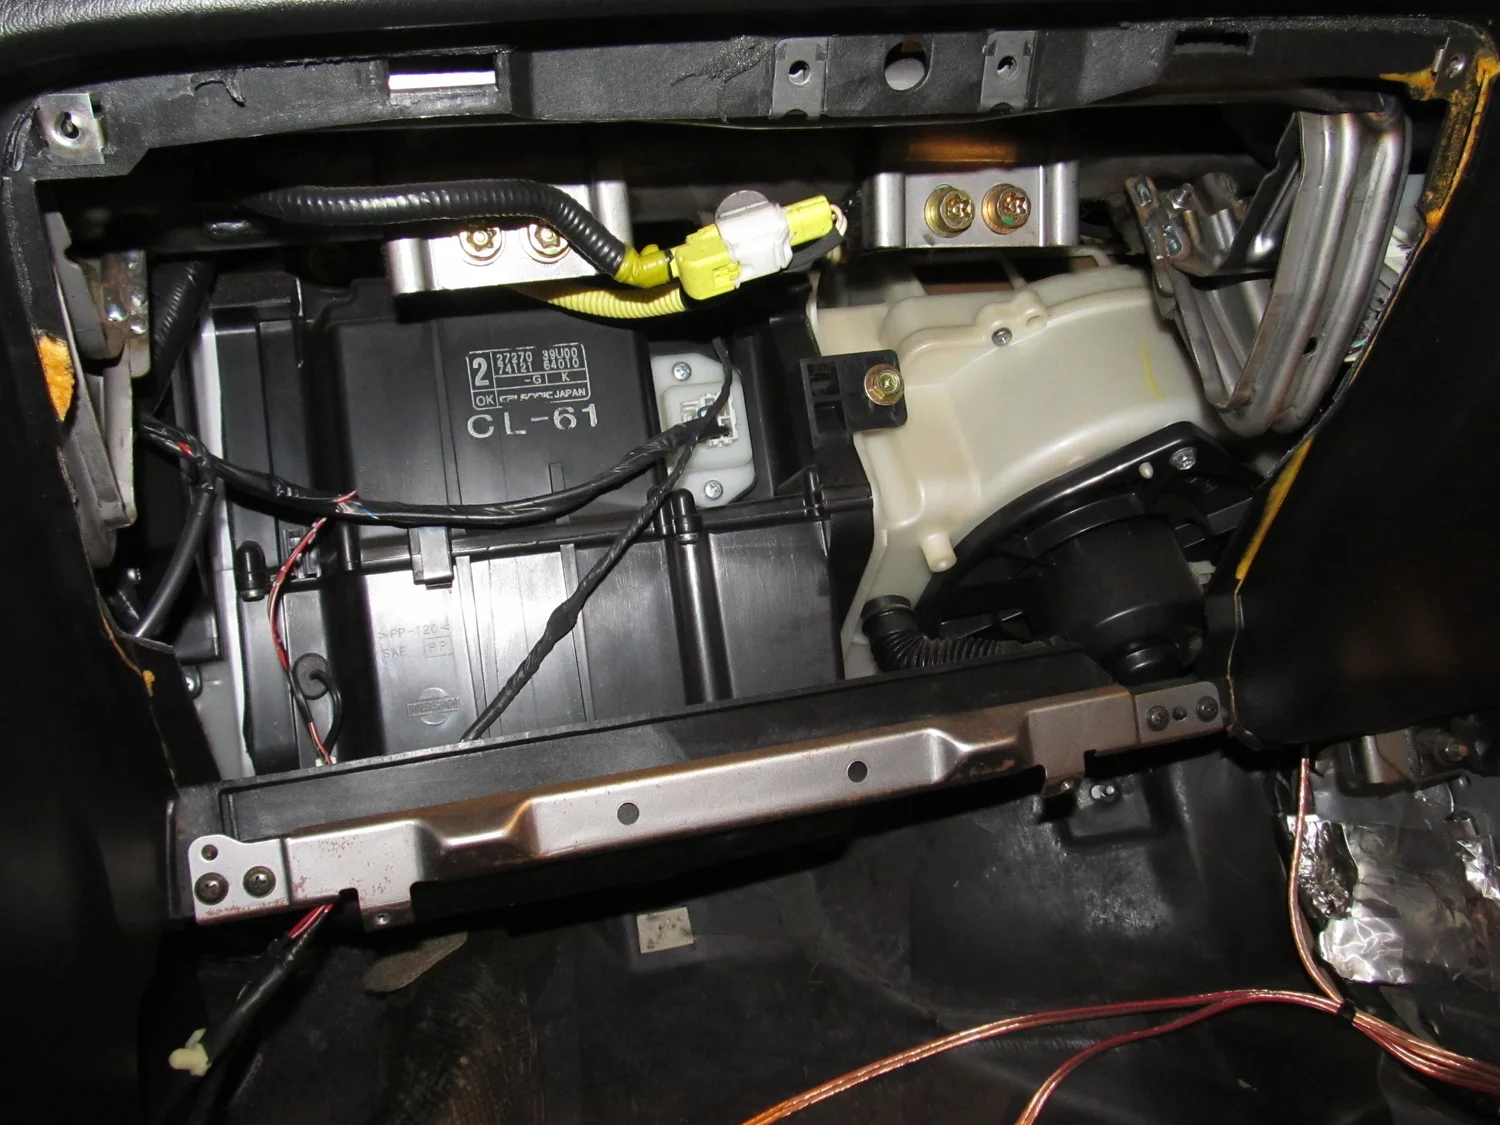
$30!
It didn't come with any instructions, does this look right?
The main o-ring came with a tear in it, I'm trying to get a replacement.
In and out locations:
The can is in a very tight area, and didn't actually require any zip ties to secure it, but I added them anyways.
Clearance is tight with the throttle cable!
But in the end it fits, and it's easily accessible, so I'm happy.
I then tried to do more troubleshooting for my water leak. It's coming in somewhere around the base of the windshield on the PS, but I still don't know where. I noticed some of the factory seam sealer was starting to crack in two areas at the base of the windshield, so I decided to apply some fresh sealer in the hopes it would stop the leak.
From above:
PS:
DS:
Unfortunately, this did nothing to stop the leak. The water is coming down somewhere below the base of the A pillar, but I don't know where. I can just barely see the base of the windshield from the inside with the A pillar cover removed, and I don't see any water there. I'm now thinking I need to remove my PS fender and inspect the area under there for cracks or something. With the HVAC stuff in the way, it's impossible to see where the water is entering the car. If this white thing wasn't there, I would be able to find it much better. Does anyone know if removing the white box means I need to drain the heater core?
Last edited by 95maxrider; 01-18-2020 at 05:22 AM.
05-07-2019, 07:12 PM
#547
Member

Join Date: Feb 2008
Location: Pittsburgh
Posts: 104
I can't even remember why now, but at some point one of my previous "mechanics" recommended I cut one of the wires going to my hood switch, so for the past 15 years or something, the hood switch hasn't worked. In an effort to track down a parasitic drain, I figured I would hook it back up. As far as I can tell, nothing changed. This is a big deal people!
I know this one. When I was doing lots of work on my valve covers I was leaving my hood open in the garage overnight... for days actually. My battery would always go dead after about 48 hours if I hadn�t started the engine.
Turns out that when the car alarm is INACTIVE, or cannot fully arm (due to the hood being open), the alarm circuit stays in a ready-to-arm mode which pulls about 200mA. When the alarm is ACTIVE it only pulls about 20mA.
Actually, I�m not sure why anyone would want to cut the lead to the switch, but if it does not close I expect that your alarm system (active or inactive) is pulling 200mA when it�s parked. Learning this saved me a lot of time hooking up the battery booster.
Any autoX plans this year? -paul

^^ needs inspection, then I put the RE71s on it and head straight for the cones. I might be selling it this year.
05-10-2019, 07:48 PM
#548
You said you didn't "need" to ziptie the can but could it shift around any? It seems awfully close to the TB - no chance it could move and wedge it open? I've had runaway throttles on 2 vehicles in my life, often becoming pucker events...
05-11-2019, 07:09 AM
#549
I know this one. When I was doing lots of work on my valve covers I was leaving my hood open in the garage overnight... for days actually. My battery would always go dead after about 48 hours if I hadn�t started the engine.
Turns out that when the car alarm is INACTIVE, or cannot fully arm (due to the hood being open), the alarm circuit stays in a ready-to-arm mode which pulls about 200mA. When the alarm is ACTIVE it only pulls about 20mA.
Actually, I�m not sure why anyone would want to cut the lead to the switch, but if it does not close I expect that your alarm system (active or inactive) is pulling 200mA when it�s parked. Learning this saved me a lot of time hooking up the battery booster.
Any autoX plans this year? -paul
I would like to auto-x the car this year, but I won't be doing a full season. The M3 is very competitive at rally-x (I won my class last season), and I live further away from the auto-x venue than I used to, so auto-x has fallen down my list of priorities.
Originally Posted by BEJAY1
You said you didn't "need" to ziptie the can but could it shift around any? It seems awfully close to the TB - no chance it could move and wedge it open? I've had runaway throttles on 2 vehicles in my life, often becoming pucker events...
schmellyfart- Any updates on making how-to swap videos?
 07-15-2019, 08:16 PM
#551
Sorry I missed this message.
I've been trying to post most things to a facebook page if you do that thing.
https://www.facebook.com/schmellyfart/
I also put two high level overview videos up on the youtube for both the Gen I & II swaps on 3.0 timing. I'll be making more detailed videos of the swap as I chip away at my to do list.
07-16-2019, 02:34 PM
#552
Sorry I missed this message.
I've been trying to post most things to a facebook page if you do that thing.
https://www.facebook.com/schmellyfart/
I also put two high level overview videos up on the youtube for both the Gen I & II swaps on 3.0 timing. I'll be making more detailed videos of the swap as I chip away at my to do list.
I've been trying to post most things to a facebook page if you do that thing.
https://www.facebook.com/schmellyfart/
I also put two high level overview videos up on the youtube for both the Gen I & II swaps on 3.0 timing. I'll be making more detailed videos of the swap as I chip away at my to do list.
07-16-2019, 03:09 PM
#553
Time for an update, I need some more help!
It turns out that the water behind the passenger seat was actually coming from the front of the car, not the rear. That's due to my driveway being on an incline. I located a water leak somewhere around the base of the A pillar on the PS. I removed the A pillar cover, and as far as I can tell, the water isn't coming from anywhere around the windshield. I can only see it coming out from below, in this corner:
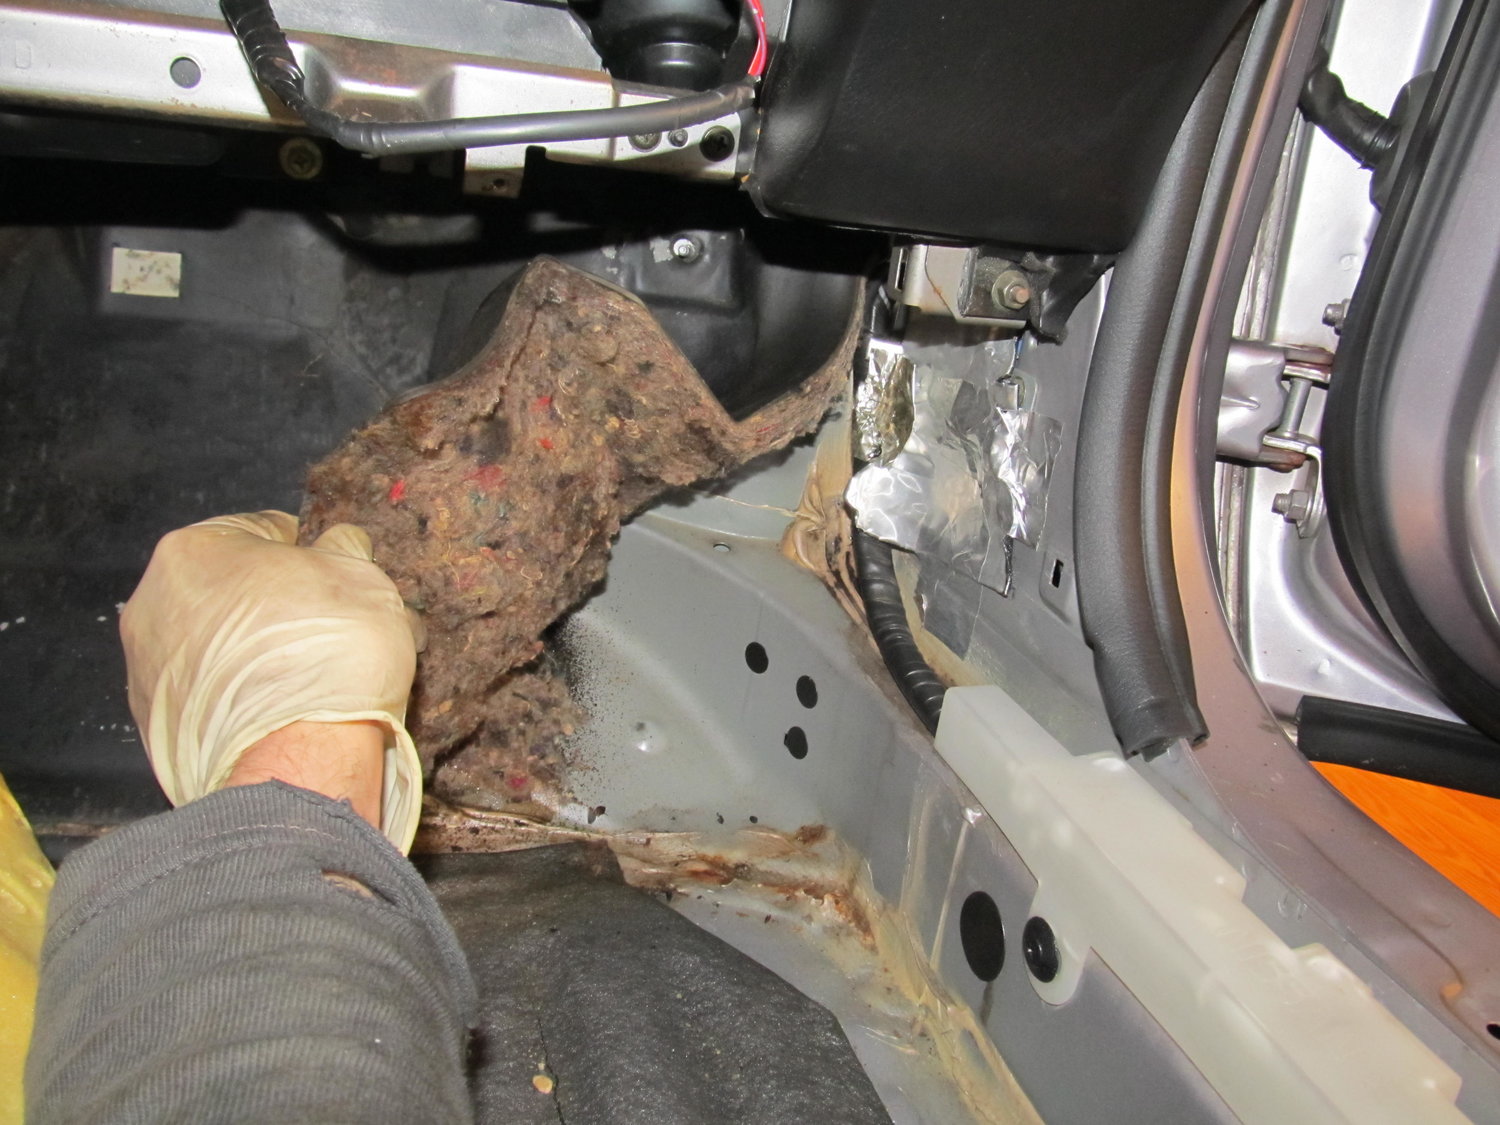
So I decided to remove the PS fender to see if there were any visible cracks on the firewall. Unfortunately, taking the fender off did little to help me see where the leak is coming from.
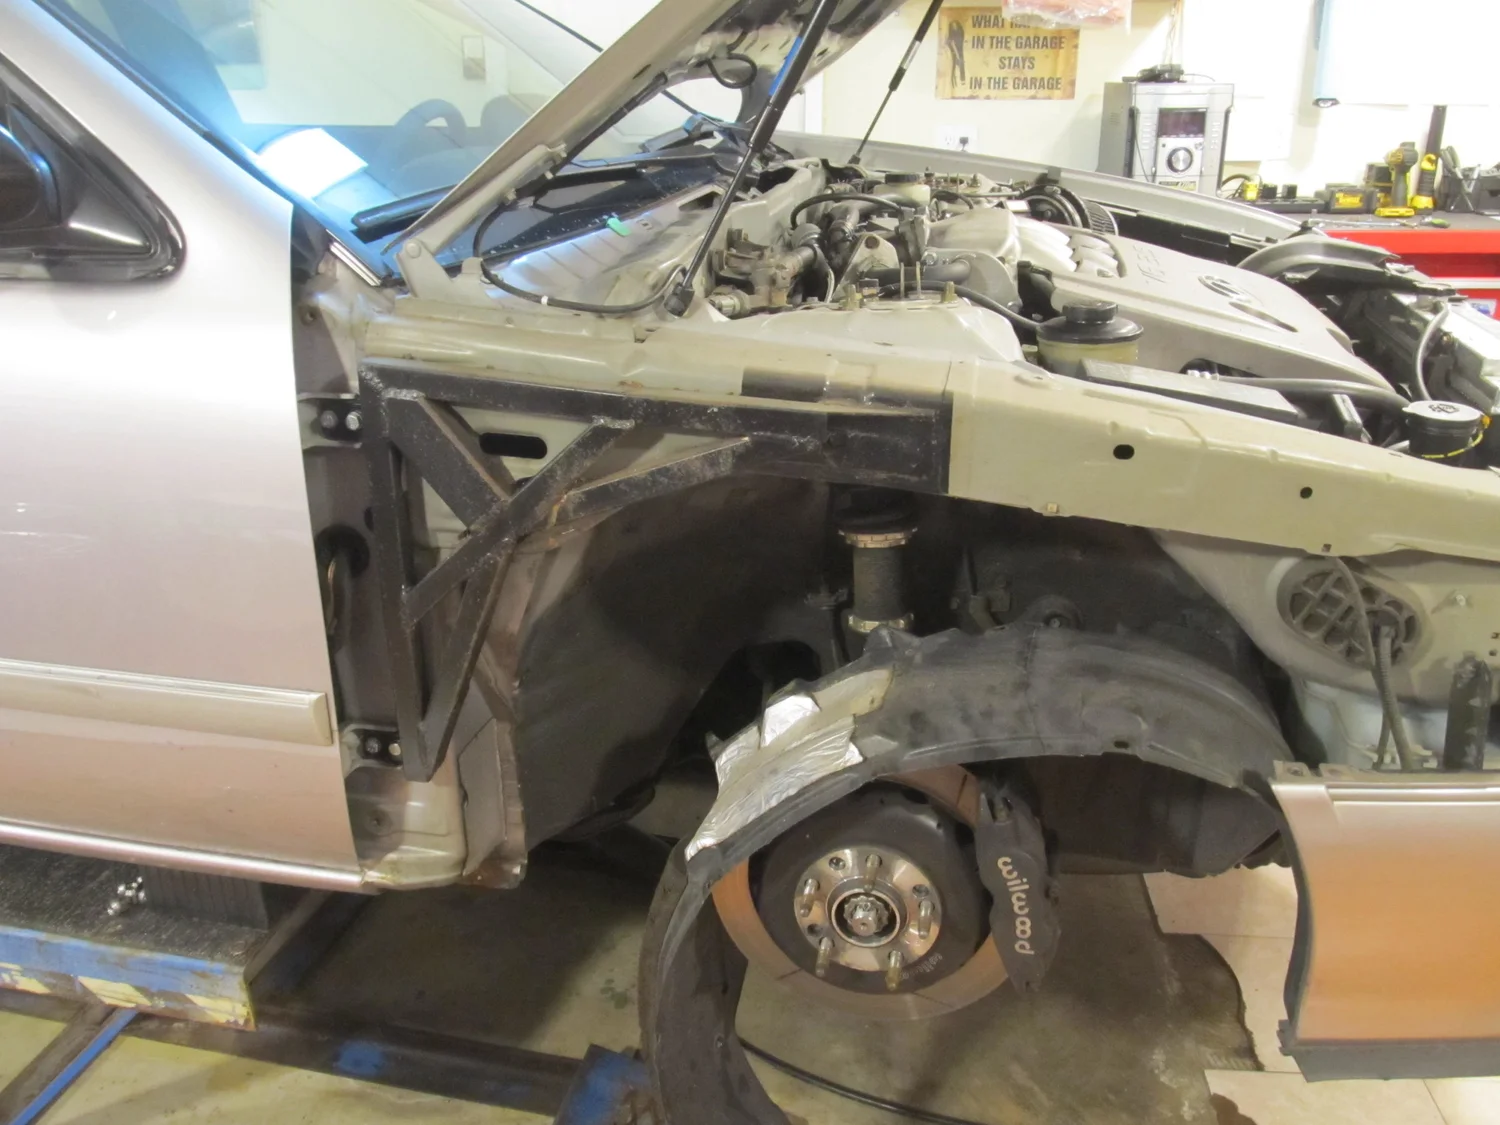
Here are some closeups:

There appears to be a drain hole beneath that large oval hole:

I was able to clear out some debris by sticking my vacuum into the large oval hole, and I think some of it was semi-clogging the drain. I took the car back outside and got the hose ready:

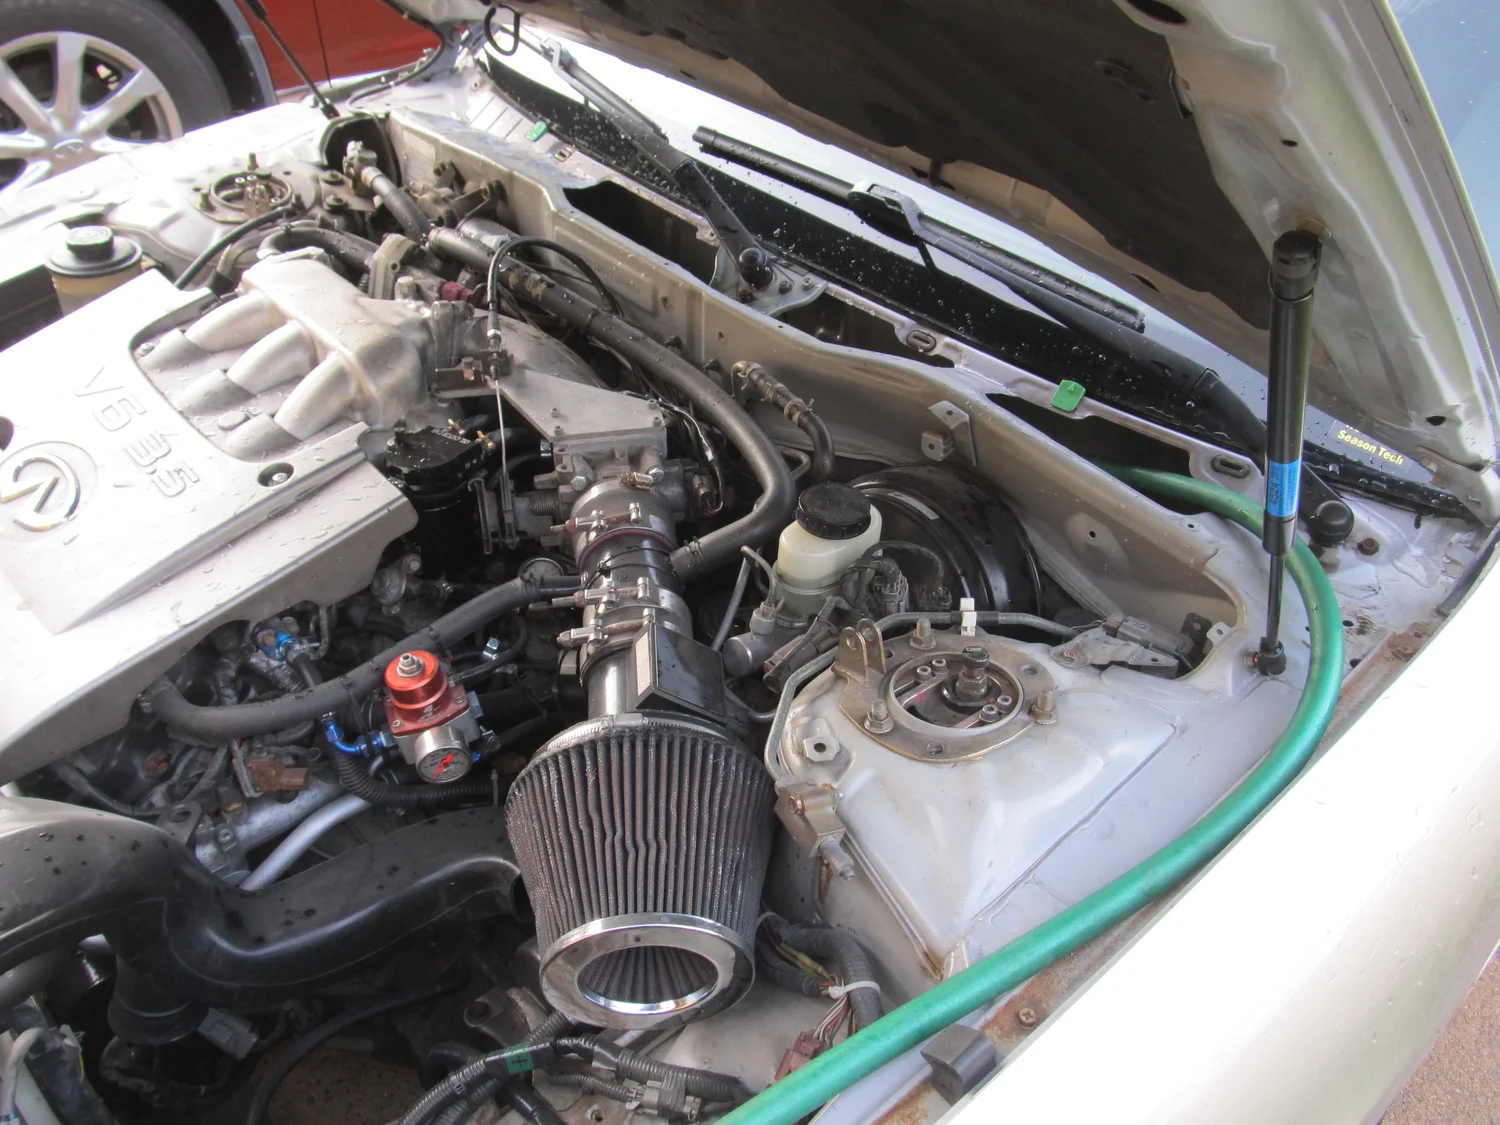
Sure enough, the water mostly drained out of the little drain under the large oval:

This is the view inside the oval hole:
The chamber behind that wall is where the intake for the HVAC is located. That intake sits inside a hole surrounded by metal about 2" high, preventing water from going into the HVAC. Here's a view from the DS:
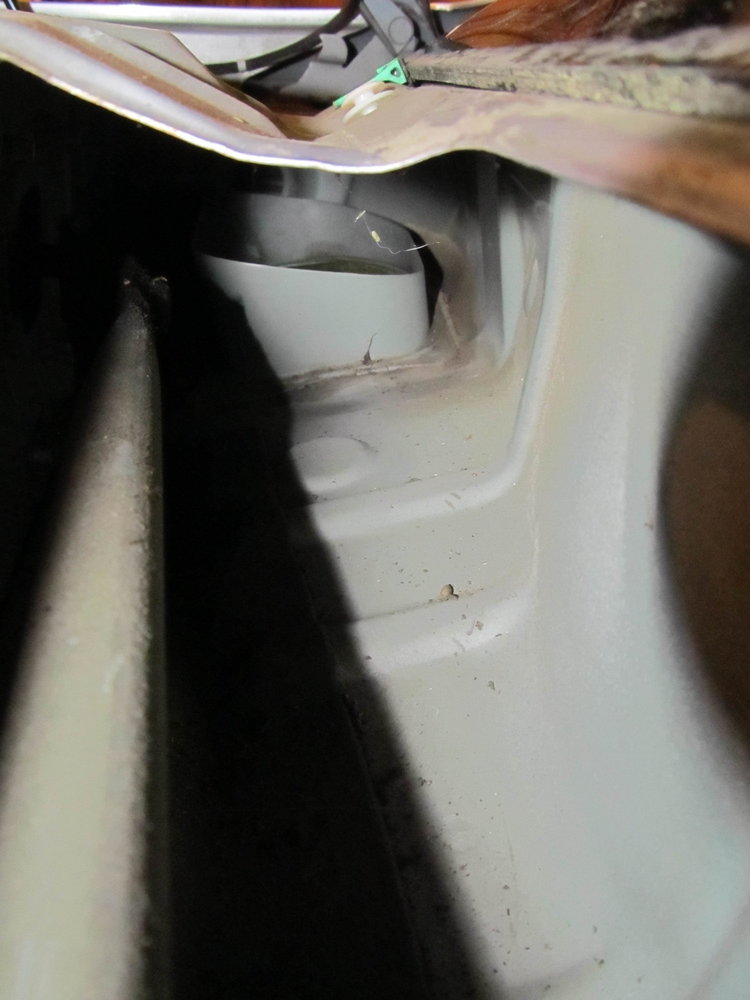
With my hose putting out a lot of water, no water went into the HVAC. But it did come right into the car again! So this seems to point to the problem being somewhere around the HVAC intake on the firewall, and not higher up around the windshield. The only problem is that I can't see a way to access the area where the leak is occurring, none of the metal around the firewall is removable! The only thing I can think to do now is to remove the dash and/or the heater core. Can anyone think of any other solutions here? Am I overlooking something real simple and stupid? Here's a look at the heater core:
I'd be curious to know if anyone who is sending an A32 to a junkyard might be able to hack up the cowl area and take pics of what's inside. I get the feeling that sealing the crack from the inside of the car isn't going to be as effective as sealing it from the outside. Help!
It turns out that the water behind the passenger seat was actually coming from the front of the car, not the rear. That's due to my driveway being on an incline. I located a water leak somewhere around the base of the A pillar on the PS. I removed the A pillar cover, and as far as I can tell, the water isn't coming from anywhere around the windshield. I can only see it coming out from below, in this corner:
So I decided to remove the PS fender to see if there were any visible cracks on the firewall. Unfortunately, taking the fender off did little to help me see where the leak is coming from.
Here are some closeups:
There appears to be a drain hole beneath that large oval hole:
I was able to clear out some debris by sticking my vacuum into the large oval hole, and I think some of it was semi-clogging the drain. I took the car back outside and got the hose ready:
Sure enough, the water mostly drained out of the little drain under the large oval:
This is the view inside the oval hole:
The chamber behind that wall is where the intake for the HVAC is located. That intake sits inside a hole surrounded by metal about 2" high, preventing water from going into the HVAC. Here's a view from the DS:
With my hose putting out a lot of water, no water went into the HVAC. But it did come right into the car again! So this seems to point to the problem being somewhere around the HVAC intake on the firewall, and not higher up around the windshield. The only problem is that I can't see a way to access the area where the leak is occurring, none of the metal around the firewall is removable! The only thing I can think to do now is to remove the dash and/or the heater core. Can anyone think of any other solutions here? Am I overlooking something real simple and stupid? Here's a look at the heater core:
I'd be curious to know if anyone who is sending an A32 to a junkyard might be able to hack up the cowl area and take pics of what's inside. I get the feeling that sealing the crack from the inside of the car isn't going to be as effective as sealing it from the outside. Help!
Last edited by 95maxrider; 01-18-2020 at 05:25 AM.
07-17-2019, 07:39 AM
#555
07-19-2019, 02:48 PM
#556
So Schmellyfart is taking apart a car to go to the junkyard, and was nice enough to snap some pics of what the inside of a 4th gen car looks like with the dash and heater core removed. These pictures are very helpful, and if you look close, you can see an area that is rusting, likely around where mine is doing the same:
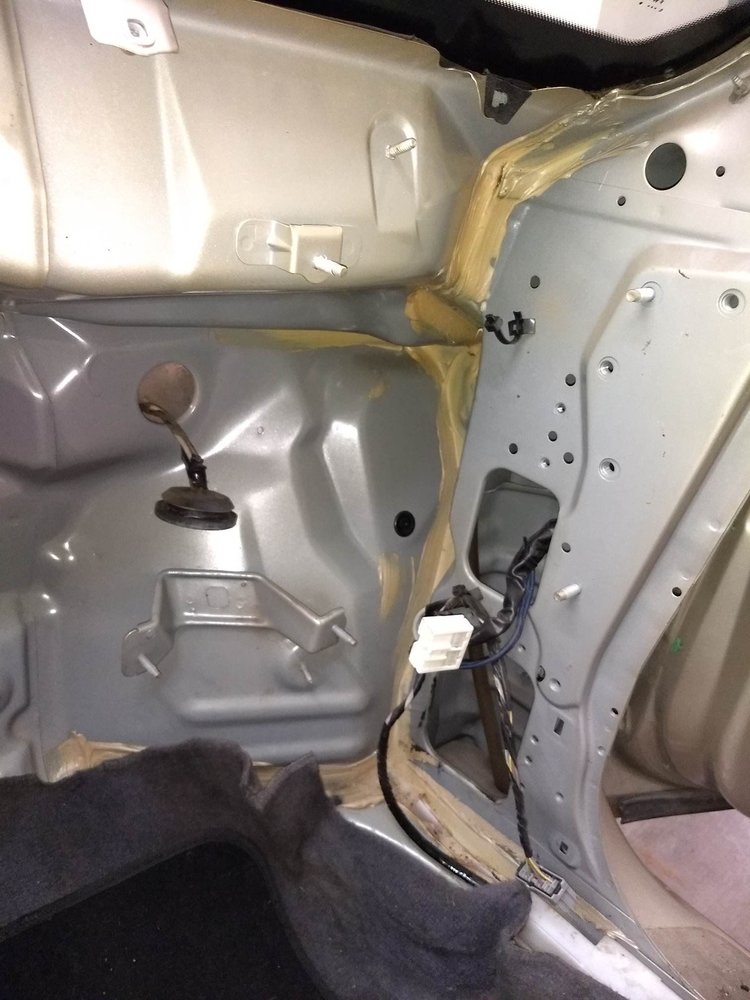


So the pics are great, but even with this added information, I'm still struggling to figure out how I'm going to seal this up from the outside of the car. Is that even worth the effort, or should I just try to seal it from the interior? The area in the pics that's showing some rust is unreachable as far as I can tell from the outside of the car. I'm considering cutting the entire cowl off, and then having it welded back on, just so I can get access to the HVAC intake area. I'm kind of lost on how to proceed from here. Do I just rip the dash out, and hope for the best? Do I attack it from the exterior, and if so, how? Try to wriggle my hand in there and start blindly smearing goo all over the place? I'm going to play around more with my mini cam over the weekend in the hopes I can get a visual of where the problem is. Either way, thank you for the pics schmelly, they're greatly appreciated!
So the pics are great, but even with this added information, I'm still struggling to figure out how I'm going to seal this up from the outside of the car. Is that even worth the effort, or should I just try to seal it from the interior? The area in the pics that's showing some rust is unreachable as far as I can tell from the outside of the car. I'm considering cutting the entire cowl off, and then having it welded back on, just so I can get access to the HVAC intake area. I'm kind of lost on how to proceed from here. Do I just rip the dash out, and hope for the best? Do I attack it from the exterior, and if so, how? Try to wriggle my hand in there and start blindly smearing goo all over the place? I'm going to play around more with my mini cam over the weekend in the hopes I can get a visual of where the problem is. Either way, thank you for the pics schmelly, they're greatly appreciated!
07-23-2019, 01:07 AM
#557
Get a dauber from POR15 site,and coat it with flex seal or something they recommend on there site.
https://www.por15.com/POR-15-Dauber-Kit
https://www.por15.com/POR-15-Dauber-Kit
07-23-2019, 02:59 PM
#559
Get a dauber from POR15 site,and coat it with flex seal or something they recommend on there site.
https://www.por15.com/POR-15-Dauber-Kit
https://www.por15.com/POR-15-Dauber-Kit
Stop being so reasonable! What if I pull the dash and it looks like the pics above, would you try to seal from the inside and hope it works, or go full crazy and cut the cowl?