
WTB: 01 yellow fog tint overlay


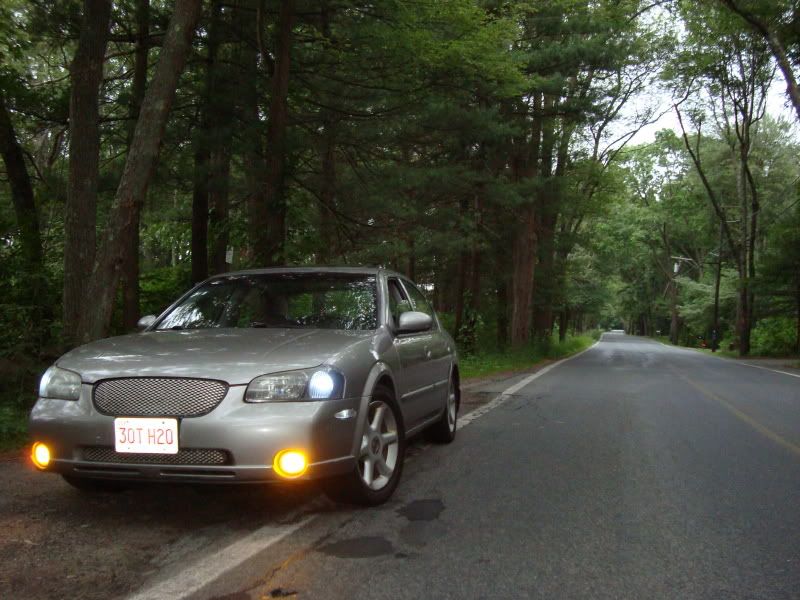
http://cgi.ebay.com/ebaymotors/ws/eB...category=38661 this is what i have an i would highly recomend it to anyone. it gives it a very deep yellow i get compliments all the time on them i used stock bulbs but i have my glare gaurds removed heres a pic it was taken in the early evening 


i did have to remove the lense mine are plastic yours are glass but i used a hand held propane torch and went around the housing a few times after taking out the 2 screws on the sides of the housings. then i just opened them up (i used a screwdriver) and went around the housing (carefully) and once open i removed a smalll screw on the front of the gaurd pop them off and cleaned out the old glue resealed them with high temp silicone. u have to re-aim them down more torwards the road to prevent blinding people theres a screw on the housing to do this i just did a couple of full turns and put them back in. that tint from the ebay link i posted is really good n thick u get a 24'' x 12'' peiece for like $8 bucks free shipping and fast theres enuff to do a bunch of fogs
OK Thanks... I have nothing to lose by trying. The lights work, but both lenses are cracked badly and one has an open hole the size of a quarter. They look like sh*t on my otherwise perfect looking car and I can not stand it anymore. I am going to try and remove the glass and either have some tempered glass cut to fix them or use a high quality lexan and cut that myself. If all elese fails I will pay for the much overpriced new ones I guess. Before those ever go in though I "will" design stone protection for them.
Thanks Again...
Thanks Again...

Didn't do overlays here...but did lexus capsule with 3k hids. I prefer those over a painted or laminated lens. I had overlays on my wife's car....but they hazed up and also started to burn a little in the middle.

those are insane! i like those alot nice max man. if i had the extra cash i would have gone that route but maybe in the future

http://cgi.ebay.com/ebaymotors/ws/eB...category=38661 this is what i have an i would highly recomend it to anyone. it gives it a very deep yellow i get compliments all the time on them i used stock bulbs but i have my glare gaurds removed heres a pic it was taken in the early evening
btw i also have the ebay tint kit, good cheap cosmetic upgrade
maximase86 ive always loved your fog setup


While this topic of overlays is up, i am thinking about getting some 3000k HIDs for my fogs, but from what I have seen, they are typically not yellow enough for my taste. The lexus capsules would be ideal but I definitely dont have enough time to do that mod. The other option would be the yellow overlays, but I dont want the lenses to look yellow when the fogs are off (IMO, that looks tacky). So I was thinking about putting on a yellow overlay first, then a smoked overlay on top of that to match with my smoked side markers.
I have 3 questions about doing this.....
1. Do you think I would have any problems with the overlays peeling using 2 layers?
2. Would the yellow still show through the smoked overlay during the day?
3. Do you think using 2 would significantly reduce the light output?
Thanks in advance for any input.
1. my friends car has 2 layers of yellow no problems yet did it over a year ago
2. i dont believe that it would show threw as long as the tint was dark enuff
3. using yellow tint then smoke tint over it most likely would reduce the light output i doubt it would be that dramatic tho.
other than lexus capsules IMO the yellow overlays is closest to the lexus fogs


While this topic of overlays is up, i am thinking about getting some 3000k HIDs for my fogs, but from what I have seen, they are typically not yellow enough for my taste. The lexus capsules would be ideal but I definitely dont have enough time to do that mod. The other option would be the yellow overlays, but I dont want the lenses to look yellow when the fogs are off (IMO, that looks tacky). So I was thinking about putting on a yellow overlay first, then a smoked overlay on top of that to match with my smoked side markers.
I have 3 questions about doing this.....
1. Do you think I would have any problems with the overlays peeling using 2 layers?
2. Would the yellow still show through the smoked overlay during the day?
3. Do you think using 2 would significantly reduce the light output?
Thanks in advance for any input.
I have 3 questions about doing this.....
1. Do you think I would have any problems with the overlays peeling using 2 layers?
2. Would the yellow still show through the smoked overlay during the day?
3. Do you think using 2 would significantly reduce the light output?
Thanks in advance for any input.

As for your questions:
1. There probably won't be a problem if you take your time and make sure that you don't have air pockets between the layers. How the install goes is a contributing factor on how it will look/last. I would imagine if you took your time, maybe did it with the lights of the car you'll probably have good results.
2. Depends on the tinted overlay I would assume.
3. Again, it'd depend on the tinted overlay. You will probably loose a little output...but I can't say how much for sure.
S


Member
Joined: Aug 2009
Posts: 33


Nice looking vehicles everyone. I am in the process of rebuilding my fogs. I have replaced my glass with 1/4" Acrylic. I just finished tiniting them yellow tonight. It looks great by the way. Tomorrow I will do some masking and paint the edges the same color as the car. I will post a how-to next week hopefully by Wednesday or so.
These will look different than I have ever saw throught the org. I am also planning on doing some improvements within the fog light wells that should improve air circulation around the fog light housings. I think excessive heat has as much to do with our glass breaking as road debris. When you consider the overall design, the front glass surface is all that is exposed to air flow. Very little if any flows beyond that.
Stay tuned...
Looking forward to seeing your results.
These will look different than I have ever saw throught the org. I am also planning on doing some improvements within the fog light wells that should improve air circulation around the fog light housings. I think excessive heat has as much to do with our glass breaking as road debris. When you consider the overall design, the front glass surface is all that is exposed to air flow. Very little if any flows beyond that.
However, anything you can do to increase the airflow and reduce the temperature of the glass may help. I am very interested on what you will to do provide ventilation without letting water in.....
Subscribed.

you can do them yourself like others said or buy the whole assembly here with them tinted already..i say do it yourself for no more than $20 (all you need is less than a yard) for the yellow tinted film.
http://www.octanemotorsports.com/Nis...duct_info.html
http://www.octanemotorsports.com/Nis...duct_info.html
OK Rochester... Here is the finished rebuilt fog light. Replaced glass with Acrylic, and went from clear to yellow. I have a how-to in PDF form, but photo-bucket only allows images and video files. Any suggestions on how to upload the how-to PDF?


Ditto that. I'm not sure what I'm looking at.
I mean, I understand you replaced the glass with a tinted yellow acryllic, although for the life of me I don't know how you did that. (Or why, for that matter. Unless you were having chronic lens cracking.)
And the nose bra makes it difficult to get a familiar perspective.
I mean, I understand you replaced the glass with a tinted yellow acryllic, although for the life of me I don't know how you did that. (Or why, for that matter. Unless you were having chronic lens cracking.)
And the nose bra makes it difficult to get a familiar perspective.
It is color matched paint that covers the area under the acrylic that has the epoxy bead.
I have a how-to that is in the form of a PDF that fully explains the process, but I can not use photo-bucket to upload it. I have no other place on the net to post it first, so I can upload it here.
Any suggestions?
I have a how-to that is in the form of a PDF that fully explains the process, but I can not use photo-bucket to upload it. I have no other place on the net to post it first, so I can upload it here.
Any suggestions?
Or buy a domain with web hosting services and do it up right and (relatively) permanent. GoDaddy is fast and cheap.
Lets see if this works. This should be a link to my how-to process document.
http://www.scribd.com/full/18755089?...nn29swf3gfxhtc
http://www.scribd.com/full/18755089?...nn29swf3gfxhtc
Last edited by Skier; Aug 18, 2009 at 07:02 AM.
Lets see if this works. This should be a link to my how-to process document.
http://www.scribd.com/full/18755089?...nn29swf3gfxhtc
http://www.scribd.com/full/18755089?...nn29swf3gfxhtc
I have to be honest with you, though, I don't care for the ring around the lens. Sorry man, it just looks odd to me. Maybe it's the photo, or the bra, but it isn't appealing, IMO.
Personally, I have a much higher sense of optimism about my lenses cracking or not cracking. I live in Upstate NY, and this region primarily uses dolomite in road construction, whereas most of the nation uses crushed gravel. Big difference. Very few nose bras around here.
Thanks for the compliments on the process document. I write process control documents at work.
Unfortunately, painting the outside ring was just a necessity. You can see in the how-to, what it would have looked like if I did not do it. This was also strictly a "salvage" job for the OEM's. It looks better with the bra off the car as the ring blends in with the same colored fascia. It's certainly not for everyone, so good or not so good reviews are both OK.
I am very familiar with Upstate NY pavement (my favorite motorcycling roads - much better than NH pavement)
Thanks for the input…
Congrats on the DIY and great write-up!
I must say that I am not a fan of the color-match circle either. Maybe if you paint the ring black, it might flow a little better and not stand out so much.
In the "demolition" part, would it be easier to use a dremel with a cutting wheel to cut around the outside? That might provide a smoother cut and not look so bad after the installation of the acrylic.
Thanks... and I did think about black, but thought it would be too much contrast against the OEM bumper Paint. I could maybe photoshop a picture and see if it is worth doing though.
Had I known a Dremel tool would cut glass easilly, and would be easy to control, I may have tried that yes.
Had I known a Dremel tool would cut glass easilly, and would be easy to control, I may have tried that yes.
I still give you high marks about process and skills, I just don't understand the choices made, is all.

Nice work skier.
Though I did notice something, since you removed the glass (which has all the fluting), it changed your beam pattern. It looks like now you have more of a driving light pattern than a wide beam pattern. Maybe it's how it reflected off the pavement, but can you provide a pic of the beam pattern against the wall?
S
I will try and get some more beam pattern pictures up, but yes the beam is more focused.
Rochester, The car paint is Titanium Silver, same as the ring on the fog lamps. What you are seeing as black is just the bra.... Once I get around to repainting the front bumper (quality paint not Nissan's poor excuse for paint), the bra is history...
Rochester, The car paint is Titanium Silver, same as the ring on the fog lamps. What you are seeing as black is just the bra.... Once I get around to repainting the front bumper (quality paint not Nissan's poor excuse for paint), the bra is history...
Thanks... and I did think about black, but thought it would be too much contrast against the OEM bumper Paint. I could maybe photoshop a picture and see if it is worth doing though.
Had I known a Dremel tool would cut glass easilly, and would be easy to control, I may have tried that yes.
Had I known a Dremel tool would cut glass easilly, and would be easy to control, I may have tried that yes.
I honestly dont know how well a dremel cuts glass. Hell, I dont even have a dremel. It was just a thought and i was hoping someone could confirm or nix the dremel idea. Even if it does cut it, the glass dust that it would create would be pretty bad. If anyone tries it, make sure you cover yourself completely.