
How to R&R your radiator


How to R&R your radiator
I haven't seen anything about this, so I thought I would post a DIY for those who aren't 'regulars' at removing their cooling system. If you regularly mess with stuff in this area, things will be easier;if your Max is 13 years old like mine and stuff has not been done to the cooling system before, you will find it more difficult as plastic pieces will break and bolts will be rusty!
ALso, if you have the stock air intake system, changing out the radiator is a lot more work than if you are running with a CAI or WAI, at least it is if you have removed the original intake plumbing.
Disclaimer; If you have no clue, let a professional do it. It's a couple hour job, not difficult, just requires patience. But if you forget to re-connect a tranny hose or radiator hose, it could be very costly! YMMV, usual disclaimers apply, I won't be responsible if YOU screw up!
This Maxima is a 1996 GXE with 170,000 miles on it.
What you will need
1) A new replacement for your radiator. I got mine from an Ebay store for $85 delivered from Georgia to calif.
2) Phillips screwdriver, Flattip screwdriver, ratchet with 6" extension and a #10 socket, pliers or channel-locks.
3) Replacement coolant; many recommend Toyota Red, Toyota dealers charge $28 for a gallon of it. I used the premium Prestone. You will also need a gallon of distilled water.
4) Ramps or jackstands to elevate the front end of the car so you can comfortably get under it. Be safe and chock the rear wheels!
5) Container/pan to drain coolant into. I did not reuse my coolant, so was not concerned about cleanliness of the container.
What I recommend you also have
1) New upper and lower radiator hoses (yours are OLD and may tear when you take them off, its just a good time to get new ones. I got the OBX Ebay blue silicone ones.
2) Maybe a new thermostat (about $17 at autozone). I had one handy but did not install it. Figured the old one has lasted this long, why mess with it; new one only has a 90 day guarantee. One extra thing to have to check for leaks...
3) Some Nissan pieces: the two clips that hold the air intake the the front support. These may not break (mine did not) and you may be able to reuse them, but don't count on it. A couple of new hose clamps for the lower tranny coolant line. The old ons will be "iffy" and my break.
4) Might as well put a new air filter in why you have that stuff off...
5) have a power drill/screwdriver handy for when you remove the bottom covers; lots of bolts to take off.
6) Something to plug the lower transmission cooling lines while you have them removed from the radiator so they don't leak. Maybe a couple of small bolts would work? I had an assistant just hold them up for a few minutes until I could re-connect them.
Ok, ready to get started? I'm gonna post all 4 photos here and you can refer back to them. I took the photos afterwards as an afterthought, so some stuff you won't be able to see in the images.


1) First, put the car up on the ramp or jackstands. Remove all the bolts that hold on the right and left lower covers so that you can take them off and see what you are doing. They will come off with a phillips screwdriver, but if you have a power drill it will make things a lot easier. For the really stubborn ones, get them started with your ratchet and #10 socket.
2) Use your phillips to remove the lower radiator drain plug and drain the coolant into your container. Remove the radiator cap up on top and it will come out quickly!
Why you are waiting for the coolant to drain, start removing the stock air intake system. There is probably an easier way to do this, but I couldn't see it so did it like this; First, take out the 2 stupid screw-clips that hold the air horn onto the upper support (#1) You may have to pry under the screw to put upward tension on it while unscrewing with a phillips. When they are most of the way out, you can pull them out with a pair of pliers.
Remove the 10mm bolt on the air horn that holds the bracket with a bunch of electrical wires connected to it. Push aside the electrical stuff, and put the bolt back in place and tighten it a few turns so you don't lose it.
Loosen the hoseclamp (#2) at the throttle body, then unclip all 4 clips that hold the air filter cover(#3) on. Disconnect the two smaller hoses that connect near the throttle body and the front valve cover. Sorry, I didn't number those. Pull the entire assembly toward you (you should be standing at the driver's side fender) and just turn it and lay it on your right, all wires intact, nothing else
to disconnect. Be careful with the wiring and the MAF, it's a $250 part!
Remove the air filter and then remove the three bolts that hold it to the fender. You will now be able to pull it toward you and the rest of the plumbing will be easy to remove from the car. You may have to use a screwdriver to put pressure at point #10 to get that piece away from the airbox under the battery tray.
Set all those plastic intake pieces aside except for the stuff you have laying up on top by the brake booster.
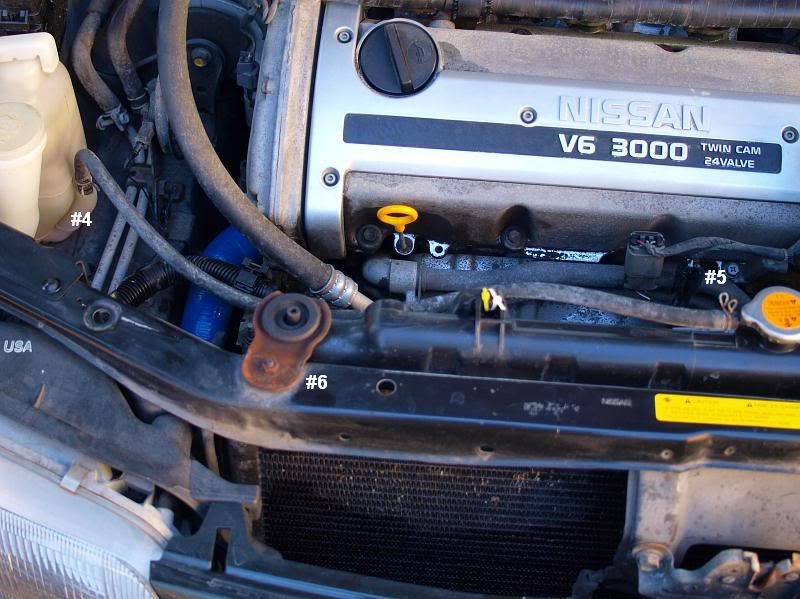
Remove the overflow hose in two places, at the overflow tank and at the radiator cap (#4 and #5)
Loosen the hoseclamp where the lower radiator hose connects to the block

You can leave the hose connected to the radiator at the bottom.
Loosen both hose clamps for the upper radiator hose and remove the hose ($9)
Carefully (needle-nose pliers work best) pull out the two wire holders that hold the fan wiring loom to the plastic shroud. If you follow the wires (#12) you will see them both. Now disconnect the two electrical clips that hold the wiring loom to the fan wires. You have to squeeze them DOWN (toward the connector itself) and wiggle them apart. Just be patient, squeeze and pull aprt at the same time.
Remove both the bolts that hold the fan shroud to the radiator with a phillips screwdriver or #10 socket. DON'T take the shroud out yet because the tranny fluid line is connected to it at the bottom.
Slide under the car (coolant should be all drained out) and after swearing at it a few time remove the tranny line from the lower shroud clip; it will be obvious! I broke the bottom of the clip off, no biggie, hose will be shorter in a few minutes anyway.
With the tranny line unclipped, it should be easy to just lift the fans and shroud up and away from the car and set them aside.
You are getting close!!
ALso, if you have the stock air intake system, changing out the radiator is a lot more work than if you are running with a CAI or WAI, at least it is if you have removed the original intake plumbing.
Disclaimer; If you have no clue, let a professional do it. It's a couple hour job, not difficult, just requires patience. But if you forget to re-connect a tranny hose or radiator hose, it could be very costly! YMMV, usual disclaimers apply, I won't be responsible if YOU screw up!
This Maxima is a 1996 GXE with 170,000 miles on it.
What you will need
1) A new replacement for your radiator. I got mine from an Ebay store for $85 delivered from Georgia to calif.
2) Phillips screwdriver, Flattip screwdriver, ratchet with 6" extension and a #10 socket, pliers or channel-locks.
3) Replacement coolant; many recommend Toyota Red, Toyota dealers charge $28 for a gallon of it. I used the premium Prestone. You will also need a gallon of distilled water.
4) Ramps or jackstands to elevate the front end of the car so you can comfortably get under it. Be safe and chock the rear wheels!
5) Container/pan to drain coolant into. I did not reuse my coolant, so was not concerned about cleanliness of the container.
What I recommend you also have
1) New upper and lower radiator hoses (yours are OLD and may tear when you take them off, its just a good time to get new ones. I got the OBX Ebay blue silicone ones.
2) Maybe a new thermostat (about $17 at autozone). I had one handy but did not install it. Figured the old one has lasted this long, why mess with it; new one only has a 90 day guarantee. One extra thing to have to check for leaks...
3) Some Nissan pieces: the two clips that hold the air intake the the front support. These may not break (mine did not) and you may be able to reuse them, but don't count on it. A couple of new hose clamps for the lower tranny coolant line. The old ons will be "iffy" and my break.
4) Might as well put a new air filter in why you have that stuff off...
5) have a power drill/screwdriver handy for when you remove the bottom covers; lots of bolts to take off.
6) Something to plug the lower transmission cooling lines while you have them removed from the radiator so they don't leak. Maybe a couple of small bolts would work? I had an assistant just hold them up for a few minutes until I could re-connect them.
Ok, ready to get started? I'm gonna post all 4 photos here and you can refer back to them. I took the photos afterwards as an afterthought, so some stuff you won't be able to see in the images.
1) First, put the car up on the ramp or jackstands. Remove all the bolts that hold on the right and left lower covers so that you can take them off and see what you are doing. They will come off with a phillips screwdriver, but if you have a power drill it will make things a lot easier. For the really stubborn ones, get them started with your ratchet and #10 socket.
2) Use your phillips to remove the lower radiator drain plug and drain the coolant into your container. Remove the radiator cap up on top and it will come out quickly!
Why you are waiting for the coolant to drain, start removing the stock air intake system. There is probably an easier way to do this, but I couldn't see it so did it like this; First, take out the 2 stupid screw-clips that hold the air horn onto the upper support (#1) You may have to pry under the screw to put upward tension on it while unscrewing with a phillips. When they are most of the way out, you can pull them out with a pair of pliers.
Remove the 10mm bolt on the air horn that holds the bracket with a bunch of electrical wires connected to it. Push aside the electrical stuff, and put the bolt back in place and tighten it a few turns so you don't lose it.
Loosen the hoseclamp (#2) at the throttle body, then unclip all 4 clips that hold the air filter cover(#3) on. Disconnect the two smaller hoses that connect near the throttle body and the front valve cover. Sorry, I didn't number those. Pull the entire assembly toward you (you should be standing at the driver's side fender) and just turn it and lay it on your right, all wires intact, nothing else
to disconnect. Be careful with the wiring and the MAF, it's a $250 part!
Remove the air filter and then remove the three bolts that hold it to the fender. You will now be able to pull it toward you and the rest of the plumbing will be easy to remove from the car. You may have to use a screwdriver to put pressure at point #10 to get that piece away from the airbox under the battery tray.
Set all those plastic intake pieces aside except for the stuff you have laying up on top by the brake booster.
Remove the overflow hose in two places, at the overflow tank and at the radiator cap (#4 and #5)
Loosen the hoseclamp where the lower radiator hose connects to the block
You can leave the hose connected to the radiator at the bottom.
Loosen both hose clamps for the upper radiator hose and remove the hose ($9)
Carefully (needle-nose pliers work best) pull out the two wire holders that hold the fan wiring loom to the plastic shroud. If you follow the wires (#12) you will see them both. Now disconnect the two electrical clips that hold the wiring loom to the fan wires. You have to squeeze them DOWN (toward the connector itself) and wiggle them apart. Just be patient, squeeze and pull aprt at the same time.
Remove both the bolts that hold the fan shroud to the radiator with a phillips screwdriver or #10 socket. DON'T take the shroud out yet because the tranny fluid line is connected to it at the bottom.
Slide under the car (coolant should be all drained out) and after swearing at it a few time remove the tranny line from the lower shroud clip; it will be obvious! I broke the bottom of the clip off, no biggie, hose will be shorter in a few minutes anyway.
With the tranny line unclipped, it should be easy to just lift the fans and shroud up and away from the car and set them aside.
You are getting close!!
Last edited by trooplewis; Oct 30, 2009 at 06:21 PM.
Remove the nuts that hold the upper radiator guides (#6 and #11). Set the bolts and the brackets aside.
The only thing now connected to the radiator should be the two transmission coolant lines. You will have to crawl under the car, loosen the clamps and pry off the hoses. Have something to plug them with or have an assistant working above hold them up or you are going to be a MESS, it's gonna drip all over you (the joy of being a home mechanic!).
Now you should be able to lift out the radiator with the lower hose still attached to it.
Remove the lower hose from the radiator and save the clamps if they are good.
Get your new Radiator, be sure that the tranny fluid hose connectors are installed at the bottom; mine were not and I had to wrench them on (they came with the radiator, but in a separate bag). Connect the lower hose to the radiator and drop the new radiator into place. Check out the ends of your tranny fluid hoses: I clipped an inch of each because they were so worn at the end. If I had thought about it earlier, I would have had new hose on hand and just replaced them both.
Get under the car and connect both the tranny-fluid cooler lines to the radiator. Tighten the clamps on both tranny lines. Tighten the lower radiator hose clamp in an accessible position so that if you ever have to remove it again, you can get to it. I pointed mine down so that I can unscrew it from under the car if need be.
Things should be looking pretty familiar now, it's just a matter of doing it all in reverse and not forgetting anything.
Make sure the rubber cups are correctly in place that the radiator sits on at the bottom. They may have come out stuck to the old radiator.
Connect the upper end of the lower radiator hose to the block and tighten the clamp there.
Connect the upper radiator hose and tighten clamps at both ends.
Drop fans/shroud back in. My radiator connected differently and did not have thread for the upper shroud bolts. I used cable ties to secure the shroud to the upper radiator, as it did not have a threaded hole to screw into. (See the 2nd photo, to the right of #6) Reconnect the wiring connectors and press them together securely, then press the plastic wire holders back into the shroud.
Clip the transmission fluid hose back into place at the bottom of the fan shroud.
Check everything for clearance.
Put the upper radiator guide brackets back on with the 10mm nuts . The radiator should be capable of some mild wiggling to accommodate engine movement.
Connect both the overflow hoses at the tank and at the cap.
Radiator should be all done, just have to put the air-intake plumbing back together and you are about done. Make sure that the air filter is properly in place and that all 4 clips on the filter box are in place and secure. Don't forget to tighten the 3" hose clamp at the throttle body, and reconnect the two smaller hoses that should still be dangling by one end.
CHECK and MAKE SURE the new radiator has the drain plug in place and properly tightened. Mine was, but you never know!
Fill radiator with a 50/50 mix of coolant and distilled water. Re-look at EVERYTHING and check for things you may have overlooked or hoseclamps you did not tighten! Make sure all your intake hoses are reconnected, aair filter is back in. everything works correctly with no gaps.
Run car with cap off radiator while still up on ramps to "burp" the system as it warms up. Keep radiator full, when system temp is normal, replace cap, check fluid in overflow tank and add if necessary.
Clean up your mess, you are done, I left my lower covers off, just so I could inspect car again after my kid drives it a day or two, for trans fluid or coolant leaks.
Took me 2.5 hours to do it, what with plastic stuff breaking, bolts underneath holding the lower covers stripping, etc. None of that stuff had ever been off the car, for 13 years.
Good luck!
BTW, I'm curious if anyone just leaves the lower covers OFF all the time; doesn't seem like they do much, unless you live in an area with salt on the roads.
Last edited by trooplewis; Oct 30, 2009 at 06:31 PM.
Another note, my radiator was a little "out of square". I noticed it when I took it out of the box. Might have been something that happened in shipping, and I might have been able to straighten it back out if I had tried, but I was concerned about breaking something. End result was that the top of the radiator is a bit more toward the driver's fender than it should be; you can see it if you look at the photos carefully, especially the 3rd image.
I don't think it makes a big difference in anything, so I just left it like that.
I don't think it makes a big difference in anything, so I just left it like that.

I haven't had those covers since the first week I owned my car. All they do is get in the way of working underneath, IMO. Granted, they likely help aerodynamics in some slight way, as well as overall cooling; there's no real difference on or off.

have some pride! this is one of the most well written write ups Ive seen on the .org.
and theres nothing like taking on a job head first that could potentially ruin your engine right?
subscribed for future maintenance
also, what in the hell is that bolted to your radiator support about 3 inches from the battery in pic 3.
and theres nothing like taking on a job head first that could potentially ruin your engine right?
subscribed for future maintenance
also, what in the hell is that bolted to your radiator support about 3 inches from the battery in pic 3.


Thread
Thread Starter
Forum
Replies
Last Post
Unclejunebug
5th Generation Maxima (2000-2003)
10
Apr 2, 2016 05:42 AM
jchronis2552
4th Generation Classifieds (1995-1999)
0
Sep 23, 2015 04:57 PM
RWCreative
4th Generation Maxima (1995-1999)
9
Sep 21, 2015 11:01 AM