
Ready to drop my motor in and I find this..


Ready to drop my motor in and I find this..
Just to get you guys up to speed here - this has been drawn out into a 2-3 year project with this car, my perfectionist attitude turned a jdm VE swap into rebuilding the whole car .. I'll make a thread with progress pics another time when I'm all up and running
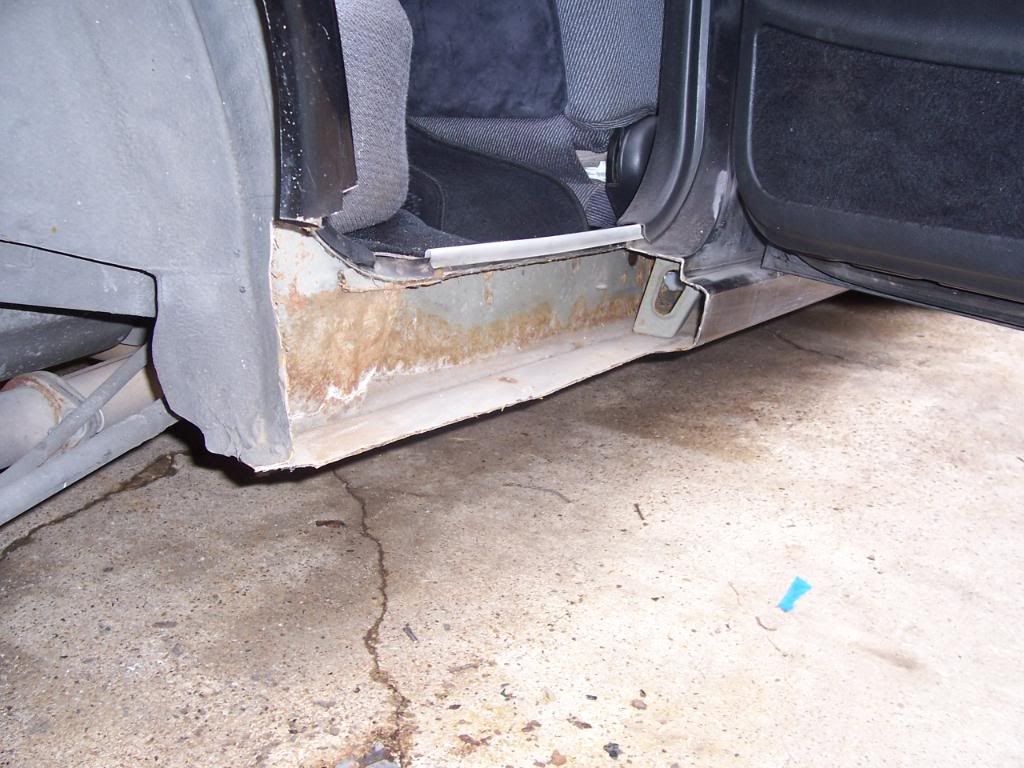
So I'm ready to drop the motor in, I go to bolt the crossmember up and I find the 2 nuts under the radiator support are rusted away. Theres maybe 3 good threads left on each of them. If it was any other nut on the car I'd probably let it go for now but these basically carry the weight of the motor so I need to fix it.
I cut a little "window" to see what was going on in there:

I'm thinking to grind the remains of the nuts down flush and weld new nuts in its place, a few good tacks around the front since I don't want to cut away too much more of my "window" and chop the frame there any more - especially those vertical support walls beside the nut. I started cutting a 2nd window for the other rusted nut but the radiator mount is making it challenging.
I thought you guys mightve liked to see that.. if you have any other ideas then I'm open to hear it, but I'm trying to make this as simple of a fix as possible without hacking up my frame
So I'm ready to drop the motor in, I go to bolt the crossmember up and I find the 2 nuts under the radiator support are rusted away. Theres maybe 3 good threads left on each of them. If it was any other nut on the car I'd probably let it go for now but these basically carry the weight of the motor so I need to fix it.
I cut a little "window" to see what was going on in there:
I'm thinking to grind the remains of the nuts down flush and weld new nuts in its place, a few good tacks around the front since I don't want to cut away too much more of my "window" and chop the frame there any more - especially those vertical support walls beside the nut. I started cutting a 2nd window for the other rusted nut but the radiator mount is making it challenging.
I thought you guys mightve liked to see that.. if you have any other ideas then I'm open to hear it, but I'm trying to make this as simple of a fix as possible without hacking up my frame


update: I cut that opening a little bit bigger and cut out a second opening for the other rusted nut, but that second cut is bigger since i had to take the lower radiator mount out with it in one piece
Everyone has valid points here.. It turns out i wanted to get those windows/openings welded back up (along with the nuts obviously) all at one shot since my friend was already here with all his welding stuff anyway. So this means I didnt have time to paint the por-15 in there and wait for it to dry before closing the 'windows' back up so right now its all bare metal.. but using this stuff looks like my solution to get up inside the 2 holes from the bottom:
http://www.eastwood.com/internal-fra...ay-nozzle.html
I have pictures, will post them later
We're still waiting on the pics! 
That internal frame coating looks cool. Looks like it has great reviews too!
This would really be great to use for you northern guys on the lower rocker panels on the 3rd gen. Drill a few holes in a couple spaces and fill it all up inside there. Alot of times those rust from the inside out. I know when I fixed the lower rocker panel on my Pennsylvania VE, the inner rockers had a good deal of surface rust internally. I really should have coated them with something but I was in a rush.
Here's a pic from when I did that job of what I'm talking about:
alright! picture time! Yes ive been delaying updating this but Ive been going at this car literally every day after work for as long as i can stand the cold outside..
So here are the final cuts I made showing the nuts in their degrading and rusted glory. The cut on the right is larger because i cut out around the radiator mount-cup as one piece

Grinded everything down flush, to prep for welding.. which robbed me of time & patience since my air tools were slowing down and icing up from the colder compressed air

New nuts welded in place

And at the mercy of time, we just welded the cutouts back up with the inside of the frame unpainted, I didnt have time to use the POR-15 inside there and wait for it to dry before welding. So I used that Eastwood internal frame spray (see post #7 above) and shot it up inside both holes pretty good. Then went in there again with regular black paint on top of the eastwood stuff. I did POR15 the outside though, and then went on top of THAT with rubberized underbody coating..

it looks a bit half assed because I was in a rush, but at least its coated. You dont even see it when the motor, radiator, etc are in place. I still had (and still do have) christmas shopping to do and I want to get the car driving asap since my 90 day warranty deadline on the JDM motor is fast approaching
Got my new tires mounted and installed on my cobra rims so now theyre on, put the motor/tranny and everything back in this past weekend, which wound up being a challenging time in the wind & cold
So here are the final cuts I made showing the nuts in their degrading and rusted glory. The cut on the right is larger because i cut out around the radiator mount-cup as one piece
Grinded everything down flush, to prep for welding.. which robbed me of time & patience since my air tools were slowing down and icing up from the colder compressed air
New nuts welded in place
And at the mercy of time, we just welded the cutouts back up with the inside of the frame unpainted, I didnt have time to use the POR-15 inside there and wait for it to dry before welding. So I used that Eastwood internal frame spray (see post #7 above) and shot it up inside both holes pretty good. Then went in there again with regular black paint on top of the eastwood stuff. I did POR15 the outside though, and then went on top of THAT with rubberized underbody coating..
it looks a bit half assed because I was in a rush, but at least its coated. You dont even see it when the motor, radiator, etc are in place. I still had (and still do have) christmas shopping to do and I want to get the car driving asap since my 90 day warranty deadline on the JDM motor is fast approaching
Got my new tires mounted and installed on my cobra rims so now theyre on, put the motor/tranny and everything back in this past weekend, which wound up being a challenging time in the wind & cold
Cool deal! Doesn't look sloppy at all to me, it actually looks good considering what had to be done. You can't even see where the hole was on the left side. Plus like you said you'll never be able to see it anyway.
So you got everything back in? When will you be starting it up/driving it?
Kudos on getting near the end of your resto project!
So you got everything back in? When will you be starting it up/driving it?
Kudos on getting near the end of your resto project!
If this was on the outside somewhere you could see it, i wouldve grinded the welds down smoother and painted it with more care and time.. the undercoating texture is great since it blends in alot of the imperfections/lines/bumps etc
Yep, its almost done, i will have to put up the pictures sometime soon of everything I did in the past 2 years. And after spending all this time and detail, its going to make me quite an angry camper if it doesnt run/drive less than perfect
Yep, its almost done, i will have to put up the pictures sometime soon of everything I did in the past 2 years. And after spending all this time and detail, its going to make me quite an angry camper if it doesnt run/drive less than perfect

Thread
Thread Starter
Forum
Replies
Last Post
tsi6001
5th Generation Maxima (2000-2003)
12
Oct 3, 2022 10:23 PM
ffcbairn
Maximas for Sale / Wanted
1
Aug 16, 2015 09:29 PM
doobadoo
4th Generation Maxima (1995-1999)
2
Aug 15, 2015 06:43 PM