
Genes1s LTB DIY


Genes1s LTB DIY
I've been looking for Lower Tower Brace for my Max for few months now. After contacting blehmco and Truax with no luck, and few other outfits that specialized in fabricating chassis improvement, I decided to to make my own. I'd figure, this would be a good time to learn how to weld. Got a good deal on HF 90 amp Flux Core welder, used with helmet, supplies, and cart for $90. Hope to have tube bender this winter

Spent the first 2 days laying down beads and practice on scrap metals. Pretty bad....
Got better yesterday....
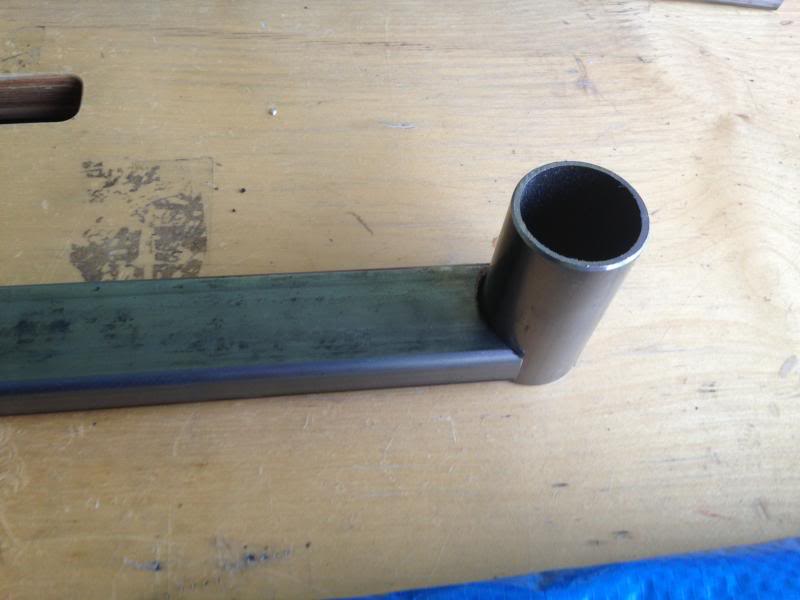
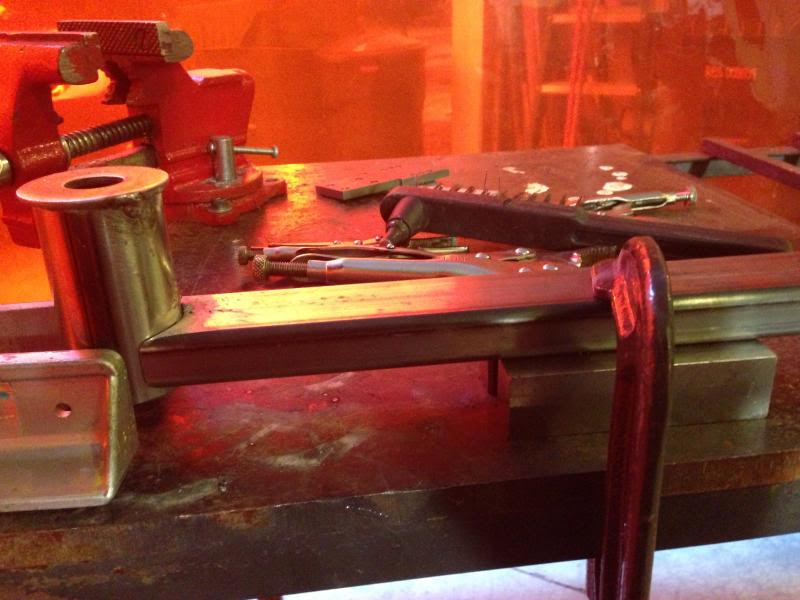
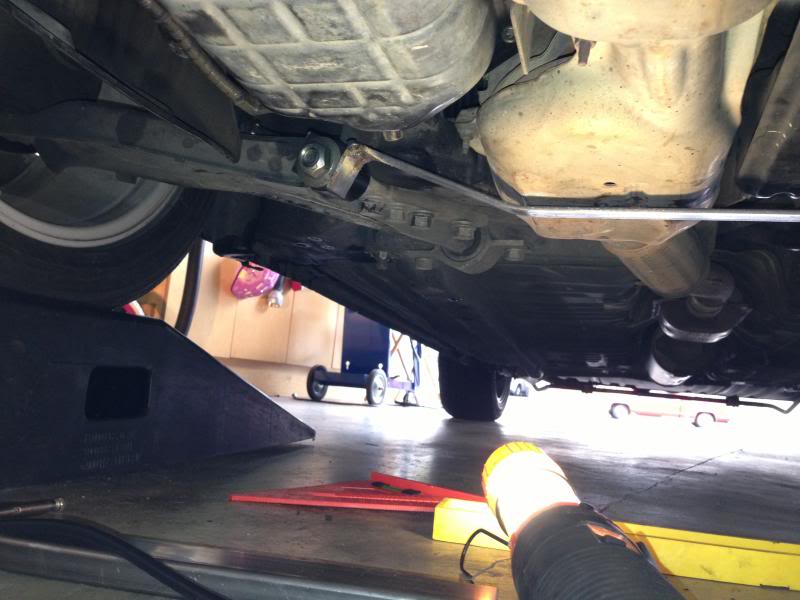
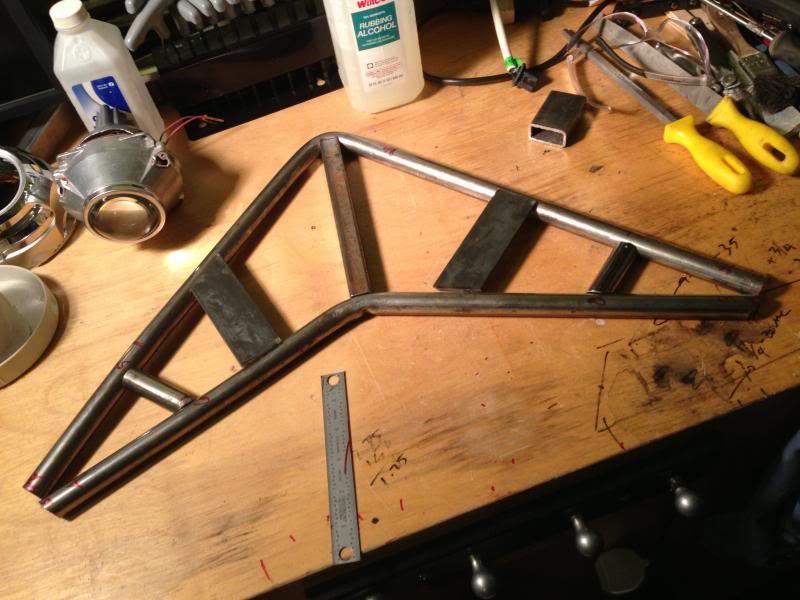
Started cutting and prepping the work piece. The first stage is to connect the front left back sub frame to the right side. I use rectangular tubing 1"x .75"x.095" and 1.5" x .095 round tubing with washer welded at the end.

The second bar is to connect the left LCA mounting to the right one. I plan to connect these 2 bars eventually.
Comments and inputs are welcomed.

Spent the first 2 days laying down beads and practice on scrap metals. Pretty bad....

Got better yesterday....

Started cutting and prepping the work piece. The first stage is to connect the front left back sub frame to the right side. I use rectangular tubing 1"x .75"x.095" and 1.5" x .095 round tubing with washer welded at the end.


The second bar is to connect the left LCA mounting to the right one. I plan to connect these 2 bars eventually.

Comments and inputs are welcomed.


Im only asking because Im curious...what type of research did you do in regards to your design and the car under strain...high turns...low COG etc ?
What about clearance issues...headers etc ?
What about clearance issues...headers etc ?
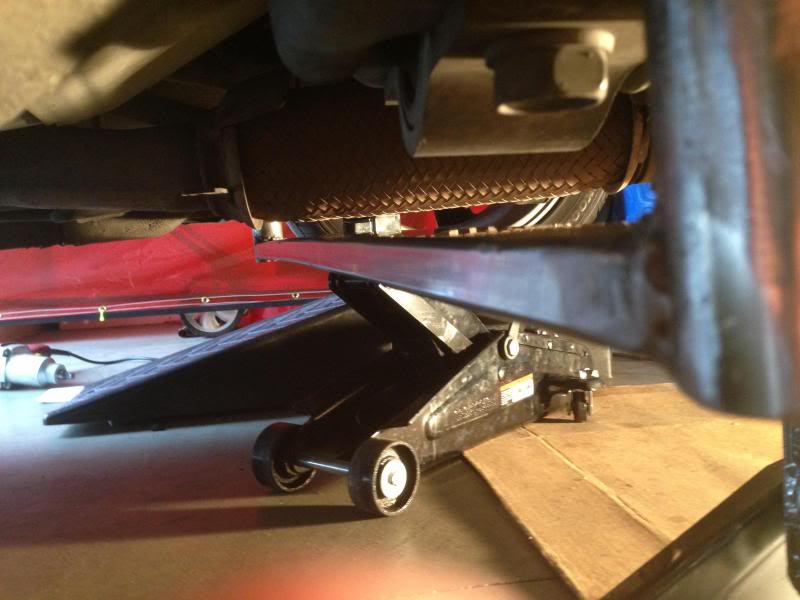
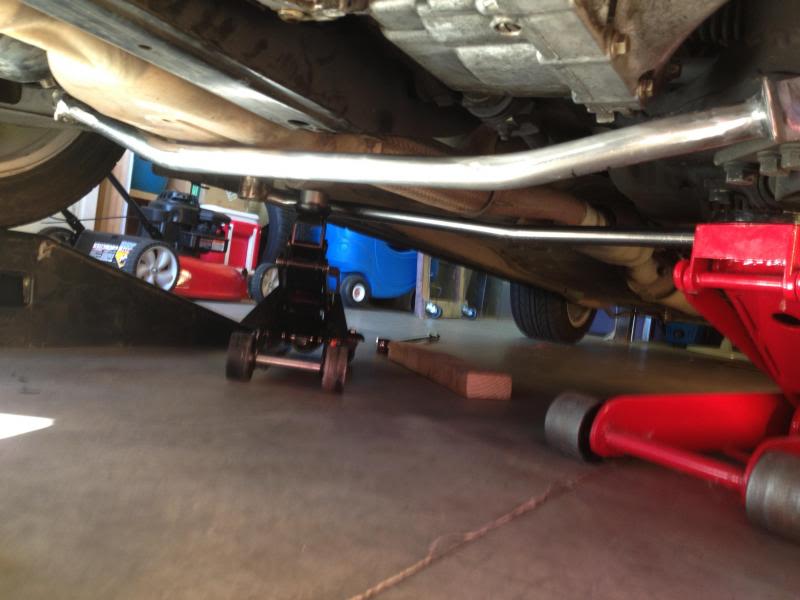
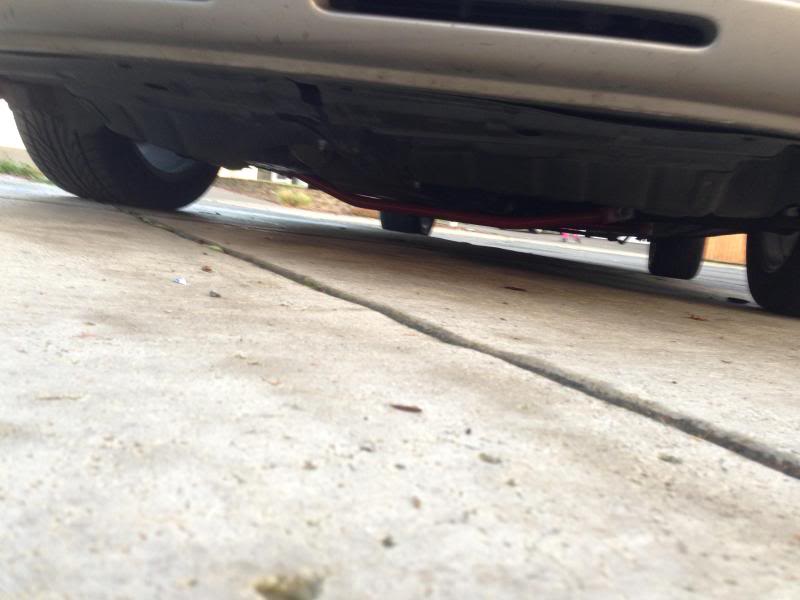
The tubing is 3/4" thick and about 1/8" clearance betweent the tubing to the exhaust. I'm lowered 1.7" front. Once I have tube bender, I might change the design and bend/slope the corner to gain road clearance as much as I can.
The design is pretty straight forward. The bar is connecting the lower control arm mounting points to reduce side loading when you corner hard. Under hard cornering, the bar is under compression, while the front tower brace (FSTB) is under tension (trying to pull outer strut tower out). It is basically my atttemp to "box in" the engine bay and chassis stiffening in general. 75" thick x 1.5" x .095" tubing has more cross seection than .75" diameter tubing, thus it is stiffer. They are also cheaper. The stiffer the chassis,the easier for you to tune and control the vehicle dynamic under loading. Maintaining the pivot and pick up point for the control arm also help maintaining overall geometry of the suspension (camber) thus increasing the steering feel and responds. This is just the first step of my effort to stiffen the chassis. The next chassis stiffening would be the sub frame connecor/collars and B Pillar and trunk brace. Once the chassis is stiff, I move to correcting the roll center axis on the front AND rear due to being lowered. Yes, being lowered can actually make the handling worse! I actually tempting to raise to stock. Low CG is good, if you can maintain the roll center otherwise it will make the car roll more.
yeah....I don't know how you drive that low. Your suspension geometry must be out of whack now with massive bump steer and body roll unless you have extremly stiff spring which would make the bump steer worse which you can fix with anti bump steer kit and/or longer ball joint stud. Either way, it's not easily tuned.
Watch out for the axle too, they don't like it that low.
Anyway, if you are that slammed, ANY chassis stiffening might not work.
Watch out for the axle too, they don't like it that low.
Anyway, if you are that slammed, ANY chassis stiffening might not work.
The car steering sucks by default but no clue if the lowering made it worse since I don't do much extreme driving... I'm using Tein SS with the stock spring rates...
Axles - had a thread already about it... Had to go back to oem to stop vibrations. But now the rear looks way higher than the front so I need to fix asap -_-"
No clue about this longer ball joint stud and anti bump steer kit - will look into it.
Plan is probably ~5 months with this low height then rest of the year with H-tech and KYB GR2 struts...
Stiffening wise - I got those mounts from Knight, sub frame collars, rear anti sway bar and ES motor mounts...
The design is pretty straight forward. The bar is connecting the lower control arm mounting points to reduce side loading when you corner hard. Under hard cornering, the bar is under compression, while the front tower brace (FSTB) is under tension (trying to pull outer strut tower out). It is basically my atttemp to "box in" the engine bay and chassis stiffening in general. 75" thick x 1.5" x .095" tubing has more cross seection than .75" diameter tubing, thus it is stiffer. They are also cheaper. The stiffer the chassis,the easier for you to tune and control the vehicle dynamic under loading. Maintaining the pivot and pick up point for the control arm also help maintaining overall geometry of the suspension (camber) thus increasing the steering feel and responds. This is just the first step of my effort to stiffen the chassis. The next chassis stiffening would be the sub frame connecor/collars and B Pillar and trunk brace. Once the chassis is stiff, I move to correcting the roll center axis on the front AND rear due to being lowered. Yes, being lowered can actually make the handling worse! I actually tempting to raise to stock. Low CG is good, if you can maintain the roll center otherwise it will make the car roll more.
I had the blehmco but sold it

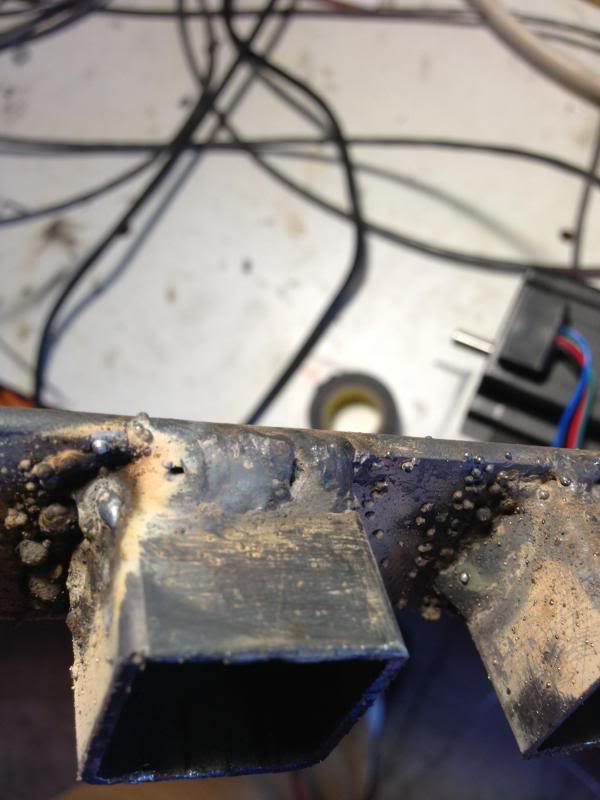
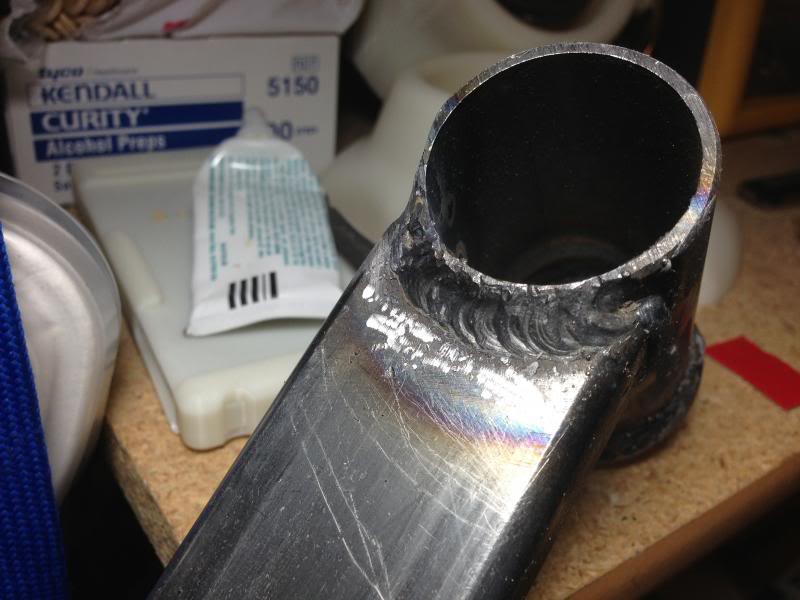
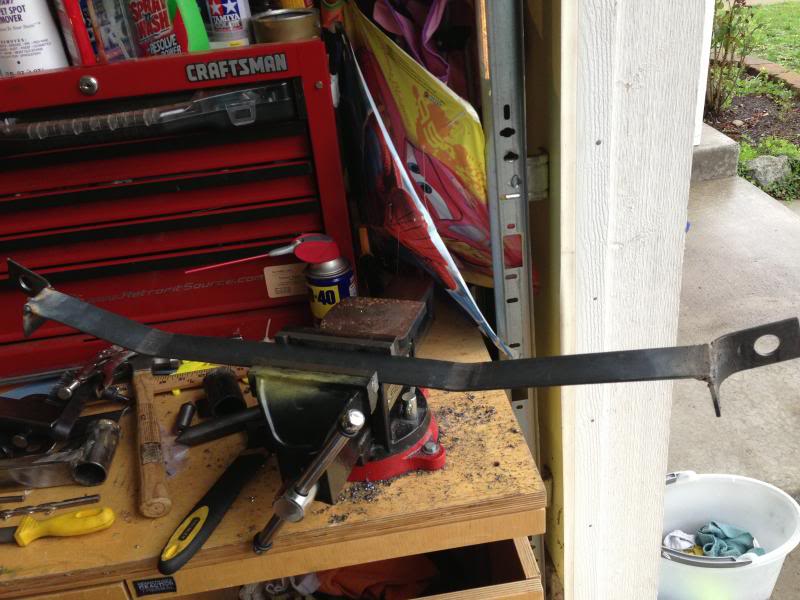
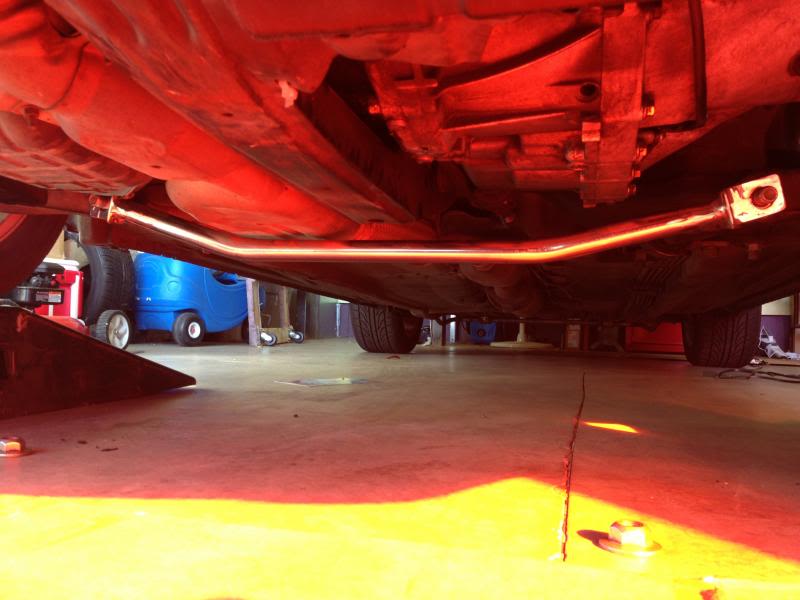
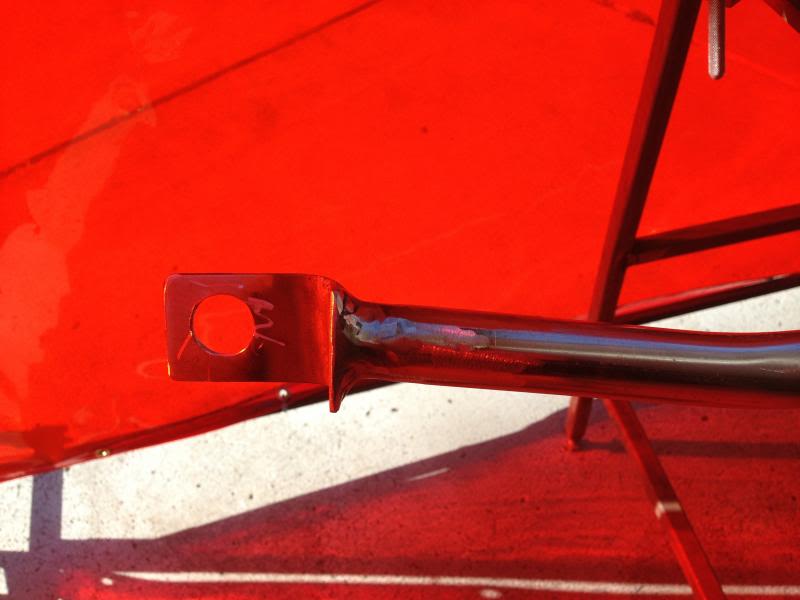
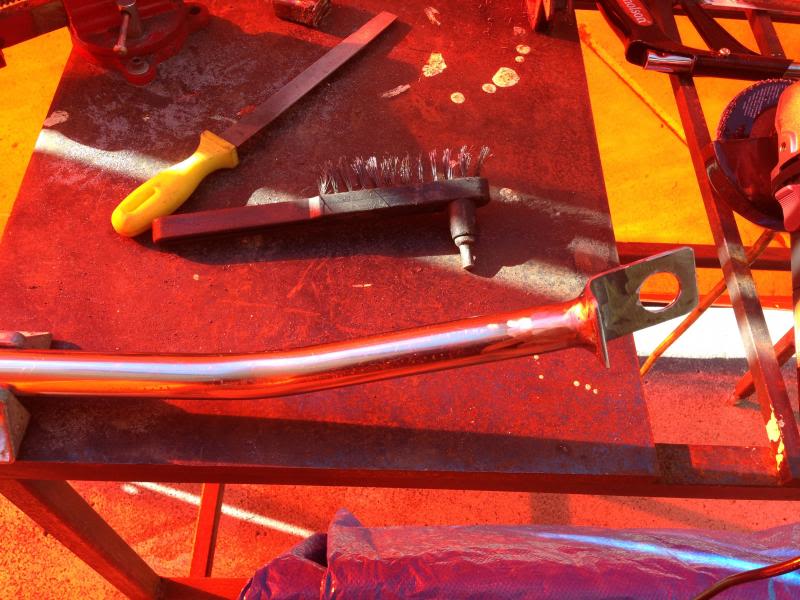
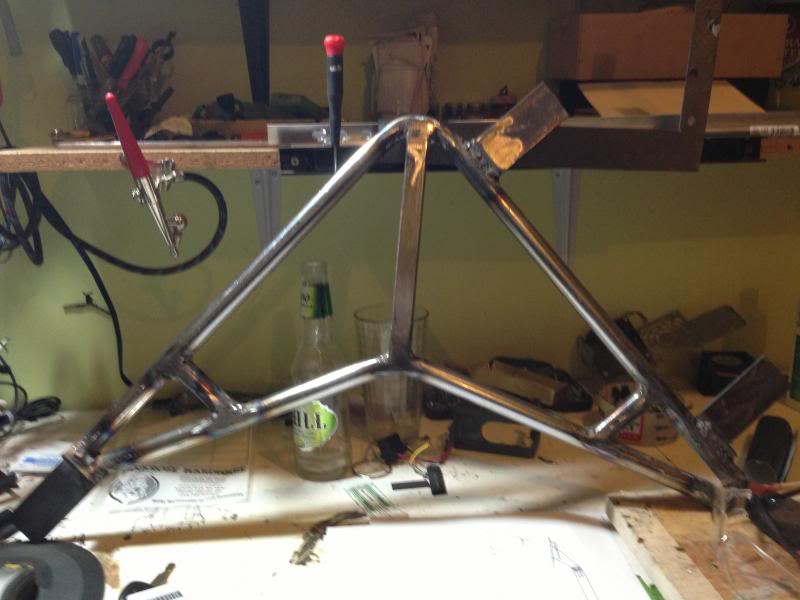
Well.. Welding on a curve/round surface was harder thatn straight line. I got all the pieces welded. My weld still looks like Grand Canyon but getting more comforatable doing it.
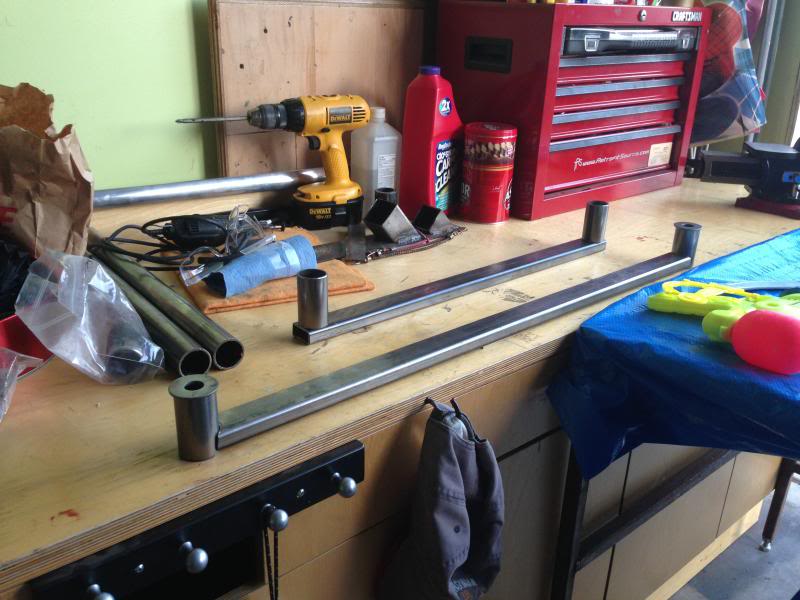
Setup
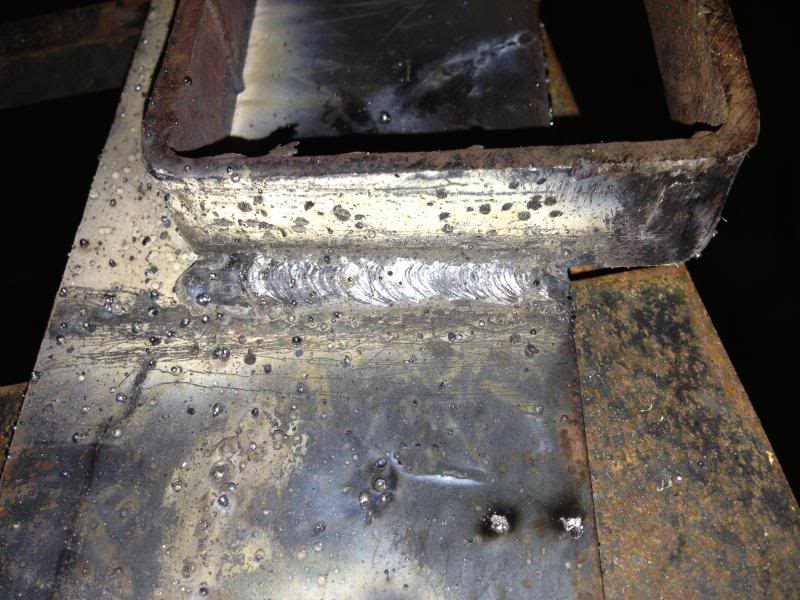
My best weld so far
not so good one
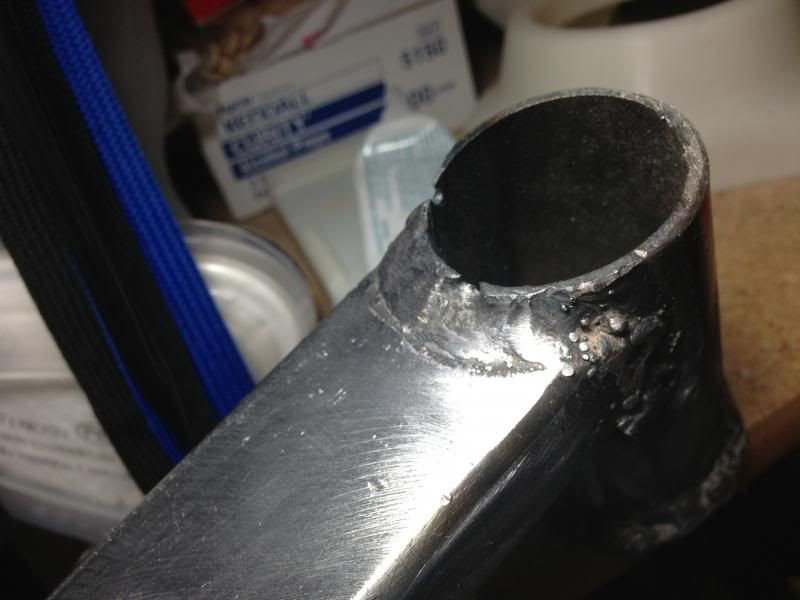

I think,structurally, the weld has good peneration and it is fused with the parent material. It just looks like hell.....
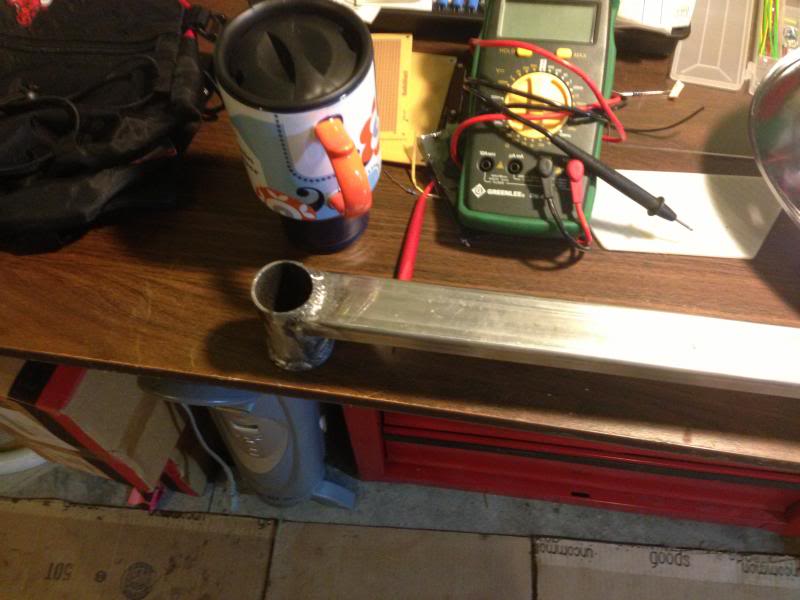
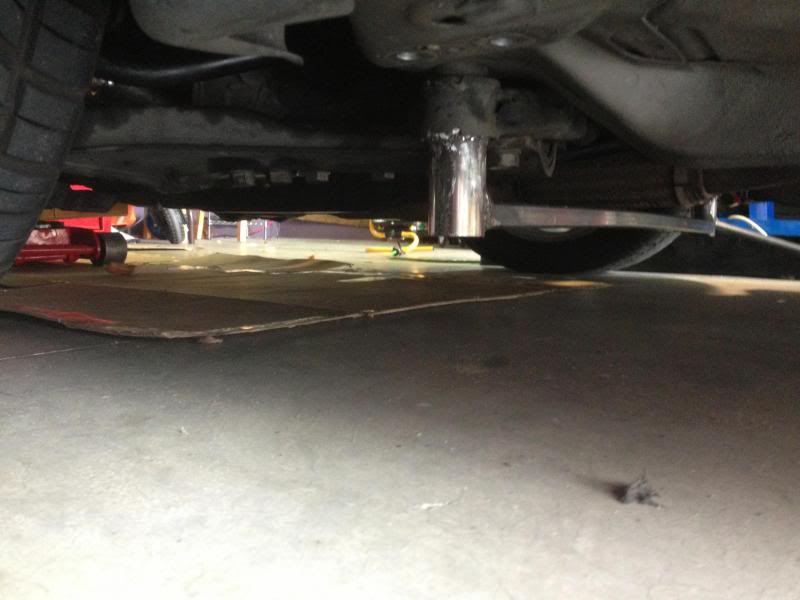
I did test fit it on the car when I tacked it and bolt holes lined up perfectly. I should also have about .25" clearance between the exhaust and the rectangular bar. Hope to move on the the shorter piece to tie the front of the LCA and connect it to this bar.
Setup

My best weld so far

not so good one


I think,structurally, the weld has good peneration and it is fused with the parent material. It just looks like hell.....
I did test fit it on the car when I tacked it and bolt holes lined up perfectly. I should also have about .25" clearance between the exhaust and the rectangular bar. Hope to move on the the shorter piece to tie the front of the LCA and connect it to this bar.
Last edited by Genes1s; Sep 21, 2013 at 10:50 PM.

Not sure about fitment issues but here's one:
http://www.ebay.com/itm/ULTRA-RACING-4POINT-FRONT-LOWER-ARM-BAR-MEMBER-BRACE-98-03-NISSAN-MAXIMA-A33-/321003541075?pt=Motors_Car_Truck_Parts_Accessories&hash=item4abd4d5253&vxp=mtr
http://www.ebay.com/itm/ULTRA-RACING-4POINT-FRONT-LOWER-ARM-BAR-MEMBER-BRACE-98-03-NISSAN-MAXIMA-A33-/321003541075?pt=Motors_Car_Truck_Parts_Accessories&hash=item4abd4d5253&vxp=mtr
Installed, can't wait to try it out. There is a sharp 15 mph turn by my sub division that I'm very familiar with. I got about 1/2" clearance between the exhaust and the pipe, I think I can reduce it to gain road clearance.
9/22/13 afternoon:
Took the car out around the area. Impression
The rough bumpiness that I had due to all the ES bushings are somewhat softened. The front end doesn't move too much on the bump and uneven road. Did figure 8 at the empty parking lot and the front end feels more even/less body roll. Slow speed turn exhibits a little bit oversteer. The biggest surprise so far is the ride quality, which I don't expect. Imagine with full sub frame connectors & B pillar support would do.
Can't wait to finish the rest.....

9/22/13 afternoon:
Took the car out around the area. Impression
The rough bumpiness that I had due to all the ES bushings are somewhat softened. The front end doesn't move too much on the bump and uneven road. Did figure 8 at the empty parking lot and the front end feels more even/less body roll. Slow speed turn exhibits a little bit oversteer. The biggest surprise so far is the ride quality, which I don't expect. Imagine with full sub frame connectors & B pillar support would do.

Can't wait to finish the rest.....
Last edited by Genes1s; Sep 22, 2013 at 02:04 PM.
Not sure about fitment issues but here's one:
Ultra Racing 4POINT Front Lower Arm Bar Member Brace 98 03 Nissan Maxima A33 | eBay
Ultra Racing 4POINT Front Lower Arm Bar Member Brace 98 03 Nissan Maxima A33 | eBay
I've been wanting to design and build my own suspension components for awhile now.
9/28/13
Made a template for the front LCA bar out of thin plate. They are not as simple as the one on the back. The pivot is angled at 2 different planes. With this template, I'll make the real one out of 1.5" X .75" X .085" tubing. Really wish I have tubing bender.....
I took the rear bar out yesterday and I could really tell the bumpiness without it. I could really feel those raised pavement markers without the bar.....
Last edited by Genes1s; Sep 28, 2013 at 09:50 PM.

Member
Joined: Oct 2004
Posts: 175
Decided not to sell the maxima then I guess?
Idea is great and another, for clearance, if you wanted to maximize that flat bar template you could double up on them and double fillet the ends of each side and then just weld the edges every so often (8-10" or so).
If you did that but left your bends at slightly separate points (for each bar) you'd have an effective square tube strength with a lot less clearance and part of the work already done!
Its nice that you always post pics thanks for sharing.
Thanks for the input guys. This flat 1/8" plate is just a mock up. I want it to use it to build welding fixture with it. As far as the real one, it would be made out of rectangular tubing. The idea is to minimize any welding and bending. Too much bending causes warpage. The bar is under compression during hard cornering and any bends would try to bend it. If my math is right, there is roughly about a couple hundred lbf force acting on the LCA pivot during hard cornering. This force is going to try to move/flex the sub fame frame. I'm tempted to make this a science project by attaching sensor to the bar to find out exactly how much stress and strain the bar sees but I think rectangular tubing gives me the most cross section /strength while maintaining clearance. Once I have the fixture build
I can duplicate it with ease.
Noah,
Thought about selling the max because I want better handling sedan. So we'll see how good of this ol Max after the modification. The steering is another things that I hate about the Max. I don't thing it has variable power assist. At slow speed it feels great but at 70mph, the steering as too much slop I think. How about yours?
Last edited by Genes1s; Sep 29, 2013 at 11:57 AM.
10/5/13
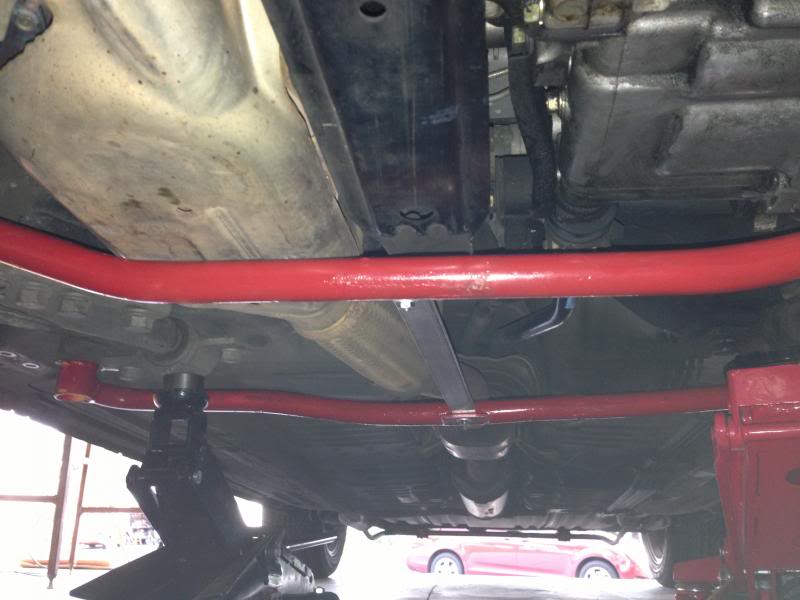
Finally got the front LTB (stage 1) done. I'll redesign the Stage 2 today to gain more ground clearance
The red background is because my welding screen.
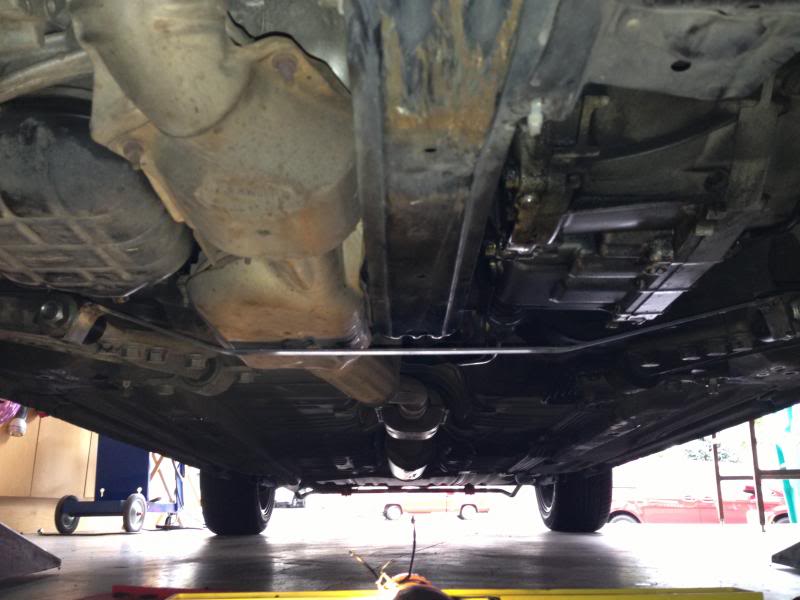
Re designed the back LTB using 1" tubing to match the front one and painted yellow. I would prefer black powdercoated but didn't want to spend any more money and only have yellow in 3/4 full.
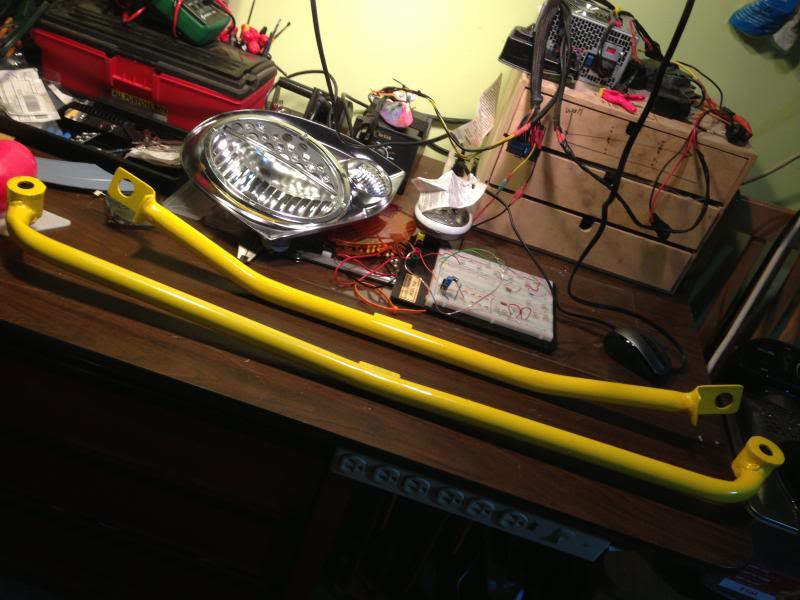
Pretty happy with the look and the result.
Finally got the front LTB (stage 1) done. I'll redesign the Stage 2 today to gain more ground clearance
The red background is because my welding screen.
Re designed the back LTB using 1" tubing to match the front one and painted yellow. I would prefer black powdercoated but didn't want to spend any more money and only have yellow in 3/4 full.
Pretty happy with the look and the result.
Last edited by Genes1s; Oct 6, 2013 at 10:13 PM.

I used 1" tube x .095" wall. The bracket can be a little thicker but 1/8 should be good with good weld joint plus I have more room to thread the nut in. A bolt-on single 1.5" rectangular tubing is connecting between the two bars
So far loving it!
With the front lower tie bar the car feels more straight under hard acceleration and braking.
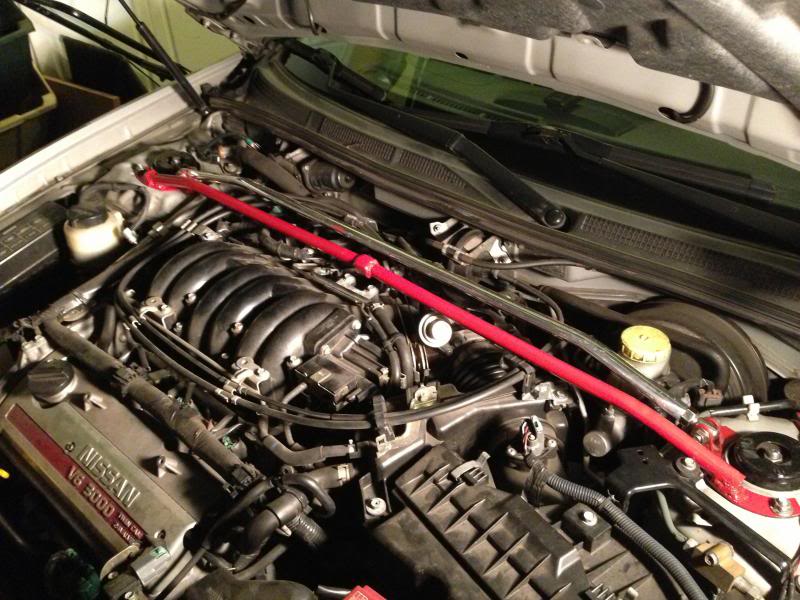
Got carried away tonight and decided to re-enforce the cheap EBay FTSB. Went to steel yard and picked up scrap 3/4" tubing for pretty much free. Cut them in half, moded the base plate, fit/bent up, welded, and painted red caliper brake. Didn't really expect any improvement but what the heck.
With the front lower tie bar the car feels more straight under hard acceleration and braking.
Got carried away tonight and decided to re-enforce the cheap EBay FTSB. Went to steel yard and picked up scrap 3/4" tubing for pretty much free. Cut them in half, moded the base plate, fit/bent up, welded, and painted red caliper brake. Didn't really expect any improvement but what the heck.
Last edited by Genes1s; Oct 11, 2013 at 08:43 PM.
Eventually...once I built the fixture and upgrade my welder.
Been driving it for awhile now and no clearance issue so far. I have about 2.75-3" clerance to the ground.
Been driving it for awhile now and no clearance issue so far. I have about 2.75-3" clerance to the ground.
Last edited by Genes1s; Oct 15, 2013 at 11:12 PM.


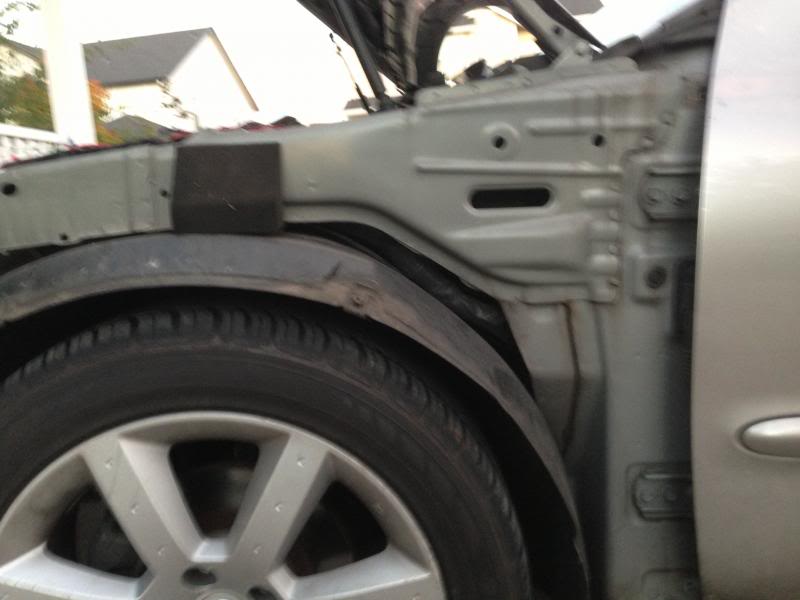
Took a break from doing Maxima 5.5th gen HID Retrofit and started to mock up the fender brace.
Took the fender off. Pretty straight forward. 3 bolts up top, 2 bolts to the front bumper, 2 bolts to the door, 2 bolts to the rail, 4 clips on rain guard.
101/17/13. Welded product
Took the fender off. Pretty straight forward. 3 bolts up top, 2 bolts to the front bumper, 2 bolts to the door, 2 bolts to the rail, 4 clips on rain guard.
101/17/13. Welded product
Last edited by Genes1s; Feb 7, 2014 at 04:01 PM.


It will help IMO. The Lower Tie Bar has reduced the wheel hop significantly. When the car goes under hard acceleration and go thru the bump, it doesn't have that wheel "skip" anymore. Also my torque steer has been reduced to very minimum now. I think what this fender brace does is to somewhat strengthen the A pillar under hard acceleration and nose dive. Eventually I want to tie all of these stiffening structure together, that's the best way to eliminate any stress concentration in the unibody.