
suspension overhaul!!! (pics)


Thread Starter
Member
Joined: Mar 2009
Posts: 78
suspension overhaul!!! (pics)
alright so, im replacing and upgrading quite a few suspension components over the next few weeks and this is my documentary as well as open questionnaire for anybody
components include
-suspension techniques rear sway bar
-tokico struts all the way around
-stillen front strut bar
-random bushings and links as needed all the way around the car
old and new

i painted it red cause theres no way im gonna have that lime green crap on my car
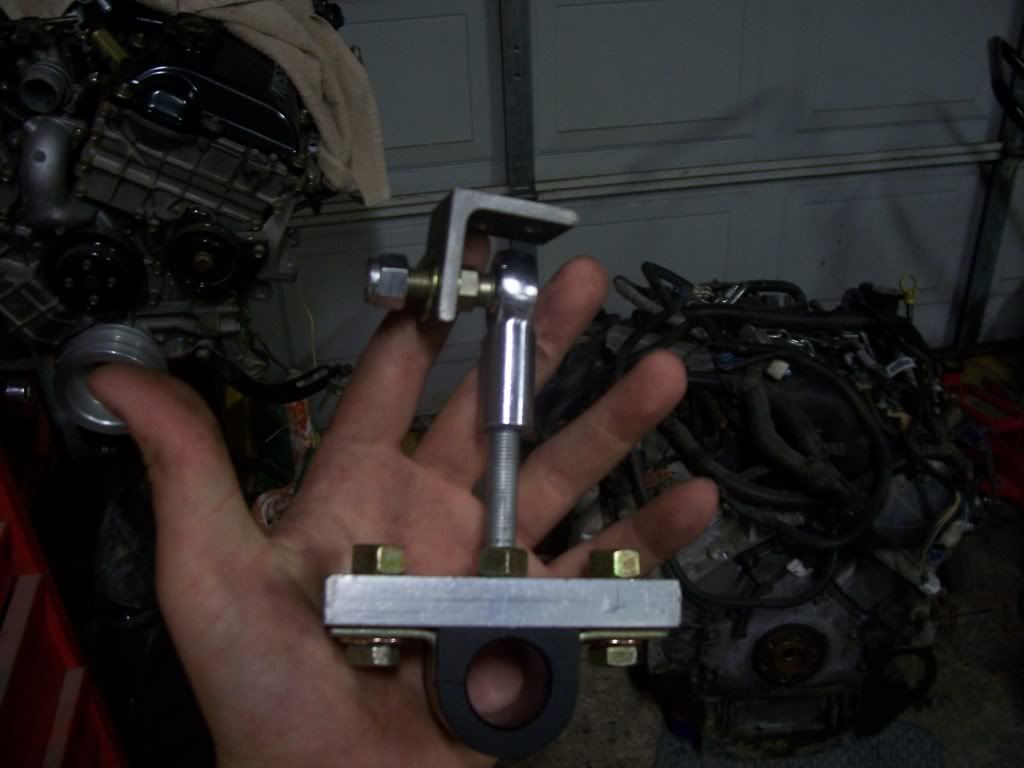
this is where your square bracket goes to mount on the st bar

right underneath the strut holder thing

it was pretty straightforward to get the bracket in. pull out the bolt and the control arm coming from the left of the pic, unbolt the mounting that was holding the control arm up the bottom of the strut holder. then you sandwich the bracket in between and put everything back.
with the bracket installed


to be continued in next post...
components include
-suspension techniques rear sway bar
-tokico struts all the way around
-stillen front strut bar
-random bushings and links as needed all the way around the car
old and new

i painted it red cause theres no way im gonna have that lime green crap on my car
this is where your square bracket goes to mount on the st bar

right underneath the strut holder thing

it was pretty straightforward to get the bracket in. pull out the bolt and the control arm coming from the left of the pic, unbolt the mounting that was holding the control arm up the bottom of the strut holder. then you sandwich the bracket in between and put everything back.
with the bracket installed


to be continued in next post...
Thread Starter
Member
Joined: Mar 2009
Posts: 78
mounting the bushings into the hangers was probably the most difficult part seeing as how the u-shape brackets didnt allow much room for the nuts.
heres the bar all installed

cross-threaded the crap out of this bolt due to no room to put the nut on

final product

will be updating with a short review after i get off work.
i deliver for pizza hut so it will be seeing a lot of use
i want to say thanks to traxtar, maxitech, and james92se for all their help
Last edited by austin from texas; Aug 3, 2009 at 11:41 AM.


expect your sway bar bracket to break/ripped out.
i actually broke a few links.
that cross thread...spin a few threads on one side and then spin a few thread on the other side...then tighten them up equally. there should be no issues w/ stripping....you even had a lift to work under!!
i assume you greased the bushings right?...because they look pretty dry in the pic. i had grease oozing out of everywhere around the bushing when i was done.

good pics of installing that aftermarke swaybar. someone had a question about how to mount one of those last week i think. are you planning to upgrade the rear swaybar links before they break? cuz that bar will *probably* break them before too long.... your best bet is to get the ones from blehmco.com and have them welded in.
Thread Starter
Member
Joined: Mar 2009
Posts: 78
expect your sway bar bracket to break/ripped out.
i actually broke a few links.
that cross thread...spin a few threads on one side and then spin a few thread on the other side...then tighten them up equally. there should be no issues w/ stripping....you even had a lift to work under!!
i assume you greased the bushings right?...because they look pretty dry in the pic. i had grease oozing out of everywhere around the bushing when i was done.
i actually broke a few links.
that cross thread...spin a few threads on one side and then spin a few thread on the other side...then tighten them up equally. there should be no issues w/ stripping....you even had a lift to work under!!
i assume you greased the bushings right?...because they look pretty dry in the pic. i had grease oozing out of everywhere around the bushing when i was done.
i figured that i would have a problem with it falling out. ill have to make a trip to the junkyard soon. i threaded one halfway, then tried to put the other one on sideways, and thats what happened.
note to anyone reviewing this thread to learn: DONT GET EXCITED AND RUSH IT! you will end up spending more money in the end
i assume this is why a lot of career mechanics dont work on their own cars
and i completely forgot to lube the bushings, what kind of difference/damage will it cause?
good pics of installing that aftermarke swaybar. someone had a question about how to mount one of those last week i think. are you planning to upgrade the rear swaybar links before they break? cuz that bar will *probably* break them before too long.... your best bet is to get the ones from blehmco.com and have them welded in.
ive heard of people putting in the sway bars but not needing the links
however, all the bushings on most of those links are shot anyway
er, somehow or another the added stiffness of the bar causes the stock links to snap off or something... i'm not sure HOW it happens, but it often does with stiff swaybars.

Senior Member
Joined: Jan 2006
Posts: 162
From: Massachusetts
Banned
Joined: Apr 2008
Posts: 1,159
From: Ontario, Canada
Cool pix bud - but your undercarriage and suspension looks like you drove it through Iraq - it's dry as hell. If I were you I would spray that beast (with used oil) at the very least then go in and grease the suspension parts with a nitrile glove and hand. Use a Marine Grease or if you don't like attracting dust or dirt use Maxi Coat...but I find this maxi coat stuff isn't the greatest.
Last edited by 1993-VG30E-GXE; Aug 3, 2009 at 05:20 PM.
Thread Starter
Member
Joined: Mar 2009
Posts: 78
im going to the junkyard this weekend to get a new hanger since theyre riveted in.
i didnt hear any squeaking but my windows dont roll down so its kinda hard to hear.
will be lubing tomorrow or wednesday
other than that, main things i notice is since my shocks are busted i didnt bounce off the road as easily, and mainly i could take turns tighter.
i didnt hear any squeaking but my windows dont roll down so its kinda hard to hear.
will be lubing tomorrow or wednesday
other than that, main things i notice is since my shocks are busted i didnt bounce off the road as easily, and mainly i could take turns tighter.

Senior Member
Joined: Jan 2007
Posts: 475
From: NJ
Cool pix bud - but your undercarriage and suspension looks like you drove it through Iraq - it's dry as hell. If I were you I would spray that beast (with used oil) at the very least then go in and grease the suspension parts with a nitrile glove and hand. Use a Marine Grease or if you don't like attracting dust or dirt use Maxi Coat...but I find this maxi coat stuff isn't the greatest.
Hmm, so the ST sways are now lime green? 
Mine are gray, although, they're about 10 years old now. It was my very first mod when I was 16
I have an Addco rear sway bar that I've never installed. It's thicker than the ST, but I really think the way the ST mounts is sturdier than the Addco.
These are what Caped are talking about. I'll get around to installing these one of these years
Hmm, so the ST sways are now lime green?
Mine are gray, although, they're about 10 years old now. It was my very first mod when I was 16
I have an Addco rear sway bar that I've never installed. It's thicker than the ST, but I really think the way the ST mounts is sturdier than the Addco.
These are what Caped are talking about. I'll get around to installing these one of these years
add a pizza delivery gig, you will.
Mine were actually lost for YEARS. I kept telling myself over the years, "I could have sworn I bought a set from Matt", then became resigned to the fact that maybe my mind was just playing tricks on me and I never did get a set.
Then recently I found them, of all places, in the box with my Addco mounting hardware. Whodathunkit that I would have put them in such a logical place
Then recently I found them, of all places, in the box with my Addco mounting hardware. Whodathunkit that I would have put them in such a logical place
Thread Starter
Member
Joined: Mar 2009
Posts: 78
got the rest of my parts in!!!
tokico struts all the way around and stillen strut brace
im really not feeling the blue though, the next time you see them they may be red
if anybody has any opinions on this feel free to express them, idk how much youll be able to see the actual strut so im not sure if its really worth it to paint them


will be installing everything next week sometime, ive got a major project due next tuesday which is my final grade and i havent even started on it and i need to buckle down in electrical class too.
im thinking, front struts one day maybe strut brace the same day, then rear struts last.
maybe vice versa, my rear struts are really f#$&ed
any specific order you would install them? all feedback is appreciated
Last edited by austin from texas; Aug 6, 2009 at 10:55 AM.
if you wanna paint the fronts black go ahead. no sense painting the rears tho since they are hidden inside the casing. since it's already clean and new the pint should stick decently well i'd think.
will be installing everything next week sometime, ive got a major project due next tuesday which is my final grade and i havent even started on it and i need to buckle down in electrical class too.
im thinking, front struts one day maybe strut brace the same day, then rear struts last.
maybe vice versa, my rear struts are really f#$&ed
any specific order you would install them? all feedback is appreciated
im thinking, front struts one day maybe strut brace the same day, then rear struts last.
maybe vice versa, my rear struts are really f#$&ed
any specific order you would install them? all feedback is appreciated
Thread Starter
Member
Joined: Mar 2009
Posts: 78


Senior Member
Joined: Feb 2009
Posts: 2,300
From: Columbia SC
The fronts are pretty easy to access. The rears on the other hand seem time consuming, as you have to remove the rear seat, and all that crap down at the bottom. I think I will pay someone to do my rears, Its a little confusing to me, even though I did replace the rear rotors before. My rear shocks are shot to hell!
Thread Starter
Member
Joined: Mar 2009
Posts: 78
ok, so i finally got around to putting in the rest of my suspension. fronts were easy as hell, got that done in about 2-3 hours as well as my strut brace install.
the rears proved to be quite a difficult task and took me about 2 days equivalent to 5 or so hours worth of work. the second one was much easier than the first since i knew what i was doing.
this section will be more of a how to than the sway bar install
unfortunately the pictures arent as good as the first set
first for the fronts, take off the wheel of course
youll need a phillips head screwdriver to get off the lug cover and a 21mm socket for lugnuts, i prefer an impact gun, much faster
now once you have the wheel off you need to take off these two bolts that connect the strut to the knuckle

it was either a 17mm or 19mm socket cant really remember. i used an impact on the bolt side and a wrench of the same size on the nut side
also you will need to unclip the brake hose from the strut as well
its kinda hard to see but there is a clip holding the hose and you can use a simple phillips head and pry it off

after you have those two steps taken care of you can unscrew the 3 top nuts. get ready to catch the strut because it will fall

this uses either a 10 or 12mm socket, wrench, impact whatever you prefer
once you have the strut out you will need to compress the spring to get the strut out

these dont work too well or maybe i just didnt do it right, idk either way it was easier to use this machine

you dont need really need to mark where the spring is set since the fronts have bearings
Thread Starter
Member
Joined: Mar 2009
Posts: 78
you take off this top bolt (19mm) to get the strut out once the spring is compressed

old and new

these bushings go on top of the strut and under the spring holder thing, as you can see, i need new ones. theyre not 100% necessary, but they do make it a much quieter ride


when you put the struts back in you have to finger tighten the top bolts to put them back on the knuckle, lower the car down so it is under a load, then since i had a strut bar to put on, i simply adjusted it to fit over the strut towers then put the bolts on top. make sure you have the car under a load before you final tighten them

in the spring make sure it is seated in the strut correctly or else it could pop out and cause some major damage everything goes back in reverse order
Last edited by austin from texas; Aug 21, 2009 at 02:28 PM.

 Have you taken her out for a drive yet with all those new suspension goods?
Thread Starter
Member
Joined: Mar 2009
Posts: 78
now the rears are a major pain in the a$$.
first you have to take of the sway bar, then the track arm, parallel links, then brake caliper
this requires 19mm, 17mm, 14mm, 10mm sockets and wrenches. impact guns are always preferable since they work much faster
before everything is taken off

after


once you have taken all the suspension "aligners" off you then have to take out the backseat to get to the strut housing. there are two clips for the bottom of the seat, you simply just pull up and they should come undone. then you lift the front of the bottom up and out. the back of the seat has 2 10mm bolts on each side at the bottom, then behind the middle arm rest there are 2 more 10mm bolts. after you have all those taken out, you lift the seat up from the bottom and push up at the very top. you should be able to see the clips holding it at the top

here is the top of the strut, these are 14mm bolts. come out just the same as the front. again, make sure you have something to catch the strut assembly

Thread Starter
Member
Joined: Mar 2009
Posts: 78
now, before you put it in the spring compressor you will need to mark the spring holder because theres only one right way it will go on. any kind of paint or something stronger than a marker will work. i think i ended up using engine enamel (big gray spot)

once you have the strut out (compress spring, remove top nut) dont forget to clean up the assembly (no more pics, was very frustrated and ran out of room on camera) there is a flat nut sort of thing holding the cartridge in the strut housing. i used a 14" monkey wrench to get this off, and a vice to hold the strut housing.
make sure to put about 2 oz of hydraulic jack oil in the strut housing and lower the new cartridge into the housing.
you should be supplied with a new flat nut thing that is a different size since the oem one will not work. tighten it down as far as you can, does not have to be completely on.
all the while you should still have the spring and top holder still on the compressor, there is no need to take it out. put the strut back up through the spring and holder, tighten down the the top nut and uncompress the spring. again, make sure it gets seated right
then you return the spring to its housing, finger tighten the top bolts only to button up the bottom alignment parts then let the car down once you have everything buttoned up then final tighten the top bolts and put the seats back in and you should be good to go
Thread Starter
Member
Joined: Mar 2009
Posts: 78
the car feels much better than it did before. turns are much much easier and i can turn much tighter than i could before
i took it out for a performance test around the lake today and was having trouble really testing it out. whenever i would take a sharp left turn my car would jerk to the left real hard and put me into oncoming traffic. in a related problem my transmission is having difficulty figuring out when to shift. my shift timing switch seems to be stuck in power mode and im pretty sure thats the cause of it. im also thinking it might have something to do with the cv axle not being splined right. im not sure. im going to look at it when i align it in a week or 2
it's a bump stop AND there's supposed to be a boot as part of it but that looks like it's gone.
no bump stop and you'll start breaking parts.
also the front struts...the upper spring seat has a certain orientation. there's a notch on one part and that should be out.
also it's a good idea to grease/regrease the upper strut bearing.

I thought I took a pic of it so I can show but I guess I didn't.
Last edited by jbbons25; Aug 21, 2009 at 05:18 PM.
Thread Starter
Member
Joined: Mar 2009
Posts: 78
you need that bushing.
it's a bump stop AND there's supposed to be a boot as part of it but that looks like it's gone.
no bump stop and you'll start breaking parts.
also the front struts...the upper spring seat has a certain orientation. there's a notch on one part and that should be out.
also it's a good idea to grease/regrease the upper strut bearing.
im not sure what you mean about the notch though, pic? or maybe point it out in one of mine?

Thread
Thread Starter
Forum
Replies
Last Post
BPuff57
Advanced Suspension, Chassis, and Braking
33
Apr 16, 2020 05:15 AM
bigfrank
4th Generation Maxima (1995-1999)
2
Oct 1, 2015 12:51 PM
JakeOfAllTrades
7th Generation Maxima (2009-2015)
1
Sep 30, 2015 03:16 PM