
How To Remove 4th Gen Door Panels - Quick Guide

How To Remove 4th Gen Door Panels - Quick Guide
How to remove your door panels - A quick reference
I searched around for a bit today, and was unable to locate a guide detailing how to remove 4th gen door panels (most likely similar for other years). This is useful when installing new speakers, fixing window switches, installing car alarms, etc.
This was done on my 95 GXE (5speed Cali if you really want to know) on 3/21/04 while it was snowing outside (Ohio weather is crazy).
First off, locate small tray pictured here:

Pop off that screw cover, then take the screw out.
You can take out the whole tray if you need to (useful for keeping track of screws), though not nessesary.
Next locate the two screws on the bottom of the door panel pictured here:

Take both of those off as well.
Locate your door light, pictured here:

There is a small conector that attaches to it, and I popped off the plastic cover (take a small flat head to either left or right side of it), and removed the two screws holding it in place. This allowed me to pull it out, giving easy access to the attached connector. Alternatively, you can probably reach your hand under the door after you have completed the next step.
Next, apply pressure all along the door panel, start at the bottom, then do the sides. There are several pop-screws that will pop out with a bit of force. Also, having the window down helps a bit with removing the whole door panel.
The last thing to remove is the doorlock/window switch connector, which can be a little stubborn, be gentle so as to not break it.
Removing this black piece may also be of some use in particular projects, it easiy pops out with a flathead, shown here:

To reinstall, just reverse the steps. Pop the black panel back in place (if you removed it). Reattach both connectors. Align the door panel on the window lip, then pop the tabs back into place. Attach the bottom two screws, then attact the center screw & tray, replace screw cover, and you are done!
I searched around for a bit today, and was unable to locate a guide detailing how to remove 4th gen door panels (most likely similar for other years). This is useful when installing new speakers, fixing window switches, installing car alarms, etc.
This was done on my 95 GXE (5speed Cali if you really want to know) on 3/21/04 while it was snowing outside (Ohio weather is crazy).
First off, locate small tray pictured here:
Pop off that screw cover, then take the screw out.
You can take out the whole tray if you need to (useful for keeping track of screws), though not nessesary.
Next locate the two screws on the bottom of the door panel pictured here:
Take both of those off as well.
Locate your door light, pictured here:
There is a small conector that attaches to it, and I popped off the plastic cover (take a small flat head to either left or right side of it), and removed the two screws holding it in place. This allowed me to pull it out, giving easy access to the attached connector. Alternatively, you can probably reach your hand under the door after you have completed the next step.
Next, apply pressure all along the door panel, start at the bottom, then do the sides. There are several pop-screws that will pop out with a bit of force. Also, having the window down helps a bit with removing the whole door panel.
The last thing to remove is the doorlock/window switch connector, which can be a little stubborn, be gentle so as to not break it.
Removing this black piece may also be of some use in particular projects, it easiy pops out with a flathead, shown here:
To reinstall, just reverse the steps. Pop the black panel back in place (if you removed it). Reattach both connectors. Align the door panel on the window lip, then pop the tabs back into place. Attach the bottom two screws, then attact the center screw & tray, replace screw cover, and you are done!

Supporting Maxima.org Member

Joined: Oct 2000
Posts: 9,159


edit: webpage is changed will just toss this photo up for this thread to add more info, basically every arrow points to what needs to be taken out.

1. pop out, use a cloth and flathead screw driver, do it enough and you will find the sweet spot that pops it out easier.
2. pop out electric window thingy, same thing cloth and flathead screw driver, will need to disconnect motor from wiring harness.
3. flat head screw driver will pop out the tab , use phillips head to take out screw
4. (2) phillips head screws here,
5. pop out the around the edges of the door panel and then life the door panel up and off.


Newbie - Just Registered
Joined: Nov 2006
Posts: 7
<-- Noob. I've got a tall order. Recently an uninsured motorist hit me on my drivers side seriously damaging my front and rear exterior side panels. I bought this car just weeks ago and my insurance hasn't come through yet, so I'm on my own in bringing her back to her beautiful self. Does anyone know somebody who could hook me up with a guide to removing the panels, possibly taking off the door, and banging out as much of this damage as possible? I'd start a thread, (not in here) but I don't have enough posts yet.
Any help would be much appreciated.
Any help would be much appreciated.

Newbie - Just Registered
Joined: Apr 2004
Posts: 3
Some helpful hints for those who, like me, may try to do things in a different order or struggle to get it off. I did 4, 5, and then 3 of Caesar's post above. Then I removed and unscrewed the courtesy light in the door, a necessary step to get enough room to maneuver.
At that point, I could then lay on the ground and peer up and see how to get the door release thingy to pop out. It was much easier and less prone to damage to release it from the inside of the door.
Since I was doing the driver's side door, I also had the trunk popper button in the arm rest to deal with. I skipped #2 and instead just removed the wiring harnass from the back side of the trunk popper button. It was possible to leave the window controls connected and move the panel out of the way for what I needed to get at, but it could also be disconnected if necessary.


The "pop out" door handle cup does not pop out very easily, and if you force it you will break it in half.
Pry it gently forward and you will see the top clip point, toward the front of the car. Gently pry up on the clip with a small flat-tipped screwdriver while prying the cup away from the door with a wide-blade flat tip screwdriver, and it will come out nicely.
After I broke the first one and saw what was going on, the 2nd door was easy. 8-(
New Infinity Reference speakers sound a lot better than the stock non-bose paper cone speakers.

And 2 year old thread FTL.

Supporting Maxima.org Member
Joined: Apr 2004
Posts: 453
From: temple hills, md
yeah, old thread, but i've always popped the lil' cover over the screw in the bottom of the door pull/cup, removed the screw and just lifted the cup out of the door (#3 above). the window switch holder, i leave in place and just unplug it once the panel is off. no need to fight with pulling it out of the panel unless replacing that part. biggest fight is bezel around door handle...still it's only a few seconds to remove. with the panel off you can push the switch hoder out from below easier by pressing the clips to release.
just my.02
just my.02
Jeez pmohr, it's not like I resurrected an old thread, it's a STICKY and it never moves. I read it thoroughly before I removed the panel and NO ONE mentioned anything specific about the door-handle cup, other than "pop it out".
Well I can testify that if you just stick a screwdriver behind it and pry, you will break off the bezel if you do not unclip it first, depending on where the screwdriver makes contact with the cup.
But it's easy if you look for the clip on the door panel and pry it up a bit. BTW, there's a clip on the top and one on the bottom, but you only have to unclip one and it slides right out.
Nitromax, you are talking about the cup in the armrest. I am talking about the trim plate behind the actual door handle/lock, yes, the bezel you called it.
One other thing, I did not have to remove any of the P/W switches before removing the panel. You can unclip the connections on the back of the panel after you remove it from the door, and leave all the switches in place. That works for the trunk release, the drivers P/W switches, and the passenger P/W switch.
Last edited by trooplewis; Mar 29, 2009 at 08:51 PM.
Jeez pmohr, it's not like I resurrected an old thread, it's a STICKY and it never moves. I read it thoroughly before I removed the panel and NO ONE mentioned anything specific about the door-handle cup, other than "pop it out".
Well I can testify that if you just stick a screwdriver behind it and pry, you will break off the bezel if you do not unclip it first, depending on where the screwdriver makes contact with the cup.
But it's easy if you look for the clip on the door panel and pry it up a bit. BTW, there's a clip on the top and one on the bottom, but you only have to unclip one and it slides right out.
FWIW you did resurrect an old thread, the post before yours was in '07. And calm down, it's not like I raged on you for bumping it.
Indeed, if you go shoving screwdrivers everywhere, you're going to start breaking stuff, especially small trim pieces. Personally I don't even use tools, I just pull it off, and they always come right off for me.

Why does the dude who made the thread 5 years ago remove the black mirror piece? Not necessary. Neither is the light piece, just unclip the connector. To plug it back in, use needle nose pliers.
The right tool for the job makes things nice as well.
http://www.sjdiscounttools.com/lis35400.html
Using this means the plastic clips and the spots they lock into never break.
Of course I've done alot of interiors so it may not be required for the one off interior job.
http://www.sjdiscounttools.com/lis35400.html
Using this means the plastic clips and the spots they lock into never break.
Of course I've done alot of interiors so it may not be required for the one off interior job.


Junior Member
Joined: Mar 2009
Posts: 16
From: North Carolina
I just replaced my door speakers yesterday, and had a couple of things to add to this.
1) The door handle cup- really a PITA. Push the cup towards the front of the car, and pull out the back side. Now, you have 1 of 3 clips released. The next two oppose one another about 80% of the way towards the front of the cup, 1/4 inch back from the face of the cup on both the top and bottom. I used a small screwdriver and pried the black clip up to release the top. Once the top is released it comes right out.
2) I didn't need to remove the door light to change the speakers. Found out by forgetting to remove it...
3) GET THAT PANEL TOOL! With both doors I found that the lower two clips come out, but the upper two, broke right off, and stayed in the door (not the panel). I didn't think much of it initially, but now noise is coming through the top of the door panel where it's not held tightly to the glass anymore... :-(
At least I planned to go back and soundproof it.

Senior Member
Joined: Jan 2005
Posts: 637
edit: webpage is changed will just toss this photo up for this thread to add more info, basically every arrow points to what needs to be taken out.
1. pop out, use a cloth and flathead screw driver, do it enough and you will find the sweet spot that pops it out easier.
2. pop out electric window thingy, same thing cloth and flathead screw driver, will need to disconnect motor from wiring harness.
3. flat head screw driver will pop out the tab , use phillips head to take out screw
4. (2) phillips head screws here,
5. pop out the around the edges of the door panel and then life the door panel up and off.
And the prying tool mentioned above, that's easily found at an autozone, right?
The rear door is a little different but it's the same idea. You really don't need a prying tool. I used a screwdriver wrapped in a thin cloth, but of course any strong thin plastic tool is best to reduce the risk of scratching anything. Once you get the screws off you just pull the panel straight off. If you spend a little time searching the forum I'm sure you can find a detailed write-up.
Here is my rear door with the panel off if it helps at all.
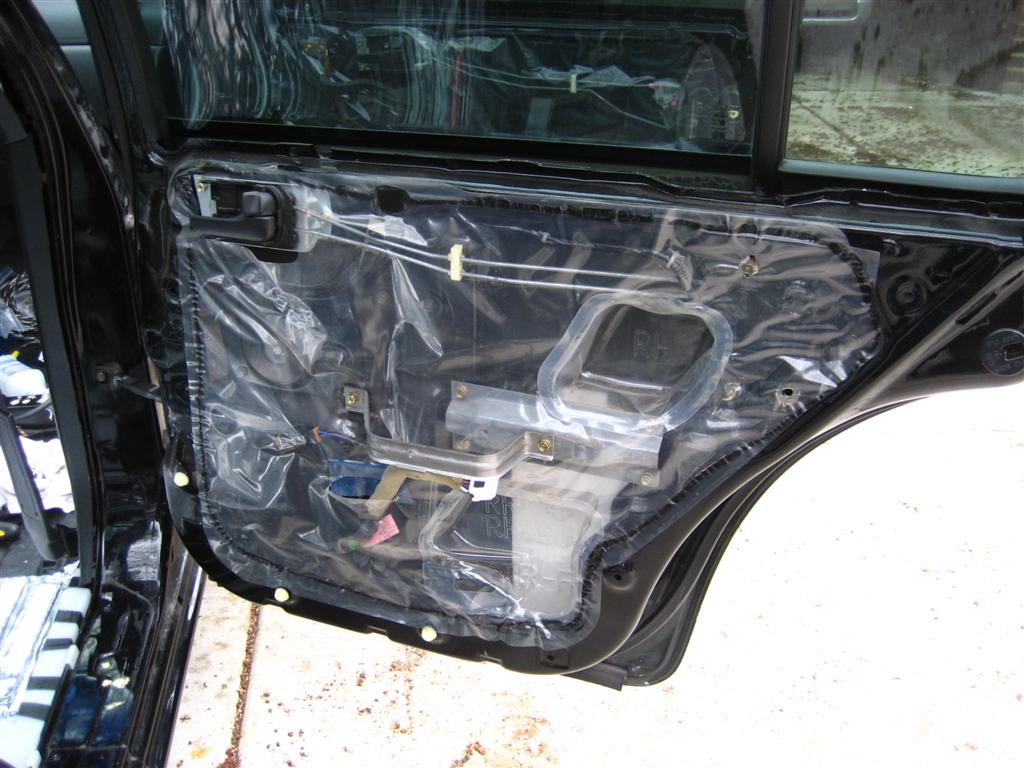
Here is my rear door with the panel off if it helps at all.


Senior Member
Joined: Jan 2005
Posts: 637
I've only found 1 screw... which was where the armrest is. There's no screws on the bottom of the door and I'm having a hard time prying the door handle off... I have the back of it loose (where the lock is) but it's not budging in the front.. and I'm scared to snap that piece in half.
EDIT: Finally got the handle off.. just needed to add more force.
Just found out that the pulley broke which is what's not letting the window get pulled up. I don't even think I'll be able to find a window pulley via internet/dealership.
EDIT: Finally got the handle off.. just needed to add more force.
Just found out that the pulley broke which is what's not letting the window get pulled up. I don't even think I'll be able to find a window pulley via internet/dealership.
Last edited by illmortal; Mar 8, 2010 at 05:27 PM.

Member
Joined: Apr 2009
Posts: 61
From: Atlanta, GA
You can find them on eBay for ~$30-$40, IIRC. Try contacting the seller and seeing if they'll sell it without the motor (regulator only). Might get it cheaper that way.
Senior Member
Joined: Jan 2005
Posts: 637
Thanks again!

Newbie - Just Registered
Joined: May 2010
Posts: 1
This helped alot im trying to install 2 new door speakers (infinity) that were in my old car and i couldn't figure out how i could get at the speaker. I guess i have to take the whole door off. Kinda rediculous. But thanks for the pictures they help a whole lot
There is no such thing as too many "Fing tools"..

I actually enjoy when people use my tools and see how easy things can be if you have the right tool, they usually decide to buy the tool after that.
Work smart and it will appear you are working hard even when you're not.

Senior Member
Joined: Dec 2009
Posts: 469
I bought a set of plastic prying and clip-removal tools on clearance at Harbor Freight for $2. Totally worth it - it saves you a ton of time and frustration in dealing with those little plastic clips and you don't have to worry about breaking them. I like that mine are plastic because I don't have to worry about damaging the interior or scraping the paint, though they do flex a little more than I'd like. If you're overhauling your interior or even just trying to track down rattles like I am, it is worth the $2 or even the $7 to buy.

Junior Member
Joined: Oct 2010
Posts: 30
From: W. Wyoming Pa
Geo


Senior Member
Joined: Mar 2004
Posts: 539
From: MA

I want to add my experience if it helps, because I referred to this thread before installing my speakers:
1. Taking the door apart was for the most part a piece of cake until you try and get that housing off around the door handle. Crutchfield instructions say just to pry it off, but that doesn't really work. Popping off the side closer to the front of the car works, but that didn't release the entire door for me. Releasing it up inside the door worked, but what a PITA. Here's a pic while I'm laying on the ground directly beneath the door while it's separated trying to release that tab. Once you pop that, everything comes off. Not sure how you can do it any other way. FU Nissan!

2. A small mistake I made was not yank up on the door before trying to remove it. That results in some of the screw/tab things to get stuck in the metal part of the door instead of staying with the cover. In my pic, the blue tab stayed because a pryed it off with the tool prior to lifting. I got frustrated and just yanked, and the cream tab stayed in the door.

3. If you leave it stuck in the door it won't create a nice seal when you put everything back together. It should look like this before you pop the piece back on.

4. Get one of these, it makes life easier. I had it already from removing interior in the trunk to get at tail lights.

1. Taking the door apart was for the most part a piece of cake until you try and get that housing off around the door handle. Crutchfield instructions say just to pry it off, but that doesn't really work. Popping off the side closer to the front of the car works, but that didn't release the entire door for me. Releasing it up inside the door worked, but what a PITA. Here's a pic while I'm laying on the ground directly beneath the door while it's separated trying to release that tab. Once you pop that, everything comes off. Not sure how you can do it any other way. FU Nissan!
2. A small mistake I made was not yank up on the door before trying to remove it. That results in some of the screw/tab things to get stuck in the metal part of the door instead of staying with the cover. In my pic, the blue tab stayed because a pryed it off with the tool prior to lifting. I got frustrated and just yanked, and the cream tab stayed in the door.
3. If you leave it stuck in the door it won't create a nice seal when you put everything back together. It should look like this before you pop the piece back on.
4. Get one of these, it makes life easier. I had it already from removing interior in the trunk to get at tail lights.