
True Blue Interior: My LED Saga…ALL who have done LED interiors step inside! *PICS*

True Blue Interior: My LED Saga…ALL who have done LED interiors step inside! *PICS*
How many of you 4th gen orgers have done wariow’s LED swap with the manual climate controls and not been satisfied with the brightness of the top 5 buttons, or the fan speed ****? I know I was. I’m not dissing warriow’s write up, because it was perfect, everything worked like he said it was and the write-up was well written, but im an extreme perfectionist and the lights up there (only the control buttons) were too dull for me to stand. I talked to wariow personally, and asked him how he got his so bright, he claimed it was the camera, and his were dull too.. I don’t know if I believe him (haha) his looked mad bright, but nonetheless mine didn’t. So I thought about it for while, and came up with a plan to make them brighter.
I don’t expect all of you to read this, but oh well here goes, heres my story:
For all of you that don’t know, that haven’t done this mod, the top 5 or 6 buttons that control where the air flow travel (ie. feet, face, defrost), the A/C button, and the fan speed **** are all lit up by a single LED, dispersed through a light bar (I don’t really know what else to call it, it’s a clear plastic piece that disperses the light 5 times). I don’t know why Nissan made it like this, but for some reason, they got it to work okay. When I replaced it, it was duller than stock. So heres what I did:
Took the thing back out, brought it inside, took it apart again and took that light bar out.
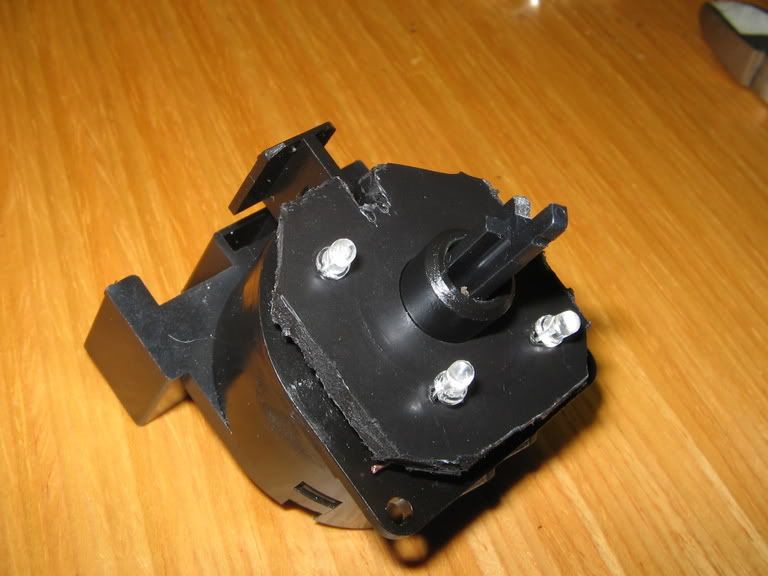
I figured there had to be a way to fit an LED in each leg of the light bar (which sit behind the buttons), so I broke out my drill, and drilled some holes to fit the LED’s in.. then I made my resisted LEDs and epoxy’ed them on there. Couldn’t find my glue gun:
here you see the light bar, and the LEDs glued on:

shot from front:

shot of the LEDs all wired together

I don’t expect all of you to read this, but oh well here goes, heres my story:
For all of you that don’t know, that haven’t done this mod, the top 5 or 6 buttons that control where the air flow travel (ie. feet, face, defrost), the A/C button, and the fan speed **** are all lit up by a single LED, dispersed through a light bar (I don’t really know what else to call it, it’s a clear plastic piece that disperses the light 5 times). I don’t know why Nissan made it like this, but for some reason, they got it to work okay. When I replaced it, it was duller than stock. So heres what I did:
Took the thing back out, brought it inside, took it apart again and took that light bar out.
I figured there had to be a way to fit an LED in each leg of the light bar (which sit behind the buttons), so I broke out my drill, and drilled some holes to fit the LED’s in.. then I made my resisted LEDs and epoxy’ed them on there. Couldn’t find my glue gun:
here you see the light bar, and the LEDs glued on:
shot from front:
shot of the LEDs all wired together
cont..
nother angle:

A/C light with its own light bar

Once those were made, (this took a while) I test-fitted them in, to check for clearance. There’s always gonna be clearance issues.. I prolly had to test it 3 or 4 times before getting it perfect.
a shot of them jammed in there, wired and ready for soldering:

A/C light with its own light bar
Once those were made, (this took a while) I test-fitted them in, to check for clearance. There’s always gonna be clearance issues.. I prolly had to test it 3 or 4 times before getting it perfect.
a shot of them jammed in there, wired and ready for soldering:
cont..
After I was satisfied with the fitment, I ran the wires (there is one set of wire ((set equals 2)) for every 2 LEDs, the A/C light gets its own) through holes I found around the housing, and if I couldn’t find any, I made some. The plan was to go outside of the housing, and come back in the housing once the bottom circuit board was in place to solder them on for power.
This is when the poo hit the fan. When I went to put the bottom circuit board back in, I realized it wouldn’t fit AT ALL because I completely forgot about the pegs that attach to the buttons, to make them function. The board wouldn’t clear at ALL, not even remotely.. hours of time WASTED. At this point im frustrated beyond belief and want to just forget about the whole thing.
After calming down, I thought of yet another way to make this work. Chop the legs off!! First I had to get the LEDs off, without breaking any connections. I used a razor blade to cut through the epoxy, luckily it wasn’t 100% dry yet, I would’ve been screwed. This was pretty easy; the connections held well, and I was able to salvage the 3 pair’s of LEDs still wired together, still in good shape.
From there, after using my trusty dremel to cut the legs off, I proceeded to drill some holes again. This part of the project was nerve-racking, because I was so sure I was going to crack/split the thing in half. I came to find out that this plastic is actually kind of strong, until you get to the corners. Then you need to be reaaaal careful.
shot of the newly designed light bar-LED assembly:
cont..
Time to test fit again. This fit was way better, I wish I had done this originally.. everything cleared with ease.
shot of assembly in housing ready to be soldered to board:

from the front:

OK, hard part is over with. From here on, the project was pretty much a breeze. I put the lower circuit board back in, and soldered all the connections to the single LED set ups, some of which I didn’t need anymore, like the one (1) that lit up the buttons. So I just got rid of it completely, and soldered the wires to the board, paying close attention to the polarity.
shot of LEDs wired up to circuit board:

From here, I took the half-together climate control unit back out to my car, and tested to see if my hard work paid off…
SUCCESS!!! They were nice and bright, even during the day! Couldn’t wait to see them at night. This alone made all this work worth it.
BUT WAIT!, there’s more. What about the fan speed ****??
The fan speed **** was also powered by a single LED, which made the number ‘3’ on the display light up nicely, but that’s about it. So I added 3 more.
I looked around my basement and all the crap that was down there, for something to hold the LEDs in place in there. I settled on a piece of plastic, no more than an 1/8th of an inch thick. I cut a circle out with my dremel, and drilled a hole in the center to fit around the fan control neck.. and drilled small holes for the LEDs to sit in.
Made my resisted LEDs, wired them up, and it looked like this:

shot of assembly in housing ready to be soldered to board:
from the front:
OK, hard part is over with. From here on, the project was pretty much a breeze. I put the lower circuit board back in, and soldered all the connections to the single LED set ups, some of which I didn’t need anymore, like the one (1) that lit up the buttons. So I just got rid of it completely, and soldered the wires to the board, paying close attention to the polarity.
shot of LEDs wired up to circuit board:
From here, I took the half-together climate control unit back out to my car, and tested to see if my hard work paid off…
SUCCESS!!! They were nice and bright, even during the day! Couldn’t wait to see them at night. This alone made all this work worth it.
BUT WAIT!, there’s more. What about the fan speed ****??
The fan speed **** was also powered by a single LED, which made the number ‘3’ on the display light up nicely, but that’s about it. So I added 3 more.
I looked around my basement and all the crap that was down there, for something to hold the LEDs in place in there. I settled on a piece of plastic, no more than an 1/8th of an inch thick. I cut a circle out with my dremel, and drilled a hole in the center to fit around the fan control neck.. and drilled small holes for the LEDs to sit in.
Made my resisted LEDs, wired them up, and it looked like this:
cont..
from the front:
Once I finished all that, I snaked that wire around the outside of the housing again, back in, and soldered it to another single LED set up (again, paying close attention to the polarity).
I was positive this was going to work, I didn’t even take it to my car with it half together this time. So I put the whole unit together, and went outside to have a look.
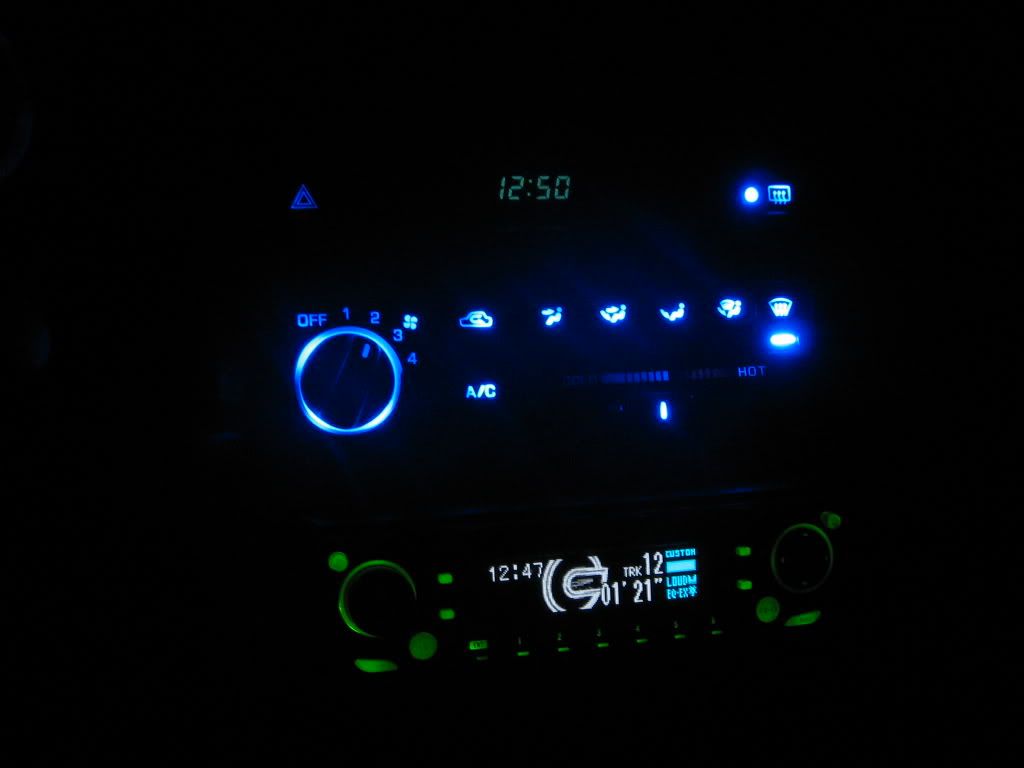
The finished climate control pics:


Once I finished all that, I snaked that wire around the outside of the housing again, back in, and soldered it to another single LED set up (again, paying close attention to the polarity).
I was positive this was going to work, I didn’t even take it to my car with it half together this time. So I put the whole unit together, and went outside to have a look.
The finished climate control pics:


i want to eventually change the cold/hot bar LED to white, so it actually shows up

window switches are done too, and gauges are complete, but not up to my standards again
 .. NEVER buy inverted wedge bulbs for gauges from ebay, they’re HORRIBLE.
 In conclusion, I successfully made my climate control LEDs go from this,:
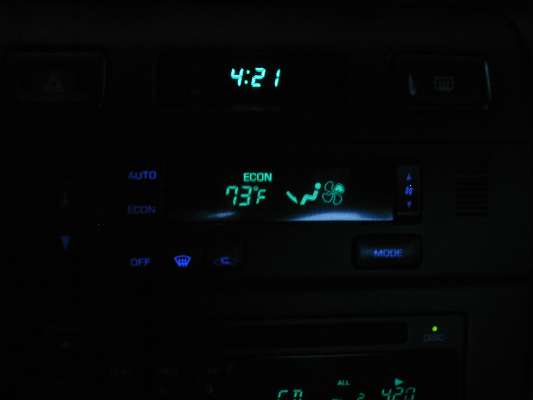
*note this is NOT my car, but this is exactly how bright they were before.
to what you see above. Man what a difference. Pics do NOT do justice, at all, I am so satisfied with the results, and it was a huge pain to do all this, but def worth it all, and I would recommend it to anyone. Just make sure your connections are SECURE, you dont want one stupid connection to be loose and you have to take the whole thing apart again for one bulb..
Questions, comments, criticisms welcomed.
Happy modding!


Good job mendon99. Please don't take this as a criticism but it appears that you still have a few hot spots. Like yourself, I am also a perfectionist so I would not be able to accept any hot spots in my work. Call it being **** or OCD, it just would bother me too much looking at it. Normally, I would increase the led count and aim them accordingly to eliminate any hot spots in my led conversions. However, sticking more leds in there is not possible within the design of the climate control so you have to upgrade to an led with a wider viewing angle. A Superflux led would generally be my first choice but it also is too large for the climate control. The led that I finally chose was a inverted type led. This led type can have almost a 360° viewing angle which will eliminate all of the hot spots issues. Here is an example of this kind of inverted led. http://cgi.ebay.com/20-WHITE-INVERTE...QQcmdZViewItem. Whether you decide the hotspots warrant a redo/modification, congrats on you interior led lighting retro.
thanks for the comments guys, especially you meanbean i've always admired your work. as for the hotspots, the camera makes it look worse, but in reality, there are hardly any on the whole thing at all. At least, i can''t really do anything about it... see the part that makes up the defrost icon for example is 100% clear, maybe its dirty inside? either way, its hardly noticeable at ALL in person..maybe ill try cleaning the buttons when i change the cold/hot bar to a white LED. I aimed the bulbs as best as i could so that the circuit board would still clear.. theres only so much you can do. thanks again
EDIT: i wish you woulda told me about those lights on ebay... i woulda ordered those first.. those look mad bright. maybe if i ever do someone elses car for them ill tell them to order those, cwithk's leds are pretty good tho.
EDIT: i wish you woulda told me about those lights on ebay... i woulda ordered those first.. those look mad bright. maybe if i ever do someone elses car for them ill tell them to order those, cwithk's leds are pretty good tho.
 Didn't know you were looking. Otherwise, I would have given you a heads up.
few random q's
meanbean, and anyone else, what did you use for your gauge face bulbs? i know 99's use #74 bulbs, and 97's use 194, but i want to know what style works best. The particular wedge bulbs i used were horrible for gauges i guess..
to know a style bulb/company on ebay would be great.
also, my gf has a 99, and she wants LEDs done in her car.. now i've heard that on 99's you can't make the gauge needles clear becuase the color is in the middle of the needle... is this true?
all help is appriciated
to know a style bulb/company on ebay would be great.
also, my gf has a 99, and she wants LEDs done in her car.. now i've heard that on 99's you can't make the gauge needles clear becuase the color is in the middle of the needle... is this true?
all help is appriciated

I am not using bulbs but rather individual leds to light my gauges. They are mounted to pcb that is then placed behind the gauges. I then have power routed through 2 heatsinked voltage regulators. 99 SE needles can be cleared while I'm told that GXE and GLE needles cannot since they are entirely orange throughout and not painted on from the bottom like the SE needles.
Cookin' with Gas!

Joined: Sep 2005
Posts: 178
From: Grand Junction, CO
Can someone post the location of wariow's write up, I just bought a max with LED conversion in it but my manual climate control doesn't light up, Now I need to fix someone else's work....yes I tried searching so don't flame me.
LOL...4 is not even enough. I had used 5mm leds with a narrow 15° viewing angle and needed about 60 to get rid of all the hot spots. Originally, when I had red leds in my gauges that had 10° viewing angle, I needed ~90 leds. I now use superflux leds and only need about 20-25. Do yourself a favor and use superflux led for your gauges.
these claim to be 80° viewing angle. how are these?
http://cgi.ebay.com/ws/eBayISAPI.dll..._BIN_Stores_IT
do they wire up just like reg. leds?
sorry for my electronics noobism. i had to teach myself to solder for crying out loud.
http://cgi.ebay.com/ws/eBayISAPI.dll..._BIN_Stores_IT
do they wire up just like reg. leds?
sorry for my electronics noobism. i had to teach myself to solder for crying out loud.

Originally Posted by mendon99
also, my gf has a 99, and she wants LEDs done in her car.. now i've heard that on 99's you can't make the gauge needles clear becuase the color is in the middle of the needle... is this true?
all help is appriciated
all help is appriciated

not to steal ur thread:
dude way to go i might actually redo this. i too tried to figure out this problem but my attempt failed so now the only thing that works are the lights beneath the air to face, feet, defroster and so on. i took the light bar out and tried using individual carboards but the fitment was extrememely tight and none of the buttons was functional. i think some of the wires accidently touch each other during testing so now my stock light doesn't even work.

i also attempted the temp bar but that didn't have a stable support.


dude way to go i might actually redo this. i too tried to figure out this problem but my attempt failed so now the only thing that works are the lights beneath the air to face, feet, defroster and so on. i took the light bar out and tried using individual carboards but the fitment was extrememely tight and none of the buttons was functional. i think some of the wires accidently touch each other during testing so now my stock light doesn't even work.
i also attempted the temp bar but that didn't have a stable support.
g4, yes it is a pia, but youll get it, and you werent stealing the thread. you have to chop the legs off, theres no other way for the buttons to clear... also, keep it as neat and low/out of the way as possible.
and are you talking about the adjuser slider control LED for the cold/hot bar? if so, i just sanded down 2 opposing sides of the LED and it fit right in there. easiest part of the whole project. you can even access it without taking it out of your car.
meanbean, thanks for all your help.
and are you talking about the adjuser slider control LED for the cold/hot bar? if so, i just sanded down 2 opposing sides of the LED and it fit right in there. easiest part of the whole project. you can even access it without taking it out of your car.
meanbean, thanks for all your help.
Originally Posted by aznprid972
I thought the SE guages had orange needles making it harder to light them up UNLESS you sand them off and it'll turn clear. The GXE and GLE have white needles. You would still get some light to go through them but you would get more if you sanded the bottom part of the needle off as well.

Senior Member
Joined: Oct 2004
Posts: 1,803
From: Manitoba
Looks amazing! I'd LOVE to do the LED mod to my car if I had somebody to help me out but I ain't smart enough to figure it out myself! I admire that you were able to figure out how to fix your brightness problem!


thanks guys for the compliments.
i figured he'd stumble upon this thread. wariow is the real LED master.
right now the gauges are embarassing. once i finish them ill post pics in here. they will be white face with blue needles.. and im sure the pics won't do justice.. ill keep you all updated...
actually ill prolly end up doing a whole half-a$$ed write up, or explination rather, like the this climate control one for the gauges also if i get it all to work correctly.
Originally Posted by g4nismo
did u ever tell wariow?
Originally Posted by Nissan 6
Have any shots of the gauges?
actually ill prolly end up doing a whole half-a$$ed write up, or explination rather, like the this climate control one for the gauges also if i get it all to work correctly.

Senior Member
Joined: Feb 2005
Posts: 3,590
From: Bartlett, IL
Originally Posted by mendon99
right now the gauges are embarassing. once i finish them ill post pics in here. they will be white face with blue needles.. and im sure the pics won't do justice.. ill keep you all updated...
actually ill prolly end up doing a whole half-a$$ed write up, or explination rather, like the this climate control one for the gauges also if i get it all to work correctly.
they were 3mm, 5000mcd bulbs from the user 'cwithk' on ebay. free resistors, free shipping, great price, cant go wrong. its funny you mention that, cus tonight i almost got a headache from them being on driving home from work... if im gonna be driving for more than half an hour, i have to dim them half way..hrm.. maybe i should tint the buttons a tiny bit. This answers your question Nissan 6, yes you can dim them with the stock dimmer.
Originally Posted by aznprid972
What MCD are those blubs? I used some white 14000mcd and they blind me if I stare into them.
dude thats bright as hell. those could be used as a flashlight