
my retrofit!


I painted the housing first, and remounted them in the aiming brackets (which I had to dremel a little bit)
Then, I mounted the projector and temporarily taped the cover on. I hit this with Meguiar's PlastX, and it cleared it up. I'm going to do another coat soon. I don't want to sand if I don't have to.
Here's the projector installed
Then, I worked on the harness. I had to replace my old terminal connectors with new ones that actually fit.

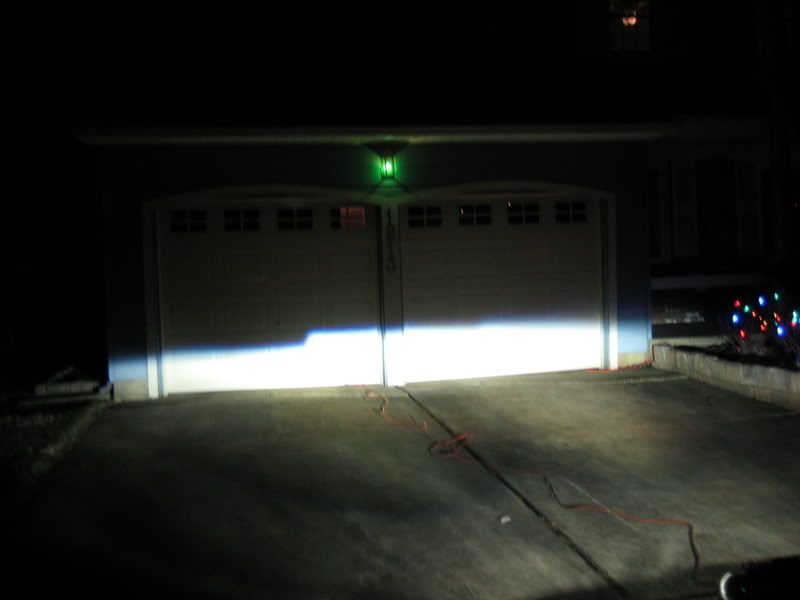
Here's the cutoff! Don't mind the height, it was on a sloped driveway. I was just glad that it was parallel to the ground and that it was pretty much straight ahead. Hopefully I won't have to do a ton of adjustments. Don't mind the odd green color, it was taken on an overcast day against a stained and patched garage wall.
Then, I mounted the projector and temporarily taped the cover on. I hit this with Meguiar's PlastX, and it cleared it up. I'm going to do another coat soon. I don't want to sand if I don't have to.
Here's the projector installed
Then, I worked on the harness. I had to replace my old terminal connectors with new ones that actually fit.
Here's the cutoff! Don't mind the height, it was on a sloped driveway. I was just glad that it was parallel to the ground and that it was pretty much straight ahead. Hopefully I won't have to do a ton of adjustments. Don't mind the odd green color, it was taken on an overcast day against a stained and patched garage wall.
Are your ballasts (kit I guess) from the Umnitza GD?
If so, how are you planning on mounting them/ protecting them in the car?


Thread Starter
Senior Member
iTrader: (11)
Joined: Jun 2006
Posts: 1,325
From: Cherry Hill, NJ / Hoboken, NJ
I hit the terminals with the "terminal cleaner" spray, which worked nice, but it left that spray on the intake box.
Yeah, they're umnitza GD ballasts. Probably just going to zip tie them somewhere. There's a ton of room behind the headlights.
The FSTB is holding up the hood.
Leaking valve cover? Is that serious?
Yeah, they're umnitza GD ballasts. Probably just going to zip tie them somewhere. There's a ton of room behind the headlights.
The FSTB is holding up the hood.
Leaking valve cover? Is that serious?

it just means you're leaking a little bit of oil on the rear valve cover.....there underneath the intake manifold near the positive crankcase ventilation valve you can see some oil "stains".
I hit the terminals with the "terminal cleaner" spray, which worked nice, but it left that spray on the intake box.
Yeah, they're umnitza GD ballasts. Probably just going to zip tie them somewhere. There's a ton of room behind the headlights.
The FSTB is holding up the hood.
Leaking valve cover? Is that serious?
Yeah, they're umnitza GD ballasts. Probably just going to zip tie them somewhere. There's a ton of room behind the headlights.
The FSTB is holding up the hood.
Leaking valve cover? Is that serious?

That oil on the UIM is leakage from the front valve cover, blowing back up onto the UIM. The rear valve cover likely wouldn't leak against gravity up towards the center of the engine, so that's probably front valve cover leakage too.
Thread Starter
Senior Member
iTrader: (11)
Joined: Jun 2006
Posts: 1,325
From: Cherry Hill, NJ / Hoboken, NJ
Working on shrouds now. I cut strips of flexible metal and put them around the lens housing. I bondo'ed them in to seal them, and once it dries I'll paint them.

Thread Starter
Senior Member
iTrader: (11)
Joined: Jun 2006
Posts: 1,325
From: Cherry Hill, NJ / Hoboken, NJ
These things are downright NASTY
Completed shroud. Yeah, I'm a rebel. The standard protocol for shrouds is to shell out $50 for a chrome ring. I'm going for the stealth dark look, so I just used aluminum tape in addition to the metal flaps on the lens holder.
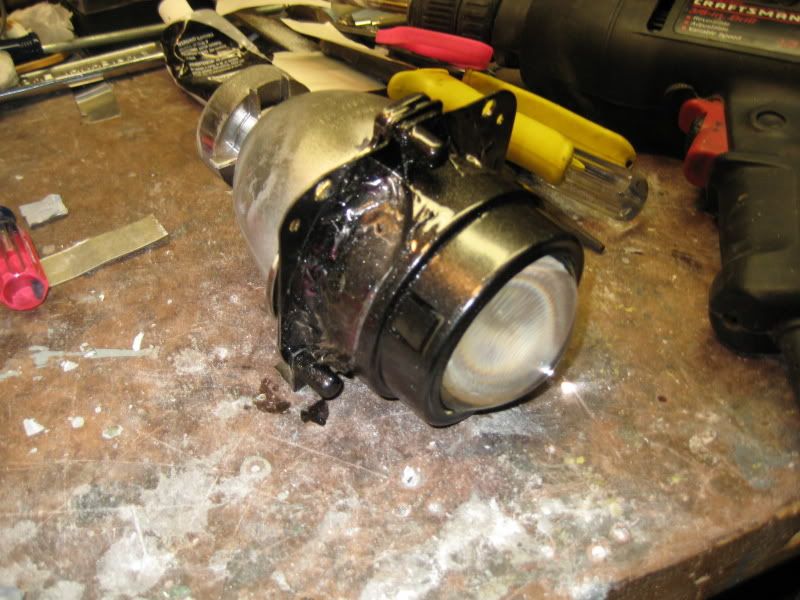
What the shroud does is prevent stray light from escaping around the edges. The cutoff does great shaping the light through the lens, but light can come out of the bowl at a weird angle and escape to the sides of the lens. It's dim compared to the light from the lens, but having a shroud noticeably reduces glare.
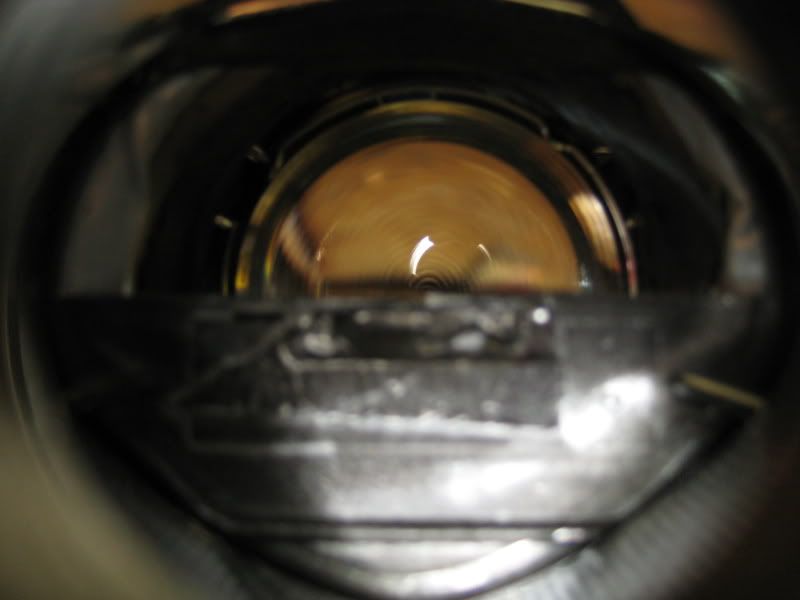
Here's what the bulb can 'see'
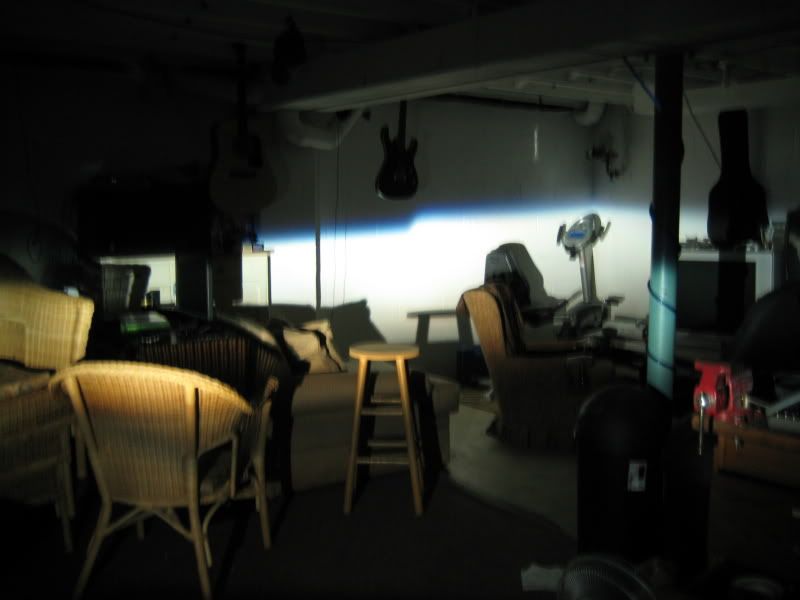
This is the longest range shot I can get inside. It's at an odd angle, a distance of 25-30 feet. Beautiful cutoff.
Completed shroud. Yeah, I'm a rebel. The standard protocol for shrouds is to shell out $50 for a chrome ring. I'm going for the stealth dark look, so I just used aluminum tape in addition to the metal flaps on the lens holder.
What the shroud does is prevent stray light from escaping around the edges. The cutoff does great shaping the light through the lens, but light can come out of the bowl at a weird angle and escape to the sides of the lens. It's dim compared to the light from the lens, but having a shroud noticeably reduces glare.
Here's what the bulb can 'see'
This is the longest range shot I can get inside. It's at an odd angle, a distance of 25-30 feet. Beautiful cutoff.

Thread Starter
Senior Member
iTrader: (11)
Joined: Jun 2006
Posts: 1,325
From: Cherry Hill, NJ / Hoboken, NJ
The projectors all buttoned up on the passenger side.

Remaining:
I need to make the shroud for the driver side.
I need to cut the aiming housing for the passenger side
I need to install them
I need to aim them
I need to reinstall the clear plastic lenses
I need to mount the ballasts
Remaining:
I need to make the shroud for the driver side.
I need to cut the aiming housing for the passenger side
I need to install them
I need to aim them
I need to reinstall the clear plastic lenses
I need to mount the ballasts
Thread Starter
Senior Member
iTrader: (11)
Joined: Jun 2006
Posts: 1,325
From: Cherry Hill, NJ / Hoboken, NJ
MDX Projectors and 1 cutoff shield - $27
Umnitza GD bulbs and ballasts - $65
Misc. electronic parts - $25
Misc. bolts, brackets, paint - $25
Spare set of 95-96 glass headlights - $37
30+ hours spent working on them - $0 (winter vacation)
total: $179
Thread Starter
Senior Member
iTrader: (11)
Joined: Jun 2006
Posts: 1,325
From: Cherry Hill, NJ / Hoboken, NJ
Well, I have them both ready to go. Still need to put them in the black aiming housings, then polish the lenses a little more
Without the headlight lenses

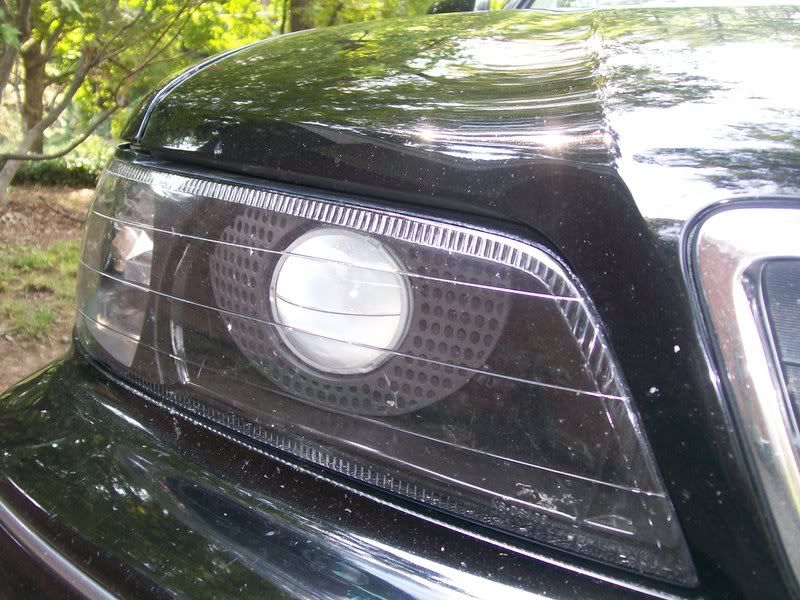
With the headlight lenses

The projector lenses don't actually look white, it's only the flash. Because I painted the cutoff shields dark grey, the projectors look dark grey too.
Without the headlight lenses
With the headlight lenses
The projector lenses don't actually look white, it's only the flash. Because I painted the cutoff shields dark grey, the projectors look dark grey too.

Senior Member
Joined: Oct 2006
Posts: 986
From: Baytown, Tx
this is sort of what i wanna do i dont really wanna go the r34 look but i might eh dual projectors :drools: but i may go this route to minimize cost but i dunno looks great bro!
looks like u got quiet a shop as well!
looks like u got quiet a shop as well!

Thread Starter
Senior Member
iTrader: (11)
Joined: Jun 2006
Posts: 1,325
From: Cherry Hill, NJ / Hoboken, NJ
Duals would be hard in the stock housings... they were kinda pain in the *** to work with. They taper slightly, it's difficult to keep track of which direction is forward. R34s look easier to do.
Jayson - PM kzoosho or maxgtr2000 or one of those guys. They can probably do a much better job than me. I'm just making this up as I go along.
I wanted to aim them tonight, but it's super cold out. It's annoying, because I want to aim them at night, but I can't see well enough to install them at night. Tomorrow I'll try to install them in the late afternoon. Then I gotta figure out a level spot to aim them. I'm not sure what to do... I don't want to drive without lenses, but I don't want to seal them until they're aimed. I don't want to tape the lenses on and have them fall off. I'll probably go to an elementary school near me (biggest parking lot I can get to without crossing a major road) and mess with them.
My worry is rotation. The 4th gen housing can do left/right and up/down. My method for rotation is washers under the bracket. Hopefully I can get it right without too much trouble. It looks pretty close as it is, so hopefully at most I'll need a thin washer.

Overall a nice job. Cutoff color looks nice, hopefully once all said and done it doesnt lose too much of its width.
For all the work done, you really should have come up with a shroud to cover up those nuts and the tape being used at the base of the projector housings.
Having all that exposed is really killing the looks of the retrofit. From far away it wont be noticeable but up close and you can really tell its a home made project. You could still paint it black if you wanted that "stealth dark look".
Maybe its just me, but I like the clean look to where if one looks at them up close, they have a hard time believing me that I created my headlights.
I like the aluminum tape, lol. Definitely one way to do it.
Thread Starter
Senior Member
iTrader: (11)
Joined: Jun 2006
Posts: 1,325
From: Cherry Hill, NJ / Hoboken, NJ
Well, I put them on the car. They aren't sealed yet.
This is the stock low beams and fogs:
As it turns out, the foglights are aimed stupidly high and make a ton of glare. I'm going to mess with them tomorrow when it's light out.
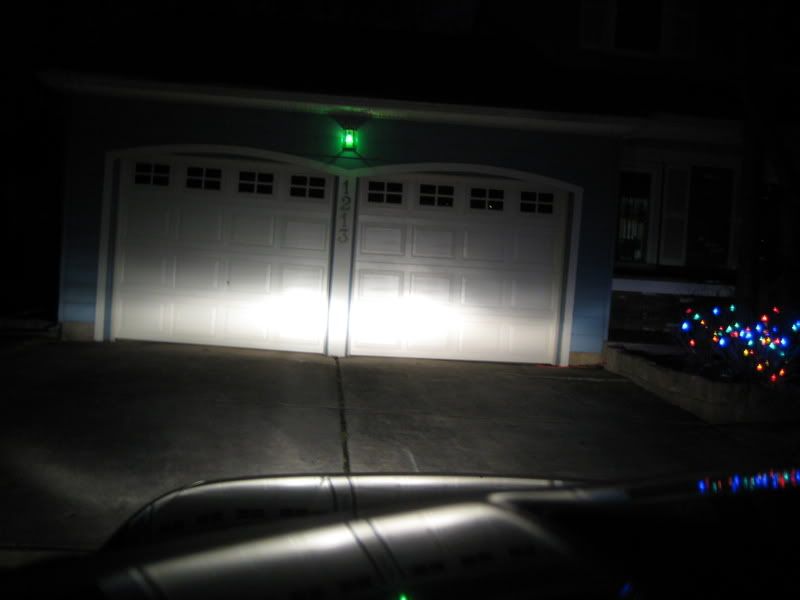
Here's the projectors without the headlight lenses:
and with them (definitely reduces the color)

I think they're aimed too low now. They look fine in this because of the slope of the driveway. They're supposed to drop 2-2.5" at 25 feet, and I think mine drop closer to 6". They definitely hit the ground within 75 feet from the car. It's proving difficult to find a place that's level and has a wall.
Still, the rotation seems fine at least, which was my big concern. I just need to tighten the long machine screws to aim them up, and then put on my ghetto coolsaber57 shrouds (thin aluminum sheet bent around the front of them), then seal them back up.
Notice how the light was a big glob in the middle, but a very narrow beam, and now it's much wider.
This is the stock low beams and fogs:
As it turns out, the foglights are aimed stupidly high and make a ton of glare. I'm going to mess with them tomorrow when it's light out.
Here's the projectors without the headlight lenses:
and with them (definitely reduces the color)
I think they're aimed too low now. They look fine in this because of the slope of the driveway. They're supposed to drop 2-2.5" at 25 feet, and I think mine drop closer to 6". They definitely hit the ground within 75 feet from the car. It's proving difficult to find a place that's level and has a wall.
Still, the rotation seems fine at least, which was my big concern. I just need to tighten the long machine screws to aim them up, and then put on my ghetto coolsaber57 shrouds (thin aluminum sheet bent around the front of them), then seal them back up.
Notice how the light was a big glob in the middle, but a very narrow beam, and now it's much wider.

Overall a nice job. Cutoff color looks nice, hopefully once all said and done it doesnt lose too much of its width.
For all the work done, you really should have come up with a shroud to cover up those nuts and the tape being used at the base of the projector housings.
Having all that exposed is really killing the looks of the retrofit. From far away it wont be noticeable but up close and you can really tell its a home made project. You could still paint it black if you wanted that "stealth dark look".
Maybe its just me, but I like the clean look to where if one looks at them up close, they have a hard time believing me that I created my headlights.
For all the work done, you really should have come up with a shroud to cover up those nuts and the tape being used at the base of the projector housings.
Having all that exposed is really killing the looks of the retrofit. From far away it wont be noticeable but up close and you can really tell its a home made project. You could still paint it black if you wanted that "stealth dark look".
Maybe its just me, but I like the clean look to where if one looks at them up close, they have a hard time believing me that I created my headlights.
Well, I put them on the car. They aren't sealed yet.
This is the stock low beams and fogs:
As it turns out, the foglights are aimed stupidly high and make a ton of glare. I'm going to mess with them tomorrow when it's light out.
Here's the projectors without the headlight lenses:
I think they're aimed too low now. They look fine in this because of the slope of the driveway. They're supposed to drop 2-2.5" at 25 feet, and I think mine drop closer to 6". They definitely hit the ground within 75 feet from the car. It's proving difficult to find a place that's level and has a wall.
Still, the rotation seems fine at least, which was my big concern. I just need to tighten the long machine screws to aim them up, and then put on my ghetto coolsaber57 shrouds (thin aluminum sheet bent around the front of them), then seal them back up.
Notice how the light was a big glob in the middle, but a very narrow beam, and now it's much wider.
 @ coolsaber57 shrouds.
Sweet, I'm famous for being ghetto, awesome

I'm going to put MDX shrouds on mine


 u forgot to add that in there.
Thread Starter
Senior Member
iTrader: (11)
Joined: Jun 2006
Posts: 1,325
From: Cherry Hill, NJ / Hoboken, NJ
I don't know. Maybe it would have worked if it had been in series with a resistor. It fired up fine, I go to look at the beam pattern, and the cap is shooting out a little stream of smoke.

Thread Starter
Senior Member
iTrader: (11)
Joined: Jun 2006
Posts: 1,325
From: Cherry Hill, NJ / Hoboken, NJ
Yeah, I'm going to hit them with my "coolsaber57 shrouds"
[I made shrouds from thin aluminum sheet]. Then I'm going to aim them up (right now the cutoff hits the ground about 50 feet in front of me), and seal them up.
[I made shrouds from thin aluminum sheet]. Then I'm going to aim them up (right now the cutoff hits the ground about 50 feet in front of me), and seal them up.

Thread Starter
Senior Member
iTrader: (11)
Joined: Jun 2006
Posts: 1,325
From: Cherry Hill, NJ / Hoboken, NJ
Sorry about the delay... I was travelling (was in Westchester, NY and Blacksburg, VA) I finally buttoned up the headlights. Sorry, no night shots yet, I will provide some when I get the chance.
I installed the "coolsaber57" ghetto shrouds. It's a piece of sheet aluminum, bent into a "C" shape, with an elongated hole to fit the lens opening. It's painted with the same Krylon metallic dark grey that I painted everything with, and is attached on either side of the projector with - you guessed it - aluminum tape. (which had been also painted, so it's not silver and purple)
I pushed the projector brackets back as far as I could to try to aim them higher up. They're still a little too low, but hopefully I'll be able to finish my adjustments with the housing screws. The rotation is fine, and A32 housings can do left/right and up/down.
All in all, I probably spent over $200 in misc parts (wire, fuses, relays, connectors, brakcets, screws, nuts, bolts, etc. - it adds up fast), and 40+ hours building these things. Both of those numbers are higher than I expected.
What would I do differently? Use the "R34 Style" housings. They are about $150 shipped on ebay, and they look a hundred times easier to work with. The A32 housings are hard to orient, because there are no straight lines. I found that the height of the reflector, which looks consistent, is not - it gets a little bit narrower at the back. I would fab up a bracket, stick it in, it would slide easily in a little bit, then get stuck. A lot of trial and error with these things.
I was happy with how my tweaked MDX projectors performed, and I would highly recommend them to someone on a budget.
It's a releif to be done with these. The downside is that I am now checking Superflux LED prices and looking at PWM designs....
Final pics:
Needs some good shrouds to look good, but at least they seem to work good. Your output would be better with some true clear lenses (a less fuzzy cutoff, a tiny bit more color, etc.). I also think your other lights need some updating to match! 
That looks pretty good w/the fabricated shrouds. But you really need to get clear corners!! and a clear parking light housing would be a good idea as well.
Last edited by AndrewR2442; Jan 2, 2009 at 12:14 PM.

Sorry about the delay... I was travelling (was in Westchester, NY and Blacksburg, VA) I finally buttoned up the headlights. Sorry, no night shots yet, I will provide some when I get the chance.
I installed the "coolsaber57" ghetto shrouds. It's a piece of sheet aluminum, bent into a "C" shape, with an elongated hole to fit the lens opening. It's painted with the same Krylon metallic dark grey that I painted everything with, and is attached on either side of the projector with - you guessed it - aluminum tape. (which had been also painted, so it's not silver and purple)
I pushed the projector brackets back as far as I could to try to aim them higher up. They're still a little too low, but hopefully I'll be able to finish my adjustments with the housing screws. The rotation is fine, and A32 housings can do left/right and up/down.
All in all, I probably spent over $200 in misc parts (wire, fuses, relays, connectors, brakcets, screws, nuts, bolts, etc. - it adds up fast), and 40+ hours building these things. Both of those numbers are higher than I expected.
What would I do differently? Use the "R34 Style" housings. They are about $150 shipped on ebay, and they look a hundred times easier to work with. The A32 housings are hard to orient, because there are no straight lines. I found that the height of the reflector, which looks consistent, is not - it gets a little bit narrower at the back. I would fab up a bracket, stick it in, it would slide easily in a little bit, then get stuck. A lot of trial and error with these things.
I was happy with how my tweaked MDX projectors performed, and I would highly recommend them to someone on a budget.
It's a releif to be done with these. The downside is that I am now checking Superflux LED prices and looking at PWM designs....
Final pics:
Thread Starter
Senior Member
iTrader: (11)
Joined: Jun 2006
Posts: 1,325
From: Cherry Hill, NJ / Hoboken, NJ
Yeah, they look pretty bad up close with a flash on. From a few feet away, though, they look fine, because you can only see the projector lenses. I'm more concerned with output than looks.
The fresnel lenses don't bother me too much... I mean, you can usually find MDX projectors for <$50, and they blow away a lot of more expensive ones.
The fresnel lenses don't bother me too much... I mean, you can usually find MDX projectors for <$50, and they blow away a lot of more expensive ones.
yea i was having trouble with my shrouds too i just ended up ditching shrouds all together, this was my ghey off of an E55:
I like how clean ur cutoff is very nice and crisp much better than what i have to deal with, the only thing is just that shroud, if u need a shroud to cover that, i might have some off a IS350, im still deciding if i should use them or not or not on my next retro, if ur interested just shot me a PM. but great work
I like how clean ur cutoff is very nice and crisp much better than what i have to deal with, the only thing is just that shroud, if u need a shroud to cover that, i might have some off a IS350, im still deciding if i should use them or not or not on my next retro, if ur interested just shot me a PM. but great work
Thread Starter
Senior Member
iTrader: (11)
Joined: Jun 2006
Posts: 1,325
From: Cherry Hill, NJ / Hoboken, NJ
Functionally, a shroud is just suppposed to block light from exiting the bowl through someplace other than the bowl, and I sealed up the lens holders, solving that issue.