
On my site here - http://boredmder.com/howto/gaugecluster/
This howto is for the quick and easy task of removing the gauge cluster. Replacing bulbs, tightening up the tach or speedo screws, tapping into an easily accessible tach signal, swapping clusters, whatever.
Most seem to remove the steering column trim when doing this. It does make it a bit easier, but it also takes a lot longer, so I don't bother. The bezel will flex a fair amount, so as long as you don't bend the damn thing in half, it'll be fine.
This whole process shouldn't take but 10 minutes, if that.
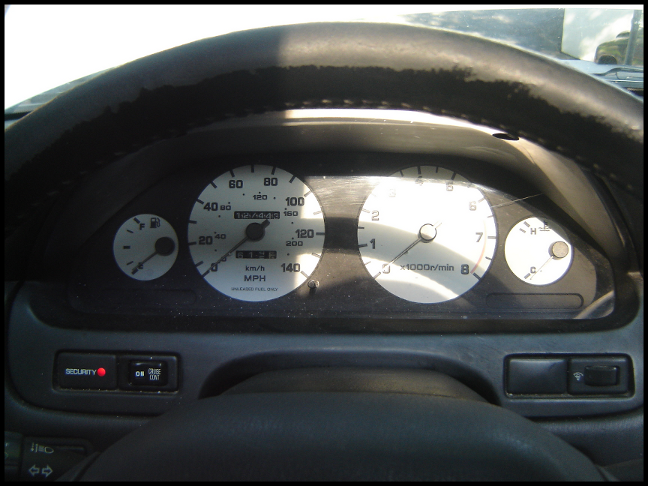
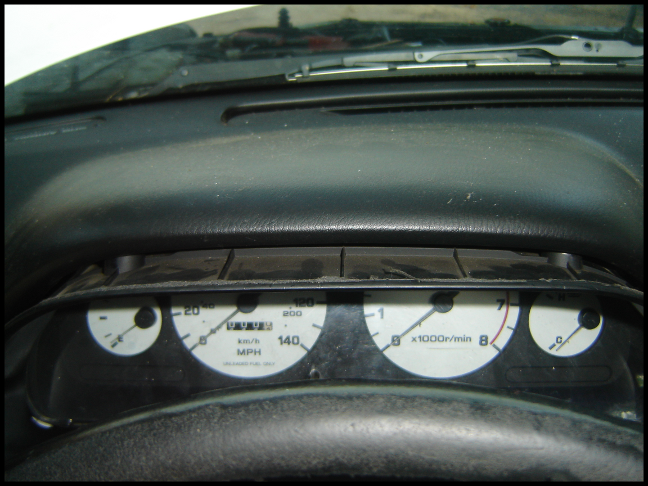
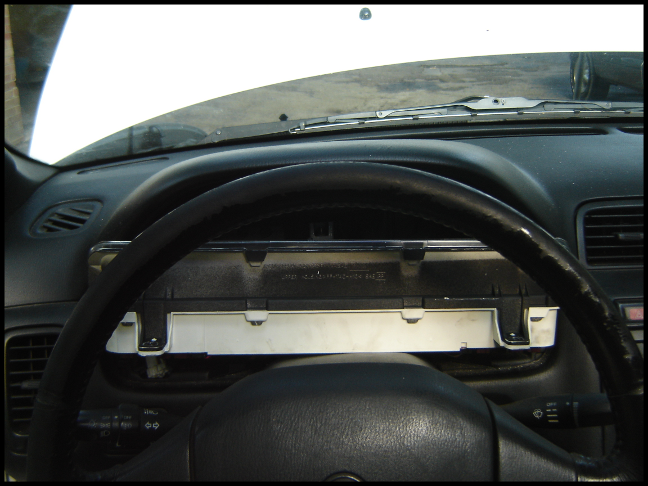
As if you didn't know already, here's the area we're going to be working in:
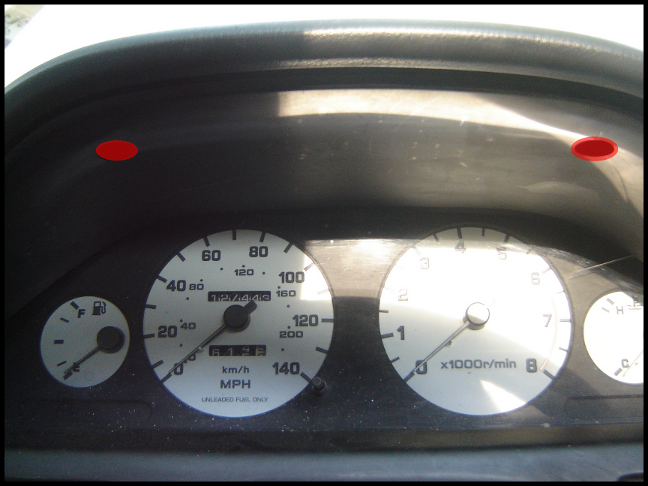
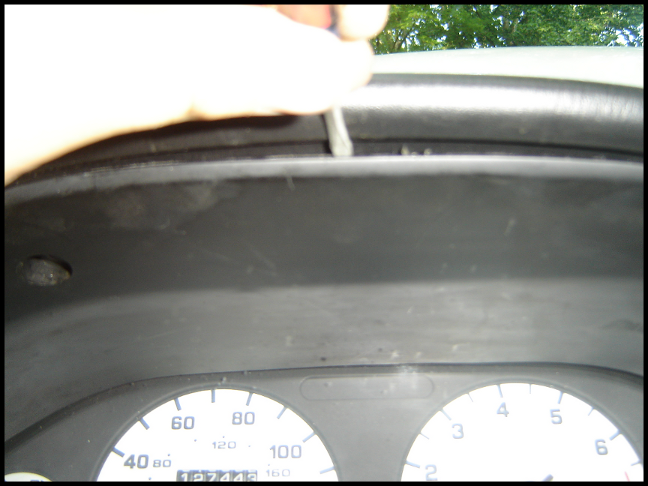
You'll need to locate the two screws, located at the top of the gauge cluster bezel.
They're indicated by circles in the photo below:
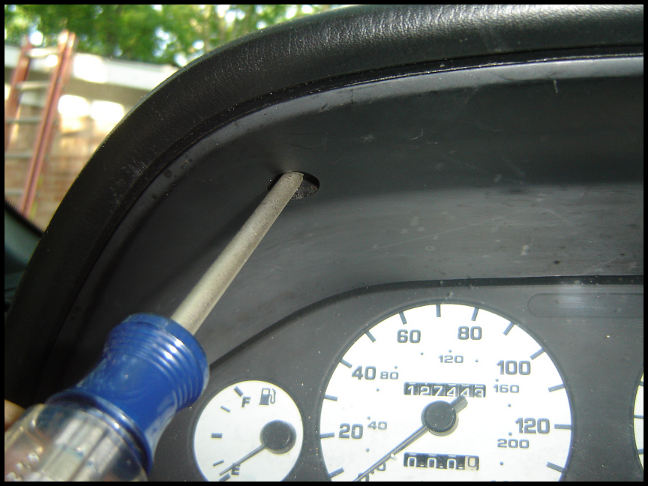
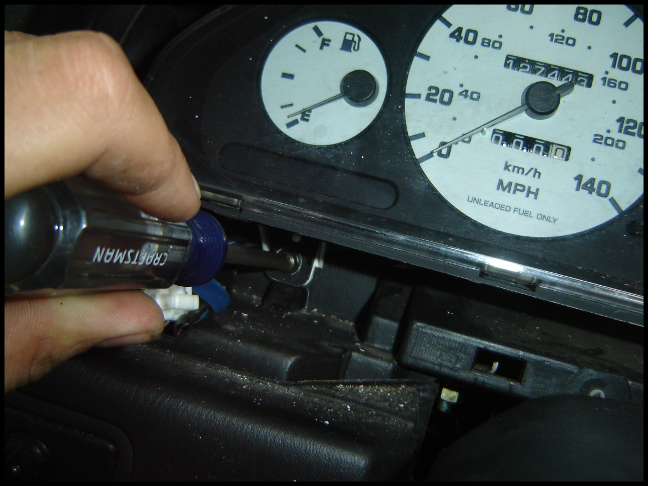
Removing the left side screw:
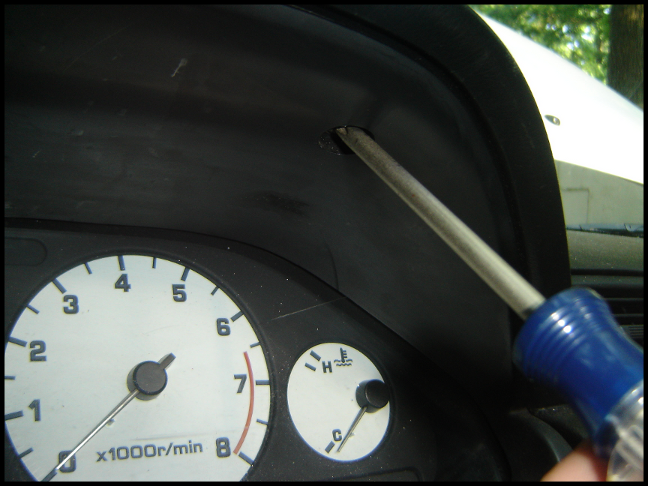
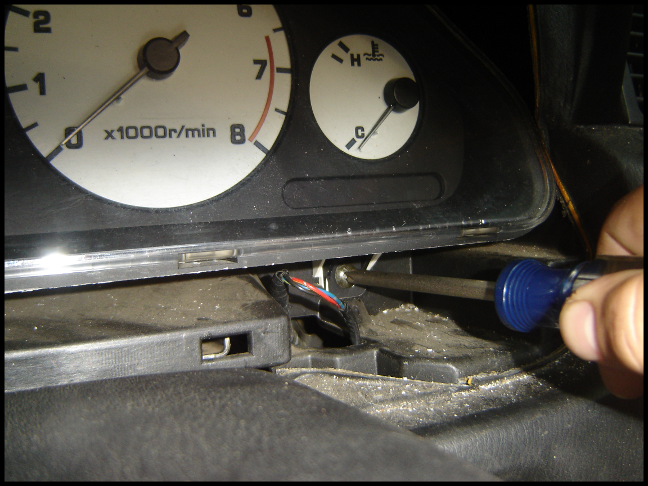
Removing the right side screw:
Now the bezel will have 4 clips holding it in place along the bottom, shown here (reverse side shown):
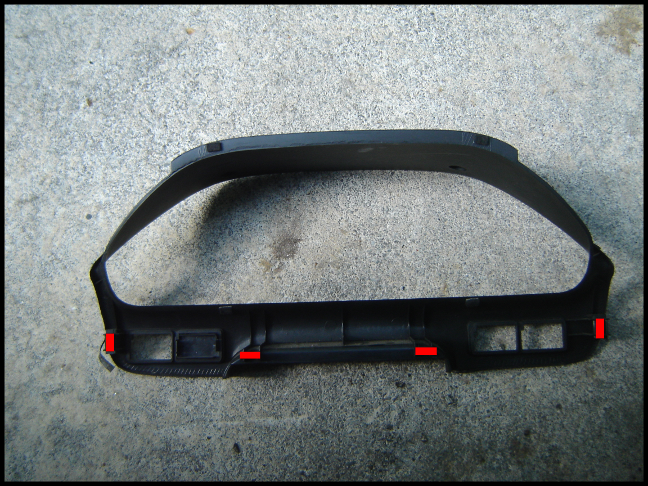
You'll need to pull sharply on the bottom of the bezel to release all of these clips. Some may remain in the dash, or fall off and disappear.
This howto is for the quick and easy task of removing the gauge cluster. Replacing bulbs, tightening up the tach or speedo screws, tapping into an easily accessible tach signal, swapping clusters, whatever.
Most seem to remove the steering column trim when doing this. It does make it a bit easier, but it also takes a lot longer, so I don't bother. The bezel will flex a fair amount, so as long as you don't bend the damn thing in half, it'll be fine.
This whole process shouldn't take but 10 minutes, if that.
As if you didn't know already, here's the area we're going to be working in:
You'll need to locate the two screws, located at the top of the gauge cluster bezel.
They're indicated by circles in the photo below:
Removing the left side screw:
Removing the right side screw:
Now the bezel will have 4 clips holding it in place along the bottom, shown here (reverse side shown):
You'll need to pull sharply on the bottom of the bezel to release all of these clips. Some may remain in the dash, or fall off and disappear.
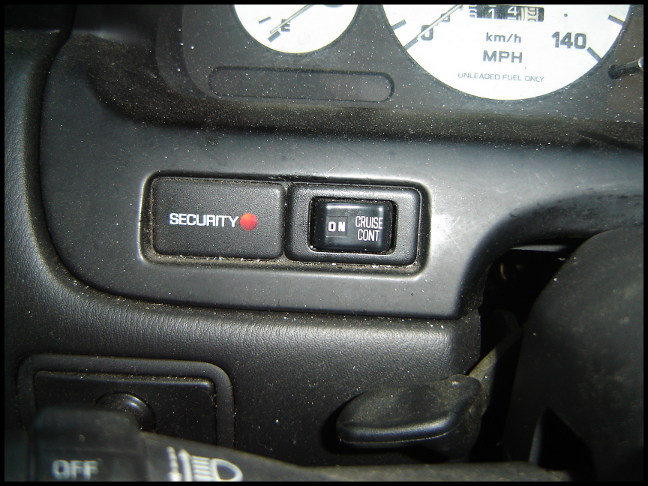
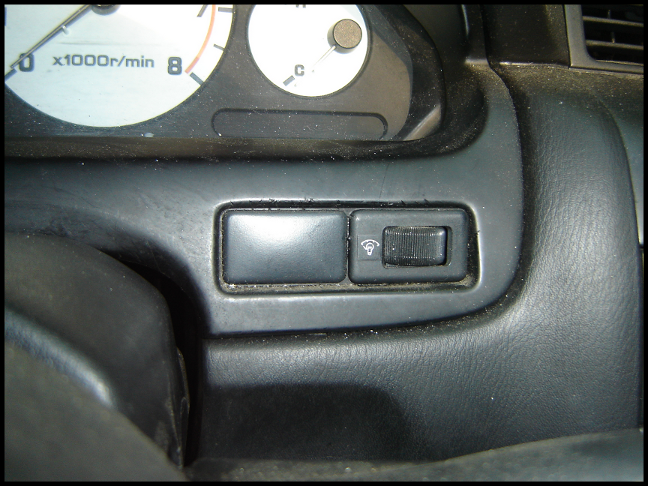
Here are the various switches, dials, and lights you'll have to remove:
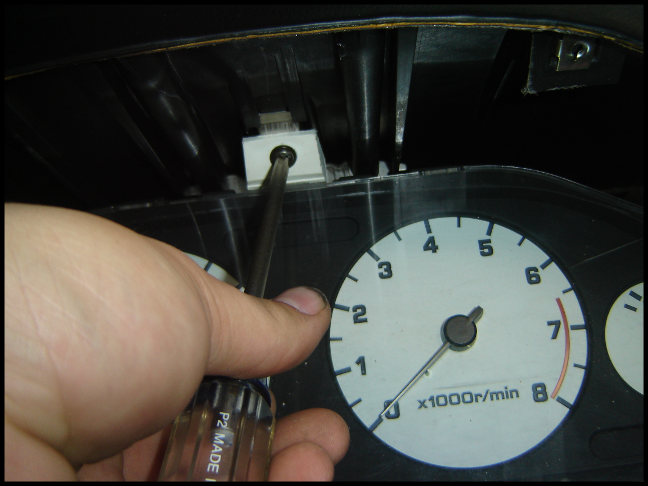
They're easily removed with a small flathead screwdriver, just insert at one of the sides, and pry it out:
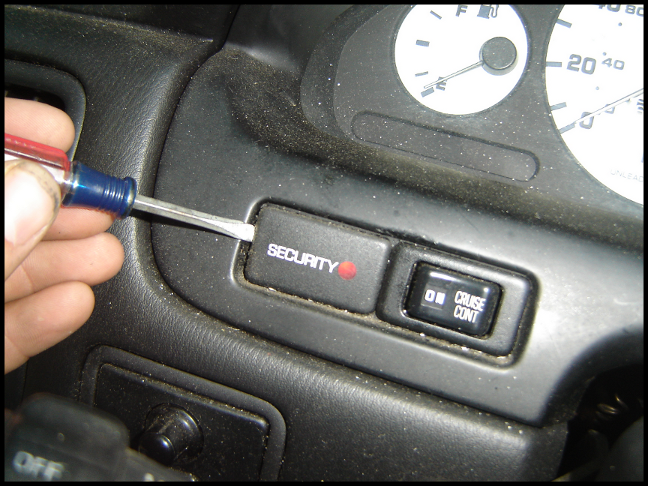
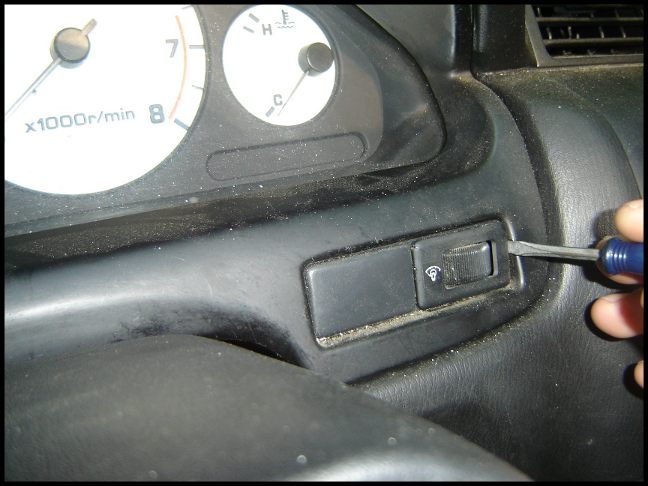
They're easily removed with a small flathead screwdriver, just insert at one of the sides, and pry it out:
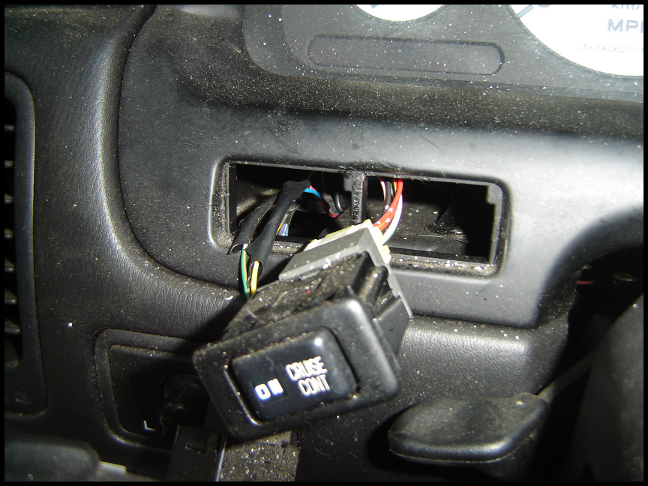
You then pull them all away from the cluster (shown), then disconnect them (not shown):
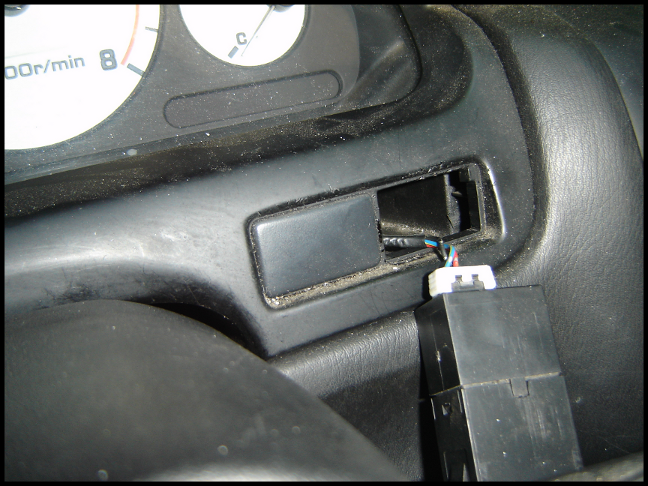
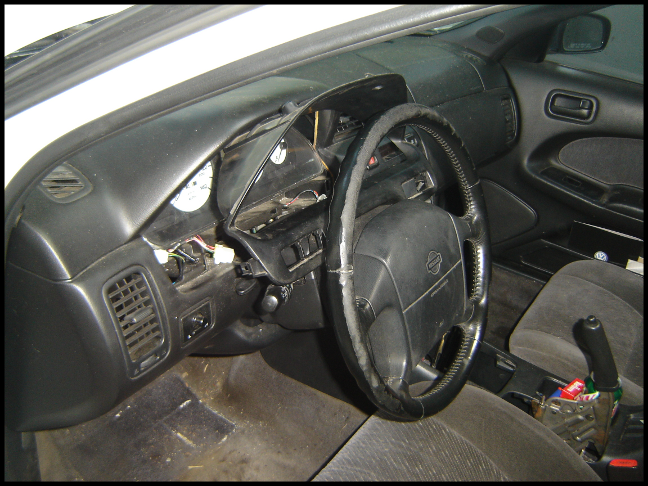
You'll then be left with this:
You then want to lift up the bottom portion of the bezel, and rest it on the steering column trim:

While holding the bottom portion there, insert a screwdriver at the top and pry out the top of the bezel:
You'll then be left with this:
You then want to lift up the bottom portion of the bezel, and rest it on the steering column trim:
While holding the bottom portion there, insert a screwdriver at the top and pry out the top of the bezel:
The top of the bezel will now be hanging on the gauge cluster 'hood':
You then need to start walking it out until it resembles this:
At this point, push down on the top of the bezel, and you should be able to pull it right out.
Now, the gauge cluster is held in place by 3 screws:

Removing the top screw:
Removing the left screw:
You then need to start walking it out until it resembles this:
At this point, push down on the top of the bezel, and you should be able to pull it right out.
Now, the gauge cluster is held in place by 3 screws:
Removing the top screw:
Removing the left screw:
Removing the right screw:
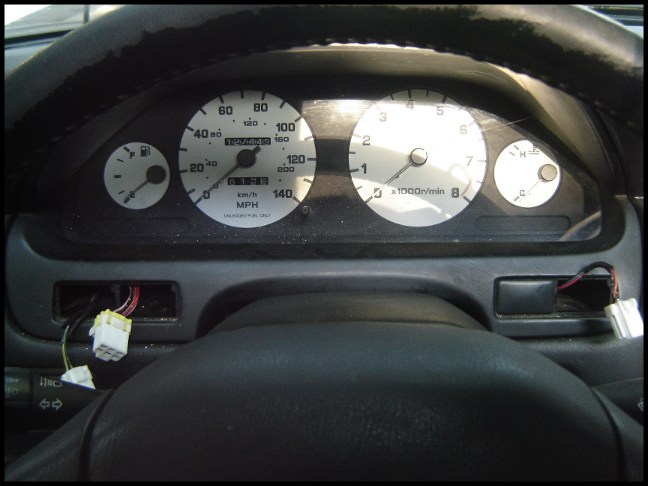
The cluster now pulls right out of the hole:
Obviously installation is the reverse of removal.
Video tutorial:
The cluster now pulls right out of the hole:
Obviously installation is the reverse of removal.
Video tutorial:

Good job. I'm always scared of breaking the bezel, as it's a bitcch to get out (as you know). I ALWAYS remove the top portion of the steering column first to give me that extra 1/4" of space as I walk out the bezel. Couple of extra steps, but worth it IMO. Plus, I don't have to worry about scratching it up.
I also don't remove the switches ahead of time with a small flathead screwdriver as you have shown, as I don't want little dents/indentations in my bezel or switches from prying. I pull the bezel, walk it out a little, then disconnect the plugs from behind, then finish removing the bezel entirely with the switches intact.
6 in one hand, half a dozen in the other, same end result. I just like to take the extra steps to ensure nothing gets damaged/scratched along the way.
Again, nice and clear writeup. I'm sure it will come in very handy for many orgers.

Senior Member
sweet, now we need a Tutorial on how to take apart the cluster and fix certain things like a sticking speedo.


Senior Member
thank you so much for the write up. I was under the impression you HAD to remove the steering column and i was having a really hard time with that for some reason and ended up just giving up. this makes it a lot easier!

Senior Member
keep em coming pmohr!
This is a prime example on how every how to's should be. The video's is just the icing on the cake.
Keep up the good work man.
Your effort is appriciated man.
This is a prime example on how every how to's should be. The video's is just the icing on the cake.
Keep up the good work man.
Your effort is appriciated man.
Quote:
This is a prime example on how every how to's should be. The video's is just the icing on the cake.
Keep up the good work man.
Originally Posted by Product_Of_Korea
keep em coming pmohr!This is a prime example on how every how to's should be. The video's is just the icing on the cake.
Keep up the good work man.

Actually what I was inspired by as the 'correct' way to do a howto was an SR20 project on 240sxforums: http://www.240sxforums.com/forums/sr...0det-prep.html
Check out some of that thread and you'll see what I mean. It couldn't possibly be more detailed.
Quote:
I also don't remove the switches ahead of time with a small flathead screwdriver as you have shown, as I don't want little dents/indentations in my bezel or switches from prying. I pull the bezel, walk it out a little, then disconnect the plugs from behind, then finish removing the bezel entirely with the switches intact.
6 in one hand, half a dozen in the other, same end result. I just like to take the extra steps to ensure nothing gets damaged/scratched along the way.
Again, nice and clear writeup. I'm sure it will come in very handy for many orgers.
Yea, I know what you mean. Actually with that small flathead, the tip is thin enough to get directly behind the face of the switch and doesn't leave any marks. All of the scratches and dents in there are from previous removals using everything but the correct tool.Originally Posted by The Wizard
Good job. I'm always scared of breaking the bezel, as it's a bitcch to get out (as you know). I ALWAYS remove the top portion of the steering column first to give me that extra 1/4" of space as I walk out the bezel. Couple of extra steps, but worth it IMO. Plus, I don't have to worry about scratching it up. I also don't remove the switches ahead of time with a small flathead screwdriver as you have shown, as I don't want little dents/indentations in my bezel or switches from prying. I pull the bezel, walk it out a little, then disconnect the plugs from behind, then finish removing the bezel entirely with the switches intact.
6 in one hand, half a dozen in the other, same end result. I just like to take the extra steps to ensure nothing gets damaged/scratched along the way.
Again, nice and clear writeup. I'm sure it will come in very handy for many orgers.
While taking the pics for the picture tutorial, I had to spend a while figuring out just how to get it out to make sure I could while on camera, heh.

Quote:

There will be, just probably not for a little while now. Still have to collect various parts for the swap.Originally Posted by Coolsaber57
Great tutorial. Next up, 00VI video tut?
Senior Member
Quote:
Originally Posted by pmohr
There will be, just probably not for a little while now. Still have to collect various parts for the swap.
Like??????

Man that is a very picture orientated write up over there. Almost make me want to get a 240 and drop a sr in

Quote:
Man that is a very picture orientated write up over there. Almost make me want to get a 240 and drop a sr in
Indeed, I felt the same way. I learned quite a bit from that thread, personally. Originally Posted by Product_Of_Korea
Like??????Man that is a very picture orientated write up over there. Almost make me want to get a 240 and drop a sr in
I spend a lot of time researching various things on various forums, just to learn new and interesting things. A tutorial with lots of pictures is as helpful to random people as it is to the owners of that specific vehicle. That's why I think the A32 (at the very least) needs more detailed, in-depth tutorials.
Basically I need to get a rear valve cover, some gaskets, and some aluminum plate so I can make up an IACV/TB adapter.
I wish I had a Z33 (or at least one available) so I could video how I change the clutch on one of those in an ~hour, that would be nice.
Senior Member
Quote:
I spend a lot of time researching various things on various forums, just to learn new and interesting things. A tutorial with lots of pictures is as helpful to random people as it is to the owners of that specific vehicle. That's why I think the A32 (at the very least) needs more detailed, in-depth tutorials.
Basically I need to get a rear valve cover, some gaskets, and some aluminum plate so I can make up an IACV/TB adapter.
I wish I had a Z33 (or at least one available) so I could video how I change the clutch on one of those in an ~hour, that would be nice.
Originally Posted by pmohr
Indeed, I felt the same way. I learned quite a bit from that thread, personally. I spend a lot of time researching various things on various forums, just to learn new and interesting things. A tutorial with lots of pictures is as helpful to random people as it is to the owners of that specific vehicle. That's why I think the A32 (at the very least) needs more detailed, in-depth tutorials.
Basically I need to get a rear valve cover, some gaskets, and some aluminum plate so I can make up an IACV/TB adapter.
I wish I had a Z33 (or at least one available) so I could video how I change the clutch on one of those in an ~hour, that would be nice.
Pictures= learning
no doubt about it.Hell this is why toddlers use picture books
 Its almost the same concept.Pictures is almost as good as doing it hands on. You can read all you want but if the other person can not visualize the process then it is pretty much useless IMHO.
I take it you want a 5th gen VC and want to use a PF TB?
Quote:
no doubt about it.Hell this is why toddlers use picture books Its almost the same concept.Pictures is almost as good as doing it hands on. You can read all you want but if the other person can not visualize the process then it is pretty much useless IMHO.
I take it you want a 5th gen VC and want to use a PF TB?
No, going to use an A32 TB. And indeed, A33 rear valve cover, then just going to modify the coils.Originally Posted by Product_Of_Korea
Pictures= learning no doubt about it.Hell this is why toddlers use picture books
Its almost the same concept.Pictures is almost as good as doing it hands on. You can read all you want but if the other person can not visualize the process then it is pretty much useless IMHO.I take it you want a 5th gen VC and want to use a PF TB?
Senior Member
Quote:
Originally Posted by pmohr
No, going to use an A32 TB. And indeed, A33 rear valve cover, then just going to modify the coils.
Hmm well if you want i could sell it probley sell it to you for pretty cheap. Say 15 shipped. Id just have to go to the shop and take it off the good ole vq30
LMK
Quote:
LMK
Works for me, PM your paypal.Originally Posted by Product_Of_Korea
Hmm well if you want i could sell it probley sell it to you for pretty cheap. Say 15 shipped. Id just have to go to the shop and take it off the good ole vq30LMK


Senior Member
i only removed my top port of the steering column. it makes it a whole lot easier and less likely to break the gauge cluster trim. plus it only takes a minute to remove that top portion anyways.


Senior Member
Just watched the video...holy ****! You're fcken brutal to your max. I'm with Wizard, i baby my max and use soft plastic tools to remove bezels/trim, i rage whenever something gets scratched.
Anyways, video was great and entertaining.
Btw in the video, did you remember to lower your steering wheel before removing the gauge bezel? looks a bit high
Anyways, video was great and entertaining.
Btw in the video, did you remember to lower your steering wheel before removing the gauge bezel? looks a bit high
Quote:
Anyways, video was great and entertaining.
Btw in the video, did you remember to lower your steering wheel before removing the gauge bezel? looks a bit high
Indeed, steering wheel was all the way down.Originally Posted by shadyonedeath
Just watched the video...holy ****! You're fcken brutal to your max. I'm with Wizard, i baby my max and use soft plastic tools to remove bezels/trim, i rage whenever something gets scratched. Anyways, video was great and entertaining.
Btw in the video, did you remember to lower your steering wheel before removing the gauge bezel? looks a bit high
I wouldn't say brutal, but I don't take any extra special care to keep everything pristine.

Junior Member
I did this a few days ago before having the tutorial and I'll state the obvious- you are 100% correct. Nice work.
So what DO you do about the little clips falling into oblivion? I've also lost the clips to hold the plastic panel under the steering wheel, and it's annoying having it loose...
So what DO you do about the little clips falling into oblivion? I've also lost the clips to hold the plastic panel under the steering wheel, and it's annoying having it loose...
Quote:
So what DO you do about the little clips falling into oblivion? I've also lost the clips to hold the plastic panel under the steering wheel, and it's annoying having it loose...
I try to replace them with salvaged clips from every junkyard visit, but I've been slacking off lately.Originally Posted by maximamazing
I did this a few days ago before having the tutorial and I'll state the obvious- you are 100% correct. Nice work.So what DO you do about the little clips falling into oblivion? I've also lost the clips to hold the plastic panel under the steering wheel, and it's annoying having it loose...
None of the panels I'm missing clips from vibrate or make any noise, so replacing the clips for me would be more of a 'peace of mind' thing, rather than serving a functional purpose.

Junior Member
nice how to vid...did exactly what u said and took maybe 15 or so mins....had some bulbs to check out....thanks

Newbie - Just Registered
Very nice write-up. I think I'll go pull my cluster out and remove that little dead spider that has been "bugging" me since I bought the car.
So much easier in the Max than in my Accord. Have to remove the whole damn HVAC panel and stereo to get the cluster out.
So much easier in the Max than in my Accord. Have to remove the whole damn HVAC panel and stereo to get the cluster out.

Junior Member
Thanks for the write up. I plan to replace my cluster lens tonight and this is exactly the info I need.


Junior Member
Quote:
PM'dOriginally Posted by secondtonone317
nice writeup, if anyone breaks their bezel I have one for sale

Senior Member
It's a really good write up, and you took great photos (and a nice vid on your site), shows just how easy this is.
I would love to see a write on changing out the faces (as I have black face gauges and would prefer the white face), I'll do the LED swap at the same time.
I would love to see a write on changing out the faces (as I have black face gauges and would prefer the white face), I'll do the LED swap at the same time.

Newbie - Just Registered
Thank you so much! I am planning on doing a swap for white gages and i was worried about how long it was going to take! Great job on the pictures! They provided lots of much needed help!
thanks again!
thanks again!

Member
Heh, I think i'm going to complement this tomorrow and take apart my cluster and photograph it. Been meaning to do it for a while. (light is out)

Senior Member
Quote:
I thought you disappeared or something lol. I am used to seeing you post tons on here but I couldn't remember the last time I saw a post by you.Originally Posted by pmohr
Hmm?