
Passenger side cv axle stuck hard


Thread Starter
Senior Member
Joined: Mar 2015
Posts: 363
From: AL
Passenger side cv axle stuck hard
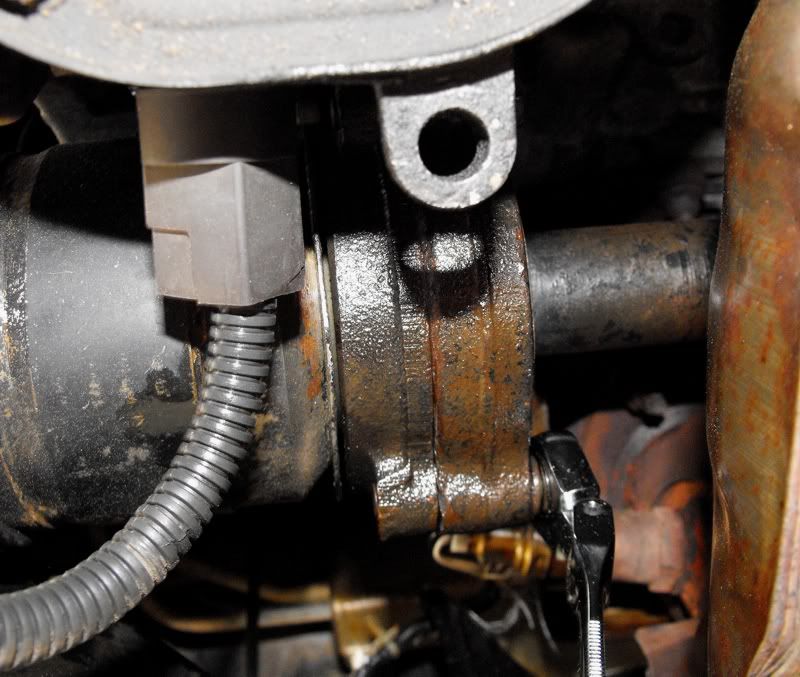
Trying to remove the passenger side axle last night. Got the bolts out of the carrier without too much fuss but the axle simply will not pull out. I was able to rotate the plate on the axle, so it's not rusted shut (look at the attached image) but it isn't coming out.
I tried beating on the back of the bolt mount on the axle with a prybar and hammer, no effect. Ripped the outboard portion of the axle out and cut the boot off. Used vice grips to grab the "can" portion of the joint that was still stuck in the car and couldn't pull it out. Shook the whole car back and forth.
Have adapters on order to attach my vice grips to a slide hammer. Concerned that it's so bound when the passenger side should come out easy if not rusted.

Senior Member
Joined: Jan 2011
Posts: 3,037
From: Central AR
I see you have been able to rotate the plate a bit inside the carrier bracket, so it should not be completely stuck.
I had this come up on my 95 model that was originally from Ohio. So there was some rust inside the carrier bracket. I had soaked it with penetrating oil that helped. I used a small chisel to break the housing loose from the bracket. The bracket is bolted to the block if you can reach the bolts to remove the bracket and the carrier housing.
After penetrating oil.
With the chisel.
This is how it looked then I removed it.

This is how it looked after I cleaned it up for installation of the new CV axle.
I had this come up on my 95 model that was originally from Ohio. So there was some rust inside the carrier bracket. I had soaked it with penetrating oil that helped. I used a small chisel to break the housing loose from the bracket. The bracket is bolted to the block if you can reach the bolts to remove the bracket and the carrier housing.
After penetrating oil.

With the chisel.

This is how it looked then I removed it.

This is how it looked after I cleaned it up for installation of the new CV axle.


Thread Starter
Senior Member
Joined: Mar 2015
Posts: 363
From: AL
Thanks CS_AR! I've seen your thread from before 
I was able to rotate the axle in the carrier; doesn't that indicate that the rust is broken free? I'd imagine that it would be completely frozen in place if it was rusted.
Appreciate the feedback!
I was able to rotate the axle in the carrier; doesn't that indicate that the rust is broken free? I'd imagine that it would be completely frozen in place if it was rusted.
Appreciate the feedback!

Senior Member
Joined: May 2012
Posts: 1,622
From: Long Island
You can start a separation with a sharp chisel and then hammer this in (link below) around the axle and use the slide hammer to pluck it out. On the passenger side (deeper in) you most likely need the extension bar.
And you'll need to remove the strut for a clear extraction path (5 bolts and a brake line connection and maybe an ABS line) And an easy re-entry path.
There are variations of this. Maybe all that's needed really is the graduated wedge that wraps around the axle. As you hammer it in, it will move the splines out of the transmission. Once you break the lock, it will be easy from there. So look into the right tool for this job at a cost you can eat.
Good luck!
https://www.nationaltoolwarehouse.co...FYxMDQodVEMDRQ
Thread Starter
Senior Member
Joined: Mar 2015
Posts: 363
From: AL
You can start a separation with a sharp chisel and then hammer this in (link below) around the axle and use the slide hammer to pluck it out. On the passenger side (deeper in) you most likely need the extension bar.
And you'll need to remove the strut for a clear extraction path (5 bolts and a brake line connection and maybe an ABS line) And an easy re-entry path.
There are variations of this. Maybe all that's needed really is the graduated wedge that wraps around the axle. As you hammer it in, it will move the splines out of the transmission. Once you break the lock, it will be easy from there. So look into the right tool for this job at a cost you can eat.
Good luck!
https://www.nationaltoolwarehouse.co...FYxMDQodVEMDRQ
And you'll need to remove the strut for a clear extraction path (5 bolts and a brake line connection and maybe an ABS line) And an easy re-entry path.
There are variations of this. Maybe all that's needed really is the graduated wedge that wraps around the axle. As you hammer it in, it will move the splines out of the transmission. Once you break the lock, it will be easy from there. So look into the right tool for this job at a cost you can eat.
Good luck!
https://www.nationaltoolwarehouse.co...FYxMDQodVEMDRQ
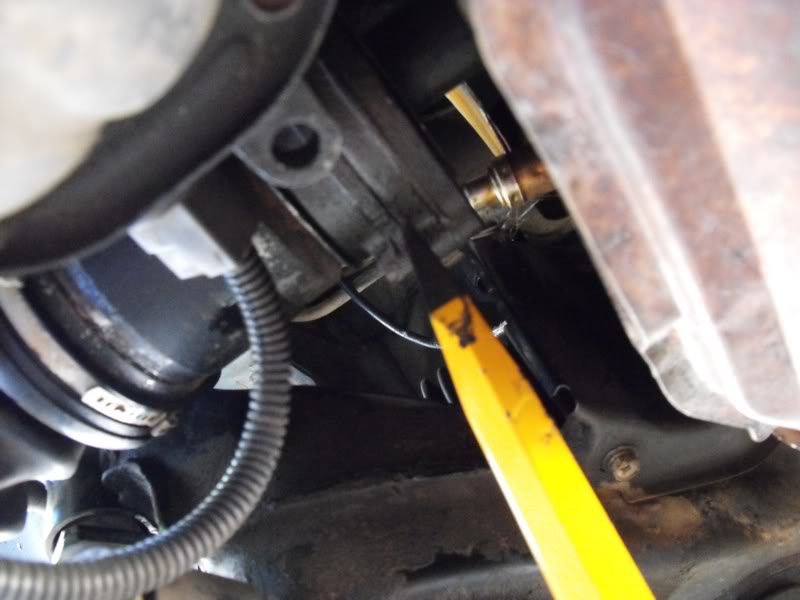
I tried to hammer a flat bladed razor in between the carrier and the axle plate but it wouldn't go. Tried a small and medium craftsman flat head screwdriver and they wouldn't go. Tried pounding on the bolt mount / knuckle with a pry bar and hammer and it wouldn't give. So hopefully the slide hammer with the vise grips will do it!
I pulled the strut out as well and can work around the brake / abs lines.
Hopefully I'll get this thing out tonight!

Quite frankly, I don't think the slide hammer is going to help much. I would start by spraying in some PB Blaster to help to break down the rust, and then tap it with a chisel or flat bladed screw driver and go from there. The slide hammer will not be applying the force close enough to the actual problem to help.
But, stranger things have happened in the repair world. Hope you prove me wrong !
But, stranger things have happened in the repair world. Hope you prove me wrong !
Thread Starter
Senior Member
Joined: Mar 2015
Posts: 363
From: AL
Quite frankly, I don't think the slide hammer is going to help much. I would start by spraying in some PB Blaster to help to break down the rust, and then tap it with a chisel or flat bladed screw driver and go from there. The slide hammer will not be applying the force close enough to the actual problem to help.
But, stranger things have happened in the repair world. Hope you prove me wrong !
But, stranger things have happened in the repair world. Hope you prove me wrong !
Take a look at this image - I zoomed in closer on my original picture. The offset knuckle there reveals a rust-free backing against the carrier bearing plate:

If I was able to rotate the axle plate doesn't it mean that there isn't any rust? I would imagine that rust would bind the plates together and prevent them from rotating.
Last edited by Shrout1; Mar 10, 2017 at 09:46 AM.
Senior Member
Joined: May 2012
Posts: 1,622
From: Long Island
Man, this car is torturing you! By the time you are done, all you'll want to do is Torch it. LOL
Those tabs where the bolts pass through, maybe you can hammer a sharpened 1 inch stiff putty knife between the tab and housing. If you can get a small amount of give on one or two, you can graduate to something thicker. And then it'll just pop. It seems corrosion isn't your problem, but rather the retainer clip on the inner shaft is holding well. REAL well. You're gonna have to have your way with it to get it to pop. No Mercy! Bang that chisel in hard until it has to give. The only thing you'll hurt is on the axle. Hurt it GOOD!
The axle is waste so don't worry about destroying it in the process. You might even feel a little better if you do! LOL
LOL
Good luck!
Those tabs where the bolts pass through, maybe you can hammer a sharpened 1 inch stiff putty knife between the tab and housing. If you can get a small amount of give on one or two, you can graduate to something thicker. And then it'll just pop. It seems corrosion isn't your problem, but rather the retainer clip on the inner shaft is holding well. REAL well. You're gonna have to have your way with it to get it to pop. No Mercy! Bang that chisel in hard until it has to give. The only thing you'll hurt is on the axle. Hurt it GOOD!
The axle is waste so don't worry about destroying it in the process. You might even feel a little better if you do!
LOLGood luck!
Thread Starter
Senior Member
Joined: Mar 2015
Posts: 363
From: AL
lol. I cut the boot wide open so I could get purchase on the can part of the CV joint.Thanks! I definitely need it...
Last edited by Shrout1; Mar 10, 2017 at 12:46 PM.
Thread Starter
Senior Member
Joined: Mar 2015
Posts: 363
From: AL
VICTORY!!!
This *just* happened and I was alone in my garage screaming "YESSS!!!! YESS!!!! YESS!!". No police have arrived as of yet.

The adapter for the vice grips with the slide hammer worked Took a little doing and the vice grips kept popping off, but I flipped them over, cranked them waaaaaaay down tight using the handle on the slide hammer and went to town.
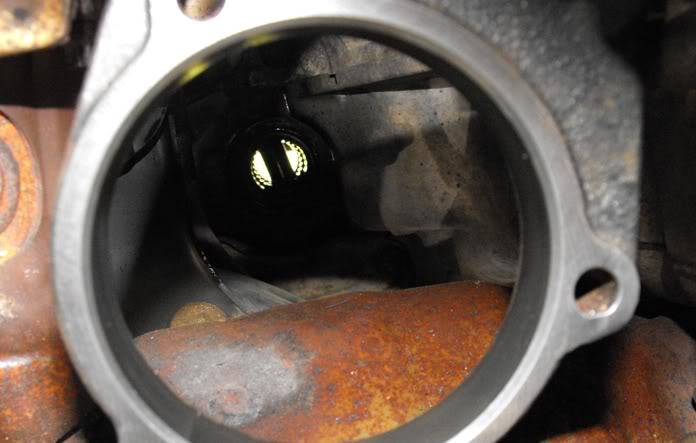
That definitely took about 2-3 minutes of banging away and then voila, it fell out. Still sitting like this in the garage
The carrier looks a tad rusty, but I'm going to take a closer look at the splines...
This *just* happened and I was alone in my garage screaming "YESSS!!!! YESS!!!! YESS!!". No police have arrived as of yet.
The adapter for the vice grips with the slide hammer worked
Took a little doing and the vice grips kept popping off, but I flipped them over, cranked them waaaaaaay down tight using the handle on the slide hammer and went to town.That definitely took about 2-3 minutes of banging away and then voila, it fell out. Still sitting like this in the garage
The carrier looks a tad rusty, but I'm going to take a closer look at the splines...
Thread Starter
Senior Member
Joined: Mar 2015
Posts: 363
From: AL
A couple notes:
1) Couldn't have gotten this done without the I bought (GearWrench 85988 12 Piece set). The pain and torture would have been unbearable without them:
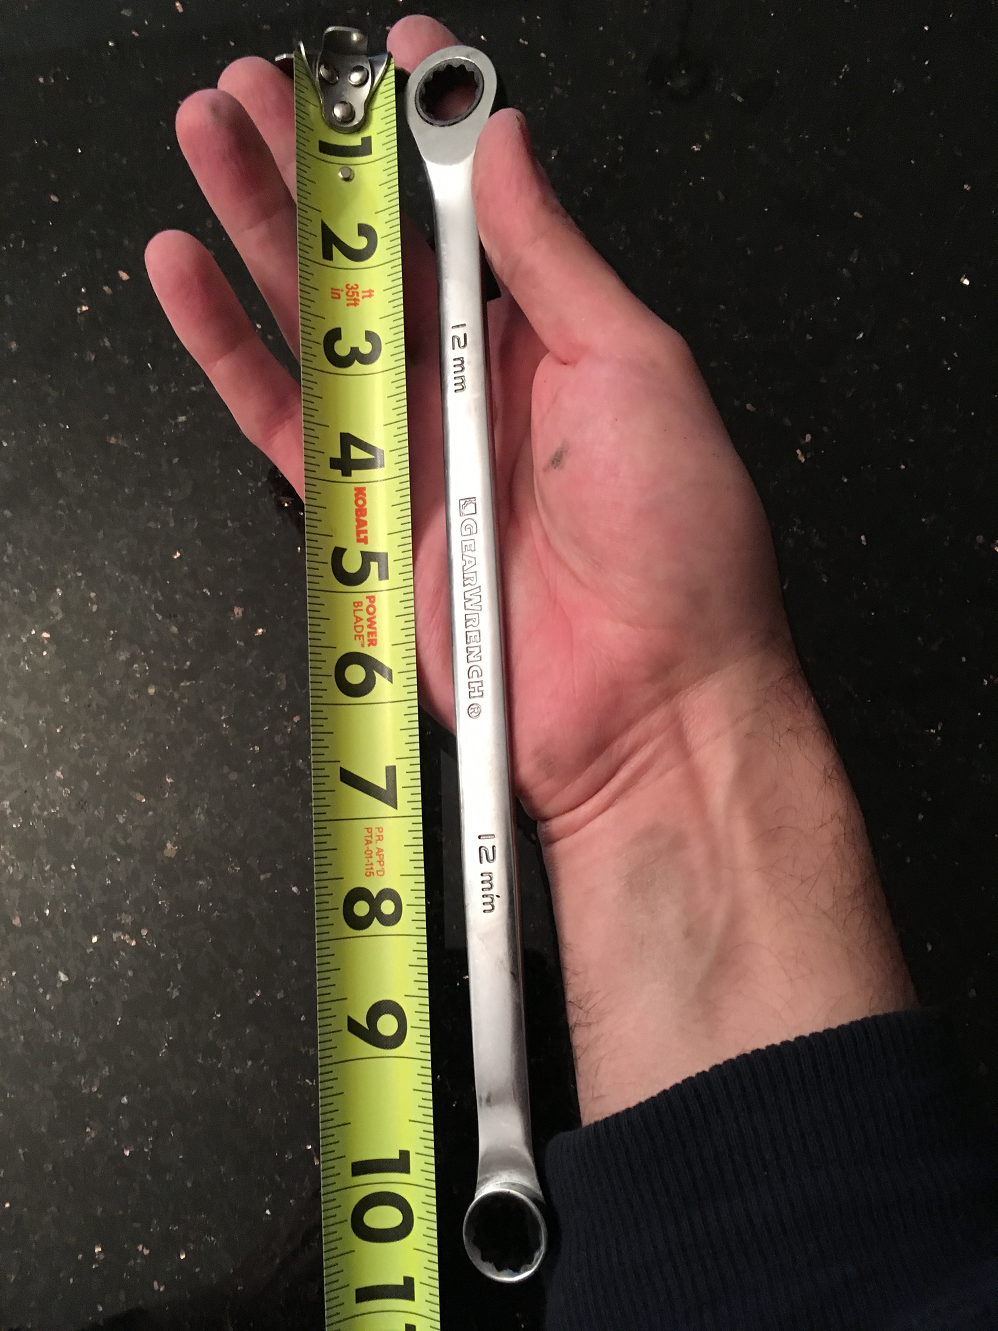
The 12mm is about 10 1/2 inches long. Not a lot of room to throw the wrench on the top bolt but *just* enough to do it. Once the bolt is loose one can get out from underneath the car, sit by the wheel hub and contort their hand to reach around the carrier bracket and spin the bolt all the way out.
Once the old axle is out take some time and sand the carrier bracket surfaces that contact the axle. I frosted the carrier bracket with copper anti-seize so I don't run into the trouble that I had with this job again. I also frosted the back of the bracket on the axle itself and around the circumference of the axle body that fits into the bracket. Anti-seize is awesome (for things that aren't supposed to get stuck...)
Before putting in the new axle I greased the inner splines with synthetic "molybdenum" grease (good for fast moving parts) and used some extra gear oil (I have a manual) on the part of the shaft that will be seated in the seal. Moly grease supposedly doesn't play nice with rubber. Be sure to grease the outer splines with moly grease prior to putting the wheel hub back on the axle (not the shaft for the axle nut though!)
When replacing the axle make sure that the shaft is aligned into the transmission first - you don't want to hurt the seal. Next try to make sure that the axle's bracket mounting bolt holes are as closely aligned to bracket bolt holes as possible; it's more difficult to turn the bracket once the splines are in (not impossible, just annoying).
I then tapped on the hub end of the axle with a rubber mallet to get the splines into place. I checked underneath the car where the shaft goes into the transmission to make sure that everything was good before I started torquing anything down.
Next I started in on the carrier bolts. You can seat the top bolt and one of the bottom bolts by reaching past the bracket while sitting in front of the wheel hub. The bottom front bolt must be seated from below.
Next I used my 12 mm gear wrench to cinch the new axle into place, very slowly. I torqued down the three bracket bolts about 4-5 turns each, moving around in a clockwise fashion. The top bolt can only be turned a little, so torque down on it until resistance can be felt, then add a little more (not too much more). Same basic concept with the other bolts.
Once the axle is torqued down all three bolts will resist turning. Give them a good final turn into place and all should be well.
Another thing of note, I wasn't always able to use the fixed box end of the gear wrench on the top bolt. Sadly I had to break it free with the ratchet and did a little bit of the torquing with the ratchet end. Used the fixed end on the bottom bolts for all breaking and final torquing.
Happy this thing is in and done! Now to replace the strut, attach the outer tie rod end and button everything up. Professional alignment coming soon...
1) Couldn't have gotten this done without the I bought (GearWrench 85988 12 Piece set). The pain and torture would have been unbearable without them:
The 12mm is about 10 1/2 inches long. Not a lot of room to throw the wrench on the top bolt but *just* enough to do it. Once the bolt is loose one can get out from underneath the car, sit by the wheel hub and contort their hand to reach around the carrier bracket and spin the bolt all the way out.
Once the old axle is out take some time and sand the carrier bracket surfaces that contact the axle. I frosted the carrier bracket with copper anti-seize so I don't run into the trouble that I had with this job again. I also frosted the back of the bracket on the axle itself and around the circumference of the axle body that fits into the bracket. Anti-seize is awesome (for things that aren't supposed to get stuck...)
Before putting in the new axle I greased the inner splines with synthetic "molybdenum" grease (good for fast moving parts) and used some extra gear oil (I have a manual) on the part of the shaft that will be seated in the seal. Moly grease supposedly doesn't play nice with rubber. Be sure to grease the outer splines with moly grease prior to putting the wheel hub back on the axle (not the shaft for the axle nut though!)
When replacing the axle make sure that the shaft is aligned into the transmission first - you don't want to hurt the seal. Next try to make sure that the axle's bracket mounting bolt holes are as closely aligned to bracket bolt holes as possible; it's more difficult to turn the bracket once the splines are in (not impossible, just annoying).
I then tapped on the hub end of the axle with a rubber mallet to get the splines into place. I checked underneath the car where the shaft goes into the transmission to make sure that everything was good before I started torquing anything down.
Next I started in on the carrier bolts. You can seat the top bolt and one of the bottom bolts by reaching past the bracket while sitting in front of the wheel hub. The bottom front bolt must be seated from below.
Next I used my 12 mm gear wrench to cinch the new axle into place, very slowly. I torqued down the three bracket bolts about 4-5 turns each, moving around in a clockwise fashion. The top bolt can only be turned a little, so torque down on it until resistance can be felt, then add a little more (not too much more). Same basic concept with the other bolts.
Once the axle is torqued down all three bolts will resist turning. Give them a good final turn into place and all should be well.
Another thing of note, I wasn't always able to use the fixed box end of the gear wrench on the top bolt. Sadly I had to break it free with the ratchet and did a little bit of the torquing with the ratchet end. Used the fixed end on the bottom bolts for all breaking and final torquing.
Happy this thing is in and done! Now to replace the strut, attach the outer tie rod end and button everything up. Professional alignment coming soon...
Last edited by Shrout1; Mar 11, 2017 at 07:43 AM.
Senior Member
Joined: May 2012
Posts: 1,622
From: Long Island
Gearwrench is actually decent stuff. Taiwan produces much better tools over China for the most part. They usually supply most of the American made tool manufacturers with their ratcheting mechanisms as well for this kind of wrenches.. So why not just go Gearwrench?
Drive her proudly and know... you got beat up in a few battles, but you WON the war! Sooth, tight and quiet is a wonderful thing!
Drive her proudly and know... you got beat up in a few battles, but you WON the war!
Sooth, tight and quiet is a wonderful thing!

Joined: Feb 2022
Posts: 1
17 Maxima severely stuck cv axle.
A couple notes:
1) Couldn't have gotten this done without the extra long gearwrenches I bought (GearWrench 85988 12 Piece set). The pain and torture would have been unbearable without them:
The 12mm is about 10 1/2 inches long. Not a lot of room to throw the wrench on the top bolt but *just* enough to do it. Once the bolt is loose one can get out from underneath the car, sit by the wheel hub and contort their hand to reach around the carrier bracket and spin the bolt all the way out.
Once the old axle is out take some time and sand the carrier bracket surfaces that contact the axle. I frosted the carrier bracket with copper anti-seize so I don't run into the trouble that I had with this job again. I also frosted the back of the bracket on the axle itself and around the circumference of the axle body that fits into the bracket. Anti-seize is awesome (for things that aren't supposed to get stuck...)
Before putting in the new axle I greased the inner splines with synthetic "molybdenum" grease (good for fast moving parts) and used some extra gear oil (I have a manual) on the part of the shaft that will be seated in the seal. Moly grease supposedly doesn't play nice with rubber. Be sure to grease the outer splines with moly grease prior to putting the wheel hub back on the axle (not the shaft for the axle nut though!)
When replacing the axle make sure that the shaft is aligned into the transmission first - you don't want to hurt the seal. Next try to make sure that the axle's bracket mounting bolt holes are as closely aligned to bracket bolt holes as possible; it's more difficult to turn the bracket once the splines are in (not impossible, just annoying).
I then tapped on the hub end of the axle with a rubber mallet to get the splines into place. I checked underneath the car where the shaft goes into the transmission to make sure that everything was good before I started torquing anything down.
Next I started in on the carrier bolts. You can seat the top bolt and one of the bottom bolts by reaching past the bracket while sitting in front of the wheel hub. The bottom front bolt must be seated from below.
Next I used my 12 mm gear wrench to cinch the new axle into place, very slowly. I torqued down the three bracket bolts about 4-5 turns each, moving around in a clockwise fashion. The top bolt can only be turned a little, so torque down on it until resistance can be felt, then add a little more (not too much more). Same basic concept with the other bolts.
Once the axle is torqued down all three bolts will resist turning. Give them a good final turn into place and all should be well.
Another thing of note, I wasn't always able to use the fixed box end of the gear wrench on the top bolt. Sadly I had to break it free with the ratchet and did a little bit of the torquing with the ratchet end. Used the fixed end on the bottom bolts for all breaking and final torquing.
Happy this thing is in and done! Now to replace the strut, attach the outer tie rod end and button everything up. Professional alignment coming soon...
 I had to remove so much stuff to get to a point where I could disconnect the carrier from the engine block, and slide the axle and carrier assembly out. Once removed, couldn�t even bang it off with a sledge! I took it to a local machine shop, who was able to chisel it apart, and he even cleaned it up for me for reinstalling. He only charged me twenty bucks, but that was the best damn 20 bucks I ever spent! I put everything back together and installed the new cv axle in a jiffy, after a week of trying a zillion internet recommendations! Nissan really should address this issue!!!!