
Subframe Bushings???


Thread Starter
Senior Member
Joined: May 2012
Posts: 1,622
From: Long Island
Subframe Bushings???
So I see CS_AR has done some of his cars and found a good portion of the noise coming from aging 4th Gens is in fact from these Bushings.
I haven't found much on the "Official" Nissan position on this needed maintenance. Especially after 18 years and 206K on my 99. And some of you guys have 95s with more miles.
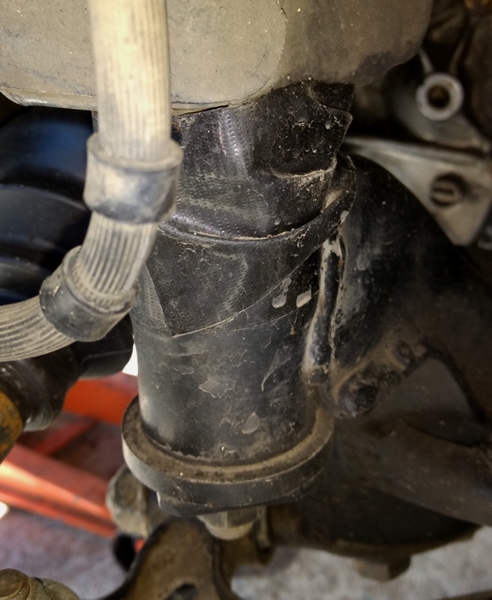
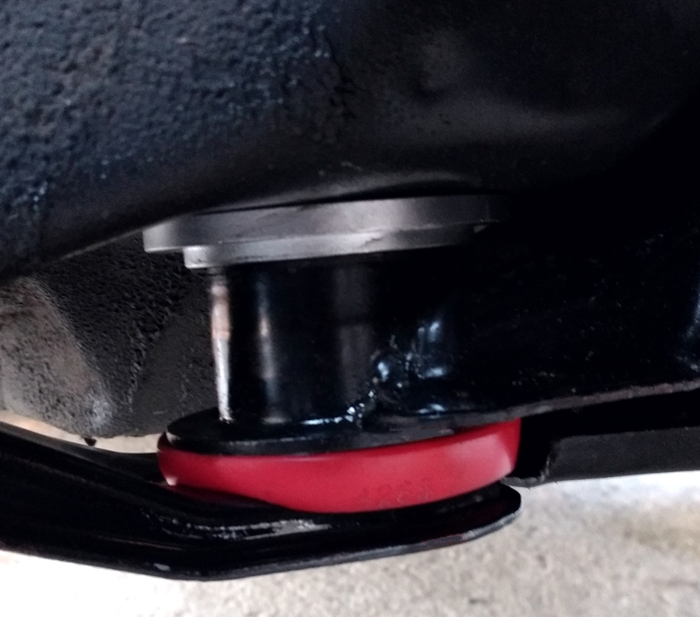
Anybody have pictures of what they looked like when new? Below is what mine looks like now. And truthfully, they look like a 90 year old man's joints with arthritis and complete cartilage disintegration.
CS_AR has experimented with several different combinations of materials. This just makes me more confused than ever and now I would love to see how to do it right as it can be. I'm not quite getting how these function and how the components interplay.
Who's got the recipe? Just you Craig? LOL The clanking and thumping has me on the edge of POSTAL!
I haven't found much on the "Official" Nissan position on this needed maintenance. Especially after 18 years and 206K on my 99. And some of you guys have 95s with more miles.
Anybody have pictures of what they looked like when new? Below is what mine looks like now. And truthfully, they look like a 90 year old man's joints with arthritis and complete cartilage disintegration.
CS_AR has experimented with several different combinations of materials. This just makes me more confused than ever and now I would love to see how to do it right as it can be. I'm not quite getting how these function and how the components interplay.
Who's got the recipe? Just you Craig? LOL The clanking and thumping has me on the edge of POSTAL!
Last edited by KP11520; Mar 29, 2017 at 05:18 PM.

Senior Member
Joined: Jan 2011
Posts: 3,037
From: Central AR
Here are two threads about 5th gen subframe collars. At one time these were offered for 4th gens. I don't think they are for sale any longer for 4th or 5th gens. When I tried to buy another set, I did not receive a reply from the email address where I purchased the first set. So it looks like the products are no longer available.
Later, I bought a used set from the 4th gen classifieds. However, one of the upper C shaped collars was missing. Apparently, it had worked loose and fallen out with the previous owner. So I checked the first set that I bought new and the front upper C collars were working loose. I had to use Gorilla tape to secure the front upper C collars so they wouldn't fall out in the street.
Unfortunately, the rear upper C collars on the 99 SE eventually worked loose and fell out on the street somewhere. I think another member had problems with the upper C collars working loose from the thread below. So the problems with the upper C collars working loose, coupled with not being able to buy any replacements, sent me looking for a better solution.
https://maxima.org/forums/5th-genera...e-collars.html
Here's a thread on the 5th gen collars. I cannot find the 4th gen thread.
https://maxima.org/forums/5th-genera...e-collars.html
Here's a thread in the Advanced Suspension section about the solution I found to replace the original set of collars for the 99 SE and to provide a set for the 98 model.
https://maxima.org/forums/advanced-s...ification.html
NOTE: I do not sell any of the parts used in the setup and have nothing to gain from anyone using the solution.
::
Problems with the old set that I purchased from a group buy several years ago.
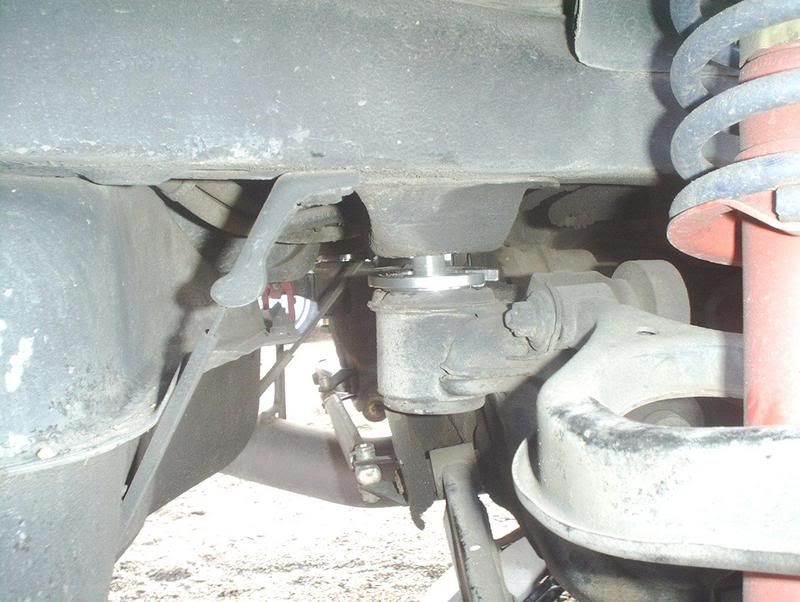
1) I had to use Gorilla tape to keep the front upper C collar from falling out.
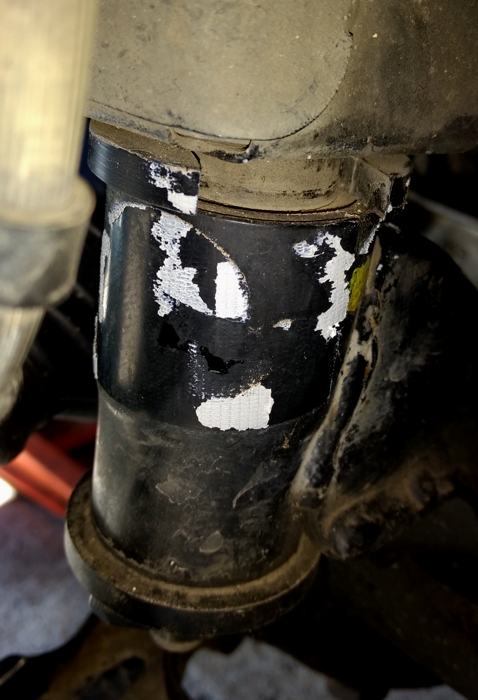
2) Picture where I removed the Gorilla tape when I replaced the old collars. You can see how the collar needed to be thicker and the opening to be smaller for the upper C collars to fit snug around the mount post.
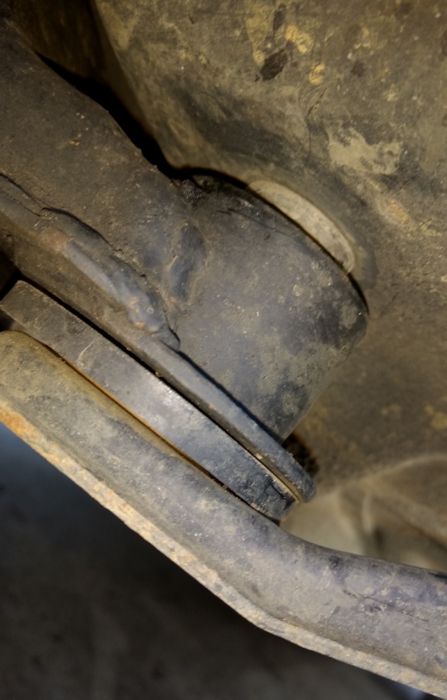
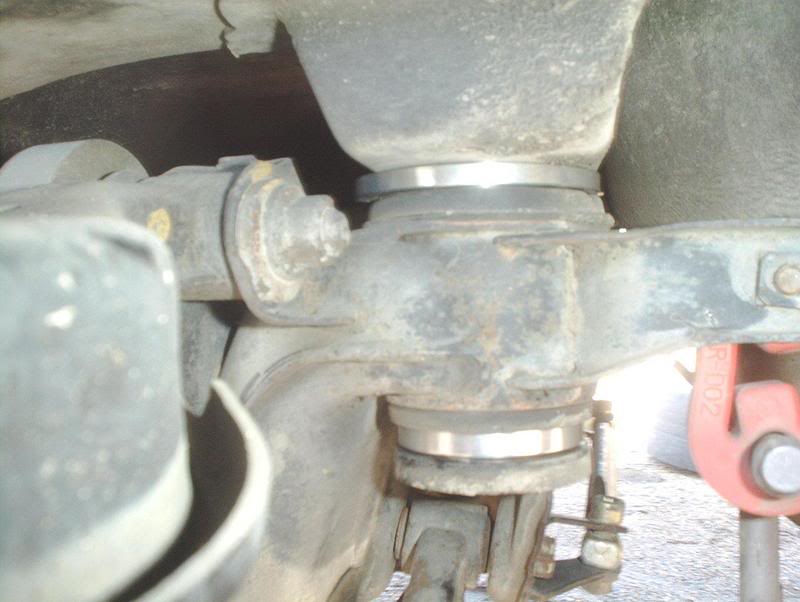
3) The old rear upper C collars fell out on the street somewhere.
4) New front C collars and delrin lower bushing from a Titan truck.
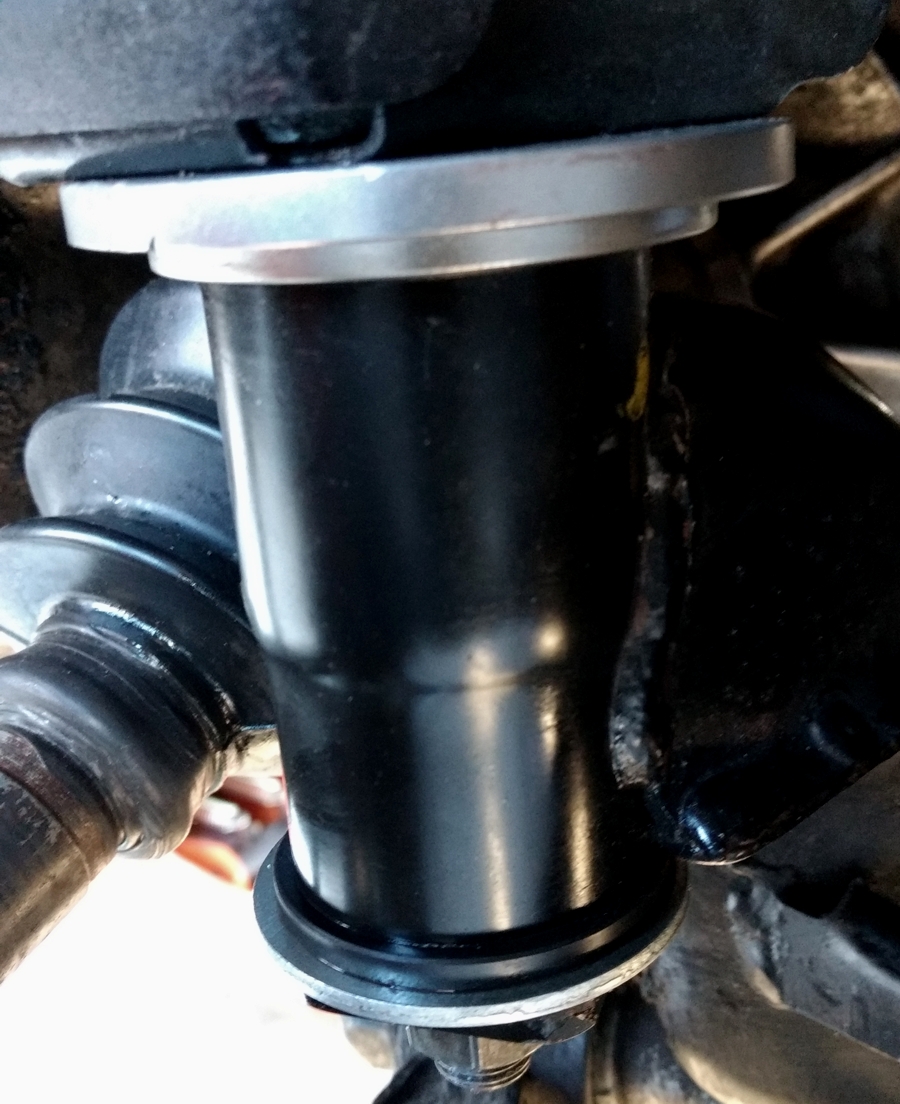
5) New rear collars and Perrin bushing from a Subaru WRX.
Later, I bought a used set from the 4th gen classifieds. However, one of the upper C shaped collars was missing. Apparently, it had worked loose and fallen out with the previous owner. So I checked the first set that I bought new and the front upper C collars were working loose. I had to use Gorilla tape to secure the front upper C collars so they wouldn't fall out in the street.
Unfortunately, the rear upper C collars on the 99 SE eventually worked loose and fell out on the street somewhere. I think another member had problems with the upper C collars working loose from the thread below. So the problems with the upper C collars working loose, coupled with not being able to buy any replacements, sent me looking for a better solution.
https://maxima.org/forums/5th-genera...e-collars.html
Here's a thread on the 5th gen collars. I cannot find the 4th gen thread.
https://maxima.org/forums/5th-genera...e-collars.html
Here's a thread in the Advanced Suspension section about the solution I found to replace the original set of collars for the 99 SE and to provide a set for the 98 model.
https://maxima.org/forums/advanced-s...ification.html
NOTE: I do not sell any of the parts used in the setup and have nothing to gain from anyone using the solution.
::
Problems with the old set that I purchased from a group buy several years ago.
1) I had to use Gorilla tape to keep the front upper C collar from falling out.

2) Picture where I removed the Gorilla tape when I replaced the old collars. You can see how the collar needed to be thicker and the opening to be smaller for the upper C collars to fit snug around the mount post.

3) The old rear upper C collars fell out on the street somewhere.

4) New front C collars and delrin lower bushing from a Titan truck.

5) New rear collars and Perrin bushing from a Subaru WRX.

Last edited by CS_AR; Mar 30, 2017 at 03:48 AM.
Thread Starter
Senior Member
Joined: May 2012
Posts: 1,622
From: Long Island
Man, that's beautiful! You even broke everything apart and sent it to the auto body shop for painting to look new again!
Now I understand why I have so much slap over slightly rough roads, never mind rough roads. I've been chasing this for years with all the other front end parts I've replaced, unaware of the impact of the degradation and/or slippage of these collars and bushings!
I'm curious on how Nissan originally assembled these into the car at the factory? Were they round and not C shaped and inserted as the machinery put the subframe to the unibody chassis? I would love to see what the new finished product looked like back then.
So, I guess the bushings just ride on the top and bottom and don't line the inner part between the housing and the rod? The top "C" shape, despite how tight, bothers me. Patent idea for anybody paying attention..... The top collars need to be a two part system of the same footprint, that when married together, create a uniform round collar locked together with a decent portion of overlap. One on its back and the other flipped upside down and inserted from the opposite (180 degrees) side. The overlap area, each has half thickness. Two C shaped collars @ 270 degrees of the circle, with the middle 90 degrees full thickness and both wings of 90 degrees half thickness. And somehow when assembled, reliably lock together. Send me 10% when you start making donuts!
I'm assuming you took the Nuts off the bottoms of both types to insert the round bushings and/or collars on the bottoms? Were you able to find any Torque spec's?
Did Nissan dealers ever have a repair process for this or just act like it wasn't there, like the Lower Radiator Support cancer, never mentioned to by the dealer, despite it crumbling apart and me asking if there was anything that needed to be addressed under the car. Bastids!
Thank you Craig. You are the Ol Lady with the Recipe. LOL. Somebody get protection for this guy. If we lose him, we are all destined to clunking front end suspensions forever. Or we'll all have to follow Asand1. OUCH! (Good for him!)
Gorilla Tape Eh?") LOL
LOL
Now let me go look at your hidden post in the suspensions area!
Now I understand why I have so much slap over slightly rough roads, never mind rough roads. I've been chasing this for years with all the other front end parts I've replaced, unaware of the impact of the degradation and/or slippage of these collars and bushings!
I'm curious on how Nissan originally assembled these into the car at the factory? Were they round and not C shaped and inserted as the machinery put the subframe to the unibody chassis? I would love to see what the new finished product looked like back then.
So, I guess the bushings just ride on the top and bottom and don't line the inner part between the housing and the rod? The top "C" shape, despite how tight, bothers me. Patent idea for anybody paying attention..... The top collars need to be a two part system of the same footprint, that when married together, create a uniform round collar locked together with a decent portion of overlap. One on its back and the other flipped upside down and inserted from the opposite (180 degrees) side. The overlap area, each has half thickness. Two C shaped collars @ 270 degrees of the circle, with the middle 90 degrees full thickness and both wings of 90 degrees half thickness. And somehow when assembled, reliably lock together. Send me 10% when you start making donuts!
I'm assuming you took the Nuts off the bottoms of both types to insert the round bushings and/or collars on the bottoms? Were you able to find any Torque spec's?
Did Nissan dealers ever have a repair process for this or just act like it wasn't there, like the Lower Radiator Support cancer, never mentioned to by the dealer, despite it crumbling apart and me asking if there was anything that needed to be addressed under the car. Bastids!
Thank you Craig. You are the Ol Lady with the Recipe. LOL. Somebody get protection for this guy. If we lose him, we are all destined to clunking front end suspensions forever. Or we'll all have to follow Asand1. OUCH! (Good for him!)
Gorilla Tape Eh?
LOLNow let me go look at your hidden post in the suspensions area!
Senior Member
Joined: Jan 2011
Posts: 3,037
From: Central AR
Now here's the item that I would like to try someday..
All I need is about $900 and to find one..
http://www.ebay.com/itm/Ultra-Racing...p2047675.l2557
All I need is about $900 and to find one..
http://www.ebay.com/itm/Ultra-Racing...p2047675.l2557
Senior Member
Joined: Jan 2011
Posts: 3,037
From: Central AR
Here's a video on how to replace subframe bushings on a 240sx (s-chassis). I've seen several postings of a similar process on different Nissans.
Of course, our subframe bushings are smaller. After watching the video, I think you can understand why I took the approach I used with the collar and bushing combo. :-)
Of course, our subframe bushings are smaller. After watching the video, I think you can understand why I took the approach I used with the collar and bushing combo. :-)

Thread Starter
Senior Member
Joined: May 2012
Posts: 1,622
From: Long Island
Now that's what I'm talking about...... Drop the whole subframe and use bushings that will go the distance with all contact points covered!
I like the 2 part ES system for that 240. Nice engineering!
On our 4th Gens, that would be a nightmare! UNFORTUNATELY!
Right now I'm underwhelmed with the piecemeal choices for the 4th Gens.
And you did an incredible job searching for the right mix of other available parts to substitute! MUCHO Kudos to you Craig!
Way better than Gorilla Tape. LOL
I guess I'm going to follow your footprints in the snow (again) before they melt!
Thread Starter
Senior Member
Joined: May 2012
Posts: 1,622
From: Long Island
Do you think the Nissan Dealers ever had a repair/replacement offering for this? I'm thinking NOT.
I despise when manufacturers make their customers eat (expensively) what they didn't bother to address in the planning stages of whatever model does these failures. And they never even come up with the right procedure/process to eradicate it properly. And why we're here now thanking Craig!
And it still feels like a bandaid for a gunshot wound compared to that 240SX solution! Now you did it! I want THAT!
Senior Member
Joined: Jan 2011
Posts: 3,037
From: Central AR
Since I've not seen how subframe bushings look on a new one and if there is any gap that allows the subframe to move around, I can't say one way or another.
Most likely Turbobink has the closest example of how good subframe post bushings should look. <hint for pictures>
Somehow I think if I did have new subframe bushings and there was any up/down movement between the post bottom and the body, I would be looking to tighten up that slack somehow.
In studying the monocoque body design from the firewall forward and my wish to tighten up the subframe where it connects to the body, this seems to compliment the upper strut tower braces by providing some extra support from the bottom side.
So I think of it like a strut tower brace enhancement that works from the underside.
Now I must tell you that after removing the 19mm nuts that hold the lower subframe supports in place, it does take some amount of muscle applied to a pry bar to push the subframe down low enough for the aluminum collars to clear the old bushings. So you are pressing down on a prybar to open a gap for inserting the aluminum collars around the stud bolts that come down from the body with one hand, while the other is inserting the collar into position.
Once you get the aluminum collars into position, and you release the pry bar, you still need to install the lower bushings and tighten up the subframe around the delrin and Perrin bushings. IIRC it was somewhere in the 80 to 100ft lbs area.
You can literally tell how far to go on tightening the bolts by the force you see being applied to the lower bushings. The bottom line is to not over do it on tightening the subframe bolts because the last thing you want to do is strip off or break one of the stud bolts that hold the subframe to the body. Use plenty of penetrating oil on removing the old 19mm nuts because depending on your location, you can be dealing with rust.. If you hit a rusty 19mm that doesn't want to come off without a lot of force, you may want to stop while you are ahead and give the penetrating oil more time to work.
On the driver side, I could not press the subframe down low enough for the aluminum collar to completely clear the old FRONT post, so I had to give it some help with a rubber mallet and tap it into position.
After you do the work to wrestle the aluminum collars around the old posts, you will be confident that they will not fall out. That part of the job is a real pain. The old collars were quite easy to slip into place. They also easily slipped out of place and fell onto on the street somewhere. So no pain, no gain when it comes to installing the new thicker aluminum collars into position.
This $5.99 Harbor Freight Tire Iron was a great help when it came to pushing down the subframe.
http://www.harborfreight.com/24-inch...ron-93230.html

Here's one of the better s-chassis (240sx) aluminum subframe collar installation posts below.
http://www.s-chassis.com/forums/how-...install-38437/
This is a popular mod with the s-chassis (240sx 300zx) crowd. It just took some improvising with the bottom bushings since the larger s-chassis lower collars will not fit inside our lowers
Most likely Turbobink has the closest example of how good subframe post bushings should look. <hint for pictures>
Somehow I think if I did have new subframe bushings and there was any up/down movement between the post bottom and the body, I would be looking to tighten up that slack somehow.
In studying the monocoque body design from the firewall forward and my wish to tighten up the subframe where it connects to the body, this seems to compliment the upper strut tower braces by providing some extra support from the bottom side.
So I think of it like a strut tower brace enhancement that works from the underside.
Now I must tell you that after removing the 19mm nuts that hold the lower subframe supports in place, it does take some amount of muscle applied to a pry bar to push the subframe down low enough for the aluminum collars to clear the old bushings. So you are pressing down on a prybar to open a gap for inserting the aluminum collars around the stud bolts that come down from the body with one hand, while the other is inserting the collar into position.
Once you get the aluminum collars into position, and you release the pry bar, you still need to install the lower bushings and tighten up the subframe around the delrin and Perrin bushings. IIRC it was somewhere in the 80 to 100ft lbs area.
You can literally tell how far to go on tightening the bolts by the force you see being applied to the lower bushings. The bottom line is to not over do it on tightening the subframe bolts because the last thing you want to do is strip off or break one of the stud bolts that hold the subframe to the body. Use plenty of penetrating oil on removing the old 19mm nuts because depending on your location, you can be dealing with rust.. If you hit a rusty 19mm that doesn't want to come off without a lot of force, you may want to stop while you are ahead and give the penetrating oil more time to work.
On the driver side, I could not press the subframe down low enough for the aluminum collar to completely clear the old FRONT post, so I had to give it some help with a rubber mallet and tap it into position.
After you do the work to wrestle the aluminum collars around the old posts, you will be confident that they will not fall out. That part of the job is a real pain. The old collars were quite easy to slip into place. They also easily slipped out of place and fell onto on the street somewhere. So no pain, no gain when it comes to installing the new thicker aluminum collars into position.
This $5.99 Harbor Freight Tire Iron was a great help when it came to pushing down the subframe.
http://www.harborfreight.com/24-inch...ron-93230.html
Here's one of the better s-chassis (240sx) aluminum subframe collar installation posts below.
http://www.s-chassis.com/forums/how-...install-38437/
This is a popular mod with the s-chassis (240sx 300zx) crowd. It just took some improvising with the bottom bushings since the larger s-chassis lower collars will not fit inside our lowers


Last edited by CS_AR; Mar 30, 2017 at 03:12 PM.
Thread Starter
Senior Member
Joined: May 2012
Posts: 1,622
From: Long Island
Craig, I can't thank you enough! From designing the suitable parts solution, to part numbers, where to buy them, and even got the vendors to expect business from us at a better deal!
And then all the countless hours to document all this for all of us to use at no cost.
If this was the Grammy's, that'd be worth "Album of the Year".
Thank you!
And then all the countless hours to document all this for all of us to use at no cost.
If this was the Grammy's, that'd be worth "Album of the Year".
Thank you!
Thread Starter
Senior Member
Joined: May 2012
Posts: 1,622
From: Long Island
So, now I'm curious about if Nissan ever made bushings to replace these when worn.
Nissan has no listings of any bushings for the four points. It would be two different part numbers because there's two front and two rear and they are the same part for both sides (L & R). But no info available.
What is funny is, it seems the "Suspension Cross-member" is still available on some sites, while it says discontinued on others.. I wonder what, if any, the bushings look like in these?
Part number is (for AT. MT is a different part number): 5440040U00
Replace the whole thing since the bushings aren't serviceable? Are these guys smoking Crack?
Senior Member
Joined: Jan 2011
Posts: 3,037
From: Central AR
An eBay seller has USED one listed for $149. I can't tell if this is the correct part from the picture.
http://www.ebay.com/itm/95-99-Nissan...-/121857677799
http://www.ebay.com/itm/95-99-Nissan...-/121857677799