
My Gauges are Complete!


My Gauges are Complete!
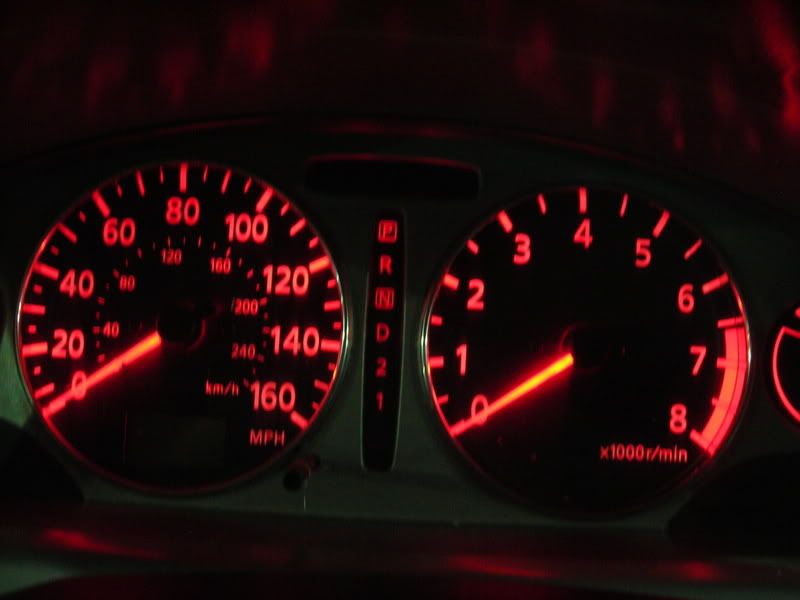
Well part of my interior process has been my gauges, I turned them red tonight, got my chrome gauge rings on and painted the plate around the gauges silver to match the color of the car. I have also painted some of the other pieces around the car such as the switch plates and the entire center console. All I have left now is to upgrade the seats, planning on fitting in some G35 seats or maybe having some custom ones done. I will have more interior shots tomorrow.
So here are the red Gauges

So here are the red Gauges


Its actually very very easy...
It takes about 15 minutes....
go here: http://autolumination.com/74.htm
order the ones that are $4.99 you need 4 of them.
pick your color, I choose red and there are no hot spots it is all even across the face and it looks gorgous at night
If you order blue or white there tends to be an issue with how the light spreads evenly across.
So once you have them
1. Lower the steering wheel
2. Unscrew the screws in the shroud around the gauges
3. Pull shroud out, it is a tight fit but you can remove it without have to remove the steering wheel cover
4. Unscrew the 3 screws holding the gauges in (One on top middle, two on the bottom sides)
5. Pull the gauges out, again a tight fit but you can pull out without removing the steering wheel cover
6. Flip it upside down and put on top of dash
7. There are black round things that you can twist out (4 of them each one located about where each gauge would be)
8. when you have them out these bulbs are a bit of a PIA to get out, DO NOT I repeat DO NOT use your teeth to remove the bulbs, they do shatter, I did not try this, put I had two out of the bulbs shatter on me when using plyers to remove them. When they do shatter, don't worry its really easy to then just yank them out using the filament to pull them out.
9. Once they are all in try them out before you put your gauges completely back in. *Hint: Dimmer switch needs to be plugged in as well. Once you know they work put everything back together and enjoy.
NOTE: If they don't light at first try, don't fret, the polarity maybe wrong just reverse the LED bulb around. I got 3 out of 4 right on first try.
Last edited by DrunkieTheBear; Oct 16, 2007 at 07:49 PM.
I totally agree everything is being made red right now, I have 15,000mcd red LEDs going in and I can't wait. I have my doors, shift bezel, map light, dome light, mirror light, center console light all done, just the window switches and auto climate control to finish got to get my soldering iron out. So when I do those LED conversions, I will take pictures and do a full write up on it.


Member
Joined: Feb 2005
Posts: 200
From: Aurora, Ohio
Hey silmax00
My 01 could sure use new bulbs...The autolumination site you linked....Is the bulb the first one listed on the page the "tripower 3 led bulb??? I am guessing it is but you stated they were 4.99 and they are listing them for 3.99... I just want to get the right bulbs before ordering four of these....I am also going to order some 194's for my clear sidemarkers because I am sick of the white light the polargs give off I have in there now...I will get the yellow led's for the front and the red for the back...Thanks....Paul
My 01 could sure use new bulbs...The autolumination site you linked....Is the bulb the first one listed on the page the "tripower 3 led bulb??? I am guessing it is but you stated they were 4.99 and they are listing them for 3.99... I just want to get the right bulbs before ordering four of these....I am also going to order some 194's for my clear sidemarkers because I am sick of the white light the polargs give off I have in there now...I will get the yellow led's for the front and the red for the back...Thanks....Paul
if you go down the page a little further until you see "#24 Only(T6-1/2, T2-1/4) bulbs are 3/4" (17mm) x 5/16 (6.5mm)" diameter" and those are your bulbs you need
Member
Joined: Feb 2005
Posts: 200
From: Aurora, Ohio
THANKS
Thanks for the replay silmax...I appreciate your response and the gauges look great....Keep up the good work with the max...I'm ordering mine tomorrow with a couple extra so I have some spares..Not sure how long they will last..


There are 4 bulbs
1- top left of the spedo(lights speedo and gas)
1- top right of the tach(lights tach and temp)
1- for odo
1- trip cpu
At least that is how it is on the 02-03 6MT
I tried it with mine and got Blue(Tri-power LED's) the light was not bright enough so after 6 months just bought the conventional #24 colored bulbs in Green to match my Bose headunit. I like it... better and more even light distribution

Member
Joined: Jul 2002
Posts: 50
From: Downingtown, PA
you can't... unless you manualy take the cluster apart and solder the LED's in.
There are 4 bulbs
1- top left of the spedo(lights speedo and gas)
1- top right of the tach(lights tach and temp)
1- for odo
1- trip cpu
At least that is how it is on the 02-03 6MT
I tried it with mine and got Blue(Tri-power LED's) the light was not bright enough so after 6 months just bought the conventional #24 colored bulbs in Green to match my Bose headunit. I like it... better and more even light distribution
so did a write up on how to do the needles with a seperate LED.

 but as you can see the final result is actually what i put in. so I am at a lose here as to how its working with red.
so, I got mine in today and fitted them. The odd thing is, i only have the following lights behind the cluster:
3 brown holders at the top (signals and hi-beam)
black holder top right and top left (gauge lighting)
black holder for odometer lighting.
(i.e. only two gauge lights).
needless to say, the lighting isn't that great, and there are hotspots where the bulbs are....

IIRC I tried this a couple years ago with similar results. I wonder if the AT '00 maxima has more ligghts for somereason (to light the center shift indicator area?)
grr...
3 brown holders at the top (signals and hi-beam)
black holder top right and top left (gauge lighting)
black holder for odometer lighting.
(i.e. only two gauge lights).
needless to say, the lighting isn't that great, and there are hotspots where the bulbs are....
IIRC I tried this a couple years ago with similar results. I wonder if the AT '00 maxima has more ligghts for somereason (to light the center shift indicator area?)
grr...


From the uneven distribution of the stock lights, I would say there are only three bulbs for the manuals.
Side note: does any one have pics of the cluster apart? I am about to try a technique to change my color with led's but have more coverage area.
Joined: May 2004
Posts: 8,143
From: Communist Wealth of Virginia
so, I got mine in today and fitted them. The odd thing is, i only have the following lights behind the cluster:
3 brown holders at the top (signals and hi-beam)
black holder top right and top left (gauge lighting)
black holder for odometer lighting.
(i.e. only two gauge lights).
needless to say, the lighting isn't that great, and there are hotspots where the bulbs are....
IIRC I tried this a couple years ago with similar results. I wonder if the AT '00 maxima has more ligghts for somereason (to light the center shift indicator area?)
grr...


You guys with the SE's might want to try a trick us Spec-V guys have. Our 04+ gauges have an orange film on the backside of the gauge faces that we sand off to allow us to get better light and other colors through.
Pretty soon I'll be getting in a ton of LEDs to make some custom gauge lights for Zero2sixtyZ and myself. I guess I can try it then...
Pretty soon I'll be getting in a ton of LEDs to make some custom gauge lights for Zero2sixtyZ and myself. I guess I can try it then...