
Heated seat switch bulb replacement?


I think you'll find that it'll be more work than would be worth it for one little bulb. Mine burned out a while ago and I'm waiting until I have another reason to take the whole center console apart before I change mine out.

Senior Member
Joined: Aug 2003
Posts: 741
From: Montreal
I think you will find it is just a 10 minute job. This is how long it took me.
Dont change the $50 switch. Change only the 49 cents bulb or LED.
Check these threads
http://forums.maxima.org/5th-generat...er-switch.html
http://forums.maxima.org/5th-generat...at-switch.html
Dont change the $50 switch. Change only the 49 cents bulb or LED.
Check these threads
http://forums.maxima.org/5th-generat...er-switch.html
http://forums.maxima.org/5th-generat...at-switch.html

Haha, I just did this the other day.
I went to RadioShack and bought the smallest 12v bulb I could find.
It's a really easy job. I just soldered the little bulb in and was good to go.
I went to RadioShack and bought the smallest 12v bulb I could find.
It's a really easy job. I just soldered the little bulb in and was good to go.

'00 GLE

Joined: Aug 2003
Posts: 97
You don't have to solder the bulb in. The silicone rubber bulb holder inside of the switch slips right off of the two copper "arms" it's attached to. It's much neater than soldering and will be easier to replace if the bulbs burn out again. Just thread the leads from the new bulb into the bulb holder like the original leads were. I used Radio Shack P/N 272-1092. They cost about $1.70 for a pack of two bulbs.
Last edited by BuRoJo; Jan 13, 2010 at 05:52 AM.


You don't have to solder the bulb in. The silicone rubber bulb holder inside of the switch slips right off of the two copper "arms" it's attached to. It's much neater than soldering and will be easier to replace if the bulbs burn out again. Just thread the leads from the new bulb into the bulb holder like the original leads were. I used Radio Shack P/N 272-1092. They cost about $1.70 for a pack of two bulbs.
'00 GLE
Joined: Aug 2003
Posts: 97


Supporting Maxima.org Member
Joined: Oct 2006
Posts: 105
Here you go.
I fixed the bulb and it cost less than $2. Here's how to do it:
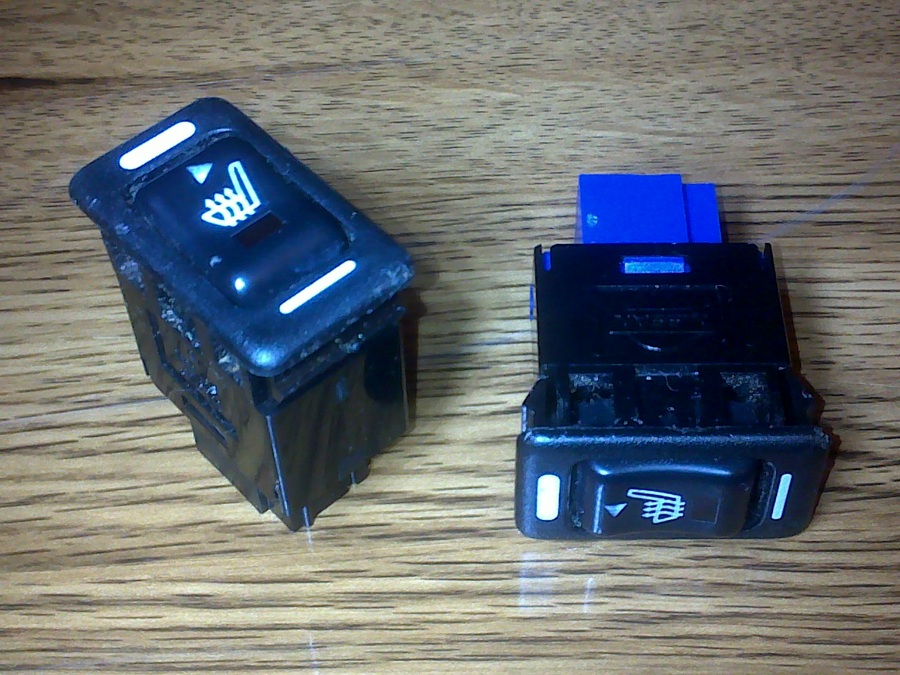
1 - Take the switch out of the center console. Be careful and pry it out gently.
2 - Disconnect the blue wiring connector and take the switch somewhere with good light.
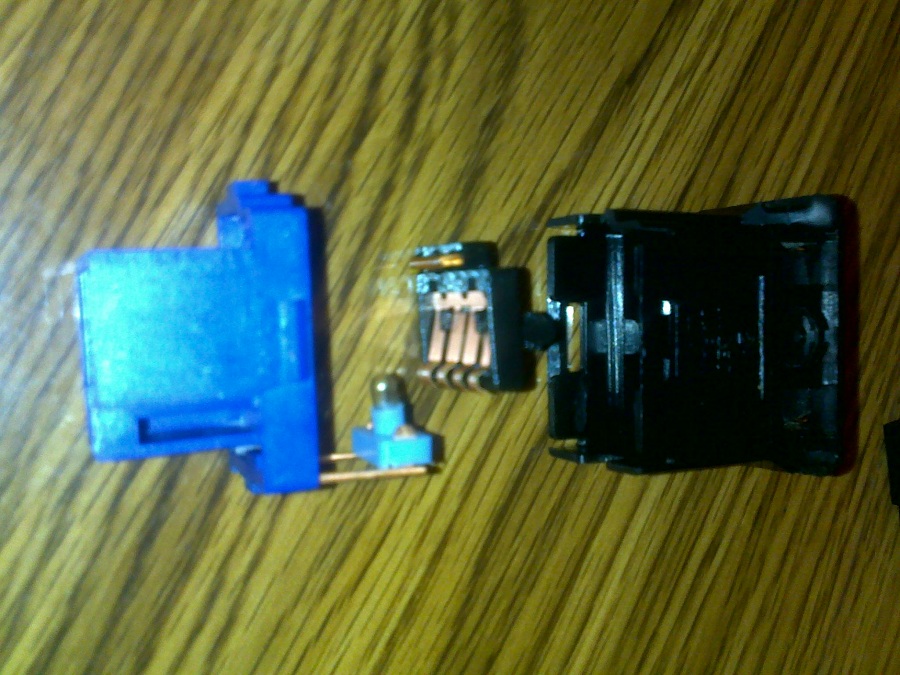
3 - Using a small flat-blade screwdriver, gently release the 2 tabs holding the blue lower section to the switch assembly.
4 - Pull the blue section out (the sliding contact may fall out-no problem-see below)
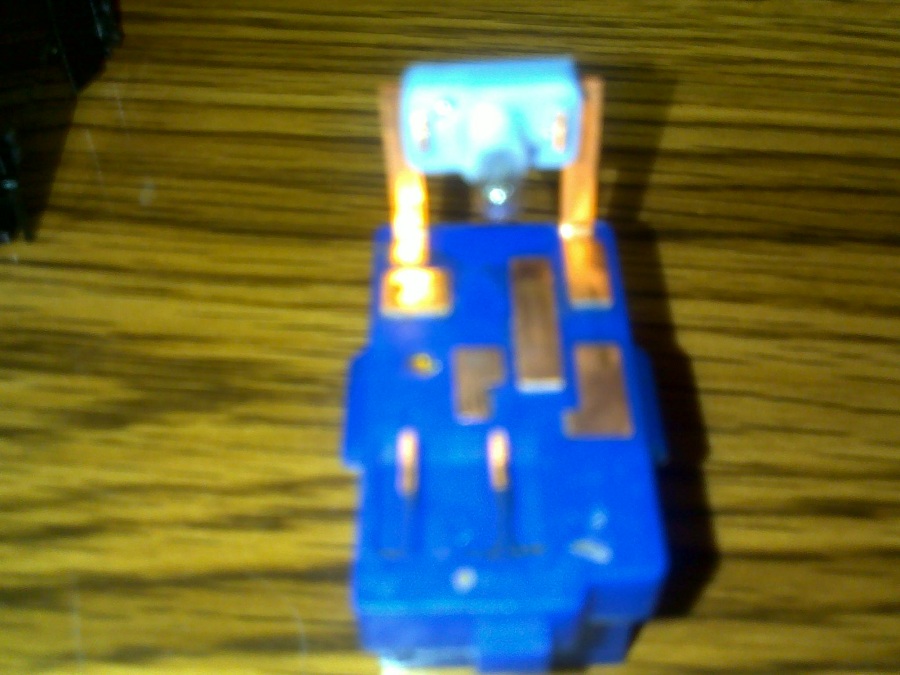
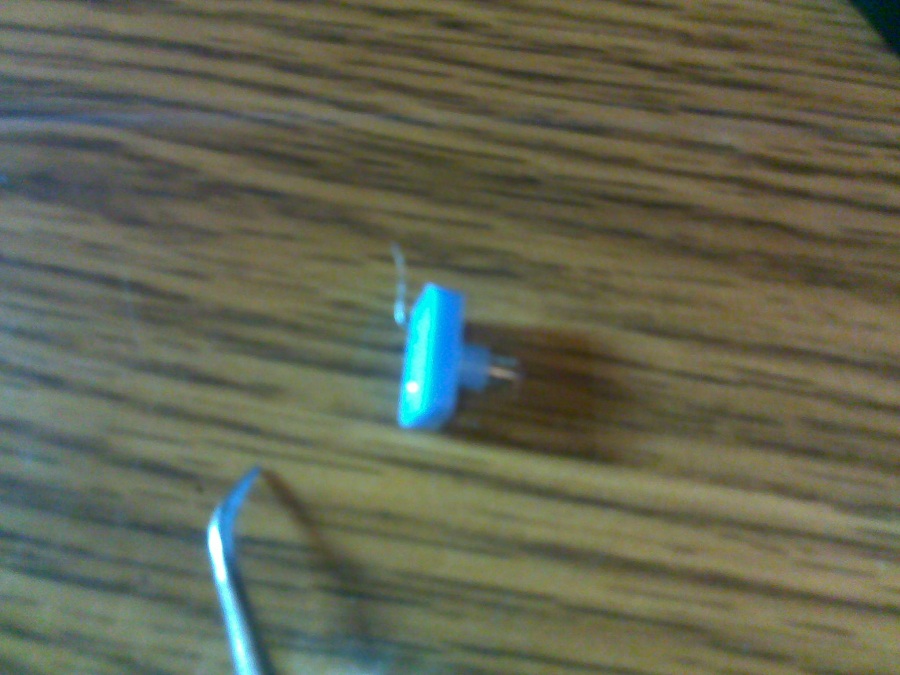
5 - If you look at the blue section you'll see the bulb in a gray/blue rubber holder.
6 - The holder is press-fit to the two copper posts, Gently wiggle it off.
7 - The bulb wires make contact with the copper posts using contact pressure only
8 - With a jewler's screwdriver gently pull the bulb wires out of their holes paying attention to the way the wires were threaded through the holder.
9 - Carefully pull the bulb from its holder. Be careful around the actual bulb, it's sticky and the rubber holder can tear.
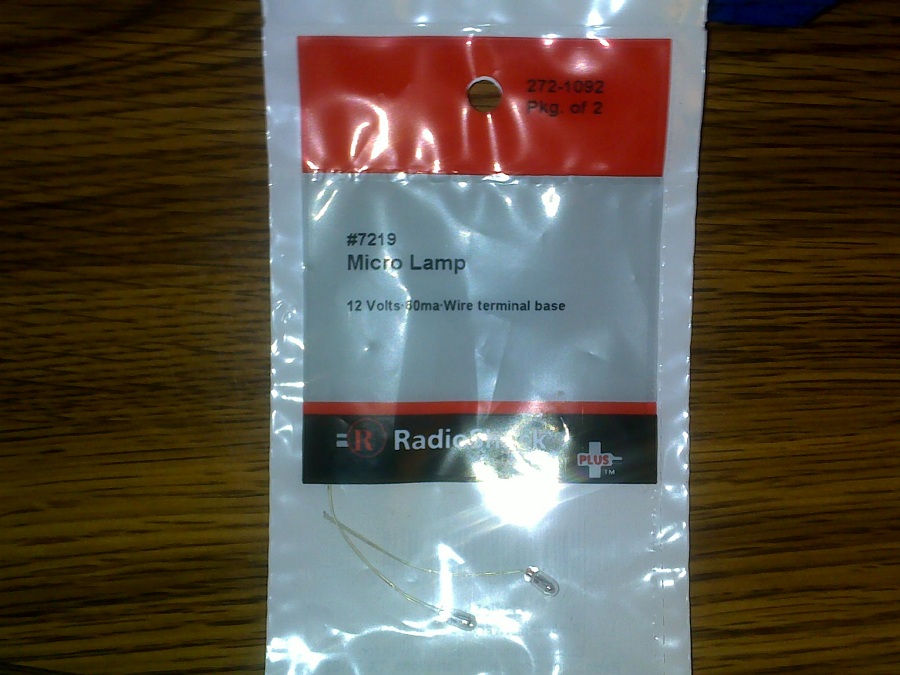
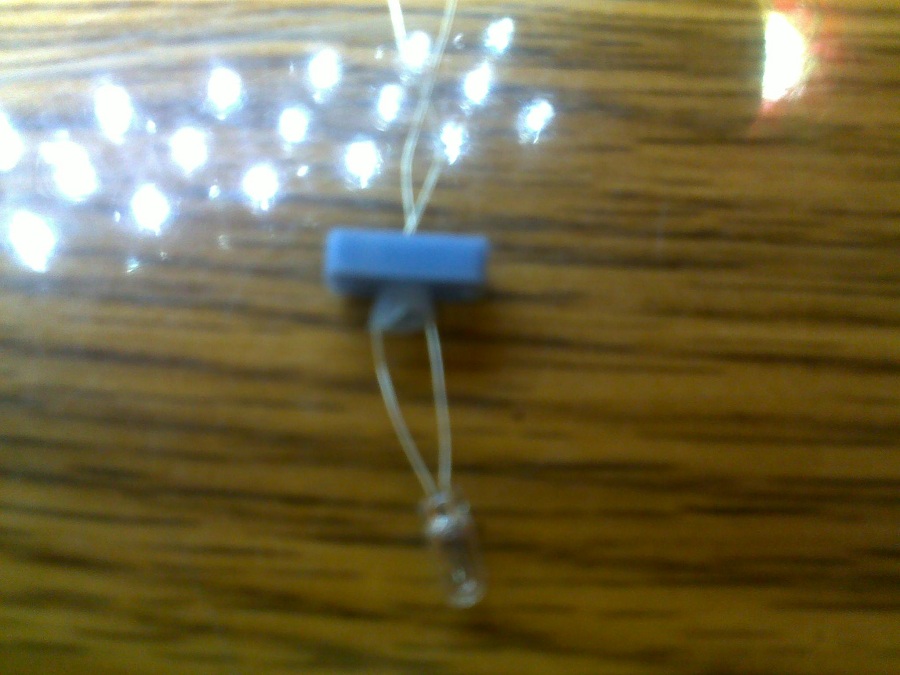
10 - Get a Radio Shack part number 272-1092 (12v microlamp) $1.69 for two.
11 - Take one lamp and feed its wires through the two holes in the base of the holder.
12 - Push the new lamp all the way down into the holder.
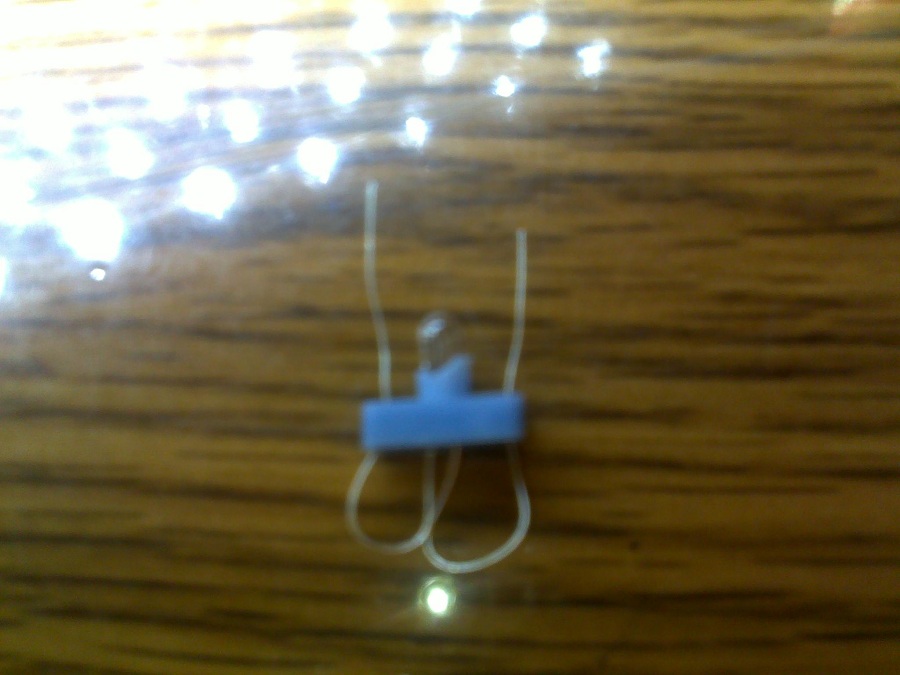
13 - Thread the wires back the way they were on the holder and cut off the extra wire
14 - Put the holder back on the copper posts with the lamp facing inside the switch
15 - If the black sliding connector fell out. Look inside the switch and place the connector back inside lining up the post on the connector with the U-shaped channel on the inside of the switch body.
16 - If the sliding connector is in correctly, you should be able to put your finger on it to hold it in place and rock the switch back and forth watching it move side-to-side.
17 - Rock the switch so the slider is to one side making the opening for the bulb as big as it can get.
18 - Slide the blub assembly as part of the blue section, back inside the switch with the bulb going up into the open section. Snap the two parts together.
19 - Put the switch back in your car and enjoy the new light!!
20 - This whole process only took about 5 minutes once I had the correct bulb.
I fixed the bulb and it cost less than $2. Here's how to do it:
1 - Take the switch out of the center console. Be careful and pry it out gently.
2 - Disconnect the blue wiring connector and take the switch somewhere with good light.
3 - Using a small flat-blade screwdriver, gently release the 2 tabs holding the blue lower section to the switch assembly.
4 - Pull the blue section out (the sliding contact may fall out-no problem-see below)
5 - If you look at the blue section you'll see the bulb in a gray/blue rubber holder.
6 - The holder is press-fit to the two copper posts, Gently wiggle it off.
7 - The bulb wires make contact with the copper posts using contact pressure only
8 - With a jewler's screwdriver gently pull the bulb wires out of their holes paying attention to the way the wires were threaded through the holder.
9 - Carefully pull the bulb from its holder. Be careful around the actual bulb, it's sticky and the rubber holder can tear.
10 - Get a Radio Shack part number 272-1092 (12v microlamp) $1.69 for two.
11 - Take one lamp and feed its wires through the two holes in the base of the holder.
12 - Push the new lamp all the way down into the holder.
13 - Thread the wires back the way they were on the holder and cut off the extra wire
14 - Put the holder back on the copper posts with the lamp facing inside the switch
15 - If the black sliding connector fell out. Look inside the switch and place the connector back inside lining up the post on the connector with the U-shaped channel on the inside of the switch body.
16 - If the sliding connector is in correctly, you should be able to put your finger on it to hold it in place and rock the switch back and forth watching it move side-to-side.
17 - Rock the switch so the slider is to one side making the opening for the bulb as big as it can get.
18 - Slide the blub assembly as part of the blue section, back inside the switch with the bulb going up into the open section. Snap the two parts together.
19 - Put the switch back in your car and enjoy the new light!!
20 - This whole process only took about 5 minutes once I had the correct bulb.

Member
Joined: Mar 2004
Posts: 120
From: Duluth, MN
Here you go.
I fixed the bulb and it cost less than $2. Here's how to do it:
1 - Take the switch out of the center console. Be careful and pry it out gently.
2 - Disconnect the blue wiring connector and take the switch somewhere with good light.
3 - Using a small flat-blade screwdriver, gently release the 2 tabs holding the blue lower section to the switch assembly.
4 - Pull the blue section out (the sliding contact may fall out-no problem-see below)
5 - If you look at the blue section you'll see the bulb in a gray/blue rubber holder.
6 - The holder is press-fit to the two copper posts, Gently wiggle it off.
7 - The bulb wires make contact with the copper posts using contact pressure only
8 - With a jewler's screwdriver gently pull the bulb wires out of their holes paying attention to the way the wires were threaded through the holder.
9 - Carefully pull the bulb from its holder. Be careful around the actual bulb, it's sticky and the rubber holder can tear.
10 - Get a Radio Shack part number 272-1092 (12v microlamp) $1.69 for two.
11 - Take one lamp and feed its wires through the two holes in the base of the holder.
12 - Push the new lamp all the way down into the holder.
13 - Thread the wires back the way they were on the holder and cut off the extra wire
14 - Put the holder back on the copper posts with the lamp facing inside the switch
15 - If the black sliding connector fell out. Look inside the switch and place the connector back inside lining up the post on the connector with the U-shaped channel on the inside of the switch body.
16 - If the sliding connector is in correctly, you should be able to put your finger on it to hold it in place and rock the switch back and forth watching it move side-to-side.
17 - Rock the switch so the slider is to one side making the opening for the bulb as big as it can get.
18 - Slide the blub assembly as part of the blue section, back inside the switch with the bulb going up into the open section. Snap the two parts together.
19 - Put the switch back in your car and enjoy the new light!!
20 - This whole process only took about 5 minutes once I had the correct bulb.
Dethreading old bulb:
New bulb threading:

It took me only 10 minutes going slow and Done!
 Thanks again TonyW
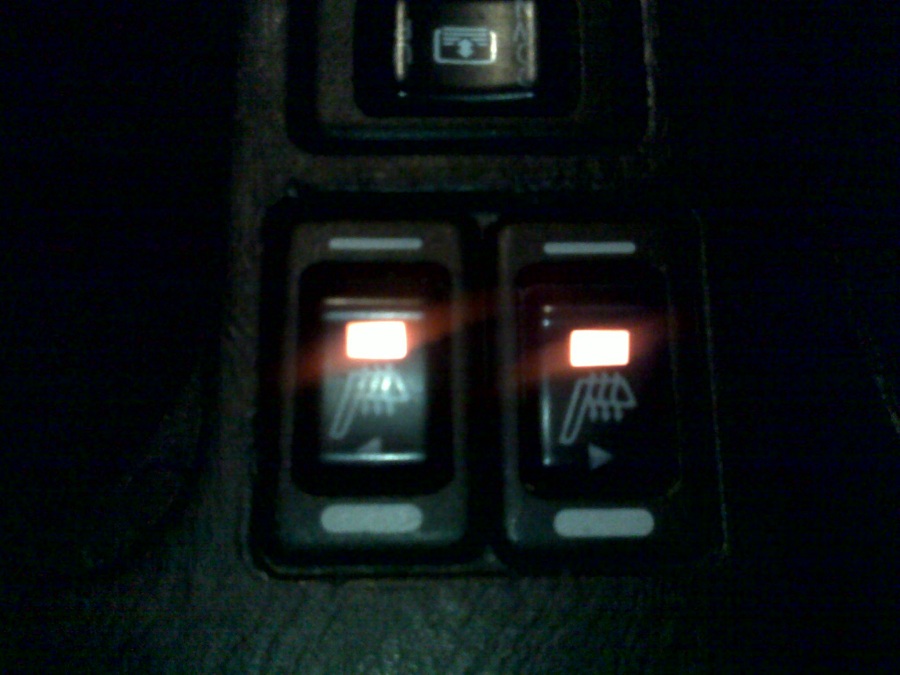


Replace with led search the Thread by tunermaxima for led replacement poll i posed a howto and pics on doing switches
Member
Joined: Mar 2004
Posts: 120
From: Duluth, MN
TunerMaxima3000 thread for lazy or confused:
http://forums.maxima.org/5th-generat...ad-w-poll.html
http://forums.maxima.org/5th-generat...ad-w-poll.html

Junior Member
Joined: Feb 2004
Posts: 71
From: Florence, SC
I need a new switch because mine does not work. The passenger side switch works but the drivers side just sort of sits there and you can rock it in either direction without it doing anything. Here are my questions - where's the best/cheapest place to buy a new switch, and are the passenger and drivers side switches the same part number?

I need a new switch because mine does not work. The passenger side switch works but the drivers side just sort of sits there and you can rock it in either direction without it doing anything. Here are my questions - where's the best/cheapest place to buy a new switch, and are the passenger and drivers side switches the same part number?
http://www.courtesyparts.com/maxima-...1996_2000.html
Looks like they're two different part numbers.


tunermaxima3000 thread for lazy or confused:
http://forums.maxima.org/5th-generat...ad-w-poll.html
http://forums.maxima.org/5th-generat...ad-w-poll.html

Thread
Thread Starter
Forum
Replies
Last Post
98nismomax
5th Generation Classifieds (2000-2003)
0
Aug 13, 2015 12:15 PM