5th Generation Maxima (2000-2003) Learn more about the 5th Generation Maxima, including the VQ30DE-K and VQ35DE engines.

Grounding Kit DIY

Thread Tools
 
Search this Thread
 
Old Mar 5, 2010 | 08:53 AM
  #1  
mandyfig's Avatar
Thread Starter
Senior Member
 
Joined: Oct 2009
Posts: 1,222
From: Atlanta
Grounding Kit DIY

I have read a lot about how additional grounding has helped solve CEL problems and how the overall running condition of our Max improved.

There are several ground kits available to purchase in retail but the whole point is to add ground.

This could be a simple DIY project and the payback may be tremendous.

All you will need will be terminals, 8 AWG Ground wire and locations to install them. These components will not set you back a lot of money. Or else, go purchase a ground kit. It will be well worth it.

I will be doing this DIY this weekend.

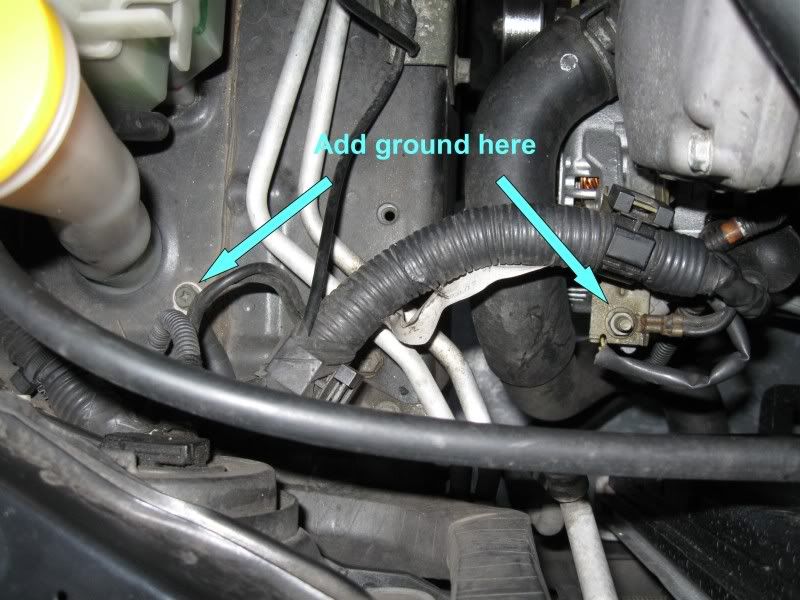
I have some ideas of where to install them based on just looking at the several pictures I have seen in different posts.

I would be open to suggestions and pics would help.
Old Mar 5, 2010 | 08:57 AM
  #2  
NissanMan97's Avatar
Supporting Maxima.org Member
iTrader: (5)
 
Joined: May 2005
Posts: 728
From: Louisville KY
post pics after you are done...this is on my TDL as well

B
Old Mar 5, 2010 | 09:13 AM
  #3  
RR5's Avatar
RR5
Senior Member
iTrader: (6)
 
Joined: Sep 2005
Posts: 1,721
From: Bellevue, WA
I would look into using a silver conductive paint to help the connections, where possible.
Old Mar 5, 2010 | 09:37 AM
  #4  
bigpopaj369's Avatar
Senior Member
iTrader: (2)
 
Joined: Jul 2008
Posts: 1,643
From: western mass
definitely post pics! im doing the BIG3 wiring mod today so ill be interested what u come up with
Old Mar 5, 2010 | 09:37 AM
  #5  
mandyfig's Avatar
Thread Starter
Senior Member
 
Joined: Oct 2009
Posts: 1,222
From: Atlanta
Where do I get this conductive paint?
Old Mar 5, 2010 | 09:38 AM
  #6  
mandyfig's Avatar
Thread Starter
Senior Member
 
Joined: Oct 2009
Posts: 1,222
From: Atlanta
Originally Posted by bigpopaj369
definitely post pics! im doing the BIG3 wiring mod today so ill be interested what u come up with
What is a BIG3 wiring mod?
Old Mar 5, 2010 | 09:42 AM
  #7  
bigpopaj369's Avatar
Senior Member
iTrader: (2)
 
Joined: Jul 2008
Posts: 1,643
From: western mass
it does almost the same thing as what ur doing. take 4awg wire or bigger and run 1 lead to the - bat to a new chassis ground then take a lead from the motor block to the same chassis ground. then take a lead with an line fuse from the + pos to the alt. its suppose to make a good bit of difference in the cars electrical system helping with dimming lites from audio systems faster window movement prolly easier starts ect ect
Old Mar 5, 2010 | 09:43 AM
  #8  
Gollum67's Avatar
Senior Member
iTrader: (1)
 
Joined: Jun 2008
Posts: 540
From: HoUsTon, TeXaS
I've done this mod. Check out the thread.

http://forums.maxima.org/6th-generat...e-i-bored.html
Old Mar 5, 2010 | 09:45 AM
  #9  
VQP0WER's Avatar
Senior Member
 
Joined: May 2008
Posts: 1,767
From: Moore, OK
Here's one of the better how-to's.

http://forums.maxima.org/audio-elect...other-how.html
Old Mar 5, 2010 | 09:50 AM
  #10  
bigpopaj369's Avatar
Senior Member
iTrader: (2)
 
Joined: Jul 2008
Posts: 1,643
From: western mass
metal max's threads are amazing guy does such great work
Old Mar 5, 2010 | 10:38 AM
  #11  
n3985's Avatar
大陆弟弟
iTrader: (36)
 
Joined: May 2004
Posts: 4,038
From: Edgewater, NJ
Here is my advice to all the new owners, forget the spaghetti like grounding kits and do the following:

1. Big 3 with either 0 gauge (overkill but why not) or 4 gauge wiring
2. One 8 gauge wire from transmission to - battery

I experimented with many DIY grounding kits I made and the preceding yielded best result and most cost effective.
Old Mar 5, 2010 | 11:47 AM
  #12  
Froggmann's Avatar
Senior Member
iTrader: (6)
 
Joined: Jun 2007
Posts: 1,887
From: Vacaville, Ca
Originally Posted by n3985
Here is my advice to all the new owners, forget the spaghetti like grounding kits and do the following:

1. Big 3 with either 0 gauge (overkill but why not) or 4 gauge wiring
2. One 8 gauge wire from transmission to - battery

I experimented with many DIY grounding kits I made and the preceding yielded best result and most cost effective.
And just a note to finding cheap 0 gauge cable, Mid 80s BMW 3 series with the battery mounted in the trunk usually yield about 15' of 0 gauge cable.
Old Mar 5, 2010 | 01:00 PM
  #13  
bigpopaj369's Avatar
Senior Member
iTrader: (2)
 
Joined: Jul 2008
Posts: 1,643
From: western mass
if ur going to upgrade the grounds u should definitely just go with the big3 i just did most of the install on mine im just waiting on the fuse come to come in the mail, i used 4awg wire. when doing this make sure u sand down the grounding spots to bare metal for the best contact. when doing the + to the alt i would highly recommend using an in line fuse. the link posted by VQPOWER is a great write up
Old Mar 5, 2010 | 01:05 PM
  #14  
NissanMan97's Avatar
Supporting Maxima.org Member
iTrader: (5)
 
Joined: May 2005
Posts: 728
From: Louisville KY
Originally Posted by bigpopaj369
if ur going to upgrade the grounds u should definitely just go with the big3 i just did most of the install on mine im just waiting on the fuse come to come in the mail, i used 4awg wire. when doing this make sure u sand down the grounding spots to bare metal for the best contact. when doing the + to the alt i would highly recommend using an in line fuse. the link posted by VQPOWER is a great write up
what is the point of an inline fuse on the grounds?

B
Old Mar 5, 2010 | 01:20 PM
  #15  
mandyfig's Avatar
Thread Starter
Senior Member
 
Joined: Oct 2009
Posts: 1,222
From: Atlanta
Man! Tons of info! I will do the simple ground. But I get it! Thanks! It will not hurt to clean up existing ground taps, sand to bare metal and re-connect and then paint.

I am so ready!
Old Mar 5, 2010 | 03:53 PM
  #16  
Froggmann's Avatar
Senior Member
iTrader: (6)
 
Joined: Jun 2007
Posts: 1,887
From: Vacaville, Ca
Originally Posted by bigpopaj369
if ur going to upgrade the grounds u should definitely just go with the big3 i just did most of the install on mine im just waiting on the fuse come to come in the mail, i used 4awg wire. when doing this make sure u sand down the grounding spots to bare metal for the best contact. when doing the + to the alt i would highly recommend using an in line fuse. the link posted by VQPOWER is a great write up
Just a quick note late 90-early 00 Ford Taurus comes with a 130 amp fuse. You will just have to fashion a holder for it.

Originally Posted by NissanMan97
what is the point of an inline fuse on the grounds?

B
Not on the ground, on the charge wire for the alternator. It's in place in case the alternator shorts internally and starts overcharging. If the fuse isn't there it can cause the battery to explode and/or set your car on fire.


BTW if anyone is looking for stuff to make up cables and such here's a good source for them. http://www.rjminjectiontech.com/ just look towards the bottom of the page for cable building parts and fuses/fuse holders.

Last edited by Froggmann; Mar 5, 2010 at 03:57 PM.
Old Mar 6, 2010 | 01:07 AM
  #17  
RR5's Avatar
RR5
Senior Member
iTrader: (6)
 
Joined: Sep 2005
Posts: 1,721
From: Bellevue, WA
Originally Posted by mandyfig
Where do I get this conductive paint?
http://www.frys.com/product/3330952?...H:MAIN_RSLT_PG

3296 Commerce Ave, Duluth, GA
(678) 405-6800

Although at $22 a pop, just for one job it's a bit steep. Either way you want to ensure you paint over the bare metal as a Just In Case precaution against rust.
Old Mar 6, 2010 | 06:57 AM
  #18  
bigpopaj369's Avatar
Senior Member
iTrader: (2)
 
Joined: Jul 2008
Posts: 1,643
From: western mass
Originally Posted by Froggmann
Not on the ground, on the charge wire for the alternator. It's in place in case the alternator shorts internally and starts overcharging. If the fuse isn't there it can cause the battery to explode and/or set your car on fire.
something id rather not have happen lol some guys do it without but im not taking any chances when a $6 fuse holder with a $2 dollar fuse could save alot of trouble
Old Mar 6, 2010 | 10:16 AM
  #19  
mandyfig's Avatar
Thread Starter
Senior Member
 
Joined: Oct 2009
Posts: 1,222
From: Atlanta
I am done! Will post pics soon. Do not know if there's an improvement. We'll see.
Old Mar 6, 2010 | 10:18 AM
  #20  
RR5's Avatar
RR5
Senior Member
iTrader: (6)
 
Joined: Sep 2005
Posts: 1,721
From: Bellevue, WA
Now replace your fuel filter.
Old Mar 6, 2010 | 10:24 AM
  #21  
KCMAXX's Avatar
KC's FINEST
iTrader: (22)
 
Joined: Mar 2004
Posts: 3,444
From: KANSAS CITY MO
HOMEMADE FTW

Old Mar 7, 2010 | 11:56 AM
  #22  
mandyfig's Avatar
Thread Starter
Senior Member
 
Joined: Oct 2009
Posts: 1,222
From: Atlanta
Wow, mine looks so cheap and generic!
Old Mar 7, 2010 | 11:56 AM
  #23  
mandyfig's Avatar
Thread Starter
Senior Member
 
Joined: Oct 2009
Posts: 1,222
From: Atlanta
Gorgot the shrink wrap. That would have been nice! Well I can still do it.
Old Mar 7, 2010 | 12:14 PM
  #24  
RR5's Avatar
RR5
Senior Member
iTrader: (6)
 
Joined: Sep 2005
Posts: 1,721
From: Bellevue, WA
Got any pictures? It would help me to see where the grounding wires are connected.
Old Mar 7, 2010 | 01:13 PM
  #25  
mandyfig's Avatar
Thread Starter
Senior Member
 
Joined: Oct 2009
Posts: 1,222
From: Atlanta
Here we go!

Tools and supplies.

Old Mar 7, 2010 | 01:14 PM
  #26  
mandyfig's Avatar
Thread Starter
Senior Member
 
Joined: Oct 2009
Posts: 1,222
From: Atlanta
Kits and target locations:


Last edited by mandyfig; Mar 7, 2010 at 01:18 PM.
Old Mar 7, 2010 | 01:16 PM
  #27  
mandyfig's Avatar
Thread Starter
Senior Member
 
Joined: Oct 2009
Posts: 1,222
From: Atlanta
Clean, scour, sand down, use a dremel:


Old Mar 7, 2010 | 01:17 PM
  #28  
mandyfig's Avatar
Thread Starter
Senior Member
 
Joined: Oct 2009
Posts: 1,222
From: Atlanta
Tap!


Old Mar 7, 2010 | 01:18 PM
  #29  
mandyfig's Avatar
Thread Starter
Senior Member
 
Joined: Oct 2009
Posts: 1,222
From: Atlanta
The last one! Tapped!
Old Mar 7, 2010 | 01:20 PM
  #30  
mandyfig's Avatar
Thread Starter
Senior Member
 
Joined: Oct 2009
Posts: 1,222
From: Atlanta
Use shrink warp on the ends of the terminals. It will look better. Also solder the wire and terminals.
Old Mar 7, 2010 | 01:21 PM
  #31  
mandyfig's Avatar
Thread Starter
Senior Member
 
Joined: Oct 2009
Posts: 1,222
From: Atlanta
Next up, when I change the oil, I need to check the tranny to body ground kit. Need to clean it up and add a kit!
Old Mar 7, 2010 | 02:55 PM
  #32  
NissanMan97's Avatar
Supporting Maxima.org Member
iTrader: (5)
 
Joined: May 2005
Posts: 728
From: Louisville KY
Originally Posted by mandyfig
Next up, when I change the oil, I need to check the tranny to body ground kit. Need to clean it up and add a kit!
nice job man.

B
Old Mar 7, 2010 | 03:36 PM
  #33  
mandyfig's Avatar
Thread Starter
Senior Member
 
Joined: Oct 2009
Posts: 1,222
From: Atlanta
Thanks. I think the idle is cleaner....or maybe I am imagining things.
Old Mar 7, 2010 | 04:13 PM
  #34  
spock's Avatar
Senior Member
iTrader: (5)
 
Joined: Oct 2009
Posts: 968
From: north of Toronto, Canada
Anyone know the reason for the flimsy ground strap from the exhaust to chassis by the rear cat? Mine is rusted off, of course, but twisted it back together temporarily.
I measured my resistance between neg batt and chassis, neg and block and block and chassis. All were 0 ohms except block to chassis which was 6 ohms. Methinks a kit is in order soon just for preventative maintenance if nothing else.
Old Mar 7, 2010 | 04:30 PM
  #35  
mandyfig's Avatar
Thread Starter
Senior Member
 
Joined: Oct 2009
Posts: 1,222
From: Atlanta
Gotta work on that grounding kit. I gotta check mine, too.
Old Mar 7, 2010 | 05:31 PM
  #36  
LILMAN's Avatar
Senior Member
 
Joined: Sep 2006
Posts: 383
From: Hartford, Ct
Are the lengths of each wire the same as the 4th gen?
I did this for my 4th gen and you definitely feel the difference in power.
Old Mar 7, 2010 | 06:03 PM
  #37  
bigpopaj369's Avatar
Senior Member
iTrader: (2)
 
Joined: Jul 2008
Posts: 1,643
From: western mass
nice job man looks good!
Old Mar 8, 2010 | 03:09 PM
  #38  
mandyfig's Avatar
Thread Starter
Senior Member
 
Joined: Oct 2009
Posts: 1,222
From: Atlanta
Thanks.

Wire length can be as short as 12" or 18". Depends on location and ease of use. Add a few inches so you can simply tuck away if needed.
Old Mar 8, 2010 | 03:49 PM
  #39  
Relic's Avatar
Junior Member
 
Joined: Feb 2010
Posts: 26
From: Stamford, CT
Excellent pics and instuctions!
Old Mar 8, 2010 | 04:59 PM
  #40  
arcueda's Avatar
Senior Member
iTrader: (3)
 
Joined: Jun 2008
Posts: 590
From: NH
ive done a few of these, deff alot of info for this out there if you want to do the research, some of the guys already linked some of the better ones. nice pics tho..think i missed one.I used random wire i already had from a stereo, big stuff. just wished i used better connectors.ill take some pics see if i can get some feedback on if i did it right or not.


All times are GMT -7. The time now is 04:24 PM.