
Cattman ypipe hitting crossmember


Cattman ypipe hitting crossmember
Hey .org'ers I need some help. 2001 AE 5sp. I swapped out my old worn front and rear motor mounts for ES mounts. Had to remove my cattman ypipe to get the crossmember off. Had a shop press them in and I reinstalled the mounts and crossmember. I put them in correctly and everything. However now that I've tightened up my ypipe to the headers, the ypipe is pressed up against the crossmember. How does that happen?
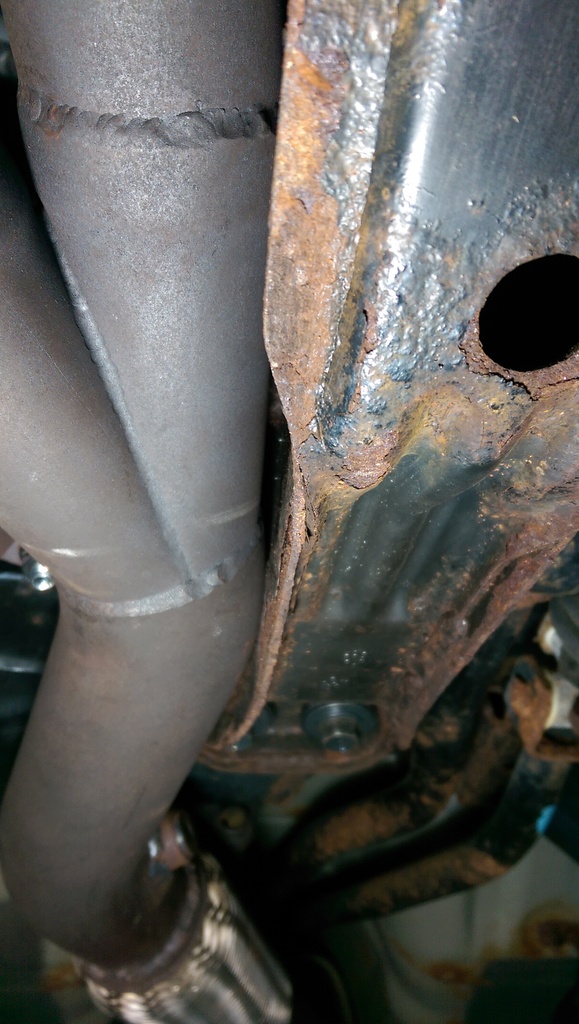
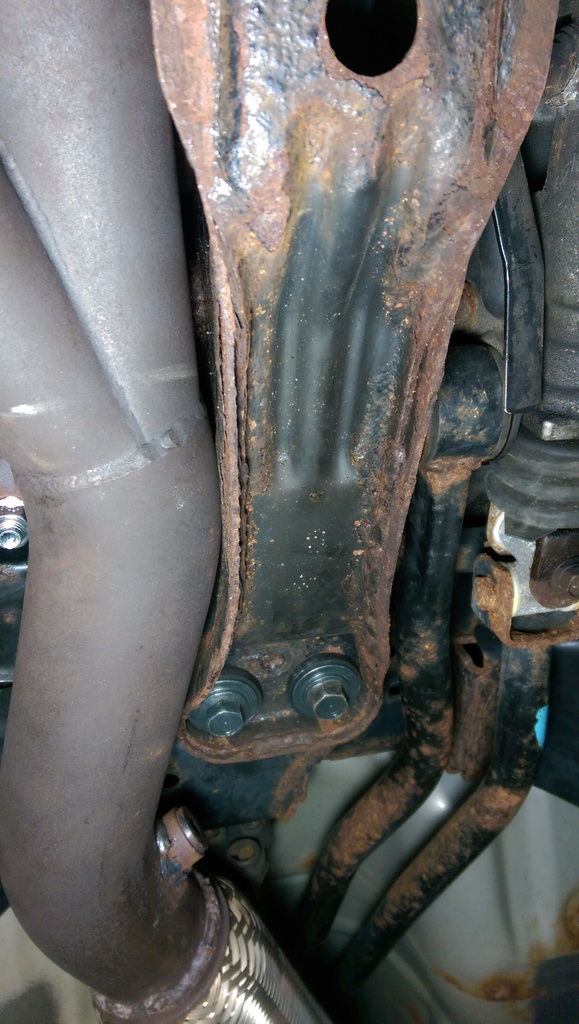
I don't get it because the crossmember is centered by the two front bolts and two rear bolts. I loosened both and tried shifting the beam as much as possible to the driver's side but that didn't do anything. Not sure what to do here as it didn't touch before the motor mount swap, although it was a very small gap (like 1/8").
I can't really grind down the crossmember either because it's not touching the lip but above the lip - right in the center. So if I grinded I'd be sacrificing the integrity of the beam.
Any suggestions?

No before pics. Not of the ypipe anyway, plenty of the mounts and uim so I don't forget where to put things. For ypipe it looked exactly the same except there was a very tight gap, about an 1/8".
I did swap over to the ES crossmember washers (or whatever those are called). But idk how I'd lose 1/8" from them.
Do I have to chop the pipe and have it re-welded? I can't think of any other way at the moment.
I did swap over to the ES crossmember washers (or whatever those are called). But idk how I'd lose 1/8" from them.
Do I have to chop the pipe and have it re-welded? I can't think of any other way at the moment.


And after the bolts are loose, create a 1/4" gap with a piece of wood or something, then re-tighten. Take out piece of wood and hopefully an 1/8" gap will remain.
Last edited by The Wizard; Nov 12, 2016 at 04:45 PM.
Yes I did that. First time it just snapped right back together, that's when I took those pics. So I just did it again - loosened six ypipe/header bolts and 4 crossmember bolts. Pried the pieces apart and this time I shoved a couple pieces of hard leather between them. Measured it to be a 1/4" gap as each leather piece is 1/8". Then tightened all bolts back up. The leather pieces are really stuck in there and I think I may leave it and just see what happens.
Can only think of 2 options at this point.......go to a shop and cut/weld. Which looks like a bad option because it's hitting right on the merge/collector. Or cutting a small hole in the crossmember. Would that be ok? It's hollow so as soon as I would start shaving I'd go through. Might as well cut a small hole.?? Not sure what else to do.
Can only think of 2 options at this point.......go to a shop and cut/weld. Which looks like a bad option because it's hitting right on the merge/collector. Or cutting a small hole in the crossmember. Would that be ok? It's hollow so as soon as I would start shaving I'd go through. Might as well cut a small hole.?? Not sure what else to do.
Maybe take a big ****ing hammer along with some heat and slightly dent the y-pipe?
I wouldn't leave the leather pieces there, they're gonna burn and smell.
Or you heat up the cross member brace with a propane torch, and beat that area in too.
I wouldn't leave the leather pieces there, they're gonna burn and smell.
Or you heat up the cross member brace with a propane torch, and beat that area in too.
I suppose a big *** hammer to the crossmember is next step. Not sure I wanna do that to my cattmans!
I'm going to try a metal strap going from the skid plate/pipe to the control arm. There's a small spot by the pin that doesn't move and secure. It'll rust, but should last for a little while.....maybe the heat cycles will help it adjust over time.(?)
Edit: yeah I'm not doing the strap that's a bad idea.
Last edited by TSelanne; Nov 17, 2016 at 10:44 PM.
Wizard you were right about the smell lol.......only lasted a little while before it turned into charcoal. Leaving the leather pieces in there made the vibrations feel something like a giant massage chair.
So I took em out and the gap was several pieces of paper thick. I was hopeful it would be enough, but under hard acceleration the ypipe would buzz the crossmember.
So I've removed the crossmember again, and thinking about cutting a small hole in it. I can't make a dent in it because of where the spot is - there's a perpendicular piece of metal behind the vertical wall which prevents the wall from bending inwards.
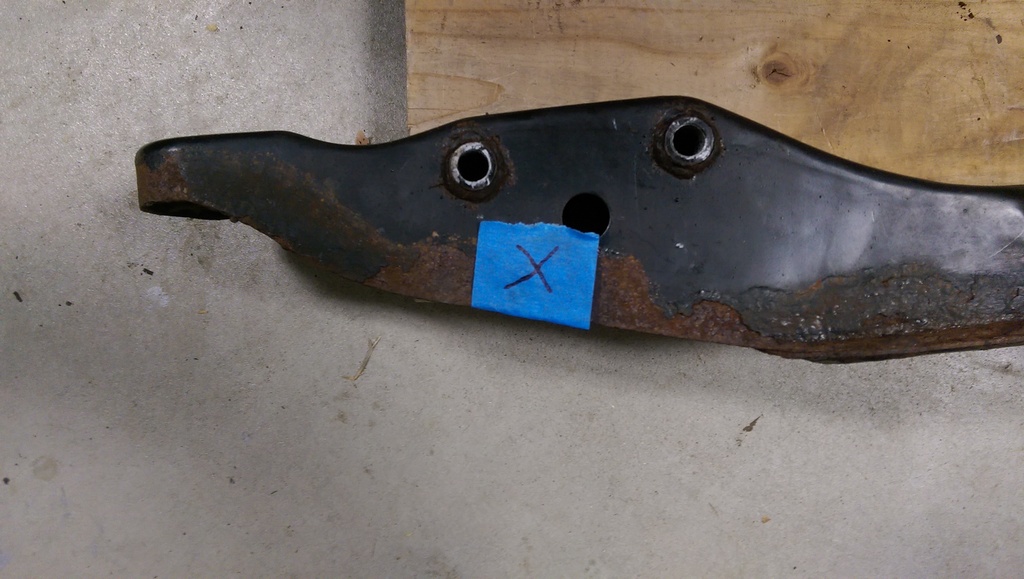
Think there will be any problems with a small hole? I mean the thing is hollow anyway. Just wanted to get opinions before I start chopping. Would be about the size of the X, not quite the size of the piece of tape.
On the bright side I am getting very efficient at removing the intake/tb/uim/motor mounts/ypipe/crossmember.
So I took em out and the gap was several pieces of paper thick. I was hopeful it would be enough, but under hard acceleration the ypipe would buzz the crossmember.
So I've removed the crossmember again, and thinking about cutting a small hole in it. I can't make a dent in it because of where the spot is - there's a perpendicular piece of metal behind the vertical wall which prevents the wall from bending inwards.
Think there will be any problems with a small hole? I mean the thing is hollow anyway. Just wanted to get opinions before I start chopping. Would be about the size of the X, not quite the size of the piece of tape.

On the bright side I am getting very efficient at removing the intake/tb/uim/motor mounts/ypipe/crossmember.
Also do you think it's necessary when we're talking about shaving 1/4", max? Of course if that's the thickness of the wall then it may end up being more like a "notch" as opposed to just thinning down the vertical wall.
What I'm calling the shoulder is what I think you are calling the wall. It is the metal that is actually touching the y-pipe.
A flat piece of metal bends pretty easy. To make it stiffer, you put a bend in it, so removing the bend will reduce the stiffness.
A flat piece of metal bends pretty easy. To make it stiffer, you put a bend in it, so removing the bend will reduce the stiffness.


I notched it. Angled the hole from the bottom of crossmember up towards the circle hole that's already there, from both sides. So basically that hole got bigger and made into a pentagon (it looks like a house w a slanted roof). No more touching. Yay.
I've read this about 10 times and still struggling to understand what you're suggesting. Don't understand how you'd weld another piece of metal in there as it would have to be bigger than the cutout and go inside the crossmember. Because obviously if it's on the outside you just have the same problem again. And the shoulder/wall is flat already, so how add a bend to it? O well.....everything is back together again so no welding, at least not now. I'm not taking everything apart a fourth time, three was plenty!
I've read this about 10 times and still struggling to understand what you're suggesting. Don't understand how you'd weld another piece of metal in there as it would have to be bigger than the cutout and go inside the crossmember. Because obviously if it's on the outside you just have the same problem again. And the shoulder/wall is flat already, so how add a bend to it? O well.....everything is back together again so no welding, at least not now. I'm not taking everything apart a fourth time, three was plenty!
Not a crossmember issue, but since the thread is here: I replaced the front & rear motor mounts w ES poly while I had the crossmember off, along w wraith poly passenger and trans mounts. Big difference!
At first I only had the front/rear ES mounts and stock pass/trans. That setup really rattled, lot of vibration. Now with all 4 it actually vibrates less. Don't really understand why, but I like it.
At first I only had the front/rear ES mounts and stock pass/trans. That setup really rattled, lot of vibration. Now with all 4 it actually vibrates less. Don't really understand why, but I like it.
Last edited by TSelanne; Dec 2, 2016 at 01:33 PM. Reason: less words
Here's what the cut out looks like. Ended up cutting more than I needed to.....didn't mean to make the hole that wide. Ended up cutting too far towards the front of the car... O well. Hope that won't cause any problems. Seems fine so far.

