
Front Endlinks No Instructions...


Front Endlinks No Instructions...
For some ungodly reason I did not receive any instructions-so I guess it's suppose to be totally obvious how these things go together.
Me being stupid has caused me to resort to you smart folks for a clue.
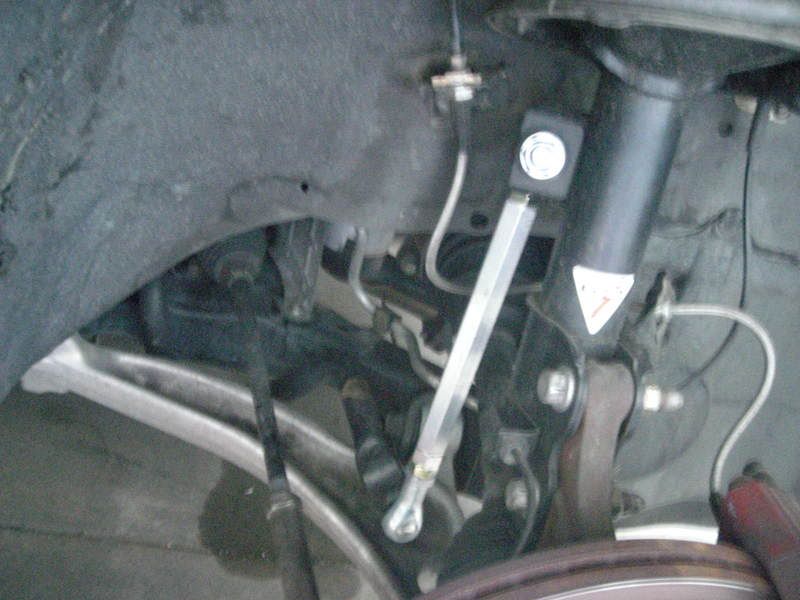
First here's how it looks. As you can see there are two different sizes of bushings. The bushings have metal inserts and one side is flush and the other side isn't.


My guess is it goes together like this...
EDIT: I have since been told the endlink bar is installed "upsidedown".


I'm sure I'm wrong. NEED HELP!!!
Me being stupid has caused me to resort to you smart folks for a clue.
First here's how it looks. As you can see there are two different sizes of bushings. The bushings have metal inserts and one side is flush and the other side isn't.
My guess is it goes together like this...
EDIT: I have since been told the endlink bar is installed "upsidedown".
I'm sure I'm wrong. NEED HELP!!!
Last edited by coolmax05; Oct 26, 2007 at 07:50 AM.


Donating Maxima.org Member

Joined: Jan 2006
Posts: 103
Yeah, I think you put it on upside down from the picture there. If you look at the stock front endlinks, the pivoting head thingy is on the bottom, attached to the swaybar. Just a guess, though. I haven't installed mine yet, because it started raining on me last night 

my apologies. the intension was for them to be installed the other way around with the larger bushing closer to the srtut. reason being it will give more clearance down by your axle to avoid possible touching of the CV boot.


Supporting Maxima.org Member
Joined: Aug 2000
Posts: 464
It pivots on the top & bottom equally.
The bigger bushing is on the strut side in the picture.
I slapped the other side on and tightened everything up. I gently lowered the car. I gently pulled the car down and over the curb. Then I turned the wheel left and right all the way while slowly going faster and faster. Went over speedbumps and dips in the road at over 30mph. Car runs perfectly!
Car feels more solid to say the least. Definetly even more responsive. The endlinks does inspire even more confidence. We are talkin' uppin' the fun factor without takin' a hit in ride quality folks.
I am lovin' my new front endlinks and do recommend this nice upgrade.
Everything lined up beautifully on the install so I now believe it is correct.
Getting the bottom bolt off the old sway bar link is no joke. Here is how you do it...
Jack the front car up on jack stands.
Take both wheels off.
Because the bolts are very tight and little room to work with--you need to remove both sway bar endlink bolts attached to the strut first. This allows the sway bar to move freely. Then you can get your ratchet on the bottom bolt. Once you do that temporarily attach the top bolt (while keeping the ratchet on the bottom bolt) to the strut again so the bar won't move. This will make it waaaay easier to remove the bottom bolt.
To remove the endlinks you're going to need 17mm socket. And a I believe a 3/4 inch open wrench to keep it from spinning. The ratchet needs to be long for leverage. Be sure to spray some bolt loosener in there first at least 1/2 hour before the removal.
The new endlinks needs (2) 3/4 inch open wrenches and a 3/4 inch socket along with the ratchet.
You're going to love this Mod.

I agree that the car feels more solid. This is because the endlinks restrict the movement of the sway bar, which is more efficient, thus making the handling better. I can wiggle the OEM endlinks with my hand, but not the Racingline Endlinks. These really work. The sway bar/endlink combo is an inexpensive upgrade that is great bang-for-the-buck.
It pivots on the top & bottom equally.
The bigger bushing is on the strut side in the picture.
I slapped the other side on and tightened everything up. I gently lowered the car. I gently pulled the car down and over the curb. Then I turned the wheel left and right all the way while slowly going faster and faster. Went over speedbumps and dips in the road at over 30mph. Car runs perfectly!
Car feels more solid to say the least. Definetly even more responsive. The endlinks does inspire even more confidence. We are talkin' uppin' the fun factor without takin' a hit in ride quality folks.
I am lovin' my new front endlinks and do recommend this nice upgrade.
Everything lined up beautifully on the install so I now believe it is correct.
Getting the bottom bolt off the old sway bar link is no joke. Here is how you do it...
Jack the front car up on jack stands.
Take both wheels off.
Because the bolts are very tight and little room to work with--you need to remove both sway bar endlink bolts attached to the strut first. This allows the sway bar to move freely. Then you can get your ratchet on the bottom bolt. Once you do that temporarily attach the top bolt (while keeping the ratchet on the bottom bolt) to the strut again so the bar won't move. This will make it waaaay easier to remove the bottom bolt.
To remove the endlinks you're going to need 17mm socket. And a I believe a 3/4 inch open wrench to keep it from spinning. The ratchet needs to be long for leverage. Be sure to spray some bolt loosener in there first at least 1/2 hour before the removal.
The new endlinks needs (2) 3/4 inch open wrenches and a 3/4 inch socket along with the ratchet.
You're going to love this Mod.
My pleasure Warren.
Taz, what does this mean (why so ambiguous)?
"The intension was for them to be installed the other way around with the larger bushing closer to the srtut. reason being it will give more clearance down by your axle to avoid possible touching of the CV boot."
The other way around pertains to what (the bushing, the link itself, both, backwards, upsidedown)???
Based on the clearer picture I provided is it correct? Does it matter? Who's the next President, and finally who will win the world series???
Donating Maxima.org Member
Joined: Jan 2006
Posts: 103
that bolt with the two bushings that are different sizes is supposed to be connected to your strut. In your picture, you have that bolt connected down at your swaybar, which makes the bolt come very close to your cv boot.....
Really? How can you tell (I can't see it)? To me they look the same way.
You wouldn't happen to be utilizing a scanning electronic Microscope combined with a digital enhancing amplifier would you? J/K
It seems to me what your're suggesting would put the endlinks at a angle as oppose to strait up and down like I have now. Not saying you're incorrect but playing "devil's advocate".
EDIT: The cv boot has plenty of clearance (1.5-2.0 inches) no matter how far right or left I turn the steering wheel. After 35 miles everything still looks perfect!
Last edited by coolmax05; Oct 25, 2007 at 03:30 PM.
Donating Maxima.org Member
Joined: Jan 2006
Posts: 103
hahahahaha. Welllllllllllllllllllll, I am blind in one eye, which I am sure makes my other one have super powers! I just looked at the things (they are sitting on my desk in the garage). The two ends are definitely different. There is one end that has an O ring on it that the bolt with the asymmetrical bushings fits through. The other end has a bolt already built into it that does not come off. That end with the built in bolt is the one that is on the bottom of Taz' picture if you look at it closely, and that end is the one that most closely resembles the swaybar end on the oem endlink... I don't know if it matters or not....
BTW, did you have to use air tools to get those bolts off the swaybar? I tried for about 5 minutes last night with a regular ratchet, but did not try the PB Blaster yet...
Jon
BTW, did you have to use air tools to get those bolts off the swaybar? I tried for about 5 minutes last night with a regular ratchet, but did not try the PB Blaster yet...
Jon
Donating Maxima.org Member
Joined: Jan 2006
Posts: 103
coolmax, again, I am no expert - I am just a poor slop like you who is trying to put this thing on without directions, so everything I have said to this point is all deduced by my own twisted logic and my bionic eye!
[QUOTE=BTW, did you have to use air tools to get those bolts off the swaybar? I tried for about 5 minutes last night with a regular ratchet, but did not try the PB Blaster yet...
Jon[/QUOTE]
I posted the technique I used (look at previous post). I do not have any air tools just a lot of hot air.
I hear ya Bro. I am a poorer slob just improvising like yourself. Notice nobody even the manufacturer wants to touch this one. I'll lower my deductable on my towing insurance and walk old ladies across the street for now.
You must have a bionic eye if you can tell up from down in that picture. Between the two of us (mutt & jeff) I'm sure we will be needing new airbags soon. Best of luck to you pal. Hopefully we will end up in the same hospital.
Jon[/QUOTE]
I posted the technique I used (look at previous post). I do not have any air tools just a lot of hot air.
You must have a bionic eye if you can tell up from down in that picture. Between the two of us (mutt & jeff) I'm sure we will be needing new airbags soon. Best of luck to you pal. Hopefully we will end up in the same hospital.
For some ungodly reason I did not receive any instructions-so I guess it's suppose to be totally obvious how these things go together.
Me being stupid has caused me to resort to you smart folks for a clue.
First here's how it looks. As you can see there are two different sizes of bushings. The bushings have metal inserts and one side is flush and the other side isn't. I'm guessing the side that is not flush faces twords the middle.
My guess is it goes together like this...
I'm sure I'm wrong. NEED HELP!!!
Kamski
Joined: May 2005
Posts: 10,197
From: Displaced New Yorker in Southern, MD
Received my new front endlinks today also and installed. The look and fit are great, haven't really put my cay through much moves to really test because we have had 2 straight days of much needed moderate to heavy rains and the roads are wet as **** (sorry west coast)...
But not like that ^^^^^^^^^^^^ mine are turned around, luckily I caught this thread before I left to install them!!!
But not like that ^^^^^^^^^^^^ mine are turned around, luckily I caught this thread before I left to install them!!!

 got mine and installing today yahoo wifes b-day gift to me gotta luv her
 sorry no but twice the fun ummm just got links installed my mechanic installed for a gift to me what a place he does all installs for me and will do the exhaust too
Thanks for the feedback guys regarding the links being upsidedown.
I want to thank "Racingline" for producing this fine product. The product works so well, you can install it upsidedown and still improve upon your handling.
Again, the car feels sooo much more solid.
Flatter cornering.
Faster steering response.
I have mine set for factory length even tho I'm lowered 2 inches in the front. I think it's perfect. You folks want bang for the buck? Get yourself one of these badboys.
Hey Ramberg,
In your opinion, what effect (if any) did it have on your ride?
As a side note...
I got the front strut bar today. It's gorgeous! I installed it in a mere 10 minutes.
So far all I have noticed is a smoother ride...even more supple.
I'll crank up the konis from 1 turn to two turns and call it the day!
No question tho, the front end links did more for me. Maybe if I had installed the two in reverse order I would have noticed more from the brace.
Regarding the endlink-------------the longer the endlink, the more "engaged" and earlier your sway bar will kick in on turns. "Called pre-loading."
The thicker the sway bar the less need for pre-loading. If you over lengthen the endlinks you'll mess up the ride quality and create twitchy handling.
The endlinks is the bar between your sway bar and what your sway bar ultimately connects to (a shock or body of the car).
Imagine if you will, the upper arm being the sway bar. Without the forearm/endlink you'll have to be closer to someone before your hand engages whatever it's aimed at (usually the head). The longer the forearm/endlink for a given distance from the target, the quicker you will engage that target by way of less distance traveled. Here is a illustration...


Newbie just Registered
Joined: May 2005
Posts: 2,795
From: LA/OC, CA
I'm assuming you're talking about the "front endlinks" Bro.
Regarding the endlink-------------the longer the endlink, the more "engaged" and earlier your sway bar will kick in on turns. "Called pre-loading."
The thicker the sway bar the less need for pre-loading. If you over lengthen the endlinks you'll mess up the ride quality and create twitchy handling.
The endlinks is the bar between your sway bar and what your sway bar ultimately connects to (a shock or body of the car).
Imagine if you will, the upper arm being the sway bar. Without the forearm/endlink you'll have to be closer to someone before your hand engages whatever it's aimed at (usually the head). The longer the forearm/endlink for a given distance from the target, the quicker you will engage that target by way of less distance traveled. Here is a illustration...
Donating Maxima.org Member
Joined: Jan 2006
Posts: 103
hmmmm. So I wonder if those of us without upgraded swaybars should actually be setting these longer? I just finally installed mine today. Unfortunately, it is raining here, so couldn't really test them out much. I just have them set to factory length as well, and I am also lowered on progress/gr2's..
Newbie just Registered
Joined: May 2005
Posts: 2,795
From: LA/OC, CA
Check out this article:whiteline
Swaybar preload adjustment - rarely a good idea
Preload of the swaybar implies that once installed the bar is loaded in torsion and applies load to the suspension system. The static result of this is that the body or chassis has been preloaded in roll and may be at a visible angle if the preload is large enough. This preload also effects the weight distribution at the tyre contact patch, both left and right and diagonal.
Dynamically the sway bar will be able to resist roll in one direction much greater than it would if it where installed without any preload. However cornering in the opposite direction the bar will allow and promote chassis roll until it has unwound or �used up� its preload, at which point the swaybar is unloaded at some cornering level. Beyond this the swaybar will provide the usual roll resistance or roll stiffness (less than a non-preloaded swaybar).
This effect is very asymmetric, although actual amount or effect it has could be minimal. The possible reasons for such a design could be to match a chassis which has its CG offset to one side, compensating any effects of that. It can also be used to modify the handling of cars that run on specific tracks, like oval racing, which benefit from asymmetric setups.
At Whiteline our swaybars are designed to provide no preload once installed, giving symmetrical roll resistance. We have not encountered any OE swaybars that are designed by preload.
Here is how you adjust the front & rear endlinks...
Estimate your initial setting which in my case was matching the stock length. Then drive. Hardly noticable? Adjust some more then drive. keep doing this until you fall in love. That is the right setting.
I figured if I'm going to get more sway bar intervention because of the way the endlink is designed (I wanted more), then I better at least match factory. Afterall, that's what I have been riding on for 6 Months. To shorten it and expect better performance does not seem logical.
Upon setting it up at as such, this has been in the top two or three as far as my favorite suspension upgrades. Folks the results are amazing! I am telling you after setting it up properly, you will notice a bigger change in your car than most anything you have done to date. We are talkin' far more effective than the strut bar.
The strut bar basically made my ride smoother and therefore allowed me to stiffen my koni struts up front and maintain great ride quality all the while improving handling (recommended).
All aftermarket sway bars as far as I know are made to connect in the same position as stock. They just vary in thickness and stiffness. The diameter of the bar, material, & weather or not it's hollow are all factors.
The Nismo bar (to my knowledge) is the thickest. The endlink's reaction time and it's physical length are very important.
Taz has provided us with a more "reactive" endlink as well as adjustability.
I will say it again, the car feels waaaay more solid, and is a absolute pleasure to drive. A huge part of this is the front endlinks.
Remember, install, test, adjust & test, to your liking...