
Supercharger facts. directions, part numbers, belts etcc

Thread Starter
Joined: Dec 2000
Posts: 6,451
From: Near Archer High School, Ga
Supercharger facts. directions, part numbers, belts etcc
Here is the supercharger facts
the two I have up top I am going to combine them to this one. All you SCer junkies post away. Ill throw what I know in here
post away Ill organize it as soon as I get a chance and sticky it
the two I have up top I am going to combine them to this one. All you SCer junkies post away. Ill throw what I know in here
post away Ill organize it as soon as I get a chance and sticky it
Thread Starter
Joined: Dec 2000
Posts: 6,451
From: Near Archer High School, Ga
SCer Instructions hosted by EJJ
Posted by EJJ:
I have converted ptatohed's write-up to .pdf and am now hosting it:
http://www.vqpower.com/v2/readarticle.php?article_id=73
I have converted ptatohed's write-up to .pdf and am now hosting it:
http://www.vqpower.com/v2/readarticle.php?article_id=73
Thread Starter
Joined: Dec 2000
Posts: 6,451
From: Near Archer High School, Ga
Metal Pullies Can Be Bought From Asp Link Below
I pulled my metal pullies off. I got too clean happy and sprayed brake cleaner on the pulley. I damaged the bearing for spraying brake cleaner. The ASP pulleys are also coated with some black chemical so just wipe them off with a rag and do not spray any chemicals on the pulleys themselves.
you can buy the ASP pulleys from this website and call the 800 number and speak to a gentleman by the name of Lee
www.aspracing.com/
the pulleys cost $65 a piece $130 shipped. Great pulley for the money they are also made of steel.
Order Toll-Free
1 877 928 8678
you can buy the ASP pulleys from this website and call the 800 number and speak to a gentleman by the name of Lee
www.aspracing.com/
the pulleys cost $65 a piece $130 shipped. Great pulley for the money they are also made of steel.
Order Toll-Free
1 877 928 8678
Last edited by JAY25; Jun 23, 2009 at 06:12 AM.
Thread Starter
Joined: Dec 2000
Posts: 6,451
From: Near Archer High School, Ga
Ngk 1 And 2 Step Colder Spark Plug Part Numbers
Go to NAPA to get the copper plugs, you can get them as cheap as $1.20 a piece and up to $1.99 a piece change them out every 20k.
Stock heat range copper plugs:
NGK #BKR5E-11
Nissan # 22401 - 50Y05
One step colder copper plugs (recommended):
NGK # BKR6E-11
Nissan # 22401 - 50Y06
Two step colder copper plugs:
NGK # BKR7E-11
Nissan # 22401 - 50Y07
The -11 part of the NGK number is multiplied by .004" to get the gap size for an engine producing stock hp. This would make the stock gap 0.044". Most people with SC's and such are running 0.034" - 0.038" in order to further reduce tendency for detonation.
Last edited by The Wizard; Feb 23, 2014 at 11:36 PM.
Thread Starter
Joined: Dec 2000
Posts: 6,451
From: Near Archer High School, Ga
Part Numbers For 4th Gen Kit
Stephen Max posted 4TH GEN KIT
I've got this:
Bill of Materials
Packing Check-off Sheet
Stillen Super Charger 95-99 Nissan Maxima
P/N 407000
oAssembly person _________________________
oDate: _____/_____/_____
oSales Order # ____________________________
oSupercharger serial number:________________
o Instruction sheet with pictures and schematics
o STILLEN SUPERCHARGED Plaque 100505 Assembled
by__________________ Date ___________
Materials supplied:
(1) Air Filter Assembly Assembled
by__________________ Date ___________
(1) Silicone Hose, Blue - �3 �� air filter to
supercharger 407000-11
(1) Steel Insert-air filter to supercharger 407000-02
(2) Hose clamp, #56 407000-14
(1) Blow-off hose nipple 407000-61
(1) Air filter with holes drilled 407000-10
(1)Vortech Supercharger assembly. Assembled
by__________________ Date ___________
(1) Supercharger 407000-01
(1) Supercharger adapter plate assembly 407000-07
(1) M12x50mm Flat head bolt 407000-74
(1) Idler pulley 407000-26 (2) M12x70mm Flat head
bolt 407000-36
(1) Supercharger drive belt 407000-29 (4) 3/8-16 x
4 � Flat head bolt 407000-37
(1) �-20 x 1 � Hex head bolt 407000-72 (1) M12
Flat washer 407000-73
(1) Fitting, -4AN Male � 1/8NPT male 407000-56 (1)
3/8-24x1 Flat head bolt 407000-76
(1) Intake tube w/blow off mount, �2 �� with STILLEN
decal 407000-03 Assembled by__________________ Date
___________
(1) Modified thermostat housing assembly. Assembled
by__________________ Date __________
(1) Modified thermostat housing 407000-05
(1) Thermostat housing gasket 407000-63
(1) Crankcase breather hose assembly Assembled
by__________________ Date ___________
(1) 36� �5/8� ID Crank case breather hose 407000-15
(1) 90� �5/8� OD Plastic vent line adapter 407000-66
(1) 45� �5/8� OD Plastic vent to air filter 407000-65
(1) 2� �5/8� ID Crankcase breather hose NEED P/N
(1)Oil feed line, -4 S.S braided line 407000-25
Assembled by__________________ Date ___________
(4) Adel clamps, �5/16�, w/�1/4� bolt hole 407000-51
(1) Oil Tee adapter assembly 407000-56,57,58
(2) M6x1.0x30MM HHCS 407000-46
(2) Aluminum spacers, ƽ� OD x � �� ID x �� Long
407000-17
(1) Blow off hose to air filter Assembled
by__________________ Date ___________
(1) �1� ID x 20� Long 407000-62
(1) Fuel pump assembly Assembled
by__________________ Date ___________
(1) FMU (Fuel Management Unit) � Comes from Vortec
assembled
(1) Bracket, Auxiliary fuel pump 407000-09
(2) Rubber Insulators � Fuel pump bracket 407000-67
(2) Adel clamps fuel pump holder 407000-87
(2) �-20 Male stud/Female rubber isolator 407000-27
(2) �-20x1/2 Flathead cap screw 407000-85
(2) � Flat washer 402991
(2) �-20 Nylon locking nut 407000-40
(8) Mini Hose clamps 407000-75
(4) 5/16� F/I fuel line 24� long each 407000-64
(2) Isolator to assembly bracket 407000-68
(1) FMU Bracket 407000-47
(1) �8 female AN to �4 Male AN, fitting 407000-59
(1) Electrical nuts to fuel pump (packaged from
Vortec)
(2) M6x1.0 HHCS w/washers
1) Auxiliary Fuel Pump electrical assembly
Assembled by__________________ Date ___________
(1) Fuel pump relay electrical assembly (Bosch relay
from Vortec, Stillen Assembly Dept. to wire)
(1) Fuel pump pressure switch 407000-49
(1) Blue 3M splice NEED P/N
(1) Hobb/boost switch bracket 407000-55
(2) 48� Blue silicone hose each 407000-16
Assembled by__________________ Date ___________
(1) Power Steering oil cooler-Stillen (1999 models)
See P/N 407100
(3) Adel clamps SG-6 (1999 models) Part of BOM of
P/N 407100
(3) M6 x 1.0 x 10mm Flange bolt (1999 models) Part of
BOM of P/N 407100
(1) M6x1.0 Nylon locking nut (1999 models) Part of
BOM of P/N 407100
(1) Back strap 18� long (1999 models) Part of BOM of
P/N 407100
(1) Coolant bottle relocation bracket 407000-50
Assembled by__________________ Date ___________
(1) 48� 5/16� hose, radiator overflow to coolant
bottle 405030-9
(2) Spring clamps, overflow radiator hose 407000-70
(1) Fuse box mounting brackets (teardrop) 407000-31
Assembled by__________________ Date ___________
(1) Fuse box relocation mounting bracket 407000-30
(2) Flat head 10-32 x 5/8 451070-4
(2) 10-32 Nyloc nuts 407000-42
(2) 90� 3� OD tube w/Air temp sensor hole & crankcase
vent Assembled by__________________ Date
___________
(push in type and bolt in type air sensor) w/nipple
(407000-20)
(1) Modified oil drain back plate 407000-06
Assembled by__________________ Date ___________
(1) Blower oil drain back hose-preformed 407000-32
(2) Hose clamps, # 10 407000-23
Hardware � Intake tubes Assembled
by__________________ Date ___________
(1) Silicone hose, Black - 90�, supercharger to cross
over tube 407000-13
(1) Silicone Hose, Blue - MAS to 90� � 3.00 tube
407000-12
(1) Silicone hose, Blue - 90�tube to Throttle body
407000-12
(4) Hose clamp #48 Hard pipe/Mas/Throttle body
407000-19
(1) Blow Off Valve Assembly with adapter 407000-24,
-8
(4) Cable Ties, 11� Black 405030-6
(2) Aluminum spacers � Stand off to valve cover
407000-17
(1) M8x1.25x40mm Flange Head CS 407000-69
(1) M8x1.25 Prevailing Lock Nut 407000-86
(8) M6x1.0x55mm Hex bolt 407000-45
(8) M6 lock washer 318109
(2) M10x1.5x60mm Hex bolt 407000-33
(2) M10 flat washer 407000-34
(6) M6x1.0 Nyloc nuts 402993
(12) M6 Flat washers 318110
(6) M6x1.0x25mm Hex bolt 402990
(2) M6x1.0x40mm Hex bolt
(2) Hose Clamp #40 � Supercharger to 90�hose
407000-18
Vacuum line assembly Assembled
by__________________ Date __________
(3) Vacuum Tees, 3/16� 407000-28
(5) Cable Ties, 6� black 505053
(5) Vacuum lines, 3/16� ID 503215-6
(1) Air-bypass adapter 407000-78
(1)Cam sensor retainer 407000-84 Assembled
by__________________ Date __________
(1) C.A.R.B. Decal EO#D436-6
(1) 92 Octane Label WARNING
(1) Stillen SuperCharged Decal STISUPERdd
95-99 pancake filter number
Stillen's PN: 400700-10
K&N's: RA-0980
Thread Starter
Joined: Dec 2000
Posts: 6,451
From: Near Archer High School, Ga
SCER belt part numbers
Gates belt sizes for V2:
3.60 to 3.33 - K060710
3.25 to 3.125 - K060705
3.00 to 2.62 - K060703
Posted by the V1 moderator Delio
Well for a fact I can tell you that anything @ 3.25 too and including ASP's 3.0" pulley will use the 6 rib 695 length. I think that is the stock belt in the V1 kit which means it will work with the 3.33, 3.48, and 3.6, but I didn't buy the kit new so I can't speak for sure.
Last edited by The Wizard; Jun 3, 2013 at 10:13 PM.
Thread Starter
Joined: Dec 2000
Posts: 6,451
From: Near Archer High School, Ga
pulley sizes and amount of boost! V2 and V1
V2 owners
3.6 - 7 psi
3.33 - 9 psi
3.25 - 10 psi
3.125 - 11 psi
2.87 - 13 psi
V1 owners deduct half to one full PSI from each pulley
3.6 - 7 psi
3.33 - 9 psi
3.25 - 10 psi
3.125 - 11 psi
2.87 - 13 psi
V1 owners deduct half to one full PSI from each pulley
Joined: Jun 2003
Posts: 2,129
From: San Fernando Valley CALI
OFFICIAL Stillen S/C Kit Part #'s
Adam Hume (adam@stillen.com) sent these to me... this may duplicate some of the data already listed here, but at least we'll know that these are "offiical". I've got the excel spreadsheet these come from, if anyone wants them.
NOTE: Always refer to these part numbers when talking to Stillen - Adam said that you have a much better chance of getting help with the right part #'s...
2000-2001 MAXIMA BILL OF MATERIALS
PART# DESCRIPTION - PART# 407500 QTY
AIR FILTER ASSEMBLY
402960L K&N Air Filter 1
407500-29 Adapter air filter 1
407500-30 support bracket, tubular 1
407500-31 support bracket, "Z" type 1
407000-67 rubber isolator 2
407000-68 rubber isolator, inner sleeve 2
407500-34 M6-1.0x 16mm flange HHCS 5
407500-40 M6-1.0x 30mm flange HHCS 2
407500-41 M6-1.0 flange hex nut 1
402991 #1/4 flat washer 2
VORTECH SUPERCHARGER ASSEMBLY
407500-01 Supercharger 1
407500-02 modify supercharger drive pulley 1
407500-03 modify supercharger pulley washer 1
407000-05 Supercharger adapter plate assembly - Aluminum 1
407000-36 M12x70mm Flat head bolt 2
407000-37 3/8 -16x 4-1/2 flat head cap screw 4
407000-74 M 12X50 mm Flat Head Bolt 1
407500-04 Steel Fitting, 90 deg - 4 AN - 1/8 NPT M (fitted into S/C) 1
407000-45 M6x 1.0x 55mm hex head cap screw ZP 2
407500-08 Serpentine Belt 1
400950-4 serrated spring washer 2
407000-76 3/8-24X1" flat head cap screw 1
CRANKCASE BREATHER HOSE ASSEMBLY
402935-6 5/8" ID Crank case breather hose (407000-15 may sub)2ft
407500-32 hose elbow 90 deg, 5/8" w/ 1/4" tee 1
407500-43 vacuum tee, 5/16"run x 3/16" branch 1
OIL FEED LINE ASSEMBLY
407500-25 OIL FEED LINE,-4S.S BRAIDED LINE 1
407000-17 aluminum spacers, dia 1/2" OD x dia 1/4" ID x 1/2" long 3
402990 M6x 1.0 x25mm HHCS 3
318110 M6 flatwasher 3
407000-56 Steel Fitting, 4m. To 1/8 NPT M 1
407000-57 Steel Fitting, 1/8 NPT M - 1/8NPT M 1
407000-58 Steel Fitting, 1/8 NT FEM, 3 way tee 1
407100-04 Adel clamps, size SG6 3
BELT ADJUSTER/PULLEY ASSEMBLY
407500-24 Flat Belt Idler Pulley, 2" w/o rails 1
407500-22 Base Bracket ( tensioner brkt assy! ) 1
407500-23 Spacer Pulley 1
IDLER PULLEY ASSEMBLY
407500-09 2" DIA Pulley w/o side rails 1
407500-07 1/2 - 13x 1-1/2 HHCS ZP 1
407000-73 M12 Flat Washer 1
407500-10 Idler Pulley Bushing 1
FUEL PUMP ASSEMBLY
402991 1/4 Flat Washer 2
318109 M6 Split Lock Washer 2
402990 M6-1.0 x 25mm Hex HD cap screw 2
405030-6 Cable ties 11" 4
407000-09 Bracket, Auxiliary fuel pump 1
407000-40 1/4-20 nyloc hex nut 2
407000-47 FMU mounting bracket 1
407000-64 5/16 MPI fuel hose 8ft
407000-67 Isolator rubber grommet 2
407000-68 Isolator sleeve 2
407000-75 #4 hose clamp 9
407000-80 10-24 x 3/8" PH pan hd screw 3
407000-85 1/4-20x 1/2" FL, Soc., hd screw 2
407000-87 #20 Adel Clamp 2
407500-20 FMU 8:1, w/ 5/16" barb fitting (w/vortec) 1
407500-27 Fuel Pump Assy w/ 5/16" barb fitting 1
407500-44 5/16" barb fuel hose joiner 3
407000-27 neopren rubber isolator 1/4-20 2
AUXILIARY FUEL PUMP ELECTRICAL ASSEMBLY
Fuel pump relay electrical assembly (Bosch relay from Vortec)
318110 M6 flat washer 1
407000-49 Fuel pump pressure switch 1
407000-55 Hobb/boost switch bracket 1
407000-60 1/2" OD x 1-1/2" aluminum spacer 1
407000-88 Blue3M splice 1
407500-06 M6-1.0x 65mm HHCS 1
407000-89 Relay Bosch 12v 20/30 amp 1
407000-90 Inline ATC fuse holder, 10-12GA Red 1
407000-91 Fuse, ATC 25 amp 1
407000-92 Wire - 18GA yellow - 6 ft. 1
407000-93 Wire recepticle, female 18GA 3
407000-94 Wire, 12GA red - 14 1/2"L 1
407000-95 Wire recepticle, female 12GA 1
407000-96 Butt connector 12GA 1
407000-97 Wire connector, 10-12GA with 1/4" ring 2
407000-98 Wire connector, 18-22GA with #10 ring 2
407000-99 Wire, 18GA Black 2
407000-100 Wire, 18GA Red 2
POWER STEERING ASSEMBLY
407000-16 Hose Power Steering to oil cooler, 3/8" ID 8ft
407500-37 12"L foam tube 1
407000-75 hose clamp #4 2
407100-01 aluminum "U" tube 1
407100-02 perforated back strap, 18"L 1
407100-03 M6-1.0x 12mm flange HHCS 3
407100-04 adel clamps SG6 3
COOLANT BOTTLE RELOCATION ASSEMBLY
407500-50 Coolant bottle relocation bracket 1
407500-34 M6-1.0x 16mm flange HHCS 1
WINDSHIELD WASHER BOTTLE ASSEMBLY
407500-36 molded hose 1
408005 hose clamp, #24 2
405030-6 cable ties, 11" 1
BYPASS VALVE ASSEMBLY
407000-24 Bosch bypass valve 1
407000-62 Rubber Hose, 1"ID x 24"L 3ft
407500-33 Hose Clamp, #12 narrow 4
FUSE BOX RELOCATION ASSEMBLY
451070-4 Flat head 10-32x5/8 2
407000-30 Fuse box relocation mounting bracket 1
407000-31 Fuse box mounting brackets (teardrop) 1
407000-35 M6-1.0 X 20mm HHCS 1
407000-42 10-32 nylock nuts 2
402993 M6-1.0 nylock hex nut 1
318110 M6 flat washer 1
MODIFIED OIL DRAIN BACK PLATE ASSEMBLY
407000-06 Modified oil drain back plate 1
407500-26 Hose clamp #10 narrow 2
407000-32 Blower oil drain back hose preformed 1
VACUUM LINE ASSEMBLY
407500-28 Vacuum tees, 3/16" 1
503215-6 Vacuum lines, 5/32" 4ft
PRESSURE PIPE ASSEMBLY
404046 hose clamp #36 1
405030-5 hose clamp #40 1
407100-03 m6-1.0x 12mm flange HHCS 2
407500-14 pressure pipe w/ welded mounting tabs 1
407500-15 2" L x 2-3/4"ID silicon hose 1
407500-16 hose clamps #44 2
407500-17 90 deg 3-1/2"ID x 2-1/2 ID hose 1
INLET PIPE ASSEMBLY
407500-18 Inlet pipe assy 1
407500-19 90 deg 3-1/2 ID x 2-1/2 ID hose 1
407000-14 hose clamps #56 1
405030-5 hose clamp #40 1
3m5314 12" long x 1/2"W double sided tape 1
402956-04 14" cable ties 2
ASSOCIATED HARDWARE ASSEMBLY
407500-06 M6-1.0X 65mm HHCS, S/C plate to engine 1
407500-42 m6 stand-off bolts, S/C plate to engine 2
407000-33 M10-1.5x 60mm HHCS 2
407000-34 M10 flat washer 2
407000-45 M6-1.0 x 55mm HHCS 1
407000-46 M6-1.0x 30mm HHCS 1
407000-84 Cam Sensor Retainer Plate 1
407500-11 M8-1.25x 25mm FHCS 1
407500-12 M8-1.25x 30mm HHCS 1
407500-13 m6-1.0 x20mm FHCS 1
318109 M6 flat washer 2
318110 M6 split lock washer 2
407000-35 M6-1.0 x 20mm FHCS 1
400950-4 Serrated spring washer 1
100505 Stillen SuperCharge Emblem
WARNING 92 Octane Label 1
STISUPER Stillen SuperCharge Decal 1
Assembly Person__________________________________
Date: / /
Sales Order #_____________________________________
Supercharger serial number:_________________________
Instruction sheet with pictures and schematics
Joined: Jun 2003
Posts: 2,129
From: San Fernando Valley CALI
OFFICIAL Stillen S/C Kit Part #'s pt. II 1995-1999
PART # DESCRIPTION QTY
AIR FILTER ASSEMBLY
407000-02 Steek Ubsert-air filter to supercharger 1
407000-10 Air filter with holes drilled 1
407000-11 Silicone Hose, Blue - dia 3-1/2 " air filter to supercharger 1
407000-14 Hose clamp #56 2
407000-61 Blow-off hose niplle 1
407000-65 air filter vent-45deg x 5/8" dia 1
407000-77 3/4" dia rubber grommet 1
VORTECH SUPERCHARGER ASSEMBLY
407500-01 Supercharger 1
407500-05 Supercharger aluminum adapter plate assembly 1
407000-36 M12x70mm Flat head bolt 2
407000-74 M 12X50 mm Flat Head Bolt 1
407000-76 3/8-24 x 1 Flat Head Bolt 1
407000-45 m6-1.0x55mm bolts in plate assy 2
407500-04 steel fitting 90 deg-4 an -1/8 npt m (fittewd into s/c) 1
407500-08 serpentine belt 1
407000-37 3/8-16 x 4 1/2 flat head cap screw 4
400950-4 serrated spring washer 2
CRANKCASE BREATHER HOSE ASSEMBLY
407000-15 48" DIA5/8" ID Crank case breather hose 4ft
407000-66 90 deg. Dia5/8" OD Plastic vent line adapter 1
OIL FEED LINE,ASSEMBLEY
407500-25 oil feed line -4 s.s braided line 1
407000-17 aluminum spacers, dia 1/2" OD x dia 1/4" ID x 1/2" long 3
402990 M6x1.0x25MM HHCS 3
318110 m6 flat washer 3
407000-56 steel fitting 4m to 1/8 npt m 1
407000-57 steel fitting 1/8 npt m-1/8 npt m 1
407000-58 steel fitting 1/8 fem 3way tee 1
407100-04 adel clamps size sg6 3
BELT ADJUSTER / PULLEY ASSY
407500-24 flat belt idler pulley, 2.0 w/rails 1
407500-22 base bracket 1
407500-23 spacer pulley 1
IDLER PULLEY ASSY
407500-09 2" dia pulley w/o side rails 1
407500-07 1/2-13 x 1-1/2 hhcs zp 1
407000-73 m12 flat washer 1
407500-10 bushing 1
FUEL PUMP ASSEMBLY
402991 1/4 Flat Washer 2
318109 m6 split lock washer 2
402990 m6-1.0 x 25mm hex hd cap screw 2
405030-6 cable ties 11" 4
407000-09 mounting plate, fuel pump assy 1
407000-27 1/4-20 Male stud/Female rubber isolator 2
407000-40 1/4 -20 Nylon Locking Nut 2
407000-47 fmu mounting bracket 1
407000-64 5/16" mpi fuel hose 8ft
407000-67 insulators rubber grommet 2
407000-68 Isolator sleeve 2
407000-75 #4 hose clamps 9
407000-80 10-24 x 3/8" ph pan hd screw 3
407000-87 #20 adel clamps 2
407500-20 fmu 8:1 w/ 5/16" barb fitting ( w / vortech ) 1
407500-27 fuel pump w / barb fitting 1
407500-44 5/16" barb guel hose joiner 1
407000-85 1/4-20 x 1/2" flat head cap screw 2
AUXILIARY FUEL PUMP ELECTRICAL ASSY
318110 m6 flat washer 1
407000-49 fuel pump pressure switch 1
407000-55A hobb/boost switch bracket 1
407000-60 1/2" OD x 1-1/2 aluminum spacer 1
407000-88 Blue3M splice 1
407500-06 m6-1.0x65mm hhcs 1
407000-89 relay bosch 12v 20/30 amp 1
407000-90 in line atc fuse holder 10-12ga red 1
407000-91 fuse atc 25 amp 1
407000-92 wire 18ga yellow - 6ft 1
407000-93 wire recepticle,female 18ga 3
407000-94 wire 12ga red 14 1/2" length 1
407000-95 wire recepticle, female 12ga 1
407000-96 12ga butt connector 1
407000-97 wire connector, 10-12ga w 1/4 ring 2
407000-98 wire connector, 18-22ga w/#10 ring 2
407000-99 wire 18ga black 2
407000-100 wire 18ga red 2
407000-16 hose pwr steering to oil cooler 3/8 ID 8FT
Additional only for 1999-2000 model
see 407100 Power steering oil cooler-Stillen (1999 models)
part of Adel clamps SG-6 (1999 models) 407100-04
BOM M6x1.0x10mm Flange bolt (1999 models) 407100-03
P/N M6x1.0 Nylon locking nut (1999 models) 402993
407100 Back strap 18" long (1999 models) 407100-02
407100-01 u-bend pwr steering cooler
COOLANT BOTTLE RELOCATION BRKT ASSY
407500-50 Coolant bottle relocation bracket 1
407000-64 48" 5/16" hose, radiator overflow to coolant bottle 4ft
407000-70 Spring clamps, overflow radiator hose 2
BYPASS VALVE ASSY
407000-24 bosch bypass valve 1
407000-62 36"-1.0" ID rubber hose 3ft
407500-33 hose clamp #12 narrow 4
407000-08 SMR-bosch by pass valve adapter assy 1
FUSE BOX RELOCATION ASSY
451070-4 flat head 10-32x3/4 2
407000-30 fuse box relocation mounting bracket 1
407000-31 fuse box mounting bracket (tear drop) 1
407000-35 M6-1.0 x 20mm hhcs 1
407000-42 10-32 nylock nuts 2
402993 m6-1.0 nylock hex nut 1
318110 m6 flat washer 1
MODIFIED OIL DRAIN BACK PLATE ASSY
407000-06 modified oil drain back plate 1
407500-26 hose clamps #10 narrow 2
407000-32 blower oil drain back hose (HOSE NEEDS CUTTING 1
VACUUM LINE ASSY
407500-28 vacuum tee 3/16" 1
503215-6 vacuum line 5/32" ID 4ft
HARDWARE INTAKE TUBES ASSY
318110 M6 Flat Washer 6
402990 M6X1.0X25 mm Hex bolt 2
402992 M6x1.0 HEX nuts 6
407000-03 SMR intake charge tube, Max s/c 1
407000-12 2.0"-3.0"ID silicon hose 2
407000-13 Silicone hose, Black-90deg, supercharger to cross over tube 1
407000-17 Aluminum spacers - stand off to valve cover 2
407000-18 hose clamp #40-Supercharger to 90 deg. Hose 1
407000-19 Hose Clamp #48 4
407500-16 hose clamp #44 hard pipe/mas/throttle body 1
407000-35 m6x1.0x20mm hhcs 6
407000-78 SMR-air by pass adapter Max s/c 1
318109 M6 lock washer 8
TUBE MAS TO THROTTLE BODY ASSY
407000-79 SMR 90deg -3"OD tube to mas to throttle body 1
407000-81 adapter -air temp sensor to 90deg tube 1
407000-82 M4-0.7x12mm shcs-air temp sensor adapter mtg 2
407000-83 viton o-ring air temp sensor adapter mtg 1
ASSOCIATED HARDWARE ASSY
407500-06 m6-1.0x65mm hhcs s/c plate to engine 1
407500-42 M6 stand off bolts s/c plate to engine 2
407000-33 M10-1.5x60mm hhcs 2
407000-34 M10 flat washer 2
407000-35 M6-1.0 x 20mm hhcs 1
407000-45 M6-1.0 x 55mm hhcs 1
407000-46 M6-1.0 x 30mm hhcs 1
407000-84 Cam sensor retainer 1
407500-11 M8-1.25 x 25mm fhcs 1
407500-12 M8-1.25 x 30mm flange hhcs 1
407500-13 M6-1.0 x 20mm fhcs 1
318109 M6 flat washer 2
318110 M6 split lock washer 2
400950-4 serrated spring washer 1
407500-21 1/4-20 x1" fhcs 2
407500-37 foam insulation wrap 1-1/8 ID-1-1/4" 1ft
DECAL ASSY
EO#D436-6 C.A.R.B. Decal 1
WARNING 92 Octane Label 1
STISUPER Stillen SuperCharge Decal 1
100505 STILLEN SuperCharge Emblem 1
Assembly Person__________________________________
Date: / /
Sales Order #_____________________________________
Supercharger serial number:_________________________
Instruction sheet with pictures and schematics
Q: Can I add an intercooler/aftercooler to my Vortech supercharger system?
A: Yes, but it's not clear how beneficial it will be.
For the sake of simplicity I will refer to air-to-water/air-to-air intercoolers and aftercoolers as just "intercoolers". For a more detailed breakdown read this thread.
First off, know that any intercooler you want to add to your vortech supercharger will have to be custom. Nobody makes an off-the-shelf intercooler so you'll have to put it together yourself or pay someone else to. At a basic level it will consist of the intercooler iteself, piping from the blower to the intercooler, and piping from the intercooler to the MAF. In the case of an air-to-water aftercooler you'll also need a water reservoir and water lines to and from the aftercooler.
Why go through all this touble? Well as your blower spins and compresses the air on its way to the engine, it also heats it up. Hot air is less dense than cold air, and all things being equal, a colder, denser charge will make more power than a warm one. In addition to creating more power with a denser charge, the cooler air will also help to combat detonation by lowering cylinder temperatures.
Sounds great, right? Unfortunately this added power and safety comes at a cost. Because the air must now follow a longer path before getting to the engine you will get a drop in boost pressure when measured at the throttle body. So while the blower may be pumping out 10psi, 2 or 3psi are getting lost on the way through the intercooler system. The amount of boost lost is dependant on the efficiency of the intercooler, the amount of piping required, and the "smoothness" of the bends in the piping.
So when does is become "worth it"? Credit goes to Stephen Max for this detailed explaination...
Here is more info you can read up to decide for yourself...
Intercooled S/C setup
I'm ready to build! Should I go Intercooler (FMIC) or Aftercooler (AWIC) and why???
questions about i30krab's vortech powercoolerIntercooler for Supercharged 95-99 Maxima's
who was the guy making the "U" piping for the intercoolers for a S/C setup?
To all Supercharged Guys
Intercooling a SC... Help from turbo guys would help to
Super Charger Intercooler
Vortech MaxFlow Power Cooler
supercharger intercooler?
Intercooler
A: Yes, but it's not clear how beneficial it will be.
For the sake of simplicity I will refer to air-to-water/air-to-air intercoolers and aftercoolers as just "intercoolers". For a more detailed breakdown read this thread.
First off, know that any intercooler you want to add to your vortech supercharger will have to be custom. Nobody makes an off-the-shelf intercooler so you'll have to put it together yourself or pay someone else to. At a basic level it will consist of the intercooler iteself, piping from the blower to the intercooler, and piping from the intercooler to the MAF. In the case of an air-to-water aftercooler you'll also need a water reservoir and water lines to and from the aftercooler.
Why go through all this touble? Well as your blower spins and compresses the air on its way to the engine, it also heats it up. Hot air is less dense than cold air, and all things being equal, a colder, denser charge will make more power than a warm one. In addition to creating more power with a denser charge, the cooler air will also help to combat detonation by lowering cylinder temperatures.
Sounds great, right? Unfortunately this added power and safety comes at a cost. Because the air must now follow a longer path before getting to the engine you will get a drop in boost pressure when measured at the throttle body. So while the blower may be pumping out 10psi, 2 or 3psi are getting lost on the way through the intercooler system. The amount of boost lost is dependant on the efficiency of the intercooler, the amount of piping required, and the "smoothness" of the bends in the piping.
So when does is become "worth it"? Credit goes to Stephen Max for this detailed explaination...
An acceptable pressure loss through the intercooler and piping is on the order of 1 to 1.5 psi. The 3.6" pulley gives 7 psi and is good for a 80 hp gain, and people running 10 psi are typically seeing 300hp at the wheel, a 120 hp gain. So that translates to about 10-15 hp per psi, with decreasing power gain the higher you go in boost pressure. So lets say a good intercooler setup with 1 psi boost loss costs 10 hp, and if the setup is not so good, a 20 hp loss.
A widely accepted figure for power gain from charge air cooling is 1% for every 10 deg F of temperature drop. So working with a 300 hp figure, to get back the 10 hp the charge air needs to be cooled 33 F, and to get back 20 hp we need 66 F of cooling.
I have done an extensive amount of data logging with an intake air temperature gauge. I have one thermocouple at the blower inlet and one at the throttle body. Boosting to 11 psi results in a maximum charge air temp of 185 F. That was on a hot day where the air temp at the road surface was about 100F, so the temp rise was 85 F. I have never seen the temperature higher than 185 F.
Assuming an intercooler with 80% cooling efficiency, the 185 F charge air will be cooled to 117 F, assuming 100 F ambient ( convert to absolute temp by adding 460; ==> [645-577]/[645-560] = 80% )
So, to summarize, an intercooler working at 80% efficiency will cool 185 F charge air down to 117 F, which is a 68 F temp drop. So for an intercooler and piping system that results in a 10 hp loss due to pressure drop, we have gained back about 20 hp due to temperature drop, for a net gain of 10 hp. If the intercooler and piping results in a 20 hp loss, then we have broken even with the temperature drop.
Intercooled S/C setup
I'm ready to build! Should I go Intercooler (FMIC) or Aftercooler (AWIC) and why???
questions about i30krab's vortech powercoolerIntercooler for Supercharged 95-99 Maxima's
who was the guy making the "U" piping for the intercoolers for a S/C setup?
To all Supercharged Guys
Intercooling a SC... Help from turbo guys would help to
Super Charger Intercooler
Vortech MaxFlow Power Cooler
supercharger intercooler?
Intercooler
Last edited by Nealoc187; Sep 18, 2007 at 01:07 PM.
Dayco replacement pulley:
http://forums.maxima.org/oldthread.p...53#post3302153
Dayco Idler Pulley Part#:89003 (76mm Flat with Flange 6 Rib)
http://forums.maxima.org/oldthread.p...53#post3302153
Dayco Idler Pulley Part#:89003 (76mm Flat with Flange 6 Rib)
Last edited by Nealoc187; Sep 18, 2007 at 01:06 PM.
The dreaded marbles-in-a-can noise may not be a bearing problem
Normally, the V2 is pretty quiet while operating but if you're starting to hear that marbles-in-a-can noise you can check one thing before you ship the blower off to Vortech. While the engine is off, take a look at the drive pulley and see if it is loose. Loose in this case meaning that there is play in sliding it back and forth a bit on the spindle. If there is, check also the side of the engine block and see if there are any shiny scratches next to it. If you do see them then that means you've got a loose pulley. The allen bolt that anchors the drive pulley to the blower has worked itself loose and the loose pulley is allowing excessive vibrations on the spindle causing that dreaded noise. You'll have to take the blower out and use a little more blue loc-tite on that bolt.
Update: blue loctite may not do the trick. I've used a little of the red loctite on it after the bolt had come loose again.
Update: blue loctite may not do the trick. I've used a little of the red loctite on it after the bolt had come loose again.

Lexus Metal Tensioner Pulley Part number and picture
The official name is: "Toyota Idler Pulley Sub Assy" and the part# is 13503-5011
http://forums.maxima.org/showthread.php?t=529578
Edit.....New link:
http://forums.maxima.org/showthread.php?t=402394
http://forums.maxima.org/showthread.php?t=529578
Edit.....New link:
http://forums.maxima.org/showthread.php?t=402394
Last edited by The Wizard; Mar 28, 2008 at 01:40 PM.
How to Re-clock your blower
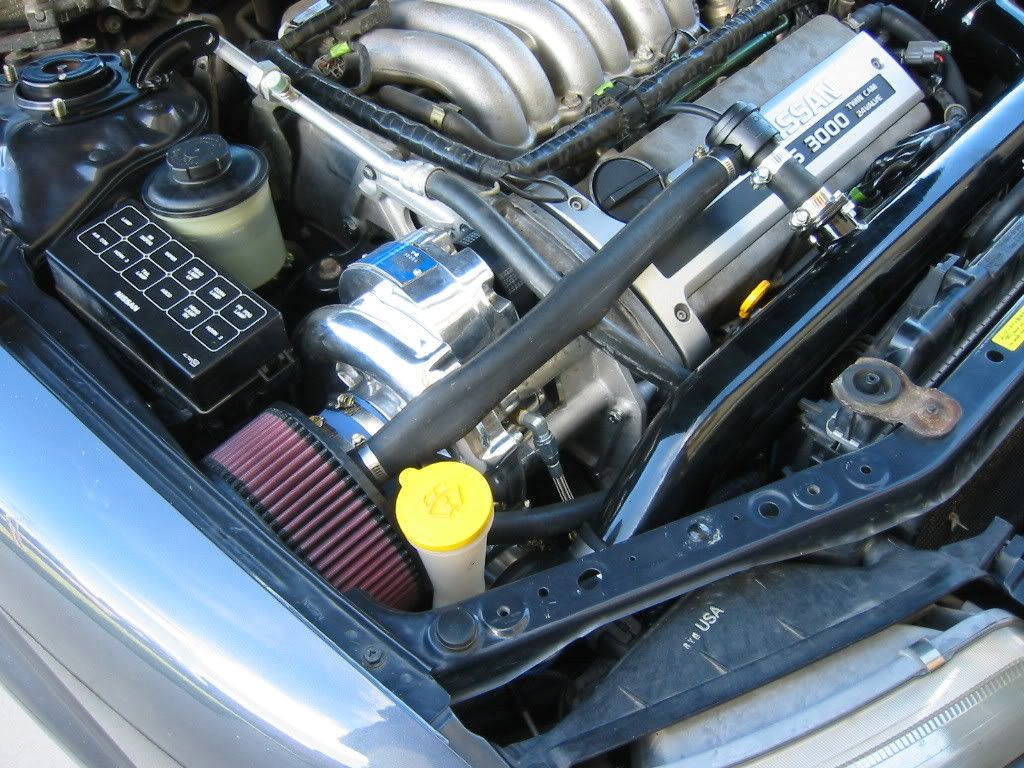
Why? So that one of the bends of the 2.5" charge pipe can be eliminated (the retarded chamfered elbow) and ease of configuration for those who want to upgrade to a 3" charge pipe system. Re-clocking the blower also gets the charge pipe away from the back of the headlight and allows a lot more room for those who do headlight retrofits. (My chamfered elbow was rubbing my OEM headlight bulb connection and causing it to flicker on and off)
Keep in mind that if you're keeping the 2.5" charge pipe that originally was provided in the Stillen kit, then you'll have to cut off a portion at the end of the charge pipe (at the second bend near the SC mounting plate) and get a new silcone 90 degree coupler (2.75" to 2.5") to reconfigure the system. If you're upgrading to a 3" charge pipe, then you'll have to buy quit a bit more including: piping/couplers/your choice of BOV, Maf adapter etc.
Where? In your car, blower fully installed and mounted to the engine. It's a common misconception that the blower must be removed from the car in order to re-clock the blower. You do not have to take the blower off the car, unless you run into the problem stated in the disclaimer below. This probably goes without saying, but re-clocking the blower while installed in the car allows you to fine tune and find the perfect angle in such a way that the 90 degree silicone elbow is situated just right and allows proper hood clearance. If the blower was removed from the car, then you'll be taking the trial and error approach and burning a lot of time taking the blower/plate on and off/re-clocking the blower in order to find the perfect angle.
Here's how the blower looks as Stillen/Vortech intended (2.5" charge pipe, two bends at/near blower outlet)
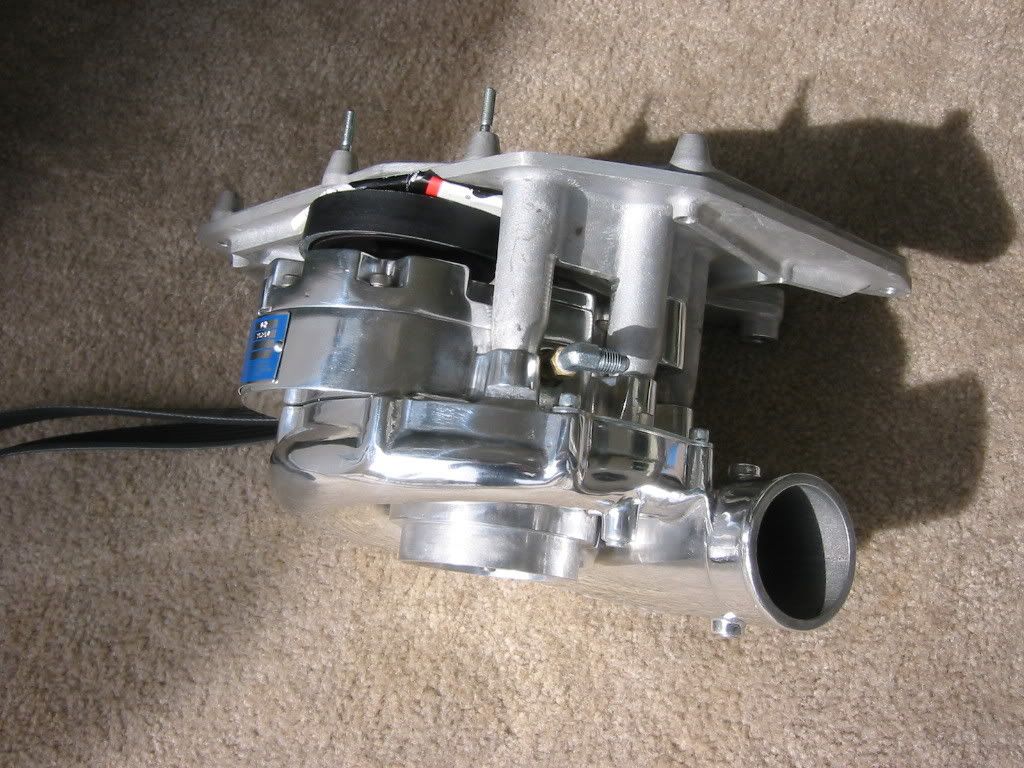
Here's how the blower looks re-clocked (3" charge pipe, one 90 degree bend)

Here's how to re-clock (rotate) your blower
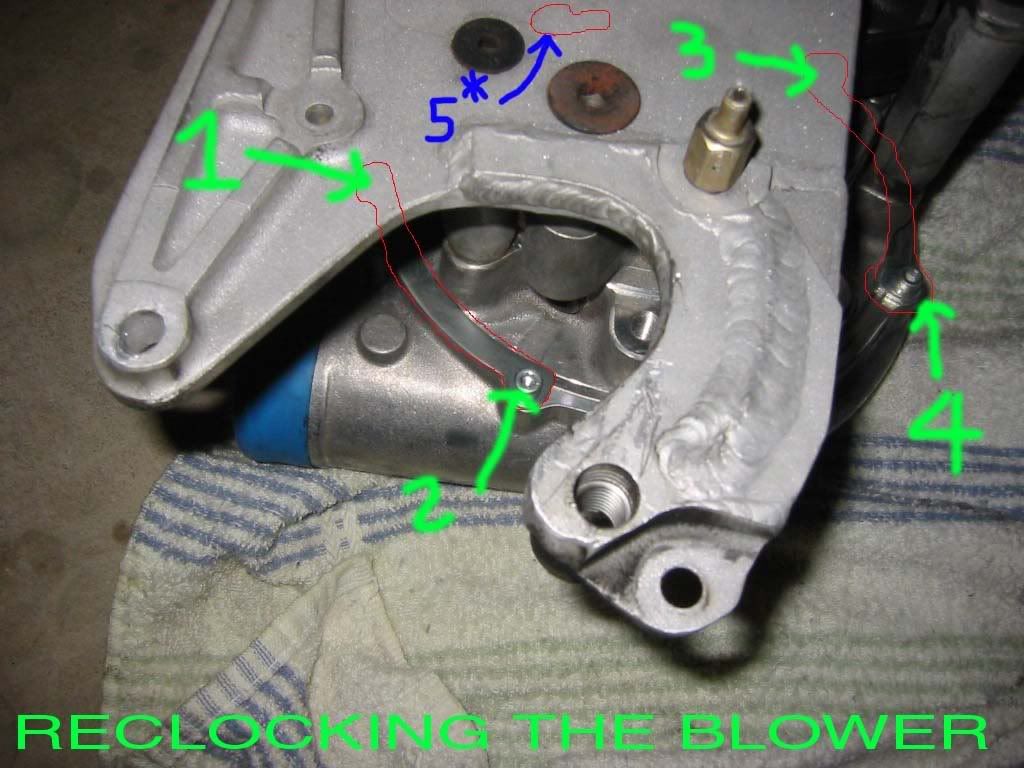
Pic 1
Pic 2
Look near the oil feed fitting and you�ll see a hold down plate and two allen screws. (See Pic 2) Keep in mind, there is still one more hold down plate and two screws to locate. See pic 1 for both plates (outlined in red) and all 4 screws (noted in green). Although the blower is installed in the car and space is limited, you should have no problem getting to the plates and allen screws. The hold down plate and screws holds the scroll to the blower itself. Loosen the screws quit a bit until you are able to re-clock (rotate) the blower�s outlet. You can remove the screws and hold down plates if you find it easier or the scroll isn�t rotating freely. Now re-clock the blower's outlet to the desired position. Tighten the allen screws to prevent any further rotation and snug things back up the way they were. If you removed the 4 allen screws and 2 plates, reinstall them at this time.
* Some people have reported that they have 5 screws and 3 hold down plates. If you can't re-clock the scroll after undoing/removing the 4 screws and 2 hold down plates as stated above, then look for a fifth screw and small hold down plate. This small hold down plate is only slightly bigger than the screw head itself. This 5th screw and small plate is noted in blue in Picture #1.
Disclaimer: Some people have it easier than others. Some discover that one of the plates is easily accessible (12 o�clock position) while the other is impossible to get to (6 o�clock position) while the blower is installed in the car. If this is the case, you may have to remove/uninstall your blower from your Maxima to gain accessibility to the hidden plate and screws. If so, feel free to relocate the plate and screws to a more accessible location anywhere around the perimeter of the scroll. Just keep in mind, that wherever you install one plate, the other plate should be on the opposite side of the scroll. When I re-clocked my blower, I had it easy. Both of my plates and 4 screws were easily accessible (3 o�clock and 9 o�clock position) [Positions are based on the individual standing at the passenger side of the car and looking at the blower]
If you have any questions/comments regarding this writeup, feel free to PM me.
Keep in mind that if you're keeping the 2.5" charge pipe that originally was provided in the Stillen kit, then you'll have to cut off a portion at the end of the charge pipe (at the second bend near the SC mounting plate) and get a new silcone 90 degree coupler (2.75" to 2.5") to reconfigure the system. If you're upgrading to a 3" charge pipe, then you'll have to buy quit a bit more including: piping/couplers/your choice of BOV, Maf adapter etc.
Where? In your car, blower fully installed and mounted to the engine. It's a common misconception that the blower must be removed from the car in order to re-clock the blower. You do not have to take the blower off the car, unless you run into the problem stated in the disclaimer below. This probably goes without saying, but re-clocking the blower while installed in the car allows you to fine tune and find the perfect angle in such a way that the 90 degree silicone elbow is situated just right and allows proper hood clearance. If the blower was removed from the car, then you'll be taking the trial and error approach and burning a lot of time taking the blower/plate on and off/re-clocking the blower in order to find the perfect angle.
Here's how the blower looks as Stillen/Vortech intended (2.5" charge pipe, two bends at/near blower outlet)
Here's how the blower looks re-clocked (3" charge pipe, one 90 degree bend)
Here's how to re-clock (rotate) your blower
Pic 1
Pic 2
Look near the oil feed fitting and you�ll see a hold down plate and two allen screws. (See Pic 2) Keep in mind, there is still one more hold down plate and two screws to locate. See pic 1 for both plates (outlined in red) and all 4 screws (noted in green). Although the blower is installed in the car and space is limited, you should have no problem getting to the plates and allen screws. The hold down plate and screws holds the scroll to the blower itself. Loosen the screws quit a bit until you are able to re-clock (rotate) the blower�s outlet. You can remove the screws and hold down plates if you find it easier or the scroll isn�t rotating freely. Now re-clock the blower's outlet to the desired position. Tighten the allen screws to prevent any further rotation and snug things back up the way they were. If you removed the 4 allen screws and 2 plates, reinstall them at this time.
* Some people have reported that they have 5 screws and 3 hold down plates. If you can't re-clock the scroll after undoing/removing the 4 screws and 2 hold down plates as stated above, then look for a fifth screw and small hold down plate. This small hold down plate is only slightly bigger than the screw head itself. This 5th screw and small plate is noted in blue in Picture #1.
Disclaimer: Some people have it easier than others. Some discover that one of the plates is easily accessible (12 o�clock position) while the other is impossible to get to (6 o�clock position) while the blower is installed in the car. If this is the case, you may have to remove/uninstall your blower from your Maxima to gain accessibility to the hidden plate and screws. If so, feel free to relocate the plate and screws to a more accessible location anywhere around the perimeter of the scroll. Just keep in mind, that wherever you install one plate, the other plate should be on the opposite side of the scroll. When I re-clocked my blower, I had it easy. Both of my plates and 4 screws were easily accessible (3 o�clock and 9 o�clock position) [Positions are based on the individual standing at the passenger side of the car and looking at the blower]
If you have any questions/comments regarding this writeup, feel free to PM me.

Newbie - Just Registered
Joined: Jan 2008
Posts: 9
From: Russia, Ekaterinburg city
Whether it is possible to buy it http://cgi.ebay.com/ebaymotors/90-06...em300200435271
What quality from this set what will turn out capacity VG30E?
What quality from this set what will turn out capacity VG30E?

2000-2001 Stillen Supercharger instructions
See link for: 2000-2001 Stillen Supercharger instructions
http://forums.maxima.org/showthread.php?t=555959
And the downloadable PDF hosted now on VQpower.com
http://www.vqpower.com/v2/readarticl...article_id=125
http://forums.maxima.org/showthread.php?t=555959
And the downloadable PDF hosted now on VQpower.com
http://www.vqpower.com/v2/readarticl...article_id=125
Last edited by The Wizard; Mar 10, 2008 at 01:30 AM. Reason: Added link to VQpower.com

ASP steel idler pulley
besides ASPracing, is there anywhere else i can get the steel idler pulley from, it takes them weeks to make it, and the black pulley just keep ripping my belts up.
Thread Starter
Joined: Dec 2000
Posts: 6,451
From: Near Archer High School, Ga
How to install that Jegs oil cooler. This is so so simple
Items needed
1. Brake cleaner
2. Permatex grey or black
3. 771-10189 250 Horsepower Oil Cooler Kit Sandwich Adapter Style Kit
4. Go to Ace and purchase fittings 42069 and 40122 You will need two of each
remove your oil filter and clean area
grab a cutting wheel or pliers and bend that piece sticking out, that holds the crank pos wire in place
install that fitting so you can tighten sandwich, follow the photos
grab your Ace fittings, apply permatex black or grey to threads, ensure one of the fittings is angled. You apply permatex so you dont leak any oil
After assembling oil adapter sandwich bolt it on
you can use your oem nissan oil filter or take adapter and sandwich to autozone or whomever and test fit a larger oil filter
run high pressure lines to the cooler
attach cooler to the front of radiator and your done
follow the photos this is a straight up install the rest is common sense
use a big socket to properly tighten that sandwich. Be patient!!! Be patient the nut is pretty slim and you might slip and bust your hand. So if we are little young technicians be patient, take it from an older guy that has busted his knuckles
Put oil back in and enjoy your cooler. It really works, I have attached a oil temp gauge to monitor the temps when I was turboed/SCed and you wont believe how hot that oil can get. This little cooler will drop your temps by alot.


pay attention to the way the serated edge is! apply permatex black or grey on the actual threads that screw into the original threads. Use some pliers to screw this small adapter on. Once again be patient and dont strip out the threads!

the fittings will prevent you from bending those high pressure hoses at an angle, much neater install, dont forget the rubber
O ring that goes behind the sandwich! its a black rubber band in the plastic bag. You will get two. Its the smaller one!

1. Brake cleaner
2. Permatex grey or black
3. 771-10189 250 Horsepower Oil Cooler Kit Sandwich Adapter Style Kit
4. Go to Ace and purchase fittings 42069 and 40122 You will need two of each
remove your oil filter and clean area
grab a cutting wheel or pliers and bend that piece sticking out, that holds the crank pos wire in place
install that fitting so you can tighten sandwich, follow the photos
grab your Ace fittings, apply permatex black or grey to threads, ensure one of the fittings is angled. You apply permatex so you dont leak any oil
After assembling oil adapter sandwich bolt it on
you can use your oem nissan oil filter or take adapter and sandwich to autozone or whomever and test fit a larger oil filter
run high pressure lines to the cooler
attach cooler to the front of radiator and your done
follow the photos this is a straight up install the rest is common sense
use a big socket to properly tighten that sandwich. Be patient!!! Be patient the nut is pretty slim and you might slip and bust your hand. So if we are little young technicians be patient, take it from an older guy that has busted his knuckles
Put oil back in and enjoy your cooler. It really works, I have attached a oil temp gauge to monitor the temps when I was turboed/SCed and you wont believe how hot that oil can get. This little cooler will drop your temps by alot.
pay attention to the way the serated edge is! apply permatex black or grey on the actual threads that screw into the original threads. Use some pliers to screw this small adapter on. Once again be patient and dont strip out the threads!
the fittings will prevent you from bending those high pressure hoses at an angle, much neater install, dont forget the rubber
O ring that goes behind the sandwich! its a black rubber band in the plastic bag. You will get two. Its the smaller one!
Last edited by JAY25; Jun 23, 2009 at 06:37 AM.
Thread Starter
Joined: Dec 2000
Posts: 6,451
From: Near Archer High School, Ga
Last photo
your done thats the hardest part of the install! rest is butter. You can cut line in half, attach cooler to the front radiator of the car and zip tie hose so it dont get caught up in the bottom etc... attach hoses to the fittings you just ran.

If your blind clik on photo 3 times! it will blow up
If your blind clik on photo 3 times! it will blow up
Last edited by JAY25; Jun 23, 2009 at 09:23 AM.


Newbie - Just Registered
Joined: Jul 2009
Posts: 1
From: Connecticut
hey, I'm sorry if this is the wrong thread, or something but this is pretty new to me. I just got a 2000 max se 5spd. I want to put a belt supercharger in it, but I am not sure what brand to get, what one is good quality, etc. any help?

your done thats the hardest part of the install! rest is butter. You can cut line in half, attach cooler to the front radiator of the car and zip tie hose so it dont get caught up in the bottom etc... attach hoses to the fittings you just ran.
If your blind clik on photo 3 times! it will blow up
If your blind clik on photo 3 times! it will blow up
Thanks
AA

Has anyone on here tried a custom supercharger setup? Meaning something that did not come with a nice convenient bolt on kit. I'm planning on doing this with the engine out of the car, but I was just seeing if anyone has tried something other than the Stillen v1s and v2s. I wanted to try attaching an eaton M62, and yes I do know what that entails, various custom brackets/pulley and I need to come up with how the belt will be routed, what kind of belt to use, bigger injectors, and since its going to be an eaton m62 (used on GM 3800 motors) I think it would be much more beneficial to intercool it than it would to intercool one of the vortech ones. Oh, and last but not least the stock hood will probably never close with an m62 strapped onto my VQ so thats another obstacle I need to still figure out. I'll probably need to fabricate a lot of things on my own but I want something unique and I don't want to drop 4 grand into a kit thats only going to give me a second off my quarter time.

Newbie - Just Registered
Joined: Nov 2009
Posts: 5
so where did you guys find the kits? i can find just the sc but not the kit to fit my max?? and whats the cost like? Is it a pretty difficult task to put it on? im lookin at the v2 more then anything my max has 120k is that to much to supercharge it will i have problems?


Supporting Maxima.org Member

Joined: Sep 2004
Posts: 538
From: Townsville, Australia
Yes. Had my SC on with stock auto for 2 weeks before it died. Reconditioned the transmission with High stall torque converter, shift kit from transgo (VB mod), and a big transmission cooler. Transmission takes a big beating and has done for quite a while. It's essential.

 See post #2.


 Sure does.

The maxima oil temp doesnt spike up that much with an SC. atleast not to dangerous Temps from what Im told from SCing, turbo is another story. and to keep in mind that its not cooling constantly. You should be running it on a thermostat unless in TX weather all year long. EVEN THEN you dont want too cool of an oil. I think it should be run with a thermostat (just my opinion) to be used effectivly.
Last edited by HomerMAC; Oct 10, 2010 at 07:43 AM.
BEFORE BUYING A VORTECH SC FROM THE ORG OR ANYWHERE ELSE
PEOPLE PLEASE BE SMART, USE THAT KNOGIN
get the serial # of any blower your buying from anyone. Heck buy the blower from a Mustang guy if the $$ is right. Maybe mods can make that a standard info to post in the threads in the FI/ FS section.
CALL VORTECH to find out if was ever serviced. I've ran into a few people who got blowers that were nice and shiny to find out its leaking, bad seals, bearing etc. Sometimes no shaft play but has marbles in can sounds. ALL sold to them with the statement "it was just rebuilt", "freshly rebuilt".
few people in the last few months bought blowers with the above problem from member on the org or affiliated with a sub org. When I asked the people why they didnt call vortech and ask them when it was serviced... there responses usually... ...
...  ......
 .........
call, email, fax, write a letter... help your self
Vortech Engineering
1650 Pacific Avenue
Oxnard, CA 93033
Hours of Operation
Monday - Thursday:
8:30 am to 4:30 pm PST
Friday:
8:30 am to 12:00 pm PST
Phone: 805-247-0226
Fax: 805-247-0669
Send email to info@vortechsuperchargers.com.
Due to the amount of email we are currently receiving, please allow 2-3 business days for a reply.
get the serial # of any blower your buying from anyone. Heck buy the blower from a Mustang guy if the $$ is right. Maybe mods can make that a standard info to post in the threads in the FI/ FS section.
CALL VORTECH to find out if was ever serviced. I've ran into a few people who got blowers that were nice and shiny to find out its leaking, bad seals, bearing etc. Sometimes no shaft play but has marbles in can sounds. ALL sold to them with the statement "it was just rebuilt", "freshly rebuilt".
few people in the last few months bought blowers with the above problem from member on the org or affiliated with a sub org. When I asked the people why they didnt call vortech and ask them when it was serviced... there responses usually...
... ...............call, email, fax, write a letter... help your self
Vortech Engineering
1650 Pacific Avenue
Oxnard, CA 93033
Hours of Operation
Monday - Thursday:
8:30 am to 4:30 pm PST
Friday:
8:30 am to 12:00 pm PST
Phone: 805-247-0226
Fax: 805-247-0669
Send email to info@vortechsuperchargers.com.
Due to the amount of email we are currently receiving, please allow 2-3 business days for a reply.

Gates belt sizes for V2:
3.60 to 3.33 - K060710
3.25 to 3.125 - K060705
3.00 to 2.87 - K060703
Posted by the V1 moderator Delio
Well for a fact I can tell you that anything @ 3.25 too and including ASP's 3.0" pulley will use the 6 rib 695 length. I think that is the stock belt in the V1 kit which means it will work with the 3.33, 3.48, and 3.6, but I didn't buy the kit new so I can't speak for sure.
***Well now for a fact i can tell you that Jay25 IS correct not V1 mod....
i tried the 695 length for my 3.125 pulley and it was too small..put the 705 on it and it works great. too bad i had to take the blower plate off numerous times to get it working lol