Engine swap
 06-11-2014, 07:45 PM
#1
Junior Member
Thread Starter

Join Date: May 2014
Location: Columbia, TN
Posts: 54
Engine swap
Has anyone ever taken on this task? How hard is it? I have already started working on taking things apart to make room to work when it comes time to remove the engine. This engine has met its end and I don't want to rebuild it and I found a engine for $250+$150 shipping, and it seems like it'll be a good engine. The engine is from B&R Auto Wrecking. So far I've pulled the battery, battery stand, radiator, distributor, and wires. Next I plan on pulling the transmission; is it good to drain the fluid?
 06-11-2014, 08:30 PM
#2

Yes, Drain the fluids or your gonna have a mess on your hands. Not really much need to pull the distributor to pull the engine. If you have a hoist it will be easier to drop the engine rather than pull it then strip what parts you wanna keep or sell afterward ie pullies, injectors etc.
Last edited by ac max 92; 06-11-2014 at 08:33 PM.
06-11-2014, 08:36 PM
#3

trans fluid you might not need to drain, some might spill out though. rarely do i drain a trans during a swap. for removing the engine always dump the oil and coolant. as said, there was absolutely no point in removing the distributor
basically all you do is unplug everything off the main wiring harness, remove the battery, air filter box, etc in the way, remove the fuel lines, bellhousing bolts, etc. some cases its easier to just take the engine and trans together as a whole out, dont know if its so for 3rd gens. if you decide to do them separately dont forget the torque converter bolts
basically all you do is unplug everything off the main wiring harness, remove the battery, air filter box, etc in the way, remove the fuel lines, bellhousing bolts, etc. some cases its easier to just take the engine and trans together as a whole out, dont know if its so for 3rd gens. if you decide to do them separately dont forget the torque converter bolts
 06-11-2014, 09:15 PM
#5

Been there, done that. But I did the work on my dad's garage which has a hoist so it made my life easier. I dropped it from the bottom as the engine and trans was dismounted from the frame and the frame was lifted up. Just swap whatever the new engine doesn't have form the old engine and simply swap.
And yes, drain some fluid, especially the transmission unless you don't take out the axles.
And yes, drain some fluid, especially the transmission unless you don't take out the axles.
06-11-2014, 09:45 PM
#6

Bottom is way easier by far. First go through and disconnect wiring (use tape with letters/numbers to mark where they plug in, if you're not familiar with the routing, it can be confusing trying to put it all back in place) and vacuum hoses where applicable (again, I recommend marking the hoses and their fittings so you know what goes where) then get everything set up for the drop, disconnect your trans mount, then unbolt the cross member.
Bear in mind this assumes you drop the engine, if you hoist it you can probably get away with unbolting the motor mounts from the cross member, but don't quote me on that. You'll also likely need to pull the hood if you lift it out the top.
Take it SLOW until you are 100% sure you have disconnected all the necessary wiring, vacuum and coolant hoses and that the motor is stable to lift/drop, you do NOT want to accidentally break any wiring harnesses because you rushed and missed one.
06-12-2014, 06:16 AM
#7
Junior Member
Thread Starter
Join Date: May 2014
Location: Columbia, TN
Posts: 54
Bottom is way easier by far. First go through and disconnect wiring (use tape with letters/numbers to mark where they plug in, if you're not familiar with the routing, it can be confusing trying to put it all back in place) and vacuum hoses where applicable (again, I recommend marking the hoses and their fittings so you know what goes where) then get everything set up for the drop, disconnect your trans mount, then unbolt the cross member.
Bear in mind this assumes you drop the engine, if you hoist it you can probably get away with unbolting the motor mounts from the cross member, but don't quote me on that. You'll also likely need to pull the hood if you lift it out the top.
Take it SLOW until you are 100% sure you have disconnected all the necessary wiring, vacuum and coolant hoses and that the motor is stable to lift/drop, you do NOT want to accidentally break any wiring harnesses because you rushed and missed one.
Bear in mind this assumes you drop the engine, if you hoist it you can probably get away with unbolting the motor mounts from the cross member, but don't quote me on that. You'll also likely need to pull the hood if you lift it out the top.
Take it SLOW until you are 100% sure you have disconnected all the necessary wiring, vacuum and coolant hoses and that the motor is stable to lift/drop, you do NOT want to accidentally break any wiring harnesses because you rushed and missed one.
06-12-2014, 06:18 AM
#8
Junior Member
Thread Starter
Join Date: May 2014
Location: Columbia, TN
Posts: 54
Yes, Drain the fluids or your gonna have a mess on your hands. Not really much need to pull the distributor to pull the engine. If you have a hoist it will be easier to drop the engine rather than pull it then strip what parts you wanna keep or sell afterward ie pullies, injectors etc.
06-12-2014, 06:57 AM
#9
tag and bag man...
you got a lot to do.
fuel lines
heater hoses
wire harness (injector, IACV, EGR/power valve, temp sensor (gauge and ECU), trans electrical stuff)
clutch line
unbolt AC compressor
linkage to the trans
if you're doing all this work it wouldn't hurt to drain the gear oil and put in some new stuff.
just work around the entire engine and make sure it's all disconnected from the rest of the car.
hood doesn't need to be removed but you need to disconnect the lifts and swing it farther back.
if you're pulling from up top...you can leave the engine mount on the x member but you must take ALL of the trans mount/brackets out (you can try w/o it...but if you're without extra hands it's better to have more space)
if you're swapping the motor might as well do the clutch (if needed), axle seals or misc rubber parts. timing belt and associated junk with it.
06-12-2014, 05:52 PM
#10
tag and bag man...
you got a lot to do.
fuel lines
heater hoses
wire harness (injector, IACV, EGR/power valve, temp sensor (gauge and ECU), trans electrical stuff)
clutch line
unbolt AC compressor
linkage to the trans
if you're doing all this work it wouldn't hurt to drain the gear oil and put in some new stuff.
just work around the entire engine and make sure it's all disconnected from the rest of the car.
hood doesn't need to be removed but you need to disconnect the lifts and swing it farther back.
if you're pulling from up top...you can leave the engine mount on the x member but you must take ALL of the trans mount/brackets out (you can try w/o it...but if you're without extra hands it's better to have more space)
if you're swapping the motor might as well do the clutch (if needed), axle seals or misc rubber parts. timing belt and associated junk with it.
you got a lot to do.
fuel lines
heater hoses
wire harness (injector, IACV, EGR/power valve, temp sensor (gauge and ECU), trans electrical stuff)
clutch line
unbolt AC compressor
linkage to the trans
if you're doing all this work it wouldn't hurt to drain the gear oil and put in some new stuff.
just work around the entire engine and make sure it's all disconnected from the rest of the car.
hood doesn't need to be removed but you need to disconnect the lifts and swing it farther back.
if you're pulling from up top...you can leave the engine mount on the x member but you must take ALL of the trans mount/brackets out (you can try w/o it...but if you're without extra hands it's better to have more space)
if you're swapping the motor might as well do the clutch (if needed), axle seals or misc rubber parts. timing belt and associated junk with it.

Good to know about the hood, didn't know if it'd have clearance to fold all the way back, much easier that way than trying to hog that big heavy bastard back on by yourself.
 06-12-2014, 07:50 PM
#11
Junior Member
Thread Starter
Join Date: May 2014
Location: Columbia, TN
Posts: 54
tag and bag man...
you got a lot to do.
fuel lines
heater hoses
wire harness (injector, IACV, EGR/power valve, temp sensor (gauge and ECU), trans electrical stuff)
clutch line
unbolt AC compressor
linkage to the trans
if you're doing all this work it wouldn't hurt to drain the gear oil and put in some new stuff.
just work around the entire engine and make sure it's all disconnected from the rest of the car.
hood doesn't need to be removed but you need to disconnect the lifts and swing it farther back.
if you're pulling from up top...you can leave the engine mount on the x member but you must take ALL of the trans mount/brackets out (you can try w/o it...but if you're without extra hands it's better to have more space)
if you're swapping the motor might as well do the clutch (if needed), axle seals or misc rubber parts. timing belt and associated junk with it.
you got a lot to do.
fuel lines
heater hoses
wire harness (injector, IACV, EGR/power valve, temp sensor (gauge and ECU), trans electrical stuff)
clutch line
unbolt AC compressor
linkage to the trans
if you're doing all this work it wouldn't hurt to drain the gear oil and put in some new stuff.
just work around the entire engine and make sure it's all disconnected from the rest of the car.
hood doesn't need to be removed but you need to disconnect the lifts and swing it farther back.
if you're pulling from up top...you can leave the engine mount on the x member but you must take ALL of the trans mount/brackets out (you can try w/o it...but if you're without extra hands it's better to have more space)
if you're swapping the motor might as well do the clutch (if needed), axle seals or misc rubber parts. timing belt and associated junk with it.
06-12-2014, 08:15 PM
#12
yup if you're outdoor just make sure the hood have some bracing or else it'll either smash the roof/glass or slam it on your head.
06-12-2014, 08:18 PM
#13
if you have the time do all that.
oh and disconnect the PS pump off the motor and tie it out of the way just like the AC compressor...you'll save yourself some headache.
06-13-2014, 09:27 PM
#14
Junior Member
Thread Starter
Join Date: May 2014
Location: Columbia, TN
Posts: 54
Okay thank you. Also where is the Fluid add bolt on the transmission? I found the drain plug, just can't seem to find the fill.
06-14-2014, 02:42 PM
#16
Junior Member
Thread Starter
Join Date: May 2014
Location: Columbia, TN
Posts: 54
06-16-2014, 04:30 PM
#17
think most fill manuals through the speed sensor hole. 3rd gens and some other Nissans like Hardbody like being overfilled a bit through the speed sensor or the shifter usually
06-19-2014, 05:23 PM
#18
Junior Member
Thread Starter
Join Date: May 2014
Location: Columbia, TN
Posts: 54
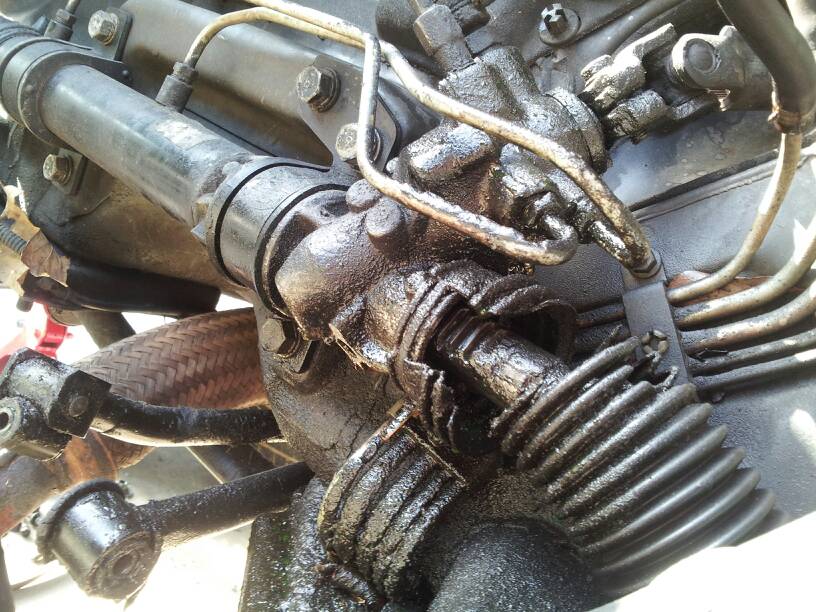
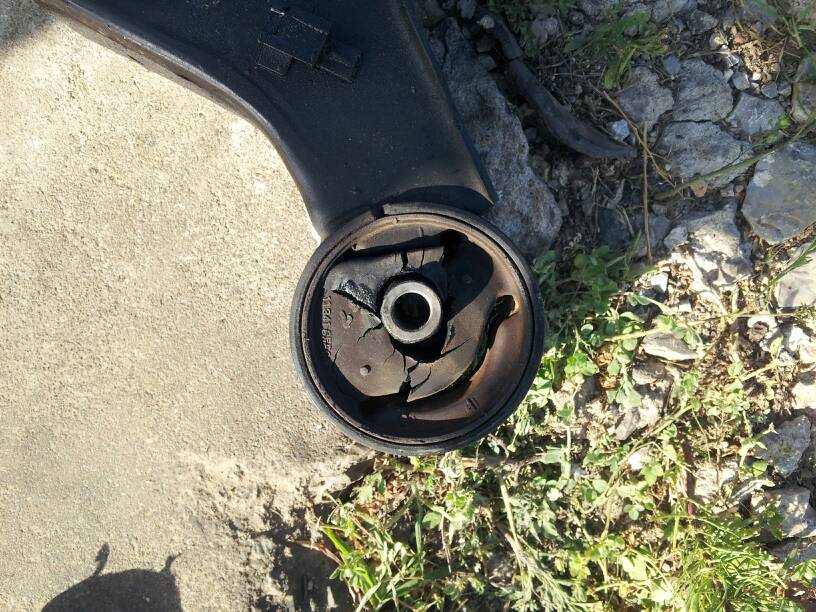
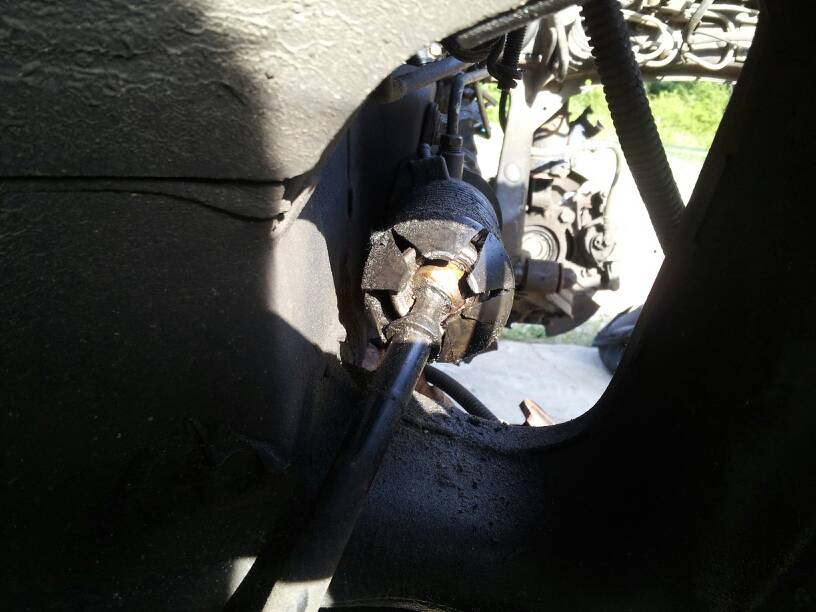
Okay the engine is out, and I found out there's play in the front axles, ball joints, suspension is due to a upgrade, tie rods are bad, right rear engine mount is cracked, and the power steering rack and pinion is leaking. Is it fine to replace the boots/seals for the steering rack or is it better to buy a re-manufactured?
06-19-2014, 05:36 PM
#19
Member

Join Date: Nov 2012
Location: Fl, USA
Posts: 249
Wow! I can't imagine how it was being driven with the steering components looking like this. You really need to replaced the rack and all the other front end parts. Get the rubber bushing/grommet for the rack from Nissan, they are not that expensive and go with the remanufactured rack. I bought mine from autozone - I think it was less than $150 - with a life time warranty and I could not believe how tight it made the car feel. Now is the time to do everything right when it is all apart. Good luck.
Oh, you can repair that mount with the 3m window seal. Multiple write up on the forum on that.
Oh, you can repair that mount with the 3m window seal. Multiple write up on the forum on that.
06-19-2014, 09:30 PM
#21
Junior Member
Thread Starter
Join Date: May 2014
Location: Columbia, TN
Posts: 54
Also since the new engine came with its original exhaust studs, and manifold where should I buy the new studs for the exhaust? Since the factory ones are known to be brittle.
Last edited by rokue; 06-20-2014 at 12:40 AM.
06-20-2014, 02:01 AM
#22
Junior Member
Thread Starter
Join Date: May 2014
Location: Columbia, TN
Posts: 54
 06-20-2014, 08:16 AM
#23

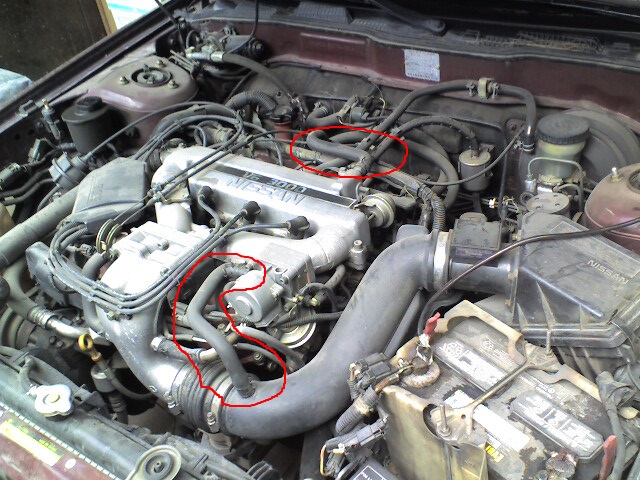
lower red circle - IACV (keeps your engine when your foot is not on the gas)

upper red circle - PCV (i think that's what you're referring to)
06-20-2014, 12:34 PM
#24
Junior Member
Thread Starter
Join Date: May 2014
Location: Columbia, TN
Posts: 54
 06-20-2014, 08:14 PM
#26
Okay the engine is out, and I found out there's play in the front axles, ball joints, suspension is due to a upgrade, tie rods are bad, right rear engine mount is cracked, and the power steering rack and pinion is leaking. Is it fine to replace the boots/seals for the steering rack or is it better to buy a re-manufactured?


06-21-2014, 10:34 AM
#27
Junior Member
Thread Starter
Join Date: May 2014
Location: Columbia, TN
Posts: 54
 06-21-2014, 11:24 PM
#29
Junior Member
Thread Starter
Join Date: May 2014
Location: Columbia, TN
Posts: 54
Well got to send back that timing belt I bought wasn't the right fit. What brands are recommended as same quality as oem?
That is similar to how my oem belt looks.

The one I bought is more like.

Also some pictures of todays progress on the engine. The belt on there is the old one, you can't tell by looking it at from the picture, but its dry as a bone/cracking in some areas.


That is similar to how my oem belt looks.
The one I bought is more like.
Also some pictures of todays progress on the engine. The belt on there is the old one, you can't tell by looking it at from the picture, but its dry as a bone/cracking in some areas.
Last edited by rokue; 06-21-2014 at 11:36 PM.
06-22-2014, 12:36 PM
#30
some VG have round tooth timing belts and some have square tooth. dont quote me but i think late 80s early 90s had round then they moved to square in the early 90s. or might be the other way around
06-22-2014, 01:06 PM
#31
Im sure 89-92 was square notch and sometime in 92 changes to round notch to 94 the belt you need is for 93-94.
I don't think the oem timing belt kit is too expensive but the goodyear belts aren't bad either. It's a good idea to get the kit so you can do the tensioner when you replace the belt and the throttle body is the part attached to your upper intake manifold with the 2 steel cables going to it. One for throttle and the other for cruise contol.
I don't think the oem timing belt kit is too expensive but the goodyear belts aren't bad either. It's a good idea to get the kit so you can do the tensioner when you replace the belt and the throttle body is the part attached to your upper intake manifold with the 2 steel cables going to it. One for throttle and the other for cruise contol.
Last edited by ac max 92; 06-22-2014 at 01:14 PM.
06-23-2014, 09:10 PM
#32

Prior to 93 all VGs had square tooth timing belts with a 60K change interval. In mid 93 they changed to the round tooth belts with a 105K change interval. Any VG can utilize the round tooth belt by simply changing the cam gears (get used) and the crank gear (buy new from Nissan, ~$25)
06-26-2014, 08:16 PM
#33
Junior Member
Thread Starter
Join Date: May 2014
Location: Columbia, TN
Posts: 54
Prior to 93 all VGs had square tooth timing belts with a 60K change interval. In mid 93 they changed to the round tooth belts with a 105K change interval. Any VG can utilize the round tooth belt by simply changing the cam gears (get used) and the crank gear (buy new from Nissan, ~$25)
06-26-2014, 08:48 PM
#35
Junior Member
Thread Starter
Join Date: May 2014
Location: Columbia, TN
Posts: 54
Alright good, I already have the kit I just need the right belt then. The one I bought I'll be sending back.
Is this the round tooth belt for my nissan?
http://www.courtesyparts.com/13028m-...610_7662_7663&
Is this the round tooth belt for my nissan?
http://www.courtesyparts.com/13028m-...610_7662_7663&
06-26-2014, 09:52 PM
#36
Is this the round tooth belt for my nissan? http://www.courtesyparts.com/13028m-...610_7662_7663&
07-12-2014, 12:29 AM
#40
Junior Member
Thread Starter
Join Date: May 2014
Location: Columbia, TN
Posts: 54
I have bought a NGK Pulley for it since it is high quality. Does anyone know if Dayco 95249 is right for the vg which is what advanced's website recommended? Also how does one replace both keys for the sprocket, and the balancer? Or is it not recommended to do his? Also is it a good idea to wait to finish the timing belt until after I have the cams regrinded by Schneider? Or can I have the belt on when I go to remove the cams? Also On the Dayco belt do the Arrows go inward or outward? Can I also get the fsm link?
Last edited by rokue; 07-12-2014 at 02:46 AM.