New OBX headers are finally in stock, pics with install, questions and comments
 01-30-2012, 09:06 AM
#1
Senior Member
Thread Starter
iTrader: (38)

Join Date: Mar 2011
Location: Jacksonville, FL
Posts: 1,077
New OBX headers are finally in stock, pics with install, questions and comments
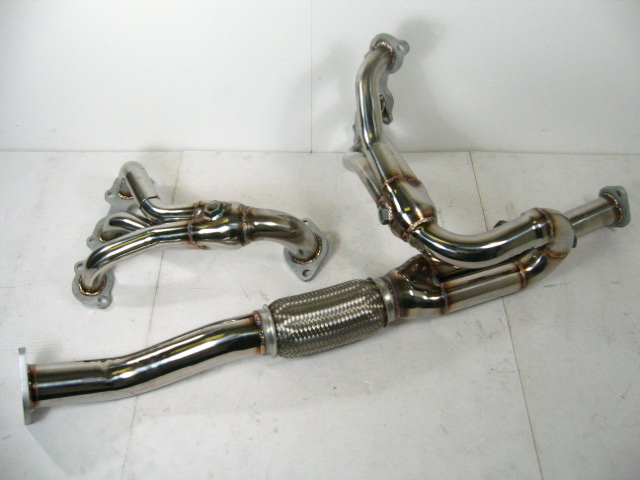
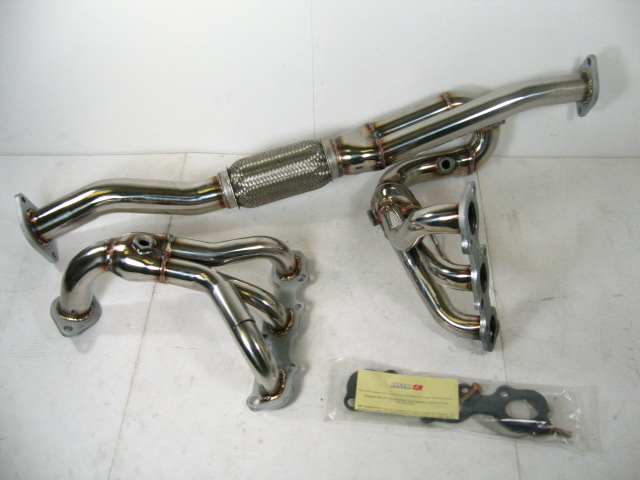
The OBX headers (02-03 Maxima, equal length y) have been out of stock for at least a year. They are finally back as of late December 2011. I am going to install them in the next week or so. For engine performance mods I have the Megan OE-RS catback installed along with berk/apexi intake and 5 piece spacers. I have compiled all of the information needed to get these headers installed correctly.
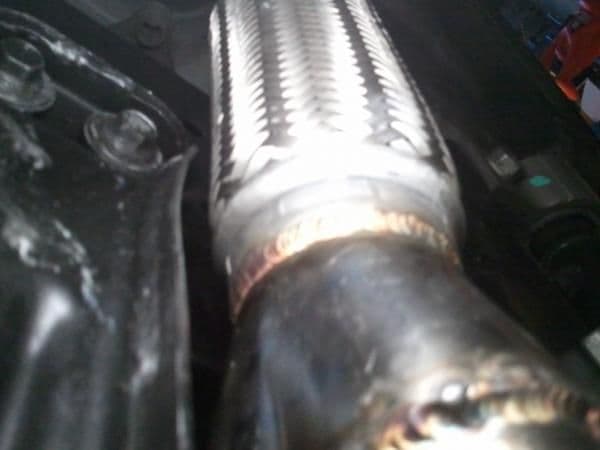
The headers are going to arrive this Wednesday. I plan on posting a few pictures of them out of the box. I have a feeling that these may have some differences from the past version 3. A few drawbacks for the previous OBX headers is the weak flex section, y-pipe past the collector being a measly 2 1/16� diameter, poor primary oxygen sensor bung placement on the rear bank, and the alignment issues which call for trimming the cross member and rear motor mount bracket. I hope that this newest batch will have addressed some of these issues. I also have a feeling that the y pipe diameter has been changed to 2.5� which is great news.
It has been confirmed! It is about 2.5" for the y pipe.
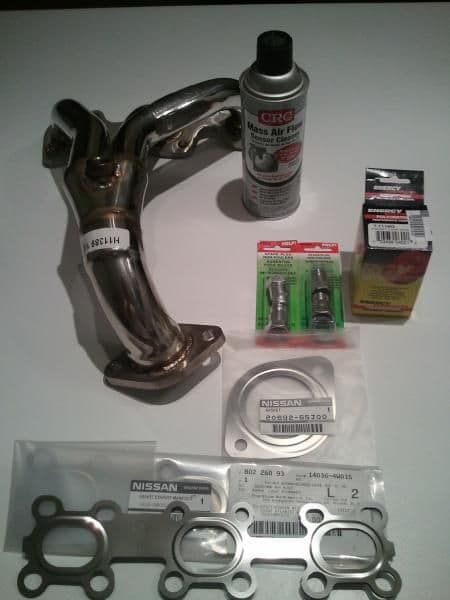
My first photo is of new OEM exhaust gaskets. Look at the part numbers and order those if you plan on doing a header install on a 3.5. Although you could get away with reusing the original gaskets, I would recommend spending 35 bucks for the peace of mind.
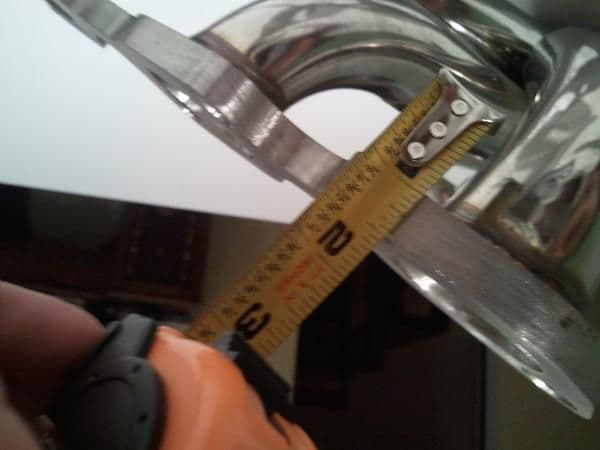
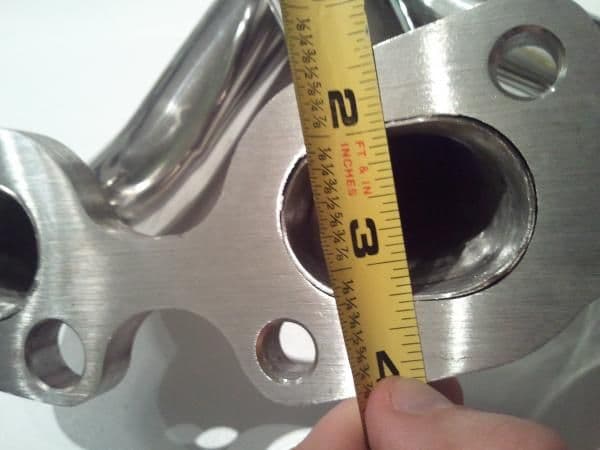
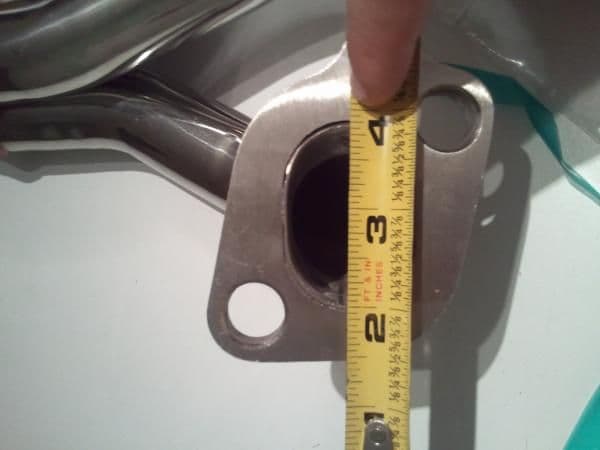
The front (closest to radiator) header measurements are as follows:
Runner length from where it meets the flange to where all three join
cylinder 2= ~10", 4= ~9" 6= ~12"
Prices and part numbers:
OEM exhaust header gaskets $13 each 14035-4W015
OEM cat gasket $8 20692-65J00
Spark plug antifouler $5 each pack made by HELP 42009, 42002
MAF cleaner $7
Energy Suspension (ES) subframe bushings $25 7.1116G
OBX 02-03 headers $350-380 shipped
The purpose of this thread is to display the newest batch of OBX headers. Exhibit how the install goes and post up some before and after pictures and videos.
Please feel free to ask questions or post comments. I will be happy to take requested pictures.
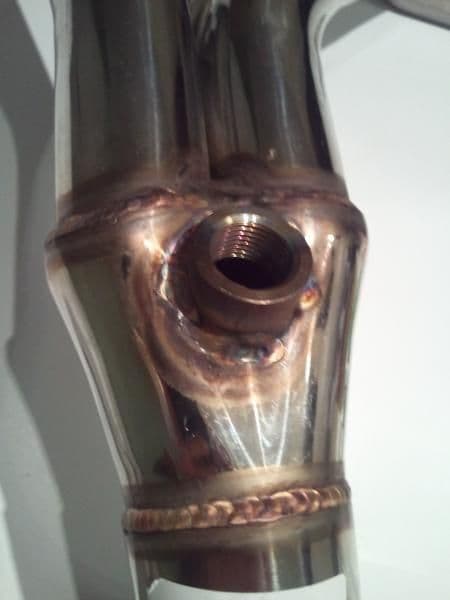
The rear header/y pipe is currently getting the primary bung relocated and a new wideband bung added. I will have them back tomorrow and will amend this post again thereafter.
 [/IMG]

Installation Notes
My install went nearly flawlessly minus one heat shield bolt being seized and a secondary o2 sensor not coming out of the old converter. I know these headers are made over seas where quality control is not great. With that being said I think no two sets of headers are exactly the same which means that you may need to trim something during your install. I came a couple of millimeters from having to trim my front motor mount bracket and my rear bracket went on no problem although it was very close. Probably about 2-3 mm from touching and my front bracket is literally 1mm from touching the header. My flex pipe has about 1/4' space from touching the subframe.
As you can see one of the primaries comes very very close close to the front motor mount bracket but it did not require trimming. Although some may be uncomfortable with how close they are, it is no problem. The mount and header will NOT move even though mine are basically touching it does not matter.

The y pipe comes about 1/4 of an inch from touching the sub frame cross member. Again this is not a problem. I have driven it like this enough to not experience any noise and the way I see it the motor really only moves front to back so this tight space does not come into play.
In order for the front primary to have enough wire slack to reach the new header bung you will have to cut the tape holding the group of wires that travels directly over the middle coil from the larger harness that runs along the top of the valve cover. The tape was holding both harnesses together to about right in the middle of the top middle of the valve cover. Easy fix takes one second.
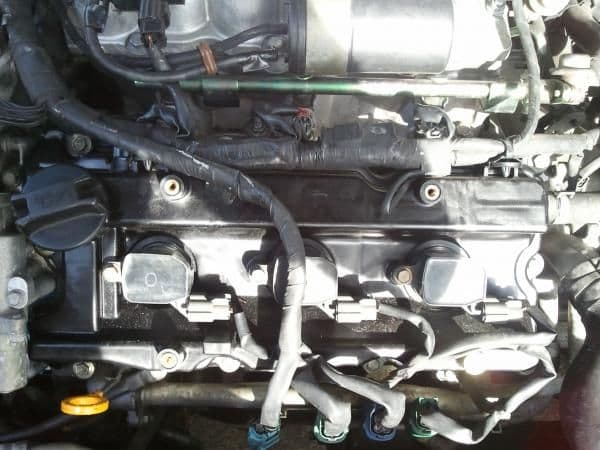
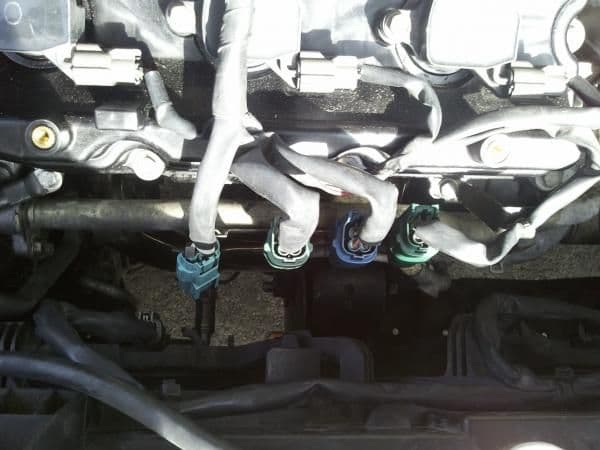
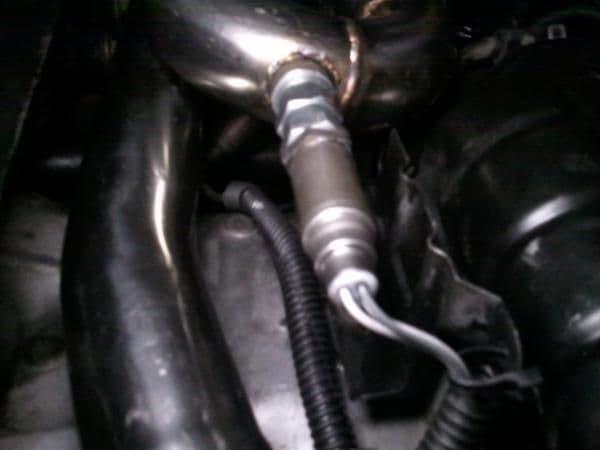
As you can see below the far left plug has to be unclipped from the coolant pipe in order for that primary to reach.
The rear primary wire has to be extended too. From all of my research people here have been saying to cut the primary either at the wire harness and add some wire to lengthen it or to cut the actual o2 wire and extend those by adding wire. Problem is that is can mess with the voltages. The wire is stainless steel which is nearly impossible for an amateur to solder correctly. My method requires NO WIRE CUTTING!!! You need to remove the wire harness cover pictures below and simply separate the o2 wires from the rest of the wires. First you need to separate is from the green plug wires, then you need to slit the right side of the main harness that fees into the back of the plastic box. PLEASE TAKE YOUR TIME!!! Be very careful to cut precisely and slowly. Doing this will give you enough slack to reach the rear primary o2 sensor.
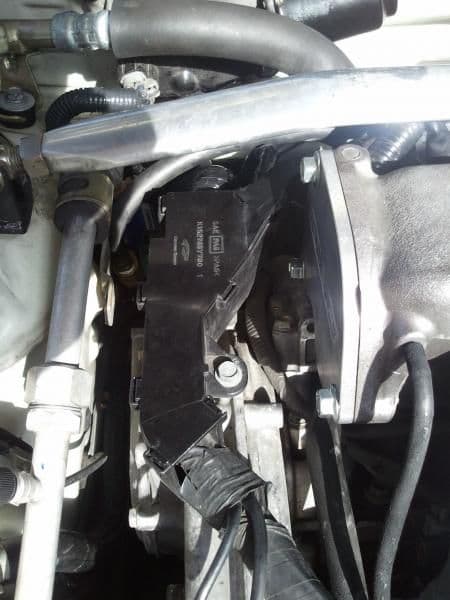
This next pictures shows exactly where my o2 wire is coming out of the main harness. It is wrapped in a black plastic protector. This picture is taken along the firewall from the driver side, so the top of the picture is the passenger side, the bottom is the drivers side and as you can see the top left is the upper part of that black wire harness box. The fattest harness coming from the box is what you need to slit the side of and separate the 02 wire from. My o2 wire is running out of that harness down toward the middle of the picture.
The following picture is of one of my secondary sensors. I have the antifouler setup and as of about 75 miles no CEL. This secondary is the one with a green plug and red wire cover. The wire running above it is actually the other secondary which is the blue plug with white wire cover. I secondaries have different length wires so I recommend this configuration
 .
.
The headers are going to arrive this Wednesday. I plan on posting a few pictures of them out of the box. I have a feeling that these may have some differences from the past version 3. A few drawbacks for the previous OBX headers is the weak flex section, y-pipe past the collector being a measly 2 1/16� diameter, poor primary oxygen sensor bung placement on the rear bank, and the alignment issues which call for trimming the cross member and rear motor mount bracket. I hope that this newest batch will have addressed some of these issues. I also have a feeling that the y pipe diameter has been changed to 2.5� which is great news.
It has been confirmed! It is about 2.5" for the y pipe.
My first photo is of new OEM exhaust gaskets. Look at the part numbers and order those if you plan on doing a header install on a 3.5. Although you could get away with reusing the original gaskets, I would recommend spending 35 bucks for the peace of mind.
The front (closest to radiator) header measurements are as follows:
Runner length from where it meets the flange to where all three join
cylinder 2= ~10", 4= ~9" 6= ~12"
Prices and part numbers:
OEM exhaust header gaskets $13 each 14035-4W015
OEM cat gasket $8 20692-65J00
Spark plug antifouler $5 each pack made by HELP 42009, 42002
MAF cleaner $7
Energy Suspension (ES) subframe bushings $25 7.1116G
OBX 02-03 headers $350-380 shipped
The purpose of this thread is to display the newest batch of OBX headers. Exhibit how the install goes and post up some before and after pictures and videos.
Please feel free to ask questions or post comments. I will be happy to take requested pictures.
The rear header/y pipe is currently getting the primary bung relocated and a new wideband bung added. I will have them back tomorrow and will amend this post again thereafter.
Installation Notes
My install went nearly flawlessly minus one heat shield bolt being seized and a secondary o2 sensor not coming out of the old converter. I know these headers are made over seas where quality control is not great. With that being said I think no two sets of headers are exactly the same which means that you may need to trim something during your install. I came a couple of millimeters from having to trim my front motor mount bracket and my rear bracket went on no problem although it was very close. Probably about 2-3 mm from touching and my front bracket is literally 1mm from touching the header. My flex pipe has about 1/4' space from touching the subframe.
As you can see one of the primaries comes very very close close to the front motor mount bracket but it did not require trimming. Although some may be uncomfortable with how close they are, it is no problem. The mount and header will NOT move even though mine are basically touching it does not matter.
The y pipe comes about 1/4 of an inch from touching the sub frame cross member. Again this is not a problem. I have driven it like this enough to not experience any noise and the way I see it the motor really only moves front to back so this tight space does not come into play.
In order for the front primary to have enough wire slack to reach the new header bung you will have to cut the tape holding the group of wires that travels directly over the middle coil from the larger harness that runs along the top of the valve cover. The tape was holding both harnesses together to about right in the middle of the top middle of the valve cover. Easy fix takes one second.
As you can see below the far left plug has to be unclipped from the coolant pipe in order for that primary to reach.
The rear primary wire has to be extended too. From all of my research people here have been saying to cut the primary either at the wire harness and add some wire to lengthen it or to cut the actual o2 wire and extend those by adding wire. Problem is that is can mess with the voltages. The wire is stainless steel which is nearly impossible for an amateur to solder correctly. My method requires NO WIRE CUTTING!!! You need to remove the wire harness cover pictures below and simply separate the o2 wires from the rest of the wires. First you need to separate is from the green plug wires, then you need to slit the right side of the main harness that fees into the back of the plastic box. PLEASE TAKE YOUR TIME!!! Be very careful to cut precisely and slowly. Doing this will give you enough slack to reach the rear primary o2 sensor.
This next pictures shows exactly where my o2 wire is coming out of the main harness. It is wrapped in a black plastic protector. This picture is taken along the firewall from the driver side, so the top of the picture is the passenger side, the bottom is the drivers side and as you can see the top left is the upper part of that black wire harness box. The fattest harness coming from the box is what you need to slit the side of and separate the 02 wire from. My o2 wire is running out of that harness down toward the middle of the picture.
The following picture is of one of my secondary sensors. I have the antifouler setup and as of about 75 miles no CEL. This secondary is the one with a green plug and red wire cover. The wire running above it is actually the other secondary which is the blue plug with white wire cover. I secondaries have different length wires so I recommend this configuration
Last edited by 02whitemaximase; 02-06-2012 at 09:53 AM.


 01-30-2012, 09:16 AM
#4


 Dont know what you USING a pie to do.but just slapping a ruler across the end of the pipe will measure it just fine.
Wonders if People on the ORG have a strange PIE fetish??


 01-30-2012, 09:58 AM
#8

Thank you for doing this. I spoke with the Header dude at OBX and he told me they where the same. I did ask specifically on the 2 piece vs 3 piece design and he said they where 2 piece. Keep us updated. Was planning on gutting the cats and buying a WS Y pipe but the cost is almost to the price of the OBX. Subbed.


 01-30-2012, 01:32 PM
#14
Looks just like the set I helped a friend install a while back. I'm willing to bet money that its the same exact design as the previous. Obx is all about keeping manufacturing costs down. Bigger diameter/thicker piping will drive that cost up significantly which in turn will make the price the consumer pays multiply by god knows how much to offset the difference.
01-30-2012, 02:41 PM
#15

Nothing changed. I installed mine last week Saturday. The inside diameter is not 2.5on the y pipe. You still have to relocate or use the next bung down for the rear primary. I still had to grind down the cross member and front motor mount, and take the little cover off of the rear mount. Other than that the install went ok i guess. Oh and its still a 2 piece design.
01-30-2012, 07:27 PM
#16
Senior Member

Join Date: Jun 2009
Location: Dallas, TX
Posts: 489
Nothing changed. I installed mine last week Saturday. The inside diameter is not 2.5on the y pipe. You still have to relocate or use the next bung down for the rear primary. I still had to grind down the cross member and front motor mount, and take the little cover off of the rear mount. Other than that the install went ok i guess. Oh and its still a 2 piece design.


Last edited by 7speed; 01-30-2012 at 07:39 PM.
01-31-2012, 03:16 AM
#17


Nothing changed. I installed mine last week Saturday. The inside diameter is not 2.5on the y pipe. You still have to relocate or use the next bung down for the rear primary. I still had to grind down the cross member and front motor mount, and take the little cover off of the rear mount. Other than that the install went ok i guess. Oh and its still a 2 piece design.
Yeah Good luck too all you OBX Lovers.....
01-31-2012, 03:42 AM
#18
gutted out my cats as well and paired it with a full exhaust and definitely runs hard
01-31-2012, 06:08 AM
#19
Member

Join Date: Mar 2006
Posts: 109
I pulled the trigger on a set of OBX headers last night. I'm looking forward to the install (once it gets warmer). I installed a set of headers on my acrua CL-S so I'd hope this isnt too much more difficult. I'll photo document the install. I may get a warpspeed hfc while I'm at it.
01-31-2012, 06:53 AM
#20
01-31-2012, 07:30 AM
#22

Nothing against OBX but I just consider it poor engineering if you claim this part fits and people have to cut and grind pieces off their car just to get it to fit. Thats unacceptable! they have been selling these things for years and STILL have not improved them??? I'm sure many people have let them know and they REFUSE to make improvements.......thats just horrible. As I said nothing against people who have OBX headers and they may perform great once installed, but purposely not changing your product after you know there are serious fitment issues is just terrible.
01-31-2012, 08:58 AM
#23
Nothing against OBX but I just consider it poor engineering if you claim this part fits and people have to cut and grind pieces off their car just to get it to fit. Thats unacceptable! they have been selling these things for years and STILL have not improved them??? I'm sure many people have let them know and they REFUSE to make improvements.......thats just horrible. As I said nothing against people who have OBX headers and they may perform great once installed, but purposely not changing your product after you know there are serious fitment issues is just terrible.
01-31-2012, 09:12 AM
#24

I pulled the trigger on a set of OBX headers last night. I'm looking forward to the install (once it gets warmer). I installed a set of headers on my acrua CL-S so I'd hope this isnt too much more difficult. I'll photo document the install. I may get a warpspeed hfc while I'm at it.
Last edited by ShocknAwe; 01-31-2012 at 09:43 AM.
01-31-2012, 09:52 AM
#25
01-31-2012, 09:55 AM
#26
NO! just Old and inpatient! oan i would do all the modding before trying to install first get 2 new O2 bungs and have them welded 90* from their current location then plug the orignals also i would get a small 4" long good quality 2.25" lined flex section and cut the rear header off and install the flex to better aide in movement and alignment.but thats just my opinion from what i went thru.
01-31-2012, 09:55 AM
#27
Just cheap lol. If I pay for a direct fit product it should be direct fit, not half *** fit with some mods. If Cattman can do it then OBX can do it. Not like it would take a million dollar research team to fix it. They probably have the issues with pictures in their inbox as we speak because EVERYONE will have these issues when they install them. I helped another friend install them who didn't care that it would take longer and it took us about 6hrs to do it with quite a few smoke and beer breaks mixed in. Not HARD per say other than the obvious difficulty with the rear header but just unnecessary for a product thats marketed as direct fit.
01-31-2012, 09:58 AM
#28
NO! just Old and inpatient! oan i would do all the modding before trying to install first get 2 new O2 bungs and have them welded 90* from their current location then plug the orignals also i would get a small 4" long good quality 2.25" lined flex section and cut the rear header off and install the flex to better aide in movement and alignment.but thats just my opinion from what i went thru.

Just extended the wires on one.
Lets see....
Extended Wires ($5)
Took a sawzall and dremel to the xmember (upon initial initial install I did not have clearance issues but then I got the solid mount and then I did). ($meh)
Brought two oil drain bolts from lowes ($5)
Had a new Flex Section Welded ($80)
OBX Headers Shipped + Mods = $470, and I got them after 3 business days.....
Happy OBX customer here.
Just cheap lol. If I pay for a direct fit product it should be direct fit, not half *** fit with some mods. If Cattman can do it then OBX can do it. Not like it would take a million dollar research team to fix it. They probably have the issues with pictures in their inbox as we speak because EVERYONE will have these issues when they install them. I helped another friend install them who didn't care that it would take longer and it took us about 6hrs to do it with quite a few smoke and beer breaks mixed in. Not HARD per say other than the obvious difficulty with the rear header but just unnecessary for a product thats marketed as direct fit.
Last edited by aackshun; 01-31-2012 at 10:16 AM.
01-31-2012, 10:02 AM
#29
I would of modded mine to fit but the damn header flange broke at the center exhaust tube but then again i was fully fustrated and think 80's heavy metal guitar smash as a picture of what i did to them.
01-31-2012, 10:25 AM
#31

We thank you for the info you've already provided and look forward to the install.
This thread might need a clean-up.
 02-01-2012, 11:44 AM
#32
Senior Member
Thread Starter
iTrader: (38)
Join Date: Mar 2011
Location: Jacksonville, FL
Posts: 1,077
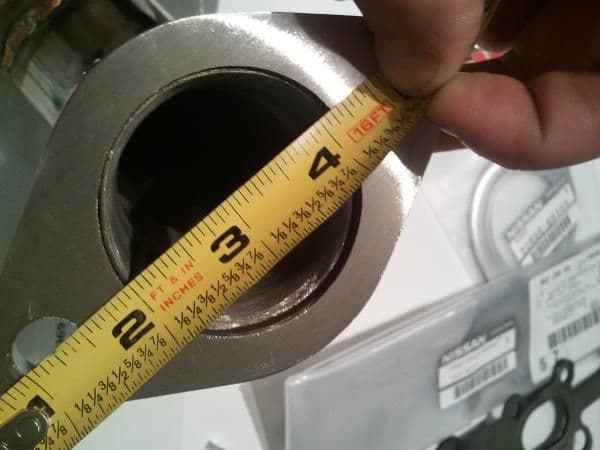
Great news. Just got the OBX headers in. I took a ruler to the y pipe outlet and the pipe diameter is just about 2.5". Maybe a sixteenth short. I will post pictures after work.
GREAT NEWS!
GREAT NEWS!
02-01-2012, 12:29 PM
#33
Honestly,...... Sometimes you'll need to make adjustments when modding that's what aftermarket performance parts bring to the table these days! My hats off to those willing to install OBX and conquering all the obstacles that you're faced with! I've install many different brands of headers and every single one of them have something you have to do to make them work or fit properly....So it separates the real technicians/mechanics from the not so talented weekend warriors! I think what everyone needs is, to have a plan and stick too it, make whatever adjustment you need to make your headers work flawlessly and be happy.....Words of wisdom from believe it or not CMax03!!!!!!
02-02-2012, 02:24 AM
#36
That's not necessary!!!! the primaries stay active so plug in bank 2 (front) and bank 1 need to be lenghtened to plug into the next plug downstream from the rear manifold O2 bung! Plug that rear O2 bung facing the firewall and plug the Bank1 primary in the next O2 bung, keeping the secondaries plugged but placed either under the engine cover or battery tray.....then installing a dual circuit O2 Sim.......
02-02-2012, 07:20 AM
#37
Member
Join Date: Mar 2006
Posts: 109
That's not necessary!!!! the primaries stay active so plug in bank 2 (front) and bank 1 need to be lenghtened to plug into the next plug downstream from the rear manifold O2 bung! Plug that rear O2 bung facing the firewall and plug the Bank1 primary in the next O2 bung, keeping the secondaries plugged but placed either under the engine cover or battery tray.....then installing a dual circuit O2 Sim.......
 ).
02-02-2012, 07:33 AM
).
02-02-2012, 07:33 AM
#38
Senior Member
Thread Starter
iTrader: (38)
Join Date: Mar 2011
Location: Jacksonville, FL
Posts: 1,077
That's not necessary!!!! the primaries stay active so plug in bank 2 (front) and bank 1 need to be lenghtened to plug into the next plug downstream from the rear manifold O2 bung! Plug that rear O2 bung facing the firewall and plug the Bank1 primary in the next O2 bung, keeping the secondaries plugged but placed either under the engine cover or battery tray.....then installing a dual circuit O2 Sim.......
02-02-2012, 02:19 PM
#39
Member
Join Date: Mar 2006
Posts: 109
http://www.ebay.com/itm/OBX-Exhaust-...item1c236c8e2e
Free shipping and $349. Just thought I'd share (I just paid 379 shipped )
)
Free shipping and $349. Just thought I'd share (I just paid 379 shipped
)
