
Porting project with pics


Porting project with pics
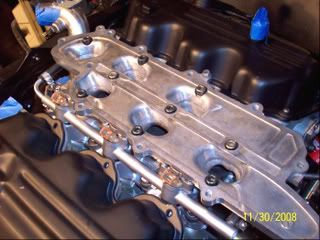
Well I just finished 2 hours ago. I started around 4pm and stopped to go buy more burs. Only to come back and finish this much. I will start and finish the lower manifold tomorrow. Then the tb the day after. Tuesday the NWP spacers and then finally done. More pics as I go along. Hella flush!


Last edited by maximo018; Oct 10, 2009 at 11:45 PM.


Looking at the pics of the burrs you're using, you can go a lot better if you use a better (higher speed) drill and a carbide burr. spend a little more money on some better tools and it will go much faster and work better. the price of the tools will pay for itself in time/labor savings.
If you have a large air compressor, get a good die grinder (at least $50.. don't buy the $20 Central Pneumatic crap), and you'll be good to go.
If you have a large air compressor, get a good die grinder (at least $50.. don't buy the $20 Central Pneumatic crap), and you'll be good to go.
I would do this with an air compressor but I live in apartment. I'm already sure my neighbors hate the noise I make now. With a compressor recharging every few minutes along with the whining of a die grinder they'll be furious LOL! I'm using that drill along with a long shaft electric die grinder. True I do need another carbide bit. The one I have is dulled out. Might get it in the morning.

Member
Joined: Aug 2009
Posts: 96
Im in the process of doing mine at the moment. There is alot to shave off when you get to the lower plenum (at least there was on mine).
I don't really have much advice to give except to make sure that if you are port matching two parts that they are bolted together real tight. You would be suprised at how much they can move about when you think they are tight enough.
EDIT :-
Something I was thinking whilst I was doing this....
In the UK I struggle to get gaskets etc for this car so I have to make my own. I have the choice of either paper or rubber. I was thinking of making a set of think rubber gaskets for all the plenum connections increasing the capacity. Anyone ever done this?
Last edited by W00dface; Oct 12, 2009 at 01:55 AM.
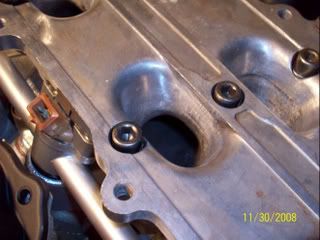
Well in the UK don't you have the VG? There isn't much I have to take off on the lower manifold like the top. Its not that far off. The idea is to just clean up all the casting marks that way its a smooth path for the air without any obstructions. Ending it with textured surface for the air to grab hold to. Mine are at a tapered funnel opening from one manifold to the other.


I actually used a dremel/ flex shaft setup up to port match my entire VG, along with carbide bits and a die grinder to clear the big obstructions.....Man everytime I look at these photos, I feel like Viagra is flowing thru my veins!

D00000d. that's part of our don't ask, don't tell policy.

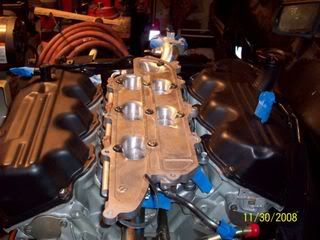
Well I finally finished everything. Yes in the background you will notice some of the other goods I have waiting to install on her. Everything is smooth with no transition (pictures do no justice but here you go).


Last edited by maximo018; Oct 31, 2009 at 12:29 AM.


I'm telling you. But its not over yet. I still have to put the motor back together. Then finish body work (paint), then put the motor back in and make it run. From there the interior. I'm closer to the beginning than the end.
Welcome to the party! As I stated B4 the easy part is ordering! Assembly is more time consuming than anything else.... so we'll see how close you'll come to your projected finish date! I'm way past mine...I thought I would be crusing way back in January this year!!!! What I need more than anything else are a few 30 hr days...

Thread
Thread Starter
Forum
Replies
Last Post
bigfrank
4th Generation Maxima (1995-1999)
2
Oct 1, 2015 12:51 PM