
Infiniti I30 HID retrofit build

Thread Starter
Supporting Maxima.org Member

Joined: Jan 2006
Posts: 241
From: Vancouver, BC
Infiniti J30 HID retrofit build
Well after 3 years of driving with the stock candles for lights (even with the total-waste-of-money-Sylvania-Ultrastars), debating over the 9007 upgrade, and any other options we might have, I've decided to start my HID retrofit. I've done this to my previous motorcycle, so I'm going to use what I learnt from that setup (http://www.fzrarchives.com/ipb/index...=hid+projector, as well as the inspiration from a fellow member on the forum here, 2Legal4Me: http://forums.maxima.org/6022918-post11.html (a big thank you for your tips and for inspiring me to do this :-)
After riding/driving with HID's, there just is no comparison. So here we go:
All the parts came in today:
1) clear euro lens "JDM" stockers from ebay
2) 1993 Infiniti I30 headlights, also from ebay
3) DDM tuning (ddmtuning.com) HID kit, with 5000K bulbs (I want to keep the light output as white as possible, don't like the blue/ricer look at all)
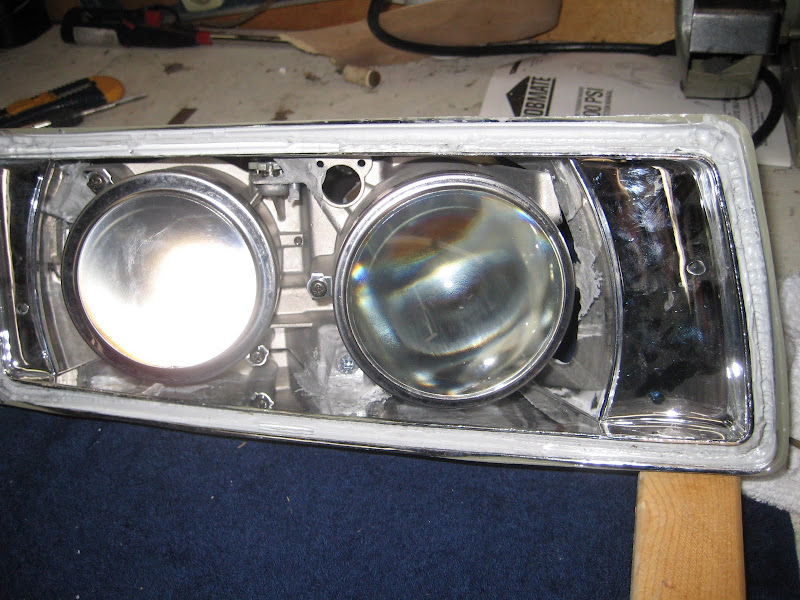
So far tonight I broke the Infiniti headlights apart, and took out the projectors, and cleaned them up. They are in excellent shape, with only a minor chip on the edge of one low-beam projector glass (though it's hidden by the surround, so no big deal).

This one shows how the projector bowls have a u-shaped shield at the top (the low-beam in addition to the cutoff at the bottom). I wonder what this is for? I'm debating dremeling it off, as every other projector I've seen doesn't have that at the top.

Should line up nicely:


More to come!
After riding/driving with HID's, there just is no comparison. So here we go:
All the parts came in today:
1) clear euro lens "JDM" stockers from ebay
2) 1993 Infiniti I30 headlights, also from ebay
3) DDM tuning (ddmtuning.com) HID kit, with 5000K bulbs (I want to keep the light output as white as possible, don't like the blue/ricer look at all)
So far tonight I broke the Infiniti headlights apart, and took out the projectors, and cleaned them up. They are in excellent shape, with only a minor chip on the edge of one low-beam projector glass (though it's hidden by the surround, so no big deal).
This one shows how the projector bowls have a u-shaped shield at the top (the low-beam in addition to the cutoff at the bottom). I wonder what this is for? I'm debating dremeling it off, as every other projector I've seen doesn't have that at the top.
Should line up nicely:
More to come!
Last edited by mszilves; Nov 10, 2009 at 10:00 AM.
those are J30, not I30. I30/35 is basically a 4th/5th gen Maxima with an infiniti badge. I started toying with a set of these (and i have a spare set too) but now maxpwer has them.
the tab on top is called a "foreground limiter", basically its purpose is to keep too much light from shining directly in front of your car so your eyes can focus better on stuff at a distance. tho if you have foglights then they will totally fill in that gap anyways.
also keep in mind these are halogen projectors, not HID projectors, and they won't work as well with HIDs as you're probably expecting them to. reason being that most of the light is right in the middle, and not very much off to the sides. see pic below.

similar story with the high beam.. hotspot in the center
this is approximately what it would look like on your car

anynow first thing to do is on your stock headlight draw a line that is straight across with the radiator support bar

then trace the imaginary seam line across the headlight like so

the tab on top is called a "foreground limiter", basically its purpose is to keep too much light from shining directly in front of your car so your eyes can focus better on stuff at a distance. tho if you have foglights then they will totally fill in that gap anyways.
also keep in mind these are halogen projectors, not HID projectors, and they won't work as well with HIDs as you're probably expecting them to. reason being that most of the light is right in the middle, and not very much off to the sides. see pic below.

similar story with the high beam.. hotspot in the center

this is approximately what it would look like on your car

anynow first thing to do is on your stock headlight draw a line that is straight across with the radiator support bar

then trace the imaginary seam line across the headlight like so

then cut up the back of the housing like so...

until you can line the seam/marker line up with the line on the housing like this


then you can mark the top of the housing where the 2 screw holes are so you can get some 90* brackets to fasten it in from the top

then you should have something like this


until you can line the seam/marker line up with the line on the housing like this

then you can mark the top of the housing where the 2 screw holes are so you can get some 90* brackets to fasten it in from the top

then you should have something like this


 where do you think the nickname came from? i hang out with some of the local .Orgers and they gave me the nickname.
Thread Starter
Supporting Maxima.org Member
Joined: Jan 2006
Posts: 241
From: Vancouver, BC
Wow caped, thanks for the great info and pics, this will definitely help. So the difference between HID and Halogen projectors then are the bodies of the projector, which focus the light a little differently? Interesting, I would've thought a projector was a projector, as long as you have the bulb at the right focal point that it would be fine.
PS. Apparently you can't change thread titles, or I've been away from the forum so long that I forgot how.
PS. Apparently you can't change thread titles, or I've been away from the forum so long that I forgot how.
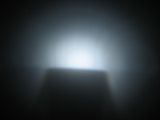
now... if you use the halogen ones.. it will work in the sense that you still still have a flat cutoff and whatnot, you just won't have the same side to side spread. you will have a hotspot in the middle and dim sides, instead of uniform brightness across the range like the pic below has

Last edited by CapedCadaver; Nov 10, 2009 at 10:25 AM.
the lens is the same, but the bowl is set up to focus more light in the center.
The reason is simple... DOT regulates a certain minimum or maximum light intensity at given test points.
Halogen projectors are typically working with 1250-1750 lumen bulbs. To get the correct output in the center, they focus most of the light into a large center "hotspot" that is very bright, and send the leftover light to the sides.
HID projectors are designed for 3200 lumen bulbs, but have to meet the same DOT standards. This means that they have the same center intensity as the halogen projectors. However, they have a bunch of extra light left over, so they spread more out to the sides.
In the center, a HID projector, a halogen projector, or even a halogen reflector will have similar intensity. On the sides, however, is where the HID projector will have significantly more output than any of the halogens.
To get a light distribution like this, HID projectors tend to have larger bowls, and the bulbs are designed differently.
Halogen projectors with HID kits will not have excessive glare above the cutoff like halogen reflectors with HID kits do, so in that regards, this setup is still a significant improvement from stock. However, you won't have as good output as you would with a real HID projector.
those are J30, not I30. I30/35 is basically a 4th/5th gen Maxima with an infiniti badge. I started toying with a set of these (and i have a spare set too) but now maxpwer has them.
the tab on top is called a "foreground limiter", basically its purpose is to keep too much light from shining directly in front of your car so your eyes can focus better on stuff at a distance. tho if you have foglights then they will totally fill in that gap anyways.
also keep in mind these are halogen projectors, not HID projectors, and they won't work as well with HIDs as you're probably expecting them to. reason being that most of the light is right in the middle, and not very much off to the sides. see pic below.
similar story with the high beam.. hotspot in the center
this is approximately what it would look like on your car
anynow first thing to do is on your stock headlight draw a line that is straight across with the radiator support bar
then trace the imaginary seam line across the headlight like so

wookiees are aliens, not animals

keep in mind i never finished tho. what you see in those pics is as far as i got. still would need shrouding for the inside (for looks), another fastener to keep them stable, i guess from the bottom or something, sealing up the back, and putting the glass on. for this, you actually would want to use the ebay clear housings, since the projector will handle the aiming and you just need the glass for protection.
Last edited by CapedCadaver; Nov 10, 2009 at 05:29 PM.
Thread Starter
Supporting Maxima.org Member
Joined: Jan 2006
Posts: 241
From: Vancouver, BC
the lens is the same, but the bowl is set up to focus more light in the center.
The reason is simple... DOT regulates a certain minimum or maximum light intensity at given test points.
Halogen projectors are typically working with 1250-1750 lumen bulbs. To get the correct output in the center, they focus most of the light into a large center "hotspot" that is very bright, and send the leftover light to the sides.
HID projectors are designed for 3200 lumen bulbs, but have to meet the same DOT standards. This means that they have the same center intensity as the halogen projectors. However, they have a bunch of extra light left over, so they spread more out to the sides.
In the center, a HID projector, a halogen projector, or even a halogen reflector will have similar intensity. On the sides, however, is where the HID projector will have significantly more output than any of the halogens.
To get a light distribution like this, HID projectors tend to have larger bowls, and the bulbs are designed differently.
Halogen projectors with HID kits will not have excessive glare above the cutoff like halogen reflectors with HID kits do, so in that regards, this setup is still a significant improvement from stock. However, you won't have as good output as you would with a real HID projector.
The reason is simple... DOT regulates a certain minimum or maximum light intensity at given test points.
Halogen projectors are typically working with 1250-1750 lumen bulbs. To get the correct output in the center, they focus most of the light into a large center "hotspot" that is very bright, and send the leftover light to the sides.
HID projectors are designed for 3200 lumen bulbs, but have to meet the same DOT standards. This means that they have the same center intensity as the halogen projectors. However, they have a bunch of extra light left over, so they spread more out to the sides.
In the center, a HID projector, a halogen projector, or even a halogen reflector will have similar intensity. On the sides, however, is where the HID projector will have significantly more output than any of the halogens.
To get a light distribution like this, HID projectors tend to have larger bowls, and the bulbs are designed differently.
Halogen projectors with HID kits will not have excessive glare above the cutoff like halogen reflectors with HID kits do, so in that regards, this setup is still a significant improvement from stock. However, you won't have as good output as you would with a real HID projector.
animal?
wookiees are aliens, not animals
keep in mind i never finished tho. what you see in those pics is as far as i got. still would need shrouding for the inside (for looks), another fastener to keep them stable, i guess from the bottom or something, sealing up the back, and putting the glass on. for this, you actually would want to use the ebay clear housings, since the projector will handle the aiming and you just need the glass for protection.

yo, i was wondering if you ever got any beam pics against a wall w/ the lowbeam HIDs?

Senior Member
Joined: Apr 2008
Posts: 1,355
From: Surrey, B.C
Well after 3 years of driving with the stock candles for lights (even with the total-waste-of-money-Sylvania-Ultrastars), debating over the 9007 upgrade, and any other options we might have, I've decided to start my HID retrofit. I've done this to my previous motorcycle, so I'm going to use what I learnt from that setup (http://www.fzrarchives.com/ipb/index...=hid+projector, as well as the inspiration from a fellow member on the forum here, 2Legal4Me: http://forums.maxima.org/6022918-post11.html (a big thank you for your tips and for inspiring me to do this :-)
After riding/driving with HID's, there just is no comparison. So here we go:
All the parts came in today:
1) clear euro lens "JDM" stockers from ebay
2) 1993 Infiniti I30 headlights, also from ebay
3) DDM tuning (ddmtuning.com) HID kit, with 5000K bulbs (I want to keep the light output as white as possible, don't like the blue/ricer look at all)
So far tonight I broke the Infiniti headlights apart, and took out the projectors, and cleaned them up. They are in excellent shape, with only a minor chip on the edge of one low-beam projector glass (though it's hidden by the surround, so no big deal).
This one shows how the projector bowls have a u-shaped shield at the top (the low-beam in addition to the cutoff at the bottom). I wonder what this is for? I'm debating dremeling it off, as every other projector I've seen doesn't have that at the top.
Should line up nicely:
More to come!


That low output looks good enough for me, better than stock. Maybe I should consider this form of retrofit; I see enough J30's in the junkyard that I could grab headlights out of.
btw, why did you say you never got around to finishing it? It looks finished to me.
btw, why did you say you never got around to finishing it? It looks finished to me.
Last edited by Dhunterx; Nov 11, 2009 at 07:33 PM.

Member
Joined: Jun 2006
Posts: 252
From: AZ
i never finished the back of the housing. im still planning on doing some fiberglass the holes n stuff. The light output is great seing that i was using my garage door as a flat surface or wall to demostrate the beam pattern.
do you have any pics that show the progress of the retrofit? I wouldn't mind doing this myself.
keep in mind that any side-by-side setup whether this or E36 requires a little trimming of the rad support bars.. nothing to get worked up about but it's just something that has to be done. maybe 2legal (thanks for those pics btw, taking them today just for this thread ) has pics of his when he cut it 
) has pics of his when he cut it
Member
Joined: Jun 2006
Posts: 252
From: AZ
Btw: there were a few cars that had dual projectors j30's and es300 lexus!
Member
Joined: Jun 2006
Posts: 252
From: AZ
forgot or failed to mention since i just read cape's last post: "good point made" your going to have to hack up that radiator support a bit to clear thoose projectors especially the high beam bowls. if u got a dremmel great if not might want to invest in one before starting this project trust me!!
Thread Starter
Supporting Maxima.org Member
Joined: Jan 2006
Posts: 241
From: Vancouver, BC
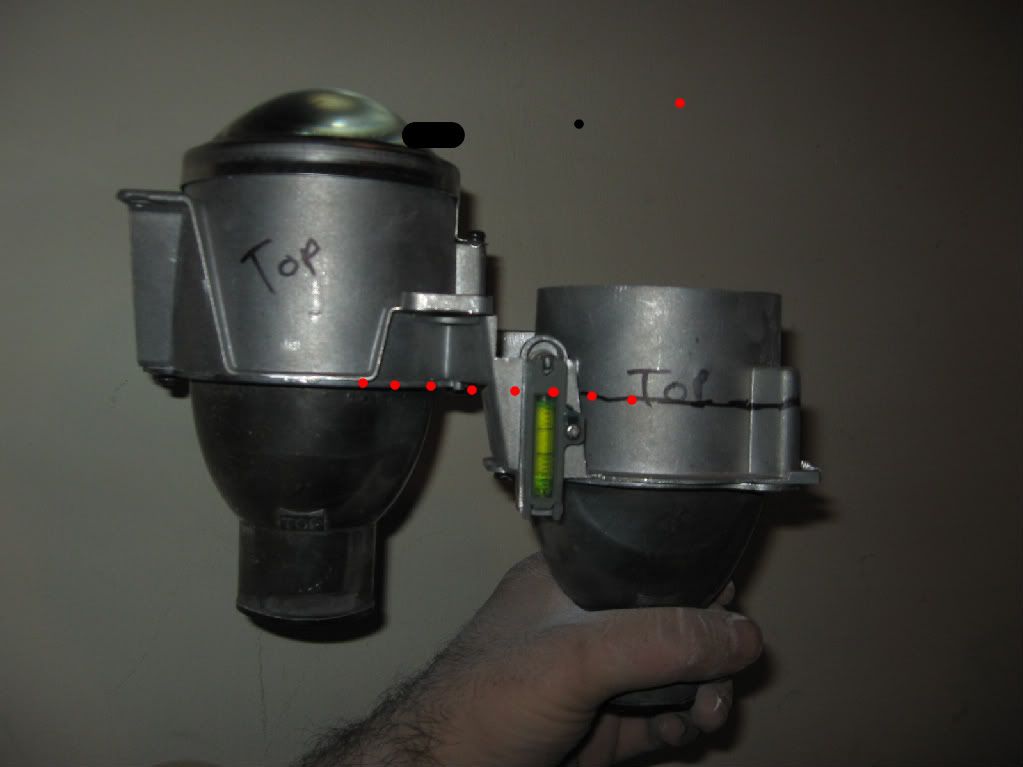
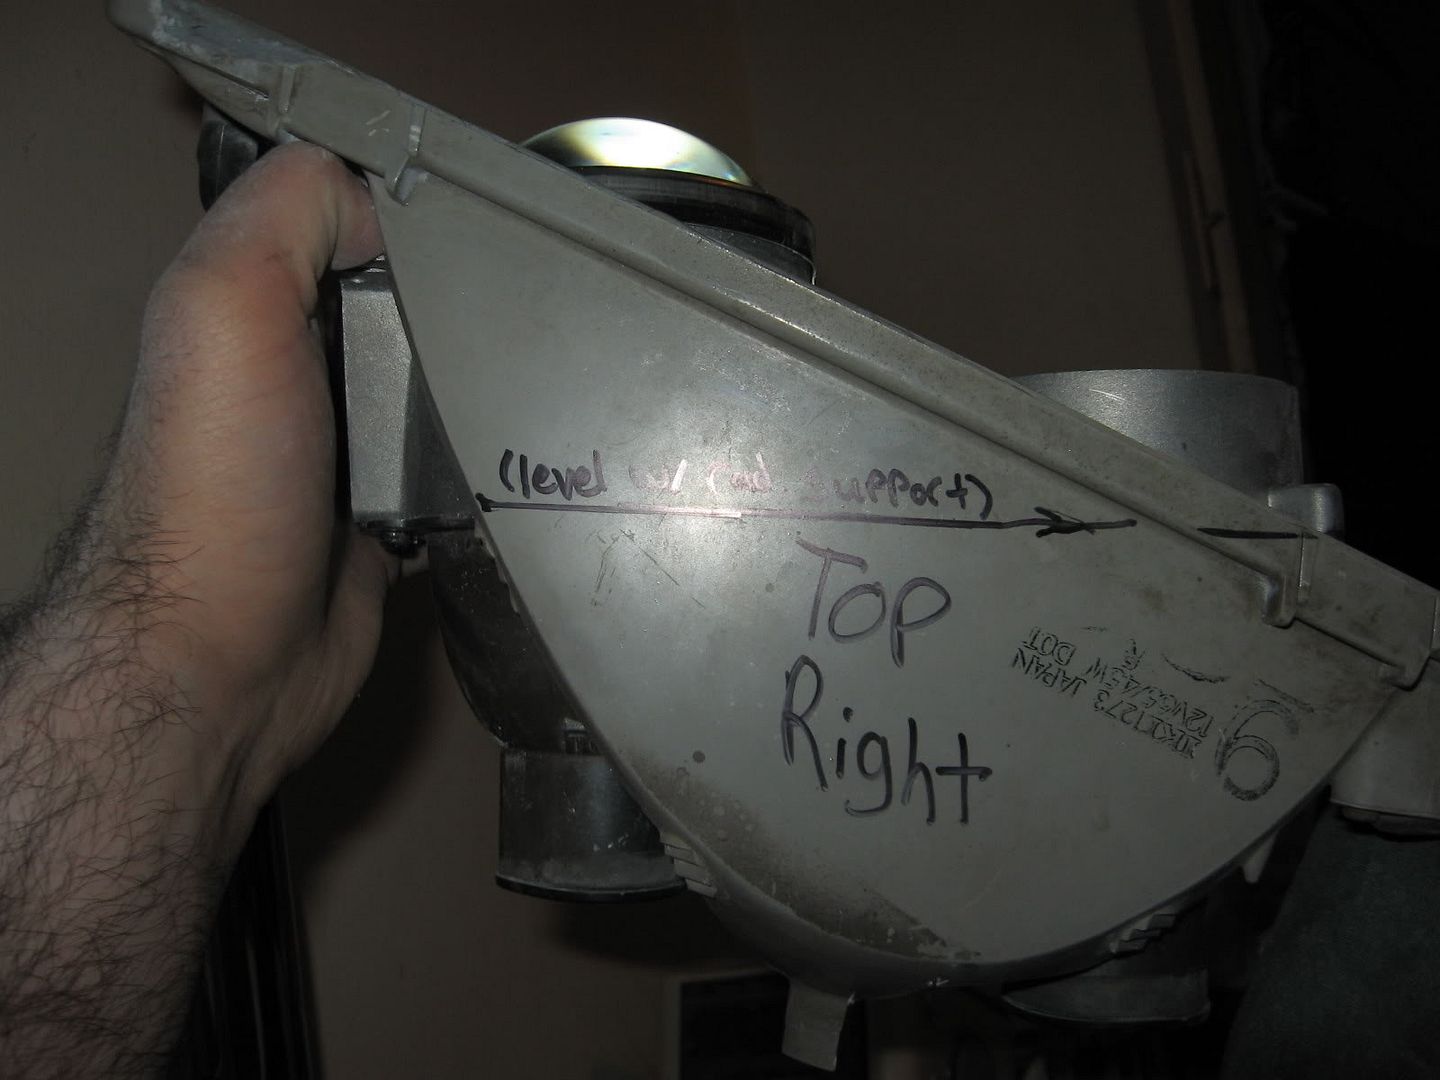
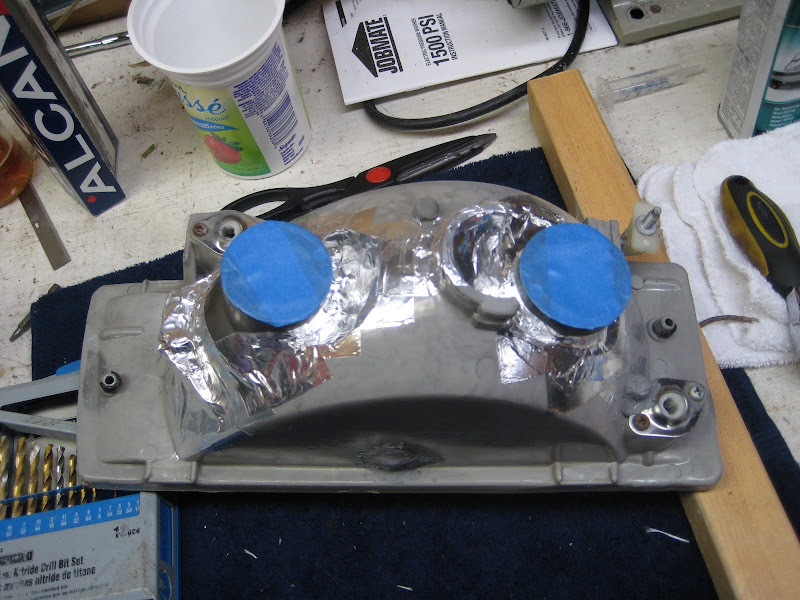
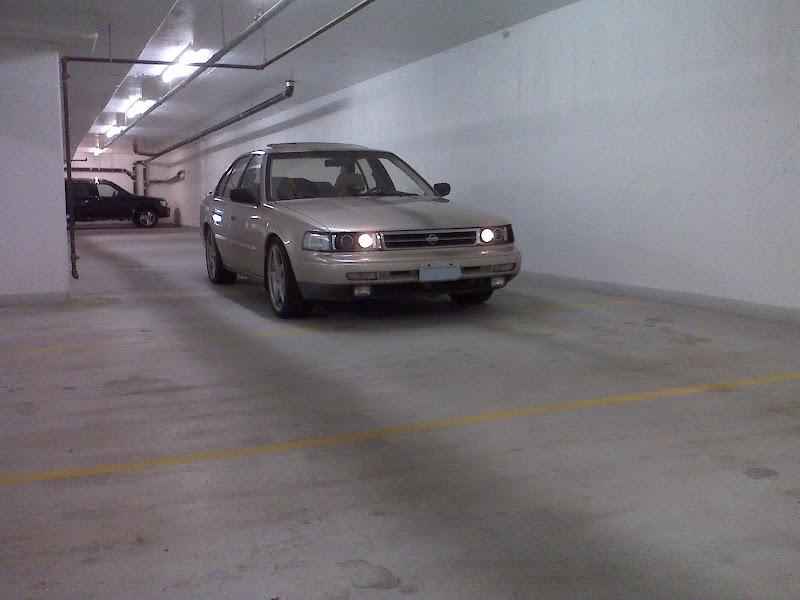
Some progress today... finished cutting one side, and got the projectors mounted and aimed. Just need to seal it up, haven't decided if I'm going to fiberglass the rear, or use "plastic metal" filler.
This pic shows the installed projectors on the left side. I've placed arrows on how I mounted the projectors to the stock housing, and this gives you initial aiming while keeping the stock glass/housing lined up nicely with the car body. After this, I'm going to use the plastic metal to secure the places with the arrows once final aiming is done, and after that, I can just use the stock adjusters for minor adjustments if needed, though it's pretty much spot on as it is.

Here are some more to give some better angles. I hope to get some progress and finish the right side tomorrow, and seal the rear of the housings once everything is lined up.


And a crappy cell phone pic of the cutoff, I see now how the middle is a bit brighter due to the halogen projector with HID, but still MUCH better than stock:

I'll try and get some pics of how much to cut from the rad supports as well.
This pic shows the installed projectors on the left side. I've placed arrows on how I mounted the projectors to the stock housing, and this gives you initial aiming while keeping the stock glass/housing lined up nicely with the car body. After this, I'm going to use the plastic metal to secure the places with the arrows once final aiming is done, and after that, I can just use the stock adjusters for minor adjustments if needed, though it's pretty much spot on as it is.
Here are some more to give some better angles. I hope to get some progress and finish the right side tomorrow, and seal the rear of the housings once everything is lined up.
And a crappy cell phone pic of the cutoff, I see now how the middle is a bit brighter due to the halogen projector with HID, but still MUCH better than stock:
I'll try and get some pics of how much to cut from the rad supports as well.
Thread Starter
Supporting Maxima.org Member
Joined: Jan 2006
Posts: 241
From: Vancouver, BC


Thread Starter
Supporting Maxima.org Member
Joined: Jan 2006
Posts: 241
From: Vancouver, BC
Update:
Well, some more progress today, nearly there...
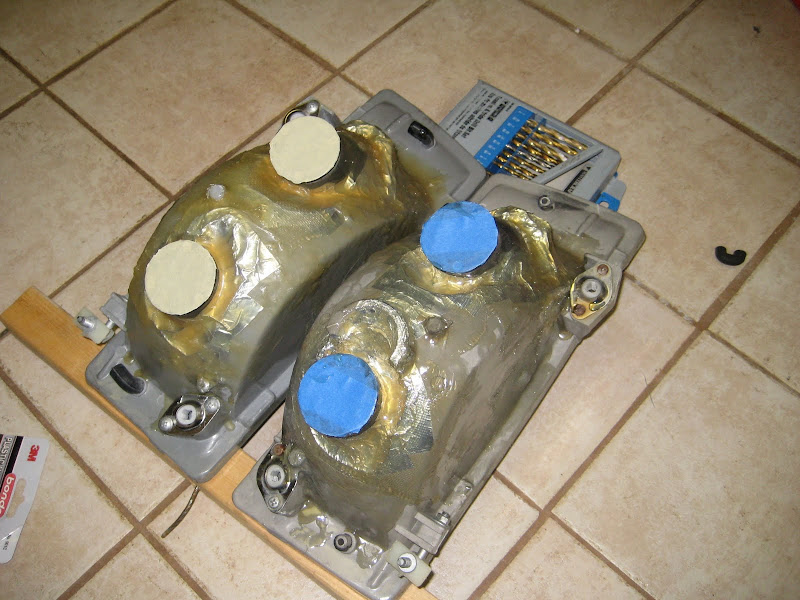
I got the idea to use a metal-based body filler to "spot-weld" the internal adjustments in place, effectively immobilizing the projector unit into the maxima light housings. I adjusted the projector units today, so with the housings lined up nicely with the body, it should all be bang on. Any minor final adjustments can be made with the original maxima housing adjusters if I need to.
I also came up with the idea to use metal tape (local hardware store) to "tape" up the rear of the housing before fiberglassing it. The metal tape is fairly flexible, heat resistant, and did a good job of molding to the rear. Then fiberglassed the whole rear over.
Not the prettiest right now, but function before form in this case. I may paint it later, but really, who's ever gonna see this?
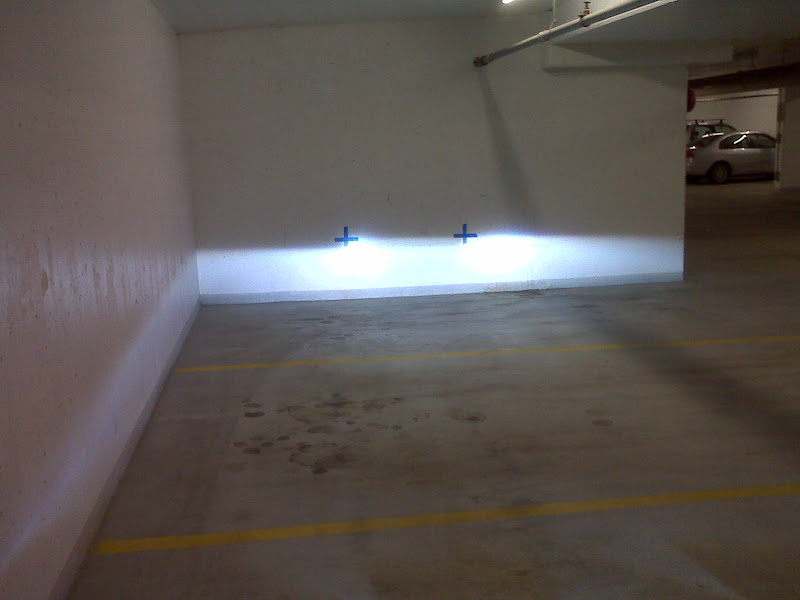
Here are some pics after adjustment today. All that's left is to modify the J30 finishing shrouds, and seal the clear glass on. A lot of friggin' work so far, but amazing the difference! And oddly enough, because of the upper shields in the low-beam projectors, it shines my first initial on the ground, how fitting is that lol. Almost there...
Low-beams:
Running lights:
Well, some more progress today, nearly there...
I got the idea to use a metal-based body filler to "spot-weld" the internal adjustments in place, effectively immobilizing the projector unit into the maxima light housings. I adjusted the projector units today, so with the housings lined up nicely with the body, it should all be bang on. Any minor final adjustments can be made with the original maxima housing adjusters if I need to.
I also came up with the idea to use metal tape (local hardware store) to "tape" up the rear of the housing before fiberglassing it. The metal tape is fairly flexible, heat resistant, and did a good job of molding to the rear. Then fiberglassed the whole rear over.
Not the prettiest right now, but function before form in this case. I may paint it later, but really, who's ever gonna see this?
Here are some pics after adjustment today. All that's left is to modify the J30 finishing shrouds, and seal the clear glass on. A lot of friggin' work so far, but amazing the difference! And oddly enough, because of the upper shields in the low-beam projectors, it shines my first initial on the ground, how fitting is that lol. Almost there...
Low-beams:
Running lights:
Last edited by mszilves; Nov 14, 2009 at 01:06 AM.

looks real good. What are you doing for shrouds? Probably best looking would be vacuum formed plastic. There's certainly not enough room for conventional shrouds. Hey, you might even be OK just painting the sides of the projectors black, and leaving the lens rings chrome.

Thread Starter
Supporting Maxima.org Member
Joined: Jan 2006
Posts: 241
From: Vancouver, BC
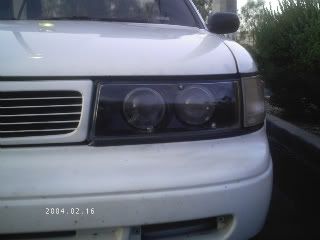
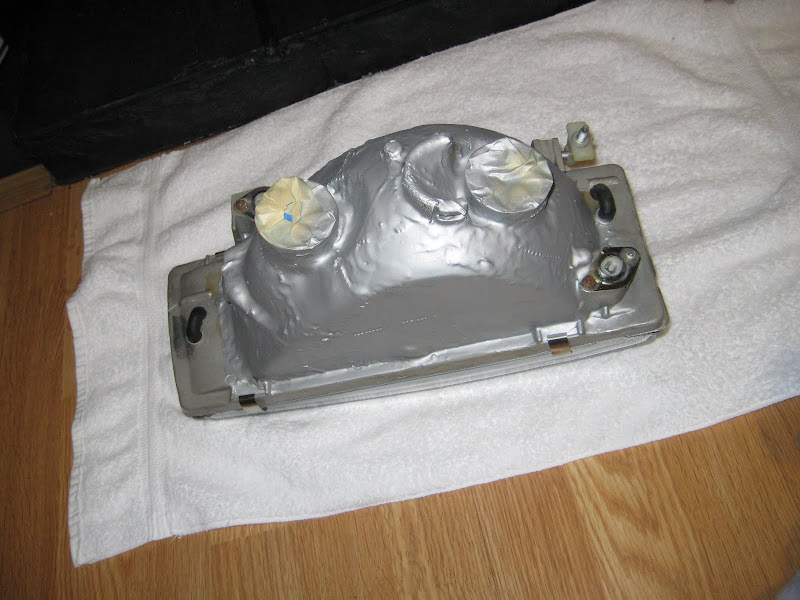
Some more progress today, nearly done! Got the housings all finished and painted (couldn't leave them plain fiberglass, too ugly
As far as the shrouds, I tried to cut the Infiniti ones to fit, but ended up massacreing them. After a good few hours wasted on trying to come up with the best way to deal with it, I went ahead and masked off the outer chrome of the housing, and used high heat BBQ silver paint to make the inside nice and even, leaving the rings chrome. Turned out better than I expected, and looks really good on the car, gives it a bit of a technical look. Not worth the hassle IMO to do any more.
Here is the housing all painted and put back together:
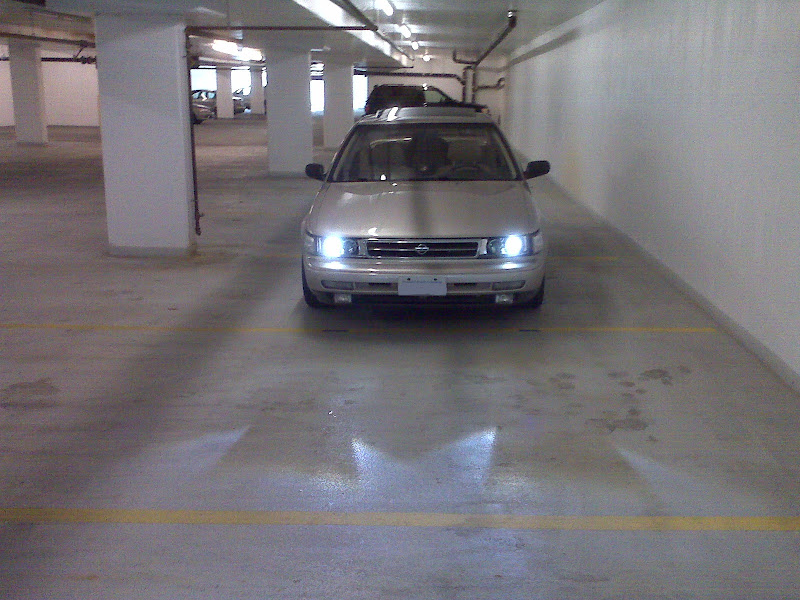
And here is a pic of the finished light, this picture really doesn't do it much justice, looks much better in real life.
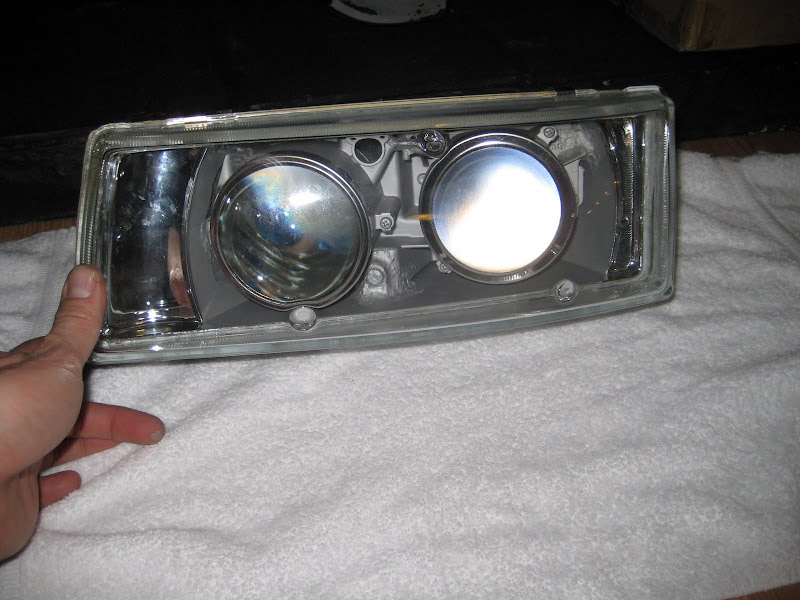
I'll try and get some pics tomorrow on the car, once everything is back together, and hopefully we get a break in the rain here (been raining on and off for the better part of a week now, November on the west coast!!).
As far as the shrouds, I tried to cut the Infiniti ones to fit, but ended up massacreing them. After a good few hours wasted on trying to come up with the best way to deal with it, I went ahead and masked off the outer chrome of the housing, and used high heat BBQ silver paint to make the inside nice and even, leaving the rings chrome. Turned out better than I expected, and looks really good on the car, gives it a bit of a technical look. Not worth the hassle IMO to do any more.
Here is the housing all painted and put back together:
And here is a pic of the finished light, this picture really doesn't do it much justice, looks much better in real life.
I'll try and get some pics tomorrow on the car, once everything is back together, and hopefully we get a break in the rain here (been raining on and off for the better part of a week now, November on the west coast!!).

mszilves: you have really done something that i haven't been able to finish. looks like i will be using these projectors instead of the BMW 5-series that i am currently using on my retrofit. here are a few of mine:


Guys the J30 projector seem to fit really nice or Mszilves just made it look really simple....It really seems to work really well....Are you gonna fit HID into your daytime running ligts as well Mszilves?
Guys the J30 projector seem to fit really nice or Mszilves just made it look really simple....It really seems to work really well....Are you gonna fit HID into your daytime running lights as well Mszilves?
er, you mean foglights? the "daytime running lights" on 3rd gens are just a box that sends 5v to the regular 9004 bulb instead of 12v until you switch the headlights on to full brightness.