
Rear parallel link bushings


Thread Starter
Member
Joined: Feb 2003
Posts: 252
Rear parallel link bushings
Looking to finally install these bushings. Is the job easy? How much time will it take? Any special tools needed? What's the best method to get the old bushings out? Will my alignment be off or can I get around it...
tks in advance,
r/Mark
tks in advance,
r/Mark

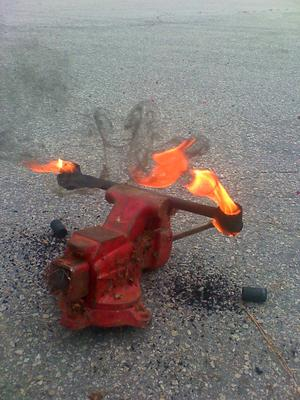
There is a bushing punch kit you can loan from autozone which is helpful, but not the best resource. The best way to remove them, effectively, is to burn them out, and then use a table vice to press the new ones in with an ample amount of grease. I didn't use the vice or grease, I hit my hand many times with a hammer using the punch tools, and I wonder how long the bushings will last without grease?
Your alignment should go back the way it was if you do not adjust the arm with the threaded portion.
Your alignment should go back the way it was if you do not adjust the arm with the threaded portion.


Are you installing OEM or Energy suspension bushings?
You'll need a hydraulic press or a large bench vise to press the old bushings out. no fire needed on the parallel links (unlike the front control arms and the radius rods).
your alignment will be close, but I'd recommend at least having it checked afterwards. be sure to mark which link goes where in the suspension and put them back in the exact same spot.
If using OEM bushings, be sure not to torque the large bolts down until the car is at normal ride height. otherwise you'll damage the new bushings.
Easiest way to do that is to measure the distance from the center of the wheel hub to the top of your fender before you ever jack up the car. (put a mark with blue tape on the fender and write the measurement with a sharpie before you take the car apart.)
THEN when you have everything back together and those pivot bolts are finger tight, stick a jack under each wheel and jack it up until the suspension is at normal height. then you can get in there and torque the bolts down without much hassle. be very careful not to push the car off jack stands when you're doing that. it's doable, so be careful. make sure you're not under the car or rear suspension at any time whiel you have the car supported this way. one slip and that rear brake rotor can chop off a leg. This procedure isn't necessary at all for the Energy bushings since they rotate freely. the factory bushings are molded to the steel sleeves and can't rotate like the ES bushings.
If you're using Energy suspension bushings, MAKE SURE you have washers on both sides of each bushing. Sometimes they include them in the kit, sometimes not. If you don't have them, the bushings have a tendency to walk out of the links and it's caused some nasty problems on other people's cars. correct installation is mandatory.
Edit #123098145801.
Time? I could do the job in two hours. for your first time to do a rear suspension project (based on your questions, you're a first-timer..), I suggest you plan a full day, if not the whole weekend.
are you doing any other suspension work at the same time? brakes? struts? sway bars? etc?
Easy? relatively.
you will need to drop the rear crossmember as well to get the links off the car. the long bolt that holds the links onto the crossmember will hit the gas tank and/or the spare tire well and/or muffler. it's been a while since I've done it... but they hit something. you'll need to pull the crossmember down, but it's way easier than you think. there's a tiny bracket between the xmember and the spare tire well- 12 or 14mm socket to remove it..
Then there's 4 nuts/bolts that hold the xmember in place. two on each side. wear goggles or safety glasses when working under there cause you WILL get dirt in your eyes working under the car. ouch...
Last edited by Matt93SE; Apr 6, 2010 at 02:19 PM.


Matt Blehmco.
edit: aside from the drama Matt put into it, it's basically straight forward. pop 'em out (you will likely have problems with the cross member removal; if it doesn't have load sensing valves, it's a much quicker job...).
 on using ES bushings.
Last edited by BenStoked; Apr 6, 2010 at 02:51 PM.
Thread Starter
Member
Joined: Feb 2003
Posts: 252
Matt, I will be using a chasis lift to do the job. Any objection to using it. I should be able to complete the entire job on the lift, correct? The bushings are the polyurethane ones, there were no washers that came in the box, just enough bushings to do both sides, and two tubes of grease. Can I re-use the washers that I will take off with the old bushings?
r/Mark
r/Mark
Are you installing OEM or Energy suspension bushings?
You'll need a hydraulic press or a large bench vise to press the old bushings out. no fire needed on the parallel links (unlike the front control arms and the radius rods).
If you're using Energy suspension bushings, MAKE SURE you have washers on both sides of each bushing. Sometimes they include them in the kit, sometimes not. If you don't have them, the bushings have a tendency to walk out of the links and it's caused some nasty problems on other people's cars. correct installation is mandatory.

however, forgetting to put washers on both sides of the bushings did not

it was the straw that broke the camel's back in terms of my decision to permanently park the car awaiting part-out. Definitely made the car un-driveable until fixed even if i had decided to fix it.

Last edited by CapedCadaver; Apr 6, 2010 at 03:54 PM.

here is a tool i made to push out the rubber bushings, i suppose you can use this also to put new rubbers back in but i went with the energy suspension polys and put those in by hand

threaded rod with nuts, washers (the washer on the right needs to be just smaller than the diameter of the control arm sleeve obviously) and a piece of pipe and pipe cap. Actually took me longer to make the tool than it did to push all 8 bushings out
Good call on the washers Matt, ill have to remember to get some
Anyone with the poly experience squeaking? I was thinking grease fittings may be a good idea but i see these arms rotate with respect to the long bolt that goes through it, so the bushings dont turn or spin within the arm (?)
here is a tool i made to push out the rubber bushings, i suppose you can use this also to put new rubbers back in but i went with the energy suspension polys and put those in by hand
threaded rod with nuts, washers (the washer on the right needs to be just smaller than the diameter of the control arm sleeve obviously) and a piece of pipe and pipe cap. Actually took me longer to make the tool than it did to push all 8 bushings out
Good call on the washers Matt, ill have to remember to get some
Anyone with the poly experience squeaking? I was thinking grease fittings may be a good idea but i see these arms rotate with respect to the long bolt that goes through it, so the bushings dont turn or spin within the arm (?)
Zerk fittings would likely be useless, much as you described.
so, I don't remember the exact size (fixed it, oh, two years ago)
mine didn't have any washers stock.. the bushing was pressed in tight so it didn't need them. but the ES ones are of a split design so they can work theirselves out... but any ways, any hardware store should have some nice wide washers with that diameter hole in the middle. if you have a friend or 2nd car, just take that big long bolt to the store with you and find a washer that will fit around it just so.
I just did this job today (took a couple hours...most of that time looking for my old ES grease). I had the Blehmco links on the car but for a daily driver I didn't like it (btw Matt I will respond to your PM later  ). I had a press so it made my life easy taking the old bushings out. Last time I used a vice and it was much more difficult (but not that bad)
I bought a bag of 1/2" washers from Fastenal for $6. It was a close fit but worked well. Part number 1133861. It had 25 washers in it and were thin enough to use 4 on each end (16 needed in all) and still have the nut screw on far enough. You probably have a fastenal around your area if not check the hardware store. I would chunk all the factory washers (too thick) and just go with the thinner ones.
BTW I don't think they give you enough grease in the pack IMO. I had a small tub of grease I bought a couple years ago to do the same thing on another Maxima. I still had plenty left over so I used it again. It was ES grease just a small container instead of the little packets.
). I had a press so it made my life easy taking the old bushings out. Last time I used a vice and it was much more difficult (but not that bad)I bought a bag of 1/2" washers from Fastenal for $6. It was a close fit but worked well. Part number 1133861. It had 25 washers in it and were thin enough to use 4 on each end (16 needed in all) and still have the nut screw on far enough. You probably have a fastenal around your area if not check the hardware store. I would chunk all the factory washers (too thick) and just go with the thinner ones.
BTW I don't think they give you enough grease in the pack IMO. I had a small tub of grease I bought a couple years ago to do the same thing on another Maxima. I still had plenty left over so I used it again. It was ES grease just a small container instead of the little packets.
Definitely install washers as the link will slide and the bushing can come out. I actually still have my old links with the poly bushings installed still laying in my garage since I got the Blehmco links 2 years ago.
I agree with Micheal on the grease.. I just bought myself a pack of ES poly grease from O'Reilly's for $2.99 and it had 3-4 of the little tubes that normally come with the bushings themselves.
I agree with Micheal on the grease.. I just bought myself a pack of ES poly grease from O'Reilly's for $2.99 and it had 3-4 of the little tubes that normally come with the bushings themselves.
As others have stated, MAKE SURE to install washers on either side of the bushings. The same day after putting mine on, I barreled into a corner and the back end kicked out...scared the **** out of me. It turns out the bushing had "stepped up" over the larger OD. (It will make sense when you see it.) I was lucky, but it could have been a much harder lesson learned...
As others have stated, MAKE SURE to install washers on either side of the bushings. The same day after putting mine on, I barreled into a corner and the back end kicked out...scared the **** out of me. It turns out the bushing had "stepped up" over the larger OD. (It will make sense when you see it.) I was lucky, but it could have been a much harder lesson learned...
at first i thought the front link had snapped (like colombianmax's did a while back) but it ended up being the bushings.
Last edited by CapedCadaver; Apr 11, 2010 at 11:03 PM.
As others have stated, MAKE SURE to install washers on either side of the bushings. The same day after putting mine on, I barreled into a corner and the back end kicked out...scared the **** out of me. It turns out the bushing had "stepped up" over the larger OD. (It will make sense when you see it.) I was lucky, but it could have been a much harder lesson learned...

slide bushing in first, then the metal sleeve into it. grease around the sleeve of course.

Thread
Thread Starter
Forum
Replies
Last Post
Huttig2009
5th Generation Classifieds (2000-2003)
8
Sep 25, 2015 03:31 PM