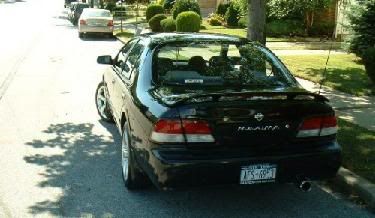
Red/Clear Conversion went awesome!! :)


Red/Clear Conversion went awesome!! :)
K guys i was a little nervous at first im not gunna lie but i got a nice heat gun from my neighbor and a dremmel from my dad and went down to home depot and picked up some florescent light cover for $4.15!!! a sheet only got one sheet so any took about six hours all together taking out the lights getting them apart and dremmeling the lens but i think it came out perfect in my eyes i did both the outside and the inside lenses so that everything matched up and it looked cleaner im very happy with the turn out rather then spending $150 at custommaxima.
Let me know what you guys think id like to hear some feed back on how good or bad of a job you think i did.


Let me know what you guys think id like to hear some feed back on how good or bad of a job you think i did.


Tomservo so woth doing the insides it only took me a total of about 2 hours and that was because i had to reglue the rubber around the lense back on cause it pop'd off and had to wait for it to dry but i would deff recommend doing the inside to looks so much better when they match up and i very much do agree that you feel more satisfaction out of making them yourself rather then buying them for crazy amounts of money rather easy mod just time consuming worth the time if you have nothing else to do and your bored or if the ambers are really ****ing you off which it was both in my case i hate amber color plus i was bored haha had a couple of hours to kill 

OMG!!!! You've done it! You now need to duplicate them at least 40 times and you my friend will be a rich, rich man! If you need an investor or another set of tails to try this on let me know!!!! I love them and the pictures are worth 1000 words! Good job!!


successful.. for the most part.
Bro. Looks awesome. I did mine but i had a time constraint because once I took them out of the oven, I got a call to hit the bars. Did them in 1.5 hours and kinda said 'fukkit' , So I melted the edges of one of my tails, so its a little curled up, and the edges of my plastic pieces are rigid cuz I used a mini pocket razor to cut it. It worked well and accurate cuz I used a ruler, but a larger box cutter wouldve been splendid. again. Great job and if only mine had turned out half as nice.
thanx alot for the feed bacj guys i was thinking of starting to do it for the org members still thinking about if i wanna and how much i should charge let me know what you think is a good price


Donating Maxima.org Member

Joined: May 2004
Posts: 55
looks good. one day at the carwash i realized mine didn't match. The ones from custom maxima were dark red (around the edge) and my inners were a lighter shade of red. So i opened the old lights and new ones put the old cover on the new base and now they're perfect. The good thing about it the custom maxima light had the same plastic as the orange original so i dont have to do the inners.(or am i reaching for a good side, paying $150 for a $10 mod?)

only advise is TAKE YOUR TIME WITH THE HEAT GUN PART and open it slowly and dont hold the heat gun in one spot for to long the rest should be easy the only real part i was nervous about was taking apart the lens then putting it back together tight a air tight so it wouldnt get water in there and fog up but it washed it after and then it just rained to day and still no fog so i doubt it will ever for up i siliconed it pritty good on top of the original glue that i heated back up after i put the lens back together 
dude don't worry. I had all 3 sets of instructions. What it comes down to is being patient and not forcing anything. The taillight should coem off easily with the right amount of heat. Everything must be done with care, but not too much or it'll take you forever. I didd the oven method. 10 minutes at 250 degrees. I'll tell you it was like sliming gum off my shoe. Only thing with the oven method is that it gets really hott and to remember not to have any edges pressing down (ie. colored part of lense housing should be pointing downwards) I kinda melted mine, youll know what i mean.
GOOD LUCK!. the mentality is, if i F this up, I can always get gen2 altezzas
GOOD LUCK!. the mentality is, if i F this up, I can always get gen2 altezzas

Junior Member
Joined: Jul 2004
Posts: 24
I tried the oven method and warped my lens. I definitely recommend using a heat gun, and definitely be PATIENT. It was easy to do after I messed up the first one because then I knew where the glue was and exactly where to heat the black housing. Another thing is to watch out for the black stuff that holds the whole light to the car. It gets everywhere (but it does just rub off fairly easily).
When cutting the fluorescent light, the dremel is the only way to go. I cut out a template on paper and taped it to the panel, then dremeling took 2 minutes. You should probably making it slightly larger than the template so that it will fit snuggly into the lens. I also used the heat gun to give the cut panel a little curvature before fitting it in.
Putting back together is pretty easy. Just fit the two together and heat. As the glue melts you can slowly push the two parts back together. The first light I did took about 45min - 1 hr. The second light took 20 minutes
Once you do it once it'll be easy.
Edit: One more thing. After I screwed up the first time, I was able to find a stock replacement for about $35 on eBay. I wasn't gonna go through with the mod, but I went for it anyway. I think that even if you screw up, buying a cheap $25 - $30 replacement light is better than buying $100 altezzas....and if you have a white maxima like me, it looks ridicously good.


Senior Member
Joined: Jul 2004
Posts: 730
I've got some great advice, DONT USE A HEAT GUN.
It works, but its much more risky... if you screwup and hold it over one spot for just a second or two too long and you've just permanently ****ed up your lights.
Use an oven. Look for previous threads for heat/time instructions ... this is how I did it, they come apart easy and no need to worry about melting them if instructions are followed properly.
I *THINK* it was 200F for 10-12 minutes, BUT DONT QUOTE ME ON THAT ... look at previous threads (i think search has been enabled again?)

Originally Posted by Dr.Monkey1313
mchne: That is not because of what I said is it? Just curious, cause I have a 96 Infiniti I30 and it can be done to my rear tails.
Just curious, not biggie.
Just curious, not biggie.


Supporting Maxima.org Member
Joined: May 2004
Posts: 464
I used the heat gun and I thought that was safer than the oven, they came out great. I also used a a very sharp tip soldering iron to cut the patterns and filed them to make them smoother. Thanks to my dad for the idea.