
Tranny Rebuild problems
 05-02-2008 | 09:50 PM
#41

use a punch/drift. if you have a torch, applying some heat to the case to expand the bore will make it easier to put them in. coat the outside of the race in grease or oil too and that aids in installation as well. tap at 12, 6, 3, 9 o'clock as needed.
05-03-2008 | 06:38 AM
#42

I got you. thanks alot. That reminds me...Do you recommend Royal Purple gear oil? I was planning on using it because I can get it locally instead of waiting for a shipment of Redline. If its not recommended I'll just get the redline stuff.
05-03-2008 | 07:41 AM
#43
you can also use that method of heating the outside of the case to expand it to remove the main shaft race that you said you can't get out. heat the case up good and hot and then bang the case down solidly on your work bench and it might fall out.
05-03-2008 | 09:42 AM
#44
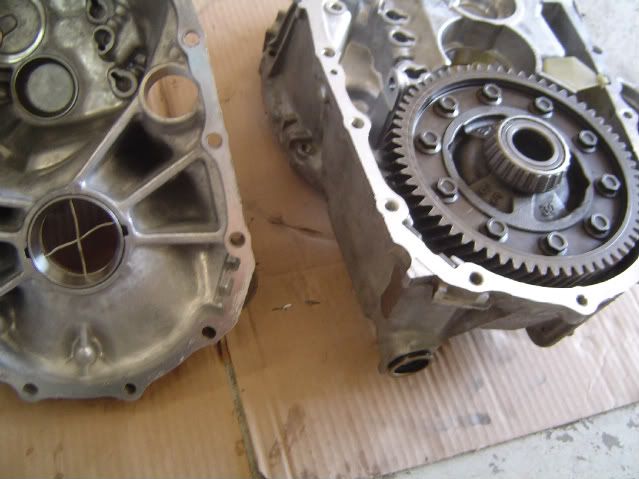
good good. The 2 differential races I have out, and the clutch-side (front) input shaft race that came out. The other input shaft race looked fine I might not mess with it..I saw some small cracks in the case that had me a little paranoid so I dont want to beat on it anymore  .
.
It seems like the shims are all on the same side of the transmission (the transmission side). But if I remember correctly the shims for the differential came out of the clutch housing side. I"ll confirm this in a bit when I go out there. I couldnt find a dial indicator ANYWHERE so Im going to see if I can use this little depth measurement thing on my micrometer/caliper tool to get an accurate reading.
. It seems like the shims are all on the same side of the transmission (the transmission side). But if I remember correctly the shims for the differential came out of the clutch housing side. I"ll confirm this in a bit when I go out there. I couldnt find a dial indicator ANYWHERE so Im going to see if I can use this little depth measurement thing on my micrometer/caliper tool to get an accurate reading.
 05-03-2008 | 10:38 AM
#46
Dang. You sure? Its an electronic one..
I have been reading the fsm its just that sometimes it seems like they flip things around...the images kinda suck.
Ill try to check the nearest sears though.
I have been reading the fsm its just that sometimes it seems like they flip things around...the images kinda suck.
Ill try to check the nearest sears though.
05-03-2008 | 11:26 AM
#47
I think you got the diff shims backwards .... (correct me if I am wrong ... anyone) but I think the shims sit behind the outter race on the case cover side ??? You might be able to find a dial indic at Autozone ... to borrow maybe? 
Cheers!
Cheers!
05-03-2008 | 11:34 AM
#48
i might havej ust been confused about the shim thing..no big deal though i'll go double check in a sec.
man...i just dont want to drop 70 bucks right now on an indicator and stand. I dont think autozone had one cause I asked when I was there. I'm going to double check with autostore cause I have no problem renting the tool.
what is my other option besides just putting in the stock shims? How do I do the solder-crush method?
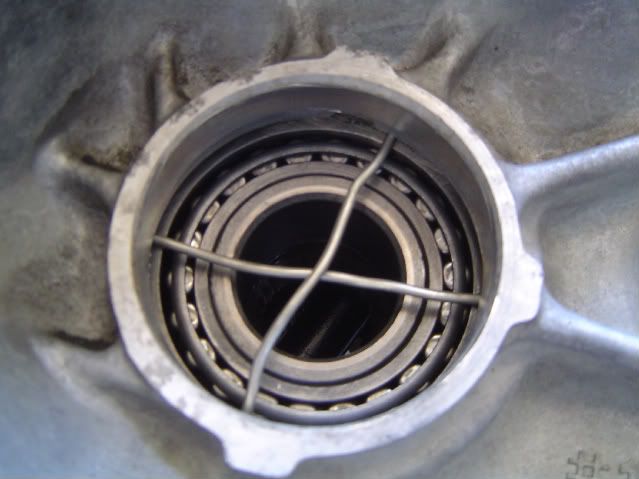
edit- I have re-read an old thread about the solder crush method. It seems kind of sketchy but if its effective then that seems like the obvious option for me since I'm not going to be able to get a dial indicator. I'm going to take some pictures to make for SURE that I'm doing this right and hopefully that will aid anyone else attempting to do this. I'll be back shortly with some pics guys. (and thanks again)
man...i just dont want to drop 70 bucks right now on an indicator and stand. I dont think autozone had one cause I asked when I was there. I'm going to double check with autostore cause I have no problem renting the tool.
what is my other option besides just putting in the stock shims? How do I do the solder-crush method?
edit- I have re-read an old thread about the solder crush method. It seems kind of sketchy but if its effective then that seems like the obvious option for me since I'm not going to be able to get a dial indicator. I'm going to take some pictures to make for SURE that I'm doing this right and hopefully that will aid anyone else attempting to do this. I'll be back shortly with some pics guys. (and thanks again)
Last edited by chillin014; 05-03-2008 at 11:58 AM.
05-03-2008 | 12:21 PM
#49
okay this is me confirming that ll the shims were on the tranny side of the case which would mean that the one race I am not removing should have shims underneath it for the main shaft. this means on the clutch housing case that oil channel goes underneath the race and thats it.
both of my differential bearings were identical so that is the same for the diff. bearing races. brb with pics.
both of my differential bearings were identical so that is the same for the diff. bearing races. brb with pics.
05-03-2008 | 01:15 PM
#50
alright I think the solder crush was a success but I'll let yall confirm that.
measuring the stock shims I get .024 and .026. A total of .05. When measuring my solder crushed areas I get .049, .053, .048, .054~. That seems pretty close...(this is for the differential shims). Does it sound like I'll be good to use the stock shims?
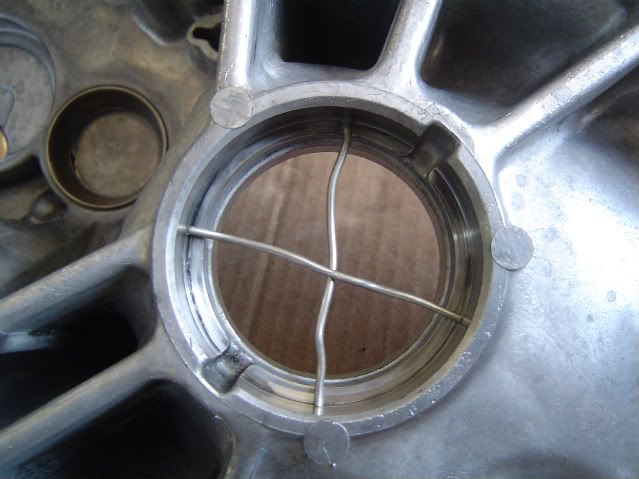
also. as far as the input shaft seal I forgot how far down it sits, should it bottom out in its bore? Or is it acceptable to have the edge flush with the top of the bore? like in this picture. thanks.

measuring the stock shims I get .024 and .026. A total of .05. When measuring my solder crushed areas I get .049, .053, .048, .054~. That seems pretty close...(this is for the differential shims). Does it sound like I'll be good to use the stock shims?
also. as far as the input shaft seal I forgot how far down it sits, should it bottom out in its bore? Or is it acceptable to have the edge flush with the top of the bore? like in this picture. thanks.
Last edited by chillin014; 05-03-2008 at 01:26 PM.
05-04-2008 | 08:31 PM
#53
excuse me? Where is there a solder crush method in the fsm? This is a method you guys know about and now your refusing to help me understand it?
I'm honestly blown away. I am trying to rebuild a transmission here...not install a cold air intake.
I'm honestly blown away. I am trying to rebuild a transmission here...not install a cold air intake.
05-04-2008 | 10:19 PM
#54
Chillin ... calm down mate. It'll be ok ....
Take the solder to a place that has a micrometer and have them measuer it for you, order that size shim. Tis prety straight forward. I know you're looking for help and all, but you gotta think along with us. No problem anyway .... How's everything else going?
Cheers!
Take the solder to a place that has a micrometer and have them measuer it for you, order that size shim. Tis prety straight forward. I know you're looking for help and all, but you gotta think along with us.
No problem anyway .... How's everything else going? Cheers!
05-05-2008 | 03:05 AM
#55
Dave
05-05-2008 | 05:59 AM
#56
I have looked at the manual plenty. My question was if I did the solder crush method correctly...the concept seems clear but since I've never done this before I'd appreciate the confirmation so I know I'm doing this right.
Sorry dgeesaman, you should know I appreciate your help. But I got pretty pissed when you took the time to respond only to disregard my questions and tell me to read the manual. I understand its easy to blow me off but I dont want to have to do this again for awhile and would rather post up a question and be safe than sorry.
The solder crush method is in neither write up that I've been following OR the FSM. It seems like a great way to get around having to buy a dial indicator, etc. I have a digital micrometer which is how I got those measurements.
I think I've taken a decent amount of initiative in this whole thing. Once I find out if Im done with these shims and have that input shaft seal in the right spot I'm going to reassemble all of it and probably be done.
05-05-2008 | 07:11 AM
#57
It looks like you placed the solder correctly. You measure the thinnest spot on the solder. Discard any value if the solder was in a spot that overlapped the lettering on the bearing cup, as it will produce an inaccurate value. Average the good readings. To be doubly safe, repeat the process.
Now take that final averaged measurement and look up in the table at the end of the MT section of the manual. It will tell you which shims to use, properly accounting for the preload.
Now take that final averaged measurement and look up in the table at the end of the MT section of the manual. It will tell you which shims to use, properly accounting for the preload.
05-05-2008 | 09:40 AM
#58
Take the average of your solder thicknesses (they shouldn't vary much more than .01-.03mm) and then look at the table in the back of the FSM's MT section. You add .40-.45mm to whatever your measured solder thickness is to figure out the diff shim you need. so if your crushed solder (the flat thin part) ended up being .80mm thick, you add .40 to .45mm to that, meaning you need a shim between 1.20-1.25mm thick to be within factory specs. then you look up the part # for nissan diff shims between 1.20 and 1.25mm thick and order, or reuse the ones you have if they are within that spec or close to it.
you use the same procedure for main shaft bearing except the value you add to the main shaft solder thickness is different (again, look up in the back of the FSM MT section). the one you said you couldn't get out, so if you still couldn't get that out, don't worry about it.
for the input shaft you crush the solder behind the ball bearing just the same, but rather than adding the value listed in the MT section, you subtract the value. so if your input shaft solder crush thickness was 1.00mm, you subtract the value listed in the FSM (i can't remember what it is but i'm pretty sure it is .00-.05mm). so whatever your arithmetic gives you, you look up the part # for that particular shim thickness in the FSM, and order it (or reuse your old one if it is within/close to the range your calculations say you need, if you feel comfortable doing that. it's up to you, it's your transmission).
by the way, you only put the solder behind the top bearings, right? (I say top as the trans is sitting on your workbench). you don't want to put solder behind all 6 of the bearings in the trans, just the top 3, the ones that your shims will eventually go behind when you do final assembly).
05-05-2008 | 09:41 AM
#59
Thanks. I just remembering reading that you said you put the solder in an "X" and that was the only way I could imagine incorporating that based on what I read. Hopefully the pictures can be added to JTz's how-to then and help other people.
I cant wait to put this thing back together and just forget about it for a long time.
I cant wait to put this thing back together and just forget about it for a long time.
05-05-2008 | 09:44 AM
#60
thanks neal, im tryin to do the math right now based on what I've already measured. At first I was just comparing the thickness of my solder and the shims but I'm rechecking everything.
05-05-2008 | 09:44 AM
#61
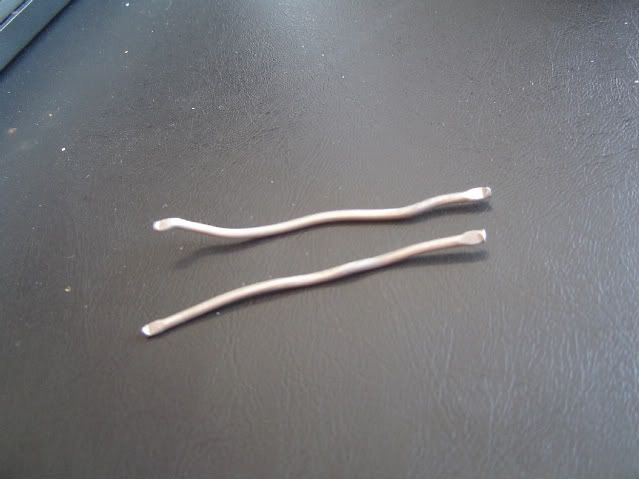
Actually I don't put the solder in an X shape like you did but it shouldn't matter as long as the ends of your X were crushed firmly behind the bearings. i cut just little strips of solder about 1/4" long and put them in the bearing bore and hold them in place with grease, then put the bearing races in the bore and bolt the trans case down.
it shouldn't make any difference in your readings how you do it.
it shouldn't make any difference in your readings how you do it.
05-05-2008 | 09:49 AM
#62
i gotcha, yeah i was thinking about trying to cover as much of that area as I could kind of make a circle but whatever works I guess. I didnt realize the shim increments were this small..half of me wants to just put the stock shims in there but god I dont want a fraction of a mm to be the difference between trashed bearings and perfectly fine bearings.
05-05-2008 | 10:01 AM
#63
The X method is nice because if you cut the solder the right length it stays put without grease. I've tried smaller pieces and they always seem to fall out of place or get lost. It also crushes easier which may give a more accurate reading.
Me, I keep the math to a minimum. I just take my endplay (solder thickness) and go right to the shim tables in back. The table has the preload/endplay built in.
Keep in mind that you can use multiple shims to get the same thickness. If the FSM says to use .72 and .76mm shims, and you have a .68, just order a .80. The same goes for availability - call and ask what is in stock at the warehouse. It's pointless to wait 2 weeks for a pair of .72's when they have a .68 and .76 on the shelf.
Dave
05-05-2008 | 10:52 AM
#64
i hear what your saying. I'm going to do the solder method one more time and do the math. Hopefully I just dont have to buy new shim(s). I'm going to be racing with this transmission werent you suggesting in another thread to go one size shim up if this is the case? I'll probably kill the synchros before I break anything I'm repairing during this rebuild though.
also about that input shaft seal...do i push that all the way down in the bore?
 i hate leaks.
also about that input shaft seal...do i push that all the way down in the bore?
i hate leaks.
05-05-2008 | 01:28 PM
#65
For a heavily loaded gearbox, it's better to have the shims on the tight side.
The preload is based upon a guess of operating temperature and resulting thermal expansion. Nissan's numbers are based on passenger car duty where the tranny doesn't get terribly hot. In road racing the gearbox develops higher temperatures, and I'd add a few thou more preload. In drag racing, not too hot since the heat input is for such a short time. For drag racing I'd use factory preloads.
Input shaft seal I put in about flush with the housing face. It's fairly forgiving since the journal on the shaft is broad.
Dave
05-05-2008 | 01:41 PM
#66
after my second measurements I've gotten what is probably an average of 1.31. although that was with a range of about a 8 hundredths (1.27 - 1.35). This is dead on with what the stock shims measure but I understand now that there is not a straight correlation between my solder measurements and the shim size. So I add .40 to this number and I get 1.71. that is off the charts as far as the FSM shim chart goes. crap.
edit- neal yes i have only been measuring with the races on the "top" housing.
I'm officially discouraged...the stock shims are lookin pretty good about now.
even my input shaft measurement is like .30 mm overboard
edit- neal yes i have only been measuring with the races on the "top" housing.
I'm officially discouraged...the stock shims are lookin pretty good about now.
even my input shaft measurement is like .30 mm overboard
Last edited by chillin014; 05-05-2008 at 01:53 PM.
05-05-2008 | 03:01 PM
#67
That's a pretty big difference, if you're measuring .05" (1.31mm) and your original shims are .05" thick. 0.05" is also a very large endplay measurement. I've had a lot that were larger than the original shims suggest, but I've not yet had one that fell off the chart.
Just double-check that you're measuring the thinnest part of the crushed solder, and your case halves are bolting solidly together with no gaps. Any dings or such will cause the case halves to stand too far apart.
So if you've checked that, I wouldn't stress about it - I'd figure out which (3) shims you need to get the proper preload. Being off 0.40mm is a whole lot. You can pretty much take one .40 shim and get there. Once the tranny warms up to operating temperature the diff will already be loose inside.
If you have trouble getting the shim in a reasonable time PM me. I probably have one.
Dave
Last edited by dgeesaman; 05-05-2008 at 03:09 PM.
05-05-2008 | 04:09 PM
#68
my biggest fear is that I will have done this wrong and then I'd be putting way too much preload on the bearing. If I thought for sure thats what it took, I'd try to get that extra shim no doubt...but I'm just having alot of second guesses now.
The cases seemed to bolt together fine, and the thinnest reading I can get out of all my smashed solders is 1.15 (+.40 = 1.55).
Its once I add that .40 that the numbers fly off the chart.
I've started putting it back together while I figure out what to do about the shims.
As far as the 5th gear shift rod, one side of it has 3 indentations and the opposite side has only 1. I'm assuming the 3 indentations face towards the 5th/reverse spring?
i guess the question now is it worse to have it under shimmed or over shimmed
Last edited by chillin014; 05-05-2008 at 08:10 PM.
05-06-2008 | 07:26 PM
#69
Chillin ... you can post those pictures on my thread if you like I don't object at all. I wish I would have done mine a bit better now that it's done and done. I dread the thought of having to re-do this trans again. Although ... I know of a good write up on it ... so maybe it wouldn't be that bad. lol
I don't object at all. I wish I would have done mine a bit better now that it's done and done. I dread the thought of having to re-do this trans again. Although ... I know of a good write up on it ... so maybe it wouldn't be that bad. lol
05-06-2008 | 07:36 PM
#70
haha I wish I would have taken more pictures myself but I was able to put everything back together properly I believe. I dont want to post up pictures of my shim measurement FAILURE and lead others to follow my path of fail lol.
The only thing I am not completely positive on is the 5th/reverse rod. the portion that sits in the bore has 3 notches on one side and 1 notch on the other side. I installed it with the 3 notches towards the reverse/5th spring and bolt.
I have the transmission completely reassembled now except for the sensors and outside case. I'm trying to decide if I should maybe just put in another shim but not actually make it equal 1.55...maybe a few shim sizes less so that if I am under or over shimming it I'm only over/under shimming it a little be rather than alot for one other other. (meeting somewhere in between)
Dgeesaman maybe you can advise me better on which route to take if you dont think I'm a complete retard by now. lol
05-06-2008 | 08:26 PM
#71
wow....dgeesaman I completely overlooked something you said that would have made all of this 10 times simpler. The chart HAS THE .40-.45 BUILT IN to it. oh...my....god.
SO I simply take my measurement, unaltered, to the table and get my shim sizes that way.
So with that said...I am definitely ON the chart but over my stock shim sizes. I need to pick up a .80 and a .92. That puts me right at the highest endplay on the chart but...at least im on it right?
SO I simply take my measurement, unaltered, to the table and get my shim sizes that way.
So with that said...I am definitely ON the chart but over my stock shim sizes. I need to pick up a .80 and a .92. That puts me right at the highest endplay on the chart but...at least im on it right?
05-13-2008 | 08:27 AM
#72
my shim should be here today and the tranny should go back together. I remember reading somewhere that the shift forks could not be in some sort of position or i'd be screwed once i got it in the car. so i guess im just going to put it all in neutral?
and thats about it.
and thats about it.
05-13-2008 | 04:38 PM
#74
i tried that and it seemed as if I could. its always hard to shift that way...so i put it in the car and the shifter seems to move between gears and go into first and second but when its in neutral the car will not move forward so I decided not to start it up because something is wrong.
am i going to have to pull the tranny back out? what is the verdict on which direction that one fork rod should be facing with the 3 notches?
am i going to have to pull the tranny back out? what is the verdict on which direction that one fork rod should be facing with the 3 notches?
05-13-2008 | 04:53 PM
#75
05-13-2008 | 05:16 PM
#76
Correct. It seems like I can get into all the gears but they are very hard and its hard to just move the shifter around in general.
On top of that I can't get the car to crank over either so I'm pretty pissed off.
Any help is appreciated.
On top of that I can't get the car to crank over either so I'm pretty pissed off.
Any help is appreciated.
05-13-2008 | 05:57 PM
#78
ut oh ... sounds like you have the car in two gears at one time, or you might have put a check ball in wrong. will it go into gear with the car off? is the stick in "N" or a gear? more info plz ....
what was your total shim thickness btw? Diff .,,,,
EDIT: ok ... after some more reading and actually soaking it in ... I think you have the 5/R rod in backwards. The dips in the end of the rod are what the check ***** rest in, thus holding the fork in that position (holding it in gear). Man mate ... whish I could be there to help you. I got my own things goin on atm tho .... - don't we all!
Last edited by JtzMax; 05-13-2008 at 06:03 PM.
05-13-2008 | 06:12 PM
#79
It seems like I can put the shifter into different gears if I am rough enough with it.
The stick seems to be in neutral but the car acts like its in gear when I let off the clutch slowly. Doesn't move..seems locked up. I don't remember having a gear selected when I put the casing together...I remember making sure it wasn't in gear.
The only spot I was unsure of was I believe the 5/r shift fork rod with which direction it was supposed to sit in there (one side is notched 3 times) for the check ***** but check ***** are on both sides of it. Couldn't get an answer for that so I put it with the 3 notches facing the bolt and spring.
It feels prety horrible trying to move between gears and into gear..not natural at all.
I don't remember my total diff shim size I believe the thickest size on the chart. Ill check for you later, I'm stressed...going to the gym now.
05-13-2008 | 07:44 PM
#80
ut oh ... sounds like you have the car in two gears at one time, or you might have put a check ball in wrong. will it go into gear with the car off? is the stick in "N" or a gear? more info plz ....
what was your total shim thickness btw? Diff .,,,,
EDIT: ok ... after some more reading and actually soaking it in ... I think you have the 5/R rod in backwards. The dips in the end of the rod are what the check ***** rest in, thus holding the fork in that position (holding it in gear). Man mate ... whish I could be there to help you. I got my own things goin on atm tho .... - don't we all!
what was your total shim thickness btw? Diff .,,,,
EDIT: ok ... after some more reading and actually soaking it in ... I think you have the 5/R rod in backwards. The dips in the end of the rod are what the check ***** rest in, thus holding the fork in that position (holding it in gear). Man mate ... whish I could be there to help you. I got my own things goin on atm tho .... - don't we all!
edit- after looking at the FSM diagram it shows the 5/R rod installed just how i installed it with the 3 slots facing the checkball and return springs just like they do on the other 2 rods. so...now i'm really confused....
Last edited by chillin014; 05-13-2008 at 07:49 PM.