
HOW TO: Install the Suprastick V4 for your 4th gen


HOW TO: Install the Suprastick V4 for your 4th gen
Got a few requests on a how to for this so i decided to do a write up.
i'm not going to go too much into the basics of wire work. If you don't know how to work with wiring, i suggest you do some research before looking at this. anyways, lets begin...
the suprastick manual can be downloaded here:
http://www.latentsolutions.com/Download.html
Tools needed
1. Wire stripper
2. wire taps
3. wire quick connectors (slide or bullet style)
4. soldering iron
5. a lot of wires
Additional parts needed:
1. DB9 male to DB9 male serial cable (for LCD screen)
2. Null modem adapter (for LCD screen)
3. USB to serial cable
4. 16x2 LCD screen with serial port (optional but recommended)
5. shift light (optional)
6. two SPST toggle switches
*EDIT: you can buy a DB9 male to DB9 male serial cable w/ a built in Null modem adapter
before you begin, disconnect the neg terminal of the battery
Step 1:
remove shifter trim, ash tray, and the whole middle piece (one w/ the cupholder and armrest) for easier access to the TCM.
Step 2:
locate the TCM, should be directly in front of you, you can't miss it. looks like the ECU. remove clear plastic cover. here you will need to identify just 2 wires, one for solenoid A and other for solenoid B. these are the solenoids that controls your gear shifting.
Step 3:
intercept wires 6 and 7 like so:
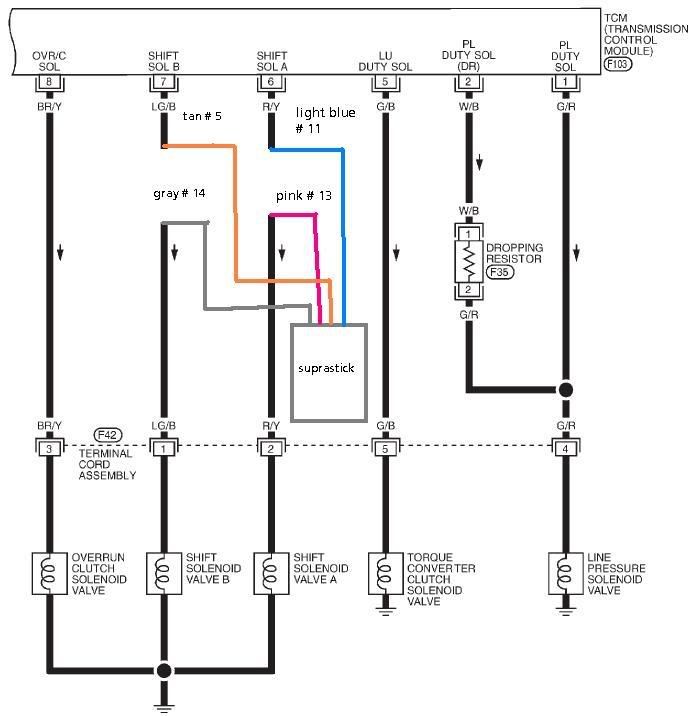
*Optional* If you want to let the suprastick control the TC lockup feature, you will have to cut wire #5 on the TCM and connect it to wire #15 on the suprastick. Then you will have to find an adequate brake signal source to tap into.
Step 4:
Finish wiring all the other wires
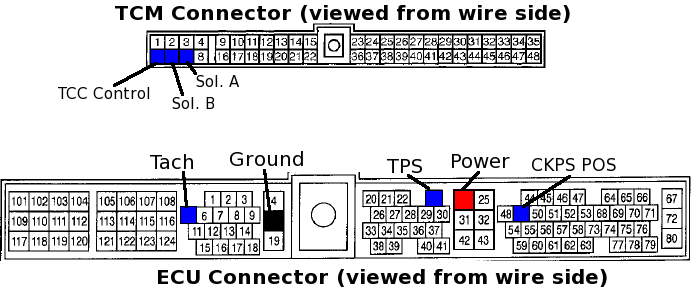
(DISREGARD THE CKPS POS)
Suprastick:
wire 1: wire to ground source
wire 2: wire to a SPST switch, other end to +12V source
wire 3: tap into pin 24 on ecu
wire 4: refer to step 3
wire 5: refer to step 3
wire 8: Tap into pin#28 on the middle harness behind the gauge cluster.
wire 9: tap into pin 23 on ecu
wire 10: tap into pin #1 on the ASCD, located above the gas pedal (EL 151 of FSM)
wire 11: tap into pin 5 on ecu
wire 12: optional, refer to step 3
wire 13: refer to step 3
wire 14: refer to step 3
wire 15: optional, refer to step 3
wire 16: optional
wire 17: tap into pin #2 on the ASCD, located above the gas pedal (EL 151 of FSM)
wire 18: Optional
wire 19: Optional
wire 20: wire to a SPST switch, other end to a +12V source
for Wires 18 and 19, again this is optional. this is for the drop resistor, to run maximum pressure for the tranny line. i have mine connected to another toggle switch but if you want the suprastick to control it, just run it inline with the two wires on the drop resistor.
Step 5:
* Now for the programming. I'm not going to go too much into detail for this part b/c thats what the manual is for. But there are a couple things that i need to mention that will save you time and headaches.
* For the initial setup, when your setting up your hyperterminal, select the correct COM port and follow all the settings. One thing you want to keep an eye on is the "hardware flow control" setting. try setting the flow control to hardware first and see if the hyperterminal screen corresponds when you push 1. if it doesn't, disconnect, go back into the flow control setting and turn hardware flow to NONE. Now it should work.
* Couple things for the Vehicle settings. One advice is, keep the speed sensor teeth to 20 and just adjust the rear end ratio until the spd display matches the speed on the gauge cluster. Best to do this w/ 2 people, one driving at a constant speed of say 20 mph, and the other adjusting the rear end ratio.
* For tire size, use the tire calculator, http://www.miata.net/garage/tirecalc.html
and record the diameter of your tire size.
* Also, remember to correctly adjust the shift pattern under the shift solenoid setup. by default its for the supra.
* for the automapping, the stock ecu defines your driving style, and not the other way around. The SSv4 will learn the stock ecu shift points if you have the stock ecu hooked up to it. Just drive the car once through the largest throttle range possible for as large a speed range possible and you are done. It is usually just quicker to tweak the base map provided, however.
that should do it. if anyone is interested in doing this and have any questions, please don't hesitate to ask.
i'm not going to go too much into the basics of wire work. If you don't know how to work with wiring, i suggest you do some research before looking at this. anyways, lets begin...
the suprastick manual can be downloaded here:
http://www.latentsolutions.com/Download.html
Tools needed
1. Wire stripper
2. wire taps
3. wire quick connectors (slide or bullet style)
4. soldering iron
5. a lot of wires
Additional parts needed:
1. DB9 male to DB9 male serial cable (for LCD screen)
2. Null modem adapter (for LCD screen)
3. USB to serial cable
4. 16x2 LCD screen with serial port (optional but recommended)
5. shift light (optional)
6. two SPST toggle switches
*EDIT: you can buy a DB9 male to DB9 male serial cable w/ a built in Null modem adapter
before you begin, disconnect the neg terminal of the battery
Step 1:
remove shifter trim, ash tray, and the whole middle piece (one w/ the cupholder and armrest) for easier access to the TCM.
Step 2:
locate the TCM, should be directly in front of you, you can't miss it. looks like the ECU. remove clear plastic cover. here you will need to identify just 2 wires, one for solenoid A and other for solenoid B. these are the solenoids that controls your gear shifting.
Step 3:
intercept wires 6 and 7 like so:
*Optional* If you want to let the suprastick control the TC lockup feature, you will have to cut wire #5 on the TCM and connect it to wire #15 on the suprastick. Then you will have to find an adequate brake signal source to tap into.
Step 4:
Finish wiring all the other wires
(DISREGARD THE CKPS POS)
Suprastick:
wire 1: wire to ground source
wire 2: wire to a SPST switch, other end to +12V source
wire 3: tap into pin 24 on ecu
wire 4: refer to step 3
wire 5: refer to step 3
wire 8: Tap into pin#28 on the middle harness behind the gauge cluster.
wire 9: tap into pin 23 on ecu
wire 10: tap into pin #1 on the ASCD, located above the gas pedal (EL 151 of FSM)
wire 11: tap into pin 5 on ecu
wire 12: optional, refer to step 3
wire 13: refer to step 3
wire 14: refer to step 3
wire 15: optional, refer to step 3
wire 16: optional
wire 17: tap into pin #2 on the ASCD, located above the gas pedal (EL 151 of FSM)
wire 18: Optional
wire 19: Optional
wire 20: wire to a SPST switch, other end to a +12V source
for Wires 18 and 19, again this is optional. this is for the drop resistor, to run maximum pressure for the tranny line. i have mine connected to another toggle switch but if you want the suprastick to control it, just run it inline with the two wires on the drop resistor.
Step 5:
* Now for the programming. I'm not going to go too much into detail for this part b/c thats what the manual is for. But there are a couple things that i need to mention that will save you time and headaches.
* For the initial setup, when your setting up your hyperterminal, select the correct COM port and follow all the settings. One thing you want to keep an eye on is the "hardware flow control" setting. try setting the flow control to hardware first and see if the hyperterminal screen corresponds when you push 1. if it doesn't, disconnect, go back into the flow control setting and turn hardware flow to NONE. Now it should work.
* Couple things for the Vehicle settings. One advice is, keep the speed sensor teeth to 20 and just adjust the rear end ratio until the spd display matches the speed on the gauge cluster. Best to do this w/ 2 people, one driving at a constant speed of say 20 mph, and the other adjusting the rear end ratio.
* For tire size, use the tire calculator, http://www.miata.net/garage/tirecalc.html
and record the diameter of your tire size.
* Also, remember to correctly adjust the shift pattern under the shift solenoid setup. by default its for the supra.
* for the automapping, the stock ecu defines your driving style, and not the other way around. The SSv4 will learn the stock ecu shift points if you have the stock ecu hooked up to it. Just drive the car once through the largest throttle range possible for as large a speed range possible and you are done. It is usually just quicker to tweak the base map provided, however.
that should do it. if anyone is interested in doing this and have any questions, please don't hesitate to ask.
Last edited by G4nismo; Sep 17, 2009 at 02:51 PM.


I have a question. I am not totally familiar with the suprastick, but you mentioned optionally wiring the DR. Can the supra stick be programmed to only run at full line pressure if you are at WOT?
Would make things easy instead of having to have your own WOT switch.
Nice write up by the way!!!
Would make things easy instead of having to have your own WOT switch.
Nice write up by the way!!!


Senior Member
Joined: Jan 2010
Posts: 1,393
From: Denver, CO
http://www.youtube.com/watch?v=uD6hJpx3zak
Its explained how it works in this post.

Thread
Thread Starter
Forum
Replies
Last Post
Finkle
4th Generation Maxima (1995-1999)
13
Sep 27, 2015 09:53 PM
MikesChevelle
5th Generation Maxima (2000-2003)
4
Aug 6, 2015 11:36 AM