
New Quad retrofit nearly complete!
 12-09-2009, 09:11 PM
#1


New Quad retrofit nearly complete!
I write books when I actually post... 9 years and counting, and less than 1100 posts... I lurk or speak my mind...
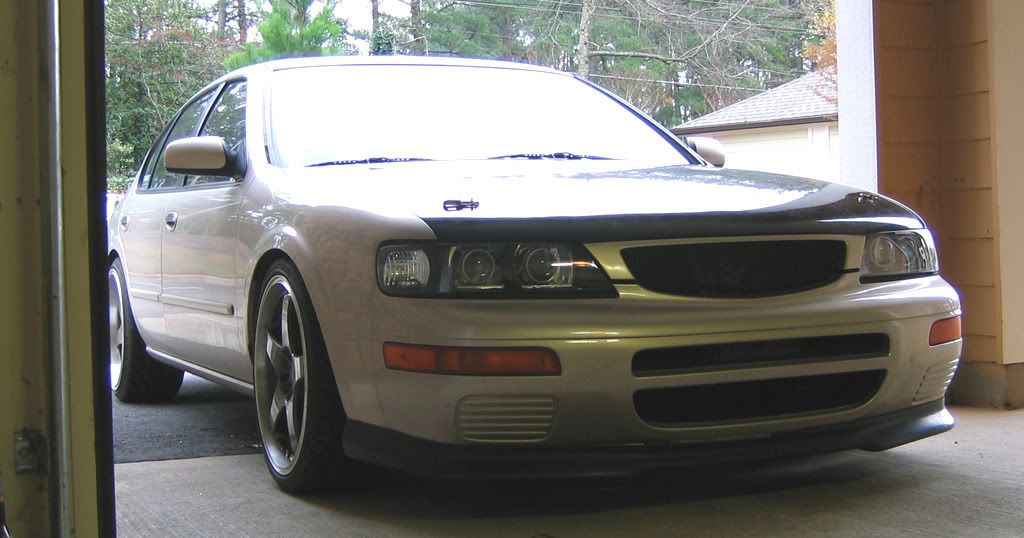
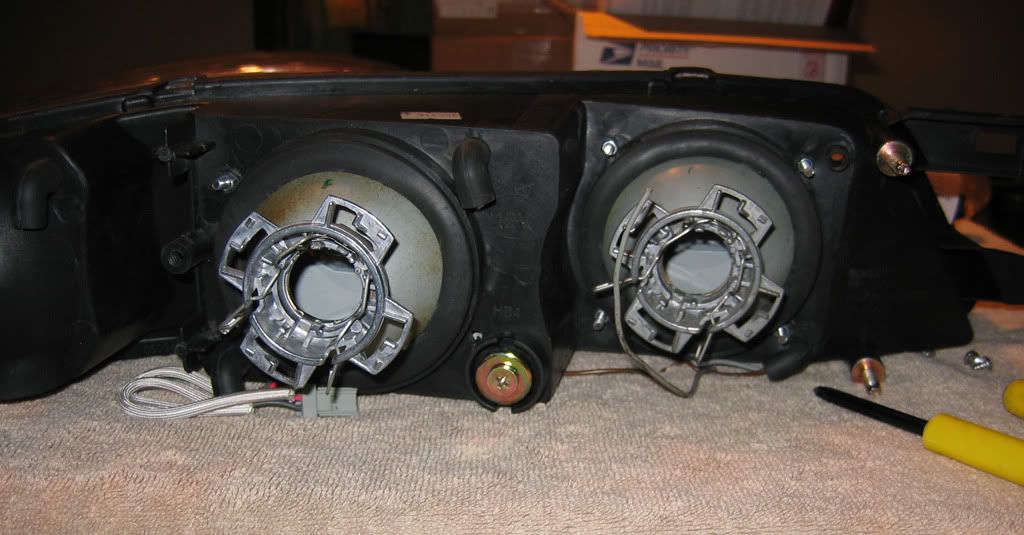
Before Picture:
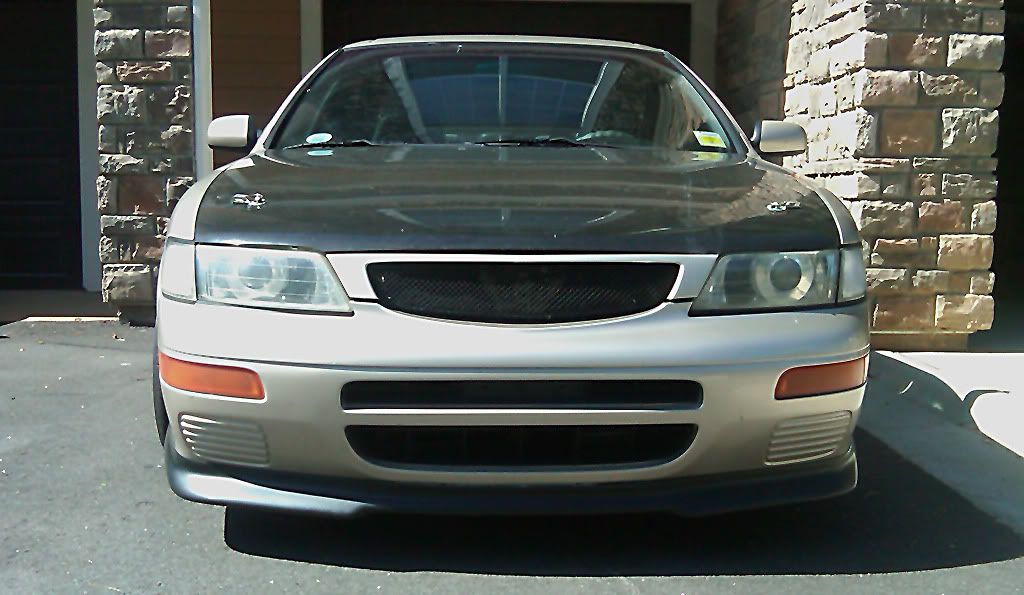
The quality is awesome right?!!? But anyway...
Background:
As some of you OG's that venture in here, I bought a set of projector headlights from a former member about 6 years ago that were absolutely horrible. One projector was E-Code, the other wasn't, and the housings looked like they came out of a junkyard car (not new like stated in the FS thread), yadda yadda. Even after fixing the housing problem, I put up with mismatched cut-offs for almost 6 years. I had wanted to do a new retrofit project ever since I did my roommate's (NCSU_MAX � first known bixenon Cefiro retro). Those retro's, as well as stock lights, are extremely simple with the E55 projectors, but I wanted something different. Well all that waiting finally ended this Monday when my new R34 style ebay headlights came in as well as an HID kit from forum sponser HIDextra, and two new E55 Hella Projectors from TheRetrofitSource.com. I chose to go with the E55's because they are the cheapest, have one of the larger lenses (3 inchers), but still have a very colorful cut-off and decently wide beam even with the Fresnel lens (but with 4 of them... wide is relative). On these I did do a slight color mod to the shields (a slightly harder �bend� - very, very, very, slight).
The plan for these is to have the �low beams� be controlled by the corner/parking lamp wiring, and the �high beam� to be controlled by the normal low beam position. That reduces, IMO, some of the effort in wiring. The only pitfall is that I will need to wire in 2 diodes to the �high beam� projectors so that when I hit the high beams (with the light stalk turned to the low beam position), they all stay on and drop the shields together (can you say bright??!)
The Process:
We all know what the "R34's" look like by now, so I'll spare a picture in this post. I started by baking them to perfection (215 degrees for 13mins works...and is what i do), tearing them apart and realized the magnitude of what it involves to put 4 pretty damn big projectors into that housing. Needless to say, I had a fair amount of work ahead of me!
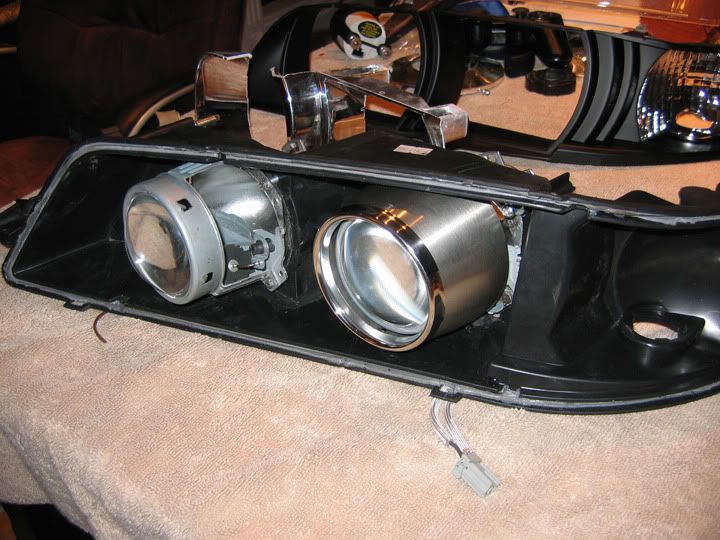
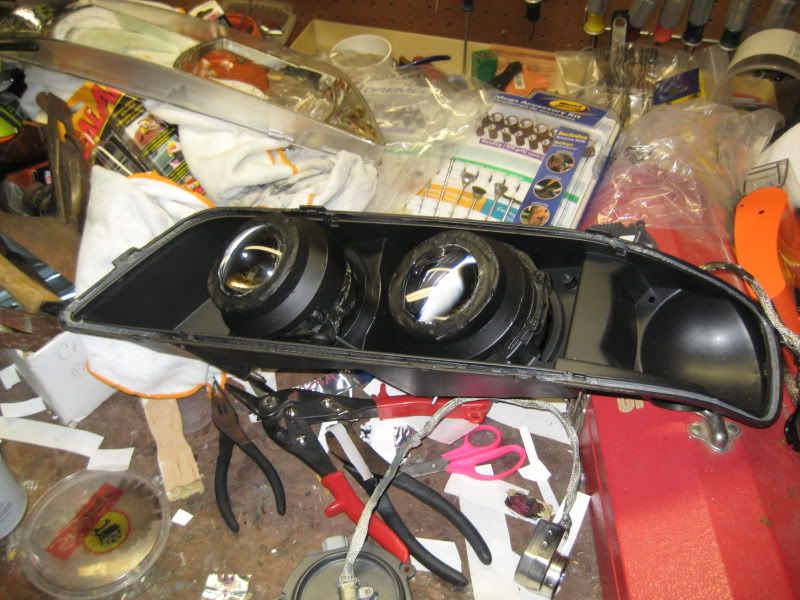
Picture showing the projectors and one sitting in the housing:
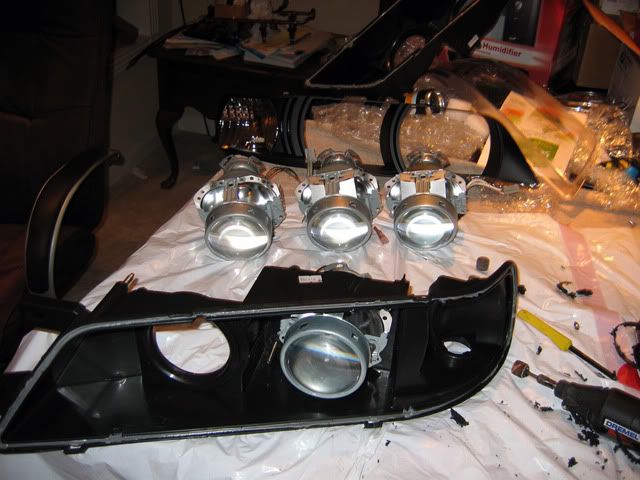
Unlike Cefiro's, there's a much more involved mounting process to get them to be aligned and still be somewhat adjustable. I Dremeled out the backs of the lights, keeping them round (explained later) and focused on keeping the virtual center flat... It took a good hour for the first hole; heaven forbid I screw up a set of headlights the day I get them for a project I waited 6 years to start... The second hole went much easier and quicker (like 15 mins). My mounting solution was to use 4 screws in each projector through the back of the housing so up, down, left, and right adjustments would be fairly simple. This is why the round part was important, to allow a decent seal on the projector, and still allow movement. Now I didn't take pictures of the mounting holes I chose on the projectors but you'll be able to easily tell when you look at them. After a 20 minute trip back to the car, the driver's side light was done. I only ran into a couple problems. One was that the headlight bracket to mount the part of the headlight where the factory parking lights are is a ***** to screw in to the light. The second was that the �bucket� in the core/radiator support wasn't deep enough to allow the igniter to sit on the back of the bulb � mallet > bucket. The only other major problem was that in a fluke accident, one of my original Mercedes Hella ballasts decided to commit suicide while aiming the light. I hadn't put in the new ballasts yet, so I had to set the headlight in the middle of the radiator and connect my old ballasts to the lights and when I stepped away to get a look without the glare, slightly turned the headlight, and the ballast fell off the radiator hose and hit the extra positive battery terminal I have on my optima for accessories and it died a sparky death, /cry. After that, I installed one of the new ballasts and finished aiming. I then went back upstairs and cut the original reflector piece to fit over the projectors to act as a semi bezel until I finally decide which type to go for on TheRetroFitSource.com. I'm pretty set on the gatlin' gun ones, but size is sort of an issue.
-Note- this light has the old regular (non-E-code) projector in it in the �high beam� location.
Buttoning it up:
Picture from the top:

Since I can't remember the limit on pictures per post, and I don't want Firefox to eat my post again... I will post the rest in the next post!
Before Picture:
The quality is awesome right?!!? But anyway...
Background:
As some of you OG's that venture in here, I bought a set of projector headlights from a former member about 6 years ago that were absolutely horrible. One projector was E-Code, the other wasn't, and the housings looked like they came out of a junkyard car (not new like stated in the FS thread), yadda yadda. Even after fixing the housing problem, I put up with mismatched cut-offs for almost 6 years. I had wanted to do a new retrofit project ever since I did my roommate's (NCSU_MAX � first known bixenon Cefiro retro). Those retro's, as well as stock lights, are extremely simple with the E55 projectors, but I wanted something different. Well all that waiting finally ended this Monday when my new R34 style ebay headlights came in as well as an HID kit from forum sponser HIDextra, and two new E55 Hella Projectors from TheRetrofitSource.com. I chose to go with the E55's because they are the cheapest, have one of the larger lenses (3 inchers), but still have a very colorful cut-off and decently wide beam even with the Fresnel lens (but with 4 of them... wide is relative). On these I did do a slight color mod to the shields (a slightly harder �bend� - very, very, very, slight).
The plan for these is to have the �low beams� be controlled by the corner/parking lamp wiring, and the �high beam� to be controlled by the normal low beam position. That reduces, IMO, some of the effort in wiring. The only pitfall is that I will need to wire in 2 diodes to the �high beam� projectors so that when I hit the high beams (with the light stalk turned to the low beam position), they all stay on and drop the shields together (can you say bright??!)
The Process:
We all know what the "R34's" look like by now, so I'll spare a picture in this post. I started by baking them to perfection (215 degrees for 13mins works...and is what i do), tearing them apart and realized the magnitude of what it involves to put 4 pretty damn big projectors into that housing. Needless to say, I had a fair amount of work ahead of me!
Picture showing the projectors and one sitting in the housing:
Unlike Cefiro's, there's a much more involved mounting process to get them to be aligned and still be somewhat adjustable. I Dremeled out the backs of the lights, keeping them round (explained later) and focused on keeping the virtual center flat... It took a good hour for the first hole; heaven forbid I screw up a set of headlights the day I get them for a project I waited 6 years to start... The second hole went much easier and quicker (like 15 mins). My mounting solution was to use 4 screws in each projector through the back of the housing so up, down, left, and right adjustments would be fairly simple. This is why the round part was important, to allow a decent seal on the projector, and still allow movement. Now I didn't take pictures of the mounting holes I chose on the projectors but you'll be able to easily tell when you look at them. After a 20 minute trip back to the car, the driver's side light was done. I only ran into a couple problems. One was that the headlight bracket to mount the part of the headlight where the factory parking lights are is a ***** to screw in to the light. The second was that the �bucket� in the core/radiator support wasn't deep enough to allow the igniter to sit on the back of the bulb � mallet > bucket. The only other major problem was that in a fluke accident, one of my original Mercedes Hella ballasts decided to commit suicide while aiming the light. I hadn't put in the new ballasts yet, so I had to set the headlight in the middle of the radiator and connect my old ballasts to the lights and when I stepped away to get a look without the glare, slightly turned the headlight, and the ballast fell off the radiator hose and hit the extra positive battery terminal I have on my optima for accessories and it died a sparky death, /cry. After that, I installed one of the new ballasts and finished aiming. I then went back upstairs and cut the original reflector piece to fit over the projectors to act as a semi bezel until I finally decide which type to go for on TheRetroFitSource.com. I'm pretty set on the gatlin' gun ones, but size is sort of an issue.
-Note- this light has the old regular (non-E-code) projector in it in the �high beam� location.
Buttoning it up:
Picture from the top:
Since I can't remember the limit on pictures per post, and I don't want Firefox to eat my post again... I will post the rest in the next post!
 12-09-2009, 09:11 PM
#2
Continuing and not as wordy...
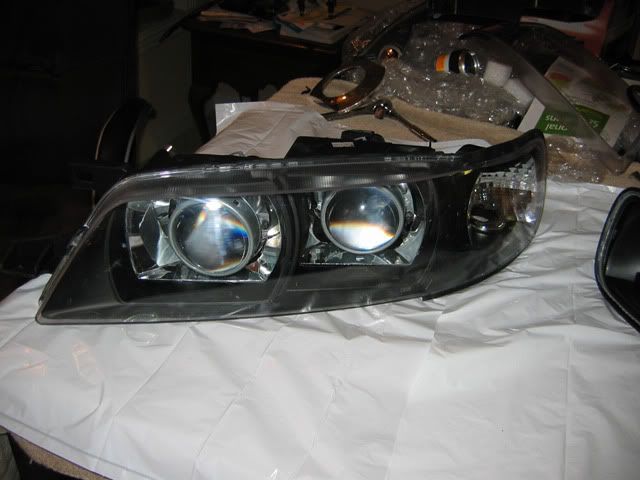
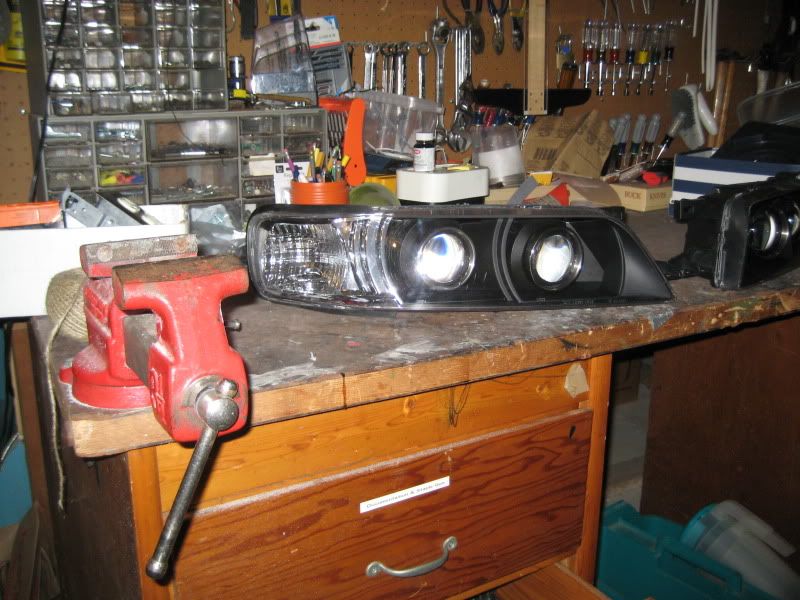
I then did the second light the same way as the first one, the only major difference was that the E-code projector went into the “high beam” part of the light. This light is going to fill in any gaps (haha) in light up to the lower level of the “step” from the other 3 lights.
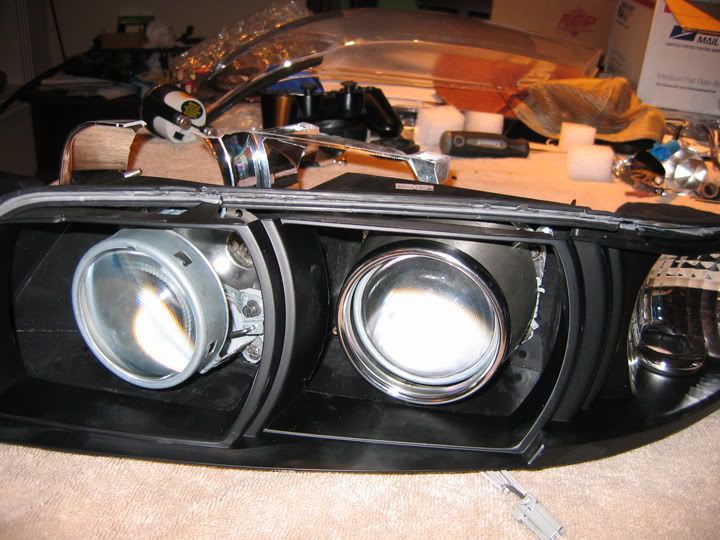
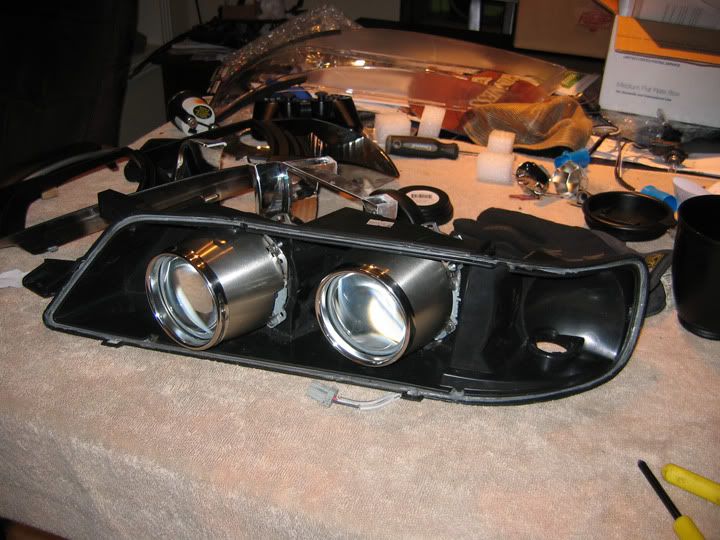
Two side by side (right one not quite finished):
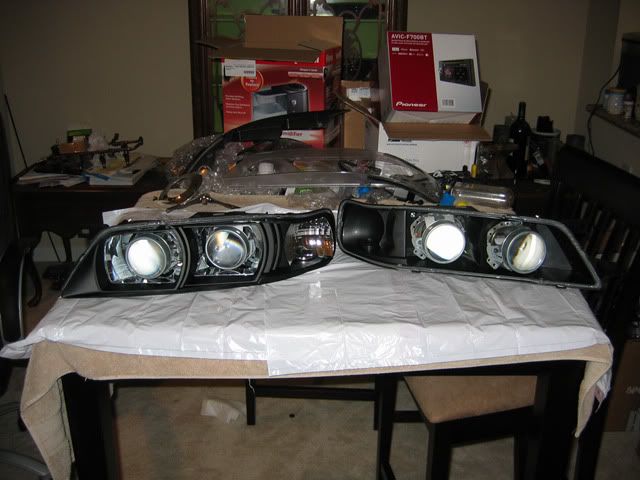
Spent a good hour working out mounting kinks and trying to level 4 projectors... I did come up with a pretty ingenious idea for fixing the up/down pitch; I used a ZipTie on the lower, inner mounting bolt and it allowed for there to be pressure on the upper bolt such that loosening the upper nut lowered the beam, and tightening it raised the beam. Also (though this is a little bit sketchy for me) loosening the “corner” lamp screw adjusted the beams left and right a small amount – this was limited by the length of the included screw, which I will be remedying later.
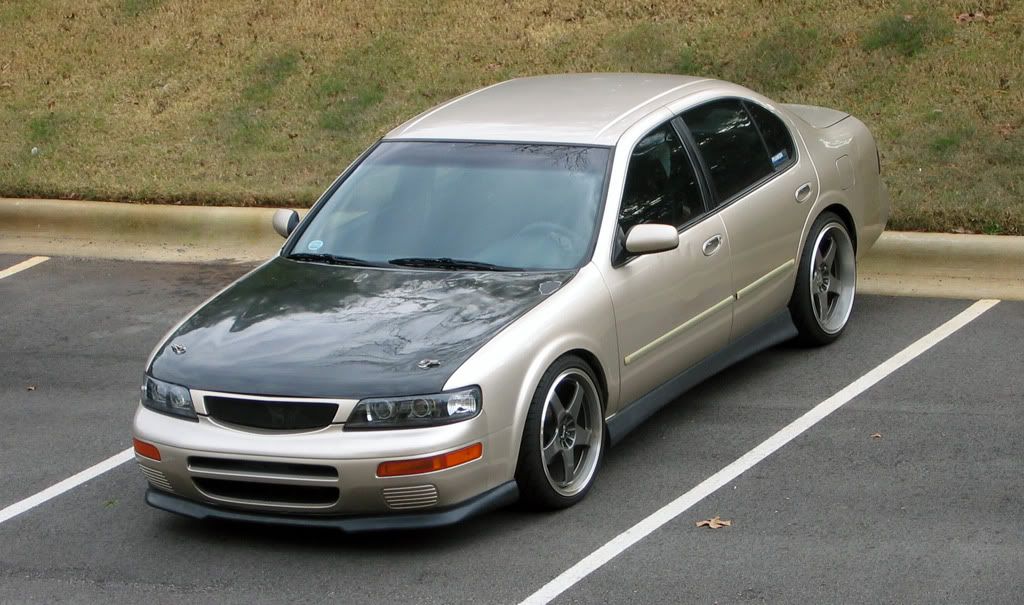
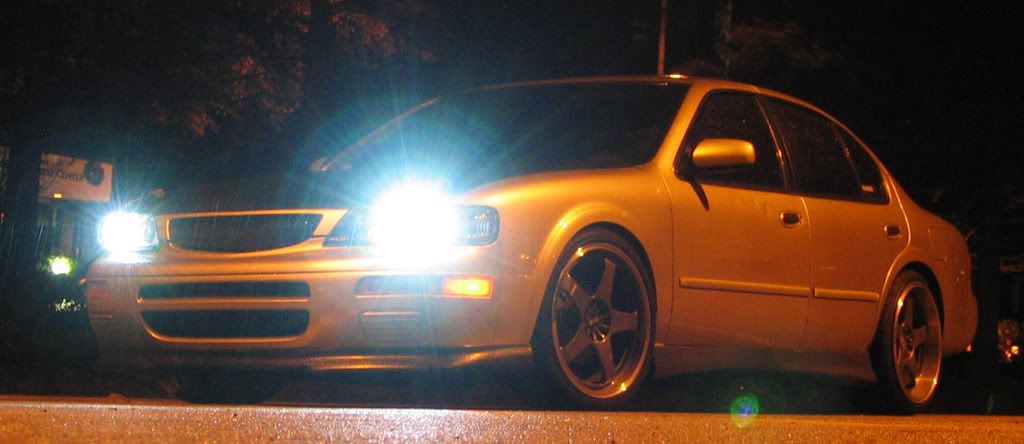
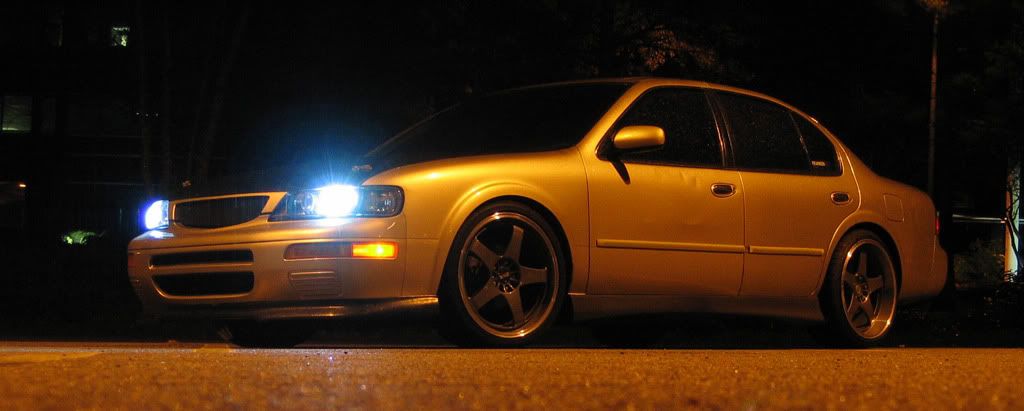
Here's the final shots and a cutoff pic (if you look closely you can see former MotM NCSU_MAX's car in the second picture):
In conclusion – so far:
This setup puts out a lot more usable light than my old setup (duh...) and all that's left is to get or make some bezels/shrouds to get rid of the 4 major hot-spots I have (all very narrow) and the glare halo's from the reflector “bezels.” I like some of the light (at night) around the outside of the projector aesthetically, but other drivers might not feel the same way, heh.
Thoughts and comments greatly appreciated!
Cliffs: look at the pictures, they're pretty! Not as easy as it looks, but still a fun project I would definitely do again (hopefully won't NEED to do again)
I then did the second light the same way as the first one, the only major difference was that the E-code projector went into the “high beam” part of the light. This light is going to fill in any gaps (haha) in light up to the lower level of the “step” from the other 3 lights.
Two side by side (right one not quite finished):
Spent a good hour working out mounting kinks and trying to level 4 projectors... I did come up with a pretty ingenious idea for fixing the up/down pitch; I used a ZipTie on the lower, inner mounting bolt and it allowed for there to be pressure on the upper bolt such that loosening the upper nut lowered the beam, and tightening it raised the beam. Also (though this is a little bit sketchy for me) loosening the “corner” lamp screw adjusted the beams left and right a small amount – this was limited by the length of the included screw, which I will be remedying later.
Here's the final shots and a cutoff pic (if you look closely you can see former MotM NCSU_MAX's car in the second picture):
In conclusion – so far:
This setup puts out a lot more usable light than my old setup (duh...) and all that's left is to get or make some bezels/shrouds to get rid of the 4 major hot-spots I have (all very narrow) and the glare halo's from the reflector “bezels.” I like some of the light (at night) around the outside of the projector aesthetically, but other drivers might not feel the same way, heh.
Thoughts and comments greatly appreciated!
Cliffs: look at the pictures, they're pretty! Not as easy as it looks, but still a fun project I would definitely do again (hopefully won't NEED to do again)
12-09-2009, 09:21 PM
#3
Senior Member
iTrader: (11)

Join Date: Jun 2006
Location: Cherry Hill, NJ / Hoboken, NJ
Posts: 1,325
Welcome to the quad club. You can just go ahead and paypal me your $25 membership dues 
Looks good. Any more pictures of the mounting idea? I've been having problems with mine, and I'm re-doing it (retrofit v3.0), and I'm curious how you mounted them.
If you want to save some money on shrouds, check out page 2 of the thread in my sig. 3" > 4" PVC pipe reducer and walmart travel mug chrome rings. The best shrouds that $10 can buy.
Last edited by nalc; 12-09-2009 at 09:24 PM.
 12-09-2009, 09:55 PM
#5
As for the projector mounting, the E55's have like 12 holes around the edge of them, I just ran 4-4x30mm screws (which are quite a bit too long, was done on purpose to cut to fit) through 4 of those holes through holes I drilled into the back of the housing. If you tighten one, it will either raise or lower the projector and also slightly turn it. The best way to get it to work is to loosen three bolts and set the 4th snug. Start with the polar opposite screw and make that one snug and check your level. If all is well evenly tighten and then cinch down those and then snug the other two. If you find that it isn't quite where you want it, the other two bolts will help better align the projector. It takes time, and having to do 4 of them is pretty rough. I happened to be a god and the passenger light was perfect where I snugged it up at durring mock-up and only had to tighten the bolts down. The first light took about 20 minutes to correctly align. Then it took about another 30 mins to get everything how i wanted with them aligning with each other.
Thinking about getting 2 pair of THESE but I really like the Gatlin' Gun bezels but at $70 and $100 respectively for 2 pair... I don't know. They act as shrouds and add a little style... I just need to be sure that the PVC wont melt. I'm pretty sure I could come up with an effective and nice looking shroud/bezel combo, just need to make sure it doesn't cause more harm than good!
Hmmm... my school has a nice lathe...the stock is just so exspencive though!
Thanks for the comments guys, glad you guys like them!
Last edited by Mad-MAX_SE; 12-09-2009 at 10:09 PM.


 12-09-2009, 10:07 PM
#8
Senior Member
iTrader: (11)
Join Date: Jun 2006
Location: Cherry Hill, NJ / Hoboken, NJ
Posts: 1,325
Thanks man, I don't have any more pictures on the mounting part. If you're talking about the up and down, just loosen the headlight bolts closest to the radiator and cinch up a ZipTie to the bolt on the bottom.
As for the projector mounting, the E55's have like 12 holes around the edge of them, I just ran 4-4x30mm screws (which are quite a bit too long, was done on purpose to cut to fit) through 4 of those holes through holes I drilled into the back of the housing. If you tighten one, it will either raise or lower the projector and also slightly turn it. The best way to get it to work is to loosen three bolts and set the 4th snug. Start with the polar opposite screw and make that one snug and check your level. If all is well evenly tighten and then cinch down those and then snug the other two. If you find that it isn't quite where you want it, the other two bolts will help better align the projector. It takes time, and having to do 4 of them is pretty rough. I happened to be a god and the passenger light was perfect where I snugged it up at durring mock-up and only had to tighten the bolts down. The first light took about 20 minutes to correctly align. Then it took about another 30 mins to get everything how i wanted with them aligning with each other.
I actually had that same thought the other night at Home Depot getting the screws, but the problem is that my projectors are "open element" style projectors. So with the heat, there's a chance it could drip down into my projector, onto the shields, or even into/onto the solenoid. I need some metal shrouds and then put a bezel over that.
Thinking about getting 2 pair of THESE but I really like the Gatlin' Gun bezels but at $70 and $100 respectively for 2 pair... I don't know. They act as shrouds and add a little style... I just need to be sure that the PVC wont melt. I'm pretty sure I could come up with an effective and nice looking shroud/bezel combo, just need to make sure it doesn't cause more harm than good!
Thanks for the comments guys, glad you guys like them!
12-09-2009, 10:46 PM
#9
 12-09-2009, 11:17 PM
#10

looks good ive always loved the quads i was planning on doing a setup like that but the amount of precision required scared me away, right now thou im looking at doing another setup maybe FX, my E-46s are getting alittle old, and narrow, and i have these nice pretty ZKW lenses too, but especially since i broke the adjuster, now when im driving down the highway i see a nice pretty little blue cutoff on the roadsigns......that are over head


 12-11-2009, 07:43 AM
#21
 its in bad shape anyway. Have to sand off the clearcoat as is and reclear it.
12-11-2009, 12:27 PM
its in bad shape anyway. Have to sand off the clearcoat as is and reclear it.
12-11-2009, 12:27 PM
#23
Senior Member

Join Date: Sep 2009
Location: Worcester, MA
Posts: 4,011
I was lookin to installing those headlights for my max. But Im not tryin to rewire anything. If i keep the wiring as it is now...will the 9004 fit or do i need to convert to 9007. I dont wanna do that jus to have separate high beams. The high beams are never really on that nuch anyways
12-11-2009, 04:44 PM
#24
I was lookin to installing those headlights for my max. But Im not tryin to rewire anything. If i keep the wiring as it is now...will the 9004 fit or do i need to convert to 9007. I dont wanna do that jus to have separate high beams. The high beams are never really on that nuch anyways

 12-12-2009, 10:47 PM
#28
haha, another lonely island fan!
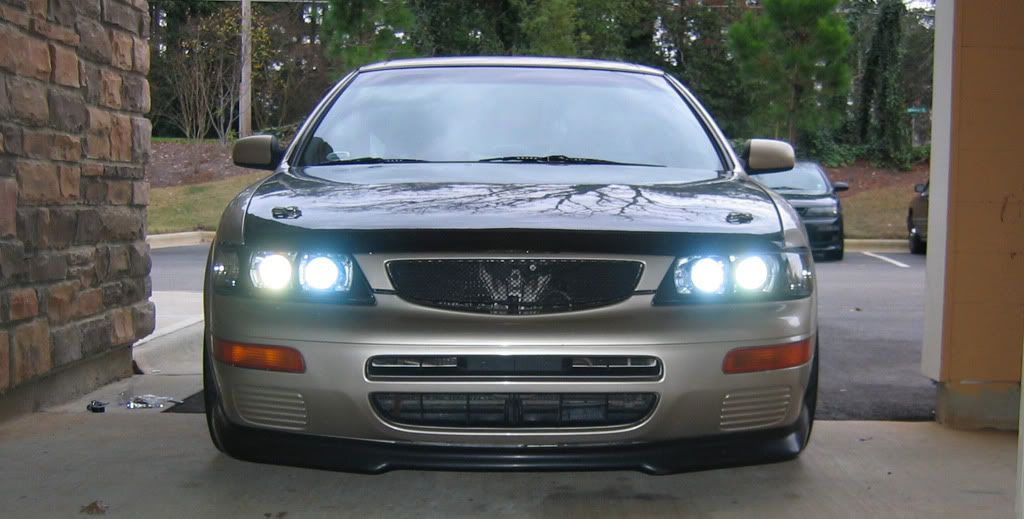
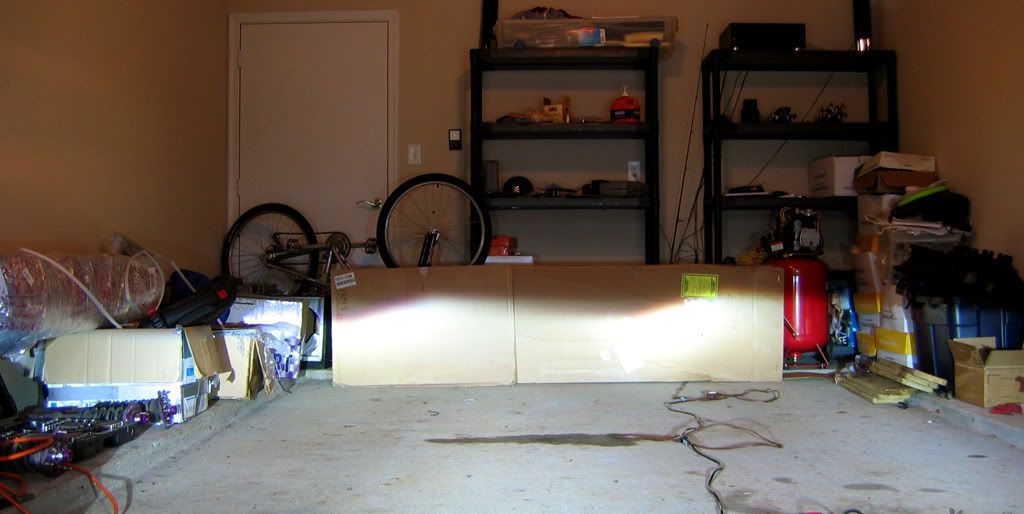
here's a couple from tonight - weather sucked as usual, but a couple decent shots,
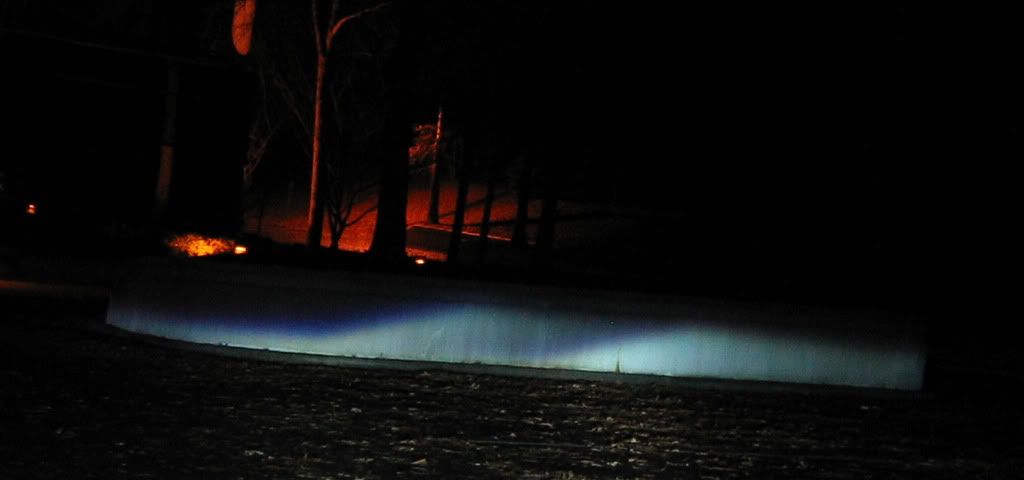
The wall is about 50ft from where the car is; 1" down from level @50ft is damn good and level. Did figure out that i'm ~2" off ~250ft, so it's as flat as oklahoma (level that is).
BTW - HID's are 6000k for those that asked... I'll have 3000k in the "high beam" soon to act as fog lights....
here's a couple from tonight - weather sucked as usual, but a couple decent shots,
The wall is about 50ft from where the car is; 1" down from level @50ft is damn good and level. Did figure out that i'm ~2" off ~250ft, so it's as flat as oklahoma (level that is).
BTW - HID's are 6000k for those that asked... I'll have 3000k in the "high beam" soon to act as fog lights....
Last edited by Mad-MAX_SE; 12-13-2009 at 04:29 PM.

 12-13-2009, 08:26 PM
#32
Well i decided to go to Home Depot tonight to get some PVC 4" - 3" reducers, but they were closed early for some reason. From following Nalc's thread I knew I wanted to try his chrome ring idea he had, so i went to Walmart to grab some of their cheap mugs. While I was grabbing those mugs, I happened to notice these stainless steel "desk mugs" they had there. Well, i went and grabbed a tape measure off the shelf (gotto love supercenter's) and damn if that mug didn't look like it would fit damn near perfectly over my projector. So I grabbed 4 desk mugs and 4 travel mugs.
Here's the two types of mugs I used: and the headlight as it was before:
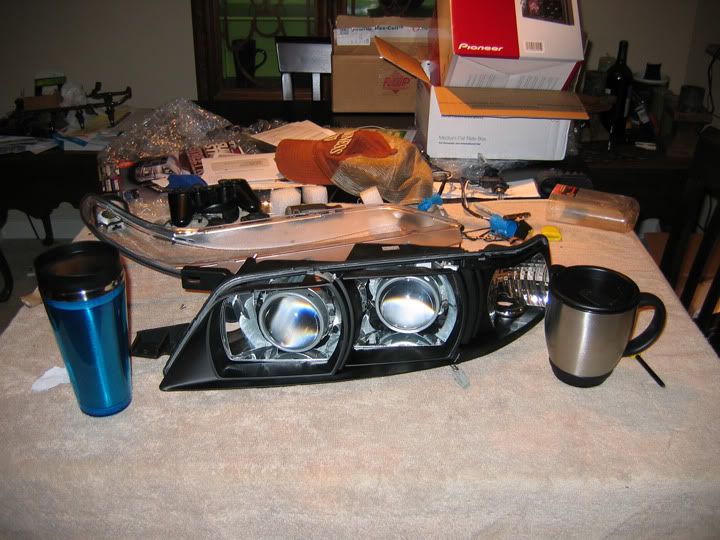
After about an hour or so painstakingly (emphasis on pain... cut the **** out of my finger on one of the edges....) cutting the two mugs - which took about 7 dremel heavy duty wheels... - here's what I ended up with

-The chrome ring is a "press-fit" over the end of the travel mug; going to be using JB weld to make sure it doesn't go anywhere.
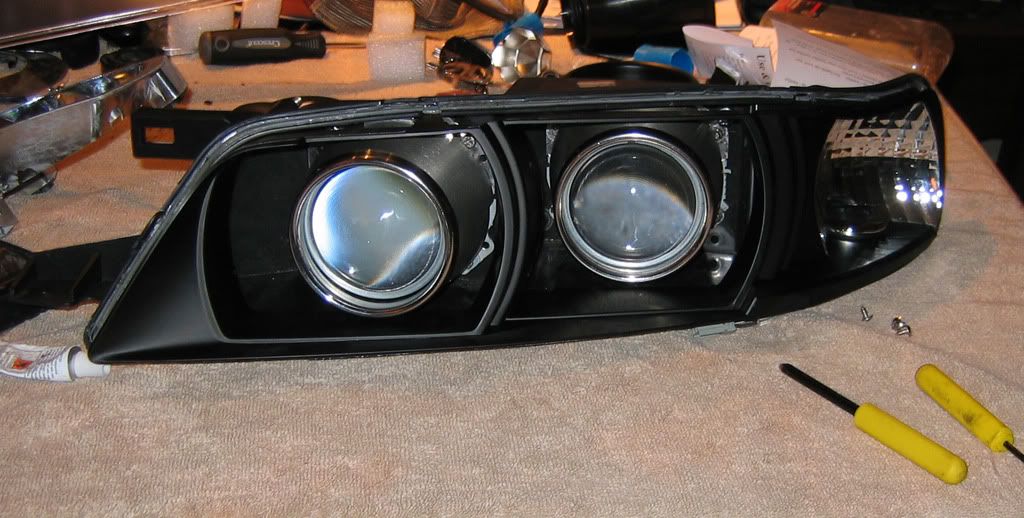
Here's the mock up fitting in the housing:
It looks good, bit I will need to possibly keep some of the reflector since you can see some of the inner workings around the shroud.
What you guys think? My roommate laughed hysterically at the fact that i went to Home Depot and came back with 8 coffee mugs!
Here's the two types of mugs I used: and the headlight as it was before:
After about an hour or so painstakingly (emphasis on pain... cut the **** out of my finger on one of the edges....) cutting the two mugs - which took about 7 dremel heavy duty wheels... - here's what I ended up with
-The chrome ring is a "press-fit" over the end of the travel mug; going to be using JB weld to make sure it doesn't go anywhere.
Here's the mock up fitting in the housing:
It looks good, bit I will need to possibly keep some of the reflector since you can see some of the inner workings around the shroud.
What you guys think? My roommate laughed hysterically at the fact that i went to Home Depot and came back with 8 coffee mugs!
12-13-2009, 10:39 PM
#33
Dude that's pretty sick with the mugs.
You're care looks awesome.
Welcome to the REAL retro club. I'm running TL's with ZKW-Replica lenses. SO sharp and so wide it ain't even funny. 6 lanes of traffic, and light a good mile or more down the road. Hate halogen lights.
(Thank you gtr_rider)
However, I do have a question related to retro's. Not trying to steal your thread.
gtr_rider didn't seal my lights because I asked for him to ship them half-done so I could use them on my 8hr trip to VA. I sealed them since, but my driver side fogs up quite a bit when it rains or if I go through a carwash. I don't even know where the water is getting in from. Should I reseal the outside of the lense? That's the only part I can think of that's allowing moisture in.
12-13-2009, 10:57 PM
#34
judging by your sig pic, you're running stock retro'd lights; if that's the case, there are two vents on the back of the light. Also, you might want to check the seal around your bulb holder and the back of the headlight. My old set had the same issue and it was coming from the seal (or lack thereof) at the bulb holder.
12-13-2009, 11:25 PM
#35
Ok, one headlight is done (minus JB welding the rings on). The second one took much less time than the first, would have posted sooner but my dumb *** left the camera on after the first set of pictures and the batteries needed to be recharged.
Here's a picture of the back of the lights, since I have neglected to post a picture of the very back of the lights:
I'm happy with the results, but not stoked... I need a way to brighten up the inside of the lights. The original reflector broke when I was test fitting it (that sucked...) so I don't have a way to fill the black void around the lights and hide the edges of the projector. I have a couple ideas but it will have to wait until tomorrow.
Last edited by Mad-MAX_SE; 12-14-2009 at 12:12 AM.
12-13-2009, 11:49 PM
#36
By vents you mean the little black rubber things? My projector doesn't fog up, the actual headlight does...so I don't think it would be bulb holder? Or do the projectors have holes?
Either way, the back of your headlight looks like it's stock. Nicely done.
Either way, the back of your headlight looks like it's stock. Nicely done.
12-14-2009, 12:08 AM
#37
Thanks! Yeah, what I'm talking about are the two little atmospheric vents with the little black hoses connected to them at the corners of the light. They let air work it's way in and out to keep the (pardon the big word) air homogeneous inside and outside, this helps prevent the fogging by allowing the temperature change on inside much more rapidly than a fully sealed light. When you go wash your car and the cold water hits the lens, the air on the back side of the lens is cooled rapidly causing the "fogging" of the lens. You want the edge of the headlight to be water tight (duh) but you still want the light to be able to breathe. TL's, if i'm not mistaken, are a sealed type projector housing; but based on what I already said, this isn't your main issue. Fogging is due to rapid temperature changes at the exterior of the light affecting the volume of air in the light.
 12-14-2009, 12:24 AM
#39
Senior Member
iTrader: (11)
Join Date: Jun 2006
Location: Cherry Hill, NJ / Hoboken, NJ
Posts: 1,325
Looks good. I know the area beatween the shroud and rear of the housing is bothering you. On mine. it's spray-painted with high-temp flat black BBQ paint.
You can tell from very close up, but from a foot or two away, all you will see is the shroud.
If it's an open lens holder, you can always spray aluminum tape flat black and wrap the very back in it, under the shroud.
This is what mine look like without the trim or the chrome rings (this is v2.0, no pics of v3.0 yet)
The messy part at the back just blends in with the housing, so you can barely see it once the headlights are assembled
12-14-2009, 10:35 AM
#40
Awesome job, you guys are making me wanna redo my FX projector in 97 housing... quad projectors sound awesome right now!
In fact I'd like to have a dedicated source of light (aimed rather high) with a separate switch for those nasty cut-off artists or people who don't use a turn signal to merge in my lane just flick a switch and blind em til they move
In fact I'd like to have a dedicated source of light (aimed rather high) with a separate switch for those nasty cut-off artists or people who don't use a turn signal to merge in my lane
just flick a switch and blind em til they move