
How To: 4th Gen Plug and Play Interior LED Thread


How To: 4th Gen Plug and Play Interior LED Thread
How To: 4th Gen Plug and Play Interior LED Thread
1. Disclaimer - I am not responsible for any damages that may occur during this mod. If you don't know what you're doing, DON'T TRY IT. Use the write-up at your own risk!
2. Supplies �
� Tools �
- Phillips Head Screw Driver
- Thin flat head screw driver
- Plastic Trim removal tool
- Extending magnetic pickup tool
- POSSIBLY 10mm socket and ratchet
- POSSIBLY a headlamp light
- Map Light - 20 SMD LED Panel with a BA9s Adapter(can be purchased from your choice of supplier, I prefer ebay because they tend to be just as good and are usually $2-3 each)
>> Cars with 2 Map lights will need TWO 12 SMD LED Panels and 2 BA9s adapters (can be purchased from your choice of supplier, I prefer ebay because they tend to be just as good and are usually $2-3 each).

- DOME Light - 36 SMD LED Panel with a Festoon Adapter (can be purchased from your choice of supplier, I prefer ebay because they tend to be just as good and are usually $2-3 each).
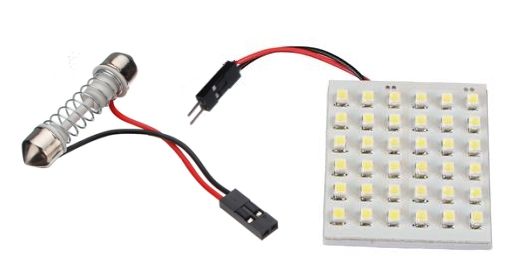
- Door Courtesy Lights - 2 x 12 SMD LED Panel and 2 T10 adapters(can be purchased from your choice of supplier, I prefer ebay because they tend to be just as good and are usually $2-3 each).
- Cluster Bulbs -
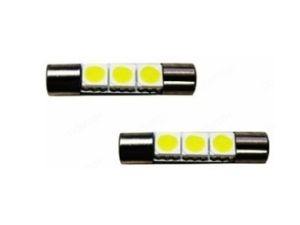
**95-97 cars - 5(five) T10/194 bulbs (can be purchased from your choice of supplier). For these I recommend that you use at least 5+ SMD LED�s because if you use something with one LED it will look awful and have a huge hotspot.

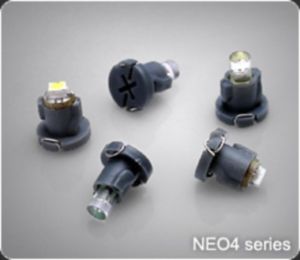
**98-99 cars - 5(five) NEOx 5mmbulbs ($2.29 each http://www.superbrightleds.com/morei...panel-led/221/)
- ACC Bulbs
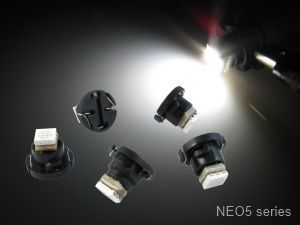
THESE ARE ONLY FOR DIGITAL UNITS. NEOx 4mm bulbs ($2.29 each http://www.superbrightleds.com/morei...panel-led/221/)
I am working on finding the information for other units. - Vanity Mirror Bulbs - 31mm Vanity 3 SMD LED bulb xenon white ($2.49 each http://www.wardenjp.com/stores/festoon.html) or from your choice of supplier)
- REMEMBER that there are several types of LED panels that are available to purchase, 5050 SMD LED are one of the brightest options that you have. Also remember that LED�s come in a wide array of colors, be sure to always check that the LED that you are looking at is the correct color that you want.
- Map Light � Approximately 5 minutes
- Dome Light � Approximately 5 minutes
- Door Courtesy Lights - Approximately 5 minutes
- Cluster Bulbs � Depending on your level of experience 30-60 minutes
- ACC Bulbs � Depending on your level of experience 30-60 minutes
- Vanity Mirror bulbs - Approximately 5 minutes
- You can swap pretty much everything from sitting in the front seats. I took the ACC in my garage when I swapped those bulbs as there are 4 small screws that I didn�t want to lose.
3. Installation
Map Light
*****Installation of the Map light is fairly straightforward
Some cars have 2 Map lights for those you will need to remove/install both sides
- Step One - Use your trim tool to remove the lense(s) from your Map light. This is done by inserting the sharp/pointed end of the tool into the grove near the front of the lense(s) and popping the lense out
- Step Two - Remove the old bulb(s). This is done by grasping the bulb(s), push down/in, and rotating counter clockwise and pull it out.
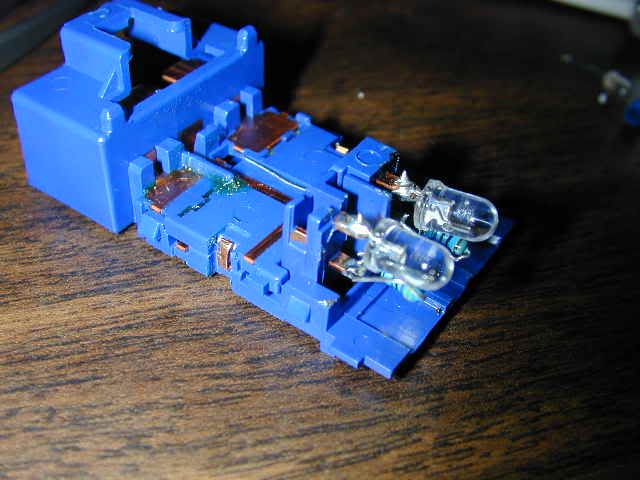
- Step Three - Installing the LED(s) is fairly simple. For the cars with 2 bulbs, the map lights will be plug and play. But the cars with one map light, they are trickier. Because of the way that the Map light bulb-base is wired, you can not simply plug in a standard LED bulb and expect it to work. I opt for LED board(s) that have a wired connection between the bulb-base and the panel. To make the LED board(s) light up you will need to connect the connection like so ..
Positive>>>Negative
Negative>>>Positive
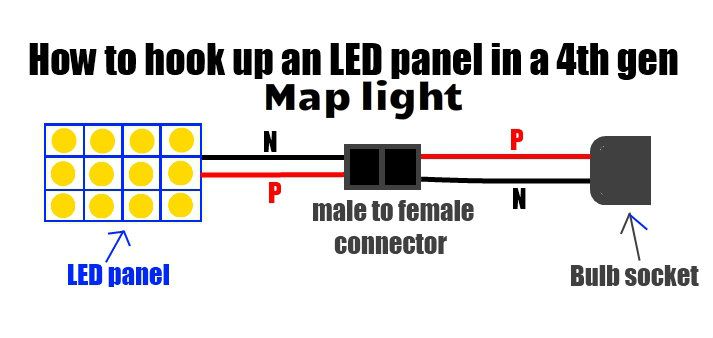
This will need to be done because Nissan wired the bulb-base in �reverse� and not what is commonly used. IIRC, Instead of getting power from the center contact, it gets power from the socket wall. And visa versa for the ground. Connect the LED board to the BA9s adapter and plug the adapter into the bulb socket (insert the adapter into the socket, push it in and turn clockwise [so that you lock the adapter in place]). - Step Four- If the panel is not lighting up when you plug the LED board in and press the �on� button, then you will need to remove the bulb base and turn it 180� as the socket is polarized and will only work in one direction. *** Note if you have followed all of the above steps and the LED board is still not working, check to see if your Interior Illumination fuse has popped.
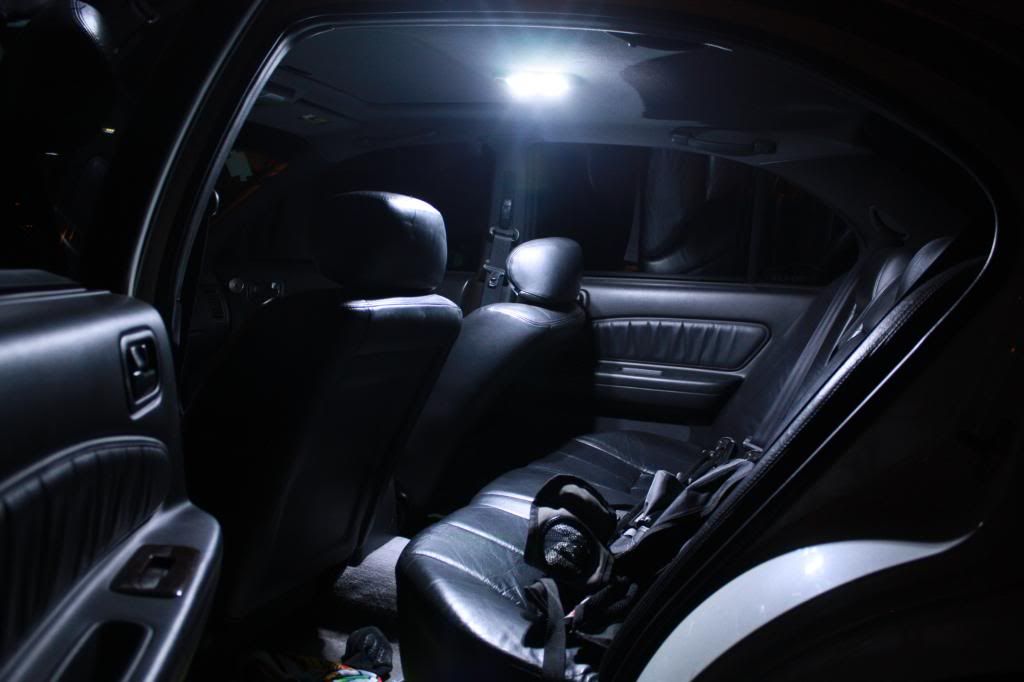
Dome Light
*****Installation of the Dome light is fairly straightforward
- Step One - Use your trim tool to remove the lense from your Dome light. This is done by inserting the sharp/pointed end of the tool into the grove near the front of the lense and popping the lense out
- Step Two - Remove the old bulb. This is done by grasping the bulb, and rotate it counter clockwise and pull it out.
- Step Three - Installing the LED. First connect the LED panel to the Festoon adapter. Unlike the Map light, this is simply plug-and-play (+ to +, - to -). Connect the LED board to the Festoon adapter and plug the adapter into the bulb socket (squeeze the adapter together and plug it into the socket)
- Step Four- If the panel is not lighting up when you plug the LED board in and turn it �on�, then you will need to remove the festoon adapter and turn it 180� as the socket is polarized and will only work in one direction. *** Note if you have followed all of the above steps and the LED board is still not working, check to see if your Interior Illumination fuse has popped.
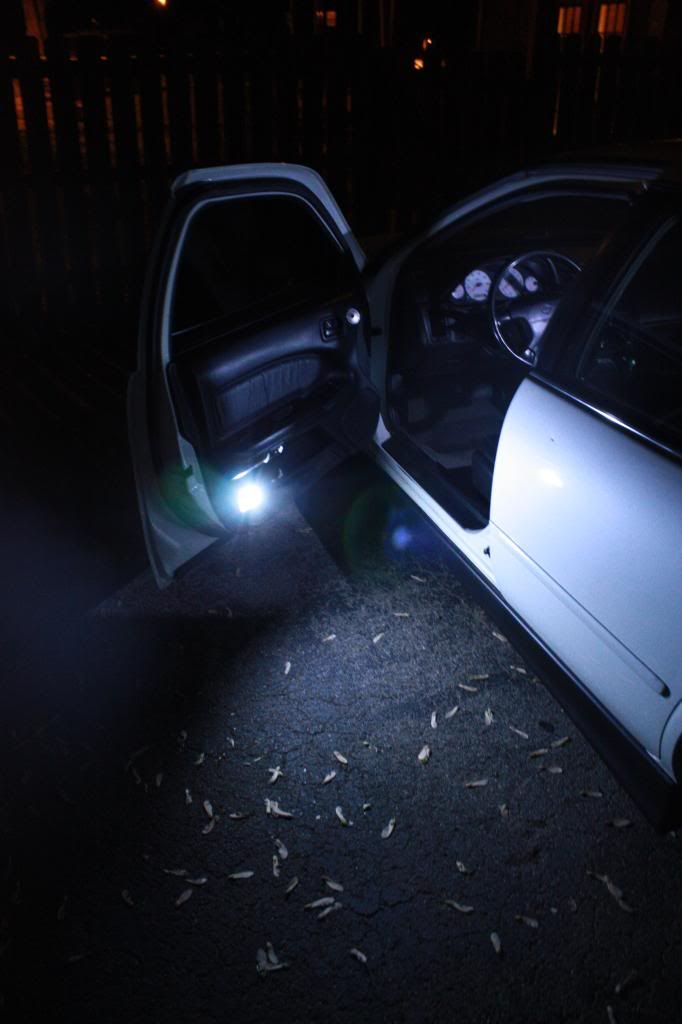
Door Courtesy Lights
*****Installation of the Door Courtesy Light (DCL) is fairly straightforward
- Step One - Use your trim tool to remove the lense from your DCL. This is done by inserting the sharp/pointed end of the tool into the grove near the front of the lense and popping the lense out
- Step Two - Remove the old bulb. This is done by grasping the bulb, and pulling straight out of the socket
- Step Three - Installing the LED. First connect the LED panel to the T10 adapter. Unlike the Map light, this is simply plug-and-play (+ to +, - to -). Connect the LED board to the T10 adapter and plug the adapter into the bulb socket.
- Step Four- If the panel is not lighting up when you plug the LED board in and turn it �on�, then you will need to remove the festoon adapter and turn it 180� as the socket is polarized and will only work in one direction. *** Note if you have followed all of the above steps and the LED board is still not working, check to see if your Interior Illumination fuse has popped.
Cluster Bulbs
*****Installation of the gauge cluster bulbs is fairly easy, but can be tedious if you have never removed the cluster before. I will say this, be sure to keep the screws in a �secure� place, such as a zip-lock baggy.
- Step One. Remove the knee bolster from under the steering wheel (two screws will need to be removed, the fuse panel cover, and one electrical connector once you pull the knee bolster down)
- Step Two. Remove the steering column cover (There are 6 screws that are accessible from the bottom of the cover). If you can not access the two screws that are farthest back you may need to remove the metal "cover" that is in the way. This is done by removing the two 10mm bolts and the "cover" should come right off.
Step Two � . Now open the lever on the driver side of the steering column so that you can lower the column down as far as it will go. - Step Three. Remove the gauge cluster trim CAREFULLY SO AS NOT TO BREAK IT (there are two screws on the top of the bezel and 3 electrical connectors which need to be "un-clipped" in order to remove the bezel)
- Step Four. Next, there are 3 screws that hold the cluster in place. Remove those screws
- Step Five. Next, slide the cluster out. There are 3 electrical plugs in the back of the cluster that will need to be "un-clipped"
- Step Six. Once the plugs are "un-clipped" pull the cluster out and you will see the 4 main bulbs on the back side (pic below)
Step Seven. At this step you will be installing the bulbs. Do note that 95-97 cars use different bulbs that 98-99 cars
95-97 cars/Analog odometer- Remove the 4 main bulbs (they will be larger than the other bulbs), this is done by twisting in a counterclockwise motion and pulling the �socket� out. Now remove the bulb from the socket and insert your car T10 LED bulbs.
98-99 cars/Digital odometer - Remove the 4 main bulbs and the odometer bulbs, this is done by twisting in a counterclockwise motion and pulling the �socket� out, and put the 5(five) Neo-5 bulbs in the cluster, this is done by inserting the Neo-5 bulbs and turning them with a small flat-head or small phillips head screwdriver). - Step Eight. Take the cluster back to your car and connect the electrical plugs in the back and plug the dimmer switch (on the bezel) back up and test your cluster bulbs. I found a good method of testing these (if it is daytime and you are outside), throw a dark blanket or jacket over you and the gauge cluster and lean close to the close to the cluster and turn the gauge lights on.
- Step 9. If any of your bulbs are not working you will need to turn them around, as they are polarized and will only work in one direction
- Step Ten. Once all 5 bulbs are working, reassemble everything and enjoy what you have accomplished.
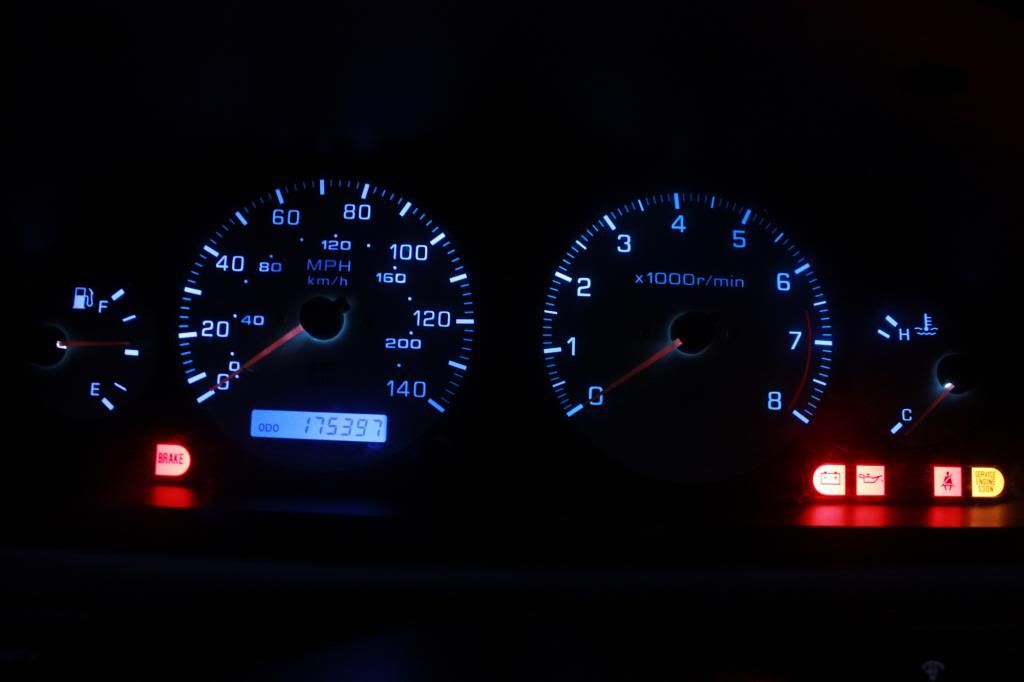
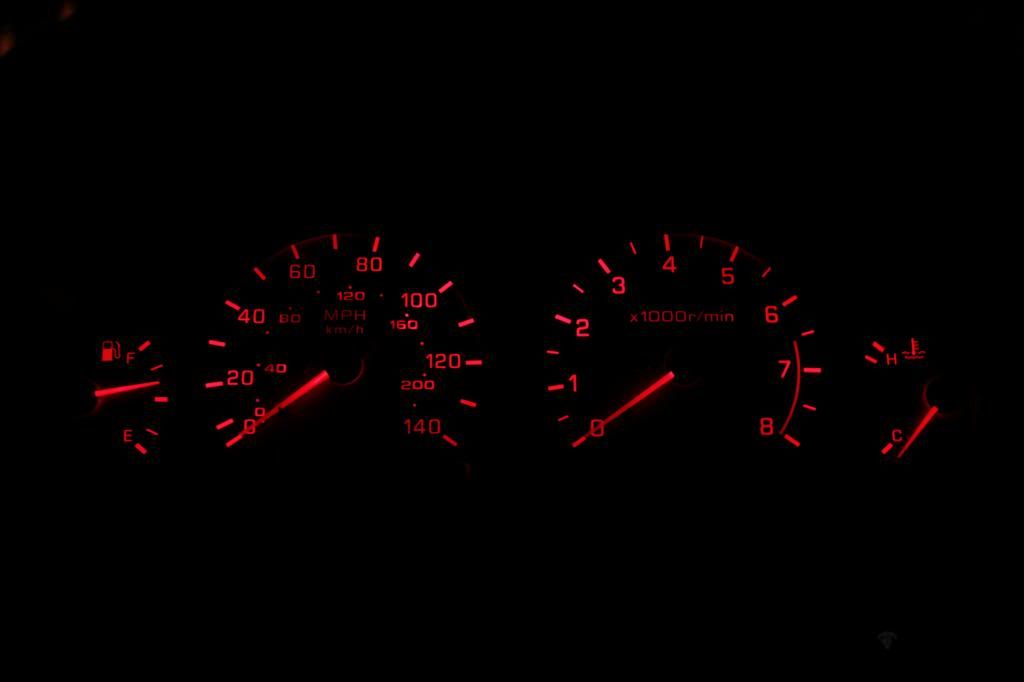
98-99 cluster with RED bulbs
ACC bulbs
*****Installation of the ACC bulbs is a little harder than any of the other swaps mentioned in this How-To. It can be tedious if you have never removed the ACC. I will say this, be sure to keep the screws in a �secure� place, such as a zip-lock baggy.
- Step One. Remove the waterfall section (shifter trim, AC vents and radio/ACC unit). This is very straightforward, if you need more descriptive information refer to this link �................. (insert link)
- Step Two. Remove the ACC by disconnecting the two grey plugs, one white plug and the hose that is attached and the 4 screws holding the ACC in the radio brackets
- Step Three. Once the ACC is removed, you will need to remove the faceplate (attached with clips) from the unit. At this time you can also clean the display face and plastic lens. There are also 4 silver screws around the edge that will need to be removed.
- Step Four. Once the faceplate is off, separate the two pieces (face and back) of the ACC by unclipping the plastic clips. Pull the two pieces apart carefully
- Step Five. You will now have the face and back, the face will have an electric circuit board on the back with 4 twist lock bulbs.
- Step Six. Remove the old bulbs by twisting them counter clockwise and lifting them straight out. Install the new bulbs by inserting them and twisting clockwise to lock them place
- Step Seven. Reassemble the ACC unit and take back to car
- Step Eight. Before screwing the unit back into the brackets connect the 3 electrical connections and test the ACC to make sure your lights are all working (if any of them are not working you will have to take the ACC apart again and turn the bulbs around as they are polarized and only work in one direction.
- Step Nine. Once all 4 bulbs are working, reassemble everything and enjoy what you have accomplished
(NOTE: the hot spots aren't that bad, I had to use a somewhat high ISO to take the pic without a tripod)

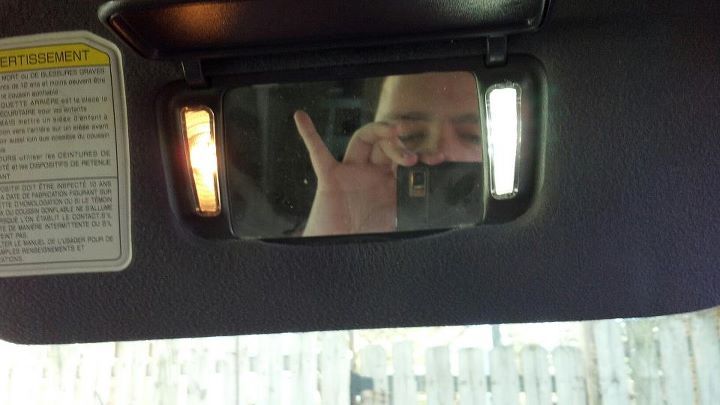
Vanity Mirror Bulbs
*****Installation of the Vanity Mirror Bulbs (VMB) is fairly straightforward. Do note, that some cars do not have lights in their vanity mirrors, for these cars you can skip this section.
- Step One - Flip open the vanity mirror cover,use your trim tool to remove the lense from your each VMB. This is done by inserting the sharp/pointed end of the tool into the grove near the front of the lense and popping the lense out
- Step Two - Remove the old bulb. This is done by grasping the bulb, and rotate it counter clockwise and pulling them out. Do this for each of the 4 bulbs.
- Step Three - Installing the LED. Insert the 31mm bulb into the bulb socket. This is done by simply pushing in place. Do this for each of the 4 bulbs.
- Step Four- If the bulbs do not light up when you plug the LED board in and turn it �on�, then you will need to remove the bulb(s) that do not light up and turn them 180� as the socket is polarized and will only work in one direction. *** Note if you have followed all of the above steps and the LED board is still not working, check to see if your Interior Illumination fuse has popped
Disclaimer - I am not responsible for any damages that may occur during this mod. If you don't know what you're doing, DON'T TRY IT. Use the write-up at your own risk!
Last edited by tigersharkdude; Jul 31, 2015 at 08:37 AM. Reason: update OP


Wow a year ago we had to solder and melt all this together now we can just buy plug and play from eBay hecka cheap lol thanks for the links and the pointer now I sit and patiently wait for the arrival of my LED'S ^_^


I no longer have the cool white bulbs in my car, im rocking red now. New theme for the car....Red panda LOL

Sharky, have you tried LEDs in the sunvisors? I think that's the only thing you don't have LEDs in lol but you could be way ahead of me already lol


EDIT: 95-97 clusters need T10/194 bulbs
Last edited by tigersharkdude; Feb 26, 2013 at 11:03 AM.
Here's a link I found for the 95-97 clusters
http://www.superbrightleds.com/cgi-b...Fwled-whp6.htm
Ima be ordering these in a week or so, I'll post pics when completed
http://www.superbrightleds.com/cgi-b...Fwled-whp6.htm
Ima be ordering these in a week or so, I'll post pics when completed
Here's a link I found for the 95-97 clusters
http://www.superbrightleds.com/cgi-b...Fwled-whp6.htm
Ima be ordering these in a week or so, I'll post pics when completed
http://www.superbrightleds.com/cgi-b...Fwled-whp6.htm
Ima be ordering these in a week or so, I'll post pics when completed

Member
Joined: Oct 2010
Posts: 238
that one has 120 degrees light pattern. do you have that installed?


love the way these lights work. got mine installed and its a word of difference.. the map light is damn near blinding though.. not the best idea to have on while driving... lol. but they look great at night.

Member
Joined: Aug 2010
Posts: 135
From: Rockland, NY
i did all blue led's on my interior, dash, hazard/defroster, climate control, dome, map, door lights, and foot wells, and trunk, i gotta put pics up. still need to do the window switches but idk bout soldering, never done it before


Im sure the ORG would love to know what kind bulbs you used, seeing how I can't find a single thread about P&P hazard LED's but found a number of soldered in LED threads
i look a little video of some of my leds the shifer u cant realy see to well in the video and i forgot to open the ashtray also the video does my gauges no justice i need a new climate controle mine has a huge crack in it but ive got other things to worry about
http://youtu.be/xOXHxKdafgs
http://youtu.be/xOXHxKdafgs
http://forums.maxima.org/4th-generat...-interior.html
They go inside the lens just like a normal bulb would. I would take some pics right now BUT im not feeling that great from this recent brain surgery.
