
Update, Th PLS40 proved too soft on Its own. While used to fill in gaps on trimmed and cleaned up stock mounts might work, what I did here initially worked loose and is as bad as before.
I know have 3M# MMM 08693 window urethane I got for $11.23 at NAPA. This is not Windo-Weld, but a cheaper and slower curing version.
My motor mounts are really bad, and I am going to poly fill them with 3M window weld or another polyurethane sealer. Are the steel sleeves for the bolt offset or centred?
I have stripped a pair of wrecking yard motor mounts of all original bushing material, and filled them with LOCTITE PL S40 polyurethane window, door & siding at $7.99 each.

Looking at this picture, I believe they are centered in the X plane, but slightly higher in the Y plane. I believe that's how I remember them looking too, as I installed new mounts about 8 months ago now.
http://www.ebay.com/itm/95-01-NISSAN-MAXIMA-3-0-ENGINE-MOTOR-MOUNT-SET-4-A7304-A7303-A7305-A7302-M002-/271070220560?pt=Motors_Car_Truck_Parts_Accessories&fits=Model%3AMaxima&hash=item3f1d0b5110&vxp=mtr
http://www.ebay.com/itm/95-01-NISSAN-MAXIMA-3-0-ENGINE-MOTOR-MOUNT-SET-4-A7304-A7303-A7305-A7302-M002-/271070220560?pt=Motors_Car_Truck_Parts_Accessories&fits=Model%3AMaxima&hash=item3f1d0b5110&vxp=mtr

Senior Member
Just a heads up please dont buy those ebay mounts and think they will last. Mine failed within two days. However if you just buy those just to poly fill go right ahead.

I centered mine as bang on as possible, when installing there may have been a little bit of off-set required but the little play in the 3m weld compensated and there was no issue with the install.


Senior Member
I've done several cars with window welds as far back as 10 yrs ago and those engine mounts never had any problems ever again!
Quote:
Originally Posted by The_Fixer
I would use this product over the window stuff.http://www.energysuspensionparts.com...sp?prod=DIYMMI
ES liquid urethane = $1.74/oz.
3M window weld = $1.48/oz.
I can walk one block and get all the window weld I want.
I don't have to mix two parts and pour a liquid, worrying about how well I sealed the mounts.
I am not saying that 3M is a superior product, I am only saying there is no compelling reason to use ES liquid urethane over 3M window weld.
I forgot that I kept my original mounts. My previous statement is accurate.
While we're on the subject, I'd like to ask a related question.
3 of my old OEM motor mounts were ripped/torn/disintegrated pretty badly...1 of which completely fell out of the mount. Would you guys recommend re-using them as-is and filling them? Or is it a bad idea to use them due to their extremely poor condition and I'd be better off with new OEM mounts or new cheap Ebay mounts and then fill those in order to get the best solid mounts possible?

I'm nutty for Nissans
Quote:
I have ES inserts and they are centered. The factory ones may be off centered somewhat because they are rubber which sags under the load.Originally Posted by asand1
Are the steel sleeves for the bolt offset or centered?

Senior Member
As long as you can locate the bolt hole (which you can because I know thats not the only mount you have  ), I'd just go ahead and fill the old ones, James.
My OEM side mounts filled with 3M windo weld have held up well for the year I've had them installed.
), I'd just go ahead and fill the old ones, James.My OEM side mounts filled with 3M windo weld have held up well for the year I've had them installed.

Senior Member
man, i wish i had a garage around here that would redo all my mounts. i know the cross-member one is original, the front center is a cheapo Taiwan made junker, the one oem one i replaced is passenger side, and the trans mount is a aftermarket with like 80,000 on it. i hear clunking some days when accelerating
and i know the rubber is shot in at least 2 of the mounts. not only that, i was kinda waiting until i did the engine rebuild to do them and got my hours cut in december so i'm kinda stuck doing nothing and cringing every time i accelerate.
and i know the rubber is shot in at least 2 of the mounts. not only that, i was kinda waiting until i did the engine rebuild to do them and got my hours cut in december so i'm kinda stuck doing nothing and cringing every time i accelerate.
Looking forward to seeing the results of this endeavor - i need to fix the motor mount on the pass. side of the engine. Thing squeaks if i accelerate from the stop or otherwise make a jerking motion with the car.
Senior Member
Quote:
While we're on the subject, I'd like to ask a related question.
3 of my old OEM motor mounts were ripped/torn/disintegrated pretty badly...1 of which completely fell out of the mount. Would you guys recommend re-using them as-is and filling them? Or is it a bad idea to use them due to their extremely poor condition and I'd be better off with new OEM mounts or new cheap Ebay mounts and then fill those in order to get the best solid mounts possible?
I would clean them up and reuse the Wiz! If they're are M/T mounts then you use the ES inserts! If they're A/T mounts you have 3 choices! Originally Posted by The Wizard
I forgot that I kept my original mounts. My previous statement is accurate. While we're on the subject, I'd like to ask a related question.
3 of my old OEM motor mounts were ripped/torn/disintegrated pretty badly...1 of which completely fell out of the mount. Would you guys recommend re-using them as-is and filling them? Or is it a bad idea to use them due to their extremely poor condition and I'd be better off with new OEM mounts or new cheap Ebay mounts and then fill those in order to get the best solid mounts possible?
1. Send the to Red Lion Racing
2. Fill them with 3M Window Weld
3. Sent them to me for keeps if you want to scrap them....I'll even pay the shipping for them.
Quote:
), I'd just go ahead and fill the old ones, James.
My OEM side mounts filled with 3M windo weld have held up well for the year I've had them installed.
Originally Posted by schmellyfart
As long as you can locate the bolt hole (which you can because I know thats not the only mount you have ), I'd just go ahead and fill the old ones, James.My OEM side mounts filled with 3M windo weld have held up well for the year I've had them installed.
Quote:
1. Send the to Red Lion Racing
2. Fill them with 3M Window Weld
3. Sent them to me for keeps if you want to scrap them....I'll even pay the shipping for them.
Thanks for your input fellas, much appreciated. Originally Posted by CMax03
I would clean them up and reuse the Wiz! If they're are M/T mounts then you use the ES inserts! If they're A/T mounts you have 3 choices! 1. Send the to Red Lion Racing
2. Fill them with 3M Window Weld
3. Sent them to me for keeps if you want to scrap them....I'll even pay the shipping for them.
Follow up question Cmax03. It's my understanding that the ES mounts are only for the left (radiator) and right (firewall).....so why do you say if M/T? If I'm correct, it doesn't matter if you're M/T or A/T to use the ES mounts.
Here's another thought for you guys filling your mounts....
What about keeping it half streetable and half track? Meaning, filled poly or ES left (radiator) and right (firewall) mounts and OEM front (timing cover) and rear (tranny)mounts? Considering we don't live on the track, maybe this is the best of both worlds?
What about keeping it half streetable and half track? Meaning, filled poly or ES left (radiator) and right (firewall) mounts and OEM front (timing cover) and rear (tranny)mounts? Considering we don't live on the track, maybe this is the best of both worlds?
Senior Member
Quote:
Follow up question Cmax03. It's my understanding that the ES mounts are only for the left (radiator) and right (firewall).....so why do you say if M/T? If I'm correct, it doesn't matter if you're M/T or A/T to use the ES mounts.
Well it does matter! ES inserts are only gonna fit the M/T! The A/T are larger mounts at the insert! Red Lion does all four mounts! But really expensive for me!Originally Posted by The Wizard
Thanks for your input fellas, much appreciated. Follow up question Cmax03. It's my understanding that the ES mounts are only for the left (radiator) and right (firewall).....so why do you say if M/T? If I'm correct, it doesn't matter if you're M/T or A/T to use the ES mounts.

Senior Member
Quote:
http://www.energysuspensionparts.com...sp?prod=DIYMMI
I confirm doing this but the stock ones are a total bizzznitch to press out if you don't have the right cups for them fittings on your press for them. There is a metal sleeve around the old ones as well and you have to take that out as well or cut it. Originally Posted by The_Fixer
I would use this product over the window stuff.http://www.energysuspensionparts.com...sp?prod=DIYMMI
I have these and they been great.
The whole window weld thing is about as ghetto as it gets next to using reguar caulking and they are offset, I will guarantee you, you will have lining up issues and you have to set them for 24-48 hours, I don't understand why and how people stand by them so hard, when you are only paying like $60 bucks more for ES mounts.
Just thought this might help, but judging from the comments, you guys already know.
http://forums.maxima.org/supercharge...or-mounts.html
http://forums.maxima.org/supercharge...or-mounts.html
Quote:
Really? I was under the impression 3 out of 4 mounts were the same regardless of transmission and only the tranny mount differed. For clarification, are you saying the diameter of the metal insert in the middle of the rubber isolator is different in size or the whole rubber isolator is bigger (ie bigger metal mount)? Originally Posted by CMax03
Well it does matter! ES inserts are only gonna fit the M/T! The A/T are larger mounts at the insert! Red Lion does all four mounts! But really expensive for me!
Footnote: excluding GLE electronic mounts of course...
Senior Member
Quote:
Footnote: excluding GLE electronic mounts of course...
The whole mount is larger on autos.Originally Posted by The Wizard
Really? I was under the impression 3 out of 4 mounts were the same regardless of transmission and only the tranny mount differed. For clarification, are you saying the diameter of the metal insert in the middle of the rubber isolator is different in size or the whole rubber isolator is bigger (ie bigger metal mount)? Footnote: excluding GLE electronic mounts of course...
Quote:
and fluid filled with an electrical connection for stiffening sometimes. You can replace the entire mount with a 5spd piece though.Originally Posted by schmellyfart
The whole mount is larger on autos.
Quote:
What about keeping it half streetable and half track? Meaning, filled poly or ES left (radiator) and right (firewall) mounts and OEM front (timing cover) and rear (tranny)mounts? Considering we don't live on the track, maybe this is the best of both worlds?
It was always my intention to replace the front and rear (chassis orientation, not engine/emmisions) and leave the passenger and driver side stock.Originally Posted by The Wizard
Here's another thought for you guys filling your mounts....What about keeping it half streetable and half track? Meaning, filled poly or ES left (radiator) and right (firewall) mounts and OEM front (timing cover) and rear (tranny)mounts? Considering we don't live on the track, maybe this is the best of both worlds?
Quote:
I have more time than money. If $60 bucks is pocket change for you then you wont mind buying me some ES inserts right? The reason people stand by this is because they can DIY for seven to 15 dollars.Originally Posted by S1cTech
The whole window weld thing is about as ghetto as it gets next to using reguar caulking and they are offset, I will guarantee you, you will have lining up issues and you have to set them for 24-48 hours, I don't understand why and how people stand by them so hard, when you are only paying like $60 bucks more for ES mounts.
Is it any less ghetto if ES molds it for you, charges you 10X the price of the material and labor, and then you need to install your self anyway.
I say if you pay the premium price for the ES parts good for you, if you cannot then DIY.
Quote:
Thanks Leonard!Originally Posted by schmellyfart
The whole mount is larger on autos.

Quote:
True, but only for the GLE mounts though, not GXEOriginally Posted by asand1
and fluid filled with an electrical connection for stiffening sometimes. You can replace the entire mount with a 5spd piece though.

Senior Member
Quote:
I really prefer the method described here:Originally Posted by NmexMAX
Just thought this might help, but judging from the comments, you guys already know. http://forums.maxima.org/supercharge...or-mounts.html
http://www.energysuspensionparts.com...nt-Inserts.asp
I think the sand and rubber glue is a great idea.
Always hearing about leaks and it being messy.
Makes sense the way they describe it.
Went to the wrecking yard in Coos Bay yesterday. I picked up a set of AT motor mounts for $20.00 and am now kicking myself for not getting all of the fog light parts. Car also had a Blose stereo in it.
From what Ive read the AT and MT mounts are interchangeable with the only difference being the bushing outer diameter. I will not be using ES bushings so it won't matter.


From what Ive read the AT and MT mounts are interchangeable with the only difference being the bushing outer diameter. I will not be using ES bushings so it won't matter.


The old bushings came out pretty easy. I just cut the bushing shell with a sawzall and then drove a large screwdriver between the bushing shell and the heavier motor mount wall. After that i just knocked the bushing out with a couple swings of the hammer. Its no wonder the mounts fail, they both were fluid filled with a pot metal and plastic insert moded into the rubber. Sorry I did not photo the crap I took out.

So $20.00 for the mounts and three tubes of poly at $7.95 ea, I will have poly mounts for only $43.85. With PL Premium It would only have been $37.97.
Senior Member
Quote:
Was white poly the only color available?Originally Posted by asand1
So $20.00 for the mounts and three tubes of poly at $7.95 ea, I will have poly mounts for only $43.85. With PL Premium It would only have been $37.97.
Quote:
In the two stores I checked, yes. I figured no one was going to be looking under my car anyway.Originally Posted by Fakie J Farkerton
Was white poly the only color available?
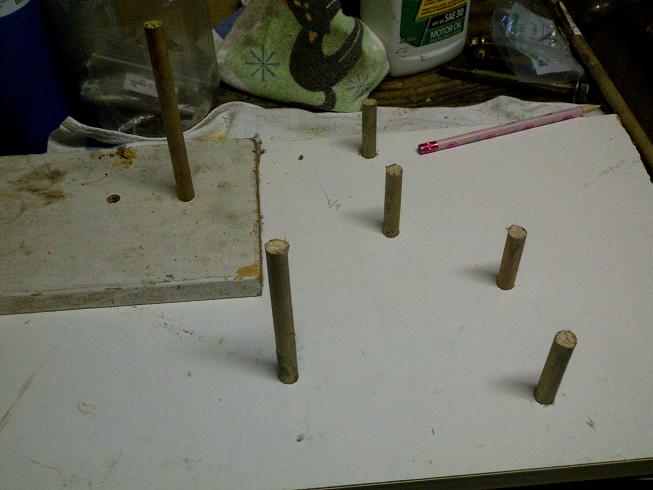
My next step is to make a couple jigs to locate the the center sleeves and then fill and wait.
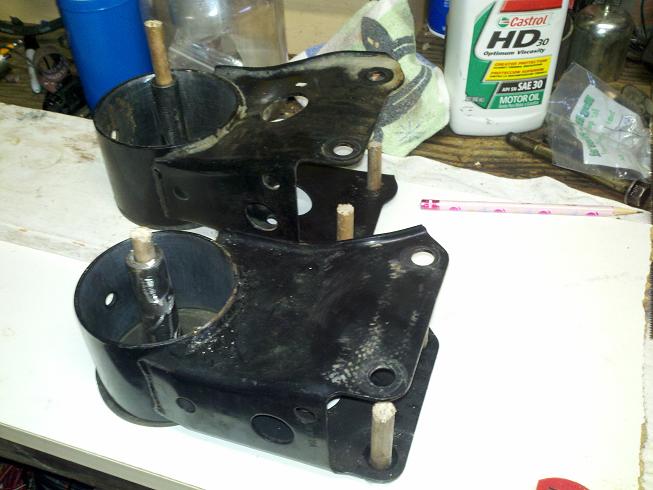
I filled the mounts today. I had to pick up another tube of sealer and I used 3 1/2 tubes altogether. This tube cost me $7.99, bringing the total to $51.84.


Jeez.. you legit gutted/filled them. I just filled around the rubber of mine lol It seems solid enough for me.

Senior Member
Yea....Ill be really curious how that holds up. That stuff isnt meant for weight. Its hardy as I use it on a rental property but as far as holding up under these conditions. Ill be curious for sure. Think I would have used as little as possible like what chris did. Those are the side mounts correct?
Quote:
In retrospect, yours was the better procedure.Originally Posted by ChrisMan287
Jeez.. you legit gutted/filled them. I just filled around the rubber of mine lol It seems solid enough for me.
Quote:
I just bought a new cheapo mount off eBay to fill. I didn't use my original because I couldn't have the car down a week.Originally Posted by asand1
After seeing the crap that was molded into the original rubber, I wouldn't think of filling around the original stuff.
