
Need Help In Understanding Timing


Thread Starter
Junior Member
Joined: Sep 2014
Posts: 73
Need Help In Understanding Timing
Okay I think I officially screwed up my timing. I need some input in how bad of a mistake I made. Basically I got everything inside the TC all tighten up and torqued to specs, and I thought to myself “why not hand crank the engine and see if everything rotates freely”, so I did. Well after rotating one complete rotation, my markings on the chain didn’t line up with the markings on the pulleys, and so I thought to myself “maybe it takes multiple rotation of crank pulley for everything to match up.” But after spinning the crank pulley by hand for some time the markings never line up. So now I’m thinking my chains have skipped timing.
I notice the markings on the secondary chain also skipped a tooth too on both front and rear side of the engine.

But I think I can save this butch job. I marked all my cams with a line in reference to TDC of the crank. So I think from this point on I can start over? Can somebody chime in give me some input?
Before I took apart the engine I made these marks:
Here is the markings for the rear side (the front side looks pretty much the same):

Here is the markings I made on the crank:

So I’m thinking maybe, if I start over I can set things back correctly.
I notice the markings on the secondary chain also skipped a tooth too on both front and rear side of the engine.
But I think I can save this butch job. I marked all my cams with a line in reference to TDC of the crank. So I think from this point on I can start over? Can somebody chime in give me some input?
Before I took apart the engine I made these marks:
Here is the markings for the rear side (the front side looks pretty much the same):
Here is the markings I made on the crank:
So I’m thinking maybe, if I start over I can set things back correctly.

Senior Member
Joined: Jan 2011
Posts: 3,037
From: Central AR
I've had that feeling. But I didn't give up. You are checking it before rushing in to trying to start it which is good. If someone doesn't chime in sooner, I'll be home in an hour where I can see the pictures to help.
Sent from my Z998 using Maxima
Sent from my Z998 using Maxima
Senior Member
Joined: Jan 2011
Posts: 3,037
From: Central AR
Here comes some videos and pictures below.
Video 1
https://www.youtube.com/watch?v=0mlUJQJKZg0
Video 2
https://www.youtube.com/watch?v=BMjbCy34cng
Camshaft Line Chain - Dowel Up Picture
Align the mating marks on the chains with the sprockets, then install them onto the camshafts

Be careful not to confuse the intake and exhaust camshaft sprockets. The exhaust camshaft sprockets are thicker than the intake camshaft sprockets.
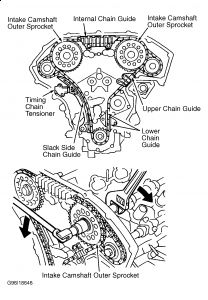
Remove the pins from the camshaft chain tensioner. Install the main timing chain on the crankshaft sprocket and water pump sprocket. Then install the camshaft drive sprockets as shown in the picture below.
Dip the camshaft sprocket bolts in fresh engine oil and torque them to 88-95 ft.lbs. (119-128 Nm.).
Align the mating marks on the chain with the sprockets, then place the chain on the water pump sprocket

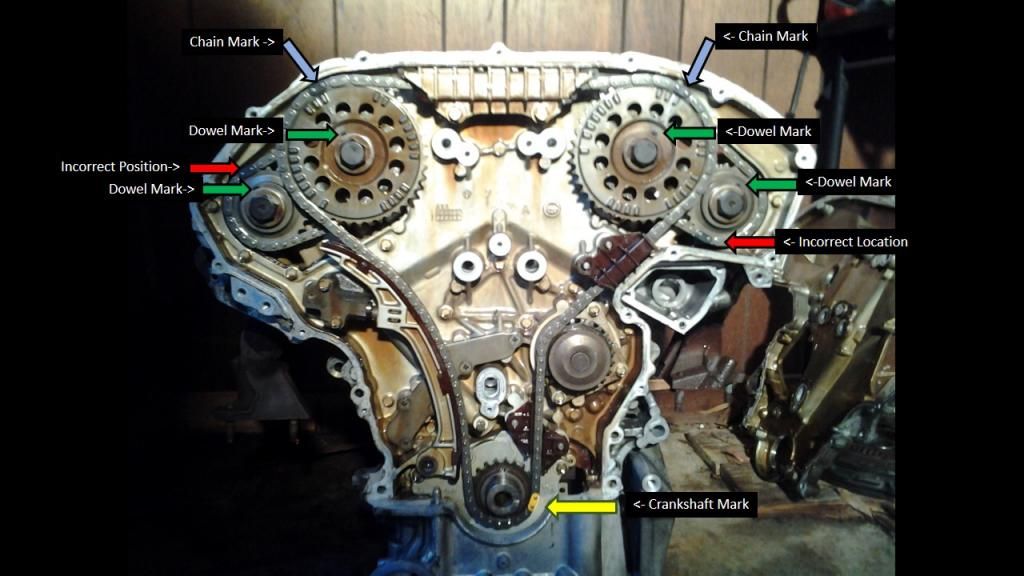
Here's a picture of the old Maxima engine that I replaced. Can you see the errors in the picture with regard to timing line up? Somebody in that car's past had the timing chains off.
Video 1
https://www.youtube.com/watch?v=0mlUJQJKZg0
Video 2
https://www.youtube.com/watch?v=BMjbCy34cng
Camshaft Line Chain - Dowel Up Picture
Align the mating marks on the chains with the sprockets, then install them onto the camshafts
Be careful not to confuse the intake and exhaust camshaft sprockets. The exhaust camshaft sprockets are thicker than the intake camshaft sprockets.
Remove the pins from the camshaft chain tensioner. Install the main timing chain on the crankshaft sprocket and water pump sprocket. Then install the camshaft drive sprockets as shown in the picture below.
Dip the camshaft sprocket bolts in fresh engine oil and torque them to 88-95 ft.lbs. (119-128 Nm.).
Align the mating marks on the chain with the sprockets, then place the chain on the water pump sprocket
Here's a picture of the old Maxima engine that I replaced. Can you see the errors in the picture with regard to timing line up? Somebody in that car's past had the timing chains off.
Last edited by CS_AR; Dec 23, 2014 at 06:56 PM.
Thread Starter
Junior Member
Joined: Sep 2014
Posts: 73
Thanks CS_AR I appreciate it.
I have another question, can I bent a valve by just rotating the engine with my bare hands? I assume it is really difficult to rotate an engine if a valve makes contact on a piston and I wouldn't be able to turn it at all without a great deal of force.
I have another question, can I bent a valve by just rotating the engine with my bare hands? I assume it is really difficult to rotate an engine if a valve makes contact on a piston and I wouldn't be able to turn it at all without a great deal of force.
Senior Member
Joined: Jan 2011
Posts: 3,037
From: Central AR
Thanks CS_AR I appreciate it.
I have another question, can I bent a valve by just rotating the engine with my bare hands? I assume it is really difficult to rotate an engine if a valve makes contact on a piston and I wouldn't be able to turn it at all without a great deal of force.
I have another question, can I bent a valve by just rotating the engine with my bare hands? I assume it is really difficult to rotate an engine if a valve makes contact on a piston and I wouldn't be able to turn it at all without a great deal of force.
We've seen people with chains that jump during a water pump replacement, then start their car and wonder why it doesn't run right.
Take a look at the thread below and the comments posted by CMAX03.
https://maxima.org/forums/4th-genera...jump-time.html
Did you look at the the EM section in the FSM. I believe timing chain is covered on EM26.
It helps when you have your year model posted in your profile.
Last edited by CS_AR; Dec 24, 2014 at 09:54 AM.
Thread Starter
Junior Member
Joined: Sep 2014
Posts: 73
Here's a picture of the old Maxima engine that I replaced. Can you see the errors in the picture with regard to timing line up? Somebody in that car's past had the timing chains off
So do you suggest that I go and follow the instruction you posted and forget about my own timing marks?
Senior Member
Joined: Jan 2011
Posts: 3,037
From: Central AR
I can see the marks in the pictures, although I never saw any of the blue chain links on my car. I'll double check again. When I opened up my TC, the gold chain link was way off from the cranks sprockets mating mark. It must had jumped timing before I bought it.
So do you suggest that I go and follow the instruction you posted and forget about my own timing marks?
So do you suggest that I go and follow the instruction you posted and forget about my own timing marks?
Be sure to read the timing section in the EM section of the FSM then watch the 2nd video and pay close attention to the comments from J. Sutter, Cardana24, and our other club member.
When I get into tedious situations like this, I print the pages from the FSM then take them to the garage so I can compare instruction information to the engine.
One other item: No doubt I've made my share of mistakes while working on a DIY engine project over the years. One thing that ALL of my mistakes had in common was the time of day -- well I should say the time of night.
This problem will look a lot better tomorrow morning.

Last edited by CS_AR; Dec 23, 2014 at 09:22 PM.
Thread Starter
Junior Member
Joined: Sep 2014
Posts: 73
I want to double check my understanding. After reading the FSM, I understand that the exhaust and the intake cams are basically set to each other by the dowel pins they both have and the markings on their chain sets their relations to each other. And when I put the 1st cam sprocket on (RH/LH) and match it to the blue markings on the chain this should set the correct relationship to the RH and LH sides engine. Finally after matching the crank sprocket with the gold link in the chain the RH side, LH side, and the crank are perfectly matched up together.
Is this the general idea?
I have another concern. When I put everything back together should I crank the engine for a period of time before actually starting it? Because the tensioner need oil to get stiff.
Thanks a bunch CS_AR.
Is this the general idea?
I have another concern. When I put everything back together should I crank the engine for a period of time before actually starting it? Because the tensioner need oil to get stiff.
Thanks a bunch CS_AR.

It will take thousands of revolutions for the marks to line up with the sprocket marks again.
Most cars don't have marks on the chain for this reason. I don't know if there are marks on the timing chain case, but you want to make sure let the sprockets are oriented correctly.
Sent from my XT1060 using Maxima
Most cars don't have marks on the chain for this reason. I don't know if there are marks on the timing chain case, but you want to make sure let the sprockets are oriented correctly.
Sent from my XT1060 using Maxima
Senior Member
Joined: Jan 2011
Posts: 3,037
From: Central AR

The final layer in the three chain arrangement is to line up the outer sprocket marks with the blue links at the top where the gold link should perfectly align with the crankshaft TDC mark.
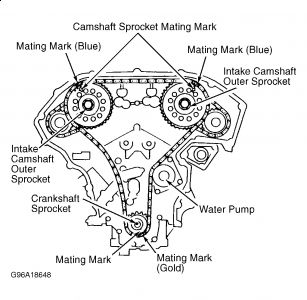
NOTICE how the crescent wrench is used to hold the cam in place to tighten the cam sprocket bolt. I saw the shrapnel produced on a different Nissan engine when the owner got in too big of a hurry and forgot to properly tighten the cam sprocket bolt. Needless to say the sprocket came off and the engine was destroyed.
Be careful to avoid having a valve in the down position while turning the crankshaft to reach TDC that will cause the valve to collide with a piston as you setup alignment. This is described starting at 3:05 in the 2nd video and noted as a suggestion from J. Sutter and Cardana24 for secondary and primary chain alignment.
Last edited by CS_AR; Dec 24, 2014 at 07:48 AM.
Thread Starter
Junior Member
Joined: Sep 2014
Posts: 73
I remove the fuel pump fuse and run the starter a few times to pump up oil pressure. Recently a member thought something was wrong from the noises made before the oil pump was able to build up pressure for the tensioners.

pretty much. if you encounter any excessive resistance turning it by hand, you shouldnt damage anything unless you keep on trying to force it
Thread Starter
Junior Member
Joined: Sep 2014
Posts: 73
Does anyone know what or how much torque i should fasten this engine mount stud? The FSM shows the torque for the nut but does not explicitly say anything about the this stud. I assume its the same torque specs.
Here's what I'm referring to.

The FSM shows this.

Should I go ahead and torque the stud to this specs?
Here's what I'm referring to.
The FSM shows this.
Should I go ahead and torque the stud to this specs?
Senior Member
Joined: Jan 2011
Posts: 3,037
From: Central AR
IIRC - I installed the stud after installed the Timing Cover. I remember having a clearance issue with the stud and the timing cover. Just be sure you can get the TC into position with the stud installed. I found some interesting issues when I did a "dry run" on the timing cover before I started using RTV. I don't recall any special tightening for it because I torqued the nut.
Do you have someone help you guide the TC into place when you have it ready with RTV for installation?
Do you have someone help you guide the TC into place when you have it ready with RTV for installation?
Last edited by CS_AR; Dec 24, 2014 at 04:04 PM.
Thread Starter
Junior Member
Joined: Sep 2014
Posts: 73
IIRC - I installed the stud after installed the Timing Cover. I remember having a clearance issue with the stud and the timing cover. Just be sure you can get the TC into position with the stud installed. I found some interesting issues when I did a "dry run" on the timing cover before I started using RTV.
Senior Member
Joined: Jan 2011
Posts: 3,037
From: Central AR
The question is can you get the TC on during a "dry run" on with the stud in place? If yes you've got it made.
Once you get the cover wet with RTV, installation becomes a different game.
Once you get the cover wet with RTV, installation becomes a different game.
Last edited by CS_AR; Dec 24, 2014 at 04:58 PM.
Thread Starter
Junior Member
Joined: Sep 2014
Posts: 73
Well I'm almost there. I got both TCs on and RTV up (hopefully correctly) and both oil pans in. Now all I need to do is install the crank pulley and tighten it up according to the FSM and this is where I'm running into trouble. I can't figure a way to tighten to that extra 60-66 degree tightness. I tried using tie down straps and wrapping it around the pulley and wrenching at the bolt but that didn't work too well.
Does anyone have any suggestion in how I can tighten the bolt?
I read that I can put the car in drive "D" and have someone hold the brake too, but right now that isn't possible, because its in the air on all four jack stand. Plus, I still have other things to do under the car.
Hey CS_AR, when I was trying to tighten that crankshaft bolt I rotated the engine again (a very slow rotation). Is there a possibility that it can jump timing again?
Senior Member
Joined: Jan 2011
Posts: 3,037
From: Central AR
Since it is an automatic, it won't lock up the engine for tightening the crankshaft bolt like a manual transmission when the car is in gear.
I've used a tool like the on the picture below.

I've read about people using a tool like the following to lock the flywheel.There is a small access door at the bottom of the upper oil pan.

I've been able to wedge a small pry bar between one of the spokes in the harmonic balancer and a ledge on the block.
Once I had the tensioners/springs and all back into the correct position, I didn't have any problem turning the engine over (clockwise) to verify line up and and to make sure there were no pistons colliding with any valves. I had the valve covers off so I could monitor the compression stroke (valves closed & piston up) move across the engine.
I've used a tool like the on the picture below.
I've read about people using a tool like the following to lock the flywheel.There is a small access door at the bottom of the upper oil pan.
I've been able to wedge a small pry bar between one of the spokes in the harmonic balancer and a ledge on the block.
Once I had the tensioners/springs and all back into the correct position, I didn't have any problem turning the engine over (clockwise) to verify line up and and to make sure there were no pistons colliding with any valves. I had the valve covers off so I could monitor the compression stroke (valves closed & piston up) move across the engine.
Thread Starter
Junior Member
Joined: Sep 2014
Posts: 73
Well its all done. The car runs nice and smooth like it did before but there is still oil oozing out of somewhere. This really sucks, I spent my whole winter break hunting down these leaks. 
At least, I have a nice clean looking engine block and less oil leak.
Since it's clean now, I found out my OPS is seeping oil out also so I'll have to replace that too.
At least, I have a nice clean looking engine block and less oil leak.
Since it's clean now, I found out my OPS is seeping oil out also so I'll have to replace that too.
Senior Member
Joined: Jan 2011
Posts: 3,037
From: Central AR
Sorry to read about the bittersweet ending. I know you took all the steps to do a nice job. I've read on here where someone took a UV dye kit like the dye used in an AC system to find a difficult to locate oil leak.
Thread Starter
Junior Member
Joined: Sep 2014
Posts: 73
I'm planning to do the UV detector next break.
There was this one oil spot that got me all weirded out. It was on the rear o2 sensor, I swear oil was coming out of nowhere forming a wet spot on the metal. It was like a scene from a horror movie, where blood keeps appearing on a wall.
There was this one oil spot that got me all weirded out. It was on the rear o2 sensor, I swear oil was coming out of nowhere forming a wet spot on the metal. It was like a scene from a horror movie, where blood keeps appearing on a wall.

Thread
Thread Starter
Forum
Replies
Last Post
trungg86
4th Generation Maxima (1995-1999)
7
Sep 4, 2015 04:58 AM